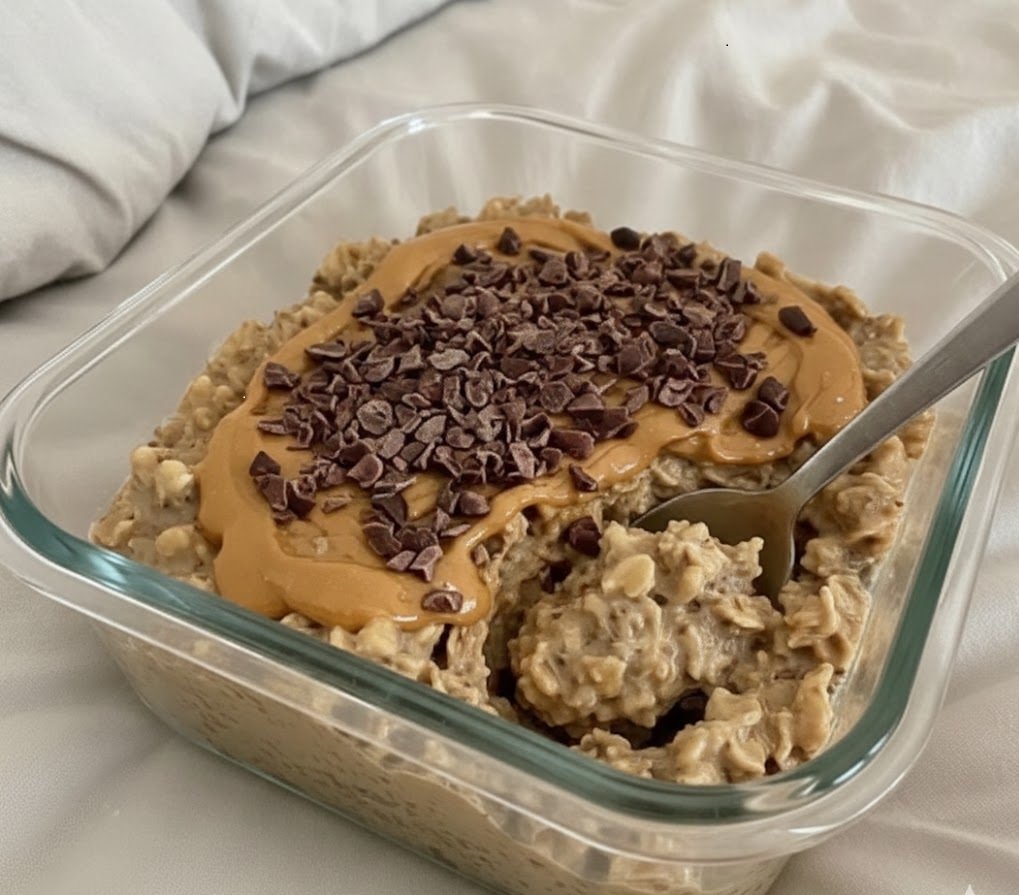
High-Protein Mocha Crunch Bowl

High-Protein Mocha Crunch Bowl

A creamy overnight oat bowl with chocolate–coffee flavor and a crunchy topping.

Prep Time: 5 minutes
Chill Time: 2 hours (or overnight)
Yield: 1 serving


📝 Ingredients

Base:

  • 1 cup rolled oats (old-fashioned oats work best for texture)

  • 1 cup non-fat plain Greek yogurt

  • 1 scoop chocolate protein powder (whey or whey-casein blend preferred)

  • 1 teaspoon instant coffee or espresso powder

  • 1 tablespoon hot water (to dissolve coffee)

  • ¼ cup unsweetened almond milk (or milk of choice)

Topping:

  • 1 tablespoon peanut butter

  • 1 tablespoon cacao nibs or dark chocolate chips (regular or sugar-free)

Optional Sweetener (to taste):

  • Stevia, monk fruit, honey, or maple syrup


👩‍🍳 Instructions

1️⃣ Dissolve the Coffee

In a small bowl, mix the instant coffee or espresso powder with 1 tablespoon hot water. Stir until fully dissolved.


2️⃣ Make the Mocha Base

In a jar or meal prep container, add:

  • Greek yogurt

  • Chocolate protein powder

  • Dissolved coffee

Whisk or stir until smooth and free of lumps.


3️⃣ Add the Oats

Add the rolled oats and almond milk to the container.
Mix well so all oats are evenly coated.

If the mixture seems very thick, add 1–2 more tablespoons of milk.


4️⃣ Taste and Adjust

Taste the mixture.
If needed, add a small amount of sweetener and stir again.


5️⃣ Add the Crunch Topping

Smooth the surface with a spoon.
Drizzle peanut butter over the top.
Sprinkle cacao nibs or chocolate chips evenly.


6️⃣ Chill

Cover tightly and refrigerate for at least 2 hours or overnight.
This allows the oats to soften and the flavors to blend.


💡 Optional Add-Ins

  • 1 tablespoon chia seeds or ground flaxseed

  • ½ teaspoon vanilla extract

  • A pinch of salt to enhance chocolate flavor

  • Banana or berries added before serving


🧊 Storage

Store covered in the refrigerator.
Best enjoyed within 2–3 days.
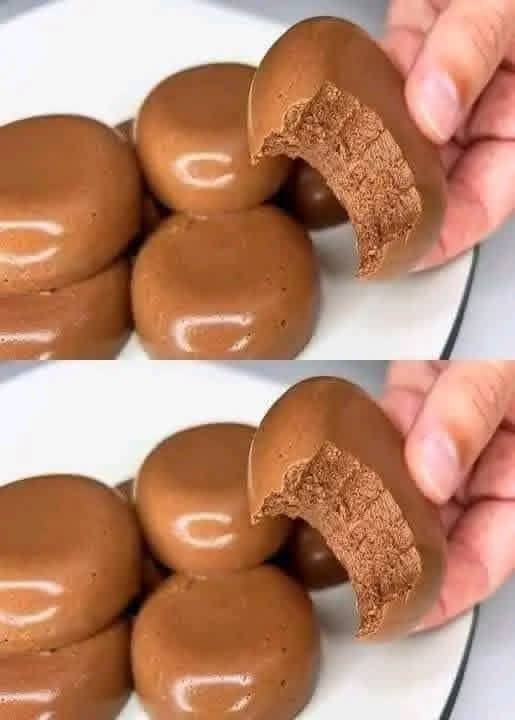
3-Ingredient Chocolate Cloud Bites

3-Ingredient Chocolate Cloud Bites

Soft, glossy chocolate bites with a texture between mousse and panna cotta.
Light, simple, and portion-controlled.

Prep Time: 10 minutes
Chill Time: 3–4 hours
Yield: 6–8 small bites


📝 Ingredients

1½ cups milk of choice
(Use skim milk, unsweetened almond milk, or oat milk for a lighter version)

1 packet (about 40 g / 1.4 oz) sugar-free chocolate instant pudding mix
OR
3 tablespoons cocoa powder + sweetener to taste (stevia, monk fruit, etc.)

1 packet (7 g / 2¼ tsp) unflavored gelatin

Optional:
Cooking spray or a few drops of oil (for molds)


👩‍🍳 Instructions

1️⃣ Bloom the Gelatin

Pour ¼ cup cold milk into a small bowl.
Sprinkle the gelatin evenly over the surface.
Let it sit 5 minutes until it becomes thick and spongy.


2️⃣ Heat the Chocolate Base

In a saucepan over medium heat, add:
• Remaining milk
• Chocolate pudding mix (or cocoa + sweetener)

Whisk continuously so it does not stick or burn.
Heat until steaming, not boiling.


3️⃣ Add the Gelatin

Add the bloomed gelatin into the warm chocolate mixture.
Whisk for 1–2 minutes until fully dissolved and smooth.


4️⃣ Pour into Molds

Lightly grease silicone molds or small cups.
Pour mixture evenly into molds.

Tap gently on the counter to remove air bubbles.


5️⃣ Chill

Refrigerate for 3 to 4 hours, or until fully set and firm.


6️⃣ Serve

Carefully remove from molds.
They should be:
• Smooth and shiny outside
• Soft and airy inside


💡 Optional Variations

Mousse-Style Texture:
Let mixture cool slightly, then gently fold in
½ cup whipped topping (sugar-free or regular) before molding.

Flavor Ideas:
• Add ½ tsp vanilla
• Add a pinch of salt
• Add espresso powder for mocha flavor


🧊 Storage

Store in an airtight container in the refrigerator.
Best consumed within 3–4 days.

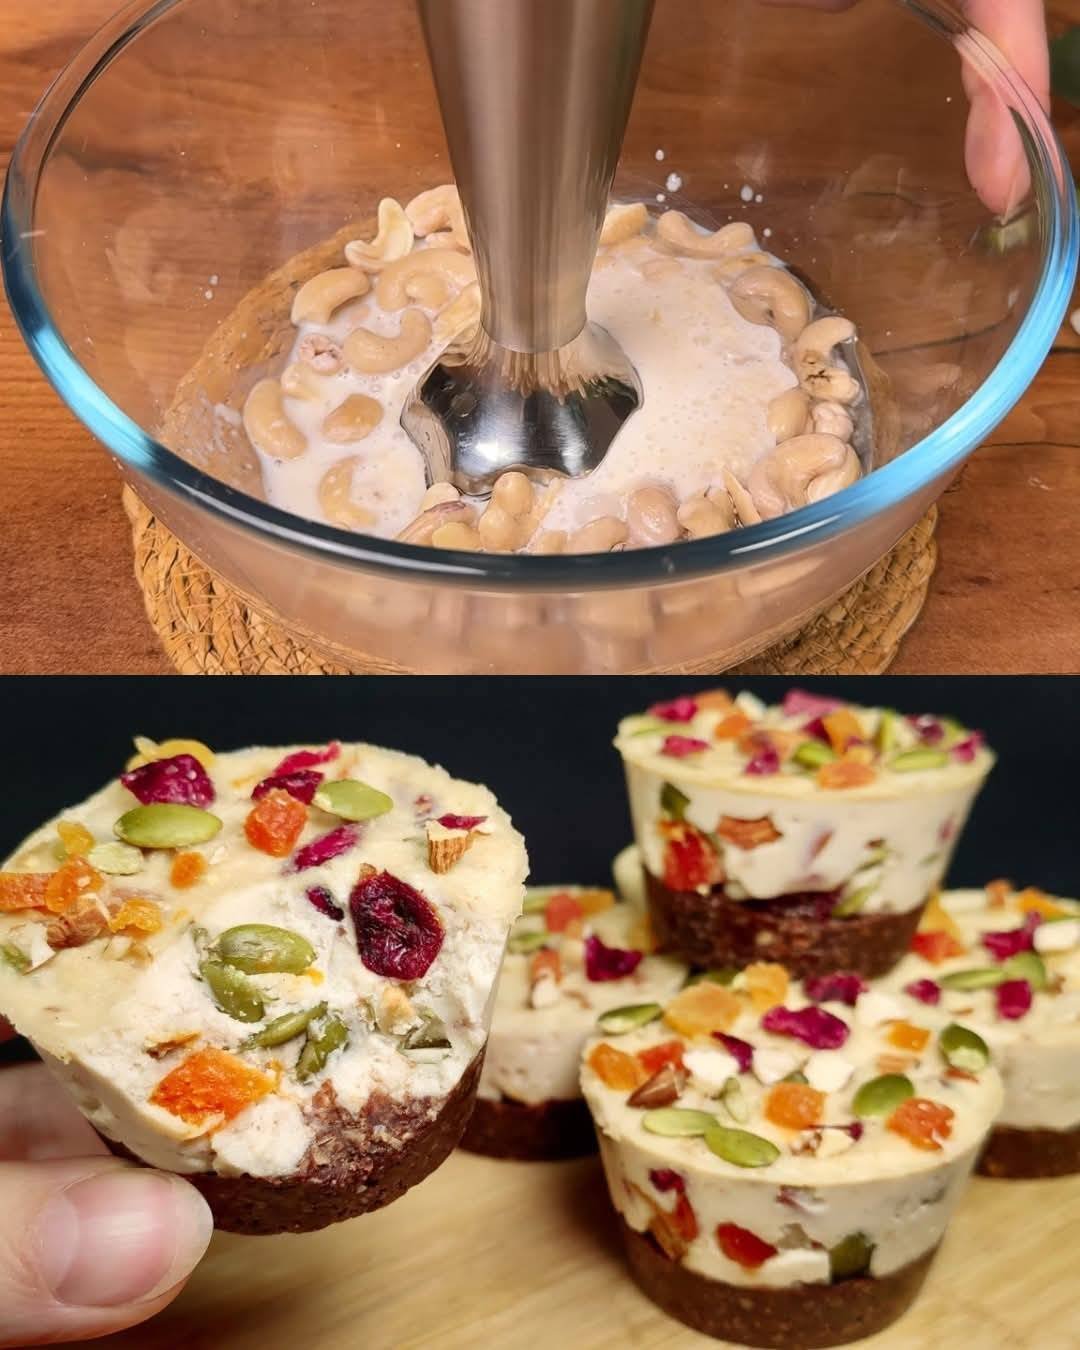
No-Bake Nutty Chocolate Energy Bars with Cashew Cream

No-Bake Nutty Chocolate Energy Bars with Cashew Cream


🧾 Ingredients

For the Chocolate Base:

  • 100 g (3½ oz) oats

  • 60 g (2 oz) dates, pitted

  • 2 tablespoons peanut butter

  • 1 teaspoon cocoa powder

  • ½ cup mixed nuts (almonds, hazelnuts, or walnuts), lightly roasted and chopped

For the Cashew Cream:

  • 150 g (5 oz) cashews (soaked in hot water for 30–40 minutes)

  • ¼ cup water or plant milk (add gradually)

  • 1 tablespoon honey or maple syrup (optional)

Topping (optional):

  • Pumpkin seeds

  • Dried cranberries

  • Chopped nuts


🧑‍🍳 Instructions

1️⃣ Prepare the Chocolate Base

  • Add oats, dates, peanut butter, and cocoa powder to a food processor.

  • Blend until the mixture becomes thick and sticky.

  • Transfer to a bowl and mix in the chopped nuts by hand.

  • Press the mixture firmly into the bottom of a lined square pan or muffin mold to form an even layer.


2️⃣ Make the Cashew Cream

  • Drain the soaked cashews.

  • Add them to a blender with a small amount of water or plant milk.

  • Blend until smooth and creamy. Add liquid slowly until desired texture is reached.


3️⃣ Assemble the Bars

  • Spread the cashew cream evenly over the chocolate base.

  • Sprinkle toppings over the surface if desired.


4️⃣ Chill and Set

  • Place in the freezer for 2 hours or until firm.

  • Remove and cut into bars or squares.


🍽 Storage

  • Store in an airtight container in the refrigerator for up to 7 days.

  • For longer storage, keep in the freezer and thaw slightly before eating.


✅ Helpful Tips

  • If dates are dry, soak them in warm water for 10 minutes before blending.

  • For a softer base, add 1–2 teaspoons of milk while blending.

  • Use parchment paper for easy removal.

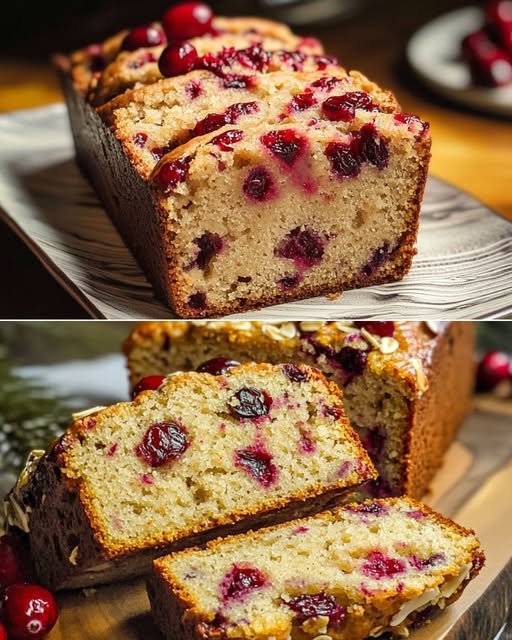
Oil-Free Orange Cranberry Loaf

Oil-Free Orange Cranberry Loaf
This soft and flavorful loaf gets its moisture from applesauce instead of oil, making it light, tender, and perfect for tea time or holiday baking.


🧾 Ingredients

  • 2 cups all-purpose flour (or 1:1 gluten-free baking blend)

  • 1 cup fresh or frozen cranberries

  • 1 cup orange juice (freshly squeezed for best flavor)

  • 1 tablespoon orange zest

  • ¾ cup granulated sugar (or coconut sugar)

  • 1 teaspoon vanilla extract

  • 1 teaspoon baking powder

  • ½ teaspoon baking soda

  • ½ teaspoon salt

  • ½ cup unsweetened applesauce

Optional topping:

  • Sliced almonds or rolled oats


👩‍🍳 Instructions

1. Prepare the Oven and Pan

Preheat your oven to 175°C (350°F).

Line a standard loaf pan with baking paper or lightly grease it with a small amount of butter or non-stick spray to prevent sticking.


2. Mix the Dry Ingredients

In a large bowl, add:

  • Flour

  • Sugar

  • Baking powder

  • Baking soda

  • Salt

Whisk well until evenly mixed.

Add the cranberries to the dry mixture and gently toss them in the flour. This helps keep them evenly distributed while baking.


3. Mix the Wet Ingredients

In a separate bowl, combine:

  • Orange juice

  • Orange zest

  • Applesauce

  • Vanilla extract

Whisk until smooth.


4. Make the Batter

Pour the wet mixture into the dry mixture.

Using a spatula or spoon, mix gently until just combined.
Do not overmix — this keeps the loaf soft and tender.

The batter will be thick.


5. Bake

Pour the batter into the prepared loaf pan and smooth the top.

Sprinkle almonds or oats on top if using.

Place in the oven and bake for 50–60 minutes, or until:

  • The top is lightly golden

  • A toothpick inserted in the center comes out clean

If the top browns too quickly, cover loosely with foil during the last 10 minutes.


6. Cool

Remove from the oven and let the loaf rest in the pan for 10 minutes.

Carefully transfer to a wire rack and allow to cool completely before slicing.
This helps the loaf hold its shape.


🍽 Serving Suggestions

Serve:

  • Plain

  • With tea or coffee

  • With a light dusting of powdered sugar

  • With a simple orange glaze (powdered sugar + orange juice)


📦 Storage

  • Store covered at room temperature for 2 days

  • Refrigerate for up to 5 days

  • Freeze slices for up to 1 month


⭐ Helpful Tips

✔ Use unsweetened applesauce
✔ Fresh orange juice gives better flavor
✔ Do not overmix the batter
✔ Frozen cranberries can be used without thawing

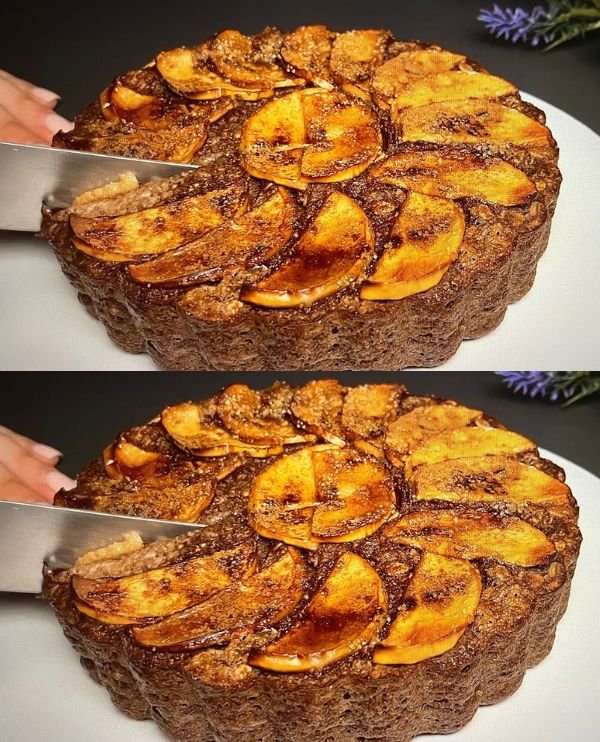
Easy & Delicious Oatmeal Apple Cake

Easy & Delicious Oatmeal Apple Cake


🧾 Ingredients

  • 200 g oat flakes

  • 250 ml milk

  • 3 eggs (room temperature)

  • 2 ripe bananas

  • 1 apple

  • Cinnamon, to taste

Optional (for extra flavor or texture):

  • 1 tablespoon honey or maple syrup (only if bananas are not sweet)

  • A handful of chopped walnuts or pecans


👩‍🍳 Instructions

1. Soak the Oats

Place the oat flakes in a large mixing bowl.

Pour in the milk and stir well.

Let the mixture rest for 10 minutes so the oats soften and absorb the liquid. This helps create a moist and tender cake texture.


2. Prepare the Fruit

Peel the bananas and mash them with a fork until smooth.

Wash the apple, remove the core, and slice it into thin, even slices. Set aside for topping.


3. Make the Batter

Add the mashed bananas to the soaked oats.

Crack in the eggs.

Add cinnamon according to your taste.

Mix everything thoroughly with a whisk or spoon until the batter is smooth and evenly combined.

If using honey or maple syrup, stir it in now.


4. Prepare for Baking

Preheat your oven to 180°C (350°F).

Grease a round cake pan or line it with baking paper.

Pour the batter into the pan and spread it evenly.

Arrange the apple slices neatly on top in a circular or decorative pattern.

If using nuts, sprinkle them over the top.


5. Bake

Place the pan in the preheated oven.

Bake for 35–40 minutes, or until:

  • The cake feels firm in the center

  • A toothpick inserted into the middle comes out clean

  • The apple slices on top are lightly golden

Remove from the oven and let the cake cool in the pan for about 10–15 minutes.


🍽 Serving Suggestions

Serve:

  • Warm or cold

  • With tea or coffee

  • With yogurt or a light drizzle of honey

  • As a breakfast cake or snack


⭐ Helpful Tips

✔ Use ripe bananas for natural sweetness
✔ Thin apple slices bake more evenly
✔ Do not overbake to keep the cake soft
✔ You can add raisins or dates for extra sweetness


📦 Storage

  • Store covered at room temperature for 1 day

  • Refrigerate for up to 3 days

  • Can be frozen in slices for up to 1 month

Grandma’s Chocolate Yogurt Marble Cake

Grandma’s Chocolate Yogurt Marble Cake
This soft and moist cake combines rich chocolate batter with creamy yogurt filling, creating a beautiful marbled look and a tender texture in every slice.


🧾 Ingredients

For the Cake Batter:

  • 3 eggs (room temperature)

  • 150 g (¾ cup) sugar

  • 110 ml vegetable or sunflower oil

  • 110 ml milk

  • 250 g (about 1⅔ cups) all-purpose flour

  • 15 g baking powder

  • 20 g cocoa powder

  • 2 tablespoons milk (for cocoa mixture)

  • A dash of vanilla extract

  • A pinch of salt


For the Yogurt Filling:

  • 300 g thick yogurt or Greek yogurt

  • 1 egg

  • 50 g sugar

  • 1 tablespoon cornstarch


👩‍🍳 Instructions

1. Prepare the Base Batter

In a large mixing bowl, add:

  • Eggs

  • Sugar

  • Salt

  • Vanilla extract

Whisk well until the mixture becomes pale and slightly thick.

Slowly add:

  • Oil

  • Milk

Whisk again until fully combined.

Sift in:

  • Flour

  • Baking powder

Fold gently using a spatula until smooth and lump-free. Do not overmix.


2. Make the Chocolate Batter

Transfer about one-third of the batter into a separate bowl.

In another small bowl, mix:

  • Cocoa powder

  • 2 tablespoons milk

Stir to form a smooth paste.

Add this cocoa paste to the smaller portion of batter and mix until dark and well blended.


3. Prepare the Yogurt Filling

In a bowl, combine:

  • Yogurt

  • Egg

  • Sugar

  • Cornstarch

Whisk until smooth and creamy. Set aside.


4. Assemble the Cake

Preheat oven to 180°C (350°F).

Grease a round cake pan or springform pan.

Pour the chocolate batter into the pan and spread evenly.

Pour the plain batter over the chocolate layer.

Use a skewer or knife to gently swirl the batters together to create a marble effect.

Spoon small dollops of the yogurt mixture on top. They will sink slightly during baking and create creamy pockets inside the cake.


5. Bake

Place the pan in the oven and bake for 35–45 minutes.

Check doneness by inserting a toothpick into the cake portion (not the yogurt spots). It should come out clean.

Remove from oven and let the cake cool completely in the pan before removing.


🍽 Serving

Slice and serve:

  • Plain

  • With tea or coffee

  • Lightly dusted with powdered sugar

  • With fresh fruit


⭐ Helpful Tips

✔ Do not overmix the batter
✔ Use thick yogurt for best texture
✔ Let cake cool fully before slicing
✔ Add chocolate chips for extra richness


📦 Storage

  • Store covered at room temperature for 1 day

  • Refrigerate for up to 3 days

  • Can be frozen for up to 1 month