
Air Fryer Grilled Cheese

Air Fryer Grilled Cheese

I still remember the very first grilled cheese my mom made for me in a cast-iron skillet—golden, buttery bread with crisp edges and melted cheddar stretching endlessly with every bite. It was simple, comforting, and perfect in its own way. Fast-forward to today, and I’m making that same nostalgic sandwich, but with a modern twist that’s quicker, cleaner, and unbelievably crispy: the air fryer.

This Air Fryer Grilled Cheese delivers everything we love about the classic—gooey cheese, crunchy bread, rich buttery flavor—without standing over the stove or flipping nervously. No greasy pans. No uneven browning. Just consistently perfect grilled cheese every single time.

🧑‍🍳 Why Make Grilled Cheese in the Air Fryer?

The air fryer creates evenly crisp bread on the outside while gently melting the cheese inside. Because hot air circulates around the sandwich, you get uniform browning without babysitting the pan. It’s also ideal for making multiple sandwiches at once, making it perfect for families, quick lunches, or busy weeknights.

Another bonus? It’s beginner-friendly and safe for kids (with supervision), making it a fun way to get little hands involved in the kitchen. Plus, it works beautifully with all kinds of bread and cheeses, so you can customize it endlessly.

🧾 Ingredients

  • 2 slices of bread (white, sourdough, whole wheat, or brioche)
  • 1–2 slices of cheddar cheese (or mozzarella, gouda, Swiss, or American)
  • 1–2 tablespoons butter, softened
See also  Cottage Cheese Pasta Sauce  

🍽️ Instructions

Step 1: Preheat the Air Fryer
Preheat your air fryer to 370°F (190°C) for about 3 minutes. This ensures the bread starts crisping immediately when it hits the basket.

Step 2: Assemble the Sandwich
Butter one side of each slice of bread generously. Place the cheese between the non-buttered sides so the buttered sides face outward. This guarantees that golden, crunchy exterior.

Step 3: Air Fry
Place the sandwich carefully into the air fryer basket. If your air fryer runs strong, you can secure the sandwich with toothpicks to prevent the top slice from lifting.
Cook at 370°F (190°C) for 4–5 minutes, flip, then cook for another 3–4 minutes, or until both sides are golden brown and the cheese is fully melted.

Tip: For ultra-melty cheese, gently press the sandwich halfway through cooking using a spatula.

Step 4: Slice and Serve
Remove from the basket, let it cool for a minute, then slice diagonally for that classic grilled cheese look.

🧀 Variations

  • Three-Cheese Grilled Cheese: Cheddar, mozzarella, and pepper jack
  • Tomato Basil: Thin tomato slices and fresh basil leaves
  • Garlic Parmesan Crust: Mix grated Parmesan and minced garlic into the butter

💬 Final Thoughts

This Air Fryer Grilled Cheese is proof that comfort food can be both nostalgic and modern. It’s crisp, melty, effortless, and endlessly customizable. Whether you’re making a quick lunch, a midnight snack, or the perfect partner for a bowl of tomato soup, this method might just become your new favorite way to enjoy a timeless classic. 🧀✨

Spinach & Feta Egg Muffins

Spinach & Feta Egg Muffins

Introduction

Spinach and Feta Egg Muffins are a nutritious, protein-rich breakfast option that’s easy to make and incredibly versatile. These mini egg bakes are inspired by Mediterranean flavors, combining earthy spinach with tangy feta cheese for a savory, satisfying bite. They’re ideal for busy mornings, lunchboxes, or even as a light dinner when paired with salad. Best of all, they can be made ahead, stored, and reheated without losing flavor or texture.

Prep Time: 10 minutes

Cook Time: 18–22 minutes

Total Time: ~30 minutes

Yield: 10–12 egg muffins

Ingredients

6 large eggs

½ cup milk (regular or low-fat)

1 cup fresh spinach, finely chopped

½ cup feta cheese, crumbled

¼ cup onion, finely chopped (optional)

¼ tsp salt (adjust to taste)

¼ tsp black pepper

¼ tsp garlic powder (optional)

¼ tsp paprika or chili flakes (optional)

1 tbsp olive oil or butter (for greasing)

Step-by-Step Instructions

Preheat & Prepare

Preheat your oven to 180°C (350°F).

Grease a muffin tin thoroughly with olive oil or butter, or line with silicone or paper liners.

Prepare the Spinach

If using fresh spinach, rinse well and chop finely.

Lightly sauté in a dry pan for 1–2 minutes until just wilted (optional but prevents excess moisture).

Let cool slightly.

Whisk the Eggs

In a large bowl, crack the eggs.

Add milk, salt, pepper, garlic powder, and paprika.

Whisk until smooth and slightly frothy.

Add Fillings

Stir in chopped spinach, feta cheese, and onions (if using).

See also  Air Fried Fish Fillet

Mix gently so ingredients are evenly distributed.

Fill the Muffin Tin

Pour the egg mixture into each muffin cup, filling about ¾ full.

Bake

Place in the preheated oven.

Bake for 18–22 minutes, or until the centers are set and the tops are slightly golden.

Cool & Serve

Remove from oven and let rest for 5 minutes.

Carefully loosen edges and remove muffins.

Serving Suggestions

Serve warm with whole-grain toast, avocado slices, or fresh salad

Great with mint tea or fresh juice for breakfast

Perfect for meal prep — grab-and-go friendly

Storage & Reheating

Refrigerator: Store in an airtight container for up to 4 days

Freezer: Freeze up to 2 months

Reheat: Microwave for 20–30 seconds

Tips & Variations

Add bell peppers, olives, mushrooms, or sun-dried tomatoes

Use cheddar or mozzarella instead of feta

Make it spicy with green chilies or chili flakes

Final Thoughts

Spinach and Feta Egg Muffins are simple, wholesome, and full of flavor. They’re an excellent way to add vegetables and protein to your day without spending much time in the kitchen. Once you try them, they’ll become a regular in your weekly meal prep routine.

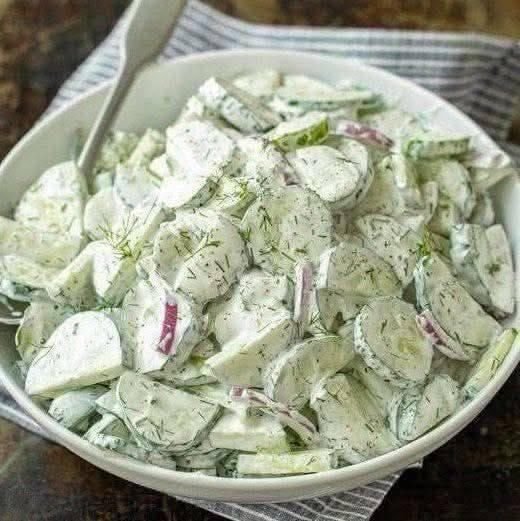
Creamy Cucumber Salad with Dill and Red Onion

Creamy Cucumber Salad with Dill and Red Onion

Creamy Cucumber Salad with Dill and Red Onion is a refreshing, cool, and lightly tangy side dish that’s perfect for warm weather meals. Crisp cucumbers are thinly sliced and tossed with delicate red onion, then coated in a creamy dressing flavored with fresh dill and a touch of acidity. This classic salad is simple, timeless, and incredibly satisfying, making it a great companion to grilled meats, sandwiches, or light summer dinners.

What makes this salad special is its balance of textures and flavors. The cucumbers stay crunchy, the red onion adds gentle sharpness, and the creamy dressing ties everything together without feeling heavy. It’s quick to prepare, requires minimal ingredients, and tastes even better after a short chill in the refrigerator.

Ingredients

2 large cucumbers, thinly sliced
½ small red onion, thinly sliced
¾ cup sour cream or Greek yogurt
1 tablespoon mayonnaise (optional, for extra richness)
1 tablespoon lemon juice or white vinegar
1–2 tablespoons fresh dill, finely chopped
Salt and black pepper, to taste

Instructions

Start by washing the cucumbers thoroughly. If the skin is thick or waxy, peel them lightly; otherwise, leaving the skin on adds color and texture. Slice the cucumbers thinly using a sharp knife or mandoliner and place them in a large bowl.

Add the thinly sliced red onion to the cucumbers. If you prefer a milder onion flavor, soak the onion slices in cold water for 5–10 minutes, then drain well before adding them to the bowl.

See also  Cheesy Baked Vegetable Casserole

In a separate mixing bowl, prepare the dressing by combining the sour cream or Greek yogurt with the mayonnaise, if using. Stir in the lemon juice or vinegar until smooth. Add the chopped fresh dill, along with salt and black pepper, and mix until fully blended.

Pour the dressing over the cucumber and onion mixture. Gently toss everything together until the vegetables are evenly coated in the creamy dressing. Be careful not to overmix, as cucumbers release water and can become soft.

For best flavor, cover the salad and refrigerate it for at least 20–30 minutes before serving. This allows the flavors to meld and the salad to become extra refreshing.

Serving Suggestions

Serve Creamy Cucumber Salad chilled as a side dish with grilled chicken, fish, or kebabs. It also pairs well with sandwiches, burgers, or picnic-style meals. For extra texture, you can add sliced radishes or a sprinkle of cracked black pepper on top just before serving.

Light, creamy, and herb-fresh, this cucumber salad is a simple dish that delivers classic comfort with every bite. 🥗💚

Crispy Garlic Parmesan Potato Wedges

Crispy Garlic Parmesan Potato Wedges

A crowd-pleasing side dish that’s baked to perfection.

Prep time: 10 minutes

Cook time: 30–35 minutes

Ingredients

  • 3–4 large Russet potatoes, scrubbed and cut into wedges

  • 3 tbsp Olive oil

  • 1/2 cup Grated Parmesan cheese

  • 1 tsp Garlic powder (or 3 cloves fresh minced garlic)

  • 1 tsp Dried parsley (plus fresh for garnish)

  • 1/2 tsp Onion powder

  • 1/2 tsp Paprika (optional, for color)

  • Salt and black pepper to taste

Instructions

  1. Preheat & Prep: Preheat your oven to 400°F. Line a large baking sheet with parchment paper or lightly grease it to prevent sticking.

  2. Soak (Optional Pro-Tip): For extra crispiness, soak your potato wedges in cold water for 15 minutes, then pat them completely dry with a paper towel.

  3. Season: In a large mixing bowl, toss the dried potato wedges with olive oil until evenly coated.

  4. The Coating: In a small bowl, whisk together the Parmesan cheese, garlic powder, parsley, onion powder, paprika, salt, and pepper. Sprinkle the mixture over the potatoes and toss until every wedge is well-coated.

  5. Arrange: Place the wedges on the baking sheet in a single layer, skin-side down. Make sure they aren’t touching so they can crisp up properly.

  6. Bake: Bake for 30–35 minutes. Flip them halfway through if you want even browning on all sides. They are done when they are fork-tender and deep golden brown.

  7. Serve: Sprinkle with extra fresh parsley and a dash more Parmesan while they are still hot.

Lemon Cheesecake Mousse (Light, Creamy & Egg-Free)

Lemon Cheesecake Mousse (Light, Creamy & Egg-Free)

This Lemon Cheesecake Mousse is a dreamy, no-bake dessert that combines the rich creaminess of cheesecake with the light, airy texture of mousse. Brightened with fresh lemon juice and zest, it delivers the perfect balance of tangy and sweet in every spoonful. Best of all, it’s completely egg-free, requires no oven, and comes together in just minutes—making it ideal for entertaining, summer gatherings, or when you want an elegant dessert without the fuss.

Ingredients (Serves 4–6)

  • 8 oz (225 g) cream cheese, softened to room temperature

  • 1 cup (240 ml) heavy whipping cream, cold

  • ½ cup (100 g) granulated sugar

  • 1 teaspoon vanilla extract

  • 3 tablespoons fresh lemon juice

  • 1 tablespoon fresh lemon zest

  • Optional garnishes: extra lemon zest, whipped cream, crushed graham crackers, or shortbread crumbs

Instructions

1. Prepare the Cream Cheese Base
Place the softened cream cheese in a large mixing bowl. Add the granulated sugar and beat using a hand mixer or stand mixer on medium speed for 2–3 minutes, until the mixture is completely smooth and creamy. Scrape down the sides of the bowl as needed to avoid lumps. This step is key to achieving a silky mousse texture.

2. Add the Lemon Flavor
Pour in the fresh lemon juice, lemon zest, and vanilla extract. Beat again on low speed until everything is well combined. The mixture should be creamy, fragrant, and lightly tangy. Taste at this stage and adjust sweetness or lemon if desired.

See also  The Delicious Blueberry Cobbler

3. Whip the Cream
In a separate chilled bowl, pour in the cold heavy whipping cream. Using clean beaters, whip on medium-high speed until stiff peaks form. The cream should hold its shape when the beaters are lifted—this is what gives the mousse its light, airy structure.

4. Fold Gently
Add the whipped cream to the cream cheese mixture in two or three batches. Using a spatula, gently fold it in with slow, sweeping motions. Take care not to overmix, as this can deflate the mousse. The final mixture should be fluffy, smooth, and pale yellow.

5. Chill to Set
Spoon or pipe the mousse into individual serving glasses, bowls, or dessert cups. Smooth the tops, cover loosely, and refrigerate for at least 2 hours, or overnight for best texture and flavor.

6. Garnish and Serve
Just before serving, garnish with a dollop of whipped cream, a sprinkle of lemon zest, or crushed graham crackers for that classic cheesecake feel. Serve chilled and enjoy every creamy bite.

Tips & Variations

  • For a less sweet version, reduce sugar to ⅓ cup and add extra lemon juice

  • Turn it into a cheesecake parfait by layering mousse with cookie crumbs

  • Make it ahead—it keeps beautifully in the fridge for up to 2 days

Light, luscious, and bursting with citrus freshness, this Lemon Cheesecake Mousse is proof that simple ingredients can create a truly elegant dessert 🍋✨

Spicy Carrot & Vegetable Salad for Jars

Spicy Carrot & Vegetable Salad for Jars

This Spicy Carrot & Vegetable Salad is a vibrant, tangy, and lightly sweet preserve that’s perfect for storing in jars and enjoying year-round. Inspired by Eastern European-style vegetable salads, it combines tender carrots, peppers, onions, and tomatoes with warm spices and vinegar for a bold, balanced flavor. Serve it as a side dish, sandwich topping, or quick appetizer straight from the jar.

INGREDIENTS (Makes 4–5 jars, 500 ml each)

  • 2 kg carrots, grated or julienned

  • 500 g onions, thinly sliced

  • 500 g bell peppers, thinly sliced

  • 1 kg tomatoes, grated or finely chopped (or 700 ml tomato purée)

  • 2–3 heads garlic, minced

  • 250 ml vegetable oil

  • 150 g sugar

  • 2 tablespoons salt (adjust to taste)

  • 80–100 ml vinegar (9%)

  • 1 teaspoon ground black pepper

  • 1–2 teaspoons chili flakes or hot pepper (optional)

  • 1 tablespoon paprika

  • 1 bunch fresh parsley or dill, finely chopped

INSTRUCTIONS

1. Prepare the Vegetables

Wash and peel the carrots, then grate them using a coarse or julienne grater. Slice the onions and bell peppers thinly so they soften evenly while cooking. Grate or finely chop the tomatoes and mince the garlic. Keep everything ready before cooking.

2. Cook the Base

In a large, heavy-bottomed pot, heat the vegetable oil over medium heat. Add the sliced onions and sauté until soft and lightly golden. Stir in the bell peppers and cook for about 5 minutes, allowing them to soften. Add the tomatoes and simmer for 10 minutes until the mixture thickens slightly and becomes fragrant.

See also  Mediterranean Carrot Walnut Cake

3. Add the Carrots

Stir in the grated carrots along with salt, sugar, black pepper, paprika, and chili flakes if using. Reduce heat to medium-low and cook for 25–30 minutes, stirring frequently to prevent sticking. The vegetables should become tender but not mushy.

4. Finish the Salad

Add the minced garlic and vinegar, then cook for an additional 5 minutes. Stir in the fresh herbs and remove from heat.

5. Jar and Store

Pack the hot salad into sterilized jars and seal tightly. For longer storage, sterilize the filled jars in boiling water for 10–15 minutes. Allow to cool completely and store in a cool, dark place. The salad is ready after 3–5 days and tastes even better after one week.