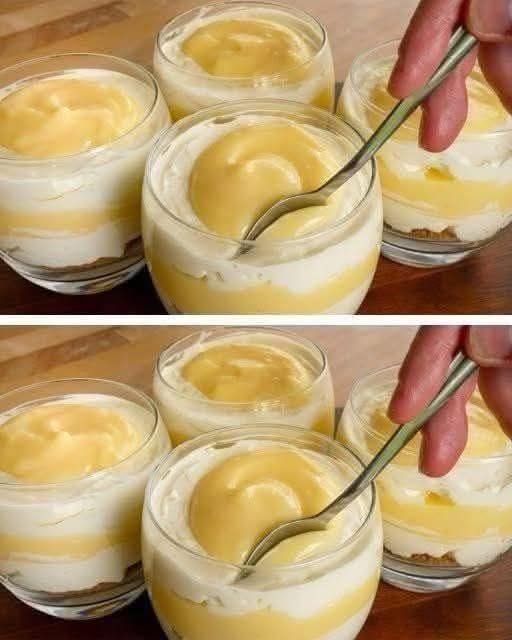
Creamy Lemon Cheesecake Parfaits

Creamy Lemon Cheesecake Parfaits

This dessert features a buttery biscuit base, a silky cream cheese layer, and a zesty homemade lemon curd.

Ingredients

For the Base:

  • 1 cup graham crackers or digestive biscuits, crushed into fine crumbs

  • 3 tbsp unsalted butter, melted

For the Cheesecake Layer:

  • 1 cup (8 oz) cream cheese, softened

  • 1/2 cup powdered sugar

  • 1 tsp vanilla extract

  • 1 cup heavy whipping cream, chilled

For the Lemon Topping:

  • 1/2 cup lemon curd (store-bought or homemade)

  • Optional: Fresh mint leaves or lemon zest for garnish


Instructions

  1. Prepare the Base: In a small bowl, mix the crushed biscuits with the melted butter until the mixture feels like wet sand. Spoon about 2 tablespoons into the bottom of each glass. Press down lightly with the back of a spoon to create an even layer.

  2. Make the Cream Layer: In a large bowl, beat the softened cream cheese, powdered sugar, and vanilla until smooth and creamy. In a separate bowl, whip the heavy cream until stiff peaks form. Gently fold the whipped cream into the cream cheese mixture until combined and fluffy.

  3. Layer the Parfaits: Pipe or spoon a thick layer of the cheesecake mixture over the biscuit base in each glass. Smooth the top with a spoon.

  4. Add the Lemon Zest: Gently stir your lemon curd to loosen it up. Pour a generous layer of curd over the cheesecake filling. For the look in the photo, you can add a small “dollop” of the white cream back on top and swirl it, or simply leave the lemon as a bright top layer.

  5. Chill and Serve: Place the glasses in the refrigerator for at least 30 minutes to allow the layers to set and the flavors to meld. Top with a bit of fresh zest or a mint leaf just before serving.


Why this works:

  • Texture: The crunch of the buttered crumbs balances the velvet-smooth cream.

  • Flavor: The tartness of the lemon cuts through the richness of the cream cheese, making it refreshing rather than heavy.

Savory Golden Potato Roll

Savory Golden Potato Roll

This dish creates a flexible potato “crust” that you can fill with almost anything, though cheese and herbs are the classic choice.

Ingredients

  • 3 large potatoes (Russet or Yukon Gold work best)

  • 2 cups shredded mozzarella (divided)

  • 2 large eggs

  • 1/2 tsp salt

  • 1/4 tsp black pepper

  • Optional Filling: Fresh parsley, sautéed spinach, or cooked minced garlic.


Instructions

  1. Prepare the Potatoes: Peel the potatoes and grate them using the large holes of a box grater. Crucial Step: Place the shredded potatoes in a clean kitchen towel and squeeze out as much liquid as possible. Removing the moisture ensures the base gets crispy rather than soggy.

  2. Create the Base: In a large bowl, mix the shredded potatoes, 1 cup of the mozzarella cheese, the eggs, salt, and pepper. Stir until well combined.

  3. Bake the Crust: Preheat your oven to 400°F (200°C). Line a large baking sheet with parchment paper. Spread the potato mixture onto the paper in a thin, even rectangular layer.

    • Bake for 20–25 minutes until the edges are golden brown and the potato is set.

  4. Add Filling and Roll: Remove the tray from the oven. Sprinkle the remaining 1 cup of mozzarella (and any herbs or extra fillings) evenly over the hot potato surface.

    • While it’s still hot, carefully grab the edge of the parchment paper and use it to help you roll the potato “crust” into a log (like a jelly roll).

  5. Final Crisp: Place the roll (seam-side down) back in the oven for another 5–10 minutes to melt the inner cheese and make the outside extra bubbly and brown.

  6. Serve: Garnish with fresh parsley. Let it sit for 5 minutes before slicing so the cheese stays inside.


Pro Tip

If you want to make this even heartier, you can spread a thin layer of cooked ground meat or ham over the cheese before rolling it up!

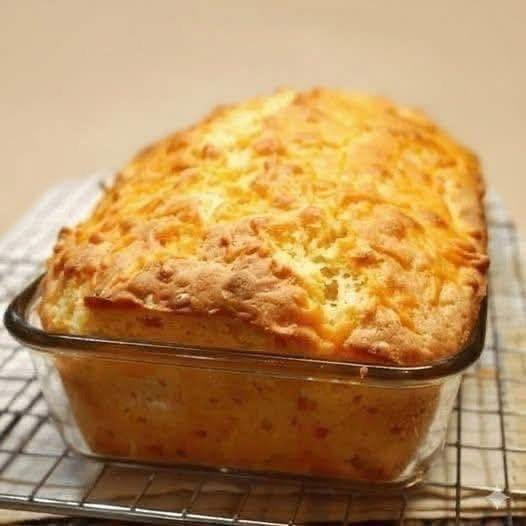
Flourless Savory Cheese Loaf


Flourless Savory Cheese Loaf

This bread uses the protein in eggs and the structure of cream cheese to create a fluffy, bread-like texture without any grain.

Ingredients

  • 3 large eggs, separated (whites in one bowl, yolks in another)

  • 3 oz (approx. 85g) cream cheese, softened to room temperature

  • 1/8 tsp cream of tartar (essential for stabilizing the egg whites)

  • 1/2 cup shredded cheddar cheese (plus a little extra for the topping)

  • 1/2 tsp garlic powder (optional)

  • A pinch of salt


Instructions

  1. Prep the Oven and Pan: Preheat your oven to 300°F (150°C). Lightly grease a small glass loaf dish or line it with parchment paper to ensure easy removal.

  2. Mix the Yolks: In a medium bowl, blend the egg yolks, softened cream cheese, and salt until the mixture is completely smooth. If you are using garlic powder or other herbs, fold them in now.

  3. Whip the Whites: In a separate, very clean metal or glass bowl, add the egg whites and the cream of tartar. Use a hand mixer or stand mixer to beat them on high speed until stiff peaks form (the whites should stand straight up when you lift the beaters).

  4. Fold Gently: Slowly and gently fold the yolk mixture into the egg whites using a spatula. Do not stir vigorously, or you will deflate the air bubbles that make the bread rise. Once mostly combined, gently fold in the shredded cheddar.

  5. Bake: Pour the batter into your prepared loaf dish. Sprinkle the remaining bit of cheese on top for that golden crust. Bake for 25–30 minutes. The top should be golden brown and the center should feel firm to the touch.

  6. Cool: Let the loaf cool in the pan for at least 10 minutes before slicing. This allows the internal structure to set so it doesn’t collapse.


Quick Tips

  • The Cream Cheese: Make sure it is truly at room temperature. If it’s cold, you’ll end up with lumps in your batter.

  • Variations: You can add dried rosemary, jalapenos, or even “everything bagel” seasoning to the top for extra flavor.

Put 4 drops in your ear

At-Home Earwax Softening Routine

This method is designed to support the ear’s natural cleaning process by softening hardened wax so it can exit the ear canal naturally.

How the Solution Works

  • The solution is formulated to penetrate deep into the ear canal to loosen and break down hardened earwax.

  • By softening the wax, it allows the material to move out of the ear naturally.

  • This process helps clear sound wave blockages, which may improve hearing clarity and comfort.

  • The formula is intended to be gentle and non-irritating for routine hygiene.


Directions for Use

  1. Application: Apply 4 drops into the affected ear.

  2. Absorption: Keep your head tilted for several minutes to allow the solution to settle and begin softening the compacted wax.

  3. Maintenance: Use as recommended for general hygiene or when you suspect a buildup is occurring.


Ideal Users

  • Individuals with muffled hearing specifically caused by earwax buildup.

  • Frequent users of earbuds, hearing aids, or earplugs, which can often push wax deeper into the canal.

  • Those seeking a non-invasive alternative to scraping or professional flushing.


Important Safety Notes

This product is intended for ear hygiene and comfort only. It is not a replacement for professional medical evaluation. If you experience persistent ringing, pain, or fluid drainage, see a doctor immediately.

Soft Skillet Flatbreads (No Flour)

Soft Skillet Flatbreads (No Flour)

These tender flatbreads are made with eggs and cheese and cooked in a pan until lightly golden. They can be served rolled, folded, or stacked and enjoyed with sweet or savory toppings.


🧾 Ingredients

  • 4 large eggs

  • 1 cup shredded mozzarella or mild cheese

  • 2 tablespoons cream cheese (optional, for softness)

  • ¼ teaspoon salt

  • ¼ teaspoon black pepper (optional)

  • ½ teaspoon garlic powder or onion powder (optional)

  • Butter or oil for the pan


🔪 Equipment

  • Mixing bowl

  • Whisk or fork

  • Non-stick skillet

  • Spatula


👩‍🍳 Instructions

1️⃣ Prepare the Batter

In a bowl:

  • Crack in the eggs

  • Add shredded cheese

  • Add cream cheese (if using)

  • Add salt and optional seasonings

Whisk until smooth and well combined.


2️⃣ Heat the Pan

  • Heat a non-stick skillet over medium-low heat

  • Lightly grease with butter or oil


3️⃣ Cook the Flatbreads

  • Pour about ¼ cup batter into the pan

  • Tilt pan to spread into a thin круг (circle)

  • Cook for 1½–2 minutes until set and lightly golden

  • Flip and cook another 1 minute

Repeat with remaining batter.


4️⃣ Serve

Serve:

  • Rolled or folded

  • With butter or honey

  • With yogurt or fruit

  • With savory fillings (cheese, eggs, vegetables)


🧊 Storage

  • Store in an airtight container in the refrigerator for 2–3 days

  • Reheat in a dry pan or microwave

Mediterranean Cheesy Chicken Roll-Ups

Mediterranean Cheesy Chicken Roll-Ups

These are essentially a Mediterranean twist on a taquito or flauta, using flour tortillas for a soft-yet-crunchy finish.

Ingredients

The Filling:

  • 2 cups Cooked Chicken: Shredded (rotisserie chicken works perfectly here).

  • 4 oz Cream Cheese: Softened to room temperature.

  • 1/2 cup Feta Cheese: Crumbled.

  • 1 cup Shredded Mozzarella: For that perfect cheese pull.

  • 1/4 cup Sun-dried Tomatoes: Finely chopped.

  • 2 tbsp Fresh Parsley: Chopped.

  • 1 tsp Garlic Powder & 1 tsp Dried Oregano.

  • Salt & Pepper: To taste.

The Assembly:

  • 8-10 Small Flour Tortillas: (Fajita or taco size).

  • 2 tbsp Olive Oil or Melted Butter: For brushing.

  • Garnish: Extra parsley and a squeeze of fresh lemon juice.


Instructions

1. Mix the Filling

In a large bowl, combine the shredded chicken, softened cream cheese, feta, mozzarella, sun-dried tomatoes, parsley, and spices. Mix until the chicken is evenly coated and the mixture is “tacky” enough to hold together.

2. Prep the Tortillas

To prevent cracking, wrap your tortillas in a damp paper towel and microwave them for about 20 seconds. This makes them pliable and easy to roll.

3. Fill and Roll

  • Place about 2-3 tablespoons of the chicken mixture in a line down the center of each tortilla.

  • Roll them up tightly and place them seam-side down on a baking sheet lined with parchment paper.

    Tip: Placing them seam-side down ensures they don’t unravel while baking without needing toothpicks.

4. Bake to Golden Perfection

  • Preheat your oven to 400°F (200°C).

  • Brush the tops of the roll-ups lightly with olive oil or melted butter. This is what gives them that golden, fried-like crunch seen in your photo.

  • Bake for 15–18 minutes, or until the edges are brown and the centers are bubbling.

5. Serve

Let them cool for 5 minutes so the cheese sets slightly. Serve with a side of tzatziki or a creamy garlic dip.


Pro-Tips for Success

  • The “Dead of Night” Secret: You can actually assemble these ahead of time and keep them in the fridge. Just bake them fresh when you’re ready to eat!

  • Add Brine: For an extra Mediterranean kick, add a tablespoon of chopped kalamata olives to the filling.