Sweet Potato & Ground Turkey Bake

Here’s a full detailed recipe for a Sweet Potato and Ground Turkey Bake, including description, nutritional info, prep/cook time, and Q&A. Sweet Potato & Ground Turkey Bake

Description:

This Sweet Potato and Ground Turkey Bake is a hearty, healthy, and balanced one-dish meal perfect for weeknight dinners or meal prep. The savory ground turkey is seasoned with garlic, onion, and herbs, layered with nutrient-dense sweet potatoes, and baked with a light cheese topping for a comforting yet wholesome casserole. Time Required:

Prep time: 20 minutes

Cook time: 40 minutes

Total time: 1 hour

Servings: 6

M Ingredients:

Main Ingredients:

1 lb (450g) lean ground turkey

3 medium sweet potatoes, peeled and thinly sliced (about 1/4″ thick)

1 medium yellow onion, dice

2 cloves garlic, minced

1 red bell pepper, chopped

1 cup spinach (optional, chopped)

1 cup shredded mozzarella or cheddar cheese (optional for topping)

Seasonings:

1 tsp smoked paprika

1/2 tsp dried thym

1/2 tsp oregano

Salt and black pepper to taste

2 tbsp olive oil (divided)

Optional for creaminess:

1/2 cup low-fat milk or Greek yogurt (to mix with cheese for a creamy top)

Instructions:

Step 1: Prep the Oven and Sweet Potatoes

Prheat oven to 375°F (190°C).

Peel and thinly slice sweet potatoes. Set aside.

Step 2: Cook the Turkey Mixture

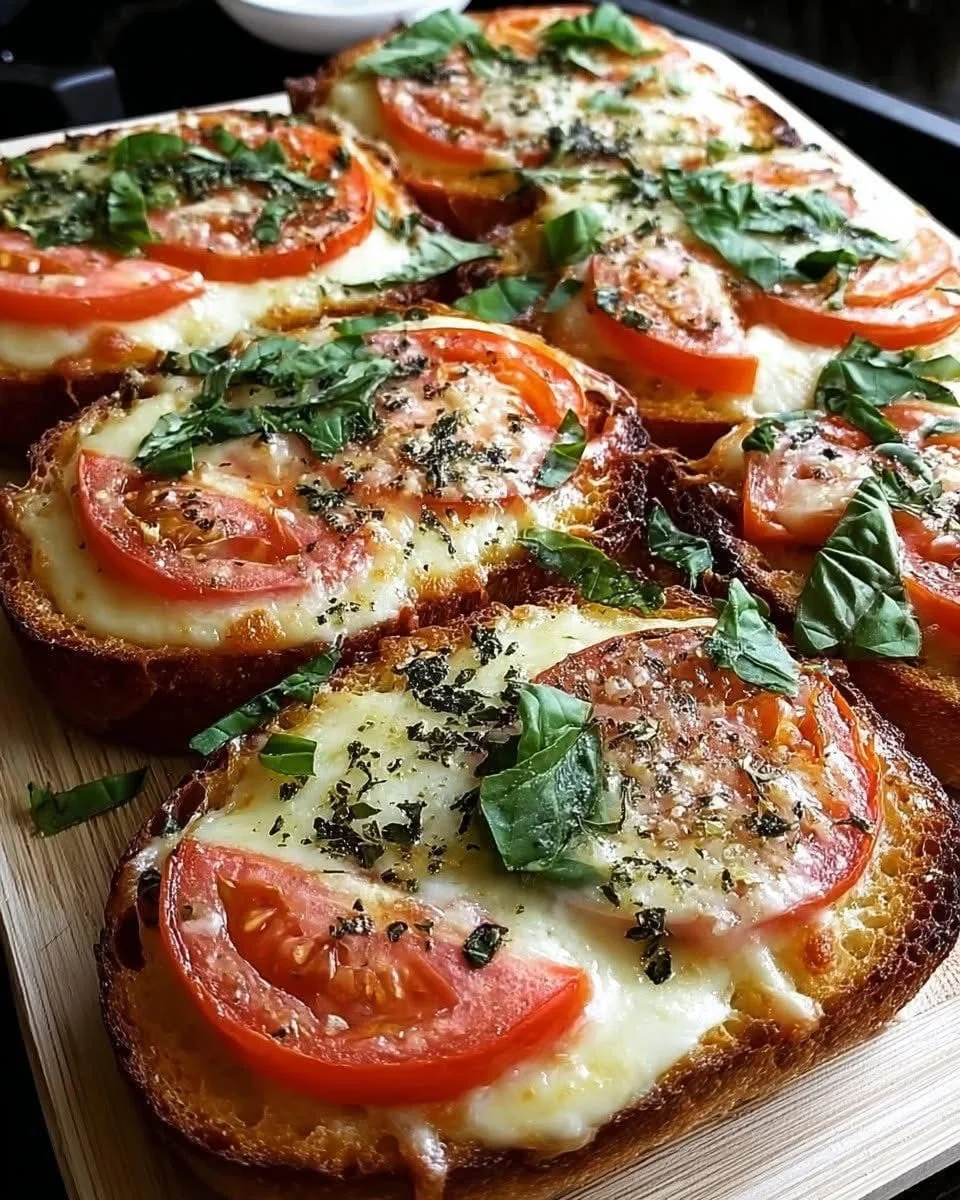
Mediterranean Tomato Basil Garlic Bread

Mediterranean Tomato Basil Garlic Bread

Table of Contents

This Mediterranean Tomato Basil Garlic Bread is a delicious twist on the classic garlic bread. It combines fresh, juicy tomatoes, fragrant basil, and roasted garlic atop a crispy, golden loaf. Perfect as an appetizer, side dish, or a tasty snack, it’s bursting with vibrant flavors that bring the Mediterranean right to your table.

Total Time:

Prep Time: 15 minutes

Cook Time: 12-15 minutes

Total: 30 minutes

Ingredients:

1 French baguette or Italian bread loaf

4 cloves garlic, minced

3 tablespoons olive oil

2 large ripe tomatoes, diced

1/4 cup fresh basil leaves, chopped

1/2 teaspoon dried oregano (optional)

1/2 teaspoon salt

1/4 teaspoon black pepper

1 cup shredded mozzarella or Parmesan cheese (optional)

Balsamic glaze (optional, for drizzling)

Instructions:

Preheat Oven: Preheat your oven to 375°F (190°C).

Prepare Bread: Slice the baguette in half lengthwise and place it on a baking sheet, cut side up.

Make Garlic Oil: In a small bowl, combine the minced garlic and olive oil.

Toast Bread: Brush the garlic oil mixture generously over the cut sides of the bread. Toast in the oven for about 5-7 minutes, until the bread starts to get golden and crispy.

Prepare Tomato Basil Topping: In a bowl, mix the diced tomatoes, chopped basil, oregano, salt, and pepper.

Assemble: Remove the toasted bread from the oven. If using cheese, sprinkle it evenly over the bread now. Then spoon the tomato basil mixture over the bread.

See also  Mediterranean-Style Juicy Baked Caesar Chicken with Parmesan Sauce 

Bake: Return to the oven for another 5-8 minutes, until the cheese melts (if using) and the toppings are heated through.

Finish & Serve: Optionally drizzle with balsamic glaze for extra flavor. Slice and serve warm.

Tips:

Use Fresh Ingredients: Fresh, ripe tomatoes and basil really make a difference in flavor. Cherry tomatoes work great too!

Garlic Intensity: Adjust the amount of garlic to your liking—roasting the garlic before mixing with oil will mellow the flavor.

Crispier Bread: For extra crispy bread, toast the bread a bit longer before adding toppings or broil for 1-2 minutes at the end (watch carefully to avoid burning).

Drain Tomatoes: If your tomatoes are very juicy, drain them slightly to prevent soggy bread.

Serve Immediately: This bread is best served warm and fresh to keep the bread crispy and toppings vibrant.

Variations:

Cheese Options: Swap mozzarella or Parmesan with feta, goat cheese, or provolone for different flavor profiles.

Add Olives: Mix in chopped Kalamata or green olives with the tomato topping for extra Mediterranean flair.

Spicy Kick: Add a pinch of red pepper flakes or diced jalapeño to the tomato mixture for some heat.

Pesto Twist: Spread a thin layer of basil pesto on the bread before adding the garlic oil for richer basil flavor.

Vegan Version: Skip the cheese or use a plant-based cheese alternative to make it vegan-friendly.

Herb Mix: Experiment with other herbs like thyme, rosemary, or parsley alongside basil.

Q&A

Q: Can I use frozen bread for this recipe?
A: It’s best to use fresh bread for optimal texture and flavor, but you can thaw frozen bread and toast it lightly before adding toppings.

See also  Gourmet seafood cassolette

Q: How long can I store leftovers?
A: Store leftovers in an airtight container in the fridge for up to 2 days. Reheat in the oven to keep the bread crispy.

Q: Can I prepare the toppings ahead of time?
A: Yes! You can mix the tomato and basil topping a few hours in advance and refrigerate. Just add to the bread before the final bake.

Q: Is this recipe gluten-free?
A: Not as is, but you can use gluten-free baguette or bread as a substitute.

Nutrition (per serving, based on 8 servings, approximate)

Calories: 180-220 kcal

Carbohydrates: 25g

Protein: 5g

Fat: 7g

Saturated Fat: 1.5g

Fiber: 2g

Sodium: 350mg

(Values vary depending on bread type and if cheese is used)

Conclusion

This Mediterranean Tomato Basil Garlic Bread is a quick, flavorful dish that brings fresh Mediterranean tastes to your table. It’s perfect for sharing at gatherings or enjoying as a tasty snack any time. The combination of garlic, fresh tomatoes, and basil on crispy bread creates a simple yet satisfying treat. Feel free to customize with your favorite cheeses, herbs, or spices to make it your own!

Weight Watchers-Friendly Beef Nachos Supreme

Welcome to our exquisite culinary journey where we elevate traditional nachos into a guilt-free indulgence. Our Weight Watchers-friendly Beef Nachos Supreme recipe boasts a delectable blend of flavors, incorporating lean ground beef, wholesome black beans, reduced-fat cheese, and vibrant, fresh toppings. Perfect for those conscious of their health without compromising on taste, this dish is a delightful crowd-pleaser suitable for any occasion.

Ingredients:

  1. Lean Ground Beef (1 lb): Begin by selecting lean ground beef with at least 93% lean content, ensuring a protein-rich foundation for our nachos.
  2. Reduced-Sodium Taco Seasoning (1 packet): Infuse the beef with savory goodness by incorporating a packet of reduced-sodium taco seasoning, enhancing flavor without unnecessary sodium.
  3. Water (1/2 cup): To achieve the ideal consistency and depth of flavor, add water according to the taco seasoning packet instructions. Simmer until the mixture thickens, creating a savory base.
  4. Black Beans (1 can – 15 oz), drained and rinsed: Elevate the nutritional profile by incorporating fiber-rich black beans, providing a hearty texture and a wealth of health benefits.
  5. Reduced-Fat Shredded Mexican Cheese Blend (1 cup): Opt for a reduced-fat cheese blend to maintain a balance of richness without compromising on health-conscious choices.
  6. Salsa (1 cup – low-sugar or fresh): Select a salsa with minimal sugar content or opt for a fresh salsa to add a burst of flavor without excess calories.
  7. Non-Fat Greek Yogurt (1 cup – substitute for sour cream): Replace traditional sour cream with non-fat Greek yogurt for a creamy and protein-packed alternative, contributing to a lighter dish.
  8. Cherry Tomatoes (1 cup), diced: Introduce a burst of freshness with diced cherry tomatoes, enhancing both visual appeal and nutritional content.
  9. Green Onions (1/2 cup), sliced: Incorporate sliced green onions for a mild onion flavor, adding a crisp and aromatic touch to the nachos.
  10. Fresh Cilantro (1/4 cup), chopped: Elevate the overall profile with fresh cilantro, imparting a zesty and herbaceous note to the dish.
  11. Baked Tortilla Chips (1 bag): Opt for baked tortilla chips to reduce overall fat content while maintaining the essential crunch and flavor.

Instructions:

Cook the Ground Beef:

  1. In a skillet over medium heat, brown and cook the lean ground beef. Drain any excess fat.
  2. Add the taco seasoning and water to the beef, simmering until the mixture thickens.

Assemble the Nachos: 3. Preheat the oven to 375°F (190°C).

  1. Arrange baked tortilla chips in a single layer on a large baking sheet or oven-safe platter.
  2. Spread the seasoned ground beef over the chips.
  3. Evenly distribute black beans, followed by a sprinkle of reduced-fat shredded Mexican cheese.

Bake: 7. Place the nachos in the preheated oven for 8-10 minutes or until the cheese is melted and bubbly.

Add Toppings: 8. Drizzle salsa over the nachos for a burst of freshness.

  1. Dollop non-fat Greek yogurt over the top, providing a creamy contrast.
  2. Sprinkle diced tomatoes, sliced green onions, and chopped cilantro for a colorful and flavorful finish.

Serve: 11. Serve immediately while the nachos are warm and the cheese is gooey, delighting in the harmonious blend of textures and flavors.

Conclusion: Indulge in our gourmet Lean  Beef  Nachos Supreme, a testament to the perfect fusion of health-conscious choices and irresistible flavors. Elevate your nacho experience with this meticulously crafted recipe that promises satisfaction without compromise. Whether shared among friends or enjoyed as a solo treat, these nachos are a culinary masterpiece that celebrates the joy of mindful eating.

Hawaiian Chicken Sheet Pan

Hawaiian Chicken Sheet Pan Recipe

Overview:
This Hawaiian Chicken Sheet Pan recipe combines the delightful flavors of sweet pineapple, savory chicken, and fresh vegetables, all roasted to perfection on a single sheet pan. It’s not just delicious; it’s also a convenient, healthy option that fits well into a balanced meal plan, especially for those following Weight Watchers. With a focus on fresh ingredients and simple preparation, this recipe is ideal for busy weeknights.
Points Information:
For those following Weight Watchers, this recipe is approximately 6 points per serving. This is based on using skinless chicken breast, low-sodium soy sauce, and fresh produce, making it a nutritious choice that fits into your meal plan without compromising on flavor.
Ingredients:
For the Chicken:
1.5 pounds skinless, boneless chicken breasts
1/4 cup low-sodium soy sauce
1/4 cup honey or agave syrup
2 tablespoons rice vinegar
2 cloves garlic, minced
1 tablespoon fresh ginger, minced
1 teaspoon sesame oil
1/4 teaspoon black pepper
For the Vegetables:
2 cups fresh broccoli florets
1 red bell pepper, sliced
1 yellow bell pepper, sliced
1 cup sugar snap peas
1 cup pineapple chunks (fresh or canned in juice, drained)
1 tablespoon olive oil
Salt and pepper to taste
Garnish:
2 green onions, sliced
Sesame seeds (optional)
Preparation Steps:
Step 1: Marinating the Chicken
In a medium bowl, combine soy sauce, honey, rice vinegar, garlic, ginger, sesame oil, and black pepper. This marinade not only adds flavor but also helps to tenderize the chicken.
Place the chicken breasts in a resealable plastic bag or a shallow dish, and pour the marinade over the chicken. Seal the bag or cover the dish and refrigerate for at least 30 minutes, or up to 4 hours for deeper flavor.
Step 2: Preparing the Vegetables
While the chicken is marinating, prepare your vegetables. Rinse and cut the broccoli into florets, slice the bell peppers, and trim the sugar snap peas. If using fresh pineapple, cut it into bite-sized chunks.
In a large mixing bowl, toss the prepared vegetables and pineapple with olive oil, salt, and pepper to taste. This will enhance the flavors and ensure even cooking.
Step 3: Preheating the Oven
Preheat your oven to 425°F (220°C). A hot oven is key to achieving perfectly roasted chicken and vegetables.
Step 4: Arranging the Sheet Pan
Line a large baking sheet with parchment paper for easy cleanup.
Place the marinated chicken breasts on one side of the sheet pan. Arrange the vegetable and pineapple mixture on the other side. Make sure the ingredients are evenly spaced to promote even cooking.
Step 5: Roasting the Chicken and Vegetables
Roast in the preheated oven for 25-30 minutes, or until the chicken reaches an internal temperature of 165°F (75°C) and the vegetables are tender and slightly caramelized. Flip the chicken halfway through for even browning.
Step 6: Finishing Touches
Once cooked, remove the sheet pan from the oven. Allow the chicken to rest for 5 minutes before slicing. This helps retain moisture.
Slice the chicken and arrange it on a serving platter alongside the roasted vegetables and pineapple.

Nutrition Information:
Per Serving (Based on 4 Servings):

Calories: 320
Protein: 30g
Carbohydrates: 40g
Fiber: 4g
Sugars: 14g
Total Fat: 5g
Saturated Fat: 1g
Sodium: 600mg
Serving Suggestions:
This dish pairs beautifully with brown rice or quinoa for a complete meal. For added flavor, consider serving it with a side of teriyaki sauce or a sprinkle of fresh cilantro.

Tips for Success:
Meal Prep: Consider marinating the chicken a day in advance to save time on busy weekdays.
Vegetable Variations: Feel free to substitute or add other vegetables like zucchini, carrots, or red onion based on your preference and seasonal availability.
Storage: Leftovers can be stored in an airtight container in the refrigerator for up to 3 days. Reheat in the oven or microwave until warmed through.
Conclusion:
The Hawaiian Chicken Sheet Pan is not just a meal; it’s an experience filled with vibrant flavors and nutritious ingredients. Whether you’re looking for a quick weeknight dinner or a dish to impress guests, this recipe checks all the boxes. The ease of preparation, combined with the delightful combination of flavors, makes it a go-to option in any home kitchen. Plus, its adaptability ensures it can cater to various dietary needs, making it a fantastic addition to your recipe repertoire. Enjoy this tropical taste of the islands right from your kitchen!

This recipe is designed to be informative and easy to follow, ensuring that even novice cooks can recreate this delightful dish. The combination of marinated chicken and fresh vegetables makes it a wholesome choice for family meals or meal prep. Enjoy your culinary journey to Hawaii with every bite!

Keto Sausage Cream Cheese Pinwheels

These Keto Sausage Cream Cheese Pinwheels make a great low-carb breakfast, and they are also easy to make and delightful. These pinwheels are made with basic fathead dough consisting of a mixture of mozzarella, cream cheese, and almond flour; they are filled with flavorful sausage and creamy cheese and baked till they are golden. Whether you are following a keto diet or not, you can enjoy them because they have a creamy, cheesy flavor with a touch of heat in every bite. These pinwheels are not only delicious but also rich in protein and gluten-free, making them ideal for party platters, meal prep, or a quick breakfast. You can add herbs, vegetables, or spicy sausage for added flavor.


STATS:

  • Calories: 190 kcal
  • Cuisine: American
  • Preparation Time: Fifteen mins
  • Cook Time: 20 to 25 mints.
  • Total Time: Forty mints.
  • Serving Size: 1 pinwheel
  • Servings: 8 to 10 pinwheels
  • Diet: Keto, & Low Carb
  • Course: Breakfast

EQUIPMENT:

  • Parchment paper
  • Rolling pin
  • Skillet
  • Bowl
  • Spatula
  • Microwave-safe bowl
  • Knife

INGREDIENTS:

FOR THE FILLING:

  • ½ lb. breakfast sausage
  • 4 oz. cream cheese
  • ¼ tsp. garlic powder
  • ¼ tsp. onion powder

FOR THE DOUGH:

  • 1 ½ cups shredded mozzarella cheese
  • 2 tbsp. cream cheese
  • ¾ cup almond flour
  • 1 large egg
  • Pinch of salt

INGREDIENTS NOTES:

CHICKEN:

  • Use ground chicken, turkey, or pork sausage for breakfast. To limit carbohydrates, pick a sugar-free, keto-friendly choice. We can use either mild or spicy variations are excellent depending on the preference.

CREAM CHEESE:

  • We can use full-fat cream cheese is ideal for flavor & texture. We have to make sure it’s softened to make mixing with the sausage easier.

MOZZARELLA CHEESE:

  • We can use the low-moisture shredded mozzarella that melts the best for fathead dough. Freshly shredded produces smoother results, while pre-shredded is more convenient.

ALMOND FLOUR:

  • We can use fine almond flour rather than almond meal for smoother dough. We cannot use the coconut flour in this recipe because it absorb too much moisture.

EGGS:

  • Eggs serve as the dough’s binder, and we use the large eggs.

SEASONING:

  • These give the filling taste. You can also add herbs like red pepper flakes, oregano, or parsley for added flavor.


INSTRUCTION:

  1. Put the sheet on the tray.
  2. We can cook the sausage over medium heat till it gets brown in a skillet.
  3. You can add onion seasoning, cream cheese, and garlic seasoning in the ground sausage.
  4. We can stir the ingredients till they get mixed & creamy.
  5. Then we can put the mozzarella & cream cheese in a bowl.
  6. Melt them for 1 to 2 mints by mixing them in between 30 seconds intervals.
  7. Add the egg, salt, and almond flour and stir to form dough.
  8. We can use two pieces of parchment paper by roll out the dough into a rectangle that is about ¼ inch thick.
  9. Then we can evenly distribute the sausage filling over the dough.
  10. We can gently roll-out the dough into a rectangle shape with help of parchment.
  11. Grab a knife & cut the dough into eight to ten pinwheels.
  12. Then we can transfer to a sheet and bake at 375°F for 20 to 25 minutes or until golden brown.

TIPS:

  • We can place the dough in the fridge for some time to prevent it from getting sticky.
  • We can add a pinch of red pepper flakes or Italian spice, or add taste.

STORAGE INFORMATION:

FRIDGE:

  • We can put these pinwheels in a close container and store these pinwheels for four days.

FREEZER:

  • We can put the pinwheels in one layer on the tray and freeze them till they get solid and then put these in the seal bag and store these pinwheels for 2 months.

FAQs:

Are these pinwheels low in carbs?

  • Yes these pinwheels are low in carbs and it is only comprises of 3g net carbs, 1g fiber, and 9g protein is present in the individual pinwheel.

How to make these pinwheels dairy-free?

  • We can use dairy-free cheese to make these pinwheels dairy-free, but it might change the taste or texture.

Can I use different kind of meat to prepare these pinwheels?

  • Yes, we can use any variety of meat, like turkey, chorizo, or chicken, to make these pinwheels.

What to do if the dough of the pinwheels gets sticky?

  • We can chill the dough for 10 minutes or use more almond flour while rolling out the dough.


NUTRITIONAL INFORMATION:

Calories: 190 Kcal
Potassium: 120mg
Net Carbs: 3g
Total Carbs: 4g
Fiber: 1g
Protein: 9g
Fat: 15g
Sodium: 310mg
Calcium: 120mg
Iron: 0.9mg
Vitamin A: 180IU
Serving Size: 1 pinwheel

1 cup of oatmeal and zucchini Better than pizza

My family is excited! 1 cup of oatmeal and zucchini! Better than pizza. We eat every day 

My Family’s Excitement: A Twist on Oatmeal and Zucchini – Better than Pizza!

When it comes to family meals, finding a dish that everyone can enjoy is often a challenge. But what if we told you there’s a recipe that’s not only delicious but also nutritious? Enter our exciting twist on oatmeal and zucchini, a dish that has our family jumping for joy. In this article, we’ll walk you through the simple steps of creating this mouthwatering treat, and why it’s a better choice than your regular pizza night. Get ready to tantalize your taste buds and make your family excited about mealtime!

The Ingredients You’ll Need 

Before we dive into the preparation process, let’s take a look at the ingredients you’ll need to whip up this delectable dish:

1 Zucchini: A versatile and low-calorie vegetable that forms the base of our recipe.

Salt: To enhance the flavor and help drain excess moisture from the zucchini.

3-4 Tablespoons of Oatmeal: A healthy whole grain that adds texture and fiber.

100g Grated Cheese: Provides that irresistible cheesy goodness.

2 Eggs: A binding agent that holds everything together.

Pepper to Taste: Adds a hint of spice and flavor.

Chives: Fresh herbs for a burst of color and flavor.

Preparing the Dish:

Now that we have our ingredients ready, let’s move on to the step-by-step process of making this mouthwatering oatmeal and zucchini dish:

Step 1: Preparing the Zucchini

Grate the zucchini and place it in a strainer.

Sprinkle some salt over the grated zucchini and let it sit for about 10 minutes. This will help drain excess juice from the zucchini.

After 10 minutes, squeeze the grated zucchini thoroughly to remove as much remaining juice as possible.

Step 2: Mixing the Ingredients

In a mixing bowl, combine the drained zucchini, oatmeal, grated cheese, eggs, pepper, and chopped chives.

Mix all the ingredients thoroughly until well combined. You’ll notice the mixture coming together to form a delicious, cheesy concoction.

Step 3: Baking to Perfection

Preheat your oven to 180°C (360°F).

Pour the zucchini mixture into a baking dish, spreading it evenly.

Place the dish in the preheated oven and bake for 20 minutes until the top is golden brown and the inside is cooked to perfection.

After 20 minutes, take the dish out of the oven and uncover it. Return it to the oven for another 10 minutes to ensure that the top is nicely golden brown and crispy.