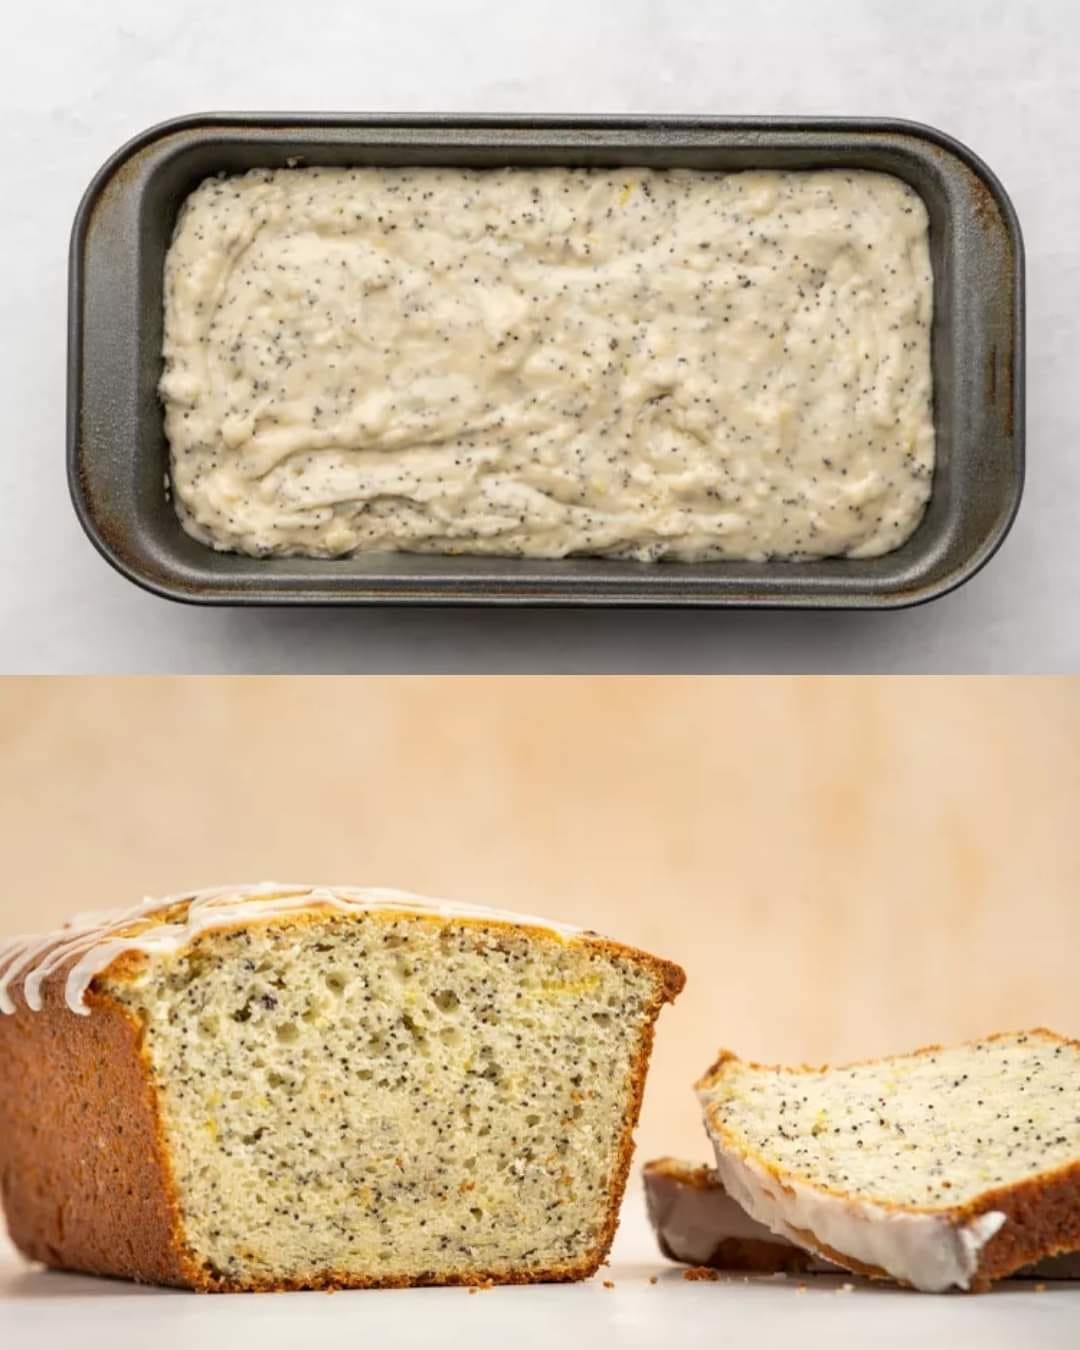
Lemon Poppy Seed Bread

Lemon Poppy Seed Bread

Servings: 8–10 slices | Prep Time: 15 minutes | Cook Time: 50–60 minutes


Ingredients

For the Bread

  • 2 cups all-purpose flour

  • 2 tablespoons poppy seeds

  • 1 teaspoon baking soda

  • ½ teaspoon baking powder

  • ½ teaspoon salt

  • 1 cup granulated sugar

  • ½ cup (1 stick) unsalted butter, softened

  • 2 large eggs

  • ⅓ cup fresh lemon juice (about 2 large lemons)

  • 1 tablespoon lemon zest

  • ¾ cup Greek yogurt or sour cream (for moisture)

  • 1 teaspoon vanilla extract

For the Lemon Glaze

  • 1 cup powdered sugar

  • 2 tablespoons fresh lemon juice


Instructions

1. Prepare the Oven and Pan

  1. Preheat your oven to 350°F (175°C).

  2. Grease a standard 9×5 inch loaf pan thoroughly, or line it with parchment paper for easy removal.


2. Combine the Dry Ingredients

  1. In a medium bowl, whisk together:

    • 2 cups flour

    • 2 tablespoons poppy seeds

    • 1 teaspoon baking soda

    • ½ teaspoon baking powder

    • ½ teaspoon salt

  2. Set aside.


3. Cream Butter and Sugar

  1. In a large mixing bowl, beat the softened butter and granulated sugar together until light, creamy, and fluffy (about 2–3 minutes).


4. Add Wet Ingredients

  1. Add the eggs one at a time, beating well after each.

  2. Stir in:

    • ⅓ cup fresh lemon juice

    • 1 tablespoon lemon zest

    • 1 teaspoon vanilla extract

    • ¾ cup Greek yogurt or sour cream

  3. Mix until smooth and fully combined.

Tip: For extra lemon flavor, rub the lemon zest into the sugar before creaming it with butter—this releases the natural oils.


5. Combine Wet and Dry Ingredients

  1. Gradually fold the dry ingredient mixture into the wet ingredients using a spatula.

  2. Mix just until combined—avoid over-mixing to keep the bread light and tender.

  3. The batter should be thick with a slightly textured consistency.


6. Bake the Bread

  1. Pour the batter into the prepared loaf pan and smooth the top with a spatula.

  2. Bake in the preheated oven for 50–60 minutes, or until:

    • The top is golden brown

    • A toothpick inserted in the center comes out clean


7. Cool and Glaze

  1. Allow the bread to cool in the pan for 10 minutes, then transfer it to a wire rack to cool completely.

  2. Prepare the glaze: whisk together 1 cup powdered sugar and 2 tablespoons lemon juice until smooth.

  3. Drizzle the glaze generously over the cooled loaf.


Baker’s Tips

  • Even Baking: If your oven tends to brown unevenly, tent the bread with foil halfway through baking.

  • Storage: Keep the bread in an airtight container at room temperature for up to 3 days, or refrigerate for up to a week to maintain moisture.

  • Serving Suggestion: Enjoy as a breakfast treat, snack, or dessert. Pairs wonderfully with tea or coffee.


Crispy Air Fryer Roast Potatoes

Crispy Air Fryer Roast Potatoes

Servings: 4 | Prep Time: 10 minutes | Cook Time: 25 minutes


Ingredients

  • 1.5 lbs (≈700g) potatoes – Use a starchy variety like Russet or Yukon Gold for fluffy interiors.

  • 2–3 tbsp vegetable oil or olive oil – Helps achieve a golden, crispy exterior.

  • 1 tsp salt – Enhances flavor and helps draw out moisture for crispiness.

  • ½ tsp garlic powder – Adds a gentle, savory flavor.

  • ½ tsp dried rosemary or thyme – Aromatic herbs that complement roasted potatoes.

  • ¼ tsp black pepper – Adds a mild, warming spice.


Instructions

1. Prepare the Potatoes

  1. Peel the potatoes.

  2. Cut them into uniform 1–2 inch chunks. Uniform size ensures even cooking.

2. Parboil the Potatoes (Optional but Recommended)

  1. Place the potato chunks in a pot of salted water.

  2. Bring the water to a gentle boil.

  3. Cook for 5–8 minutes, until the edges start to soften but the centers are still firm.

  4. Drain the water thoroughly. Let the potatoes sit for 1–2 minutes to allow excess moisture to evaporate.

Tip: This step ensures the inside stays fluffy while the outside crisps beautifully.

3. Roughen the Edges

  1. Return the drained potatoes to the pot.

  2. Cover with the lid and gently shake the pot for 10–15 seconds.

  3. This creates small rough edges on the potatoes, which will become extra-crispy when cooked.

4. Season the Potatoes

  1. Transfer the potatoes to a large mixing bowl.

  2. Add the oil, salt, garlic powder, herbs, and black pepper.

  3. Toss gently but thoroughly to coat every piece evenly.

5. Preheat the Air Fryer

  1. Set the air fryer to 400°F (200°C).

  2. Allow it to preheat for 3–5 minutes.

6. Air Fry the Potatoes

  1. Place the seasoned potatoes in the air fryer basket in a single layer. Avoid overcrowding for maximum crispiness.

  2. Air fry for 20–25 minutes.

  3. Shake the basket every 10 minutes to ensure even browning.

7. Check for Doneness

  • The potatoes should be deep golden brown.

  • Tap a piece lightly; it should sound “hollow” when done.

8. Serve

  • Serve immediately while hot for the best texture.

  • These potatoes pair well with roasted meats, salads, or as a snack with a dipping sauce.


Pro Tips for Perfect Crispiness

  1. Ensure dryness: After parboiling, remove as much surface moisture as possible before tossing with oil.

  2. Cook in batches: Avoid overcrowding the air fryer basket. Air circulation is key to crisp edges.

  3. Adjust seasoning: Feel free to add paprika or onion powder for extra flavor.

Crispy Stuffed Potato Omelette

Crispy Stuffed Potato Omelette

Ingredients
5 medium potatoes, peeled and grated
2 large eggs
30 g (2 tablespoons) all-purpose flour
3 slices cooked ham
3 slices cheese (mozzarella, Swiss, or provolone)
Salt and black pepper, to taste
2 tablespoons olive oil or butter, for cooking
Optional: freshly chopped chives or parsley, for garnish

Instructions

Prepare the Potatoes
Grate the peeled potatoes using the coarse side of a box grater. Place the grated potatoes in a bowl of cold water and gently swirl them to release excess starch. Drain well. Transfer the potatoes to a clean kitchen towel or cheesecloth and squeeze firmly to remove as much moisture as possible. Well-dried potatoes help create a crisp outer texture.

Make the Potato Mixture
In a large bowl, whisk the eggs with salt, black pepper, and the flour until smooth. Add the grated, dried potatoes and mix thoroughly so every strand is evenly coated.

Cook the First Layer
Heat 1 tablespoon of olive oil or butter in a wide non-stick skillet over medium to medium-low heat. Add half of the potato mixture to the pan. Press it down gently with a spatula to form an even, round layer.

Add the Filling
When the bottom layer begins to set and hold together, arrange the ham slices over the center. Place the cheese slices on top of the ham, leaving a small border around the edges.

Seal the Omelette
Carefully spread the remaining potato mixture over the filling. Use the spatula to smooth the surface and gently seal the edges so the filling stays enclosed.

Turn and Finish Cooking
Cook slowly for about 8–10 minutes until the underside develops a rich golden color and feels firm. Place a large plate over the skillet, turn the omelette out onto the plate, then slide it back into the skillet. Add the remaining tablespoon of oil or butter if needed. Cook the second side for another 8–10 minutes until evenly golden and the cheese inside is fully melted.

Serve
Transfer the omelette to a cutting board and let it rest for about 2 minutes. Slice into wedges and serve warm. Garnish with fresh chives or parsley if desired.

Helpful Tips

Heat Control
Keep the heat moderate and steady. Gentle cooking allows the potatoes to become tender inside while developing a crisp exterior.

Variations
You can replace the ham with cooked mushrooms, sautéed onions, or fresh spinach for a meat-free option. Adding herbs such as thyme or oregano to the potato mixture also adds extra flavor.

Garlic and Herb Three-Cheese Puff Pastry Flatbread

Garlic and Herb Three-Cheese Puff Pastry Flatbread

This crispy, golden flatbread is made with flaky puff pastry and a rich blend of three cheeses, finished with fragrant garlic and fresh herbs. It’s quick to prepare and perfect as a snack, appetizer, or light meal.


Ingredients

• 1 sheet puff pastry, fully thawed
• ½ cup cream cheese, softened
• ¼ cup shredded mozzarella or cheddar
• 1 tablespoon grated Parmesan cheese
• 1 garlic clove, finely minced (or ½ teaspoon garlic powder)
• 1 tablespoon butter, melted
• 1 teaspoon fresh parsley, finely chopped
• A small pinch of salt
• A small pinch of black pepper

Optional
• 1 egg, beaten (for brushing the edges for extra shine)


Instructions

1. Oven and Tray Preparation
Preheat your oven to 400°F (200°C). Line a large baking tray with parchment paper so the pastry lifts easily after baking.

2. Prepare the Puff Pastry
Place the puff pastry onto the lined tray. Gently score a 1-inch border around the edges without cutting all the way through.
Lightly prick the center area with a fork so it stays flat while baking.

3. Make the Cream Cheese Layer
In a small bowl, mix the softened cream cheese with garlic, salt, and black pepper until smooth.
Spread evenly over the center of the pastry, staying inside the border.

4. Add the Cheese Topping
Sprinkle the shredded mozzarella evenly over the cream cheese. Finish with Parmesan for extra flavor.

5. Optional Egg Wash
Brush the outer edges with beaten egg to achieve a deeper golden color.

6. Bake
Bake for 15–20 minutes, until the edges are puffed and golden and the cheese is melted.

7. Garlic Herb Finish
Mix melted butter with chopped parsley.
Brush over the warm flatbread immediately after baking for added aroma and shine.

8. Rest and Serve
Let rest for 5 minutes. Slice into squares or triangles and serve warm.


Serving Ideas

• Pair with a fresh salad
• Add tomato slices or spinach before baking
• Serve as a snack, appetizer, or light meal


Storage Tip

Store leftovers in an airtight container in the refrigerator for up to 2 days. Reheat in the oven or air fryer for best texture.

Cloves: Nutritional Value and Gentle Ways to Use Them

Cloves: Nutritional Value and Gentle Ways to Use Them

Cloves are dried flower buds from the Syzygium aromaticum tree. They are widely used in cooking and traditional food preparations because of their strong aroma and naturally occurring plant compounds, including eugenol.

Nutritional Highlights

  • Naturally occurring antioxidants: Cloves contain plant compounds that help protect foods and the body from everyday environmental stress.

  • Manganese content: A small amount of ground cloves contributes to daily manganese needs, a mineral that supports normal bone structure and overall metabolism.

  • Digestive tradition: Cloves have long been included in meals and drinks to support comfortable digestion and reduce heaviness after eating.


Gentle Daily Use (Up to 2 Cloves)

Cloves have a strong flavor and should be used in small amounts. These methods allow you to enjoy them comfortably.

1. Clove-Infused Warm Drink

This is one of the mildest and most pleasant ways to use cloves.

Ingredients

  • 2 whole cloves

  • 1 cup hot water

  • Optional: a slice of lemon or a teaspoon of honey

Method

  • Place the cloves in hot water

  • Let steep for 5–10 minutes

  • Remove the cloves before drinking


2. Small Amounts in Breakfast Foods

Ground cloves can be blended easily into everyday meals.

How to use

  • Add a very small pinch (about the amount from 2 cloves) to oatmeal, yogurt, or smoothies

  • Pairs well with cinnamon, ginger, apples, or bananas


3. Flavoring Savory Dishes

Whole cloves can gently enhance cooked foods.

How to use

  • Add 1–2 whole cloves to rice water, soups, or stews while cooking

  • Remove the cloves before serving to keep the flavor balanced


Important Usage Notes

  • Use whole cloves or ground spice only: Concentrated clove extracts are much stronger than culinary cloves and are not intended for everyday food use.

  • Moderation matters: Small amounts are sufficient due to their strong natural oils.

  • Mouth comfort: Chewing raw cloves may feel intense for some people, so using them infused or cooked is usually more comfortable.


A Helpful Reminder

Spices like cloves are best enjoyed as part of a varied, balanced diet. They are commonly used to enhance flavor and support everyday wellness routines, but they are not substitutes for professional care when dealing with serious health concerns.

Mediterranean Swirled Garlic & Herb Cheese Bread

Mediterranean Swirled Garlic & Herb Cheese Bread

This soft pull-apart cheese bread is layered with fragrant garlic, herbs, and melted cheese. Each slice reveals beautiful swirls and delivers a comforting Mediterranean-inspired flavor. It is perfect for sharing with meals, soups, or enjoyed warm on its own.


Ingredients

For the Dough

  • 3 cups all-purpose flour

  • 1 packet (2¼ teaspoons) instant yeast

  • 1 tablespoon sugar

  • 1 teaspoon salt

  • 1 cup warm water (about 110°F / warm to the touch)

  • 2 tablespoons olive oil

For the Filling

  • 4 tablespoons unsalted butter, softened

  • 3 cloves garlic, finely minced

  • 1½ cups shredded cheese (mozzarella and cheddar combination works well)

  • 2 tablespoons fresh parsley, finely chopped

  • 1 teaspoon dried oregano or Italian seasoning

  • ¼ teaspoon red pepper flakes (optional)


Instructions

1. Prepare the Dough
In a large bowl, combine the flour, yeast, sugar, and salt. Add the warm water and olive oil. Mix until a soft dough forms.

2. Knead and Rest
Transfer the dough to a lightly floured surface and work it gently for about 5–7 minutes until smooth and elastic. Place it into a lightly greased bowl, cover, and allow it to rest in a warm area for 1 hour, or until it increases in size.

3. Make the Garlic Herb Butter
In a small bowl, mix together the softened butter, garlic, parsley, and dried herbs until evenly blended.

4. Shape the Dough
Roll the rested dough into a large rectangle, about 12 x 18 inches. Spread the garlic herb butter evenly over the surface, then sprinkle the shredded cheese across the top.

5. Create the Layers
Cut the dough into squares about 3–4 inches wide. Stack several squares together, keeping the layers aligned.

6. Arrange in the Pan
Lightly grease a loaf pan. Place the stacked dough pieces upright inside the pan, arranging them side by side so the layers are visible from the top. Cover and allow to rest for 20–30 minutes.

7. Bake
Preheat the oven to 350°F (175°C). Bake for 30–35 minutes, until the top is golden and the cheese is fully melted.

Tip: If the top colors too quickly, loosely cover with foil during the final minutes.

8. Serve
Let the bread rest in the pan for 10 minutes, then remove and serve warm.


Flavor Ideas

  • Add finely chopped sun-dried tomatoes for extra richness

  • Mix in sliced olives for a Mediterranean touch

  • Sprinkle a little extra parsley on top before serving