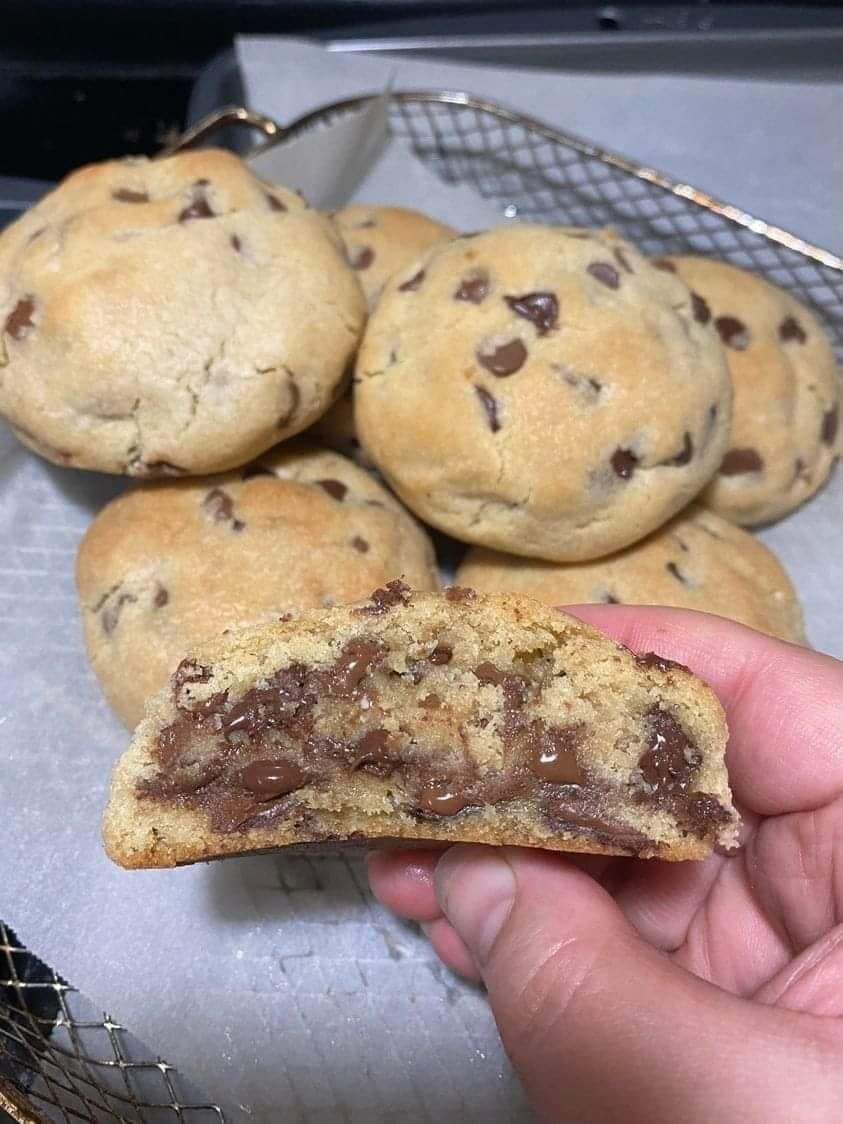
Soft & Thick Chocolate Chip Cookies

Soft & Thick Chocolate Chip Cookies

These cookies are designed to bake up thick with soft centers and lightly crisp edges. The method of dissolving baking soda in warm water helps control spread and improves texture, while the full amount of brown sugar supports moisture and structure.

Prep Time: 15 minutes
Bake Time: 10–12 minutes
Yield: About 24 cookies
Oven Temperature: 350°F (175°C)


Ingredients

  • 1 cup (226 g) unsalted butter, softened

  • 1 cup granulated sugar

  • 1 cup packed brown sugar

  • 2 large eggs, room temperature

  • 2 teaspoons vanilla extract

  • 1 teaspoon baking soda

  • 2 teaspoons hot water

  • ½ teaspoon salt

  • 3 cups all-purpose flour, spooned and leveled

  • 2 cups semi-sweet chocolate chips

  • 1 cup chopped walnuts (optional)


Step-by-Step Instructions

1. Prepare the Oven and Pans

  • Preheat the oven to 350°F (175°C).

  • Line baking sheets with parchment paper or silicone baking mats.

  • Set aside.


2. Cream Butter and Sugars

  • In a large mixing bowl, add the softened butter, granulated sugar, and brown sugar.

  • Beat with a hand mixer or stand mixer on medium speed until the mixture is light, smooth, and evenly blended (about 2–3 minutes).


3. Add Eggs and Vanilla

  • Add the eggs one at a time, mixing well after each addition.

  • Stir in the vanilla extract until fully combined.


4. Prepare the Baking Soda Mixture

  • In a small bowl, dissolve the baking soda completely in the hot water.

  • Add this mixture to the dough along with the salt.

  • Mix gently until incorporated.


5. Add the Flour

  • Gradually add the flour to the bowl.

  • Mix on low speed or by hand just until no dry flour remains.

  • Avoid overmixing to maintain a soft texture.


6. Fold in Add-Ins

  • Gently fold in the chocolate chips and walnuts (if using) using a spatula.


7. Portion the Dough

  • Scoop dough in portions of about 2 tablespoons.

  • Place cookies about 2½ inches apart on the prepared baking sheets.


8. Bake

  • Bake for 10–12 minutes, or until:

    • Edges are lightly golden

    • Centers appear soft but set


9. Cool

  • Allow cookies to rest on the baking sheet for 5 minutes.

  • Transfer to a wire rack to cool completely.


Storage Tips

  • Store in an airtight container at room temperature for up to 4 days.

  • Dough may be refrigerated for up to 48 hours before baking.
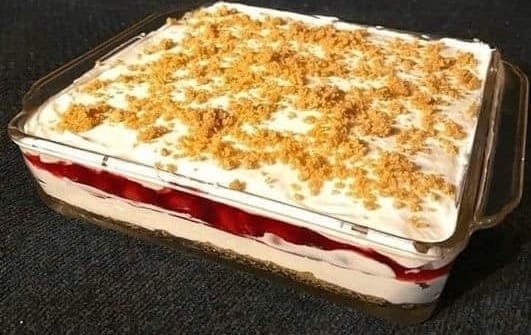
Cherry Cheesecake Lush (No-Bake Layered Dessert)

Cherry Cheesecake Lush (No-Bake Layered Dessert)

A classic no-bake layered dessert made with a buttery graham cracker base, a smooth cream cheese filling, a fruit layer, and a light whipped topping. This dessert is easy to assemble, sets beautifully in the refrigerator, and is ideal for gatherings or make-ahead occasions.

Preparation Time: 20 minutes
Chilling Time: Minimum 4 hours (overnight recommended)
Servings: 12–15 portions
Pan Size: 9 × 13 inch (23 × 33 cm)


Ingredients

For the Crust

  • 1½ cups graham cracker crumbs (about 10–12 full sheets, finely crushed)

  • ⅓ cup granulated sugar

  • 6 tablespoons unsalted butter, melted and slightly cooled

For the Cream Cheese Layer

  • 8 oz (225 g) cream cheese, fully softened to room temperature

  • 1 cup powdered sugar, sifted

  • 1 cup whipped topping or freshly whipped cream (stiff peaks)

For the Fruit Layer

  • 21 oz (about 600 g) cherry pie filling (1 standard can)

For the Top Layer

  • 2 cups whipped topping or lightly sweetened whipped cream

Optional Garnish

  • Extra graham cracker crumbs

  • Finely chopped nuts (such as pecans or walnuts)


Step-by-Step Instructions

1. Prepare the Crust

  1. Place the graham cracker crumbs into a medium mixing bowl.

  2. Add the granulated sugar and stir until evenly mixed.

  3. Pour in the melted butter and mix until all crumbs are evenly coated and the mixture holds together when pressed.

  4. Transfer the mixture to a 9×13 inch glass or ceramic baking dish.

  5. Press firmly and evenly into the bottom of the dish using the back of a spoon or the bottom of a measuring cup.

  6. Place the dish in the freezer for 10 minutes to help the crust firm while preparing the filling.


2. Make the Cream Cheese Layer

  1. In a large bowl, add the softened cream cheese.

  2. Beat using a hand mixer or stand mixer on medium speed until completely smooth and free of lumps.

  3. Gradually add the powdered sugar and continue mixing until fully combined and creamy.

  4. Gently fold in 1 cup of whipped topping (or whipped cream) using a spatula.

    • Use slow, gentle motions to keep the mixture light and smooth.


3. Assemble the Layers

  1. Remove the crust from the freezer.

  2. Spoon the cream cheese mixture evenly over the crust.

  3. Spread carefully to the edges using an offset spatula or the back of a spoon.

  4. Add the cherry filling on top of the cream layer.

  5. Spread gently so the fruit is evenly distributed without pressing down.

  6. Add the remaining 2 cups of whipped topping over the cherry layer.

  7. Smooth the surface or create light swirls for a neat finish.


4. Chill

  1. Cover the dish tightly with plastic wrap or a lid.

  2. Refrigerate for at least 4 hours.

    • Overnight chilling is recommended for the cleanest slices and best texture.


5. Garnish and Serve

  1. Just before serving, sprinkle with extra graham cracker crumbs or chopped nuts if desired.

  2. Slice into squares using a sharp knife.

  3. For neat layers, wipe the knife clean between cuts.


Helpful Tips

  • Room-Temperature Cream Cheese: This ensures a smooth filling with no lumps.

  • Homemade Whipped Cream Option:
    Beat 1½ cups cold heavy cream with 3 tablespoons powdered sugar until stiff peaks form.

  • Even Layers: Chill briefly between layers if your kitchen is warm.

  • Serving Temperature: Serve well-chilled for best structure.

Creamy Banana & Avocado Smoothie

Creamy Banana & Avocado Smoothie

Prep time: 5 minutes | Servings: 1 large glass


Ingredients

  • 1 Ripe Banana: Preferably frozen for a thicker, colder texture.

  • ½ Ripe Avocado: Provides the creamy base and healthy fats.

  • 1 cup Milk of choice: Almond milk, oat milk, or dairy milk all work great.

  • 10 Whole Almonds: Use a handful in the blender, plus a few sliced for the topping.

  • 1 tsp Honey or Maple Syrup: (Optional) If you prefer extra sweetness.

  • ¼ tsp Vanilla Extract: To enhance the flavor.

  • Ice Cubes: A small handful if your fruit isn’t frozen.


Instructions

  1. Prep the Fruit: Peel the banana and scoop the flesh out of the avocado half.

  2. Load the Blender: Place the banana, avocado, almonds, and milk into your blender.

  3. Add Flavor: Add the vanilla extract and your choice of sweetener if you are using one.

  4. Blend: Start on a low speed and gradually increase to high. Blend for about 45–60 seconds until the mixture is completely smooth and no almond bits remain.

  5. Garnish: Pour into a tall glass. Top with thinly sliced or crushed almonds, just like in the photo.


Why this is a great choice:

  • Satiety: The healthy fats from the avocado and protein from the almonds keep you full for longer.

  • Potassium: Bananas are excellent for heart health and muscle recovery.

  • Energy: It’s a perfect breakfast or post-workout snack.

Pro-Tip: If you want to boost the protein even further, you can add a scoop of vanilla protein powder or a tablespoon of Greek yogurt.

Cheesy Chicken & Avocado Wraps

Cheesy Chicken & Avocado Wraps

Prep time: 10 mins | Cook time: 10 mins | Servings: 4 wraps

Ingredients

  • Chicken: 2 cups shredded cooked chicken (rotisserie chicken works great).

  • Avocado: 2 large avocados, sliced or cubed.

  • Cheese: 1 cup shredded cheddar or a Mexican blend.

  • Tortillas: 4 large flour tortillas.

  • Herbs: 2 tablespoons fresh cilantro, chopped.

  • Creamy Base: 2 tablespoons Greek yogurt or sour cream (optional, for extra creaminess).

  • Cooking Oil: 1 teaspoon of butter or olive oil for browning the wraps.

Instructions

  1. Prepare the Filling: In a medium bowl, gently toss the shredded chicken with the chopped cilantro and the Greek yogurt/sour cream (if using). Season with a pinch of salt and pepper.

  2. Assemble: Lay the tortillas flat. In the center of each, layer the ingredients in this order:

    • A sprinkle of cheese.

    • A generous portion of the chicken mixture.

    • 3-4 slices of fresh avocado.

    • Another sprinkle of cheese (this helps “glue” the wrap together).

  3. Fold: Fold the sides of the tortilla inward, then roll it up tightly from the bottom to create a burrito shape.

  4. Toast: Heat a skillet over medium heat with a little butter or oil. Place the wraps seam-side down first. Grill for 2–3 minutes per side until the tortilla is golden brown and the cheese inside has melted.

  5. Serve: Slice them in half diagonally to show off that beautiful green and gold filling, just like in your photo!


Tips for Success

  • Add Heat: If you like spice, add a few slices of jalapeño or a dash of hot sauce inside before rolling.

  • Prevent Browning: If you aren’t eating them immediately, squeeze a little lime juice over the avocado slices to keep them bright green.

  • Extra Crunch: You can add some finely diced red onion or bell peppers for added texture.

Creamy Blueberry Cheesecake Bars


Creamy Blueberry Cheesecake Bars

The Crust

  • 2 cups Graham cracker crumbs

  • 1/2 cup Unsalted butter, melted

  • 1/4 cup Granulated sugar

The Cheesecake Filling

  • 24 oz Cream cheese (3 blocks), softened to room temperature

  • 1 cup Granulated sugar

  • 3 large Eggs, room temperature

  • 1 cup Sour cream

  • 1 tbsp Vanilla extract

  • 1 tbsp Lemon juice (optional, for brightness)

The Blueberry Topping

  • 3 cups Fresh blueberries (keep some aside to add fresh at the end)

  • 1/2 cup Sugar

  • 1 tbsp Cornstarch mixed with 1 tbsp water (slurry)

  • 1 tsp Lemon zest


Instructions

1. Prepare the Crust

  1. Preheat your oven to 325°F (160°C).

  2. Mix graham cracker crumbs, sugar, and melted butter until it feels like wet sand.

  3. Press firmly into the bottom of a 9×13 inch baking dish. Bake for 10 minutes, then let it cool while you make the filling.

2. Make the Filling

  1. In a large bowl, beat the softened cream cheese and sugar until smooth and fluffy.

  2. Add sour cream, vanilla, and lemon juice; mix until combined.

  3. Add eggs one at a time, mixing on low speed just until incorporated. Do not overmix, as this causes cracks.

  4. Pour the mixture over the cooled crust.

3. Bake

  1. Bake for 45–55 minutes. The edges should be set, but the center should still have a slight “jiggle” when you move the pan.

  2. Turn off the oven, crack the door open, and let it cool inside for 30 minutes (this prevents cracking).

  3. Remove and cool completely at room temperature, then refrigerate for at least 4 hours (overnight is best).

4. Add the Blueberry Topping

  1. In a small saucepan, combine 2 cups of blueberries, sugar, and lemon zest over medium heat.

  2. Once the berries begin to burst and release juice, stir in the cornstarch slurry.

  3. Simmer for 1–2 minutes until thickened.

  4. Remove from heat and fold in the remaining 1 cup of fresh berries for texture.

  5. Once the sauce is cool, spread it over the chilled cheesecake before slicing.


Pro Tips for Success

  • Room Temperature is Key: Make sure your cream cheese and eggs are truly at room temperature to avoid a lumpy batter.

  • Easy Slicing: For clean cuts like the one in your photo, dip a sharp knife in hot water and wipe it clean between every single slice.

Baked Chicken Zucchini with Bacon

Baked Chicken Zucchini with Bacon is a low carb dinner packed with protein and veggies! Chicken breasts are smothered with Mozzarella and Parmesan cheeses. Everything is baked in a casserole dish. This easy and quick.
Ingredients:
• 4 chicken breasts thinly sliced
• 0.5 oz dry Ranch seasoning (12 packet)
• 1 zucchini thinly sliced
• 6 strips bacon cooked, drained, chopped
• 1/2 cup Mozzarella cheese shredded
• 1/2 cup Parmesan cheese shredded
Instructions:
1. Heat oven to 375 F.
2. Add 4 chicken breasts to casserole dish.
3. Sprinkle the chicken with dry Ranch seasoning mix.
4. Top with sliced zucchini and chopped cooked bacon.
5. Top with shredded Parmesan and Mozzarella cheeses.
6. Bake uncovered for about 20 minutes.
7. Broil for the last 2-3 minutes (optional).
8. Remove from the oven.
9. Allow the chicken rest in the casserole dish. It will continue cooking as it rests for 5-10