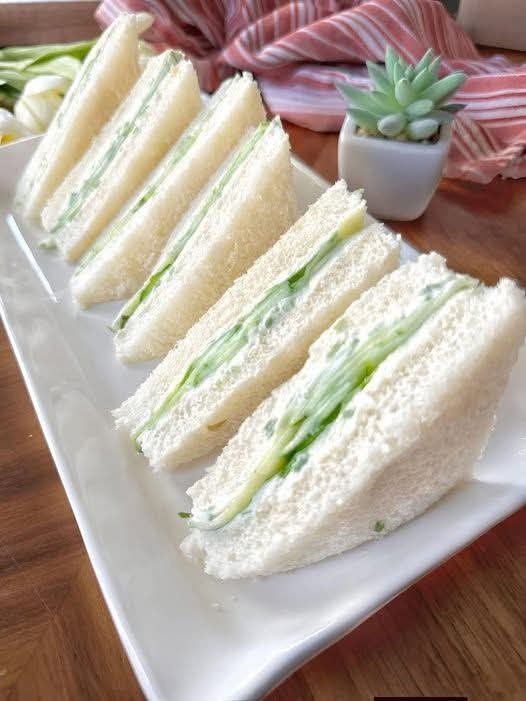
Classic Cucumber Tea Sandwiches

Classic Cucumber Tea Sandwiches

Prep time: 15 minutes


Yields: 12–16 finger sandwiches


Ingredients

Bread: 8 slices of soft white sandwich bread (shokupan or “pullman” loaf works best).


Cucumbers: 1 large English cucumber (these have thinner skin and fewer seeds).


The Spread:


4 oz (1/2 block) Cream cheese, softened to room temperature.


2 tbsp Mayonnaise.


1 tsp Fresh dill or chives, finely chopped.


A squeeze of fresh lemon juice.


A pinch of salt and cracked black pepper.


Instructions

Prep the Cucumbers: Peel the cucumber (or leave strips of skin for color). Use a mandoline or a sharp knife to slice them into paper-thin rounds. Place them on a paper towel and sprinkle with a tiny bit of salt to draw out moisture; pat them dry after 5 minutes so your bread doesn’t get soggy.


Mix the Spread: In a small bowl, whip the softened cream cheese, mayonnaise, herbs, and lemon juice until smooth. Season with salt and pepper to taste.


Assemble: Spread a generous, even layer of the cream cheese mixture onto one side of every bread slice. This acts as a “sealant” to keep the bread fluffy. Layer the cucumber slices slightly overlapping on half of the bread slices.


Close and Trim: Top with the remaining bread slices. Using a very sharp serrated knife, cut the crusts off first to create a perfect square.


The Signature Cut: Cut each square diagonally twice to create the small triangles shown in your image.


Pro-Tips for Success

Room Temp: Make sure your cream cheese is truly soft, or it will tear the delicate white bread.


Storage: If you aren’t serving them immediately, cover them with a slightly damp paper towel and plastic wrap to keep the bread from drying out.


The “Crunch”: For extra flavor, some people like to lightly butter the bread before adding the cream cheese spread.


Stuffed Cabbage Rolls on a Vegetable Bed

Stuffed Cabbage Rolls on a Vegetable Bed

Tender cabbage leaves wrapped around a savory meat and rice filling, slowly cooked in a rich tomato and vegetable sauce. This comforting classic is loved worldwide for its rustic flavor and hearty texture—perfect for family dinners or cozy weekends.


Ingredients

For the Cabbage Rolls

  • 1 large green cabbage

  • 1 lb (450 g) ground beef

  • ½ cup uncooked white rice

  • 1 medium onion, finely chopped

  • 2 garlic cloves, minced

  • 1 large egg

  • ½ tsp paprika

  • Salt and black pepper, to taste

For the Vegetable Bed

  • 2 carrots, sliced thin

  • 1 onion, sliced

  • 1 bell pepper, sliced

  • 2 celery stalks, chopped

  • 2 garlic cloves, minced

  • 2 tbsp olive oil

For the Sauce

  • 1 can (14 oz / 400 g) crushed tomatoes or tomato sauce

  • 1 tbsp tomato paste

  • 1 tsp sugar

  • 1 tsp dried thyme or oregano

  • 1 bay leaf

  • 1 cup vegetable or chicken broth

  • Salt and black pepper, to taste


Instructions

  1. Bring a large pot of water to a boil. Remove the core from the cabbage and place the whole head into the boiling water.

  2. Cook for about 8–10 minutes, gently removing softened leaves as they loosen. Drain and allow leaves to cool.

  3. In a large bowl, combine ground beef, rice, onion, garlic, egg, paprika, salt, and pepper. Mix gently until combined.

  4. Trim the thick stem from each cabbage leaf to make rolling easier.

  5. Place about 2 tablespoons of filling in the center of each leaf. Fold in the sides and roll tightly.

  6. Heat olive oil in a large pot or baking dish. Add carrots, onion, bell pepper, celery, and garlic. Cook for 5–7 minutes until softened.

  7. Arrange cabbage rolls seam-side down on top of the vegetables in a single layer.

  8. In a bowl, mix crushed tomatoes, tomato paste, sugar, herbs, bay leaf, broth, salt, and pepper. Pour over the rolls.

  9. Cover and simmer gently for 1½ hours, or bake covered at 175°C (350°F) for 1 hour 30 minutes, until the cabbage is tender and the filling is cooked through.

  10. Remove the bay leaf and let rest for 10 minutes before serving.


How to Make (Summary)

  • Soften cabbage leaves first

  • Prepare the savory meat and rice filling

  • Roll tightly to secure the filling

  • Create a vegetable base for flavor and moisture

  • Cook slowly in tomato sauce until tender


Variations

  • Vegetarian: Use lentils, mushrooms, and extra rice

  • Spicy: Add chili flakes or hot paprika

  • Creamy Sauce: Stir in sour cream before serving

  • Middle Eastern Style: Use lamb with cumin and cinnamon

  • Sweet & Sour: Add vinegar and raisins to the sauce


Tips

  • Use fresh cabbage for easier rolling

  • Do not overfill rolls

  • Light browning before simmering adds flavor

  • Tastes even better the next day

  • Serve with bread or yogurt-based sauce

  • Freezes well for up to 3 months


Conclusion

These Stuffed Cabbage Rolls on a Vegetable Bed are a timeless comfort food. The tender cabbage, flavorful filling, and rich tomato sauce combine into a satisfying dish that brings warmth and tradition to every

Melt in your mouth Chicken

This is one of those recipes I make over and over again. On those days when I get home late to start dinner, this is my go-to recipe. Melt in your mouth chicken is just that. It melts in your mouth.

Melt in Your Mouth Chicken is a classic recipe that’s been around for ages. Its origins are unclear, but I’m glad whoever came up with it did.

The idea of topping chicken breast with mayo and parmesan is pure genius! The mixture turns beautifully golden post-baking, and it smells phenomenal, too.

The flavor is so rich, so creamy, and so addictive!

More importantly… OMG… the chicken is insanely tender and moist! That’s something that’s hard to come by with baked chicken breast.

Best of all, this recipe is impossible to mess up. Even if you’re a newbie in the kitchen, you can easily pull it off.

If you’re looking for a dish to shock and impress your family and friends, this is the one.

Ingredients:

  • 4 boneless, skinless chicken breasts
  • 1 Cup mayonnaise
  • 1/2 Cup Shredded Parmesan cheese
  • 1 tsp salt
  • 1/2 tsp black pepper
  • 1 tsp minced garlic
  • 1 tsp garlic powder

How To Make Melt in your mouth Chicken:

  1. Preheat the oven to 375 degrees.
  2. In a small bowl, add the mayonnaise, parmesan cheese, and seasonings.
  3. Mix to combine.
  4. Place the chicken in a baking dish, sprayed with a non-sticking baking spray.
  5. Spread the mixture on top of the chicken breasts.
  6. Bake the chicken for 45 minutes, or until cooked through.
  7. Serve warm!

Creamy Chicken & Vegetable Stew

Creamy Chicken & Vegetable Stew

Prep time: 15 mins | Cook time: 30 mins | Servings: 4-6


Ingredients

The Protein: 1.5 lbs chicken breast or thighs (cut into bite-sized chunks).


The Veggies: 2 large potatoes (peeled and cubed), 3 large carrots (sliced into rounds), 1 cup frozen peas.


The Base: 1 yellow onion (diced), 3 cloves garlic (minced), 4 cups chicken broth.


The Creaminess: 3 tbsp butter, 1/3 cup all-purpose flour, 1/2 cup heavy cream (or half-and-half).


Seasoning: 1 tsp dried thyme, 1 tsp dried rosemary, salt and black pepper to taste, fresh parsley for garnish.


Instructions

Sear the Chicken: In a large pot or Dutch oven, heat a splash of oil over medium-high heat. Season chicken with salt and pepper and brown it slightly (about 3–5 minutes). Remove chicken and set aside.


Sauté the Aromatics: In the same pot, melt the butter. Add the onion and carrots, cooking until the onion is translucent. Stir in the garlic and cook for 1 more minute.


Make the Roux: Sprinkle the flour over the vegetables and stir constantly for 2 minutes to cook out the raw flour taste.


Simmer: Slowly pour in the chicken broth while whisking to prevent lumps. Add the potatoes, thyme, rosemary, and the seared chicken back into the pot.


Cook: Bring to a gentle boil, then reduce heat to low. Cover and simmer for 15–20 minutes, or until the potatoes and carrots are fork-tender.


The Finishing Touch: Stir in the frozen peas and the heavy cream. Let it simmer for another 2–3 minutes until thickened and the peas are bright green.


Serve: Taste and adjust salt or pepper. Garnish with fresh parsley and serve with crusty bread.


Pro-Tips for that “Picture Perfect” Look

Texture: If you want it extra thick like the photo, mash a few of the cooked potato chunks directly into the broth.


Color: Add the peas at the very end. If they cook too long, they turn a dull olive green instead of that vibrant pop you see in the image.

Easy Vegetable Egg Muffins (Omelette Muffins)

Easy Vegetable Egg Muffins (Omelette Muffins)

Soft, savory egg muffins loaded with vegetables and cheese. These are easy to prepare, kid-friendly, and perfect for breakfast or a light snack.


Ingredients

(Makes 8–10 muffins)

  • Eggs: 4 large

  • Onion: 1 small, finely chopped

  • Green chili: 1, finely chopped (optional; adjust or skip for kids)

  • Carrot: 1 medium, finely grated or finely chopped

  • Sweetcorn: ¼ cup, boiled or canned (drained)

  • Mozzarella cheese: ½ cup, grated

  • Fresh coriander leaves: 2 tablespoons, finely chopped

  • Black pepper: to taste

  • Salt: to taste

  • Oil or butter: for greasing the muffin tray


Instructions

1. Prepare the Oven and Tray

  • Preheat the oven to 180°C (350°F).

  • Lightly grease a muffin tin with oil or butter, or line with silicone or paper liners.


2. Prepare the Egg Mixture

  • Crack the eggs into a large mixing bowl.

  • Add salt and black pepper.

  • Whisk well until the eggs are fully combined and slightly frothy.


3. Add Vegetables and Cheese

  • Add chopped onion, green chili (if using), carrot, sweetcorn, and coriander leaves to the egg mixture.

  • Stir gently to distribute the vegetables evenly.

  • Fold in the grated mozzarella cheese.


4. Fill the Muffin Tray

  • Pour the mixture evenly into the prepared muffin cups, filling each about ¾ full to allow space for rising.


5. Bake

  • Place the tray in the preheated oven.

  • Bake for 18–22 minutes, or until the muffins are set in the center and lightly golden on top.

  • A toothpick inserted in the middle should come out clean.


6. Cool and Serve

  • Remove from the oven and allow the muffins to rest in the tray for 5 minutes.

  • Carefully remove and serve warm.


Serving Suggestions

  • Serve with toast, fruit, or yogurt for a balanced breakfast.

  • These muffins also work well in lunchboxes or as an evening snack.


Storage Tips

  • Store leftovers in an airtight container in the refrigerator for up to 3 days.

  • Reheat gently in a microwave or oven before serving.

Italian 12-Spoon Sponge Cake

Italian 12-Spoon Sponge Cake

A light and tender cake made using tablespoons for easy measuring. Perfect for everyday baking, even without a kitchen scale.


Ingredients

  • Eggs: 3 large, room temperature

  • Sugar: 12 tablespoons

  • Vanilla sugar or vanilla extract: 1 teaspoon

  • Salt: a small pinch

  • Milk: 12 tablespoons

  • Vegetable oil: 12 tablespoons

  • All-purpose flour: 12 tablespoons

  • Baking powder: 1 teaspoon

  • Powdered sugar: for dusting (optional)


Instructions

1. Prepare the Baking Pan

  • Preheat the oven to 180°C (350°F).

  • Grease a 21 × 21 cm (8 × 8 inch) baking pan.

  • Line the base with parchment paper for easy removal.


2. Whisk the Eggs and Sugar

  • In a large mixing bowl, add the eggs, sugar, vanilla sugar, and salt.

  • Whisk for 3–4 minutes until the mixture becomes pale, thick, and slightly foamy. This helps create a soft texture.


3. Add Liquid Ingredients

  • Pour in the milk and vegetable oil.

  • Whisk gently until fully combined and smooth.


4. Add Dry Ingredients

  • Sift together the flour and baking powder.

  • Gradually fold the dry ingredients into the batter using a spatula or whisk.

  • Mix just until smooth, avoiding overmixing.


5. Bake the Cake

  • Pour the batter evenly into the prepared pan.

  • Tap the pan lightly on the counter to release air bubbles.

  • Bake for 25–30 minutes, or until a toothpick inserted into the center comes out clean.


6. Cool and Serve

  • Remove the cake from the oven and allow it to cool in the pan for 10–15 minutes.

  • Transfer to a serving plate and let cool completely.

  • Lightly dust with powdered sugar before slicing, if desired.


Helpful Tips

  • Use the same tablespoon for all measurements to keep proportions accurate.

  • Serve plain or pair with fresh fruit, yogurt, or jam.

  • Store covered at room temperature for up to 2 days, or refrigerate for longer freshness.