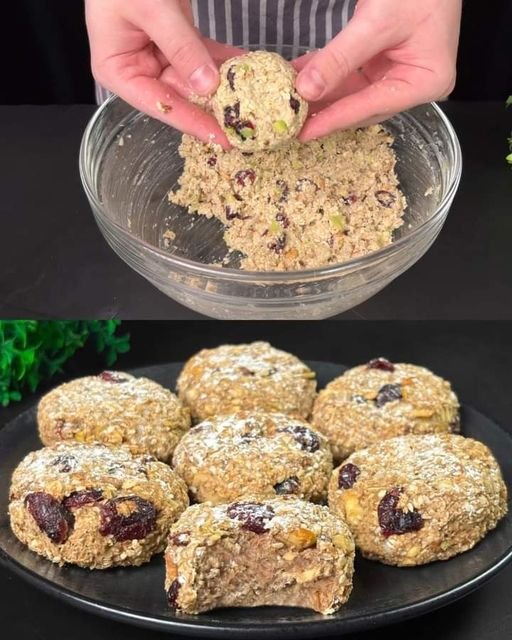
No-Sugar Healthy Oatmeal Cookies

No-Sugar Healthy Oatmeal Cookies

Naturally Sweet • Wholesome • Easy to Make

These no-sugar oatmeal cookies are gently sweetened with fruit and stevia, making them a great option for everyday snacking. They are soft, lightly chewy, and full of natural texture from oats, nuts, and dried fruit. No refined sugar, no butter, and no flour are needed.

Prep Time

10 minutes

Bake Time

15–20 minutes

Yield

8–10 cookies


Ingredients

  • 1 cup (90 g) rolled oats

  • 50 g oat flakes (for added texture)

  • 1 medium apple, peeled, cored, and finely diced

  • 1 ripe banana

  • 80 g nuts (almonds, walnuts, or pecans), roughly chopped

  • 50 g dried cranberries

  • 1 tablespoon stevia (adjust to taste)

  • 1 tablespoon sesame seeds

  • 1 teaspoon vanillin or vanilla powder (optional)


Instructions

1. Prepare the Oven

Preheat your oven to 350°F (180°C).
Line a baking sheet with parchment paper or lightly grease it.

2. Mash the Banana

Place the banana in a large mixing bowl and mash thoroughly with a fork until smooth and creamy. This will act as the main binder for the cookies.

3. Combine the Base

Add the diced apple, rolled oats, oat flakes, and vanillin (if using) to the mashed banana.
Stir well until everything is evenly coated and the mixture begins to hold together.

4. Add Texture and Flavor

Fold in the chopped nuts, dried cranberries, stevia, and sesame seeds.
Mix gently until fully combined. The mixture should be thick and slightly sticky. If it feels too dry, add 1–2 teaspoons of water.

5. Shape the Cookies

Scoop about 2 tablespoons of the mixture for each cookie.
Roll gently into a ball, then flatten slightly into a thick disc.
Place cookies on the prepared baking sheet, leaving a little space between each one.

6. Bake

Bake for 15–20 minutes, or until the edges turn lightly golden and the cookies feel set when touched.

7. Cool

Remove from the oven and let the cookies cool on the baking sheet for 5 minutes, then transfer to a plate or cooling rack.
They will firm up more as they cool.


Helpful Tips

  • For softer cookies, bake closer to 15 minutes.

  • For firmer, slightly crisp edges, bake closer to 20 minutes.

  • You can replace cranberries with raisins or chopped dates if preferred.

  • Store cookies in an airtight container at room temperature for up to 2 days, or refrigerate for up to 5 days.

Carrot Cake with Cream Cheese Frosting

Carrot Cake with Cream Cheese Frosting

Prep Time: 25 minutes
Bake Time: 25–35 minutes
Cooling & Assembly: 60 minutes
Yield: 1 two-layer 8-inch cake or one 9×13-inch cake

This carrot cake has a moist crumb, balanced spice flavor, and a smooth cream cheese frosting. It is suitable for gatherings, celebrations, or everyday desserts.


Ingredients

For the Carrot Cake

  • 2 cups (250 g) all-purpose flour

  • 1½ cups (300 g) granulated sugar or brown sugar

  • 1 teaspoon baking powder

  • 1 teaspoon baking soda

  • ½ teaspoon salt

  • 1 tablespoon ground cinnamon

  • ½ teaspoon ground nutmeg

  • ½ teaspoon ground ginger

  • ¼ teaspoon ground cloves (optional)

  • 3 large eggs, room temperature

  • ¾ cup (180 ml) vegetable oil

  • ½ cup (120 ml) buttermilk or milk

  • 1 teaspoon vanilla extract

  • 2½ cups (260 g) finely grated carrots

  • ½ cup chopped walnuts or pecans (optional)

  • ½ cup raisins, sultanas, or dried cranberries (optional)

  • Zest of 1 orange (optional)


For the Cream Cheese Frosting

  • 200 g cream cheese, softened

  • ½ cup (113 g) unsalted butter, softened

  • 2½ cups (300 g) powdered sugar

  • 1 teaspoon vanilla extract

  • ½ teaspoon orange zest (optional)


Detailed Instructions

1. Prepare the Oven and Pans

Preheat the oven to 350°F (175°C).

Grease and line:

  • Two 8-inch round cake pans, or

  • One 9×13-inch baking pan

Set aside.


2. Mix Dry Ingredients

In a large bowl, whisk together:

  • Flour

  • Sugar

  • Baking powder

  • Baking soda

  • Salt

  • Cinnamon

  • Nutmeg

  • Ginger

  • Cloves

Whisk until evenly combined and free of lumps.


3. Mix Wet Ingredients

In a separate bowl, whisk together:

  • Eggs

  • Vegetable oil

  • Buttermilk

  • Vanilla extract

Mix until smooth and fully combined.


4. Combine Batter

Pour the wet ingredients into the dry ingredients.

Using a spatula, gently fold until just combined.

Add:

  • Grated carrots

  • Nuts (if using)

  • Dried fruit (if using)

  • Orange zest

Fold gently. Do not overmix, as this can affect texture.


5. Bake

Divide the batter evenly between prepared pans.

Bake for 25–35 minutes, or until:

  • The center springs back lightly when touched

  • A toothpick inserted in the center comes out clean

Remove from the oven and allow cakes to cool in pans for 10 minutes. Transfer to a wire rack and cool completely before frosting.


Cream Cheese Frosting

6. Prepare the Frosting

In a large bowl, beat the softened cream cheese and butter until smooth and creamy.

Gradually add powdered sugar, mixing on low speed until incorporated.

Add vanilla extract and orange zest (if using).

Increase speed and beat until light and smooth.


7. Assemble the Cake

If using layered pans:

  • Place one cake layer on a serving plate

  • Spread frosting evenly on top

  • Place the second layer on top

Frost the top and sides evenly.

For a sheet cake:

  • Spread frosting evenly over the cooled cake


Optional Garnishes

  • Chopped nuts

  • Dried fruit

  • Thin carrot curls

  • Light dusting of powdered sugar


Storage

  • Store refrigerated in an airtight container for 3–4 days

  • Bring to room temperature before serving

  • Cake layers can be frozen (unfrosted) for up to 2 months

Italian Lemon Yogurt Cake (Sugar-Free)

Italian Lemon Yogurt Cake (Sugar-Free)

Moist, fragrant, and naturally sweetened

Prep Time: 15 minutes
Bake Time: 45–50 minutes
Total Time: 1 hour
Yield: 1 loaf (8–10 slices)

This Italian-style lemon yogurt cake is light, moist, and full of bright citrus flavor. It’s sweetened with stevia instead of refined sugar, making it a better option for those reducing sugar intake while still enjoying a classic homemade cake.


Ingredients

Dry Ingredients

  • 1½ cups all-purpose flour

  • 2 teaspoons baking powder

  • ½ teaspoon kosher salt

Wet Ingredients

  • 1 cup plain coconut yogurt (or whole milk yogurt)

  • Stevia powder, to taste
    (use the amount equivalent to ¾–1 cup sugar, depending on brand strength)

  • 3 large eggs

  • 2 teaspoons finely grated lemon zest (from about 2 lemons)

  • ⅓ cup freshly squeezed lemon juice

  • ½ teaspoon pure vanilla extract

  • ½ cup olive oil

Lemon Soaking Syrup (Sugar-Free)

  • ¼ cup lemon juice

  • Stevia powder, equivalent to ¼ cup sugar

Sugar-Free Lemon Glaze (Optional)

  • Juice of 1 lemon

  • Powdered stevia sweetener, to taste
    (or sugar-free confectioner’s sweetener blend)


Step-by-Step Instructions

1. Prepare the Pan

Preheat oven to 350°F (180°C).
Grease an 8½ × 4¼ × 2½-inch loaf pan and line the bottom with parchment paper, or lightly coat with baking spray.


2. Mix Dry Ingredients

In a large bowl, sift together:

  • Flour

  • Baking powder

  • Salt

Set aside.


3. Mix Wet Ingredients

In a separate bowl, whisk together:

  • Yogurt

  • Stevia powder

  • Eggs

  • Lemon zest

  • Lemon juice

  • Vanilla extract

Whisk until smooth and well combined.


4. Combine Batter

Gradually whisk the dry ingredients into the wet mixture until just combined.
Do not overmix.


5. Add Oil

Gently fold in the olive oil using a spatula until fully incorporated.
The batter should be smooth and slightly thick.


6. Bake

Pour the batter into the prepared loaf pan and smooth the top.

Bake for 45–50 minutes, or until a toothpick inserted into the center comes out clean.


7. Prepare the Lemon Syrup

While the cake bakes, combine:

  • ¼ cup lemon juice

  • Stevia powder

Heat gently in a small saucepan just until dissolved. Do not boil. Set aside.


8. Soak the Cake

Allow the cake to cool in the pan for 10 minutes.
While still warm, slowly pour the lemon syrup over the cake so it absorbs evenly.

Let the cake cool completely.


9. Prepare the Sugar-Free Glaze (Optional)

Mix powdered stevia with lemon juice until a pourable glaze forms.
Drizzle over the cooled cake.

Allow glaze to set for about 1 hour before slicing.


Tips for Best Results

  • Use fine powdered stevia for smooth texture.

  • Olive oil gives authentic Italian flavor; use light olive oil if preferred.

  • For extra moisture, wrap the cooled cake and rest overnight before serving.

  • Skip the glaze for a lighter, breakfast-style cake.


Storage

  • Store covered at room temperature for 2 days

  • Refrigerate for up to 5 days

  • Freeze slices for up to 2 months

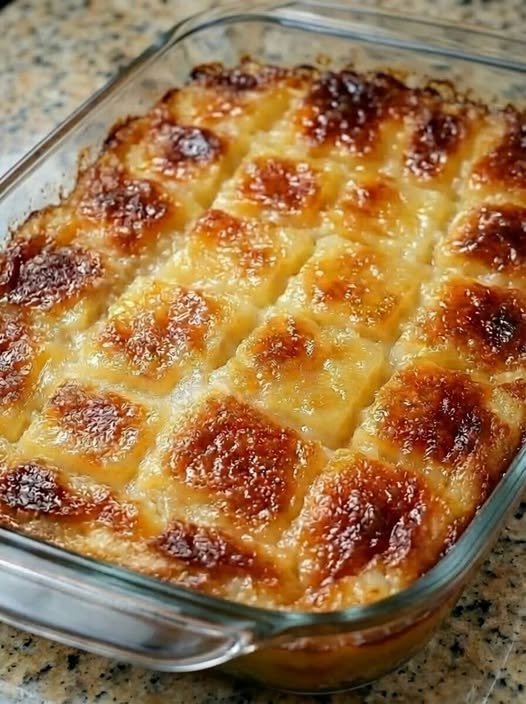
Easy Pineapple Bake

Easy Pineapple Bake

This versatile dish works beautifully as either a unique side dish for ham or a warm, spoonable dessert.

  • Prep time: 10 minutes

  • Cook time: 45–50 minutes

  • Total time: 1 hour

  • Servings: 8


Ingredients

  • 1 can (20 oz / 565 g) crushed pineapple, undrained

  • 1 cup granulated sugar

  • ½ cup all-purpose flour

  • 2 large eggs, beaten

  • ½ cup (1 stick) unsalted butter, melted

  • 1 tsp vanilla extract

  • Pinch of salt

  • 1 cup shredded sharp cheddar cheese (optional for a savory contrast)

  • Optional topping: ½ cup shredded coconut or chopped nuts


Instructions

  1. Preheat and Prep: Set your oven to 350°F (175°C). Lightly grease a baking dish to ensure the bake doesn’t stick.

  2. Mix the Base: In a large bowl, combine the crushed pineapple (with its juice), sugar, and flour. Stir until the mixture is smooth.

  3. Combine Wet Ingredients: Stir in the beaten eggs, melted butter, vanilla extract, and a pinch of salt. The batter should be thick but easy to pour.

  4. Add Cheese (Optional): If you enjoy the traditional savory-sweet version, gently fold in the shredded cheddar cheese until evenly distributed.

  5. Bake: Pour the mixture into your prepared dish and smooth the top. Add any desired toppings, such as coconut or nuts. Bake for 45–50 minutes until the center is set and the top is lightly golden.

  6. Rest and Serve: Allow the dish to cool for about 10 minutes before serving. This resting period helps the bake firm up and allows the flavors to deepen.


Tips for Success

  • Pineapple Texture: Use canned crushed pineapple in juice rather than syrup to avoid making the dish overly sweet.

  • Storage: Leftovers can be stored in an airtight container in the refrigerator for up to 4 days.

  • Serving Suggestions: This dish pairs exceptionally well with holiday mains like baked ham or roast turkey. If serving as a dessert, try it with a dollop of whipped cream or vanilla ice cream.

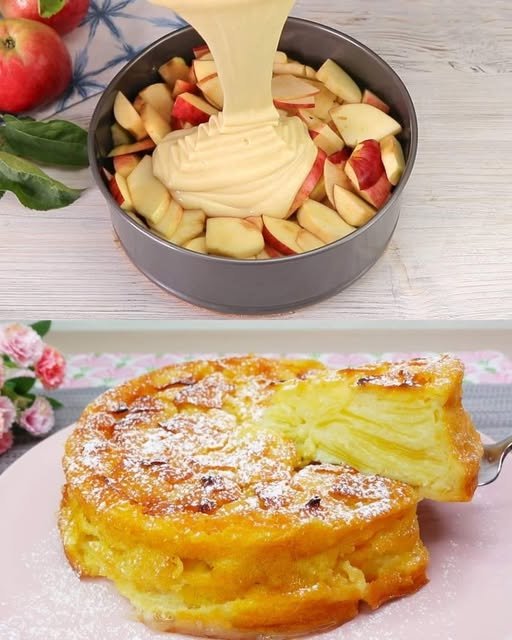
More Apples Than Dough” Pie

More Apples Than Dough” Pie

  • Prep time: 15 minutes

  • Cook time: 40–50 minutes

  • Total time: ~1 hour

  • Servings: 4–6


Ingredients

  • 4–5 medium apples, peeled and thinly sliced

  • 2 eggs

  • ½ cup sugar (100 g)

  • 1 tsp vanilla sugar

  • ⅓ cup milk (100 ml)

  • 1 ½ tbsp melted butter (20 g)

  • Zest of 1 lemon

  • Juice of ½ lemon (to drizzle over apples)

  • ⅔ cup wheat flour (80 g)

  • 1 tsp baking powder

  • A pinch of salt

  • Powdered sugar (for dusting)


Instructions

  1. Prepare Apples: Peel, core, and slice the apples very thinly (using a mandoline is recommended for uniform slices). Drizzle them with the juice of ½ a lemon to prevent browning and add flavor.

  2. Mix Wet Ingredients: In a mixing bowl, beat the 2 eggs with a pinch of salt. Add the sugar and vanilla sugar, beating until the mixture is frothy and light in color.

  3. Combine Remaining Liquids: Stir in the milk, melted butter, and lemon zest.

  4. Add Dry Ingredients: Gradually whisk in the flour and baking powder until the batter is smooth. Note that the batter will be quite thin and watery.

  5. Coat Apples: Gently fold the apple slices into the batter, ensuring every slice is thoroughly coated.

  6. Assemble: Grease an 8-inch (20 cm) baking pan and line it with parchment paper. Pour the apple-batter mixture into the pan, smoothing the top so the slices lie flat.

  7. Bake: Bake in a preheated oven at 350°F (180°C) for 40–50 minutes. The cake is done when the top is golden brown and a toothpick inserted into the center comes out clean.

  8. Cool and Serve: Allow the cake to cool completely in the pan to set its creamy, custard-like texture. Dust with powdered sugar before serving.


Recipe Tips

  • Consistency: The batter is meant to be thin; it serves primarily to bind the apple layers together into a custard.

  • Apple Choice: Use firm baking apples like Granny Smith, Honeycrisp, or Fuji to ensure the slices hold their shape.

  • Storage: This pie is excellent served cold and can be stored in an airtight container in the fridge for up to 4–5 days.

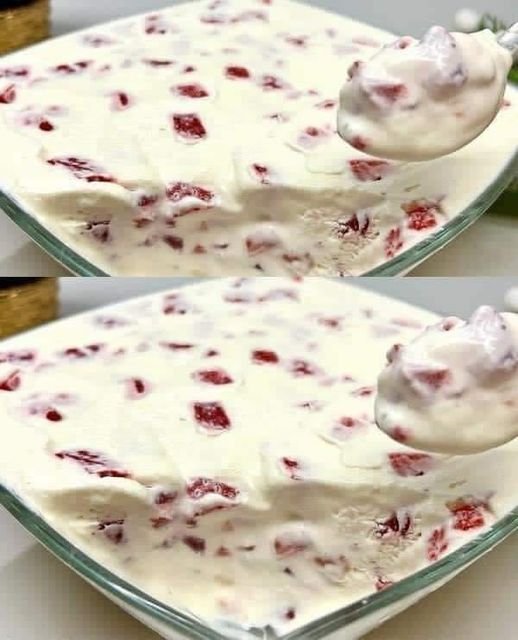
Homemade 3-Ingredient Strawberry Ice Cream

Homemade 3-Ingredient Strawberry Ice Cream

No gelatin, no ice cream machine—just creamy, fruity goodness

Prep Time: 10 minutes
Freeze Time: 4–6 hours
Yield: About 4–6 servings

This recipe is simple, naturally creamy, and customizable. You can swap strawberries for other fruits, chocolate chips, or even cookie pieces.


Ingredients

  • 500 ml (2 cups) whipping cream
    Use full-fat cream for best results; it creates a rich, creamy texture.

  • 150 g (2/3 cup) sweetened condensed milk
    Provides sweetness and helps the ice cream hold its shape without gelatin.

  • 100 g (3/4 cup) fresh strawberries, diced
    Adds natural fruit flavor. You can substitute raspberries, blueberries, or mango if desired.


Step-by-Step Instructions

1. Whip the Cream

Pour the cold whipping cream into a large mixing bowl.
Using an electric mixer, whip on medium-high speed until stiff peaks form.

  • Stiff peaks mean the cream holds its shape when the beaters are lifted.

  • Do not overwhip, or the cream may turn into butter.


2. Fold in the Condensed Milk

Gently add the sweetened condensed milk to the whipped cream.
Use a spatula to fold it in carefully, preserving the air in the whipped cream.
The mixture should become smooth and slightly glossy.


3. Add the Fruit

Fold in the diced strawberries (or your chosen fruit) until evenly distributed.
Be gentle to keep the whipped cream light and airy.


4. Transfer and Freeze

Pour the mixture into a freezer-safe container.
Smooth the top with a spatula and cover the container with a lid or plastic wrap.

Freeze for at least 4 hours, or until firm.
For best flavor, you can refrigerate the mixture for 1–2 hours before freezing to let the flavors meld, but this step is optional.


5. Serve

Scoop the ice cream into bowls and enjoy immediately.
Optional toppings: fresh berries, chocolate shavings, or a drizzle of fruit syrup.


Tips & Variations

  • Fruit Variations: Mango, banana, or mixed berries all work well.

  • Chocolate Strawberry: Fold in 50 g of finely chopped chocolate with the fruit.

  • Nutty Option: Add 2–3 tablespoons chopped nuts for texture.

  • Storage: Keep covered in the freezer for up to 7 days. For softer scooping, let ice cream sit at room temperature for 5 minutes before serving.