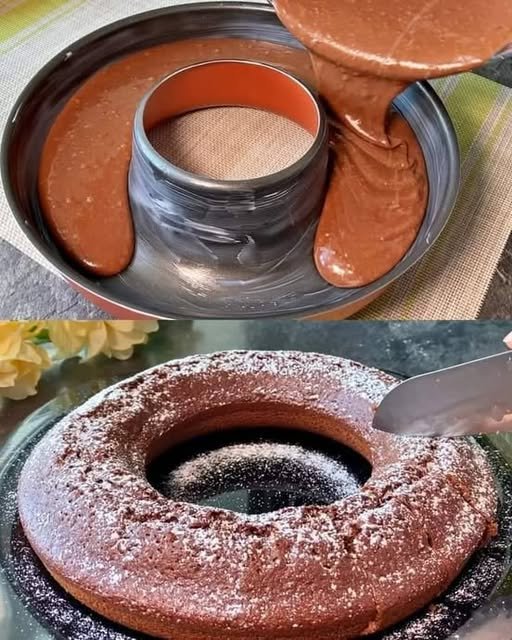
Simple & Moist 5-Minute Chocolate Cake

Simple & Moist 5-Minute Chocolate Cake

Soft • Fluffy • Comforting Homemade Cake

This easy chocolate cake comes together quickly using everyday ingredients. It bakes into a tender, moist sponge with a rich cocoa taste and a smooth crumb, making it ideal for casual gatherings or a relaxed homemade treat.


Ingredients

Cake Batter

  • 2 large eggs, at room temperature

  • 160 g granulated sugar (about ¾ cup)

  • 10 g vanilla sugar (or 1 teaspoon pure vanilla extract)

  • 2 tablespoons unsweetened cocoa powder

  • 160 ml milk (⅔ cup)

  • 100 ml vegetable oil (about 7 tablespoons; any neutral oil works)

  • A small pinch of salt

  • 170 g all-purpose flour (about 1⅓ cups, sifted)

  • 1 teaspoon baking powder

Optional Add-Ins & Finish

  • Chocolate chips or chunks (for extra texture)

  • Powdered sugar for a light decorative dusting


Step-by-Step Instructions

1. Prepare the Oven and Baking Dish

  • Heat your oven to 180°C (360°F)

  • Lightly coat a 24 cm (9–10 inch) round, casserole, or bundt pan with oil or butter

  • If desired, lightly dust with flour and tap out the excess to help with easy release


2. Combine the Eggs and Sugar

  • In a large mixing bowl, add the eggs, granulated sugar, and vanilla sugar

  • Whisk for 1–2 minutes until the mixture becomes slightly lighter in color and looks smooth and glossy

    • This step helps create a soft, airy texture


3. Add the Liquid Ingredients

  • Pour in the milk and vegetable oil

  • Add the pinch of salt

  • Whisk gently until everything is fully blended and uniform


4. Incorporate the Dry Ingredients

  • Place a sieve over the bowl and add:

    • Flour

    • Cocoa powder

    • Baking powder

  • Sift directly into the wet mixture

  • Whisk gently just until the batter is smooth and lump-free

    • Avoid over-mixing to keep the cake tender

If using chocolate chips, fold them in gently at this stage.


5. Bake the Cake

  • Pour the batter evenly into the prepared baking dish

  • Smooth the top lightly with a spatula

  • Place in the center of the oven

  • Bake for 38–42 minutes

Doneness Check:
Insert a toothpick into the center. It should come out clean or with a few soft crumbs.


6. Cool and Finish

  • Remove from the oven and let the cake rest in the pan for 10 minutes

  • Carefully turn it out onto a serving plate or cooling rack

  • Once completely cooled, dust lightly with powdered sugar if desired


Serving Suggestions

  • Enjoy as is with tea or coffee

  • Serve with fresh fruit

  • Pair with yogurt, cream, or a light dessert topping for special occasions


Helpful Tips

  • Extra Moist Texture: Replace 2 tablespoons of milk with yogurt

  • Flavor Boost: Add a pinch of cinnamon or instant coffee powder

  • Smaller Pan: If using a loaf pan, bake slightly longer and check near the end
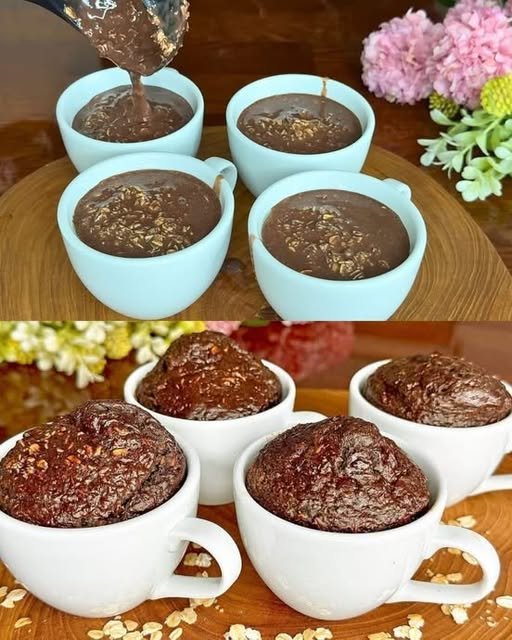
Healthy Chocolate Lava Baked Oats

Healthy Chocolate Lava Baked Oats

Naturally Sweet • Wholesome • Comforting
Serves: 2 generous portions (easily doubled)

This recipe turns simple pantry staples into a warm, chocolatey breakfast or dessert with a naturally soft center. It’s filling, balanced, and made with everyday ingredients.


Ingredients

Oat Base

  • 1 cup rolled oats (old-fashioned oats for best texture)

  • 1 medium ripe banana (naturally sweet and creamy)

  • ½ cup milk of choice (almond, oat, soy, or dairy)

  • 2 tablespoons unsweetened cocoa powder

  • 1–2 tablespoons natural liquid sweetener (maple syrup or honey, to taste)

  • 1 teaspoon baking powder

  • ½ teaspoon pure vanilla extract

  • A small pinch of sea salt (balances the chocolate flavor)

Soft Chocolate Center (Optional but Recommended)

  • 2 small pieces dark chocolate (70% cocoa or higher)
    or

  • 1 tablespoon dark chocolate chips


Step-by-Step Instructions

1. Prepare the Oven

  • Heat your oven to 180°C (350°F)

  • Lightly coat two oven-safe ramekins or ceramic mugs with a little oil or butter to prevent sticking

  • Place them on a baking tray for easy handling


2. Blend the Batter

Add the following to a blender:

  • Rolled oats

  • Banana

  • Milk

  • Cocoa powder

  • Natural sweetener

  • Baking powder

  • Vanilla extract

  • Sea salt

Blend for 30–45 seconds until the mixture is:

  • Completely smooth

  • Thick but pourable

  • Similar to cake or pancake batter

If the batter seems too thick, add 1–2 tablespoons of milk.


3. Fill the Cups

  • Pour the batter into the prepared mugs

  • Fill each about ¾ full to allow gentle rising


4. Add the Chocolate Center

  • Gently press one piece of dark chocolate into the center of each mug

  • Make sure it is fully covered with batter so it stays soft inside


5. Bake

  • Place the tray in the oven

  • Bake for 18–25 minutes, depending on your preferred texture:

    • 18–20 minutes: softer, richer texture

    • 22–25 minutes: more set and cake-like


6. Rest & Enjoy

  • Remove from the oven

  • Let sit for 5 minutes to settle

  • Enjoy warm, straight from the mug or turned out onto a plate


Optional Toppings (Wholesome Add-Ons)

  • Fresh berries or sliced banana

  • A spoon of yogurt or coconut yogurt

  • Chopped nuts or seeds

  • Light drizzle of nut butter


Helpful Notes

Air Fryer Method

  • Cook at 160°C (320°F) for 12–15 minutes

  • Check at 12 minutes and adjust as needed

No Blender Option

  • Use 1 cup oat flour instead of whole oats

  • Mash the banana very smoothly with a fork

  • Whisk all ingredients until well combined

Diet-Friendly

  • Naturally sweetened

  • Made with whole grains

  • Easily adaptable for dairy-free or gluten-free needs (use certified oats)

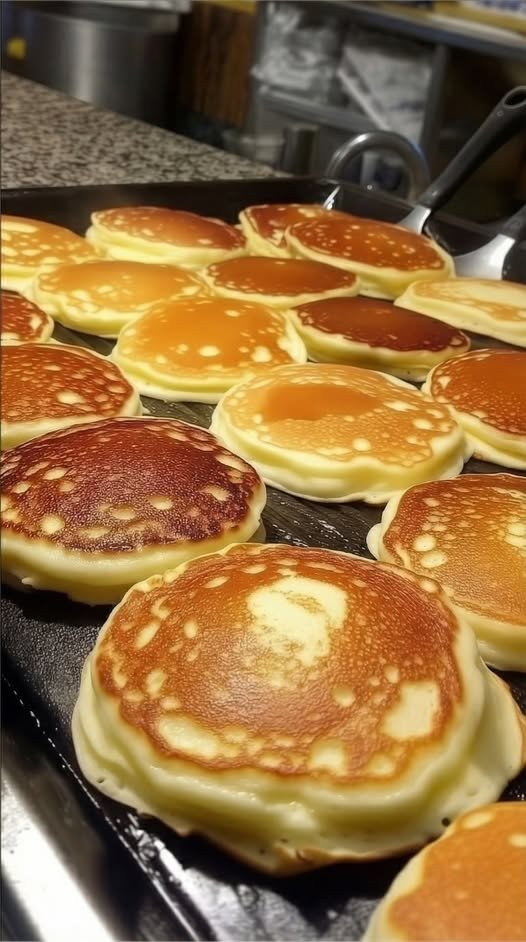
🥞 The Very Best Blueberry Buttermilk Flapjacks

There is nothing quite like a slow weekend morning with a stack of fluffy pancakes to make a family feel connected! Your description of the “synchronized hunger” of four little ones is so relatable—and your trick of using a warming oven to keep everyone’s breakfast hot at the same time is a total “parenting win.”

Since I’m keeping track of your full recipes, here is the organized version of your Blueberry Buttermilk Flapjacks. It’s a great addition to your collection, especially since you can easily adapt it to be sugar-free or dairy-free to match your other health goals!


🥞 The Very Best Blueberry Buttermilk Flapjacks

Thick, cake-like, and incredibly fluffy pancakes featuring a DIY buttermilk base and “non-bleeding” blueberries.

  • Prep time: 10 minutes

  • Cook time: 15 minutes

  • Yields: Approx. 12 pancakes

  • Special Tool: 200°F oven with a wire rack for “holding.”

Ingredients

The DIY Buttermilk (Liquid Base):

  • 2 cups Standard whole dairy milk

  • 1 tbsp Fresh lemon juice (to curdle the milk)

The Dry Components:

  • 2 cups White all-purpose flour

  • 2 tbsp Fine white sugar

  • 2 tsp Baking powder (leavening powder)

  • ½ tsp Baking soda (alkaline)

  • ½ tsp Table salt

The Richness & Fruit:

  • 1 Large egg

  • 3 tbsp Unsalted butter, melted and slightly cooled

  • 1 cup Fresh or frozen blueberries (if frozen, rinse and dry thoroughly)

  • 2 tsp Neutral vegetable oil (for the griddle)


Instructions

  1. The Warming Station: Move an oven rack to the center and preheat to 200°F. Place a wire cooling rack over a baking sheet, spray lightly with oil, and tuck it into the oven. This keeps your pancakes from getting soggy while you cook the rest!

  2. Make “Buttermilk”: Whisk the lemon juice into the milk and let it sit for 5–10 minutes. It will thicken and curdle slightly—this acidity is what makes the pancakes rise.

  3. Mix Dry Ingredients: In a medium bowl, whisk together the flour, sugar, baking powder, baking soda, and salt.

  4. Combine Wet Ingredients: Whisk the egg and cooled melted butter into your thickened milk mixture.

  5. The “Lumpy” Batter: Create a well in the dry ingredients and pour in the wet mix. Whisk gently until just combined. Stop immediately when the flour streaks disappear; those lumps are the secret to fluffiness!

  6. Heat the Skillet: Heat a nonstick skillet or griddle over medium heat. Add a teaspoon of oil and coat the surface.

  7. The Blueberry Trick: Scoop ¼ cup of batter per pancake onto the hot surface. Immediately sprinkle 1 tablespoon of blueberries over each pancake. This prevents the berries from staining the whole batch of batter.

  8. Flip: Cook until bubbles form on the surface and the edges look set (about 2 minutes). Flip and cook for another minute until golden brown.

  9. Hold and Serve: Place cooked pancakes on the rack in the warm oven until the whole batch is ready. Serve with butter and maple syrup!


💡 Pro-Tips for Success

  • Don’t Overmix: Overmixing develops gluten, which makes pancakes rubbery rather than tender.

  • Frozen Berry Secret: If using frozen berries, rinsing and drying them removes the “blue juice” ice crystals, so your pancakes stay golden instead of turning grey.

  • The Sizzle Test: If a drop of water flicked onto the pan sizzles and dances, it’s ready for the batter!

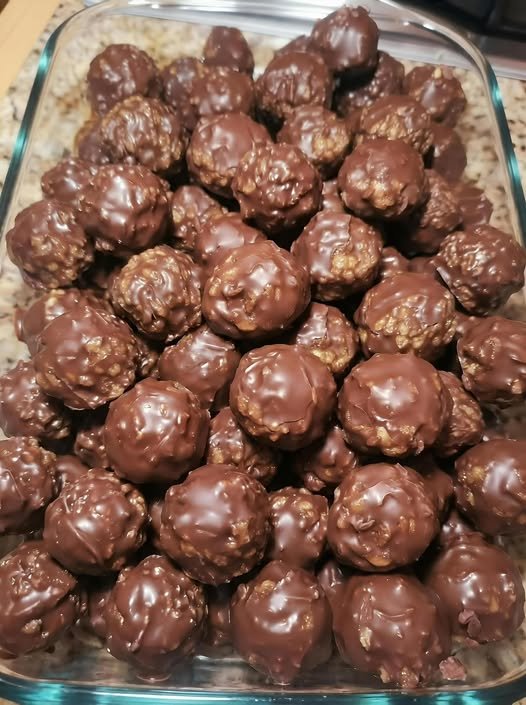
Homemade Chocolate Hazelnut Truffles


Homemade Chocolate Hazelnut Truffles

Prep time: 30 minutes | Chill time: 1 hour | Yields: Approx. 20–24 truffles

Ingredients

The Filling:

  • 1 cup Chocolate hazelnut spread (like Nutella)

  • 1 cup Toasted hazelnuts, finely chopped (plus 20–24 whole toasted hazelnuts for the centers)

  • 1 cup Crushed wafer cookies (vanilla or hazelnut flavored work best)

The Coating:

  • 1 ½ cups Semi-sweet or milk chocolate chips

  • 1 tsp Coconut oil (helps the chocolate flow smoothly)

  • ½ cup Hazelnuts, very finely chopped (for that signature bumpy texture)


Detailed Instructions

  1. Prepare the Base: In a medium mixing bowl, combine the chocolate hazelnut spread, the 1 cup of finely chopped hazelnuts, and the crushed wafer cookies. Stir until the mixture is uniform and holds its shape when pressed.

  2. Chill to Set: Place the mixture in the refrigerator for about 20–30 minutes. This makes it much easier to roll into balls without it sticking to your hands.

  3. Form the Truffles: Scoop about a tablespoon of the chilled mixture. Press one whole toasted hazelnut into the center, then roll the mixture between your palms to form a smooth ball.

  4. Second Chill: Place the rolled balls on a parchment-lined tray and freeze for 15 minutes. This ensures they don’t melt when you dip them in the warm chocolate.

  5. Melt the Coating: In a microwave-safe bowl, combine the chocolate chips and coconut oil. Microwave in 30-second intervals, stirring in between, until completely smooth. Stir in the remaining ½ cup of finely chopped hazelnuts.

  6. The Dip: Using a fork or a dipping tool, submerge each chilled truffle into the chocolate-nut mixture. Tap the fork against the side of the bowl to let excess chocolate drip off.

  7. Final Set: Place the truffles back on the parchment paper. Let them sit at room temperature until firm, or pop them in the fridge for 10 minutes for a quick set.


Tips for Success

  • Toast Your Nuts: Even if you buy pre-roasted hazelnuts, giving them a quick 5-minute toast in a dry pan over medium heat brings out the oils and makes them much more fragrant.

  • Wafer Texture: Don’t pulverize the wafers into a powder; leave some tiny shards for that authentic “crunch” when you bite into the center.

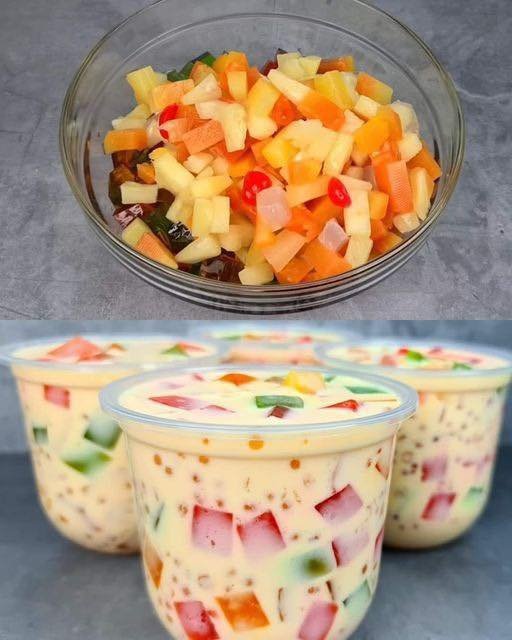
Tropical Delight: Fruity Tapioca Jelly Drink

Tropical Delight: Fruity Tapioca Jelly Drink

A colorful, creamy chilled drink with fruit, jelly cubes, and soft tapioca pearls

Introduction

Tropical Delight is a vibrant and refreshing dessert-style drink made with creamy milk, tender tapioca pearls, fruity jelly cubes, and mixed fruit. It’s visually beautiful, lightly sweet, and wonderfully textured—perfect for warm days, gatherings, or as a fun treat for the whole family.


🧾 Ingredients

For the Jelly

  • 4 cups water

  • ¼ cup white sugar

  • 25 grams white unflavored jelly powder

  • Red food coloring

  • Yellow food coloring

  • Green food coloring

For the Drink Base

  • 835 grams fruit cocktail, well-drained
    (or an equal amount of chopped fresh fruits such as mango, pineapple, papaya, grapes, or strawberries)

  • 250 ml all-purpose cream or heavy cream

  • 300 ml condensed milk

  • 2 cups evaporated milk or fresh milk

  • 1 cup cooked small tapioca pearls


⏱️ Time Breakdown

  • Preparation Time: 20 minutes

  • Cooking Time: 15 minutes

  • Chilling Time: 1 hour

  • Total Time: 1 hour 35 minutes


👩‍🍳 Step-by-Step Instructions

1. Prepare the Jelly

In a medium pot, bring 4 cups of water to a full boil.
Add the ¼ cup white sugar and 25 grams jelly powder, stirring continuously until fully dissolved and clear.

Remove from heat and carefully divide the hot jelly mixture evenly into three separate heat-safe bowls.

Add:

  • Red food coloring to the first bowl

  • Yellow food coloring to the second bowl

  • Green food coloring to the third bowl

Stir each bowl until the color is evenly mixed.

Pour each colored mixture into separate shallow containers.
Allow them to cool at room temperature, then refrigerate until completely set.

Once firm, cut the jelly into small, even cubes. Set aside.


2. Prepare the Creamy Milk Base

In a large mixing bowl, combine:

  • All-purpose cream (or heavy cream)

  • Condensed milk

  • Evaporated milk (or fresh milk)

Whisk gently until smooth and well blended.


3. Assemble the Drink

Add the drained fruit cocktail (or fresh fruit mixture) into the milk base. Stir gently.

Fold in:

  • Cooked tapioca pearls

  • Colored jelly cubes

Mix carefully to avoid breaking the jelly pieces.


4. Chill and Serve

Transfer the mixture into serving glasses or a large pitcher.

Refrigerate for at least 1 hour to allow the flavors and textures to come together.

Serve well chilled.


🍹 Serving Suggestions

  • Serve as a cold dessert drink or sweet snack

  • Garnish with fresh fruit pieces or mint leaves for presentation

  • Best enjoyed cold with a spoon or wide straw


💡 Helpful Tips

  • Ensure the jelly is fully set before cutting for clean cubes

  • Drain canned fruits well to prevent excess liquid

  • Adjust sweetness by adding more or less condensed milk

  • Stir gently to keep the jelly cubes intact


🥛 Dietary Notes

  • Contains dairy

  • Can be prepared gluten-free by using certified gluten-free ingredients


🧊 Storage

Store leftovers in a covered container in the refrigerator and enjoy within 2 days. Stir gently before serving again.

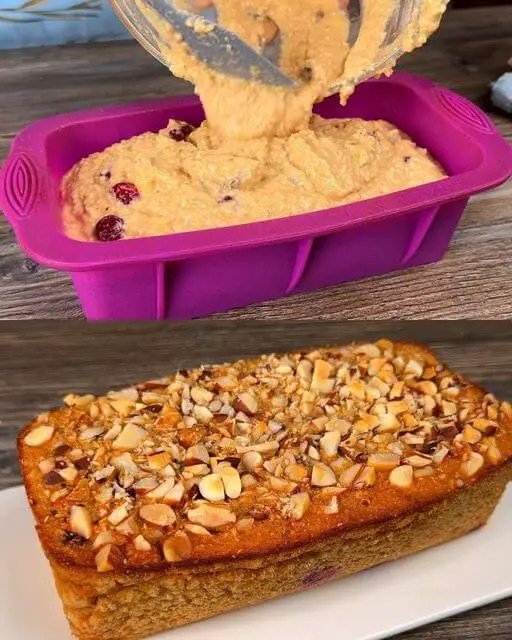
Apple & Banana Oatmeal Breakfast Loaf

Apple & Banana Oatmeal Breakfast Loaf

A moist, naturally sweet loaf perfect for breakfast or a snack

This wholesome breakfast loaf combines the fiber of oats with the natural sweetness of apples and banana. Raisins, cherries, and a crunchy nut topping make it a satisfying treat for mornings or anytime you want a nutritious snack.


Recipe Overview

  • Prep Time: 15 minutes

  • Bake Time: 45–50 minutes

  • Total Time: About 1 hour 5 minutes

  • Yield: 1 loaf


Ingredients

  • 1 cup (100 g) rolled oats or oatmeal

  • 2 medium apples, peeled and grated

  • 1 ripe banana, mashed

  • 2 large eggs

  • 100–120 ml water

  • 100 g raisins (or sultanas)

  • 100 g pitted cherries

  • 1 teaspoon baking powder

  • 50 g Brazil nuts, chopped (for topping)

  • Vegetable oil (for greasing the pan)


Step-by-Step Instructions

1. Hydrate the Oats

  • In a large mixing bowl, combine the oats with 100–120 ml of water.

  • Let the mixture sit for about 10 minutes so the oats soften and absorb moisture.


2. Prepare the Fruit

  • Peel and grate the apples.

  • In a small bowl, mash the banana with a fork until smooth.


3. Mix the Batter

  • Add the mashed banana and eggs to the soaked oatmeal. Whisk together until fully incorporated.

  • Stir in the grated apples, raisins, and cherries. Mix gently to combine.


4. Add Baking Powder

  • Sprinkle the baking powder over the mixture.

  • Fold everything together carefully with a spatula until evenly distributed. Avoid overmixing, which can make the loaf dense.


5. Prepare the Pan

  • Preheat your oven to 350°F (180°C).

  • Grease a loaf pan with vegetable oil.

  • Optional: Line a standard metal pan with parchment paper for easier removal.


6. Top and Bake

  • Pour the batter into the prepared pan and smooth the surface.

  • Evenly sprinkle the chopped Brazil nuts on top.

  • Bake for 45–50 minutes, or until the loaf is golden brown and a toothpick inserted into the center comes out clean.


7. Cool and Serve

  • Allow the loaf to cool in the pan for at least 10 minutes.

  • Remove from the pan and slice.

  • Serve warm or at room temperature.


Tips for Success

  • Smoother texture: Pulse the oats in a blender for a few seconds before hydrating to create a finer, cake-like crumb.

  • Storage: Store leftovers in an airtight container in the refrigerator for 3–4 days.

  • Nut swaps: Use walnuts, almonds, or pecans instead of Brazil nuts for a different flavor.

  • Optional additions: Add a pinch of cinnamon or nutmeg for extra warmth, or a handful of sunflower seeds for extra texture.