Savory Zucchini & Potato Bites

Savory Zucchini & Potato Bites

Soft Inside • Lightly Crisp Outside • Perfect for Any Meal

These baked zucchini and potato bites are flavorful, tender, and satisfying. They work beautifully as a snack, breakfast option, or side dish and pair wonderfully with a cool yogurt dip.


Ingredients

Main Vegetable Mixture

  • 2 medium zucchini (courgettes)

  • 1 medium potato, peeled

  • 2 large eggs, at room temperature

  • 1 red pepper, finely diced

  • 50 ml milk (about 3 tablespoons)

  • 2 tablespoons olive oil

  • 3 tablespoons semolina

  • 70 g all-purpose flour (about ½ cup)

  • 1 teaspoon baking powder

  • 50 g hard cheese, finely grated

  • Fresh parsley and dill, finely chopped

  • Salt and black pepper, to taste


Refreshing Yogurt Dip

  • Greek yogurt, plain and thick

  • 2 cucumbers, grated

  • 3 olives, finely chopped

  • 1 garlic clove, finely minced


Step-by-Step Instructions


1. Prepare the Vegetables

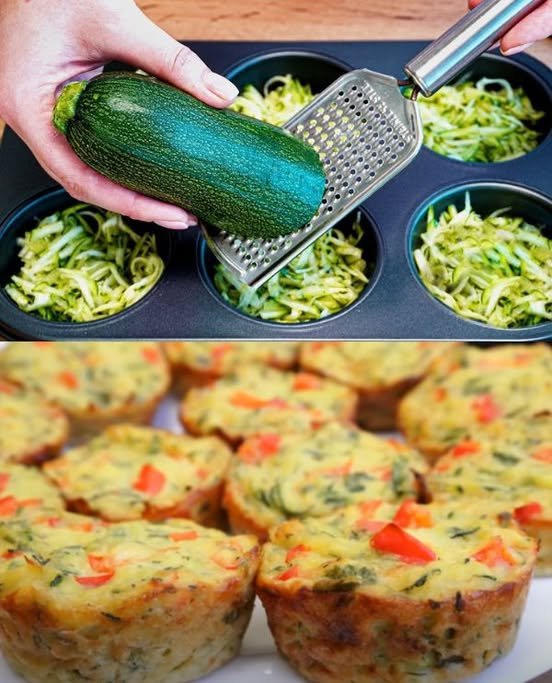
  • Grate the zucchini and potato into a large bowl

  • Sprinkle lightly with salt

  • Let them rest for about 5 minutes

  • Gently press or wrap the vegetables in a clean kitchen towel to remove excess moisture

    • This helps create a light, well-balanced texture


2. Prepare the Batter

  • In a separate bowl, whisk together the eggs, milk, and olive oil until smooth

  • Add the semolina, flour, and baking powder, mixing gently

  • Stir in the prepared zucchini and potato

  • Add the diced red pepper, grated cheese, and chopped herbs

  • Season with black pepper and adjust salt if needed

  • Mix until evenly combined


3. Fill and Bake

  • Heat the oven to 180°C (350°F)

  • Lightly grease a muffin tin or use silicone molds

  • Spoon the mixture evenly into each cup, filling nearly to the top

  • Bake for 25–30 minutes, until the tops are lightly golden and the bites feel set


4. Prepare the Yogurt Dip

  • Grate the cucumbers and gently press out excess liquid

  • In a bowl, combine:

    • Greek yogurt

    • Grated cucumbers

    • Minced garlic

    • Chopped olives

  • Stir until smooth and well blended

  • Chill until ready to serve


5. Serve

  • Allow the baked bites to rest in the pan for a few minutes

  • Carefully remove and serve warm

  • Add a spoon of the yogurt dip on the side for a refreshing contrast


Helpful Notes

  • Texture Tip: Removing extra moisture from vegetables helps maintain a soft, pleasant crumb

  • Flavor Option: Swap herbs or cheese to suit your taste

  • Make Ahead: These bites store well in the refrigerator and reheat gently in the oven


Optional Finishing Touch

For a lightly crisp surface, sprinkle a small amount of extra grated cheese on top during the final few minutes of baking.


Classic Soft Bread Rolls (Pide-Style)

Classic Soft Bread Rolls (Pide-Style)

Light • Soft • Beautifully Layered

These bread rolls are wonderfully soft with delicate layers and a tender crumb. They are perfect for breakfast, alongside soups, or served warm at the table for any meal.


Ingredients

Liquid Base

  • 1½ cups (300 ml) warm water
    (Comfortably warm to the touch, not hot)

  • 1 tea glass vegetable oil (about 90 g / 100 ml)

  • 1 tea glass plain yogurt (about 100 ml, room temperature)

Dry Ingredients

  • 1 packet active dry yeast (7 g or 2¼ teaspoons)

  • 1 tablespoon granulated sugar

  • 1 teaspoon salt

  • 4½–5 cups all-purpose flour, added gradually

For Layering & Finishing

  • 50 g butter, melted (for brushing between layers)

  • 1 egg yolk (for brushing the tops)


Step-by-Step Instructions

1. Prepare the Yeast Mixture

  • In a large mixing bowl, add the warm water, sugar, and yeast

  • Stir gently until combined

  • Let the mixture rest for 5–10 minutes until it becomes foamy and active

This step ensures the dough rises beautifully.


2. Combine the Dough Ingredients

  • Add the vegetable oil and yogurt to the yeast mixture

  • Whisk until smooth and well blended

  • Gradually add flour and salt, mixing with a spoon or spatula

  • Continue until a soft dough forms


3. Knead and First Rise

  • Transfer the dough to a lightly floured surface

  • Knead gently for 8–10 minutes until smooth, elastic, and soft

  • Place the dough in a lightly oiled bowl

  • Cover with a clean cloth

  • Let it rest in a warm place for about 1 hour, or until it has expanded noticeably


4. Form the Layers

  • Gently press the dough to release excess air

  • Divide it into 4 equal portions

For each portion:

  • Roll into a thin rectangle

  • Brush evenly with melted butter

Once all pieces are brushed:

  • Stack them neatly on top of each other

  • Roll the stack into a firm log, starting from the long side


5. Shape the Rolls

  • Using a sharp knife or dough scraper, cut the log into triangle shapes by slicing in a gentle zig-zag pattern

  • This shaping helps create the beautiful layered texture once baked


6. Rest and Prepare for Baking

  • Place the shaped rolls on a baking tray lined with parchment paper

  • Leave a little space between each piece

  • Cover lightly and allow them to rest for 20 minutes

Meanwhile:

  • Preheat the oven to 190°C (375°F)


7. Bake to a Golden Finish

  • Brush the tops of the rolls with egg yolk for a glossy, golden surface

  • Bake for 20–25 minutes, until evenly golden and beautifully risen

The rolls should feel light and sound crisp on the outside while remaining soft inside.


Serving Suggestions

  • Serve warm with butter, honey, or jam

  • Pair with cheese, eggs, or soup

  • Excellent for sandwiches or as a dinner side


Helpful Tips

  • Yogurt Temperature: Use room-temperature yogurt to keep the dough comfortable for rising

  • Flour Amount: Add flour gradually; the dough should feel soft and slightly elastic

  • Extra Flavor: Sprinkle sesame or nigella seeds on top before baking if desired

Egg Muffins – Quick & Nutritious Breakfast

Egg Muffins – Quick & Nutritious Breakfast

High in protein, low in carbs, and fully customizable

Prep Time: 10 minutes
Cook Time: 18–22 minutes
Total Time: 30 minutes
Yield: 6 muffins

Egg muffins are a versatile breakfast or snack option. You can add your favorite vegetables, meats, or cheeses, making them ideal for low-carb, keto, or meal-prep-friendly diets.


Ingredients

  • 6 large eggs

  • ¼ cup (60 ml) milk (or unsweetened almond/oat milk for dairy-free)

  • ½ cup shredded cheese (cheddar, feta, or your choice; optional for dairy-free)

  • ½ cup chopped vegetables (bell peppers, spinach, green onions, mushrooms, zucchini, etc.)

  • ¼ cup cooked bacon or ham (optional)

  • Salt and pepper to taste

  • ½ teaspoon garlic powder (optional)

  • ½ teaspoon paprika (optional)


Step-by-Step Instructions

1. Preheat the Oven

Preheat your oven to 375°F (190°C).
Lightly grease a 6-cup muffin tin with cooking spray, oil, or butter. Silicone muffin cups can also be used.


2. Prepare Ingredients

  • Chop your vegetables into small pieces.

  • Dice cooked bacon or ham if using.

  • Pre-sauté watery vegetables (like mushrooms or spinach) for 2–3 minutes to prevent soggy muffins.


3. Whisk the Eggs

In a large bowl, whisk together the eggs, milk, salt, pepper, garlic powder, and paprika until smooth and slightly frothy.
This ensures fluffy muffins with evenly distributed seasoning.


4. Assemble the Muffins

  • Divide the chopped vegetables and cooked meat evenly among the muffin cups.

  • Pour the egg mixture over the fillings, filling each cup about ¾ full.

  • Top each with shredded cheese, if using.


5. Bake

Place the muffin tin in the preheated oven.
Bake for 18–22 minutes, or until the egg muffins are set and lightly golden on top.
A toothpick inserted in the center should come out clean.


6. Cool and Serve

  • Allow the muffins to cool for a few minutes before removing them from the tin.

  • Serve warm, or store for meal prep.


Tips for Perfect Egg Muffins

  • Grease Well: Prevents sticking; silicone cups work best.

  • Whisk Thoroughly: Ensures light, fluffy muffins.

  • Do Not Overfill: Fill ¾ full to prevent overflow.

  • Cool Slightly Before Removing: Prevents breaking.

  • Storage & Reheating: Refrigerate in an airtight container for up to 5 days; microwave for 30–45 seconds to reheat.

  • Freezing: Let muffins cool completely, then freeze in airtight containers or freezer bags for up to 3 months. Reheat 1–2 minutes in the microwave.

Homemade Garden Vegetable Spread

Homemade Garden Vegetable Spread

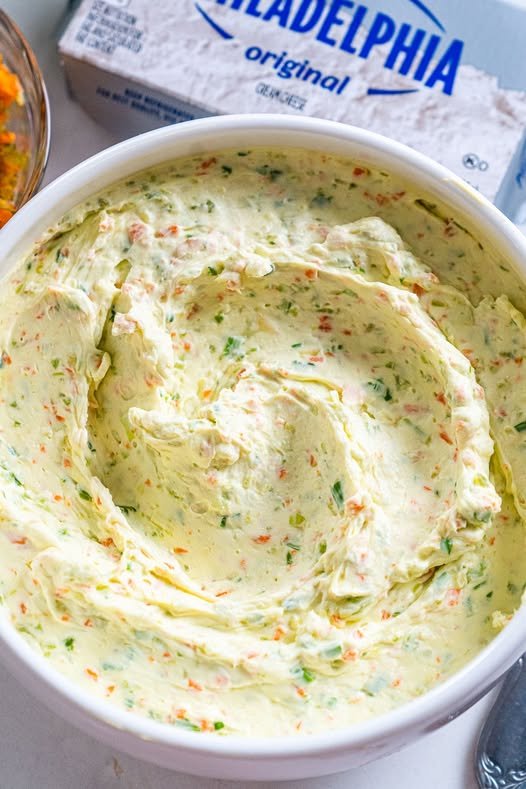
This creamy, tangy spread is packed with crunchy carrots, celery, and zesty green onions. It’s the perfect companion for toasted bagels, crackers, or even as a dip for fresh bell pepper strips.

  • Prep time: 15 minutes

  • Inactive time: 1–2 hours (chilling)

  • Yields: Serves 8

  • Dietary Info: Vegetarian, Contains Milk

Ingredients

  • 2 (8 oz) packages cream cheese, softened to room temperature

  • ¼ cup carrots, chopped

  • ½ cup celery, chopped

  • 2 green onions, chopped

  • ½ tsp salt

  • ½ tsp garlic powder

  • ¼ tsp onion powder

Preparation

  1. Prep the Veggies: Place the chopped carrots, celery, and green onions into a food processor. Pulse several times until the vegetables are broken down into very small bits.

    Tip: Be careful not to over-process; you want distinct texture, not a watery paste.

  2. Mix: In a medium-sized mixing bowl, combine the softened cream cheese, the pulsed vegetable mixture, salt, garlic powder, and onion powder. Stir vigorously until the vegetables and seasonings are evenly distributed throughout the cream cheese.

  3. Chill: Spoon the spread into an airtight container or a glass jar. Place it in the refrigerator for at least 1 to 2 hours. This allows the cream cheese to firm back up and the flavors from the onion and garlic to meld.

  4. Serve: Spread generously on toasted bagels or crusty bread.

Storage

Keep the spread refrigerated in an airtight container. It will stay fresh and delicious for 7–10 days.

Yeast-Free Savory Cheese & Herb Triangles

Yeast-Free Savory Cheese & Herb Triangles

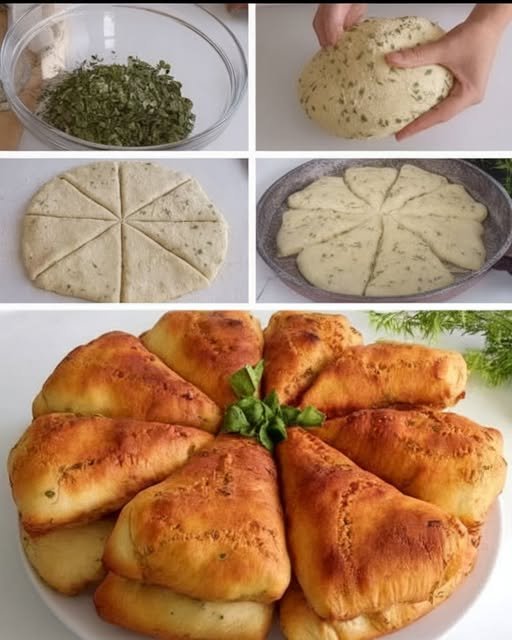
Soft, pan-cooked or baked cheese-filled bread triangles made without yeast. Ideal for breakfast, tea time, or a light savory snack.

Preparation Time

  • Prep: 15 minutes

  • Resting: 5 minutes

  • Cooking: 10–12 minutes (pan) or 20–25 minutes (oven)

  • Total: About 30–35 minutes

Yield

  • Makes 8 medium triangles


Ingredients

Dairy & Eggs

  • 2 large eggs (room temperature)

  • 90 ml milk (about 1 tea glass)

  • 80 g feta cheese or white cheese, crumbled

  • 80 g cheddar or mozzarella cheese, grated

Fresh Herbs

  • 3 green onions, finely chopped

  • 5–6 sprigs fresh parsley, finely chopped

Dry Ingredients

  • 3 cups all-purpose flour (approximately 360 g)

  • 1 packet baking powder (10 g)

  • 1 teaspoon salt (adjust depending on cheese saltiness)

For Cooking

  • 1–2 tablespoons olive oil or vegetable oil (for greasing the pan or tray)


Step-by-Step Instructions

1. Prepare the Wet Mixture

In a large mixing bowl, crack the eggs and whisk lightly until the yolks and whites are combined. Add the milk and mix until smooth.

Add the crumbled white cheese and grated cheese. Stir gently so the cheeses are evenly distributed throughout the mixture.


2. Add Herbs and Seasoning

Add the finely chopped green onions and parsley to the bowl. Sprinkle in the salt. Mix well to ensure the herbs are spread evenly.


3. Form the Dough

Sift the baking powder into the flour. Add the flour gradually to the bowl, one cup at a time, mixing with a spoon or your hand.

Once the mixture begins to come together, knead gently until a soft, smooth dough forms.

Dough texture guide:

  • If the dough feels sticky, add 1 tablespoon of flour at a time.

  • If the dough feels dry or crumbly, add 1–2 teaspoons of milk.

The dough should be soft and easy to handle, not stiff.


4. Shape the Dough

Lightly flour your work surface. Place the dough on it and gently press or roll it into a round shape about 1 cm (½ inch) thick.

Using a knife or pizza cutter, divide the dough into 8 equal triangles, similar to slicing a pizza.


5. Cooking Options

Pan Method

  • Lightly grease a non-stick pan with oil.

  • Place the triangles in the pan, leaving a little space between them.

  • Cover with a lid and cook over medium-low heat for about 5 minutes.

  • Turn the triangles carefully and cook the other side for another 4–5 minutes until both sides are evenly cooked.

Keep the heat moderate so the inside cooks properly without browning too quickly.

Oven Method

  • Preheat the oven to 180°C (350°F).

  • Line a baking tray with parchment paper or lightly grease it.

  • Arrange the triangles on the tray.

  • Bake for 20–25 minutes, turning once if needed, until cooked through.


6. Serving

Serve warm for the best texture and flavor. These cheese and herb triangles pair well with:

  • Fresh tomatoes or cucumbers

  • Olives

  • Yogurt or labneh

  • A light salad


Helpful Tips

  • You may replace parsley with dill or cilantro if preferred.

  • A small pinch of black pepper or mild paprika can be added for extra flavor.

  • These can be prepared ahead and reheated gently in a pan or oven.


Storage

  • Store leftovers in an airtight container in the refrigerator for up to 2 days.

  • Reheat on a pan over low heat or in the oven until warm.

Hearty Ground Beef & Potato Casserole

Hearty Ground Beef & Potato Casserole

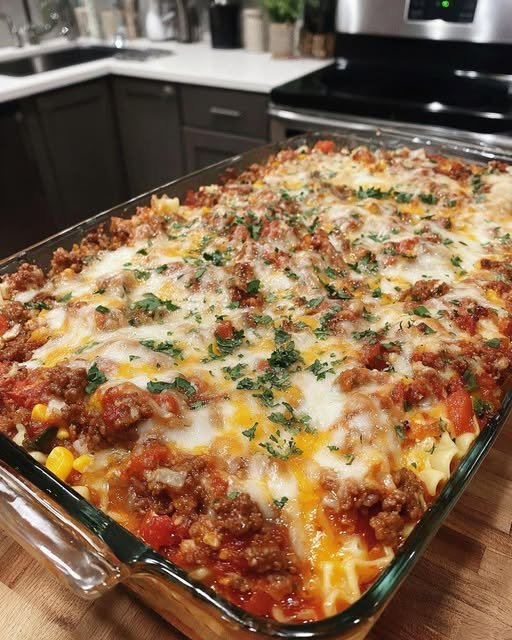
A comforting, layered bake featuring thin-sliced potatoes, fire-roasted tomatoes, and melted cheese.

Ingredients

The Meat & Sauce:

  • 1 lb Lean ground beef

  • ½ tbsp Olive oil + ½ tbsp Butter

  • ½ cup Onions, chopped

  • 4 cloves Garlic, minced

  • 8 oz can Plain tomato sauce

  • 14 oz can Fire-roasted tomatoes (don’t drain!)

  • ½ tsp Fine sea salt

  • ½ tsp Black pepper

  • 1 tbsp Fresh basil, chopped (for garnish)

The Layers:

  • 2 large Russet potatoes (peeled and thinly sliced)

  • ¾ cup Shredded cheese (Cheddar, Mozzarella, or a blend)


Instructions

1. Preparation

  • Preheat your oven to 375°F (190°C).

  • Grease a 9×13-inch baking dish with butter or nonstick spray.

2. Cook the Beef Base

  • Heat the olive oil and butter in a large skillet over medium heat.

  • Sauté the onions and garlic until the onions are translucent (about 3–4 minutes).

  • Add the ground beef, salt, and pepper. Cook until browned (5–7 minutes), then drain any excess fat.

3. Layer the Casserole

  • First Layer: Arrange half of the thinly sliced potatoes in the bottom of the dish.

  • Second Layer: Spread half of the cooked beef mixture over the potatoes.

  • Third Layer: Pour half of the tomato sauce and half of the fire-roasted tomatoes over the beef.

  • Fourth Layer: Sprinkle with half of the shredded cheese.

  • Repeat: Repeat the layers one more time, ending with the remaining cheese on top.

4. The Bake

  • Covered: Cover tightly with aluminum foil and bake for 45 minutes.

  • Uncovered: Remove the foil and bake for another 15 minutes until the potatoes are tender and the cheese is bubbly and golden.

5. Serving

  • Let the casserole rest for 10 minutes before slicing (this helps the layers stay together). Garnish with fresh basil and serve warm!


Quick Customization Tips

  • Low-Carb Swap the potatoes for thinly sliced zucchini or eggplant (just salt them first to draw out moisture!).

  • Spice it up: Add a pinch of red pepper flakes to the beef while browning.

  • Make-Ahead: You can assemble this 24 hours in advance and keep it in the fridge; just add 5–10 minutes to the covered baking time.