Creamy Layered Delight: The Perfect No-Bake Biscuit Pudding Recipe

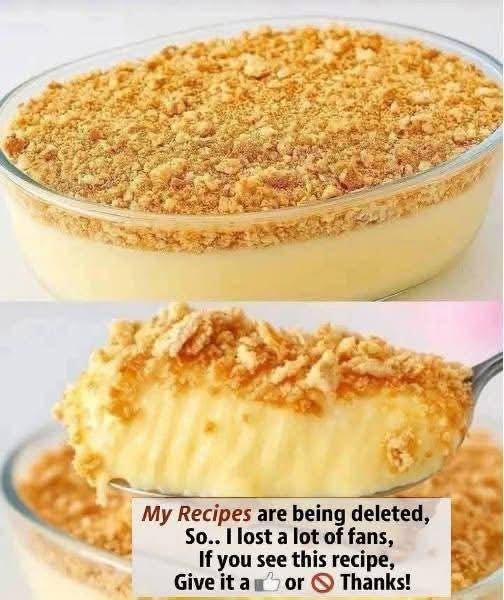
If you’re looking for an irresistibly creamy and easy dessert, this No-Bake Biscuit Pudding is the answer. With its smooth layers of velvety custard and the crunch of biscuit crumbs, this dessert offers a beautiful balance between textures. It’s an ideal sweet treat for any occasion—especially when you’re short on time but still want something impressive.


Let’s walk through how you can create this mouthwatering dessert at home!


This no-bake dessert requires minimal ingredients and effort, but it packs a punch in flavor. The combination of creamy, custard-like layers with the subtle sweetness and crunch of biscuits makes it a satisfying treat for everyone. Plus, it doesn’t require an oven, making it the perfect go-to recipe for hot summer days or any time you want a quick dessert fix.


Ingredients You’ll Need:

3 cups (700ml) whole milk

1 can (14 oz) sweetened condensed milk

4 tablespoons cornstarch

1 teaspoon vanilla extract

2 packets of digestive or graham crackers (or any plain biscuits you prefer)

1/4 cup butter (optional, for extra richness)

Crushed biscuits or graham crackers (for topping)

INSTRUCTIONS:

Instructions:

Step 1: Prepare the Creamy Custard Base

In a medium saucepan, combine the whole milk, sweetened condensed milk, and cornstarch. Whisk them together until the cornstarch is fully dissolved, ensuring no lumps remain. This mixture will form the base of the pudding.


Turn on the heat to medium and stir the mixture continuously. As it heats up, the mixture will thicken. This usually takes about 5 to 7 minutes. Once the pudding thickens to a creamy, custard-like consistency, remove it from the heat. Stir in the vanilla extract for a touch of flavor and richness. If you prefer a slightly richer custard, add the butter at this point and stir until melted.

Step 2: Layer the Biscuits

While the custard is cooling slightly, crush half of your biscuits or graham crackers into fine crumbs. You can do this by placing them in a ziplock bag and gently crushing them with a rolling pin, or by pulsing them in a food processor.


Take a deep dish or baking dish (preferably glass for presenation), and spread a thin layer of crushed biscuits on the bottom. This forms the crispy foundation for the pudding layers.


Step 3: Layer the Custard

Once your biscuits are in place, pour half of the custard mixture over the biscuit layer. Spread it evenly using a spatula or the back of a spoon. The smooth, creamy custard contrasts beautifully with the crunch of the biscuits.


Step 4: Add Another Biscuit Layer

Now, crush more biscuits and sprinkle a second layer over the custard. Be generous—this adds extra texture and flavor!


Step 5: Top with the Remaining Custard

Pour the remaining custard over the top biscuit layer. Gently spread it out, ensuring that the biscuit layer is fully covered and sealed in by the rich custard.


Step 6: Finish with Crushed Biscuits

To add the finishing touch, sprinkle the top with more crushed biscuits. This gives the dessert a lovely crunchy texture that complements the creamy filling.


Step 7: Chill and Serve

Place the dish in the refrigerator for at least 2 hours, or until fully set. Chilling allows the flavors to meld together and gives the pudding a more cohesive texture. For best results, you can even leave it to chill overnight.


Tips for Success:

Cornstarch consistency: Make sure to whisk constantly while heating the milk mixture to avoid lumps.

Layer variation: You can add more layers of biscuits and custard if desired for extra height and texture.

Flavored twist: Feel free to add a dash of cinnamon or cocoa powder to the biscuit layers for an extra flavor boost.

Serving Suggestions:

Once the pudding has set, it’s ready to be served! You can cut it into slices for a neat presentation or scoop it out with a large spoon for a more rustic look. The combination of the cool, creamy custard and the crumbly biscuit layers is sure to be a hit with anyone who tries it.


Why You’ll Love This Recipe:

No-bake: This is a perfect dessert when you don’t want to use the oven.

Minimal ingredients: With only a few pantry staples, you can whip this up in no time.

Customizable: You can experiment with different biscuits, toppings, or even flavors in the custard.

Make-ahead: This pudding can be made the night before, making it ideal for parties or gatherings.
Fluffy Apple & Cocoa Cake (No Added Sugar)

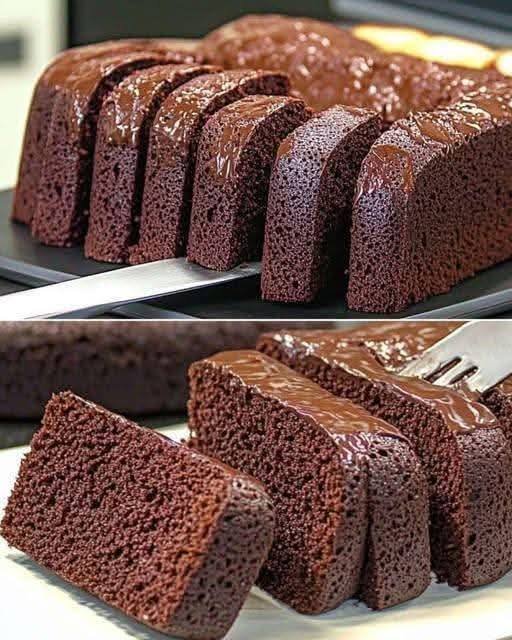
Fluffy Apple & Cocoa Cake (No Added Sugar)

A light, moist, and chocolatey treat powered by fruit.

Ingredients

  • 4 Medium Sweet Apples (Gala, Fuji, or Honeycrisp work best for natural sweetness)

  • 4 Large Eggs

  • 5 Tablespoons Unsweetened Cocoa Powder

  • 1 Teaspoon Baking Powder

  • Olive Oil (specifically for greasing the mold)


Step-by-Step Instructions

1. Prepare the Apples

Wash, peel, and core your four apples. Cut them into small chunks.

  • Pro Tip: To get that incredibly smooth, cake-like texture seen in your photo, you will want to steam or boil the apple chunks for about 10 minutes until they are very soft. Drain any excess water.

2. Blend the Base

Place the softened apples into a blender or food processor. Pulse until you have a completely smooth apple purée.

3. Combine with Eggs

Add the 4 large eggs to the blender with the apple purée. Blend again for about 30 seconds until the mixture is light and well-combined.

4. Sift in Dry Ingredients

Add the 5 tablespoons of cocoa powder and the 1 teaspoon of baking powder to the blender.

  • Important: Use a high-quality unsweetened cocoa powder to ensure a deep chocolate flavor without any hidden sugars.

  • Pulse the blender until the batter is a uniform chocolate color and completely smooth.

5. Prepare the Mold

Lightly grease a silicone mold or a small baking tin with a little olive oil. This ensures the cake releases perfectly without sticking to the sides.

6. Bake or Set

  • Oven Method: Preheat your oven to 350°F (175°C). Pour the batter into the mold and bake for 40–45 minutes, or until a toothpick comes out clean.

  • Alternative: Some versions of this recipe can be “set” in the fridge if using a setting agent, but for the spongy texture in your photo, baking is the best route.

7. Cool and Slice

Allow the cake to cool completely in the mold before flipping it onto a plate. As seen in your image, you can top it with a thin layer of melted sugar-free chocolate or a dusting of extra cocoa powder if you like.


Why It Works for You

By using apples as the base, you are getting natural fiber and sweetness without the need for refined flours or sugars. It keeps the calorie count low while providing a dense, satisfying texture.

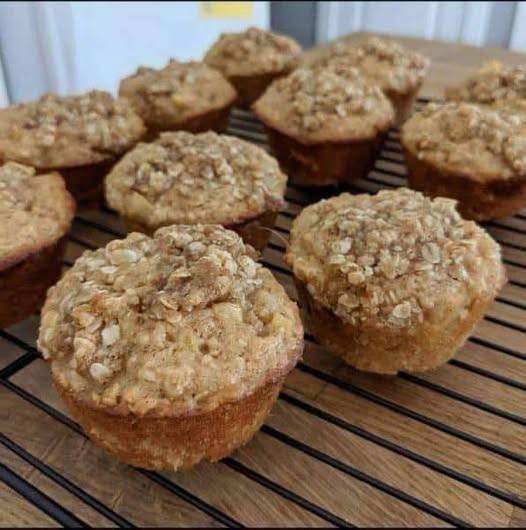
Easy Apple Oatmeal Muffins

Easy Apple Oatmeal Muffins

This recipe creates a dense, satisfying muffin with a lovely toasted oat topping.

Ingredients

  • 1 ½ cups All-purpose flour (or whole wheat flour for extra fiber)

  • 1 cup Rolled oats (plus a little extra for sprinkling on top)

  • ½ cup Brown sugar (packed)

  • 1 tbsp Baking powder

  • 1 tsp Cinnamon

  • ½ tsp Salt

  • 1 cup Milk (any variety)

  • 1 Large egg

  • ¼ cup Melted coconut oil or butter

  • 1 tsp Vanilla extract

  • 1 ½ cups Fresh apples (peeled and finely diced; Fuji or Honeycrisp work great)


Step-by-Step Instructions

  1. Preheat and Prep: Preheat your oven to 400°F (200°C). Grease a 12-cup muffin tin or line it with paper liners.

  2. Combine Dry Ingredients: In a large bowl, whisk together the flour, rolled oats, brown sugar, baking powder, cinnamon, and salt.

  3. Mix Wet Ingredients: In a separate medium bowl, whisk the milk, egg, melted oil/butter, and vanilla extract until well combined.

  4. Merge the Two: Pour the wet ingredients into the dry ingredients. Stir gently with a spatula just until combined. Tip: Do not over-mix; a few lumps are perfectly fine for a fluffy texture.

  5. Fold in Apples: Gently fold the diced apples into the batter.

  6. Fill the Tins: Spoon the batter into the prepared muffin tin, filling each cup about ¾ full.

  7. Add the Topping: Sprinkle a few extra rolled oats over the top of each muffin for that beautiful bakery-style look shown in your photo.

  8. Bake: Bake for 18–20 minutes, or until a toothpick inserted into the center comes out clean.

  9. Cool: Let the muffins cool in the tin for 5 minutes before transferring them to a wire rack.


Why This Recipe Works

  • Texture: The oats soften during baking but provide a hearty chew.

  • Beginner Friendly: This is a “one-bowl” style method that doesn’t require a heavy stand mixer.

  • Customizable: You can swap the apples for blueberries or add a handful of chopped walnuts for extra crunch.

Fluffy Homemade White Bread

Fluffy Homemade White Bread

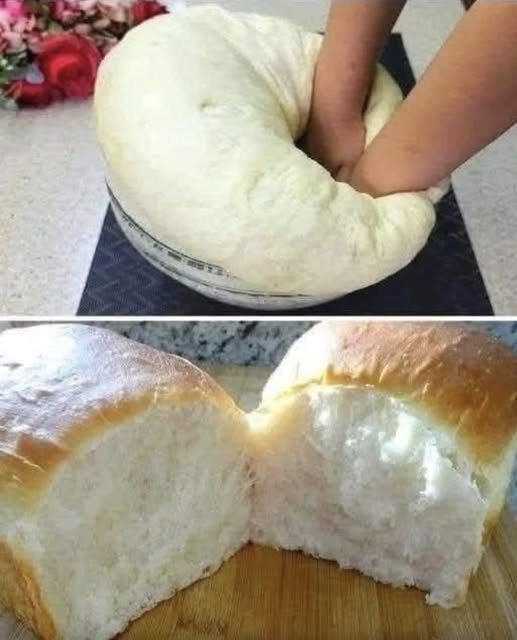
This recipe uses a simple kneading technique to develop the structure needed for that “cloud-like” interior seen in your photos.

Ingredients

  • 1 cup Warm water (ensure it is between 105–115°F; too hot will kill the yeast)

  • 1 package (2 ¼ tsp) Active dry yeast

  • 1 tbsp Sugar (this feeds the yeast and helps with browning)

  • 3 ½ cups All-purpose flour (plus a little extra for dusting)

  • 1 tsp Salt

  • ¼ cup Olive oil (this keeps the crumb soft and moist)


Step-by-Step Instructions

1. Activate the Yeast

In a large bowl, combine the warm water and sugar. Stir until the sugar dissolves. Sprinkle the active dry yeast over the top. Let it sit for about 5–10 minutes until it becomes foamy and smells like fresh bread.

2. Mix the Dough

Add the olive oil and salt to the yeast mixture. Gradually stir in the flour, one cup at a time. Continue mixing until a shaggy dough forms and begins to pull away from the sides of the bowl.

3. Knead for Structure

Turn the dough out onto a lightly floured surface. Knead the dough for 8–10 minutes by hand (or 5 minutes using a stand mixer with a dough hook).

  • The Goal: The dough should become smooth, elastic, and slightly tacky, but it should not stick to your hands. This process builds the strength needed for that high rise shown in your images.

4. The First Rise

Lightly grease a large bowl with a little olive oil. Place the dough inside and turn it once to coat it in oil. Cover the bowl with a clean kitchen towel or plastic wrap. Let it rise in a warm, draft-free spot for 1 to 1 ½ hours, or until it has doubled in size.

5. Shape the Loaf

Gently “punch down” the dough to release excess air (as seen in the top image of your file). Turn it onto a floured surface and shape it into a rectangle. Roll it up tightly into a log shape and pinch the seams shut. Place the dough into a greased 9×5-inch loaf pan.

6. The Second Rise

Cover the loaf pan and let the dough rise again for about 30–45 minutes. The dough should rise about an inch above the rim of the pan. Preheat your oven to 375°F (190°C) during this time.

7. Bake to Perfection

Bake for 30–35 minutes. The top should be a beautiful golden brown, and the loaf should sound hollow when you tap the bottom.

  • Optional: Brush the top with a little melted butter or olive oil immediately after taking it out of the oven for an extra soft crust.

8. Cool Completely

Allow the bread to cool in the pan for 10 minutes, then transfer it to a wire rack. Wait at least 30 minutes before slicing to ensure the internal structure is set and stays fluffy.


Tips for the Best Results

  • Temperature Matters: If your kitchen is cold, your dough will take longer to rise. You can place the bowl inside an “off” oven with the oven light turned on for a perfect proofing environment.

  • Don’t Over-Flour: Use only as much flour as needed during kneading. Too much flour will make the bread dense rather than fluffy.

High-Protein Blueberry Breakfast Bake

High-Protein Blueberry Breakfast Bake

Serves 1 | Prep time: 5 mins | Bake time: 25-30 mins

Ingredients

The Base:

  • Bread: 2-3 slices of low-calorie/high-fiber bread or sourdough (cubed).

  • Blueberries: 1/2 cup fresh or frozen blueberries.

The “Protein Bomb” Liquid:

  • Egg Whites: 1/2 cup (liquid carton egg whites work best for volume).

  • Whole Egg: 1 large egg.

  • Protein Powder: 1 scoop (approx. 30g) Vanilla Whey or Casein/Whey blend.

  • Greek Yogurt: 1/4 cup non-fat plain Greek yogurt.

  • Milk: 1/4 cup unsweetened almond milk (or milk of choice).

  • Sweetener: 1-2 tbsp calorie-free sweetener (like Stevia or Monkfruit).

  • Flavorings: 1/2 tsp vanilla extract and a pinch of cinnamon.


Instructions

  1. Prep the Oven: Preheat your oven to 350°F (175°C). Lightly grease a small oven-safe ramekin or individual baking dish with non-stick spray.

  2. Layer the Dish: Place your cubed bread into the dish and sprinkle most of the blueberries over and between the bread pieces.

  3. Mix the Liquid: In a blender or a medium bowl with a whisk, combine the egg whites, whole egg, protein powder, Greek yogurt, milk, sweetener, vanilla, and cinnamon. Pro Tip: Blending ensures the protein powder is completely smooth with no clumps.

  4. Soak: Pour the protein mixture over the bread cubes. Use a spoon to gently press the bread down so every piece is submerged and soaking up the liquid. Let it sit for 2-3 minutes.

  5. Bake: Top with the remaining blueberries. Bake for 25–30 minutes, or until the center is set and the top is golden brown and slightly puffed.

  6. Cool and Serve: Let it cool for a few minutes (it will deflate slightly, which is normal).


Helpful Tips for Success

  • The Bread Matters: Using a slightly “stale” or toasted bread helps it absorb the liquid without becoming too mushy.

  • Casein vs. Whey: If you use a Casein-Whey blend protein powder, the texture will be thicker and more cake-like. Pure Whey tends to be a bit more “custard-like.”

  • The Topping: For an extra treat, drizzle a little sugar-free maple syrup or a “frosting” made of a tablespoon of Greek yogurt mixed with a teaspoon of protein powder.

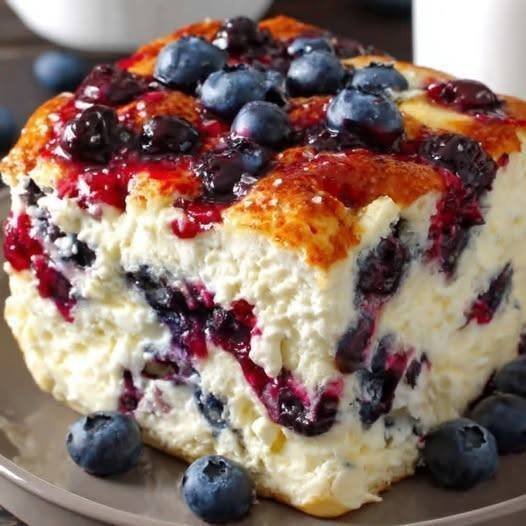
Blueberry Cottage Cheese Breakfast Bake

Blueberry Cottage Cheese Breakfast Bake

A creamy, protein-packed breakfast that tastes like dessert.

Ingredients

  • 1 cup Cottage cheese

  • 1/2 cup Rolled oats

  • 1/2 cup Fresh blueberries

  • 2 Large eggs

  • 1/4 cup Honey or maple syrup

  • 1/2 tsp Cinnamon

  • 1/4 tsp Vanilla extract


Step-by-Step Instructions

1. Preheat and Prep

Preheat your oven to 175°C (350°F). Lightly grease a small baking dish (about 6×6 inches or a small round pie dish) with a little bit of butter or coconut oil.

2. Blend the Base (Optional)

If you prefer a smooth, cheesecake-like texture, place the cottage cheese, eggs, honey/syrup, vanilla, and cinnamon in a blender and pulse until smooth. If you enjoy a more rustic, textured bake, simply whisk them together in a medium bowl.

3. Combine with Oats

Stir the rolled oats into the mixture. Let it sit for about 5 minutes; this allows the oats to soften slightly and ensures a better “set” once baked.

4. Add the Berries

Gently fold in half of the fresh blueberries. Pour the mixture into your prepared baking dish. Scatter the remaining blueberries over the top so they look beautiful once baked.

5. Bake

Place in the oven and bake for 30–35 minutes. You’ll know it’s ready when the edges are golden brown and the center is set (it should have a slight, firm jiggle but not be liquid).

6. Cool and Set

Allow the bake to cool for at least 10 minutes before slicing. This time is crucial for the cottage cheese and eggs to fully firm up.


Helpful Tips

  • Storage: This keeps well in the refrigerator for up to 3 days, making it an excellent meal-prep option.

  • Serving: You can enjoy this warm, but many people find the flavor and texture are even better when served chilled with an extra dollop of Greek yogurt.