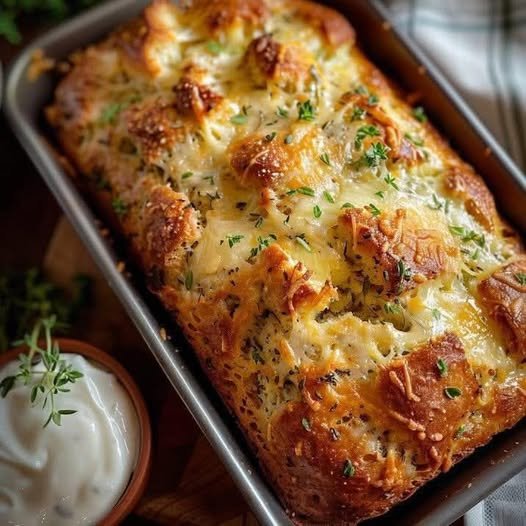
Herb & Cheese Quick Bread: A Savory Delight in Just One Hour

Introduction:

If you’re looking for a savory bread that’s easy to make and bursting with flavor, this Herb & Cheese Quick Bread is the perfect choice. Quick breads are ideal for when you want a homemade loaf without the hassle of yeast or extended rising times. This recipe is packed with fresh herbs like parsley and thyme, combined with a savory mix of cheeses to create a moist, tender loaf that’s delicious on its own or served alongside your favorite soups and salads. The best part? It comes together in about an hour, making it an excellent option for last-minute dinner additions or an afternoon snack. Whether you’re a beginner baker or a seasoned pro, this recipe is sure to become a go-to in your kitchen.

Ingredients:

Dry Ingredients:

  • 2 cups all-purpose flour
  • 1 tbsp baking powder
  • 1 tsp garlic powder
  • 1/2 tsp salt
  • 1/4 tsp black pepper

Wet Ingredients:

  • 1 cup whole milk
  • 2 large eggs
  • 1/4 cup olive oil

Add-ins:

  • 1 cup shredded cheddar cheese
  • 1/2 cup grated Parmesan cheese
  • 2 tbsp fresh parsley, chopped
  • 1 tbsp fresh thyme, chopped (or 1 tsp dried thyme)
  • 1 tbsp fresh chives, chopped

Optional Topping:

  • 2 tbsp melted butter for brushing the top

Directions:

Step 1: Preheat and Prepare

  1. Preheat the Oven: Preheat your oven to 350°F (175°C). Grease a 9×5-inch loaf pan or line it with parchment paper.
  2. Prepare the Ingredients: Shred the cheddar cheese and grate the Parmesan. Chop the fresh herbs and set them aside.

Step 2: Mix the Dry Ingredients

  1. Combine Dry Ingredients: In a large mixing bowl, whisk together the flour, baking powder, garlic powder, salt, and black pepper until well combined.

Step 3: Mix the Wet Ingredients

  1. Combine Wet Ingredients: In a separate bowl, whisk together the milk, eggs, and olive oil until smooth.

Step 4: Combine and Add the Cheese and Herbs

  1. Mix Everything Together: Pour the wet ingredients into the dry ingredients, stirring gently until just combined. Be careful not to overmix.
  2. Add the Cheese and Herbs: Fold in the shredded cheddar, grated Parmesan, parsley, thyme, and chives. The batter will be thick.

Step 5: Bake the Bread

  1. Transfer to the Pan: Spoon the batter into the prepared loaf pan and smooth the top.
  2. Bake: Bake for 45-50 minutes, or until a toothpick inserted into the center comes out clean and the top is golden brown.
  3. Cool: Let the bread cool in the pan for 10 minutes before transferring it to a wire rack to cool completely.

Step 6: Optional Topping

  1. Brush with Butter: If desired, brush the top of the warm bread with melted butter for extra richness.

How to Prepare:

  • Storage: Store any leftover bread wrapped tightly at room temperature for up to 2 days, or in the refrigerator for up to 5 days.
  • Serving Suggestion: Serve warm with butter or alongside soups, stews, or a fresh salad.

Preparation Time:

  • Prep Time: 15 minutes
  • Cook Time: 45-50 minutes
  • Total Time: 1 hour 5 minutes

Servings:

  • Yields: 8-10 slices

FAQs:

1. Can I use other types of cheese?

  • Yes! Feel free to swap out the cheddar and Parmesan for other cheeses like Gruyère, mozzarella, or even feta for a different flavor.

2. Can I make this bread gluten-free?

  • You can substitute all-purpose flour with a gluten-free baking mix. Make sure it includes a binder like xanthan gum for the best texture.

3. Can I use dried herbs instead of fresh?

  • Absolutely! If using dried herbs, reduce the quantity to about 1/3 of the fresh herbs called for in the recipe.

4. How can I make this bread more flavorful?

  • You can add more garlic powder or even include some sautéed onions or roasted garlic for a deeper flavor.

5. Can I freeze this bread?

  • Yes! Once the bread is fully cooled, wrap it tightly in plastic wrap and then in aluminum foil. It will stay fresh in the freezer for up to 3 months. Thaw at room temperature before serving.

Conclusion:

This Herb & Cheese Quick Bread is not only incredibly easy to make but also packed with flavor from the fresh herbs and a delicious mix of cheeses. It’s a versatile bread that pairs perfectly with hearty soups, stews, or even served on its own with a bit of butter. The best part is, you don’t need any yeast or long rising times—this quick bread is ready to enjoy in just about an hour. Whether you’re baking it for a special occasion or simply to enjoy a savory snack, this recipe is sure to be a hit with family and friends.


Cheesy Garlic Potato & Onion Bake

Cheesy Garlic Potato & Onion Bake

Prep time: 15 mins | Cook time: 45 mins | Servings: 4

Ingredients

  • 2 cups potatoes: Peeled and diced into small, uniform cubes.

  • 1 cup onion: Chopped finely.

  • 1 cup shredded cheese: Use a good melting cheese like Cheddar or Mozzarella.

  • 2 cloves garlic: Minced finely.

  • 1/4 cup olive oil

  • 1 tsp salt

  • 1/2 tsp black pepper

Flavor Boosters (Optional):

  • Herbs: Freshly chopped rosemary, thyme, or parsley.

  • Spice: A pinch of cayenne or smoked paprika.

  • Cheese Twist: A sprinkle of Parmesan for a nutty crust.


Instructions

1. Preparation

Preheat your oven to 375°F (190°C). While the oven warms, prep your vegetables. Ensure the potatoes are diced into even cubes so they cook at the same rate. Thoroughly wash and scrub them before peeling.

2. Sauté the Base

In a large skillet, heat the olive oil over medium heat. Add the diced potatoes and cook, stirring occasionally, until they are slightly browned and starting to soften.

3. Add Aromatics

Stir in the chopped onions and minced garlic. Season with salt and black pepper. Continue to cook until the onions are translucent and the potatoes are tender.

Note: Be careful not to burn the garlic or over-brown the onions; you want them soft and fragrant.

4. The Cheesy Finish

Transfer the mixture to a baking dish (a rustic ceramic dish looks great for serving). Evenly sprinkle the shredded cheese over the top. If you are using Parmesan or smoked paprika, add them now.

5. Bake

Place the dish in the oven and bake until the cheese is completely melted, bubbly, and slightly golden (usually about 10–15 minutes depending on your oven).


Tips for Success

  • The Best Sauté: Keep an eye on your onions. You want them translucent, not caramelized to a crisp, to maintain that sweet, savory balance.

  • Storage: If you have leftovers, they keep beautifully in an airtight container in the fridge for 3–4 days.

  • Reheating: To maintain the texture of the potatoes, reheat in the oven with a tiny drizzle of olive oil to crisp the edges back up.

Baked Cauliflower Tastes Better Than Meat! Crispy Roasted Cauliflower

Baked Cauliflower Tastes Better Than Meat! Crispy Roasted Cauliflower

Table of Contents

Cauliflower has transcended its reputation as a bland, overlooked vegetable and emerged as a culinary superstar, especially when roasted to perfection. My Crispy Roasted Cauliflower recipe is a testament to the versatility and deliciousness of this humble vegetable. Infused with Italian herbs and Parmesan, this dish promises a crispy, flavorful experience that rivals any meat dish. Whether you are a dedicated vegetarian or simply looking to add more vegetables to your diet, this recipe will win you over with its crispy texture and rich, savory taste.

History

Cauliflower, a member of the Brassica family, has been cultivated for centuries. Originally from the Mediterranean region, it has been a staple in many traditional cuisines. Over time, it has gained popularity worldwide due to its adaptability and nutritional benefits. Roasting cauliflower enhances its natural sweetness and creates a delightful crispiness that makes it a favorite in modern kitchens. This recipe pays homage to the classic roasted cauliflower while elevating it with contemporary flavors and techniques.

Ingredients

1 head of cauliflower

3 slices of lemon

A handful of dill

1 1/4 cups panko breadcrumbs

1 clove of minced garlic

3/4 cup all-purpose flour

3 eggs

5 tbsp olive oil

1 tsp Italian herbs

A handful of chopped parsley

1 cup grated Parmesan cheese

Salt, to taste

Ground black pepper, to taste

Sauce:
  • 3/4 cup sour cream
  • 1/2 cup yogurt
  • Freshly chopped parsley
  • Salt and ground black pepper
  • Lemon juice
Directions
Prepare the Cauliflower

Start by cutting the cauliflower into florets. Bring a pot of salted water to a boil and add the lemon slices, a handful of dill, and the cauliflower florets. Boil for five minutes, then drain and set aside. This step helps to infuse the cauliflower with subtle flavors and tenderize it slightly before roasting.

See also  3 STEPS TO MAKE CAKE
Prepare the Coating Mixture

In a large mixing bowl, combine the panko breadcrumbs, minced garlic, olive oil, Italian herbs, salt, ground black pepper, chopped parsley, and grated Parmesan cheese. Mix until well combined. This breadcrumb mixture will give the cauliflower its irresistible crispy coating.

Coat the Cauliflower

Set up a dredging station with a plate of all-purpose flour, a bowl of whisked eggs, and the bowl of breadcrumb mixture. Dredge each cauliflower floret first in the flour, then dip it in the whisked eggs, and finally coat it in the breadcrumb mixture. Ensure each piece is evenly coated for maximum crispiness.

Bake the Cauliflower

Place the coated cauliflower florets on a parchment-lined baking tray. Preheat your oven to 350°F (175°C) and bake for 20 minutes, or until the cauliflower is golden brown and crispy. The aroma of the herbs and Parmesan will fill your kitchen, making it hard to wait for the finished product.

Prepare the Sauce

While the cauliflower is baking, prepare the sauce. In a small bowl, combine the sour cream, yogurt, freshly squeezed lemon juice, chopped parsley, salt, and ground black pepper. Mix well. This creamy, tangy sauce complements the crispy cauliflower perfectly, adding a refreshing contrast to each bite.

Serve and Enjoy

Once the cauliflower is done baking, remove it from the oven and let it cool slightly. Serve the crispy roasted cauliflower with the prepared sauce. Garnish with extra parsley if desired. Enjoy this delicious, meat-free dish that is sure to impress both vegetarians and meat-lovers alike.

Nutrition Information

Per Serving:

Calories: 220

See also  Mediterranean Lemon Chicken with Artichokes & Olives

Protein: 10g

Carbohydrates: 25g

Dietary Fiber: 3g

Sugars: 3g

Fat: 10g

Saturated Fat: 3g

Cholesterol: 75mg

Sodium: 320mg

Vitamin A: 8% DV

Vitamin C: 70% DV

Calcium: 20% DV

Iron: 10% DV

Conclusion

This Crispy Roasted Cauliflower recipe is a delightful alternative to traditional meat dishes. The combination of herbs, Parmesan, and a crispy breadcrumb coating makes it a standout dish that will leave you craving more. Perfect for a weeknight dinner or as a side dish for a special occasion, this recipe is sure to become a favorite in your household.

Lemon Butter Baked Cod

This Lemon Butter Baked Cod recipe is a delightful dish that combines the freshness of lemon with the richness of butter to create a flavorful and tender cod fillet. The cod is coated in a buttery lemon mixture, then lightly breaded and baked to perfection. It’s a simple yet elegant dish that is perfect for a weeknight dinner or a special occasion.

Why You’ll Love This Recipe:

  • Quick and easy to prepare
  • Bright and refreshing flavors
  • Versatile and can be paired with various side dishes

Ingredients:

  • 2 lb cod fillet (any white fish)
  • 1/4 cup butter or margarine
  • 2 tablespoons lemon juice
  • 1/4 cup all-purpose flour
  • Dash(es) of paprika
  • Salt & pepper to taste

Directions:

  • Cut the cod fillets into serving sizes.
  • Melt the butter in a saucepan or microwave. Add lemon juice to the melted butter.
  • In another dish, mix together flour, salt, and pepper.
  • Dip each fish fillet into the butter and lemon mixture, coating well on all sides.
  • Then dip the buttered fish into the flour mixture, coating well on all sides.
  • Place the coated fillets in an ungreased baking dish.
  • Drizzle the remaining butter mixture over the fillets.
  • Sprinkle the entire dish with paprika.
  • Bake the dish, uncovered, in a 350°F oven for 25-30 minutes or until the fish flakes easily with a fork.
  • Garnish with parsley and lemon wedges before serving.
  • Prep Time: 15 minutes
  • Cooking Time: 25-30 minutes
  • Total Time: 40-45 minutes
  • Servings: 4
  • Kcal: 320 per serving

Storage:

  • Store any leftovers in an airtight container in the refrigerator for up to 2 days. Reheat in the oven or microwave until heated through.

Recipe Tips:

  • For added flavor, you can squeeze some extra lemon juice over the baked cod before serving.
  • Serve this dish with a side of steamed vegetables or a fresh salad for a complete meal.

Cheesy Garlic Herb Twisted Bread

Cheesy Garlic Herb Twisted Bread

Yields: 6–8 large twists
Prep Time: 25 minutes
Rise Time: 1 hour 30 minutes
Bake Time: 15–20 minutes

Soft, fluffy bread filled with buttery garlic, herbs, and melted cheese, twisted into beautiful bakery-style strips.


🥖 Ingredients

For the Dough

  • 3½ cups all-purpose flour (or bread flour for extra chew)

  • 1 cup warm milk (about 110°F / 45°C)

  • 2¼ teaspoons active dry yeast (1 packet)

  • 1 tablespoon sugar

  • 1 teaspoon salt

  • 1 large egg (room temperature)

  • 4 tablespoons unsalted butter, softened

For the Filling

  • 2 cups shredded mozzarella or cheddar (or a mix of both)

  • 4 tablespoons unsalted butter, softened

  • 3 cloves garlic, finely minced

  • 2 tablespoons fresh parsley, finely chopped

  • ½ teaspoon onion powder

For the Glaze

  • 1 egg

  • 1 tablespoon water


👩‍🍳 Instructions

1️⃣ Prepare the Dough

Activate the Yeast
In a small bowl, combine warm milk, sugar, and yeast. Stir gently and let it sit for 5–10 minutes until the mixture looks foamy and bubbly.

Mix the Dough
In a large mixing bowl, combine the flour and salt. Add the yeast mixture, egg, and softened butter.

Knead
Knead the dough by hand or with a mixer for 8–10 minutes until it becomes smooth, stretchy, and slightly soft to the touch without sticking.

First Rise
Place the dough into a lightly oiled bowl. Cover with a cloth or plastic wrap and let it rest in a warm place for 1 to 1½ hours, until it has doubled in size.


2️⃣ Prepare the Filling

In a small bowl, mix together:

  • Softened butter

  • Minced garlic

  • Chopped parsley

  • Onion powder

Stir until it forms a smooth garlic-herb spread.
Set the cheese aside for later use.


3️⃣ Shape the Twists

Roll the Dough
Place the risen dough onto a lightly floured surface. Roll it into a large rectangle about 12 × 18 inches.

Add the Filling
Spread the garlic-herb butter evenly over the surface. Sprinkle the shredded cheese over the butter layer.

Fold and Slice
Fold the dough in half lengthwise so the filling is inside.
Using a knife or pizza cutter, slice into strips about 1½ inches wide.

Twist
Hold each strip at both ends and gently twist it several times.
Place each twist on a parchment-lined baking sheet with space between them.


4️⃣ Final Rise & Baking

Second Rest
Cover the twists loosely and allow them to rest for 20–30 minutes.
During this time, preheat the oven to 375°F (190°C).

Prepare Egg Wash
Beat 1 egg with 1 tablespoon water.

Brush
Lightly brush the tops of the twists with the egg wash for a glossy finish.

Bake
Bake for 15–20 minutes, until:

  • The bread is golden brown

  • The cheese is melted and bubbly

  • The kitchen smells amazing 😄


🌿 Serving Ideas

  • Serve warm with marinara or garlic butter

  • Perfect as a side for pasta or soup

  • Great for parties, lunchboxes, or snack boards


💡 Tips

✔ Add chili flakes for heat
✔ Add oregano or basil for Italian flavor
✔ Use pizza cheese blend for stretchier texture
✔ Best eaten warm, but reheats beautifully

Cheesy Mashed Potato Puffs (Easy Leftover Potato Recipe)

Cheesy Mashed Potato Puffs (Easy Leftover Potato Recipe)

These cheesy mashed potato puffs are the ultimate way to transform leftover mashed potatoes into something golden, crispy, and irresistible. Baked in a muffin tin, they develop crunchy edges on the outside while staying soft and fluffy inside. Packed with melted cheese and fresh chives, they make an ideal side dish, snack, or party appetizer.

If you love creative potato recipes like potato pancakes or stuffed potato cups, this recipe will quickly become a favorite. It uses simple ingredients and turns everyday leftovers into a brand-new comfort food.


Why You’ll Love This Recipe

• Crispy outside, fluffy inside
• Melty cheddar cheese in every bite
• Perfect for meal prep and lunchboxes
• Easy to customize with meat, vegetables, or herbs
• Naturally gluten-free
• Great way to use leftover mashed potatoes

These baked potato puffs are portable, reheatable, and always a crowd-pleaser.


Ingredients

3 cups mashed potatoes (cold or room temperature)
1 cup shredded cheddar cheese
2 large eggs
1/4 cup chopped chives
Salt and black pepper, to taste


How to Make Cheesy Mashed Potato Puffs

Step 1: Preheat the Oven

Preheat oven to 400°F (200°C). Grease a standard muffin tin with butter or nonstick spray.

Step 2: Mix the Ingredients

In a large bowl, combine mashed potatoes, shredded cheese, eggs, chives, salt, and pepper. Mix until smooth and evenly blended.

Step 3: Fill the Muffin Cups

Spoon the mixture into the muffin tin, filling each cup to the top. Smooth the surface slightly.

Step 4: Bake

Bake for 25–30 minutes, or until the tops are golden brown and the edges are crispy.

Step 5: Cool and Serve

Allow to cool for 5 minutes before removing from the pan. Serve warm as a snack, side dish, or appetizer.


Recipe Variations

Make this recipe your own with easy add-ins:

Protein: cooked chicken, turkey bacon, or beef sausage
Vegetables: bell peppers, broccoli, caramelized onions
Herbs: parsley, dill, or thyme instead of chives
Spicy: chili flakes or hot sauce
Cheese: mozzarella, gouda, or white cheddar


Serving Ideas

• With scrambled eggs or omelets for breakfast
• Alongside soup or stew
• On party platters with dipping sauces
• In kids’ lunchboxes
• As mini sliders with sausage or tofu


Storage & Reheating

Refrigerator: Store in an airtight container for up to 4 days
Freezer: Freeze for 1–2 months

Reheat Options:
• Oven: 350°F for 8–10 minutes
• Air fryer: 375°F for 5–6 minutes
• Microwave: 30–40 seconds (softer texture)


Common Mistakes & Fixes

Sticking to pan: Grease well or use silicone liners
Falling apart: Use 2 eggs for binding
Too soft: Drain excess moisture from potatoes
Bland taste: Season mashed potatoes before mixing
Soggy bottoms: Bake at full temperature (400°F)


Frequently Asked Questions

Can I use instant mashed potatoes?
Yes, as long as they are thick and fully cooled.

Can I make them dairy-free?
Yes, use plant-based cheese and dairy-free mashed potatoes.

Can I freeze them?
Yes, freeze after baking and cooling completely.

How do I know they’re done?
They will be golden on top with crisp edges.

Best cheese to use?
Sharp cheddar for bold flavor, or mozzarella and gouda for a milder taste.


Final Thoughts

These cheesy mashed potato puffs are one of the easiest and tastiest ways to reinvent leftovers. They’re quick to prepare, endlessly customizable, and suitable for breakfast, lunch, or parties. Whether you serve them fresh from the oven or reheat them later, they deliver crispy edges and creamy centers every time.