Easy Cheesecake Recipe

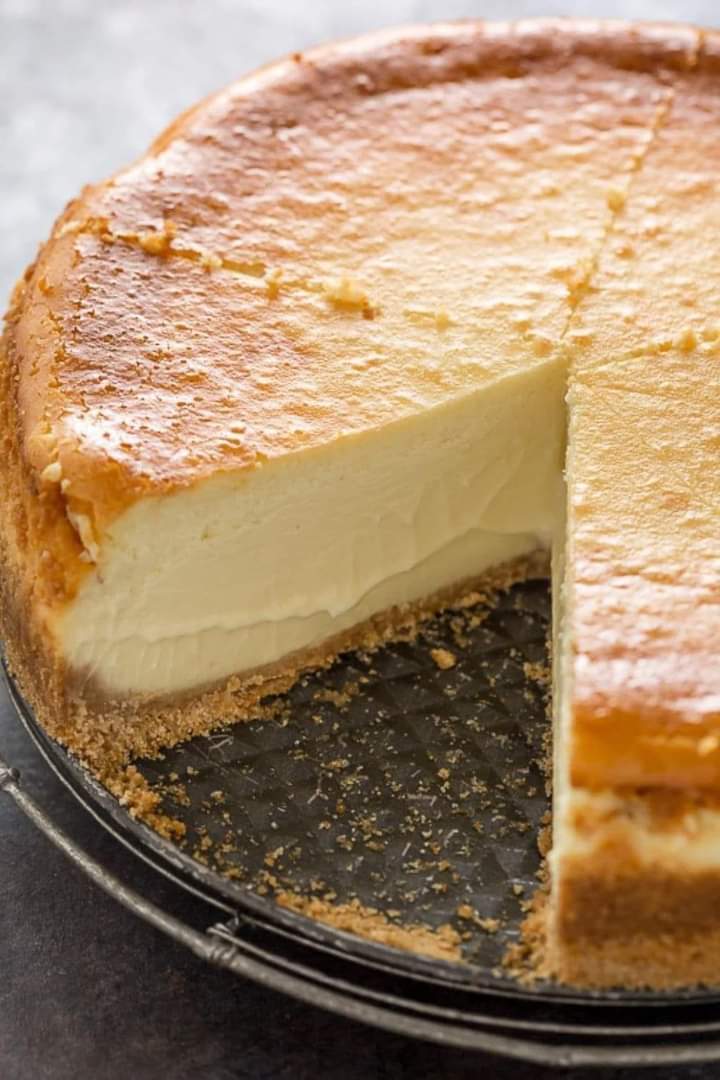
Today I’m so excited to show you how to make the best Cheesecake Recipe of your life. Simple, classic, and no water bath required!! The texture is smooth, rich, and creamy, served over a crisp homemade graham cracker crust. 

I’ve included tons of detailed tips and important info in today’s post so you can make the perfect creamy cheesecake every time. For a visual how-to, be sure to check out my step-by-step video beneath the recipe!

How to make the creamiest, BEST Cheesecake Recipe! Oh, and there’s no water bath required!

Course: Dessert

Cuisine: American

Prep Time: 20minutes

Cook Time: 1hour 15minutes 

Cooling Time: 6hours

Total Time: 7hours 35minute

Servings: 12 slices


INGREDIENTS:

  • Graham Cracker Crust¹
  • 1 ½ cups graham cracker crumbs (170g)
  • 2 Tablespoons sugar
  • 1 Tablespoon brown sugar (can substitute white)
  • 7 Tablespoons butter melted
Cheesecake
  • 32 oz cream cheese² softened to room temperature (910g)
  • 1 cup sugar (200g)
  • ⅔ cups sour cream (160g)
  • 1 ½ teaspoons vanilla extract
  • ⅛ teaspoon salt
  • 4 large eggs room temperature, lightly beaten

INSTRUCTIONS:

  1. Preheat oven to 325F (160C).
  2. Prepare Graham Cracker crust first by combining graham cracker crumbs, sugar, and brown sugar, and stirring well. Add melted butter and use a fork to combine ingredients well.
  3. Pour crumbs into a 9” Springform pan and press firmly into the bottom and up the sides of your pan. Set aside.
Cheesecake
  1. In the bowl of a stand mixer or in a large bowl (using a hand mixer) add cream cheese and stir until smooth and creamy (don’t over-beat or you’ll incorporate too much air).
  2. Add sugar and stir again until creamy.
  3. Add sour cream, vanilla extract, and salt, and stir until well-combined. If using a stand mixer, make sure you pause periodically to scrape the sides and bottom of the bowl with a spatula so that all ingredients are evenly incorporated.
  4. With mixer on low speed, gradually add lightly beaten eggs, one at a time, stirring just until each egg is just incorporated. Once all eggs have been added, use a spatula to scrape the sides and bottom of the bowl again and make sure all ingredients are well combined.
  5. Pour cheesecake batter into prepared springform pan. To insure against leaks, place pan on a cookie sheet that’s been lined with foil.
  6. Transfer to the center rack of your oven and bake on 325F (160C) for about 75 minutes. Edges will likely have slightly puffed and may have just begun to turn a light golden brown and the center should spring back to the touch but will still be Jello-jiggly. Don’t over-bake or the texture will suffer, which means we all suffer.
  7. Remove from oven and allow to cool on top of the oven³ for 10 minutes. Once 10 minutes has passed, use a knife to gently loosen the crust from the inside of the springform pan (this will help prevent cracks as your cheesecake cools and shrinks). Do not remove the ring of the springform pan.
  8. Allow cheesecake to cool another 1-2 hours or until near room temperature before transferring to refrigerator and allowing to cool overnight or at least 6 hours. I remove the ring of the springform pan just before serving then return it to the pan to store. Enjoy!

NOTES:

I have not tested this recipe in a convection oven.

1) For more details on making this crust or to use whole graham crackers, please see my Graham Cracker Crust Recipe.

2) Make sure that you use the brick-style cream cheese, not the spreadable version that is available in tubs.

3) I recommend the top of the oven because it is usually the warmest place in my house (after it’s been on for over an hour). This will help to cool the cheesecake more gradually and will also help avoid cracks).

NUTRITIONAL INFO:

Serving: 1slice | Calories: 500kcal | Carbohydrates: 32g | Protein: 8g | Fat: 36g | Saturated Fat: 22g | Polyunsaturated Fat: 1g | Monounsaturated Fat: 3g | Cholesterol: 179mg | Sodium: 450mg | Potassium: 45mg | Fiber: 1g | Sugar: 24g | Vitamin A: 1200IU | Calcium: 80mg | Iron: 0.9mg


California Pasta Salad Recipe

This delicious and colorful California Pasta Salad is always a hit as part of a party menu. Make this easy pasta salad recipe up to a day ahead if you like; the flavors only get better as it marinates.

Course: Salad

Cuisine: American

Prep Time: 15minutes

Cook Time: 2hours 25minutes 

Total Time: 2 hours 40minutes

Servings: 16 (1-cup) servings

INGREDIENTS:

For the Salad Dressing:
  • 1 cup olive oil
  • 1/2 cup red wine vinegar
  • 1/4 cup Parmesan cheese
  • 1 tablespoon sesame seeds
  • 2 teaspoons dried oregano
  • 2 teaspoons poppy seeds
  • 1/4 teaspoon garlic or two cloves fresh, finely minced
  • 1 teaspoon paprika
  • 1/2 teaspoon celery seed
  • 1/4 teaspoon salt or more to taste
For the Pasta Salad:
  • 1 pound thin spaghetti broken into thirds (see note 1)
  • 2 medium zucchini diced
  • 1 pint grape tomatoes halved (see note 2)
  • 1 large hot house cucumber diced
  • 1 medium green bell pepper diced
  • 1 medium red bell pepper diced
  • 1 red onion diced (optional)
  • 1 (6.5 ounce) can sliced black olives drained (see note 3)

INSTRUCTIONS:

  1. In a small bowl with a whisk, or in a jar with a tight-fitting lid, combine olive oil, red wine vinegar, Parmesan cheese, sesame seeds, oregano, poppy seeds, garlic, paprika, celery seed, and salt.
  2. Mix well and allow flavors to blend while preparing the salad.
  3. Bring 4 quarts water and 1 tablespoon salt to boil.
  4. Add spaghetti and cook according to package directions, about 9 minutes. Drain well and rinse in cold water.
  5. In a large bowl add zucchini, tomatoes, cucumber, bell peppers, onion, and black olives.
  6. Add rinsed pasta and drizzle with salad dressing to taste (you don’t have to use it all).
  7. Toss to combine, cover, and chill at least 2 hours or overnight.

Notes:

Thin spaghetti: Yes, I know Italian chefs will scoff at me recommending that you break the noodles into thirds. I strongly suggest that you follow suit, however; this allows the pasta to not only cook faster and fit easier into your pot, but also makes it easier to eat.

Grape tomatoes: Cherry tomatoes or chopped Roma, classic, or heirloom tomatoes can also pinch hit.

Canned black olives: I know these are polarizing, so feel free to omit. But I adore the briny element they add to the pasta salad.

Yield: This California Pasta Salad recipe makes a whopping 16 1-cup servings. Talk about perfect for parties, potlucks, or picnics! Feel free to halve the recipe if you’re sharing it with a smaller crew.

Storage: Transfer extra pasta salad to an airtight container in the refrigerator up to 4 days

Make ahead: California Pasta Salad can be assembled up to 3 days in advance. Store in an airtight container in the refrigerator until ready to serve. Toss gently before serving.

Cheese, please! If you enjoy your pasta salad with a bit of creamy dairy in the mix, toss in mozzarella bocconcini or crumble in some feta or goat cheese.

Nutritional Info:

Serving: 1cup | Calories: 257kcal | Carbohydrates: 26g | Protein: 5g | Fat: 15g | Saturated Fat: 2g | Polyunsaturated Fat: 2g | Monounsaturated Fat: 10g | Cholesterol: 1mg | Sodium: 70mg | Potassium: 278mg | Fiber: 2g | Sugar: 3g | Vitamin A: 647IU | Vitamin C: 25mg | Calcium: 54mg | Iron: 1mg

Cheesy Broccoli Souffle Recipe

Every holiday meal needs a solid side dish to round it out, Grandma’s Cheesy Broccoli Souffle Casserole is just that dish. It’s quick & easy, full of good for you veggies served in tasty cheesy form. It’s perfect for the holidays, but also easy enough for every day dinner.

If you grew up in the South, you know there’s one thing treasured above all else. A precious item handed down, or passed down, from generation to generation.

Some might argue it’s more precious than fine jewels, money, even gold. Every generation one matriarch is entrusted with it’s keeping. And with bringing it’s sacred, secret contents to every family gathering.

A cheesy vegetable casserole that pairs perfectly with any main meat for a comforting meal, fit for a crowd.

Prep Time: 10mins

Cook Time: 45mins

Total Time: 55mins

Course: Side Dish

Cuisine: American

Servings: 8 

Ingredients:

  • 2 10 oz pkgs frozen broccoli, thawed, drained, & chopped OR 20 oz fresh broccoli, steamed, and chopped
  • 1 medium onion, diced
  • 1 10 3/4 oz can cream of broccoli or cream of mushroom soup
  • 1 cup shredded sharp cheddar cheese, divided
  • 1/4 cup milk
  • 1/4 cup mayonnaise
  • 2 eggs beaten
  • pinch crushed red pepper flakes
  • smoked paprika

INSTRUCTIONS:

  1. Cook the broccoli, drain thoroughly, and spoon into a lightly greased, medium-large sized baking dish. Set aside.
  2. In a large mixing bowl, stir together the onion, soup, 1/2 cup of cheese, milk, mayo, eggs, and red pepper flakes until evenly combined.
  3. Spoon the mixture evenly out over the broccoli. Using the back of the spoon, spread out as necessary.
  4. Sprinkle the remaining 1/2 cup of cheddar evenly out over top the casserole. Sprinkle with smoked paprika.
  5. Bake the casserole at 350 degrees for 45 minutes. Let rest 5-8 minutes before serving.

Nutritional Info:

Calories: 202kcal | Carbohydrates: 2g | Protein: 12g | Fat: 16g | Saturated Fat: 6g | Cholesterol: 245mg | Sodium: 223mg | Potassium: 128mg | Fiber: 1g | Sugar: 1g | Vitamin A: 482IU | Vitamin C: 1mg | Calcium: 148mg | Iron: 1mg

KFC Original Secrat Chicken Recipe

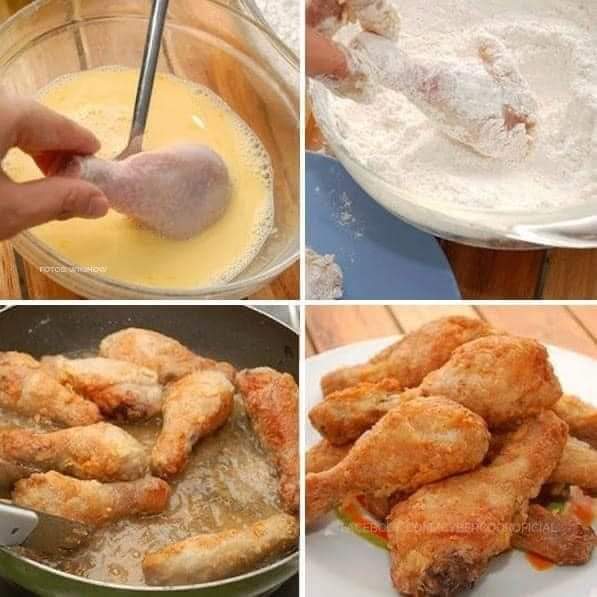
There’s something nostalgic about a bucket of KFC Original Recipe Chicken. Growing up, most of us didn’t have parents that were willing to fry chicken at home, so KFC became something of a special occasion food. It made an appearance at block parties, Fourth of July celebrations, and end-of-season soccer tournaments, wowing us with its salty, greasy, spicy, and flavorful crust. If you didn’t grab a piece early enough, you’d end up with the one at the bottom of the bucket, stripped of its extra crispy skin by someone with a voracious appetite (also known as the saddest thing ever).

Course: Main Course

Cuisine: American

Prep Time: 1hr

Cook Time: 10mins

Total Time: 1 hr 10mins

Servings: 3

INGREDIENTS:

Brine

  • Chicken drumsticks – 500 grams
  • Buttermilk – 1 ½ cup
  • Salt – ¼ tsp
  • Crispy coating
  • Cornstarch – 2 tbsp
  • Egg white – 1
  • Bread crumbs – 1 cup
  • Oil for deep frying – 2 to 3 cups
  • Seasoning
  • Slat – ½ tsp
  • Red chilli powder – 1 tsp
  • Ground black pepper – ½ tsp
  • Allspice – ¼ tsp
  • Garlic powder – ¾ tbsp
  • Onion powder – 1 tsp
  • Mixed Herbs – 1 tsp

INSTRUCTIONS:

Preparing Brine Chicken

  1. Take a bowl and add in the buttermilk. In case you don’t have buttermilk, add in 1/2 tsp yoghurt along with 1 cup of water. Mix it well and add 1/4 tsp of salt.
  2. Clean the chicken to be used and then add it to the buttermilk. Cover the bowl and put it in the refrigerator overnight. If you are short on time, at least refrigerate for four hours. Refrigeration will make the chicken soft.
  3. Steps to prepare crispy fried chicken
  4. When you want to cook fried chicken, then take the chicken out of the fridge and keep it aside.
  5. In a separate bowl, add egg white.
  6. In a flat try or wider bowl, add some bread crumbs. Keep them aside.
  7. Drain all the buttermilk from the chicken. In this chicken, add seasonings and rub. Mix well for 2 to 3 minutes. Sprinkle corn starch on the chicken and mix again.
  8. Add 1 egg white and 3 to 4 tbsp buttermilk in a bowl. Mix them in the chicken so it becomes moist enough to stick bread crumbs.
  9. Take each chicken piece and coat in bread crumbs. Repeat the same step to all chicken pieces.
  10. Keep coated chicken pieces aside for 10 min before frying.
  11. Add some oil to the pan and heat it. Keep the flame on the medium level.
  12. When oil is heated enough, test the oil by adding a small amount of wet portion. If the wet piece rises without browning then the oil is hot enough.
  13. You may shake your chicken pieces to shed off the extra crumbs. Now add chicken pieces to oil and fry. In one try, add only two or three pieces.
  14. Keep flame at medium level and fry until they turn golden. Cook pieces from all sides.
  15. After they are cooled and turned crispy. Take them out and put them on serving plates.
  16. Serve them hot with sauces or ketchup.

Blue Smoothie Recipe

Move over green smoothie, make way for the new kid on the block. ♥️

There’s a new color in the world of smoothies and it is my favorite one!

What are your thoughts on a Blue Smoothie? Yay or nay? I am personally a huge fan of blue so it is definitely a yay for me.The color comes from blue spirulina, a nutrient dense aqua botanical that is rich in protein, vitamins, minerals and antioxidants. Besides the high nutritional content, it is known to boost the immune system and increases energy too. Powerful algae I have to say!

There’s a whole lot of goodness in just 1 serving of this people!

This blue smoothie recipe starts with frozen fruits. I love making smoothies using frozen fruits as the smoothies get really thick and yummy, just like an ice cream! Furthermore, frozen fruits can easily be stored in the freezer for a long time, so you can blend up some smoothies whenever you need one.

Actually, I think I need one right NOW

Prep time: 10 mins

Total time: 10 mins

Serves: 2

Ingredients:

  • 2 tsp blue spirulina
  • 1 large frozen banana or 2 small frozen bananas
  • ¼ cup frozen blueberries
  • ¼ cup frozen strawberries
  • ⅓-1/2 cup plain yogurt (depending on how sour you like it)
  • ⅔ – 1 cup milk (depending on the thickness you prefer)
  • 1.5 tbsp sweetener of your choice (I used honey)

Instructions:

  1. In a blender, add all of the above ingredients and blend till smooth.
  2. Pour into 2 glasses and serve immediately.

Sweet Potatoes Recipe

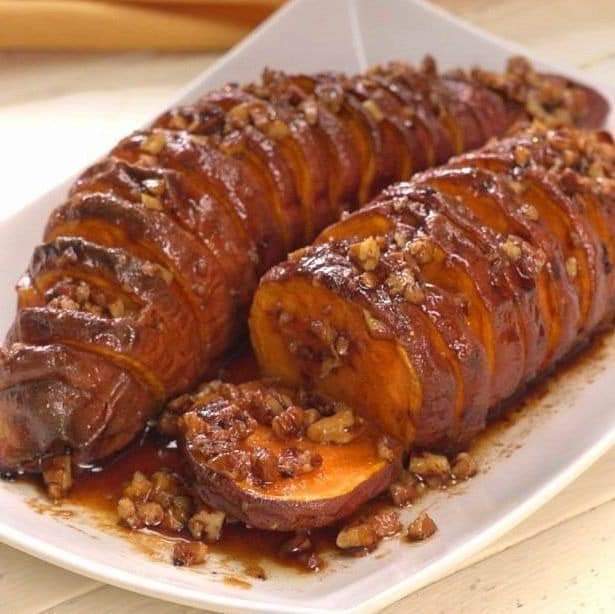
It’s that time of year when the air gets crisp and we start craving all the tastes of fall: cinnamon, maple, nuts and, of course, sweet potatoes. So let’s put them together! We have the perfect dish to do it, too: Hasselback Maple Pecan Sweet Potatoes.

The hasselback method is one of our favorites – remember our Smoky Hasselback Potatoes, Hasselback Chicken and Easy Hasselback Baked Apples?! – and it’s the perfect way of getting all that flavor mixed in with the delicious orange spud. Plus, the slicing and baking method gives the sweet potatoes a fantastic combination of creamy and crispy that’s the epitome of fall food. We can’t praise this one enough, so let’s stop talking and start cooking! Watch us make it, then read on for the recipe

Serves 2

Prep Time: 5 minutes

Total Time: 45 minutes

INGREDIENTS:

  • 2 medium sweet potatoes
  • 1 tablespoon vegetable oil
  • Salt and black pepper, to taste
  • 2 tablespoons butter, melted
  • 1 teaspoon ground cinnamon
  • ¼ cup chopped pecans
  • ¼ cup maple syrup
  • ½ teaspoon pure vanilla extract
  • ½ teaspoon kosher salt

DIRECTIONS:

  1. Preheat oven to 425 degrees Fahrenheit (218 degrees Celsius).
  2. Place a sweet potato between two chopsticks for stability and knife guidance. Every ¼-inch along the length of the sweet potato, slice ⅞ of the way through, or until the knife hits the chopsticks. (The chopsticks will help prevent the knife from cutting all the way through the sweet potato.) Repeat with the second potato.
  3. Brush the sweet potatoes with the vegetable oil. Place in a small baking dish and season with salt and pepper to taste.
  4. Bake the sweet potatoes for 30 to 40 minutes, or until soft.
  5. Remove the sweet potatoes from the oven, and increase the oven temperature to 450 degrees Fahrenheit (230 degrees Celsius).
  6. In a small bowl, combine the melted butter, ground cinnamon, chopped pecans, maple syrup, vanilla extract, and kosher salt. Stir to mix.
  7. Spoon the maple syrup mixture over and in between the baked sweet potato slices, pushing the pecan pieces in between each slice.
  8. Drizzling hasselback-cut sweet potatoes with maple pecan mixture.
  9. Return the filled sweet potatoes to the oven and bake an additional 8 to 10 minutes.
  10. Remove the baked sweet potatoes from the oven and spoon any cooking liquid over the potatoes. Allow them to cool slightly before serving.