Sliced Baked Potatoes Recipe

These baked potatoes topped with bacon, melted cheese, green onions and sour cream make a great side for steak or light dinner. Enjoy!

INGREDIENTS

Baking potatoes

Cheddar cheese, grated

Bacon, cooked and crumbled

Green onions, sliced

Sour cream

PREPARATION:

STEP 1

Preheat oven to 400°F.

Brush both side of potato slices with butter; place them on a cookie sheet.

Bake for 30 to 40 minutes, or until lightly browned on both sides, turning once.

When potatoes are ready, top with crumbled bacon, cheese, green onion.

Return to oven and continue baking until the cheese has melted.

Add a dollop of sour cream when done and enjoy!

Note:

You can also poke holes in the potatoes and microwave them for six minutes instead of baking.


Syn Free Slow Cooker Maxican Casserole

This is the first time I have tried quinoa in this type of dish and it’s ideal- it provides a filling bulk that cooks nicely but doesn’t go mushy or squishy, and actually quinoa itself is packed full of protein and high in fibre. If you feel a bit unsure about the quinoa I urge you to try it- it’s a common enough ingredient that you can buy it almost anywhere these days and it is such a useful ingredient! It’s great for bulking out a meal like this, but also as an alternative to breadcrumbs or pasta.

You may think it odd that I have used cup measures here when I usually use grams for my recipes, but this one is ideal for the easy of using a cup- if you don’t have an ‘official’ measuring cup, a regular sized teacup or coffee cup will do- one of the joys of this recipe is that there is no need to be precise- it’ll taste great even if you end up with a bit extra of one ingredient.

I use 2 chicken breasts in this (which feeds 4 people)- there is extra protein in both the black beans and the quinoa and once shredded this is plenty of chicken. It really does make a difference buying free-range fillets- they are more expensive (hence using less), but at least you know that they aren’t factory farmed, and they have the consistency and taste that chicken should have.

If you end up with leftovers of this, you can use it to fill wraps, cook into a quesadilla… it’s a great easy lunch to reheat too!

 Total Time: 5 minutes

Yield: 4 servings 

A tasty Mexican ‘dump dinner’

Syn-free

INGREDIENTS:

1 large onion (finely diced (or 1 cup of frozen pre-chopped onion))

2 chicken breasts

1 tin black beans (drained)

1 red pepper (1 green pepper, deseeded and diced)

1 cup frozen sweet corn

1 tin chopped tomatoes (refill with water, and also add 1 tin of water)

1 cup uncooked quinoa

Juice of 1 lime

1 tsp garlic granules

1 tsp paprika

1 tsp oregano

1 tsp cumin

1/2 cup pickled jalapenos (roughly chopped)

salt & pepper

Low calorie cooking spray (or spray oil if you prefer)

Coriander to serve

INSTRUCTIONS:

Into your slow-cooker pot add in the onion, whole chicken breasts, quinoa, black beans, sweet corn, pepper, chopped tomatoes, water, lime juice

Add in the garlic granules, paprika, oregano, cumin, jalapenos and salt and pepper

Give everything a little mix together, and put the slow-cooker on

Cook on high for 3 hours, or low for 7-8 hours.

Once cooking time is finished, shred the chicken breasts using 2 forks and mix everything together

Serve with fresh lime wedges and chopped coriander.

Notes:

If you want to take it to the next level then serve into portions, cover with grated cheddar, and pop under the grill to melt the cheese before serving.


Pecan Pie Cheesecake Bars Recipe

Pecan pie cheesecake bars are made with a graham cracker crust. Then, we top it with a smooth cream cheese filling. And finally, the top layer is a pecan pie caramel topping! These bars are DIVINE!

How far in advance can I make pecan pie cheesecake bars?

The thing I love most about this recipe is that you can make these pecan pie cheesecake bars up to 4 days in advance. I find that cheesecake most often tastes better the day after it was made, so this is the ideal make-ahead dessert recipe!

How long will these pecan cheesecake bars last?

I mean, if you have any left, you can store them covered in the refrigerator for up to one week. But I highly doubt you’ll have nay for that long!

How do I ensure I get clean cuts?

To make clean cuts, I suggest using a very sharp knife and wiping the blade on a piece of paper towel in between cuts.

Can I freeze these bars?

Yes, you can! We have a large batch stored in the freezer, and when you’re ready to eat, you can do a quick 15-20 second zap in the microwave or allow them to defrost in the refrigerator overnight! These pecan pie cheesecake bars are super low maintenance!

I really hope you won’t let this year go by without trying my favorite dessert – seriously though, and this is by far the best dessert I’ve ever made!

YIELD: 24 BARS

Pecan Pie Cheesecake Bars

prep time 20 MINUTES

cook time 50 MINUTES

total time 1 HOUR 10 MINUTES

Pecan pie cheesecake bars are made with a graham cracker crust. Then, we top it with a smooth cream cheese filling. And finally, the top layer is a pecan pie caramel topping! These bars are simply DIVINE!

INGREDIENTS:

Cheesecake:

1 (13.5-ounce) box graham cracker crumbs (or 3 ¼ cups)

1 ⅓ cup granulated sugar, divided

½ teaspoon ground cinnamon

1 cup (2 sticks) salted butter, melted

4 packets (2 pounds) softened cream cheese

2 large eggs + 2 egg yolks, room temperature

1 tablespoon vanilla extract

¼ cup sour cream, room temperature

Pecan Pie Topping:

½ cup EACH: diced salted butter, light corn syrup, AND heavy cream

1 cup light brown sugar, packed

1 teaspoon vanilla extract

2 cups of toasted pecans

INSTRUCTIONS:

PREP: Position a rack in the center of the oven and preheat the oven to 350ºF. Spray a 13×9 square baking pan with cooking spray and line with parchment paper, making sure it hangs over on all sides, so it’s easy to remove later, set aside.

CRUST: In a medium bowl, stir together the graham cracker crumbs, ⅓ cup sugar, and cinnamon. Add the melted butter and stir to combine. Make sure all the crumbs are moistened. Press the crumbs into the bottom of a baking pan in an even layer and bake for 10 minutes. Remove from oven and allow for it to cool while you prepare the filling.

FILLING: Beat the cream cheese and the remaining 1 cup of sugar together for a minute until smooth. Then, add the eggs + yolks, one at a time, waiting a few seconds, and allowing each egg/yolk to incorporate before adding the next. Add the sour cream, then add the vanilla extract and continue to mix for a few additional seconds. It’s okay if the batter has a few small lumps. When mixed, pour the cheesecake mixture over the graham cracker base and bake for 40-42 minutes or until the cheesecake is set and not wet. Mine was just barely jiggly in the center, and that’s perfect.

PECAN PIE LAYER: Add the butter, corn syrup, and brown sugar to a medium saucepan over medium-high heat and bring to boil while you stir it continuously. When boiling, whisk in the heavy cream and allow for the caramel mixture to cook for 4 minutes on medium-high while you whisk continuously. Remove the pot from the heat and pour in the vanilla extract and stir in the pecans. Then, continuously stir the pecan pie mixture for 5 minutes. Pour the prepared pecan pie layer over the cheesecake and let cool completely to room temperature. Allow the bars to cool in the refrigerator for several hours (ideally overnight), so they are completely set. Remove by gently lifting the parchment and place on a clean flat surface. Cut them into bars and serve!

Notes:

Bars are best when removed from the refrigerator about 15-20 minutes before serving. The pecan pie mixture softens a bit and is much easier to break with a fork!

Harissa Maple Glazed Pork Chops Recipe

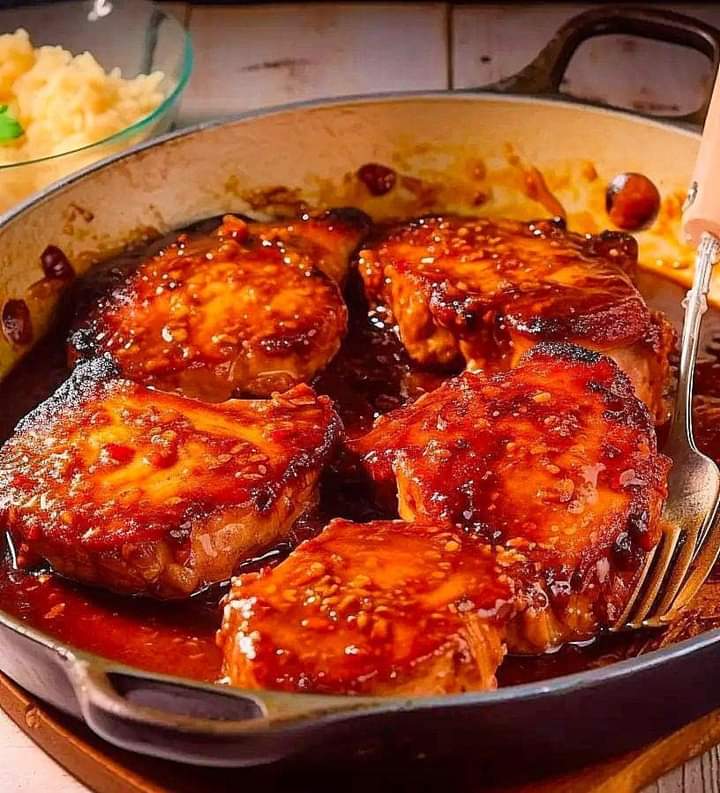
These maple glazed pork chops are infused with flavorful harissa for the perfect blend of sweet and spicy. The easy recipe is perfect for a quick weeknight dinner and you only need 5 ingredients to make it.

spooning extra pork chop glaze onto maple glazed pork chops in a skillet

Why I love this spicy glazed pork chops recipe

When it comes to dinner, I tend to go for one of two categories. Easy one-pot-type meals like chicken and broccoli or a meat-starch-veggie combo plate, and I have honestly always found the latter to be boring.

Until I realized that a few simple ingredients can turn bland meat into a phenomenal dinner. I did it with my baked mahi mahi recipe and my favorite garlic baked chicken legs, and I think the possibilities are endless.

spicy glazed pork chops in a cast iron skillet with a serving bowl of mashed potatoes, fresh herbs and a blow of glaze to the side

These maple glazed pork chops combine super flavorful and spicy harissa with sweet maple syrup for the perfect sweet and savory recipe. The simple, seasoned pork chops only take 10 minutes to cook and then they’re drenched it a thick, beautiful glaze that packs so much flavor.

Serve them with creamy, dairy free mashed potatoes and your favorite vegetable or salad. If you’re not in the mood for mashed, try crispy roasted potatoes or wild rice pilaf, instead.

 Should you rinse pork chops before cooking?

No. Rinsing any raw meat increases the chances of contaminating your kitchen. Simply remove them from their packaging and blot any excess liquid with a paper towel before seasoning.

How long do you cook pork chops for?

1-inch thick pork chops will generally take about 4 – 5 minutes per side to cook (bone-in) or 3 – 4 minutes per side (boneless). If your chops are a different thickness, you will need to adjust your cooking time accordingly.

What temperature do you cook pork chops to?

Pork chops need to be cooked to an internal temperature of 145˚F to be considered safe to eat. I recommend using a meat thermometer to accurately check the temperature 

These maple glazed pork chops are infused with flavorful harissa for the perfect blend of sweet and spicy. The easy recipe is perfect for a quick weeknight dinner and you only need 5 ingredients to make it.

 Prep Time: 10 minutes

  Cook Time: 15 minutes

Total Time: 25 minutes

  Yield: 4 servings 

INGREDIENTS:

For the pork chop glaze:

6 tablespoons maple syrup

2 tablespoons tomato paste

1/2 tablespoon harissa powder

1 teaspoons minced garlic

1/4 teaspoon coarse salt

For the pork chops

4 bone-in pork chops

1/2 – 1 teaspoon coarse salt

1/4 teaspoon black pepper

1 teaspoon harissa powder

1 tablespoon olive oil

Cook Mode Prevent your screen from going dark

INSTRUCTIONS:

In a small saucepan, combine the glaze ingredients and whisk until smooth. Bring to a boil, then immediately reduce heat to low and simmer for about 10 minutes, until thickened. Once the glaze has thickened, remove from heat and set aside.

Season pork chops with salt, pepper and harissa.

Heat olive oil in a large skillet to medium-high. Add the pork chops and sear for 4 – 5 minutes per side, or until pork chops reach an internal temperature of 145˚F.

Remove from heat and add prepared glaze before serving.

NOTES

This recipe makes enough glaze for up to 8 pork chops. Feel free to double the amount of chops you’re cooking if you need more servings.

NUTRITIONAL INFO:

Serving Size:Calories: 167Sugar: 19.4 gSodium: 493.6 mgFat: 5.1 gSaturated Fat: 1 gCarbohydrates: 22.3 gFiber: 0.4 gProtein: 8.7 gCholesterol: 24.9 mg

Mac and Cheese Recipe

Low-Carb Mac and Cheese Recipe (keto, gluten-free)

This post may contain Amazon affiliate links. I earn a small commission (at no extra cost to you) when you purchase using one of those links. I only recommend products I use and love. Thanks for supporting Stem and Spoon.

This is the low carb mac and cheese recipe you’ve been waiting for. A creamy, white cheddar sauce and tender low-carb pasta (no cauliflower florets here!) bake until bubbly. Covered with a crispy topping, there’s incredible flavor and texture in every bite.

Heavy cream, white cheddar cheese and Parmesan come together to make a deliciously creamy cheese sauce. Combine that cheesy goodness with a low-carb pasta and you’ve got the ultimate comfort food that tastes just like the real thing!

Why this recipe works

Let’s be honest, keto cauliflower mac and cheese is just not mac and cheese.

Which is why I was so excited to be gifted Kaizen Food Company’s low-carb lupin bean pasta to try out. My mind immediately went to macaroni and cheese. One that doesn’t involve cauliflower. 😉

I’m thrilled to finally share a low carb mac and cheese recipe here on the blog that doesn’t taste like a compromise.

The main ingredient for a good keto mac and cheese is a superb low-carb pasta and in my honest opinion, none are comparable to the taste and texture of Kaizen’s lupin bean pasta.

Not only is it a plant-based and gluten-free pasta, but it also has an impressive nutritional profile: high in fiber, high in protein, low in carbs, only 6 grams of net carbs per serving (which blows other “low-carb” pastas out of the water).

It’s a healthy, keto diet friendly ingredient that will satisfy when those pasta cravings hit. And you can easily swap in Kaizen pasta for traditional pasta to make low-carb versions of your favorite recipes.

the perfect balance of creamy noodles with a crispy, pork rind topping

a baked mac and cheese recipe without flour which makes it gluten-free and keto-friendly!

Overhead shot of low-carb mac and cheese in a baking dish with crispy topping.

Three different cheeses, heavy cream and the perfect mix of savory seasonings mixed with keto macaroni is just irresistible and has every potential to become one of your favorite foods.

The crispy pork rind topping is similar to the keto “breadcrumbs” that I use in my meatloaf and air fryer cauliflower. You can certainly omit it but I think it makes this low-carb mac and cheese recipe a bit more elevated. Plus, creamy, cheesy noodles with a crispy topping is the combo for a wonderful mouthfeel.

This keto mac and cheese recipe really only requires three easy steps: boil the noodles, make the cream sauce, bake the mac and cheese. Simple, delicious and comforting.

YIELD: 4-6 servings

PREP TIME: 15 minutes

Cook Time: 25 minutes

Additional Time: 5 minutes

Total Time: 15 minutes

A creamy white cheddar sauce, tender low-carb noodles and a crispy pork rind topping bake until bubbly. This low-carb mac and cheese recipe is comfort food without compromises!

INGREDIENTS:

8 ounces Kaizen Food Company pasta

3 tablespoons butter

1-¼ cups whipping cream

¼ cup full-fat sour cream

1-½ cups grated white cheddar cheese

½ cup grated mild cheddar cheese

½ cup grated Gruyère or (more white cheddar)

½ teaspoon salt

¼ teaspoon dried thyme

¼ teaspoon pepper

¼ teaspoon ground nutmeg

½ cup crushed pork rinds

2 tablespoons grated parmesan

1 tablespoon almond flour

1 teaspoon olive oil

INSTRUCTIONS:

Preheat the oven to 375°F.

Fill a medium pot with water and bring it to a boil. Cook the Kaizen pasta for 7-8 minutes, or until al dente. Drain and transfer to a baking dish. Set aside.

In the same pot, melt the butter and add the cream and sour cream. Stir the mixture and heat for about 3-4 minutes over medium heat. Stir frequently.

Turn the heat to low and stir in the white cheddar, mild cheddar and Gruyére. Mix in the salt, pepper, thyme and nutmeg. Stir until the cheese is melted and the sauce thickens.

Pour the sauce over the pasta and mix until all of the pasta is well-coated in the cheese sauce.

Mix together the crushed pork rinds, grated parmesan, almond flour and olive oil (or pulse a few times in a food processor). Crumble the mixture on top of the pasta.

Transfer the baking dish to the oven and bake for 25-30 minutes or until the top is golden brown.

NOTES:

You can substitute the white cheddar and cheddar cheese with your favorite cheese varieties. For a sharper cheddar flavor, use 2 cups white cheddar and omit the mild cheddar. For a milder cheesy flavor, use half white cheddar and half mild cheddar. Grated mozzarella and Fontina are also a good swap for Gruyére.

If you’d like to mellow out the richness of the cheese sauce, youcan use ¾ cup heavy cream with ½ cup unsweetened almond milk.

The crispy topping is optional. If you feel like skipping that step, simply bake the low-carb mac and cheese until it is hot and bubbly, about 15 minutes.

To easily crush pork rinds, place several in a Ziploc bag, then use a rolling pin to break them down into crumbs. Save any extra in the pantry for another use!

Store leftovers in the refrigerator for up to 5 days. Reheat in the microwave or in the oven at 300°F until heated through.


Homemade Summer Sausage Recipe

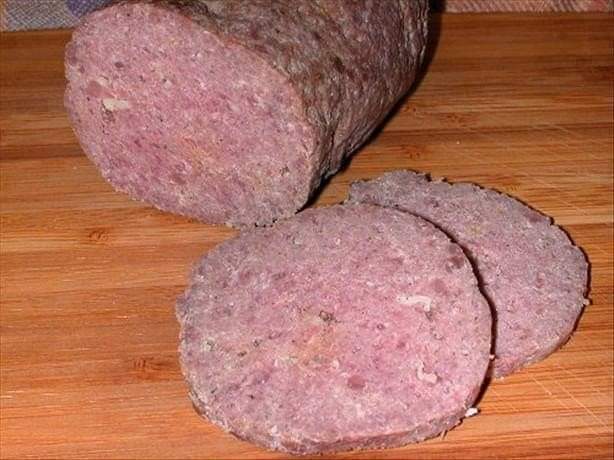
Make the best flavored summer sausage right in your very own home with this easy homemade recipe that requires no casing.

Mmmm homemade summer sausage beats out store bought by 100% any day. You will enjoy reaping the many compliments. This recipe is sure to impress your friends and family. Wherever you take this scrumptious dish be sure to let everyone know that the summer sausage is “homemade”. A well worth recipe in my book for sure!

How To Serve Summer Sausage

Summer sausage can be a simple appetizer served on a tray with cheese and crackers at your next holiday gathering, party or potluck. This summer sausage is a must-have while watching sports at home or just serve as a simple snack. And if you want to add some dipping sauces why not try a sweet hot mustard or your favorite BBQ sauce. However you plan to serve it I’m sure it will be a big hit!

Make the best flavored summer sausage right in your very own home with this easy recipe that requires no casing.

 Course Appetizer, Snack

 Cuisine American

 Prep Time 15 minutes

 Cook Time 8 hours

 chill 1 day

 Total Time 1 day 8 hours 15 minutes

 Servings 4 logs

INGREDIENTS:

3 pounds ground beef (first choice 70/30 or second choice 80/20)

1 Tablespoon Morton Tender Quick Meat Cure (this is usually found in the grocer spice section near the salt)

1 Tablespoon garlic powder

2 teaspoons mustard seed (can use up to 1 Tablespoon)

1/2 Tablespoons liquid smoke flavoring

1/2 cup water

2 1/2 teaspoons coarse ground peppercorns (I use this pepper mill to get fresh course ground)

INSTRUCTIONS:

Combine Ingredients

Place all ingredients into a large mixing bowl. Kneading by hand for about 3-5 minutes or until the mixture has that real sticky look.

Chill

Cover mixture with foil, plastic wrap or lid and place mixture in refrigerator for 8 hours.

Shape and Chill

Remove mixture from refrigerator and knead by hand for about 3 minutes. Using a kitchen scale divide meat evenly into four pieces. Roll each piece into about a 9-inch log. Place prepared logs on a quarter baking pan with rack, cover and return to the refrigerator for 16 more hours.

Bake

Preheat oven to 200 degrees Fahrenheit. Remove baking pan with sausage from refrigerator and discard cover. To get that beautiful brown edge on the outside of the logs bake the sausage on the quarter baking pan with rack for 8 hours uncovered. Carefully remove pan from oven, wrap each log in a sheet of aluminum foil and refrigerate.

Slice and Serve

Slice chilled summer sausage thinly and serve with a variety of cheeses and crackers like pepper cracked water crackers. If desired, serve with some type of sauce (mustard or your favorite BBQ sauce). Oh, and to keep all the food from getting touched by everyone don’t forget to set out the frilly toothpicks in a small cup or container. TIP: if the cup or container is too deep just add a few dried beans and then add the toothpicks. Works perfect!