
A clean, bright smile isn’t just about looks—it’s often a sign of good daily care. The problem is that tartar (hardened plaque) can build up quietly, making teeth look dull and sometimes contributing to bad breath, gum irritation, and cavities if it’s left alone. This guide explains why tartar forms, what actually works to remove it safely, and gentle ways to support a whiter-looking smile—without making risky claims or using harsh hacks. What Is Tartar (And Why Does It Form)? Dental plaque is a sticky film of bacteria that forms on teeth every day—especially after eating. If plaque isn’t removed well, it can harden into tartar (also called calculus). Once hardened, tartar clings strongly to teeth and often collects near the gumline. Common reasons tartar builds up Inconsistent brushing (less than twice a day) Skipping flossing, where plaque hides between teeth Frequent sugary or starchy snacks Smoking or chewing tobacco Low saliva flow (saliva helps rinse and balance acids) Staining drinks (coffee, tea, red wine) consumed often When tartar stays in place too long, it may lead to gum inflammation (gingivitis), stubborn bad breath, and sometimes more serious gum issues. How to Remove Tartar Safely and Effectively Here’s the honest truth: You can prevent plaque from hardening at home, but removing established tartar usually requires a professional cleaning. The safest approach is a mix of smart home care and dental visits. 1) Professional dental cleaning (the fastest, safest option) A dental cleaning (prophylaxis/scaling) is the most reliable way to remove tartar without harming enamel. Why it helps: tartar is fully removed, including hard-to-reach areas How often: many people benefit from every 6 months, or at least once a year (depending on your dentist’s advice) 2) Brush the right way (and don’t rush it) Brushing twice daily is good—but technique matters more than force. Use a soft-bristle brush Angle the brush gently toward the gumline Brush for 2 full minutes Replace your brush (or brush head) every 3 months Tip: An electric toothbrush can make technique easier for many people. 3) Floss or use interdental brushes daily Tartar loves the places a toothbrush misses. Flossing removes plaque before it hardens. Floss once a day, gently If floss is difficult, try interdental brushes or a water flosser 4) Alcohol-free antibacterial mouthwash (supportive, not magical) A gentle mouthwash can help lower bacterial load and support fresher breath—especially at night. Look for options with fluoride or essential oils Use as directed (overuse of strong antiseptics isn’t always ideal) Gentle “At-Home” Habits That Help Reduce Buildup These won’t “chip off tartar” safely (and you shouldn’t try), but they can help keep plaque under control and slow staining. Baking soda (occasional, gentle use) Baking soda can help neutralize acids and lightly polish surface stains. How to use (safe approach): Mix a small pinch with toothpaste (or water) Brush gently for 30 seconds Limit to once a week to avoid over-polishing Coconut oil pulling (optional support) Some people use oil pulling as a traditional routine for mouth freshness. How: Swish 1 tablespoon coconut oil for 10–15 minutes Spit into a trash bin (not the sink) Rinse and brush afterward Do this 2–3 times per week if it feels good for you. Citrus peels (be careful) Rubbing teeth with lemon/orange peel is popular online, but citrus is acidic and can irritate enamel if overdone. If you try it, keep it rare—and don’t scrub aggressively. Safer alternative: rinse with water after acidic foods/drinks. How to Make Teeth Look Whiter Naturally (The Smart Way) A naturally brighter smile usually comes from: keeping plaque down, reducing stains, and protecting enamel 1) Foods that help “clean” the surface as you chew These don’t bleach teeth, but they can reduce residue: Apples and celery (crisp texture) Raw carrots Strawberries (popular for surface stain support) 2) Limit enamel-staining habits (without giving up everything) Main stain contributors: coffee, tea, red wine, dark sauces (soy sauce, ketchup), sugary sodas, and energy drinks Simple trick: drink water afterward or rinse your mouth to reduce staining. 3) Home whitening “remedies”: what to use carefully Some trendy methods can be too harsh. Here’s a safer take: Baking soda + lemon: use very rarely. Lemon is acidic and may weaken enamel. Activated charcoal: can be abrasive; if you use it, keep it occasional and gentle. Strawberry + baking soda: popular, but still use sparingly. If you want noticeable whitening, dentist-supervised whitening is usually safer and more predictable than aggressive DIY mixes. Daily Routine for a Cleaner, Brighter Smile (Simple Plan) Brush 2x/day for 2 minutes Floss 1x/day Use a fluoride toothpaste Rinse with water after coffee/tea/dark foods Schedule cleanings regularly Avoid smoking (one of the biggest stain triggers) When to See a Dentist Soon: Get help sooner if you notice bleeding gums that don’t improve or persistent bad breath tooth sensitivity that worsens, visible tartar along the gumline, and pain when chewing These can be signs that more than “surface buildup” is going on—and early care makes everything easier. Final Thoughts: A White Smile Is Also a Healthy Smile Removing tartar and improving tooth brightness isn’t about chasing perfection—it’s about protecting gums, enamel, and comfort. With consistent daily habits, smart stain prevention, and professional cleanings when needed, you can keep your smile looking fresh for years.
 HealthyDiet RecipeWorld
Classic Creamed Chipped Beef

Classic Creamed Chipped Beef (S.O.S.)
Prep time: 5 mins | Cook time: 10 mins | Servings: 2-4
Ingredients
-
4-5 oz. Dried Beef: Usually found in a glass jar (like Hormel) or plastic pouch.
-
2 tbsp Butter: Unsalted is best, as the beef is already quite salty.
-
2 tbsp All-Purpose Flour: To create your roux.
-
2 cups Whole Milk: For a rich, creamy sauce.
-
1/4 tsp Black Pepper: Freshly ground is best.
-
1 pinch Nutmeg (Optional): A secret diner trick to add depth.
-
4 slices Toast: Thick-cut white bread or “Texas Toast” holds up best under the gravy.
Instructions
-
Prepare the Beef: Take the dried beef out of the jar and slice it into small, bite-sized strips or squares.
Pro Tip: Dried beef is very salty. If you want to reduce the saltiness, rinse the beef under cold water and pat it dry before chopping.
-
Make the Roux: In a medium skillet over medium heat, melt the butter. Once bubbling, add the chopped beef. Sauté for 2–3 minutes until the edges of the beef begin to curl slightly.
-
Build the Sauce: Sprinkle the flour over the beef and butter. Stir constantly for about 1 minute to cook out the “raw” flour taste.
-
Add the Milk: Slowly pour in the milk while whisking or stirring constantly. Continue to cook over medium heat until the mixture thickens and comes to a gentle simmer (usually 3–5 minutes).
-
Season: Stir in the black pepper and a pinch of nutmeg if using. Taste it before adding any salt—you likely won’t need any!
-
Serve: Toast your bread until it’s nice and golden-brown. Place the toast on a plate (you can leave them whole or cut them into triangles) and ladle a generous amount of the creamed beef over the top.
Variations to Try
-
The “Luxury” Version: Add a splash of Worcestershire sauce or a handful of frozen peas for color and sweetness.
-
The Sausage Swap: If you don’t have dried beef, you can use cooked crumbled breakfast sausage to make a standard “Biscuits and Gravy” style sauce.
-
Heat: Add a dash of cayenne pepper or hot sauce if you like a little kick.
Minute Healthy Shrimp & Vegetable Stir-Fry

Minute Healthy Shrimp & Vegetable Stir-Fry
Prep time: 10 mins | Cook time: 15 mins | Servings: 4
📜 Ingredients
The Protein & Veggies:
-
1 lb large shrimp (peeled, deveined)
-
1 tbsp olive oil or sesame oil (divided)
-
1 head broccoli (cut into small florets, approx. 3 cups)
-
2 medium carrots (peeled and thinly sliced diagonally)
-
1 cup snap peas (trimmed)
-
2 cloves garlic (minced)
-
1 inch fresh ginger (grated)
The Savory Sauce:
-
1/4 cup halal soy sauce or Tamari
-
2 tbsp water or low-sodium chicken broth (halal)
-
1 tbsp honey or maple syrup
-
1 tsp cornstarch
Optional Garnish:
-
1/2 tsp white sesame seeds
-
Red pepper flakes (for heat)
📝 Instructions
-
Whisk the Sauce: In a small bowl, combine the halal soy sauce, water (or broth), honey, and cornstarch. Whisk until the cornstarch is fully dissolved and set aside.
-
Sear the Shrimp: Heat 1/2 tablespoon of oil in a large skillet or wok over medium-high heat. Add the shrimp and cook for 1-2 minutes per side until pink and opaque. Remove the shrimp from the pan and set aside to avoid overcooking.
-
Sauté Harder Veggies: Add the remaining 1/2 tablespoon of oil to the same skillet. Toss in the broccoli and carrots. Stir-fry for 3-4 minutes until they are vibrant but still have a “snap” (tender-crisp).
-
Aromatics & Snap Peas: Add the snap peas, garlic, and ginger. Stir-fry for another 2-3 minutes. You’ll know it’s ready when the garlic is fragrant and the snap peas turn bright green.
-
Thicken the Sauce: Give your sauce mixture one last whisk (cornstarch tends to settle) and pour it over the vegetables. Stir constantly for 1-2 minutes until the sauce bubbles and thickens into a glossy glaze.
-
Combine: Return the shrimp to the skillet. Toss gently for 30 seconds to reheat the shrimp and coat everything evenly in the sauce.
-
Serve: Plate immediately over jasmine rice, quinoa, or noodles. Top with sesame seeds.
💡 Quick Tips
-
The “Crunch” Factor: If you prefer your carrots very soft, add them 2 minutes before the broccoli.
-
Meal Prep: This recipe holds up well for 2 days in the fridge, making it a great healthy lunch option.
Roasted Savory Cabbage Steaks

Roasted Savory Cabbage Steaks
Prep time: 10 mins | Cook time: 25-30 mins | Servings: 4-6 steaks
Ingredients
The Base:
-
1 medium head of Cabbage (Green or Savoy works best)
-
50 ml Olive oil
-
1 tsp Salt
-
Ground black pepper & Red pepper flakes (to taste)
The Savory Brush-on Sauce:
-
1 tbsp Balsamic vinegar or Dijon mustard (to get that creamy brown color seen in your photo)
-
2 cloves Garlic, minced
-
1 tsp Paprika (optional, for color and smoke)
The Topping:
-
1 cup Shredded Mozzarella or Gruyère cheese
-
1/4 cup Finely diced red bell pepper or chili (for that pop of color)
Instructions
-
Prep the Oven and Pan: Preheat your oven to 200°C (400°F). Line a large baking sheet with parchment paper to prevent sticking.
-
Slice the Cabbage: Remove any wilted outer leaves. Slice the cabbage into rounds (disks) about 1.5 to 2 cm thick. Keep the core intact in each slice so the “steak” doesn’t fall apart.
-
Prepare the Seasoning Oil: In a small bowl, whisk together the olive oil, salt, black pepper, red pepper, garlic, and your choice of mustard or balsamic vinegar.
-
Season the Steaks: Place cabbage slices on the baking sheet. Using a pastry brush (as seen in your image), generously coat both sides of each cabbage slice with the oil mixture.
-
First Roast: Bake for 20-25 minutes. The edges should be starting to brown and get crispy, and the center should be tender when pierced with a fork.
-
Add Toppings: Remove the tray from the oven. Sprinkle the shredded cheese and diced red peppers evenly over the top of each steak.
-
Melt and Crisp: Return to the oven for another 5-7 minutes, or until the cheese is melted, bubbly, and slightly golden.
-
Serve: Serve immediately while hot. These are great as a side dish or even a light main course!
Keto Cubed Steak Recipe
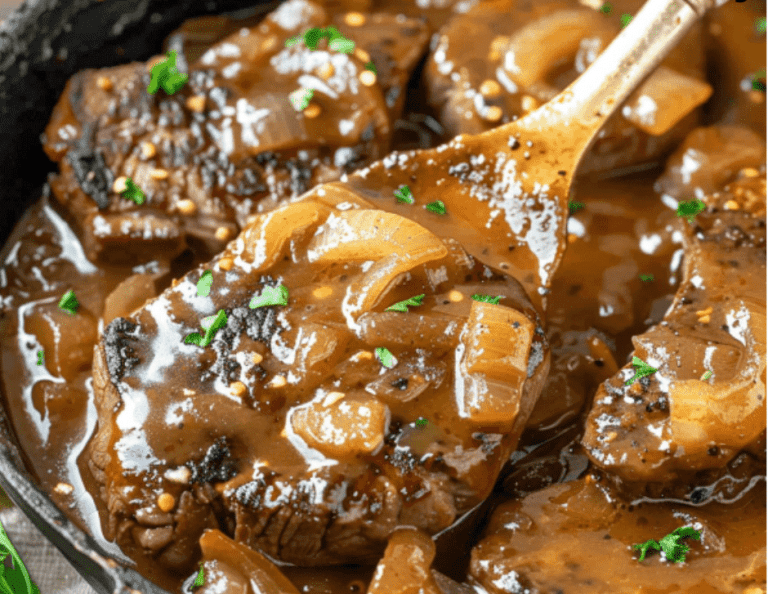
This Keto Cubed Steak with onion gravy is a keto and satisfying soup. This dish is made with very simple ingredients that we can easily get access to in any supermarket, or might be present in the home. We can have this steak and gravy dish on this diet. This dish is prepared very fast in only 35 minutes, so it is best to make it on a quick weeknight or busy days. Keto Cubed Steak with Onion Gravy is very amusing & tasty, and everybody enjoys eating this dish. We can easily store this dish so we can make it for meal prep purposes. We can also use the coconut cream if you are allergic to dairy. You can also use sunflower seed flour to prepare this dish nut-free.
STATS:
- Total time: 35 mints.
- Serving size: 1 steak with gravy
- Caloric content: 390 kcal
- Culinary: American
- Time of preparation: Ten mints.
- Course: Main Course
- Cook time: 25 mints.
- Diet: Keto, Low-Carb
- Servings: 4
EQUIPMENT:
- Large skillet
- Tongs
- Whisk
- Measuring cups & spoons
INGREDIENTS:
- 4 cubed steaks
- Salt and pepper
- 1 tsp. garlic powder
- ½ cup almond flour
- 1 tsp. onion powder
- 3 tbsp. olive oil
- One onion
- Two pieces of garlic
- One cup beef stock
- Two tablespoon heavy cream
- 1 tsp. Worcestershire sauce
- Fresh parsley
INGREDIENT NOTES:
CUBE STEAK:
- We use the cube steak to prepare this dish, and it is also called minute steak as it gets tenderized very quickly.
ALMOND FLOUR:
- We can use the almond flour for dredging as a low-carb substitute to prepare the light crust.
ONION:
- Onions are added to give a slight sweetness and depth in the taste.
GARLIC:
- It is used in the dish to deliver the aroma & essence.
BEEF BROTH:
- It is added to provide the rich and savory base to prepare the gravy, and we have to use low-sodium.
HEAVY CREAM:
- We use heavy cream to prepare the creamy gravy, and it also helps to thicken the gravy.
WORCESTERSHIRE SUCE:
- We have to use the keto Worcestershire sauce as it adds the umami flavor to the dish.
OLIVE OIL:
- We use the oil in this dish to provide the healthy fats.
Parsley:
- We use parsley to garnish the dish.
INSTRUCTIONS:
- We can apply the oil on the steak and sprinkle garlic seasoning, black pepper, salt, and onion seasoning, and then lightly coat the steak with almond flour.
- Then we can warm up oil on a moderate setting.
- Put the steak on the flame & sear for 3-4 minutes from every surface to brown the steak, & put it on a plate.
- Then we can put the leftover oil along with onions in the pan and sauté the onions for six minutes.
- We would include garlic & stir-fry it for thirty seconds.
- Then we can put the steak in the pan and cook for ten to twelve minutes till the steak gets tender and the gravy gets thick.
- We can garnish the dish with parsley and serve it warm.
SERVING SUGGESTIONS:
- Serve this dish with cauliflower mash.
- We can pair this dish with sautéed green beans or asparagus.
- You can also add this dish to the zoodles.
- We can also include some salad or ranch dressing in this dish.
- Serve this dish over mashed turnips or radishes
- We can have this dish with roasted broccoli or Brussels sprouts
TIPS:
- We don’t have to overcook the steak, or it will become chewy.
- You have to slice the onions evenly so that they caramelize evenly.
- We can also add some mushrooms for the extra depth.
- You can add some wine and deglaze the pan to add some relish.
- We would use xanthan gum to thicken the gravy.
STORAGE INFORMATION:
FRIDGE:
- You would transfer this dish in close dish and stock it for 4 days.
FREEZER:
- You would stock this dish in the freezer for 2 months.
FAQs:
Can I prepare this soup dairy-free?
- We can use coconut cream to prepare the dairy-free steak and onion gravy.
Is the dish free from gluten?
- This dish is completely free from gluten as it has almond flour instead of classic flour.
Can I utilize any other steak to prepare this dish?
- We can easily use a sirloin steak to prepare this steak.
Will I use slow cooker to prepare this dish?
- We can make this steak in the slow cooker on low heat for four hours, but we have to sear the steak first.
NUTRITIONAL INFORMATION:
Calories: 390 kcal
Net carbs: 5g
Total Carbs: 6g
Fiber: 1g
Protein: 38g
Fat: 25g
Sodium: 420mg
Potassium: 610mg
Calcium: 45mg
Iron: 3.1mg
Vitamin A: 110IU
Serving Size: 1 cubed steak with gravy
Sweet Potato & Ground Turkey Bake

Here’s a full detailed recipe for a Sweet Potato and Ground Turkey Bake, including description, nutritional info, prep/cook time, and Q&A. Sweet Potato & Ground Turkey Bake
Description:
This Sweet Potato and Ground Turkey Bake is a hearty, healthy, and balanced one-dish meal perfect for weeknight dinners or meal prep. The savory ground turkey is seasoned with garlic, onion, and herbs, layered with nutrient-dense sweet potatoes, and baked with a light cheese topping for a comforting yet wholesome casserole. Time Required:
Prep time: 20 minutes
Cook time: 40 minutes
Total time: 1 hour
Servings: 6
M Ingredients:
Main Ingredients:
1 lb (450g) lean ground turkey
3 medium sweet potatoes, peeled and thinly sliced (about 1/4″ thick)
1 medium yellow onion, dice
2 cloves garlic, minced
1 red bell pepper, chopped
1 cup spinach (optional, chopped)
1 cup shredded mozzarella or cheddar cheese (optional for topping)
Seasonings:
1 tsp smoked paprika
1/2 tsp dried thym
1/2 tsp oregano
Salt and black pepper to taste
2 tbsp olive oil (divided)
Optional for creaminess:
1/2 cup low-fat milk or Greek yogurt (to mix with cheese for a creamy top)
Instructions:
Step 1: Prep the Oven and Sweet Potatoes
Prheat oven to 375°F (190°C).
Peel and thinly slice sweet potatoes. Set aside.
Step 2: Cook the Turkey Mixture