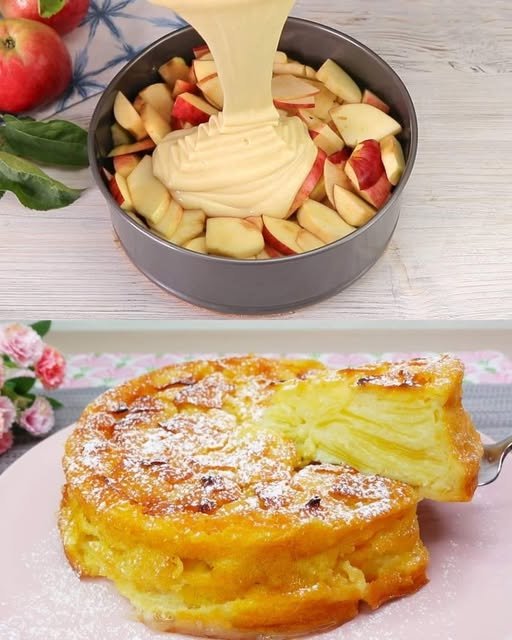
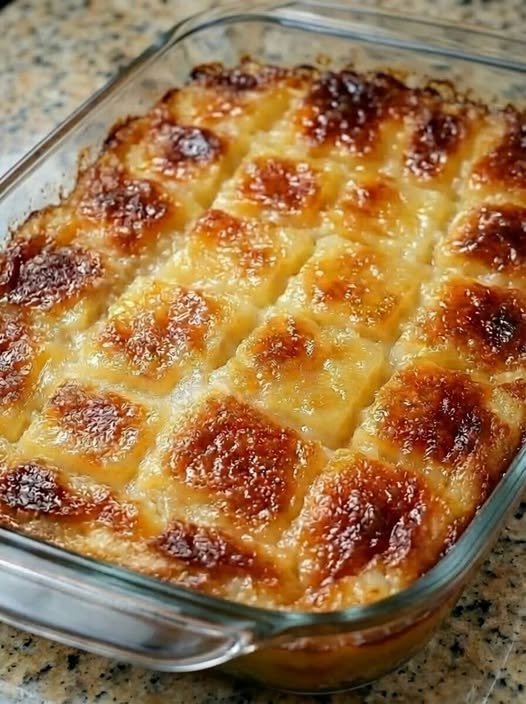
This versatile dish works beautifully as either a unique side dish for ham or a warm, spoonable dessert.
Prep time: 10 minutes
Cook time: 45–50 minutes
Total time: 1 hour
Servings: 8
Ingredients
1 can (20 oz / 565 g) crushed pineapple, undrained
1 cup granulated sugar
½ cup all-purpose flour
2 large eggs, beaten
½ cup (1 stick) unsalted butter, melted
1 tsp vanilla extract
Pinch of salt
1 cup shredded sharp cheddar cheese (optional for a savory contrast)
Optional topping: ½ cup shredded coconut or chopped nuts
Instructions
Preheat and Prep: Set your oven to 350°F (175°C). Lightly grease a baking dish to ensure the bake doesn’t stick.
Mix the Base: In a large bowl, combine the crushed pineapple (with its juice), sugar, and flour. Stir until the mixture is smooth.
Combine Wet Ingredients: Stir in the beaten eggs, melted butter, vanilla extract, and a pinch of salt. The batter should be thick but easy to pour.
Add Cheese (Optional): If you enjoy the traditional savory-sweet version, gently fold in the shredded cheddar cheese until evenly distributed.
Bake: Pour the mixture into your prepared dish and smooth the top. Add any desired toppings, such as coconut or nuts. Bake for 45–50 minutes until the center is set and the top is lightly golden.
Rest and Serve: Allow the dish to cool for about 10 minutes before serving. This resting period helps the bake firm up and allows the flavors to deepen.
Tips for Success
Pineapple Texture: Use canned crushed pineapple in juice rather than syrup to avoid making the dish overly sweet.
Storage: Leftovers can be stored in an airtight container in the refrigerator for up to 4 days.
Serving Suggestions: This dish pairs exceptionally well with holiday mains like baked ham or roast turkey. If serving as a dessert, try it with a dollop of whipped cream or vanilla ice cream.
These truffles feature a crunchy peanut and cookie center coated in a rich chocolate-cocoa glaze.
Prep time: 5 minutes
Chill time: 30–60 minutes
Servings: Makes approx. 20–25 truffles
Ingredients
500 g Cookies: Digestive biscuits, graham crackers, or vanilla wafers work best.
120 g Peanuts: Roasted and roughly chopped.
70 g Sugar
60 g Cocoa powder
250 ml Milk
150 g Butter
Optional: Extra melted chocolate and chopped nuts for the outer coating (as shown in the images).
Instructions
Prepare the Base: Crush the 500 g of cookies into small crumbs using a food processor or by placing them in a bag and crushing them with a rolling pin. Leave some small chunks for texture.
Add Crunch: Mix the 120 g of chopped peanuts into the cookie crumbs in a large bowl.
Create the Chocolate Syrup: In a saucepan over medium heat, combine the 250 ml milk, 70 g sugar, 60 g cocoa powder, and 150 g butter. Stir constantly until the butter is melted and the sugar has completely dissolved. Do not let it reach a rolling boil; just heat until smooth.
Combine: Pour the warm chocolate mixture over the cookie and peanut blend. Stir well until all the dry ingredients are fully hydrated and you have a thick, moldable “dough.”
Shape: Take about a tablespoon of the mixture at a time and roll it between your palms to form smooth balls (as seen in the first image). Place them on a tray lined with parchment paper.
Chill: Place the tray in the refrigerator for at least 30 minutes to allow the truffles to firm up.
Optional Glaze (for the look in the second image): Melt additional chocolate with a teaspoon of oil and stir in more crushed peanuts. Dip the chilled balls into this glaze and return to the fridge until set.
Recipe Tips
Cookie Choice: Using chocolate-flavored cookies will make these even richer.
Nut Variations: If you don’t like peanuts, hazelnuts or walnuts make an excellent substitute and pair perfectly with cocoa.
Storage: Keep these in an airtight container in the refrigerator for up to a week. They actually taste better the next day once the flavors have fully melded!
Quick Description (Hook)
A timeless Classic French Onion Soup with deeply caramelized onions, rich broth, and a golden cheese topping—comforting, elegant, and lighter without sacrificing flavor.
▢ 1 cup shredded Gruyère Swiss cheese, room temperature
▢ 3 tablespoons shredded Mozzarella cheese, room temperature
▢ 2 tablespoons finely grated Parmesan cheese, room temperature
Instructions
In a large pot over medium-high heat, melt the butter. Add the sliced onions and cook, stirring frequently, until softened, about 10 minutes.
Reduce heat to medium. Stir in salt and sugar. Cook for 35–40 minutes, stirring every 5 minutes, until onions are deeply caramelized, golden brown, and syrupy.
Add garlic and cook until fragrant, about 20 seconds.
Pour in red wine to deglaze the pot, scraping up browned bits from the bottom.
Add beef broth, chicken broth, Worcestershire sauce, thyme, and bay leaf.
Simmer gently over medium-low heat for 20 minutes, stirring occasionally.
Remove and discard thyme sprigs and bay leaf.
Stir in balsamic vinegar. Taste and adjust seasoning with black pepper and additional salt if needed.
Reduce heat to low, cover, and keep warm.
Prepare the Bread & Finish
10. Preheat oven broiler with rack positioned about 6 inches from heat.
11. Arrange bread slices on a baking sheet and brush lightly with olive oil on both sides.
12. Broil 2–3 minutes total, flipping once, until evenly toasted. Watch closely to prevent burning.
13. Place oven-safe soup bowls on a rimmed baking sheet. Fill each bowl about ⅔ full with hot soup.
14. Top each bowl with toasted bread and sprinkle with Gruyère, Mozzarella, and Parmesan.
15. Broil until cheese is bubbly and lightly golden, forming a crust over the edges.
16. Serve immediately.
Brief Introduction (After Recipe Card)
Classic French Onion Soup is proof that simple ingredients can create extraordinary depth of flavor. Slowly caramelized onions form the heart of this dish, enriched with savory broth and finished with crisp bread and melted cheese. This lighter version keeps the soul of the original while reducing overall calories—perfect for cozy evenings without the heaviness.
Step-by-Step Cooking Guide
Caramelizing the Onions
Cook onions slowly and patiently. They should turn golden, then deep amber.
Tip: If onions start sticking, add 1–2 tablespoons of broth instead of more fat.
Building the Soup
Deglazing with wine lifts all the flavor from the pot.
Simmer gently to avoid overpowering the onion sweetness.
Broiling the Cheese
Use moderate cheese amounts so it melts fully without becoming greasy.
Tip: Place bowls on a baking sheet for safe handling and even broiling.
Ingredient Details & Substitution Tips
Yellow Onions: Best for balanced sweetness and depth.
Gruyère: Classic choice; melts smoothly and adds nutty flavor.
Wine: Dry red wine adds richness; alcohol cooks off during simmering.
Broth Blend: Using both beef and chicken broth creates layered flavor without excessive richness.
Equipment Alternative:
No oven-safe crocks? Ladle soup into a baking dish, top with bread and cheese, broil, then portion into bowls.
Recipe Variations & Serving Suggestions
Flavor Variations
Add ½ teaspoon cracked black pepper for bolder heat.
Stir in 1 teaspoon fresh chopped thyme at the end for extra aroma.
Dietary Variation
For WW-style tracking, use thinner bread slices and slightly less cheese per bowl.
Serving Suggestions
Serve with a simple green salad and lemon vinaigrette.
Pair with sparkling water or a small glass of dry red wine.
Storage & Make-Ahead Information
Storage
Refrigerate soup (without bread and cheese) in an airtight container for up to 4 days.
Reheating
Reheat gently on the stovetop over medium-low heat.
Add fresh toasted bread and cheese before broiling.
Make-Ahead Tip
Soup base can be made up to 2 days ahead; flavors improve with time.
Quality Note
Best enjoyed fresh once cheese is broiled for optimal texture.
Nutrition Highlights (Approximate, Per Serving)
Calories: ~320 kcal
Protein: ~15 g
Carbohydrates: ~28 g
Fat: ~14 g
WW SmartPoints:7 points per serving (including bread and cheese)
Dietary Highlights: Lower-calorie comfort food, rich in flavor without excess fat Allergens: Contains dairy, gluten
Frequently Asked Questions
Q: Can I skip the wine?
Yes. Replace with equal amount of additional broth and add 1 teaspoon balsamic vinegar for depth.
Q: Why didn’t my onions caramelize?
Heat may have been too high or cooking time too short. Caramelization requires patience.
Q: Can I freeze this soup?
Yes, freeze the soup base only (no bread or cheese) for up to 3 months.
Final Notes & Reader Engagement
This soup is all about patience and simplicity—when onions are given time, they reward you with incredible flavor. Try this lighter version and let me know how it turned out. Share your tweaks, questions, or serving ideas in the comments, and don’t forget to rate the recipe if you enjoyed it.
This Peanut Butter Honey Smoothie is a smooth, indulgent drink with a perfect balance of nutty richness and natural sweetness. The creamy texture comes from ripe banana and milk, while peanut butter adds depth and protein. Honey provides gentle sweetness, and vanilla gives a warm, aromatic finish. Ideal for breakfast, post-workout energy, or a healthy dessert-style drink.
Ingredients (Serves 1–2)
2 tablespoons creamy peanut butter
1 large ripe banana, sliced
1½ cups cold milk (dairy or almond/oat milk)
1–2 tablespoons pure honey (adjust to taste)
½ teaspoon vanilla extract
4–5 ice cubes (optional, for thicker texture)
1 tablespoon chia seeds or flaxseeds (optional, for nutrition)
Step-by-Step Instructions
Prepare the Ingredients Peel and slice the banana for easier blending. Measure all ingredients in advance to ensure smooth preparation.
Add to Blender Pour the milk into the blender first. Add banana slices, peanut butter, honey, vanilla extract, and seeds (if using).
Blend Until Smooth Blend on high speed for 30–45 seconds until the smoothie becomes thick and creamy. Add ice cubes if you prefer a colder, milkshake-like consistency.
Taste & Adjust Taste the smoothie and adjust sweetness with extra honey or thin it with a splash of milk if needed.
Serve Pour into a tall glass. Drizzle honey or peanut butter along the inside of the glass for a decorative swirl, just like the image.
Tips & Variations
Add ½ cup Greek yogurt for extra creaminess and protein
Use frozen banana instead of ice for a richer texture
Prepare Apples: Peel, core, and slice the apples very thinly (using a mandoline is recommended for uniform slices). Drizzle them with the juice of ½ a lemon to prevent browning and add flavor.
Mix Wet Ingredients: In a mixing bowl, beat the 2 eggs with a pinch of salt. Add the sugar and vanilla sugar, beating until the mixture is frothy and light in color.
Combine Remaining Liquids: Stir in the milk, melted butter, and lemon zest.
Add Dry Ingredients: Gradually whisk in the flour and baking powder until the batter is smooth. Note that the batter will be quite thin and watery.
Coat Apples: Gently fold the apple slices into the batter, ensuring every slice is thoroughly coated.
Assemble: Grease an 8-inch (20 cm) baking pan and line it with parchment paper. Pour the apple-batter mixture into the pan, smoothing the top so the slices lie flat.
Bake: Bake in a preheated oven at 350°F (180°C) for 40–50 minutes. The cake is done when the top is golden brown and a toothpick inserted into the center comes out clean.
Cool and Serve: Allow the cake to cool completely in the pan to set its creamy, custard-like texture. Dust with powdered sugar before serving.
Recipe Tips
Consistency: The batter is meant to be thin; it serves primarily to bind the apple layers together into a custard.
Apple Choice: Use firm baking apples like Granny Smith, Honeycrisp, or Fuji to ensure the slices hold their shape.
Storage: This pie is excellent served cold and can be stored in an airtight container in the fridge for up to 4–5 days.
No-Knead Rosemary Cranberry Bread with Olive Oil & Sea Salt
Overview:
This rustic bread is crispy on the outside, soft and chewy on the inside, and packed with sweet dried cranberries and savory fresh rosemary. The olive oil adds depth and moisture, while sea salt finishes it off with a perfect savory touch.
Ingredients:
3 cups (360g) all-purpose flour
1½ tsp salt
½ tsp instant yeast (or active dry)
1¼ cups (300ml) warm water (approx. 100–110°F / 38–43°C)
1 tbsp olive oil (plus more for brushing)
1 tbsp chopped fresh rosemary (or 1½ tsp dried)
¾ cup dried cranberries
Flaky sea salt for topping (like Maldon)
Instructions:
1. Mix the Dough (10 min)
In a large bowl, stir together:
Flour
Salt
Yeast
Rosemary
Cranberries
Add the warm water and olive oil. Stir until you get a shaggy, sticky dough.
2. First Rise (12–18 hours)
Cover the bowl tightly with plastic wrap or a lid. Let it sit at room temperature (away from drafts) for 12–18 hours. The dough should double and have bubbles on top.
3. Shape the Dough
Lightly flour a work surface.
Scrape out the dough and fold it over on itself a few times.
Shape it into a rough ball. It will be loose – that’s normal.
Let it rest, covered with a towel or bowl, for 30–45 minutes while you preheat the oven.
4. Preheat Oven & Dutch Oven (at least 30 minutes)
Place a Dutch oven with the lid inside your oven and preheat to 450°F (230°C).
5. Bake
Carefully remove the hot Dutch oven.
Place the dough inside (parchment paper helps with transfer).
Brush with olive oil and sprinkle with flaky sea salt.
Bake:
30 minutes with the lid on
10–15 minutes with the lid off, until golden brown and crusty
6. Cool
Let the bread cool on a wire rack for at least 30 minutes before slicing. This helps set the crumb.
Tips:
Add chopped walnuts or pecans for a nuttier variation.
Use orange zest for a citrusy holiday twist.
Dried cherries can be swapped for cranberries.
Q&A: Common Questions
Q: Can I use fresh cranberries instead of dried? A: Yes, but they’ll add moisture. Chop and lightly coat them in flour before mixing in.
Q: No Dutch oven—what now? A: Use a heavy pot with a lid (like a cast iron or enamel pot), or bake on a baking stone with an inverted roasting pan over it to trap steam.
Q: My dough is too wet/sticky—is that okay? A: Yes! No-knead doughs are wetter than normal. Resist the urge to over-flour. It should be shaggy, sticky, and bubbly after the rise.
Q: Can I make this gluten-free? A: It’s tricky, but you can try a 1:1 gluten-free flour blend that includes xanthan gum. Results may vary.
Q: Can I refrigerate the dough after the first rise? A: Absolutely. After the bulk ferment (12–18 hours), refrigerate for up to 2 days. Let it come to room temp before baking.
Q: How should I store leftovers? A: Store at room temp wrapped in a towel or bread bag for 1–2 days. Freeze slices for longer storage.



 Description
 Ingredients (Serves 1–2)
 Step-by-Step Instructions
 Tips & Variations
 Nutritional Benefits