Copycat Sweet Blueberry Biscuits

Copycat Sweet Blueberry Biscuits

Inspired by the North Carolina classic, these biscuits are flaky, sweet, and finished with a bright lemon-vanilla glaze.

  • Prep time: 15 minutes (+ 1 hour for freezing butter)

  • Bake time: 7–12 minutes

  • Yields: Approx. 6 large biscuits

Ingredients

For the Biscuits:

  • 2 cups All-purpose flour

  • 1/3 cup Granulated sugar

  • 4 tsp Baking powder

  • 1 tsp Salt

  • 5 tbsp Butter (cold or frozen)

  • 1 cup Cold milk

  • 3 oz Blueberries (fresh or dried)

  • 1 tbsp Butter, melted (for brushing)

For the Sweet Glaze:

  • 1 cup Powdered sugar

  • 1/8 cup Water (approx. 2 tbsp)

  • 1 tsp Vanilla extract

  • 1/2 tsp Lemon juice

  • 1 tsp Honey (optional, for extra depth)


Instructions

1. Prep the Butter and Oven

  • Pro-tip: Place your butter stick in the freezer for roughly one hour before starting.

  • Preheat your oven to 450°F (230°C).

2. Mix the Dough

  • In a large bowl, whisk together the flour, sugar, baking powder, and salt.

  • Gently fold in the cold milk and blueberries until a shaggy dough forms.

3. Incorporate the Butter

  • Remove the butter from the freezer and break or grate it into small chunks.

  • Turn the dough out onto a floured surface. Spread a portion of the frozen butter chunks over the dough.

  • Fold and Knead: Fold the dough over the butter, press down, and repeat the process until all the frozen butter is evenly distributed. This “folding” method creates the flaky layers.

4. Cut and Bake

  • Roll the dough out to a thickness of 1/4 to 1/2 inch (keep it slightly thick for taller biscuits).

  • Using a biscuit cutter, cut approximately 6 biscuits. Press straight down—don’t twist the cutter, or the edges will seal and won’t rise as high!

  • Place on a baking sheet and bake for 7 to 12 minutes, or until the tops are golden brown.

5. Finish and Glaze

  • Immediately after removing from the oven, brush the tops with 1 tablespoon of melted butter.

  • In a small bowl, whisk together the powdered sugar, water, vanilla, lemon juice, and honey until smooth.

  • Drizzle the glaze generously over the warm biscuits while they are still hot.


Helpful Tips

  • Fresh vs. Dried: If using fresh berries, be very gentle when folding so you don’t “bleed” the juice into the dough (unless you want purple biscuits!).

  • Cold is Key: The secret to the “melt-in-your-mouth” texture is keeping that butter frozen until it hits the hot oven; the steam from the melting butter is what creates the lift.

Cheesy Garlic Chicken Wraps

Ingredients

  • 2 large chicken breasts diced
  • 1 tbsp olive oil
  • 2 tsp garlic powder
  • 1 tsp onion powder
  • 1 tsp paprika
  • Salt and pepper to taste
  • 1 cup shredded cheddar cheese
  • 1/2 cup shredded mozzarella cheese
  • 4 large flour tortillas
  • 1/2 cup creamy garlic sauce store-bought or homemade
  • Fresh parsley chopped (optional, for garnish)

Instructions

  • Season the Chicken
  • In a large bowl, toss the diced chicken with olive oil, garlic powder, onion powder, paprika, salt, and pepper until well coated.
  • Cook the Chicken
  • Heat a non-stick skillet over medium heat. Add the seasoned chicken and cook for 6-8 minutes, stirring occasionally, until fully cooked and golden brown. Remove from heat and set aside.
  • Assemble the Wraps
  • Spread a spoonful of creamy garlic sauce onto each tortilla. Add the cooked chicken and sprinkle a generous amount of cheddar and mozzarella cheese over the top.
  • Melt and Crisp
  • Fold the tortillas over the filling to form wraps. Return them to the skillet and cook for 2-3 minutes per side until the cheese melts and the tortillas turn golden brown.
  • Serve and Enjoy
  • Slice in half, garnish with fresh parsley if desired, and serve warm. Enjoy the cheesy, garlicky goodness in every bite!

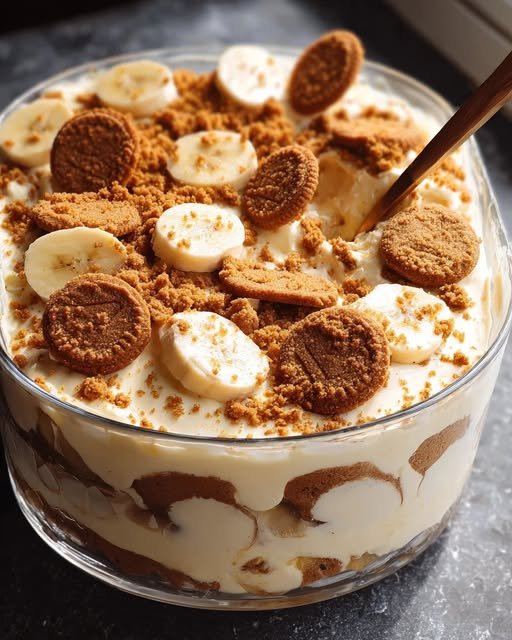
Creamy Sweet Banana Pudding

This recipe sounds like a dream—the combination of cream cheese and sweetened condensed milk gives it that “mousse-like” texture that sets it apart from traditional puddings.

Since you asked for full recipes, I have organized your notes into a clean, easy-to-follow format for your collection.


Creamy Sweet Banana Pudding

This recipe is exceptionally rich and creamy. Using instant pudding and room-temperature cream cheese ensures a smooth, thick consistency without any cooking required.

  • Prep time: 20 minutes

  • Chill time: 3–4 hours

  • Servings: 10–12

  • Shelf Life: Best eaten within 48 hours.

Ingredients

  • 1 (8-oz) block cream cheese, room temperature

  • 1 (14-oz) can sweetened condensed milk

  • 1 (5-oz) package instant vanilla pudding mix

  • 2 1/2 cups cold milk

  • 2 tsp vanilla extract

  • 8 oz heavy cream, whipped (or one 8-oz tub of Cool Whip)

  • 4 ripe bananas, sliced

  • 10 oz shortbread cookies (like Chessmen or Lorna Doone)

Instructions

  1. Cream the Base: In the bowl of a stand mixer fitted with the whisk attachment, beat the softened cream cheese and sweetened condensed milk until completely smooth. Scrape the sides of the bowl to ensure there are no lumps (about 2–3 minutes).

  2. Thicken the Pudding: Add the dry pudding mix, cold milk, and vanilla. Start on low speed for 30 seconds to avoid a mess, then increase to high. Beat for 4–5 minutes until the mixture is thick and smooth.

  3. Lighten the Texture: Gently fold half (4 oz) of your whipped cream into the pudding mixture until just combined. Set the other half aside for the topping.

  4. Layer the Dish: * Line the bottom of a 9×13 baking dish (or a trifle bowl) with a single layer of shortbread cookies.

    • Place the sliced bananas evenly over the cookie layer.

  5. Assemble: Spread the pudding mixture evenly over the bananas. Top the pudding with the remaining whipped cream, smoothing it to the edges.

  6. Garnish: Crumble any remaining cookies over the top or tuck whole cookies around the edges for decoration.

  7. Chill: Cover with plastic wrap and refrigerate for at least 3–4 hours before serving to allow the cookies to soften slightly and the flavors to meld.


Pro-Tips

  • Banana Ripeness: Use bananas that are yellow with just a few brown spots. If they are too green, they won’t be sweet enough; if they are too dark, they will become mushy too quickly.

  • Smoothness Hack: If your cream cheese is still a bit cold, microwave the unwrapped block for 15 seconds before mixing to prevent lumps.

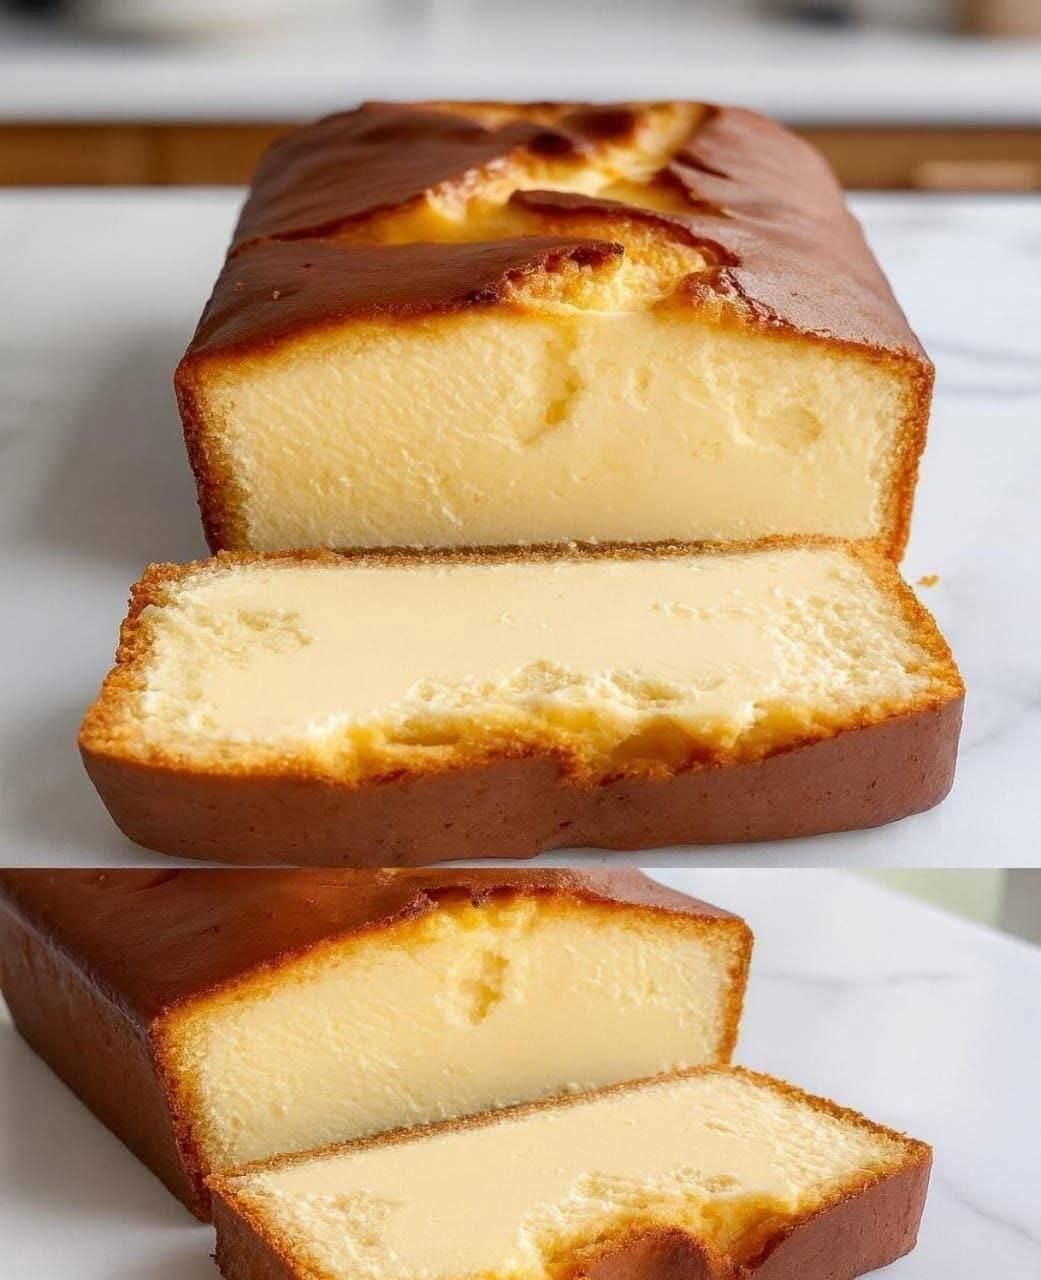
Magic Custard Cake Loaf

Magic Custard Cake Loaf

  • ​Yields: 1 loaf (approx. 8–10 servings)
  • ​Prep Time: 20 mins
  • ​Bake Time: 50–60 mins

​Ingredients

  • ​4 eggs (separated, at room temperature)
  • ​¾ cup (150g) sugar
  • ​1 stick (113g) unsalted butter, melted and slightly cooled
  • ​1 tsp vanilla extract
  • ​¾ cup (115g) all-purpose flour
  • ​2 cups (500ml) milk, lukewarm
  • ​Optional: A pinch of salt or lemon zest for flavor

​Instructions

  1. ​Prep: Preheat your oven to 160°C (325°F). Grease a standard 9×5 inch loaf pan and line it with parchment paper, leaving an overhang on the sides for easy removal.
  2. ​Whip Egg Whites: In a clean bowl, beat the egg whites until stiff peaks form. Set aside.
  3. ​Mix Yolks and Sugar: In a separate large bowl, beat the egg yolks and sugar until the mixture is pale and creamy (about 2 minutes).
  4. ​Combine Fats and Aromatics: Stir the melted butter and vanilla into the yolk mixture until smooth.
  5. ​Add Flour and Milk: Mix in the flour until just combined. Gradually whisk in the lukewarm milk until the batter is thin and smooth—it will look very watery, similar to crepe batter.
  6. ​Fold in Whites: Gently fold the stiff egg whites into the batter in three additions. Note: Do not over-mix; you want small “islands” of egg white floating on top to create the sponge layer.
  7. ​Bake: Pour the batter into the prepared loaf pan. Bake for 50–60 minutes. The cake is done when the top is golden and the center has a slight jiggle but is not liquid.
  8. ​Cool and Set: Allow the cake to cool completely in the pan at room temperature, then refrigerate for at least 2–3 hours (or overnight) to allow the custard layer to set before slicing.

​Success Tips

  • ​Temperature Matters: Ensure your milk is lukewarm, not hot, to prevent curdling the eggs.
  • ​Don’t Rush the Chill: Slicing the cake while warm will cause the creamy custard layer seen in your photo to run.
  • ​Avoid Over-folding: If you fold the egg whites in too thoroughly, you will lose the distinct spongy top layer.

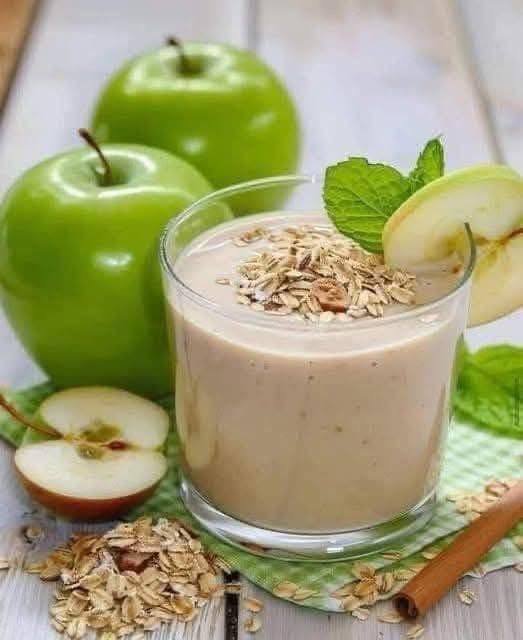
🍏 Apple Cinnamon Oatmeal Smoothie

🍏 Apple Cinnamon Oatmeal Smoothie

Prep time: 5 minutes | Servings: 1

Ingredients

  • 1 medium Green Apple: (Granny Smith works best for tartness), cored and chopped.

  • 1/4 cup Rolled Oats: Provides a creamy texture and keeps you full.

  • 1 cup Milk of choice: (Dairy, Almond, or Oat milk all work great).

  • 1/4 cup Greek Yogurt: For extra creaminess and protein.

  • 1/2 tsp Ground Cinnamon: For that classic warm flavor.

  • 1 tsp Honey or Maple Syrup: (Optional) Adjust based on your preferred sweetness.

  • A handful of Ice cubes: To keep it chilled and thick.


Instructions

  1. Prepare the Apple: Wash the apple thoroughly. You can leave the skin on for extra fiber (as seen in the garnish) or peel it for a smoother consistency.

  2. Combine: Place the chopped apple, oats, milk, yogurt, cinnamon, and sweetener into a high-speed blender.

  3. Blend: Start on a low speed and gradually increase to high. Blend for about 45–60 seconds until the oats are completely pulverized and the mixture is silky smooth.

  4. Check Consistency: If it’s too thick, add a splash more milk. If you want it colder, add a few more ice cubes and pulse again.

  5. Serve: Pour into a glass. Garnish with a sprinkle of dry oats, a thin apple slice, and a sprig of fresh mint as shown in your photo.


Pro Tips for the Best Result

  • Soak the Oats: If you don’t have a high-powered blender, soak the oats in your milk for 5–10 minutes before blending to ensure there’s no “gritty” texture.

  • Add Protein: You can easily add a scoop of vanilla protein powder to make this a complete meal replacement.

  • Healthy Fats: Toss in a tablespoon of chia seeds or almond butter for added nutrients.

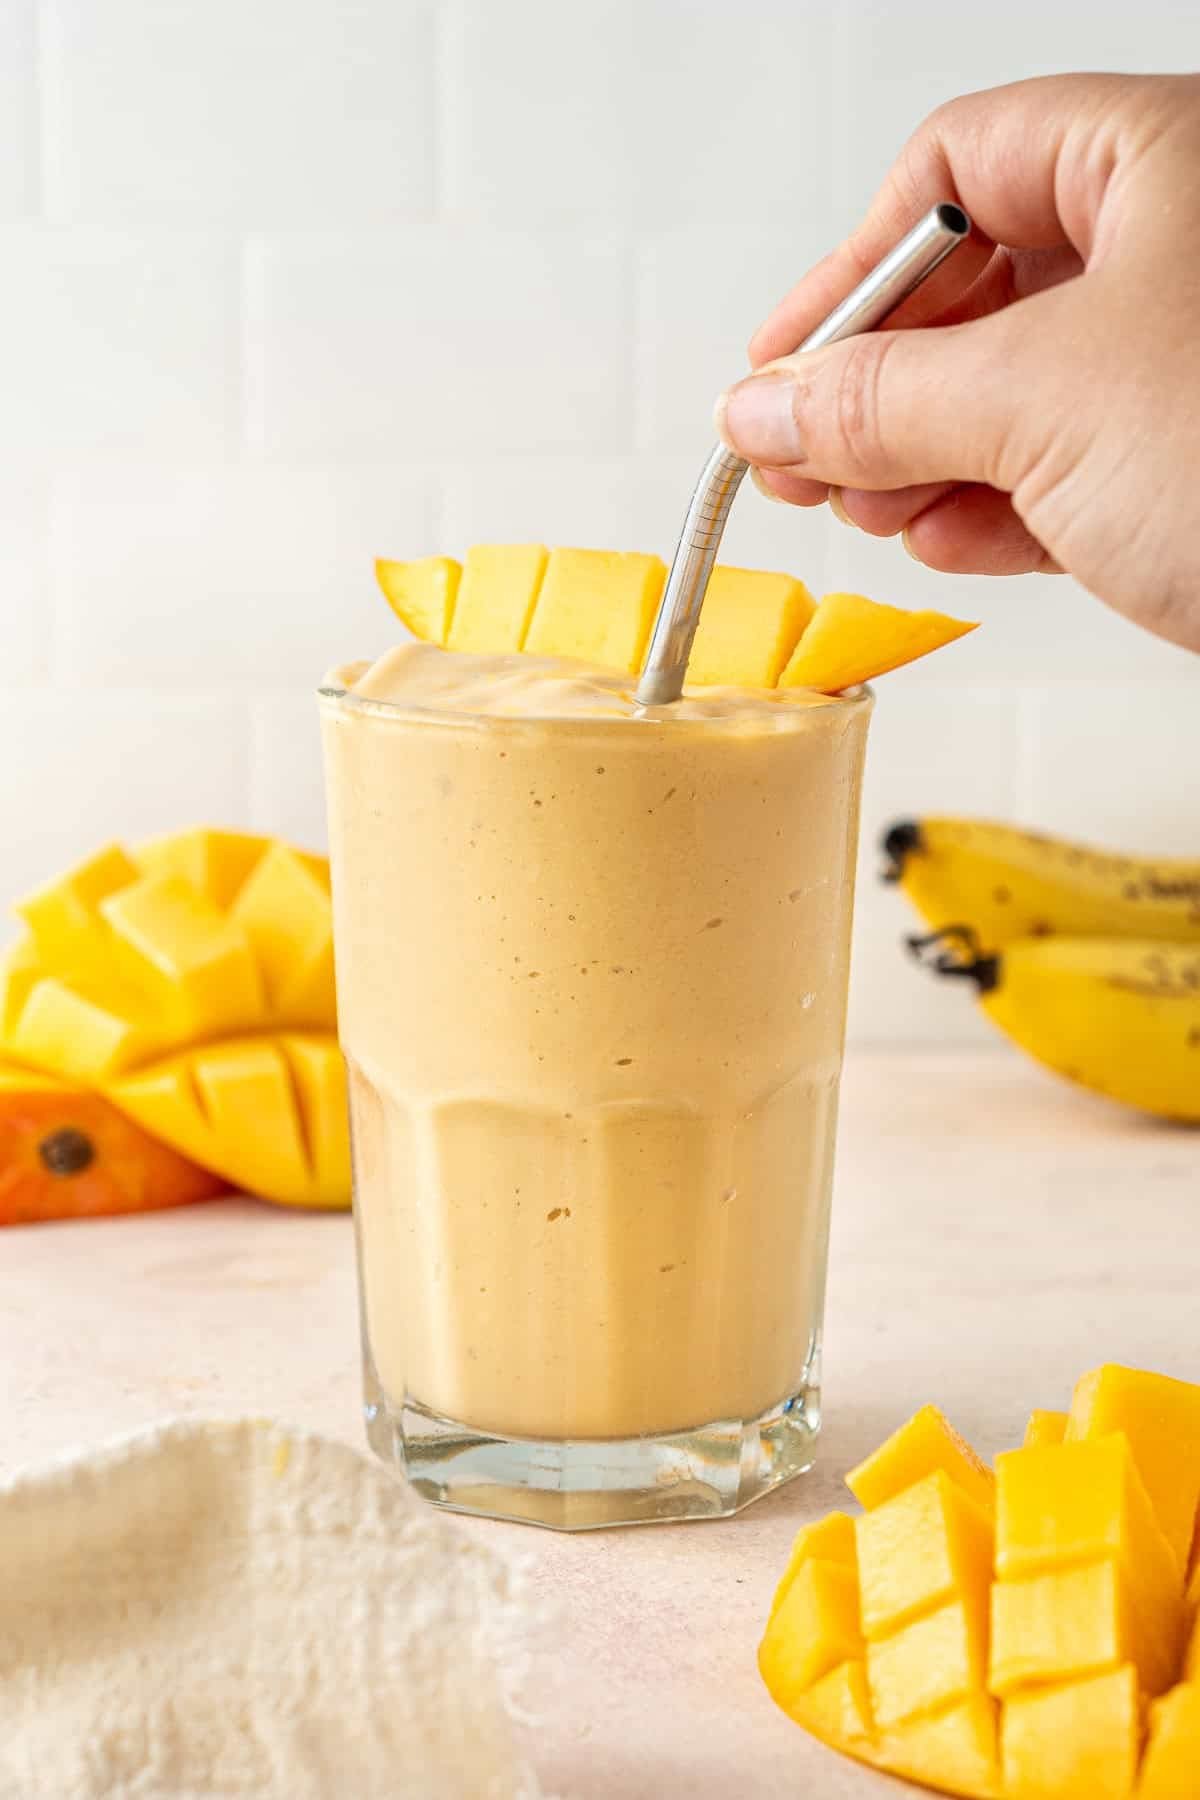
Creamy Mango Banana Smoothie

Creamy Mango Banana Smoothie

  • Prep time: 5 minutes

  • Servings: 1 large glass

  • Texture: Thick, “soft-serve” consistency


### Ingredients

  • 1 cup Frozen Mango Chunks: Using frozen mango is the secret to that thick, frost-like texture without needing ice.

  • 1 Ripe Banana: (Fresh or frozen). A spotty, ripe banana provides the best natural sweetness.

  • 1/2 cup Greek Yogurt: Use plain for a tangier flavor or vanilla for extra sweetness.

  • 1/2 cup Milk of Choice: (Dairy, Almond, or Coconut milk).

  • 1 tsp Honey or Maple Syrup: (Optional) Add only if your fruit isn’t quite sweet enough.

  • Garnish: 1/2 a fresh mango, sliced into a “hedgehog” or cubes (as seen in the photo).

### Instructions

  1. Layer the Blender: Start by pouring the milk and yogurt into the blender first. Adding liquids at the bottom helps the blades move more easily through the frozen fruit.

  2. Add Fruit: Add the banana slices and the frozen mango chunks.

  3. Blend: Start on a low speed to break up the frozen chunks, then increase to high. Blend for 45–60 seconds until completely smooth and “creamy” in appearance.

  4. Adjust Consistency: * If it’s too thick, add a splash more milk.

    • If it’s too thin, add a few more frozen mango chunks or a couple of ice cubes.

  5. Serve: Pour into a tall glass. Top with the fresh mango slices and serve with a reusable metal straw for that exact look!


### Pro-Tips for the Best Results

  • The “Hedgehog” Garnish: To get the look in the bottom right of your photo, slice the mango “cheek” off the pit, score it into a grid pattern without cutting through the skin, and push the skin side up to pop the cubes out.

  • No Added Sugar: If you use a very ripe (brown-spotted) banana, you likely won’t need any honey or sweetener at all.

  • Boost It: For a breakfast version, add a tablespoon of chia seeds or a scoop of vanilla protein powder before blending.