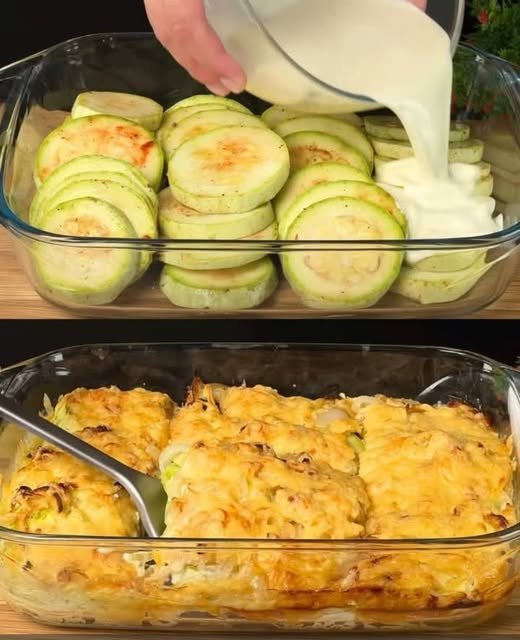
Baked Zucchini with Cheese

Baked Zucchini with Cheese

A creamy, golden-brown vegetable bake featuring tender zucchini and a savory yogurt-egg glaze.

  • Prep time: 15 minutes

  • Cook time: 30–35 minutes

  • Servings: 4 side portions


Ingredients

  • 2 zucchini, sliced into rounds

  • 2 onions, thinly sliced into rounds

  • 2 cloves garlic, finely chopped

  • 2 eggs

  • 150 g yogurt (plain or Greek)

  • 150 g cheese, grated (such as Mozzarella or Cheddar)

  • Seasonings: Salt, black pepper, paprika, and vegetable seasoning to taste

  • Oil for greasing and cooking


Instructions

1. Prepare the Vegetables

Preheat your oven to 390°F (200°C). Lightly grease a glass baking dish with oil. Season the zucchini rounds with salt, black pepper, paprika, and vegetable seasoning.

2. Layer the Dish

Arrange the seasoned zucchini rounds and sliced onions in rows in the baking dish, overlapping them slightly to fill the pan. Sprinkle the chopped garlic evenly over the top.

3. Mix the Creamy Glaze

In a small bowl, whisk together the 2 eggs and 150 g of yogurt until smooth. Season this mixture with a pinch of salt and pepper if desired.

4. Top and Bake

Pour the yogurt and egg mixture evenly over the rows of vegetables, ensuring they are well-coated. Sprinkle the 150 g of grated cheese generously over the entire surface.

5. Bake to Perfection

Place the dish in the oven and bake for 30–35 minutes, or until the zucchini is tender and the cheese topping is bubbly and deep golden brown.

6. Serve

Let the dish rest for 5 minutes before serving to allow the creamy sauce to set.


Recipe Variations

  • Extra Protein: You can tuck slices of cooked ham or turkey between the zucchini layers.

  • Herb Freshness: Top with fresh chopped parsley or dill after baking for a burst of color and flavor.
Baked Zucchini with Cheese

Baked Zucchini with Cheese

A creamy, golden-brown vegetable bake featuring tender zucchini and a savory yogurt-egg glaze.

  • Prep time: 15 minutes

  • Cook time: 30–35 minutes

  • Servings: 4 side portions


Ingredients

  • 2 zucchini, sliced into rounds

  • 2 onions, thinly sliced into rounds

  • 2 cloves garlic, finely chopped

  • 2 eggs

  • 150 g yogurt (plain or Greek)

  • 150 g cheese, grated (such as Mozzarella or Cheddar)

  • Seasonings: Salt, black pepper, paprika, and vegetable seasoning to taste

  • Oil for greasing and cooking


Instructions

1. Prepare the Vegetables

Preheat your oven to 390°F (200°C). Lightly grease a glass baking dish with oil. Season the zucchini rounds with salt, black pepper, paprika, and vegetable seasoning.

2. Layer the Dish

Arrange the seasoned zucchini rounds and sliced onions in rows in the baking dish, overlapping them slightly to fill the pan. Sprinkle the chopped garlic evenly over the top.

3. Mix the Creamy Glaze

In a small bowl, whisk together the 2 eggs and 150 g of yogurt until smooth. Season this mixture with a pinch of salt and pepper if desired.

4. Top and Bake

Pour the yogurt and egg mixture evenly over the rows of vegetables, ensuring they are well-coated. Sprinkle the 150 g of grated cheese generously over the entire surface.

5. Bake to Perfection

Place the dish in the oven and bake for 30–35 minutes, or until the zucchini is tender and the cheese topping is bubbly and deep golden brown.

6. Serve

Let the dish rest for 5 minutes before serving to allow the creamy sauce to set.


Recipe Variations

  • Extra Protein: You can tuck slices of cooked ham or turkey between the zucchini layers.

  • Herb Freshness: Top with fresh chopped parsley or dill after baking for a burst of color and flavor.

Air Fryer Cheesy Hasselback Potatoes

Air Fryer Cheesy Hasselback Potatoes

Crispy, garlic-buttered edges with a soft, cheesy center—made easily in the air fryer.

  • Prep time: 10 minutes

  • Cook time: 45 minutes

  • Total time: 55 minutes

  • Servings: 2 side portions


Ingredients

  • 2 large russet potatoes (scrubbed and cleaned)

  • 4 tbsp unsalted butter, melted

  • 1 tbsp garlic paste (or finely minced garlic)

  • 3 to 5 slices Colby Jack cheese (cut into small squares/fourths)

  • Kosher salt and black pepper, to taste

Optional Toppings:

  • Sour cream

  • Fresh chives, chopped

  • Bacon bits


Instructions

1. Prep the Potatoes

To ensure the potato sits still, cut a thin horizontal slice off the bottom of each potato to create a flat base. Do not discard these slices! Place the potato flat-side down between two chopsticks. Use a sharp knife to cut 1/4-inch slices across the potato. The chopsticks will act as a guard, preventing you from cutting all the way through the bottom.

2. The Air Fryer Setup

Place the small potato slices you cut from the bottoms into the air fryer basket. Place the large sliced potatoes directly on top of them. This creates a slight curve that helps the “Hasselback” slices fan out and open up during cooking.

3. First Garlic Butter Wash

In a small bowl, whisk together the melted butter, garlic paste, salt, and pepper. Gently pry the potato slices apart and brush about half of the garlic butter over the tops, ensuring some of it drips down into the crevices. Sprinkle with a little extra salt and pepper.

4. The Initial Roast

Set your air fryer to 370°F (188°C). Cook the potatoes for 20 minutes.

5. Second Baste

Open the air fryer and brush the remaining garlic butter over the potatoes. Continue cooking at 370°F for another 20–25 minutes. The potatoes should be tender on the inside and the edges should be golden-brown and crisp.

6. Add the Cheese

Take your cheese squares (Colby Jack melts beautifully here) and tuck them into the slices. You can put cheese in every slice for a “mega-melt” or every other slice depending on your preference. Return to the air fryer for 1–2 minutes until the cheese is bubbling and melted.

7. Garnish and Serve

Carefully remove the potatoes from the basket. Top with a dollop of sour cream and a sprinkle of fresh chives.


Success Tips

  • The Chopstick Trick: If you don’t have chopsticks, two wooden spoons with flat handles work just as well to stop your knife.

  • Potato Choice: Russets are best for this recipe because their high starch content leads to a fluffier interior and crispier skin compared to waxy potatoes.

  • Don’t Overcrowd: Ensure there is space between the two potatoes in the basket so the air can circulate and crisp up the sides.

The Best Garlic Bread Recipe – Quick, Easy & Guilt-Free Comfort Food

Servings: 8
Total Time: 15 minutes
Difficulty: Easy
Calories per Serving: ~105
Macros (Per Slice): Protein 3g • Carbs 8g • Fat 7g • Fiber 1g

Intoduction

This garlic bread delivers everything we crave—crispy golden edges, a soft buttery center, and the kind of aroma that makes the whole kitchen feel warm and inviting. It’s quick, comforting, and wonderfully light compared to traditional versions.

Perfect for anyone wanting a simple, wholesome, and guilt-free recipe, this version uses clean, pantry-friendly ingredients while still delivering big garlic flavor. Whether you’re pairing it with dinner, serving it as a snack, or adding it to a weekend spread, this garlic bread fits beautifully into a lighter, more intentional approach to comfort food.

If you love easy weeknight meals, nutrient-conscious swaps, and bold, satisfying flavor, this garlic bread is your new go-to.

Look at the Recipe

  • Crispy edges with a soft, buttery center
  • Rich garlic flavor with herby, savory notes
  • Lightened-up ingredients for a guilt-free, cleaner comfort food experience

Ingredients Needed

Garlic Butter Spread
• 4 tbsp softened butter or light butter
• 1 tbsp olive oil
• 4–5 garlic cloves, minced
• 1 tbsp chopped parsley
• ½ tsp garlic powder
• ½ tsp dried oregano
• Salt and pepper to taste
• 2 tbsp parmesan (optional)

Bread
• 1 baguette, ciabatta, sourdough, or low-carb bread of choice

How to Make Our Garlic Bread

  1. Preheat your oven to 400°F (200°C).
  2. Mix together the butter, olive oil, minced garlic, parsley, garlic powder, oregano, salt, and pepper until smooth.
  3. Slice your bread and spread the garlic mixture generously over the surface.
  4. Sprinkle parmesan on top if you want deeper savory flavor.
  5. Bake for 10–12 minutes until the edges turn golden and crisp.
  6. Slice and serve warm for the best texture and flavor.

Macros & Plan Compatibility

Plan Notes
Keto & Low-Carb 3–4g net carbs per slice using low-carb bread. Grain-free options work well.
Slimming About 2 syns per slice using light butter and a lighter bread option.
High-Protein 6–8g protein per slice if using high-protein bread and adding parmesan.
Weight Watchers About 2–3 SmartPoints per slice (Blue plan) using reduced-fat butter.
Mediterranean Works well using whole-grain bread and olive oil for heart-healthy fats.

Storage & Serving Suggestions

Store:
Keep leftovers in an airtight container for up to 2 days.
Reheat:
Warm in the oven at 350°F for 5–7 minutes to regain crispness.
Freeze:
Freeze pre-buttered slices and bake straight from frozen.
Serve With:
Soups, salads, pasta alternatives, grilled chicken, low-carb casseroles.

FAQs

1. Can I make this garlic bread without butter?

Yes. You can replace butter with olive oil to keep it lighter. Olive oil gives a crispier crust, while butter creates a richer texture.

2. How do I keep garlic bread from getting soggy?

Bake in a hotter oven, avoid excess butter/oil, and use a wire rack to allow air to circulate underneath.

3. Can I prepare garlic bread ahead of time?

Yes. Assemble the bread and refrigerate up to 24 hours before baking.

4. Does garlic bread freeze well?

Absolutely. Freeze prepared slices and bake directly from frozen at 400°F for 12–14 minutes.

5. What bread works best?

Baguette for crispness, ciabatta for chew, sourdough for depth, or keto/high-protein bread for diet-friendly versions.

6. How can I boost the flavor even more?

Use roasted garlic, stir parmesan into the spread, or add fresh herbs after baking.

🥭 Fresh Mango Lassi Recipe

🥭 Fresh Mango Lassi Recipe

Prep time: 5 minutes | Servings: 2

Ingredients

  • 1 cup Fresh Mango: Diced (Alphonso or Kesar mangos are best for color and sweetness, but any ripe mango works).

  • 1 cup Plain Yogurt: Use Greek yogurt for a thicker consistency or regular yogurt for a traditional feel.

  • 1/2 cup Milk: (Or water) to adjust the thickness.

  • 2 tablespoons Honey or Sugar: Adjust based on the sweetness of your mango.

  • 1/4 teaspoon Cardamom powder: For that authentic floral aroma.

  • Ice cubes: A small handful for serving chilled.

  • Garnish: Fresh mint leaves or a pinch of saffron.


Instructions

  1. Prepare the Mango: Peel and dice your mango, discarding the pit.

  2. Blend: Place the mango chunks, yogurt, milk, sweetener, and cardamom powder into a blender.

  3. Smooth it out: Blend on high speed until the mixture is completely smooth and frothy.

  4. Check Consistency: If it is too thick, add a little more milk. If you want it colder, add a few ice cubes and pulse again.

  5. Serve: Pour into glasses. Garnish with a fresh mint leaf (as seen in your photo) or a few extra mango bits on top.


Pro Tips for Success

  • Vegan Option: Swap the dairy yogurt for coconut yogurt and use almond or oat milk. It pairs beautifully with mango!

  • No Fresh Mango? You can use 1 cup of canned mango pulp instead; just reduce the added sugar as the pulp is usually pre-sweetened.

  • The “Chill” Factor: For the best texture, ensure your yogurt and mango are cold before you start.

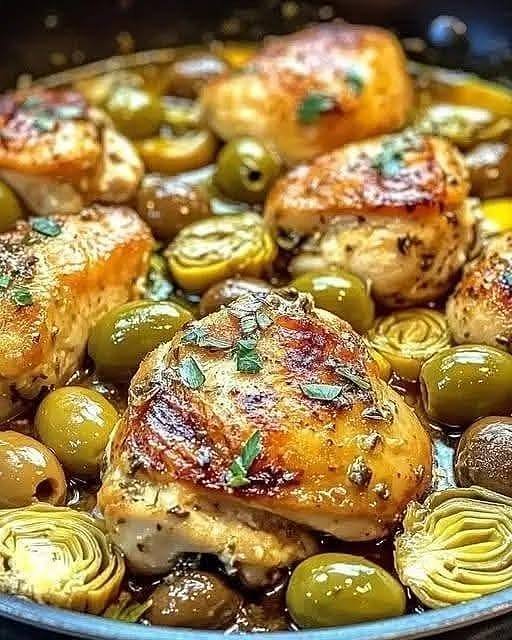
Mediterranean Lemon Chicken with Artichokes & Olives

Mediterranean Lemon Chicken with Artichokes & Olives

📝 Ingredients

(Serves 4)

  • Chicken thighs (bone-in, skin-on)—4–6 pieces

  • Salt – 1 ½ tsp

  • Black pepper – 1 tsp

  • Olive oil – 2 tbsp

  • Garlic – 4 cloves, minced

  • Red onion – 1 small, sliced

  • Lemon – 1 large (zest + juice, plus extra slices for garnish)

  • Chicken broth – 1 cup

  • White wine (optional) – ½ cup

  • Artichoke hearts (canned or frozen)—1 ½ cups (about 8 halves)

  • Green or Kalamata olives – ½ cup, pitted

  • Fresh thyme or oregano – 1 tsp (or ½ tsp dried)

  • Fresh parsley—for garnish

🍳 Instructions

1. Prep the Chicken

  1. Pat the chicken dry with a paper towel.

  2. Season generously with salt, pepper, and a little lemon zest.

2. Sear

  1. Heat olive oil in a large skillet or Dutch oven over medium-high heat.

  2. Sear chicken skin-side down for 4-5 minutes until golden brown. Flip and sear the other side for 3-4 minutes. Remove and set aside.

3. Sauté Aromatics

  1. In the same pan, add onion and garlic; cook for 2-3 minutes until fragrant.

  2. Deglaze with white wine (if using), scraping up any browned bits.

4. Simmer

  1. Add chicken broth, lemon juice, thyme/oregano, artichoke hearts, and olives. Stir gently.

  2. Return chicken to the pan, skin-side up.

  3. Cover and simmer over medium-low heat for 25-30 minutes until chicken is cooked through (internal temp 74°C / 165°F).

5. Finish

  1. Taste and adjust seasoning with extra salt, pepper, or lemon juice.

  2. Garnish with fresh parsley and extra lemon slices.

🍽️ Serving Suggestions

  • Serve with warm couscous, rice pilaf, or crusty bread to soak up the sauce.

  • A side of grilled vegetables or a Greek salad pairs beautifully.

 Tips

  • For crispy chicken skin, uncover the pan in the last 5 minutes and broil (or bake at 200°C / 400°F) for a golden finish.

  • You can use boneless chicken thighs or breasts, but reduce simmering time to 18-20 minutes.

  • Add capers for extra briny flavor.