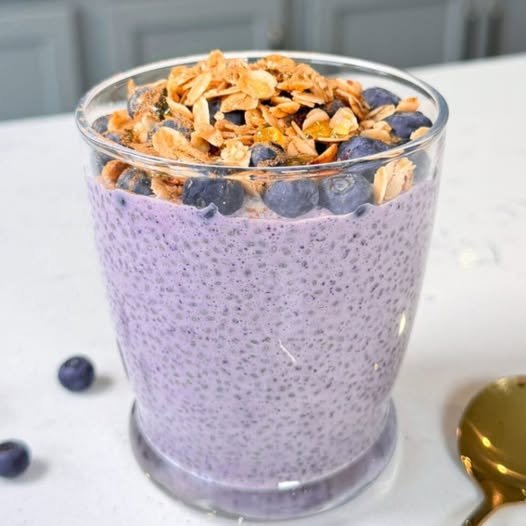
🫐 Instant Blueberry Chia Pudding

Instant Blueberry Chia Pudding

A high-protein, Omega-3-rich breakfast ready in 5 minutes.

  • Prep Time: 5 minutes

  • Servings: 1

  • Protein: 50g

  • Calories: ~350 kcal

Ingredients

  • 2 tbsp chia seeds

  • 1/4 cup very hot water

  • 3/4 cup plain or vanilla Greek yogurt (nonfat for lowest calorie count)

  • 1 serving Vanilla protein powder (Whey is recommended for texture)

  • 1/3 cup blueberries (fresh or thawed)

  • Optional toppings: Granola, almond butter, honey, shredded coconut, or extra berries.


Instructions

  1. Flash-Gel the Chia: In a small bowl, combine the chia seeds and the very hot water. Stir continuously for about 30 seconds. The heat allows the seeds to absorb liquid and create a gel-like consistency almost instantly.

  2. Blend the Base: In a blender, combine the Greek yogurt, protein powder, and blueberries. Blend until the mixture is smooth, creamy, and vibrant purple.

  3. Combine: Pour the blended blueberry protein mixture into the bowl with the chia gel. Stir well until the seeds are evenly distributed.

  4. Serve: Add your desired toppings and eat immediately. If you prefer a thicker, mousse-like consistency, let it sit in the fridge for 10–15 minutes.


Nutrition Facts (Per Serving)

Estimate based on nonfat Greek yogurt and whey protein.

Calories Protein Carbs Fat
350 50g 28g 8g

Quick Swaps & Tips

  • The “Muffin” Vibe: Top with almond butter and a dash of cinnamon.

  • Dairy-Free: Use a thick coconut or soy-based Greek-style yogurt and a plant-based protein powder (though you may need a splash more water as plant proteins absorb more liquid).

  • Frozen Fruit: If using frozen blueberries, thaw them slightly before blending so the pudding doesn’t turn into a “nice cream” (unless that’s what you’re going for!).

Cheeseburger Egg Rolls

Cheeseburger Egg Rolls

Crispy egg roll wrappers filled with seasoned beef, bacon, melted cheese, and pickles — a fun fusion of classic cheeseburger flavor and crunchy appetizer texture.

Prep Time: 20 minutes
Cook Time: 15 minutes
Yield: 15–20 egg rolls


🧾 Ingredients

• 2 lb ground beef
• 4 slices bacon
• ½ white onion, diced
• 5 cloves garlic, minced
• ½ cup diced pickles or pickle relish
• ½ tsp salt
• ½ tsp black pepper
• 1 cup shredded cheese (cheddar, mozzarella, or American blend)
• 15–20 egg roll or wonton wrappers

For sealing wrappers:
• ¼ cup cold water
• 2 tsp cornstarch

For frying:
• Vegetable oil (about ½ inch deep in pan)


👩‍🍳 Instructions

1. Cook the Bacon

In a large skillet over medium heat, fry the bacon until crisp.
Remove and place on paper towels to drain.
Once cool, chop into small pieces. Set aside.


2. Cook the Beef Mixture

In the same skillet, add diced onion and garlic.
Sauté for 2–3 minutes until onions become soft and translucent.

Add ground beef, breaking it up with a spoon.
Season with salt and pepper.
Cook until fully browned and no longer pink.

Drain excess grease from the pan.


3. Add Fillings

Stir in:
• Chopped bacon
• Pickles
• Shredded cheese

Mix until well combined.
Remove from heat and allow mixture to cool slightly.


4. Prepare Sealing Paste

In a small bowl, whisk together cornstarch and cold water.


5. Assemble Egg Rolls

Place one wrapper on a flat surface (diamond shape).

Add about 3 tablespoons of filling near one corner, leaving about ½ inch space from the edges.

Brush the edges with cornstarch mixture.
Fold in the sides, then roll tightly into a log shape.

Repeat until filling is used.


6. Fry the Egg Rolls

Heat oil in a skillet to medium-high (about 350°F / 175°C).

Carefully place egg rolls in hot oil.
Fry, turning often, until all sides are golden brown (about 3–4 minutes).

Remove and place on paper towels or a rack to drain.


🥣 Dipping Sauce (Optional – “Burger Sauce” Style)

Mix together:
• ½ cup mayonnaise
• ¼ cup ketchup
• 2 tbsp pickle relish
• 1 tsp mustard

Stir until smooth.


🍽 Serving Suggestions

Serve hot as:
• Party appetizer
• Game-day snack
• Family-style sharing dish

Pairs well with:
• Fries
• Coleslaw
• Salad


❄ Storage & Reheating

• Refrigerate up to 2 days
• Reheat in oven or air fryer for best crispiness
• Can be frozen (uncooked) up to 2 months

3-Ingredient Breakfast Arepas

3-Ingredient Breakfast Arepas

Description

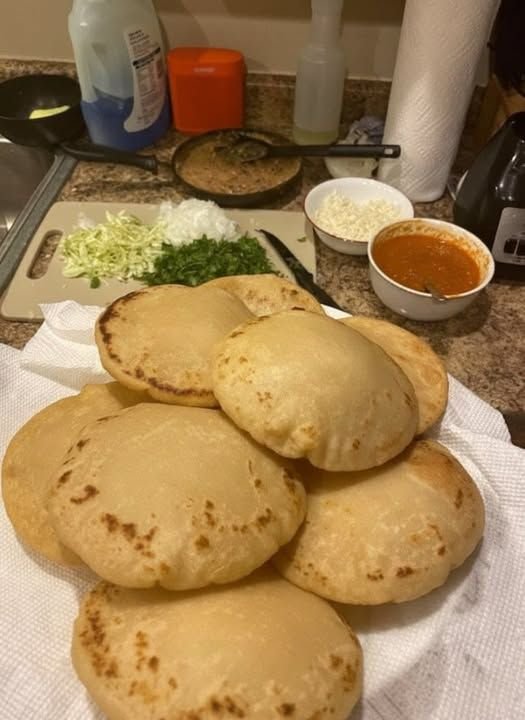
These 3-Ingredient Breakfast Arepas are golden, pan-toasted corn cakes with a soft, pillowy center. Naturally gluten-free, incredibly filling, and endlessly versatile, they’re a staple breakfast you can enjoy every single day. Simple ingredients, big comfort.


Ingredients

  • 2 cups pre-cooked white cornmeal (such as PAN)

  • 2½ cups warm water

  • 1 tsp salt

(That’s it!)


Instructions

  1. In a bowl, mix warm water and salt.

  2. Slowly add cornmeal while mixing with your hand.

  3. Knead gently for 2–3 minutes until a smooth, soft dough forms (not sticky).

  4. Divide dough into equal balls.

  5. Flatten into discs about ½–¾ inch thick.

  6. Heat a lightly oiled skillet or griddle over medium heat.

  7. Cook arepas 5–7 minutes per side until golden with light char spots.

  8. Optional: finish in oven at 350°F (180°C) for 10 minutes for extra fluffiness.


Chef’s Notes

  • Dough should feel like soft clay—add a splash of water if dry.

  • Let dough rest 5 minutes before shaping for best texture.

  • They puff slightly as they cook—that’s the magic.


Tips for Best Results

  • Crispier exterior: Cook longer on slightly lower heat.

  • Fluffier inside: Finish in the oven after pan-searing.

  • Daily breakfast hack: Make extra and reheat in a skillet.

  • Stuffable: Slice open and fill once cooked.


Servings

  • Makes 6–8 arepas, depending on size

  • 2 arepas = 1 hearty serving


Estimated Nutritional Information (Per Arepa)

(Approximate)

  • Calories: ~180 kcal

  • Carbohydrates: ~36g

  • Protein: ~4g

  • Fat: ~2g

  • Fiber: ~3g

  • Sugar: 0g


Benefits

  • Only 3 ingredients

  • Naturally gluten-free

  • Very filling and satisfying

  • Budget-friendly

  • Great base for sweet or savory toppings

  • Perfect for meal prep


Q & A

Q: Can I eat these plain?
A: Absolutely—they’re delicious on their own, especially fresh and warm.

Q: What can I fill them with?
A: Cheese, eggs, shredded meat, butter, avocado, or anything you love.

Q: Can I store them?
A: Yes—refrigerate up to 4 days or freeze up to 1 month.

Q: Are they good for breakfast every day?
A: Yes! They’re simple, satisfying, and easy on digestion.

Q: Can I bake them instead?
A: You can, but pan-cooking gives the best flavor and texture.

2-Ingredient Strawberry Cloud Mousse

2-Ingredient Strawberry Cloud Mousse

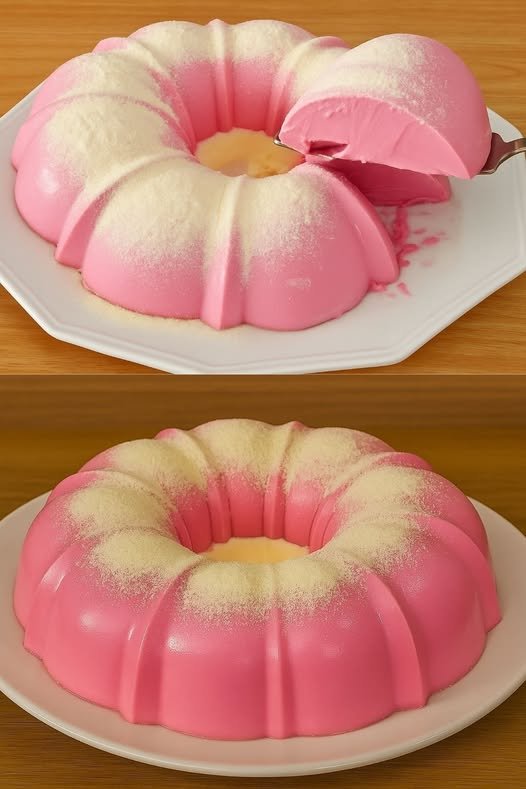
This dessert relies on the air bubbles whipped into the mixture to give it that “cake-like” structure while remaining a melt-in-your-mouth gelatin.

Ingredients

  • Strawberry Gelatin: 2 packets (about 80g-90g total).

  • Heavy Cream or Evaporated Milk: 2 cups (approx. 500 ml), chilled very cold.

    • Note: You will also need 2 cups of hot water to dissolve the gelatin, but since water is a pantry staple, it’s usually not counted in the “2-ingredient” claim!

Instructions

  1. Dissolve the Gelatin: In a large bowl, mix the 2 packets of strawberry gelatin with 2 cups of boiling water. Stir until completely dissolved and let it cool to room temperature (but don’t let it set).

  2. Whip the Base: In a separate bowl, whip the chilled heavy cream (or evaporated milk) until it is thick and doubled in volume.

  3. Combine: Slowly pour the room-temperature gelatin into the whipped cream while continuing to whisk at low speed until the color is uniform and the mixture is frothy.

  4. Mold: Lightly grease a Bundt pan or silicone mold with a tiny bit of neutral oil. Pour the mixture in.

  5. Chill: Refrigerate for at least 4 hours, or ideally overnight, until firm.

  6. Unmold: Carefully pull the edges away from the mold with your fingers to break the vacuum, then flip onto a plate.

  7. Finish: Dust the top with powdered milk (as seen in your photo) or powdered sugar for that snowy finish.


Pro-Tips for Success

  • The “Magic” Dust: That white powder on top is almost certainly powdered milk (like Nido). It adds a creamy sweetness that balances the tart strawberry without making it soggy like powdered sugar can.

  • Temperature is key: if the gelatin is too hot, it will melt your cream. If it’s too cold, it will clump. Aim for a “lukewarm” touch.

Creamy Mango Banana Smoothie

Creamy Mango Banana Smoothie

Prep time: 5 minutes


Servings: 1 large glass


Texture: Thick, “soft-serve” consistency


### Ingredients

1 cup Frozen Mango Chunks: Using frozen mango is the secret to that thick, frost-like texture without needing ice.


1 Ripe Banana: (Fresh or frozen). A spotty, ripe banana provides the best natural sweetness.


1/2 cup Greek Yogurt: Use plain for a tangier flavor or vanilla for extra sweetness.


1/2 cup Milk of Choice: (Dairy, Almond, or Coconut milk).


1 tsp Honey or Maple Syrup: (Optional) Add only if your fruit isn’t quite sweet enough.


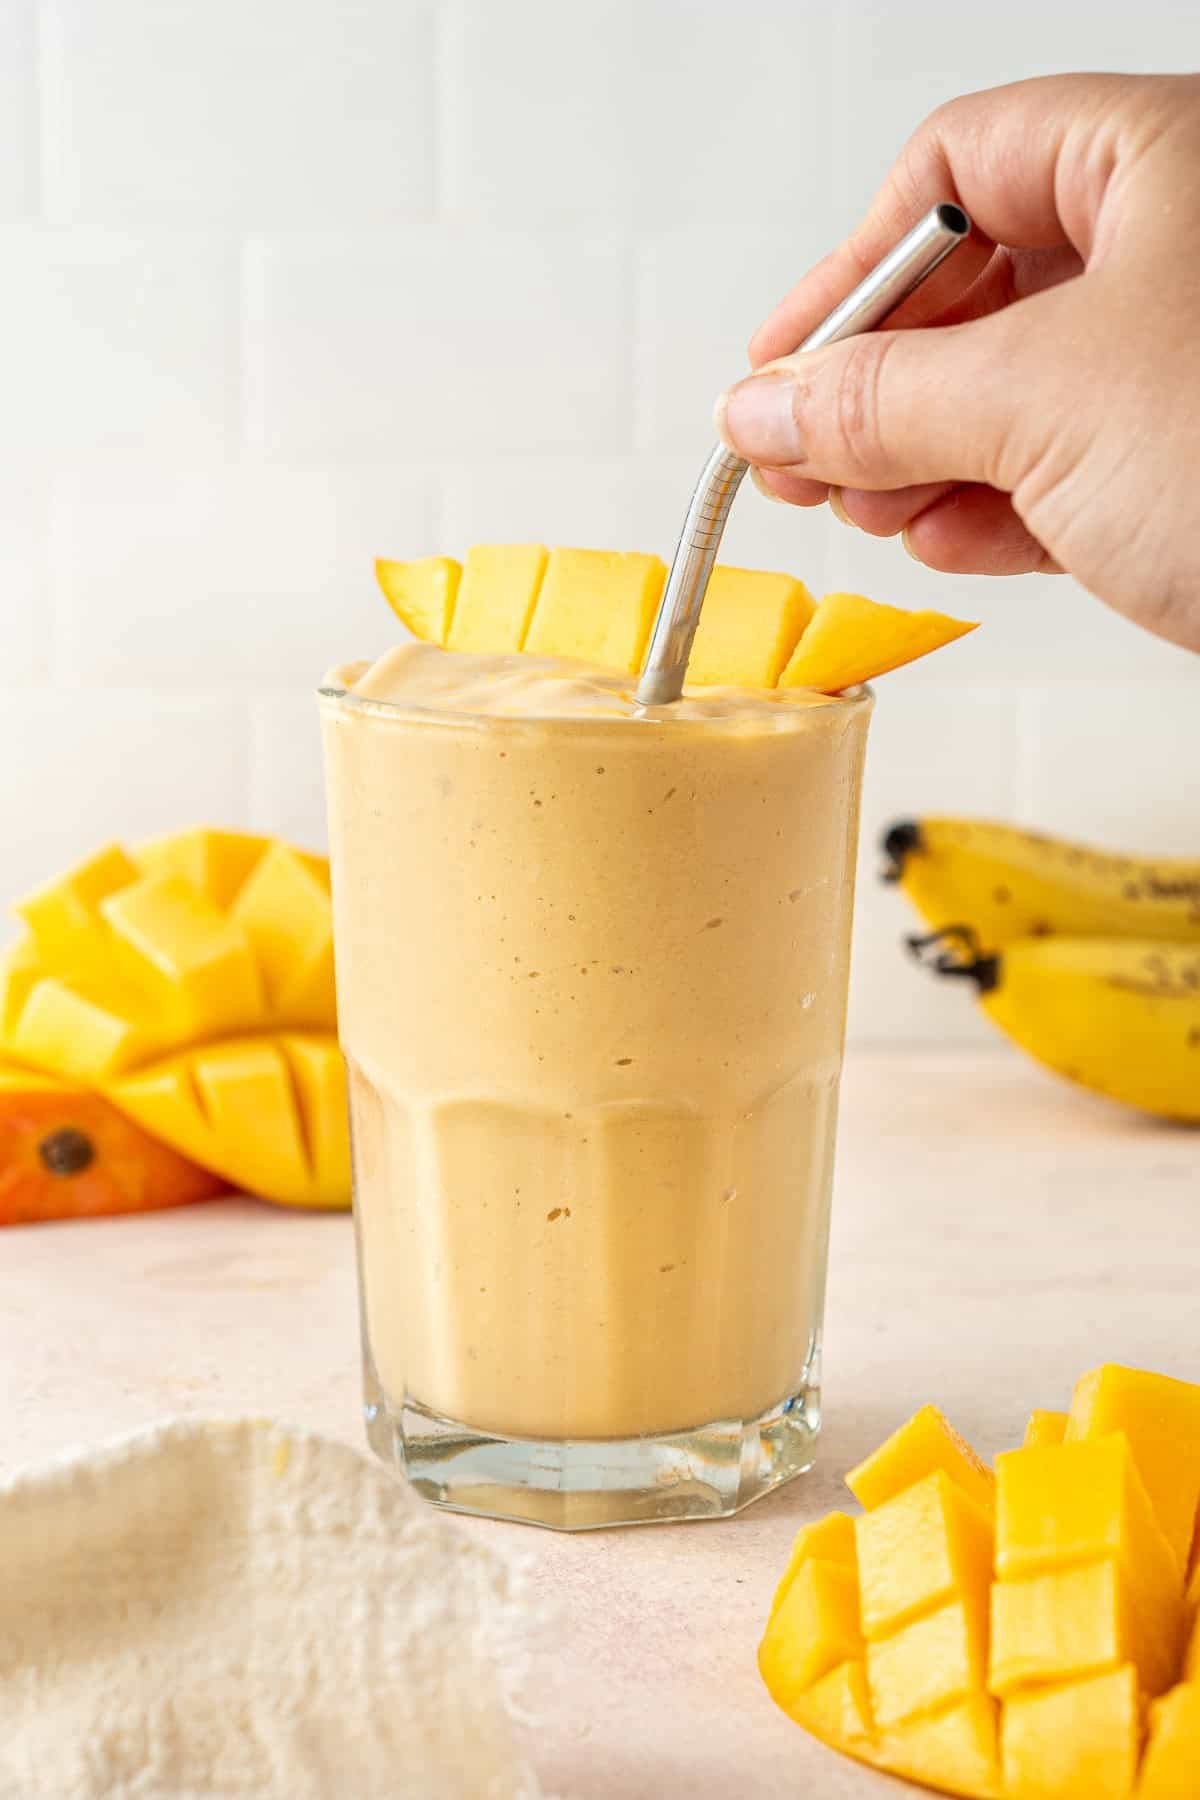
Garnish: 1/2 a fresh mango, sliced into a “hedgehog” or cubes (as seen in the photo).

## Instructions

Layer the Blender: Start by pouring the milk and yogurt into the blender first. Adding liquids at the bottom helps the blades move more easily through the frozen fruit.


Add Fruit: Add the banana slices and the frozen mango chunks.


Blend: Start on a low speed to break up the frozen chunks, then increase to high. Blend for 45–60 seconds until completely smooth and “creamy” in appearance.


Adjust Consistency: * If it’s too thick, add a splash more milk.


If it’s too thin, add a few more frozen mango chunks or a couple of ice cubes.


Serve: Pour into a tall glass. Top with the fresh mango slices and serve with a reusable metal straw for that exact look!

## Pro-Tips for the Best Results

The “Hedgehog” Garnish: To get the look in the bottom right of your photo, slice the mango “cheek” off the pit, score it into a grid pattern without cutting through the skin, and push the skin side up to pop the cubes out.


No Added Sugar: If you use a very ripe (brown-spotted) banana, you likely won’t need any honey or sweetener at all.


Boost It: For a breakfast version, add a tablespoon of chia seeds or a scoop of vanilla protein powder before blending.

High-Protein Cheesy Garlic Bread

High-Protein Cheesy Garlic Bread

Yields: 1 Loaf | Prep time: 15 mins | Bake time: 35-40 mins

Ingredients

The Dough:

  • 1 cup Cottage cheese (small curd)

  • 2 Large eggs

  • 2 cups Self-rising flour (or 2 cups all-purpose flour + 1 tbsp baking powder + 1 tsp salt)

  • ½ cup Shredded cheddar or mozzarella (mixed into the dough)

  • 1 tsp Garlic powder

  • 1 tsp Dried oregano or Italian seasoning

The Topping:

  • ½ cup Shredded mozzarella (for that golden crust)

  • 2 tbsp Butter, melted

  • 2 cloves Garlic, minced

  • Fresh thyme or parsley for garnish


Instructions

  1. Preheat & Prep: Preheat your oven to 375°F (190°C). Grease a standard loaf pan with butter or non-stick spray.

  2. Blend the Wet Ingredients: In a blender or food processor, blend the cottage cheese and eggs until completely smooth. This is the secret to getting a “bread” texture rather than a “chunky” one.

  3. Mix: In a large bowl, combine the flour, garlic powder, and dried herbs. Pour in the blended cottage cheese mixture and the ½ cup of shredded cheese. Stir until a thick, sticky dough forms.

  4. Transfer: Spread the dough evenly into your prepared loaf pan.

  5. Add the Flavor: In a small bowl, mix the melted butter and minced garlic. Brush this generously over the top of the dough. Sprinkle the remaining mozzarella and fresh herbs on top.

  6. Bake: Bake for 35–40 minutes. The top should be deep golden brown, and a toothpick inserted into the center should come out clean.

  7. Cool: Let it sit in the pan for 10 minutes before slicing. This helps the crumb set so it doesn’t fall apart.


Serving Suggestion

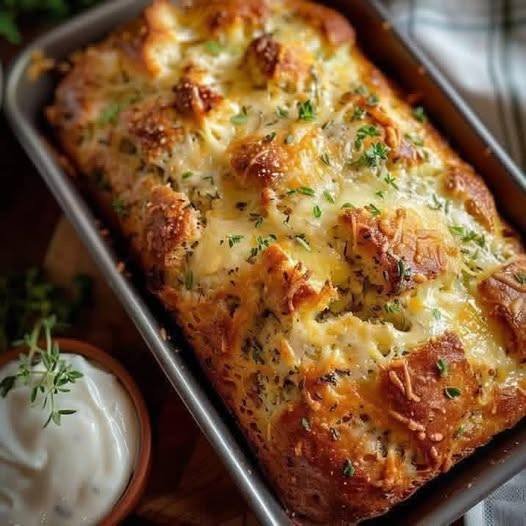
This bread is incredible when dipped into a side of warm marinara or a garlic aioli (like the white sauce shown in your photo).