Flourless Apple & Cocoa Cake

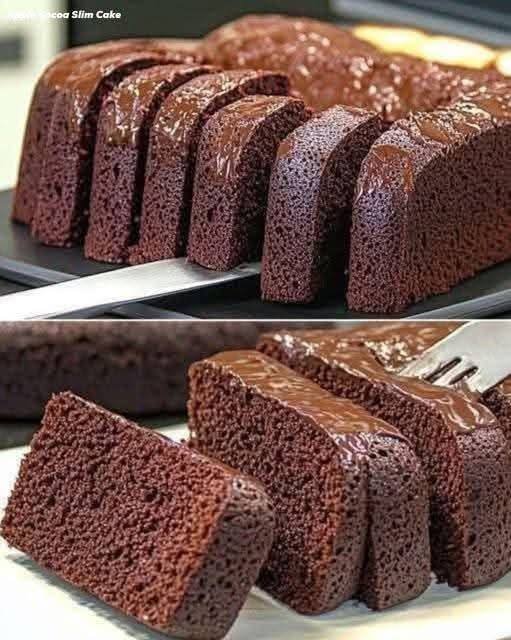
Flourless Apple & Cocoa Cake

Prep Time: 10 minutes
Bake Time: 35–40 minutes
Serves: 8 slices

A soft, dense chocolate-style cake made from blended apples, eggs, and cocoa powder.


Ingredients

  • 4 medium apples (such as Gala, Fuji, or Red Delicious), peeled and cored

  • 4 large eggs

  • 5 tablespoons unsweetened cocoa powder

  • 1 teaspoon baking powder

  • Olive oil, for greasing the pan

  • Optional: Pinch of salt


Instructions

1. Prepare the Apples

Peel and core the apples.
Cut them into small chunks so they blend easily.


2. Blend the Base

Place the apple pieces and eggs into a blender or food processor.
Blend until completely smooth and liquid, with no visible apple pieces.


3. Add Dry Ingredients

Add the cocoa powder, baking powder, and salt (if using).
Blend again until the mixture is fully combined and evenly colored.


4. Prepare the Pan and Oven

Preheat your oven to 350°F (180°C).
Lightly grease a silicone mold or line a loaf pan with parchment paper and brush with olive oil.


5. Bake

Pour the batter into the prepared pan.
Bake for 35–40 minutes, or until a toothpick inserted into the center comes out clean.


6. Cool and Set

Let the cake cool in the pan for 20 minutes.
Transfer to the refrigerator and chill for 1 hour before slicing.
This helps the cake firm up and develop its dense texture.


7. Serve

Slice and serve as is, or with an optional topping of melted dark chocolate drizzled over the top.


Helpful Tips

  • Smoother texture: Blend the apples very well to avoid chunks in the batter.

  • Flavor option: Add ½ teaspoon vanilla extract or cinnamon for extra aroma.

  • Pan choice: Silicone or parchment-lined pans release more easily.

  • Storage: Store covered in the refrigerator for up to 3 days.

Classic Creamy Strawberry Smoothie


Classic Creamy Strawberry Smoothie


Ingredients

2 cups Fresh or frozen strawberries (hulled)


1 cup Milk of your choice (dairy, almond, or oat work great)


1/2 cup Plain or vanilla Greek yogurt (for that creamy texture)


1 tablespoon Honey or maple syrup (optional, depending on berry sweetness)


1/2 cup Ice cubes (only if using fresh berries; skip if using frozen)


Fresh mint leaves (optional, for garnish)


Instructions

Prep the Berries: Wash the strawberries and remove the green stems. If they are very large, cut them in half to help the blender along.


Combine: Place the strawberries, milk, yogurt, and sweetener into your blender.


Blend: Start on a low speed and gradually increase to high. Blend for about 45–60 seconds until the mixture is completely smooth and no large fruit chunks remain.


Adjust Consistency: * If it’s too thick, add a splash more milk.


If it’s too thin, add a few more frozen berries or a handful of ice.


Serve: Pour into tall glasses and garnish with a fresh strawberry on the rim or a sprig of mint for that professional look.


Pro Tips for the Best Flavor

Freeze your fruit: Using frozen strawberries gives the smoothie a thicker, “milkshake” consistency without diluting the flavor with ice.


Balance the tang: If your yogurt is very tart, a tiny pinch of salt can actually help bring out the natural sweetness of the strawberries.

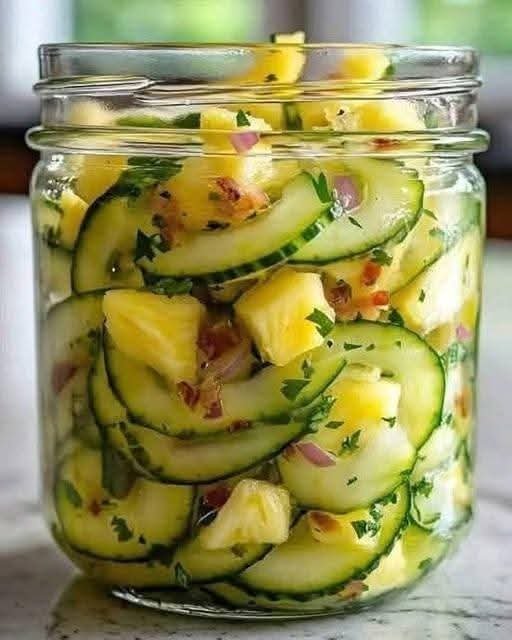
Pineapple Cucumber Salad recipe

Pineapple Cucumber Salad recipe

If your salad game needs a refresh, this bright and zesty pineapple cucumber salad is the perfect way to shake things up. Sweet, tangy, and slightly spicy, it’s the kind of dish that disappears from the table faster than you expect.

Ingredients

Serves: 4

For the Salad:

2 cups fresh pineapple, diced

1 large cucumber, thinly sliced (English or Persian cucumbers work best)

½ small red onion, thinly sliced

¼ cup fresh cilantro, chopped

1 small red chili (or jalapeño), finely sliced (optional, for heat)

¼ teaspoon salt (or to taste)

For the Dressing:

2 tablespoons lime juice (freshly squeezed)

1 tablespoon honey or agave syrup

1 tablespoon olive oil

½ teaspoon chili flakes (optional)

Black pepper, to taste

Instructions

Prepare the Ingredients:

In a large mixing bowl, combine pineapple, cucumber, red onion, and chili.

Make the Dressing:

In a small bowl, whisk together lime juice, honey, olive oil, salt, and pepper.

Combine:

Pour the dressing over the pineapple mixture and toss gently to coat everything evenly.

Add Fresh Herbs:

Sprinkle in chopped cilantro and toss again lightly.

Chill & Serve:

Refrigerate for at least 15–20 minutes to let the flavors meld. Serve col

d as a side or light snack.

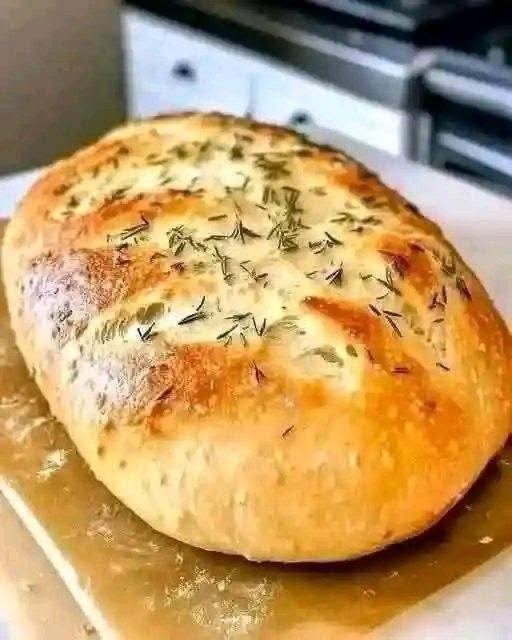
Simple No-Knead Herb Bread

Simple No-Knead Herb Bread

Prep Time: 10 minutes
Rise Time: 1½–2 hours
Bake Time: 35–40 minutes
Yields: 1 round loaf

A soft, airy bread with a lightly crisp crust and herb topping, made without kneading.


Ingredients

  • 3 cups all-purpose flour

  • 1 teaspoon salt

  • 1 tablespoon sugar

  • 1 tablespoon instant yeast

  • 1½ cups warm water (about 110°F / 43°C)

  • 1 tablespoon olive oil (for brushing)

  • 1–2 teaspoons dried herbs (rosemary, thyme, or mixed herbs)

Optional topping:

  • Coarse salt or extra herbs


Instructions

1. Mix the Dough

In a large bowl, combine:

  • Flour

  • Salt

  • Sugar

  • Yeast

Pour in the warm water and stir with a spoon until a sticky, shaggy dough forms.
Do not knead.


2. First Rise

Cover the bowl with a towel or plastic wrap.
Let rise in a warm place for 1½ to 2 hours, or until doubled in size and bubbly.


3. Shape

Line a baking tray with parchment paper.
Turn the dough out onto the tray and gently shape it into a round loaf using a spatula or lightly oiled hands.


4. Second Rest

Cover loosely and let rest for 20 minutes while the oven heats.


5. Preheat Oven

Preheat to 375°F (190°C).


6. Add Topping

Brush the loaf lightly with olive oil.
Sprinkle dried herbs evenly over the top.
Optional: add a light pinch of coarse salt.


7. Bake

Bake for 35–40 minutes, or until:

  • The top is deep golden

  • The loaf sounds hollow when tapped on the bottom


8. Cool

Transfer to a rack and cool for 15–20 minutes before slicing.


Helpful Tips

  • Crispier crust: Place a small oven-safe dish of hot water on the lower rack while baking.

  • Flavor ideas: Add garlic powder or grated cheese to the dough.

  • Storage: Wrap and store at room temperature for 2 days or freeze for longer storage.

  • Serving: Great with soups, butter, olive oil, or as sandwich bread.

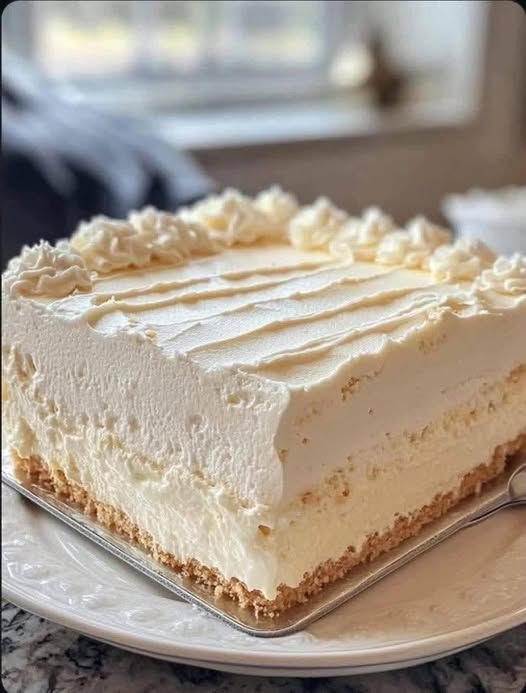
Creamy Vanilla Cream Slice Dessert

Creamy Vanilla Cream Slice Dessert

Prep Time: 20 minutes
Chill Time: 4 hours (or overnight)
Serves: 8–10 slices

A smooth, rich dessert with a biscuit base, creamy vanilla filling, and a soft whipped topping.


Ingredients

For the Base

  • 200 g (about 2 cups) crushed plain biscuits or graham crackers

  • 100 g (½ cup) melted butter

For the Cream Filling

  • 2 cups milk

  • ½ cup sugar

  • ¼ cup cornstarch

  • 2 egg yolks

  • 1 tablespoon butter

  • 1 teaspoon vanilla extract

For the Whipped Layer

  • 1½ cups heavy whipping cream

  • 3 tablespoons powdered sugar

  • ½ teaspoon vanilla extract


Instructions

1. Prepare the Base

In a bowl, mix the crushed biscuits with melted butter until evenly combined.
Press the mixture firmly into the bottom of a rectangular dish lined with parchment paper.
Refrigerate while preparing the filling.


2. Make the Cream Filling

In a saucepan, whisk together:

  • Milk

  • Sugar

  • Cornstarch

  • Egg yolks

Place over medium heat and stir constantly until thickened and smooth (about 5–7 minutes).
Remove from heat and stir in:

  • Butter

  • Vanilla extract

Let the mixture cool slightly, then pour over the biscuit base.
Spread evenly and refrigerate for at least 1 hour until set.


3. Prepare the Whipped Layer

In a chilled bowl, beat the heavy cream with powdered sugar and vanilla until soft peaks form.


4. Assemble

Spread the whipped cream evenly over the set cream layer.
Use a spatula to smooth the top or create decorative lines.


5. Chill

Refrigerate for 3 more hours or until fully firm and easy to slice.


6. Serve

Lift out using the parchment paper and cut into neat squares or slices.
Serve cold.


Helpful Tips

  • Neater slices: Dip your knife in hot water and wipe between cuts.

  • Flavor variation: Add lemon zest or a little almond extract to the cream filling.

  • Topping idea: Sprinkle shredded coconut or white chocolate curls on top.

  • Storage: Keep covered in the refrigerator for up to 3 days.
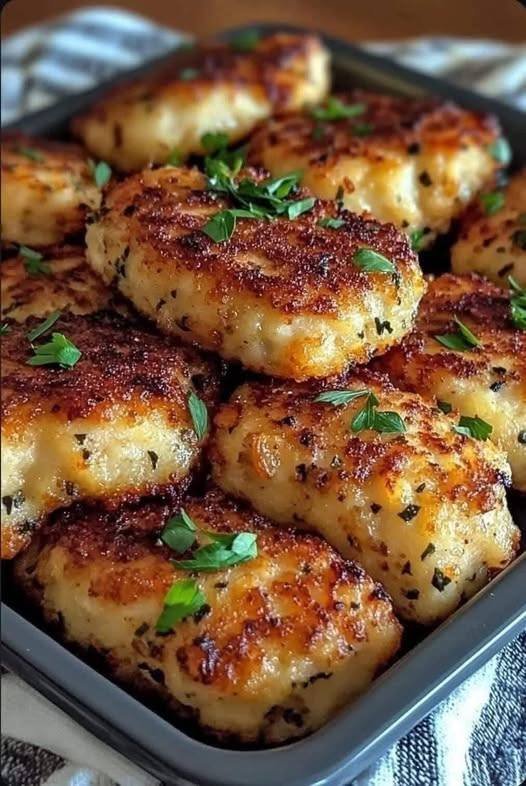
Crispy Chicken and Potato Patties

Crispy Chicken and Potato Patties

Prep Time: 20 minutes
Cook Time: 15 minutes
Yield: 10–12 patties

Golden, crispy patties made with seasoned chicken and mashed potatoes. These can be pan-fried and served as a main dish, snack, or sandwich filling.


Ingredients

  • 1 lb (450 g) ground chicken (or very finely minced chicken breast)

  • 2 large potatoes, peeled, boiled, and mashed

  • 1 small onion, finely grated or minced

  • 1 large egg

  • ½ cup breadcrumbs, plus extra for coating

  • 2 cloves garlic, minced

  • 1 tablespoon fresh parsley, finely chopped

  • 1 teaspoon salt

  • ½ teaspoon black pepper

  • ½ teaspoon paprika

  • Oil, for shallow frying (vegetable or olive oil)


Instructions

1. Prepare the Base

Place the ground chicken and mashed potatoes in a large mixing bowl.
Make sure the potatoes have cooled slightly before adding the egg.


2. Add the Aromatics

Add to the bowl:

  • Onion

  • Garlic

  • Parsley

  • Egg

  • Breadcrumbs

Mix gently until combined.


3. Season the Mixture

Add salt, black pepper, and paprika.
Mix thoroughly using your hands or a spoon until the mixture is uniform and holds together.


4. Shape the Patties

Scoop about ¼ cup of the mixture.
Roll into a ball, then flatten into a patty about ½ inch (1–1.5 cm) thick.
Repeat with the remaining mixture.


5. Coat the Patties

Place extra breadcrumbs in a shallow dish.
Lightly coat each patty in breadcrumbs on both sides.


6. Fry

Heat oil in a large skillet over medium heat.
Place patties in the pan without overcrowding.
Cook for 5–7 minutes per side, turning carefully, until golden brown and fully cooked through.


7. Drain and Serve

Transfer cooked patties to a plate lined with paper towels to remove excess oil.
Sprinkle with extra chopped parsley if desired.


Helpful Tips

  • Even cooking: Keep patties similar in size and thickness.

  • Extra flavor: Add a pinch of chili powder or dried herbs to the mixture.

  • Make ahead: Patties can be shaped and refrigerated (uncooked) for up to 24 hours before frying.

  • Serving ideas: Serve with a dipping sauce, in a sandwich bun, or with a side of vegetables or salad.