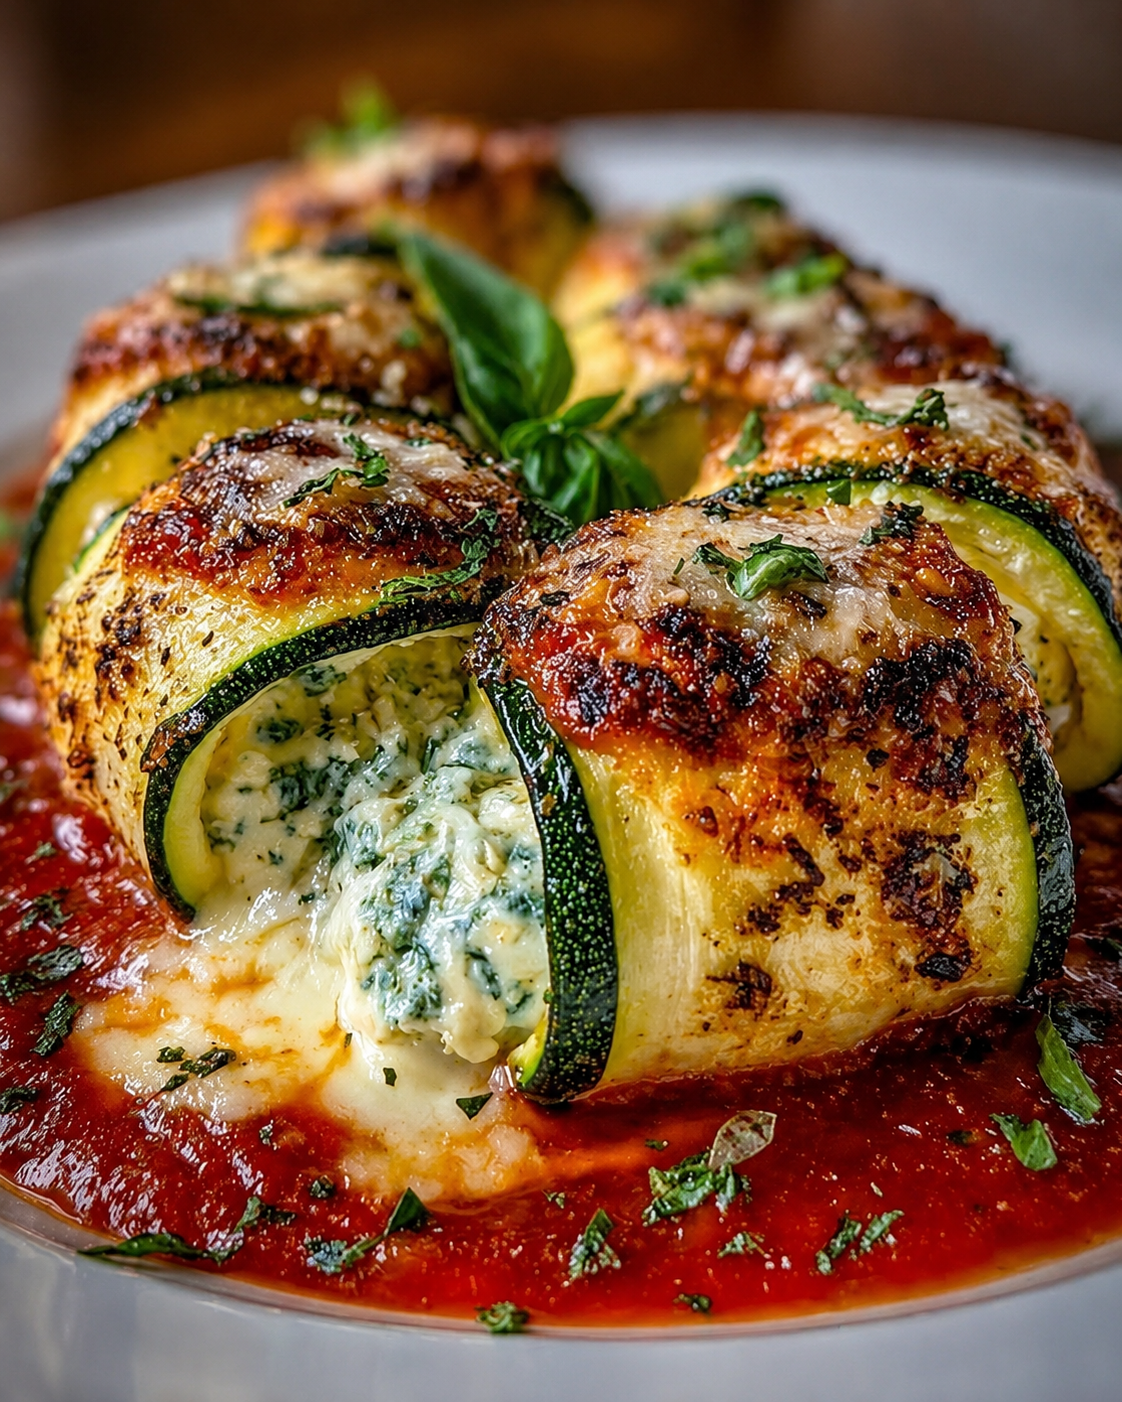
Creamy Spinach and Chicken Bake

Creamy Spinach and Chicken Bake

Ingredients

Chicken: 1.5 lbs chicken breasts (boneless, skinless), sliced into thin cutlets.


Spinach: 10 oz fresh baby spinach.


Cream Base: 4 oz softened cream cheese, 1/2 cup heavy cream, and 1/4 cup sour cream.


Cheese: 1.5 cups shredded Mozzarella and 1/4 cup grated Parmesan.


Aromatics: 3 cloves minced garlic and 1 small shallot, finely diced.


Seasoning: 1 tsp onion powder, 1/2 tsp dried oregano, salt, and black pepper to taste.


Fat: 1 tbsp olive oil or butter.


Instructions

Prep the Oven: Preheat your oven to 375°F (190°C). Lightly grease a 9×13 inch baking dish.


Sauté the Greens: In a large skillet over medium heat, add oil and sauté the garlic and shallot until fragrant. Add the spinach in batches, stirring until wilted. Remove from heat and drain any excess liquid—this prevents a watery bake!


Create the Sauce: In a bowl, whisk together the softened cream cheese, heavy cream, sour cream, onion powder, oregano, and half of the Parmesan. Stir in the wilted spinach.


Assemble: Season the chicken cutlets with salt and pepper and lay them in a single layer in the baking dish. Spread the creamy spinach mixture evenly over the chicken.


Top & Bake: Generously sprinkle the Mozzarella and remaining Parmesan over the top.


Cook: Bake for 25–30 minutes until the chicken is cooked through. For that perfect golden crust seen in your photo, broil on high for the last 2 minutes.


Serving Suggestion

Let it rest for 5 minutes before serving to allow the sauce to set. This pairs beautifully with roasted potatoes, pasta, or a simple crusty baguette.

The Ultimate Glow Green Juice

The Ultimate Glow Green Juice

Ingredients

2 cups Fresh spinach or kale (tightly packed)


1 medium Green apple (cored and sliced)


1 large Cucumber (chopped into chunks)


2 stalks Celery (including leaves)


1 inch Fresh ginger root (peeled)


½ large Lemon (peeled)


Optional: A splash of cold filtered water if using a blender.


Instructions

1. Preparation

Wash all produce thoroughly under cold running water. Since you’ll be juicing the skins of the apple and cucumber, organic is a great choice if available. Chop the ingredients into sizes that fit your specific juicer’s chute.


2. Juicing Process

If using a juicer, feed the ingredients through in this order: spinach, ginger, lemon, apple, and finally the cucumber and celery. The high water content in the cucumber and celery helps flush the smaller leafy bits through the machine to ensure you get every drop of nutrients.


3. The Blender Method

If you don’t have a juicer, add all ingredients to a high-speed blender with ½ cup of cold water. Blend until completely smooth. Pour the mixture through a nut milk bag or a fine-mesh strainer into a glass, squeezing well to separate the juice from the pulp.


4. Serve

Stir the juice well to combine the flavors. Serve immediately over ice for the most refreshing experience.


Pro Tip: To maintain the highest nutritional value, drink this juice within 20 minutes of making it. If you need to store it, keep it in a sealed glass jar in the fridge for up to 24 hours.

Creamy Raspberry Frozen Yogurt

Creamy Raspberry Frozen Yogurt (Detailed Recipe)

📝 Ingredients:

  • 2 cups frozen raspberries
  • 1 cup Greek yogurt (plain or vanilla)
  • 2–3 tbsp honey or maple syrup (as per taste)
  • 1 tsp lemon juice
  • (Optional) 1–2 tbsp milk or water if needed

👩‍🍳 Step-by-Step Instructions:

Step 1: Prepare the raspberries

  • If you have fresh raspberries, wash and dry them.
  • Put them in the freezer for at least 4 hours or until fully frozen.
  • Frozen fruit is important for a thick and creamy texture.

Step 2: Add ingredients to blender

  • Take a high-speed blender or food processor.
  • Add:
    • Frozen raspberries
    • Greek yogurt
    • Honey or maple syrup
    • Lemon juice

Step 3: Start blending

  • First, pulse a few times to break the fruit.
  • Then blend on high speed for 30–60 seconds.
  • Stop and scrape the sides if needed.

👉 Tip:

If the mixture is too thick and not blending, add 1 tablespoon milk or water to help it move.

Step 4: Check texture

  • Blend until the mixture becomes smooth, creamy, and thick.
  • Make sure there are no big fruit pieces left.

Step 5: Serve or freeze

  • For soft-serve style:
    Serve immediately. It will be soft, creamy, and ready to eat.
  • For scoop style (like ice cream):
    • Transfer to a container
    • Freeze for 1–2 hours
    • Then scoop and serve

Step 6: Garnish

  • Add some fresh raspberries on top
  • You can also add nuts, granola, or chocolate chips (optional)

💪 Nutritional Benefits:

  • Rich in antioxidants: Raspberries help protect your body
  • Good for digestion: Yogurt contains healthy bacteria
  • High in protein: Keeps you full for longer
  • High fiber: Good for stomach health

❓ Q/A:

Q: Can I make it dairy-free?

A: Yes, use coconut yogurt or almond yogurt instead of Greek yogurt.

Q: Why does it become hard after freezing?

A: Because it has no chemicals or fats like ice cream. Let it sit outside for 5–10 minutes before eating.

Q: Can I use other fruits?

A: Yes! Try strawberries, mangoes, or peaches.T

🌼 Perfect Chamomile Tea (No Bitterness, Maximum Calm)

🌼 Perfect Chamomile Tea (No Bitterness, Maximum Calm)

https://images.openai.com/static-rsc-4/vNW5CYoRLuyjRCdhpjbNbuHwy1XgyxGlZhWbF5ivdQwW0Ot8YGPfM11Jx34FPRM5L-_ZhUJsltZeD241RePx0PcVo-uz48iiGf2F8Ryipxq470ynsKGA2mqATvoz1rP0mnFzsR--6qSLz56Us489dsLuvj_wwvpj2PP7hBq_bsF7uaTiVLfwAWbRwQb2QG1T?purpose=fullsize
https://images.openai.com/static-rsc-4/dWe6mDgxAsH0fbILB5HHb8zTS_TpK24V33iISq6_b5AYonDroSJ4algqAsA0J9phCcTP9cDXXuQvRldlY5PV8zfhmz7trS4ufNEuuzJJPmBV2NbibWBkcLhVGDOuZgGRZlyEFaGm0XvUUMR5xLKrPoKbJCX1LS4p1r3b190GGliWux2T_ToLJitxooEkXXaN?purpose=fullsize
https://images.openai.com/static-rsc-4/FZ87u7tDLVNOoGk1WkGC_82MPOn0b9Cr6UB5W_TqlE4YzqHE_liGmhHmk2GLBGY0JkYnc3ChQHkU7rjzpEpYxBd8uW3M9p5LWe49_z1JBNueFjd5LC8DGyQS5UC8oWpg5vSi1UTgE1FTHACMfvtFQuKzKAlY-LpIn44XlzXmkhSg0vxuUBzNrjAP1wfUXEz5?purpose=fullsize
https://images.openai.com/static-rsc-4/UTLXWTVdy6UbRllmyooBebYj2MfpHfKQTyfMPR0ivnTlC92f-pG-mTvl9ACS-ZJJ1oFb6jKy0mmmXBdIfRzc_yy4daw36APGxIwlsYM76azhH4Wy6_TiIHLE4JKT7asFrc8vxfscF0ymDgHDHRmOT2UK-CCCjFe23Fq0ZhRZNMxJniaDJ1D54ymrhWM2r2Vt?purpose=fullsize
https://images.openai.com/static-rsc-4/jEc8vVeNcQafxBQ5o8CCSdN2WYv2IfLiBeOv6lHB9rt_iP5e6LgrIrMU_w0jP500wFEyGbKuXGrJwSkNuLqL1LFvcB23PLEsolD6L3douEc5c4flNMoISw1reSQZ8kZ9pg7_4F-eRz42TNHT90U7eGGaXMVUvJzZTWMgUP0elqFCu62jt4Pneo4yXGd39-CY?purpose=fullsize

📝 Ingredients

  • 1 ½ cups filtered water (clean water = clean flavor)
  • 2 tbsp dried chamomile flowers (or 2 premium tea bags)
  • 1 tsp raw honey (optional, low-carb sweetness)
  • 1 thin slice lemon or fresh mint sprig (optional)

☕ Instructions (The Right Way)

1. Heat the Water
Bring water to about 90°C (not boiling).
👉 No thermometer? Let it rest 2 minutes after boiling.

2. The “Trap the Calm” Method
Add chamomile to your mug and pour hot water over it.
👉 Immediately cover with a lid or saucer.

3. Deep Steep (Don’t Rush This)
Let it steep for 5–7 minutes.
Chamomile needs time to release its full soothing compounds.

4. Strain & Finish
Remove flowers or tea bag gently.
Add honey and lemon/mint if desired.


🔬 Why This Method is Superior

✔ The Lid = Maximum Relaxation
Chamomile contains bisabolol, a delicate essential oil.
Without a lid → it evaporates → weaker tea.
With a lid → you keep the calming magic.

✔ Perfect Temperature = No Bitterness
Boiling water burns delicate floral notes → bitter taste.
90°C keeps it smooth, sweet, and apple-like.

✔ No Squeezing Rule
Squeezing tea bags releases tannins
🚫 bitter
🚫 grassy (“wet hay” taste)
✔ smooth if left alone


💡 Pro Tips (Next-Level Upgrade)

  • Use a glass or ceramic cup (keeps flavor pure)
  • Add a tiny pinch of cinnamon for warmth
  • Drink before bed for best calming effect 😴
  • Try double steeping (reuse flowers once for lighter second cup)

🌿 What It Tastes Like (When Done Right)

  • Lightly sweet
  • Soft apple-like notes
  • Smooth, buttery floral finish
  • Zero bitterness

Creamy Avocado & Dragon Fruit Smoothie

Creamy Avocado & Dragon Fruit Smoothie

Ingredients

  • 1/2 medium Avocado (ripe, for creaminess)

  • 1/2 White Dragon Fruit (peeled and cubed; use frozen for a thicker texture)

  • 1 cup Milk of choice (Almond, Coconut, or Soy milk work best for this flavor profile)

  • 1 tbsp Honey or Maple Syrup (to taste)

  • 1/2 frozen Banana (optional, for extra sweetness and thickness)

  • Splash of Lime juice (optional, to brighten the flavor and keep the avocado green)

Instructions

  1. Prep the Fruit: Cut the dragon fruit in half and scoop out the white flesh with the black seeds. Do the same for the avocado.

  2. Blend: Place the avocado, dragon fruit, milk, and sweetener into a high-speed blender.

  3. Process: Blend on high until completely smooth. The black seeds will remain intact but smaller, giving it the signature speckled look seen in your photo.

  4. Serve: Pour into a tall glass.

  5. Garnish: To match the photo, cut a small triangular wedge or use a melon baller on a fresh piece of dragon fruit and place it on the rim of the glass.

Why this combination works:

  • The Texture: Avocado contains healthy fats that act as a natural thickener, making the smoothie feel like a milkshake.

  • The Flavor: Dragon fruit has a very mild, slightly sweet flavor (similar to a cross between a kiwi and a pear), which complements the buttery, neutral taste of the avocado perfectly.

Creamy Cucumber Salad with Dill and Red Onion

Creamy Cucumber Salad with Dill and Red Onion

Creamy Cucumber Salad with Dill and Red Onion is a refreshing, cool, and lightly tangy side dish that’s perfect for warm weather meals. Crisp cucumbers are thinly sliced and tossed with delicate red onion, then coated in a creamy dressing flavored with fresh dill and a touch of acidity. This classic salad is simple, timeless, and incredibly satisfying, making it a great companion to grilled meats, sandwiches, or light summer dinners.

What makes this salad special is its balance of textures and flavors. The cucumbers stay crunchy, the red onion adds gentle sharpness, and the creamy dressing ties everything together without feeling heavy. It’s quick to prepare, requires minimal ingredients, and tastes even better after a short chill in the refrigerator.

Ingredients

2 large cucumbers, thinly sliced
½ small red onion, thinly sliced
¾ cup sour cream or Greek yogurt
1 tablespoon mayonnaise (optional, for extra richness)
1 tablespoon lemon juice or white vinegar
1–2 tablespoons fresh dill, finely chopped
Salt and black pepper, to taste

Instructions

Start by washing the cucumbers thoroughly. If the skin is thick or waxy, peel them lightly; otherwise, leaving the skin on adds color and texture. Slice the cucumbers thinly using a sharp knife or mandoliner and place them in a large bowl.

Add the thinly sliced red onion to the cucumbers. If you prefer a milder onion flavor, soak the onion slices in cold water for 5–10 minutes, then drain well before adding them to the bowl.

In a separate mixing bowl, prepare the dressing by combining the sour cream or Greek yogurt with the mayonnaise, if using. Stir in the lemon juice or vinegar until smooth. Add the chopped fresh dill, along with salt and black pepper, and mix until fully blended.

Pour the dressing over the cucumber and onion mixture. Gently toss everything together until the vegetables are evenly coated in the creamy dressing. Be careful not to overmix, as cucumbers release water and can become soft.

For best flavor, cover the salad and refrigerate it for at least 20–30 minutes before serving. This allows the flavors to meld and the salad to become extra refreshing.

Serving Suggestions

Serve Creamy Cucumber Salad chilled as a side dish with grilled chicken, fish, or kebabs. It also pairs well with sandwiches, burgers, or picnic-style meals. For extra texture, you can add sliced radishes or a sprinkle of cracked black pepper on top just before serving.

Light, creamy, and herb-fresh, this cucumber salad is a simple dish that delivers classic comfort with every bite. 🥗💚

Blueberry Cottage Cheese Breakfast Bake

Blueberry Cottage Cheese Breakfast Bake

Introduction

This Blueberry Cottage Cheese Breakfast Bake is a wholesome, oven-baked dish that combines creamy cottage cheese, juicy blueberries, and simple pantry ingredients into a lightly sweet, custard-like bake. It’s an excellent alternative to sugary breakfasts, offering long-lasting energy thanks to its high protein and fiber content. Enjoy it warm on busy mornings or chilled as a grab-and-go breakfast or snack.

Prep Time: 10 minutes

Bake Time: 35–40 minutes

Cooling Time: 10 minutes

Total Time: ~55 minutes

Servings: 6–8 squares

Ingredients

1½ cups cottage cheese (full-fat or low-fat)

3 large eggs

⅓ cup honey or maple syrup

1 tsp vanilla extract

½ tsp cinnamon

¼ tsp salt

½ cup oats (rolled or quick oats)

1 tbsp cornstarch or flour

1 cup blueberries (fresh or frozen)

1 tsp lemon zest (optional, enhances flavor)

1 tbsp butter or oil (for greasing pan)

Step-by-Step Instructions

Preheat & Prepare

Preheat oven to 180°C (350°F).

Grease an 8×8-inch baking dish or similar size.

Blend the Base

In a blender or food processor, add:

cottage cheese

eggs

honey/maple syrup

vanilla

cinnamon

salt

Blend until smooth and creamy.

Add Dry Ingredients

Pour mixture into a bowl.

Stir in oats and cornstarch/flour until well combined.

Fold in Blueberries

Gently fold in blueberries and lemon zest.

If using frozen blueberries, do not thaw.

Bake

Pour batter into prepared dish.

Smooth the top evenly.

Bake for 35–40 minutes, until the center is set and the top is lightly golden.

Cool & Slice

Let cool for 10 minutes before slicing.

Texture firms up more as it cools.

Serving Suggestions

Serve warm with extra blueberries

Drizzle with honey or yogurt

Add nuts or seeds for crunch

Enjoy chilled for a cheesecake-style bite

Storage & Reheating

Refrigerator: Store in an airtight container for 4–5 days

Freezer: Freeze slices up to 2 months

Reheat: Microwave for 20–30 seconds or enjoy cold

Variations

Banana Blueberry: Add ½ mashed banana

Lemon Blueberry: Add 1 tbsp lemon juice + extra zest

Protein Boost: Add 1 scoop vanilla protein powder (reduce oats slightly)

Gluten-Free: Use certified gluten-free oats

Final Thoughts

This Blueberry Cottage Cheese Breakfast Bake is creamy, nourishing, and incredibly easy to make. It feels indulgent like dessert but fuels your body like a balanced breakfast. Perfect for meal prep, family breakfasts, or a healthy sweet craving.

Classic Strawberry Banana Glow Smoothie.

Classic Strawberry Banana Glow Smoothie.

Ingredients

  • 2 cups fresh or frozen strawberries (hulled)

  • 1 large ripe banana (frozen chunks work best for creaminess)

  • 1 ½ cups unsweetened almond milk (or your preferred dairy/non-dairy milk)

  • ½ cup Greek yogurt (plain or vanilla)

  • 1 tbsp honey or maple syrup (optional, for extra sweetness)

  • 1 tbsp chia seeds (plus extra for garnish)

  • Ice cubes (only if using fresh fruit)


Instructions

  1. Prep the Fruit: If you are using fresh strawberries, give them a good rinse and remove the green stems. Peel your banana and break it into a few chunks.

  2. Layer the Blender: To ensure a smooth blend without taxing your motor, add the liquid (milk) first. Follow with the yogurt, then the chia seeds, and finally the strawberries and banana chunks.

  3. The Blend: Secure the lid and blend on high for about 45–60 seconds. You’re looking for a velvety, uniform pink texture with no visible fruit chunks.

  4. Adjust Consistency: If the smoothie is too thick, splash in a little more milk. If it’s too thin, add a few more frozen berries or a handful of ice and pulse again.

  5. Serve: Pour into tall glasses. Top with a sprinkle of chia seeds and a fresh strawberry slice on the rim to match the aesthetic in your photo.

Tip: For a “protein boost,” you can swap the Greek yogurt for a scoop of vanilla protein powder, though you may need to add a bit more liquid.

🥜 Peanut Pasta Salad (with Leftover Spaghetti Noodles)


🥜 Peanut Pasta Salad (with Leftover Spaghetti Noodles)

https://images.openai.com/static-rsc-4/qdPcdOQRIFyhF5fCyQGxOWogxMsrVN3Lv25ngR18DqFgxwAErRijGf3syG5emnzRpQPMBEiUfIdOmvRs2YwlAsHAOWppQR0SMRNTfpZg9980CDCODAZllmLNOyUgLGiAwt2pjLEPdQ_kHX3sND018f6S3M0l-Vypoeh90iGglUDy9qiIo9JvdppBWo8X-l4H?purpose=fullsize
https://images.openai.com/static-rsc-4/IboggDD82llRGidgAHveF7IDSUSwlXgfzjRhwhbJJczMN8D5dAYpJg7Fr-mJU-YYy-s5A1sCJ1ZskpIZ6_nkseg_eQmNGX1MURx3a83LS5Sv5GHOYxbuB1N2riPTM6WX3py7QdsAVVhH2ltsmLg5lbgJVNVZeMxWHVyM9Cg_Qa6byNfRWQG9bTBFiyZS45EJ?purpose=fullsize
https://images.openai.com/static-rsc-4/tIfUBMUotMHE_rLhwciJ1rQ2Zp0fHRxhHF7yrE4KSVeVbzRbjMIRfEeJndFoxg2GZGHE84lx6QvFmOhzJtzpmwIgeP9qEqpwSylf2tn_ZVapXJ23B_EuBEJ7HAxdCVc5skKdB1z_8suQfZoYjYiAE0bFt4mp1ShQgWa9S5Kle9rnsKA1T-D6Zd-RUmnJwSZC?purpose=fullsize
https://images.openai.com/static-rsc-4/PPqd607CI6Msnzs4R-geQgOn9wi5eq0mrSPhNwBKedpnhWbbEhPgDcvQ6lAGv0TYWvQySaiQBiYMX5ZvLnNVOrbBRjcZ5FMx7xwfKcgl_b5EcoXj2CUKhJoDlz0eCb_u8ScORQ9fqx0wDaKbVtuZrl0nSXrlu80mvRejBjLgLFjRMFQVUiahBE9cpR2GTOid?purpose=fullsize
https://images.openai.com/static-rsc-4/-FlAyFIiaCi0Nf_EYkKNJ9Ebhke7j2uddtEPn7f7fN1JTf3dkYOGi28PTjQNHNsG69SHZCuEoQ7_57hfXmkkWLltBZjkYySs00D7MVUKm73bbVOijo_Qp5oY7-ygO78Yyd7B0qtzTNNIY6FQDSixXyTMQVKa4IsJZzka9fa-nRlT0Fx-6NYrIrfFQIhkBLFZ?purpose=fullsize
https://images.openai.com/static-rsc-4/zmPt5nMMAcjzFjxLMBP5FE8u2SImmPssPgEIXd_QH00_sRC428u05-e95_9or3Rv7PUWQM_i2ZI9984U5V3B3yMcf45IXe4oZpOkoYDTGbIt9-xTLfahP-R-GSgNZ1j7NE2h5Is9jp5WxgZLuGGUiyrJps1NRfKGF_OT0tjoOusfpGEt71riypItW-kfvqLH?purpose=fullsize

🌟 Why You’ll Love This Recipe

  • Perfect way to use leftover spaghetti
  • Creamy, nutty, slightly tangy & sweet flavor
  • Great for meal prep, lunch, or light dinner
  • Can be made healthy / Weight Watchers friendly

🛒 Ingredients (Serves 4–6)

🥗 For the Salad:

  • 3 cups cooked spaghetti noodles (leftover works best)
  • 1 cup shredded carrots
  • 1 red bell pepper, thinly sliced
  • 1 cup purple cabbage, shredded
  • ½ cup cucumber, julienned
  • ¼ cup green onions, chopped
  • ¼ cup fresh cilantro

🥜 For the Peanut Sauce:

  • ¼ cup peanut butter (smooth or chunky)
  • 2 tbsp soy sauce (low sodium)
  • 1 tbsp honey (or low-cal sweetener for WW)
  • 1 tbsp lime juice
  • 1 tsp sesame oil
  • 1–2 tbsp warm water (to thin sauce)
  • 1 tsp garlic, minced
  • ½ tsp ginger, grated

🌿 Optional Toppings:

  • Crushed peanuts
  • Sesame seeds
  • Chili flakes
  • Edamame or grilled chicken (for protein)

👩‍🍳 Step-by-Step Instructions

1️⃣ Prepare the noodles

  • If using leftover spaghetti, loosen them with a splash of warm water
  • If fresh, cook → drain → rinse with cold water (for salad texture)

2️⃣ Chop fresh vegetables

  • Slice all veggies thin for better texture
  • Keep colors vibrant for a beautiful dish

3️⃣ Make the peanut sauce

In a bowl, whisk together:

  • Peanut butter
  • Soy sauce
  • Honey
  • Lime juice
  • Garlic & ginger

👉 Add warm water slowly until smooth and creamy


4️⃣ Combine everything

  • In a large bowl, add noodles + veggies
  • Pour peanut sauce over
  • Toss well until everything is coated evenly

5️⃣ Add toppings

  • Sprinkle peanuts, sesame seeds & cilantro
  • Add chili flakes if you like a spicy kick 🌶️

6️⃣ Chill & serve

  • Refrigerate for 15–30 minutes (best flavor!)
  • Serve cold or slightly chilled

📊 Nutritional Information (Per Serving)

Nutrient Amount
Calories ~280–350 kcal
Protein 8–12 g
Carbs 35–40 g
Fat 12–16 g
Fiber 4–6 g
WW Points 5–7 SmartPoints

👉 To reduce points:

  • Use powdered peanut butter
  • Skip sesame oil
  • Use sugar-free sweetener

💡 Pro Tips for Best Flavor

✔ Use cold noodles → better texture
✔ Add sauce gradually → avoid soggy pasta
✔ Let it sit → flavors deepen
✔ Add protein → turns into full meal


🔥 Variations

  • 🍗 Add grilled chicken → high-protein meal
  • 🥑 Add avocado → creamy twist
  • 🌱 Vegan → already plant-based (just use maple syrup)
  • 🌶️ Spicy → add sriracha or chili oil

❤️ Storage Tips

  • Store in airtight container → lasts 2–3 days in fridge
  • Stir before serving (sauce thickens over time)

😍 Perfect For:

  • Lunch boxes
  • Light dinners
  • Potlucks & gatherings
  • Healthy meal prep

Mediterranean 15 Minute Healthy Roasted Chicken and Veggies (One Pan)

Mediterranean 15 Minute Healthy Roasted Chicken and Veggies (One Pan)

If you need a balanced, Mediterranean-style dinner in a hurry, this 15-Minute Healthy Roasted Chicken and Veggies is your go-to. Featuring juicy chicken, a medley of colorful veggies, and aromatic herbs, all roasted on one pan, this dish keeps cleanup minimal and flavor maximal. It’s a perfect weeknight lifesaver packed with protein, fiber, and healthy fats — all in a single dish.

Time Required:

Prep Time: 10 minutes

Cook Time: 15 minutes (at high heat or broiler setting)

Total Time: ~25 minutes

Ingredients:

For the Chicken:

2 boneless, skinless chicken breasts or

2 bone-in, skin-on chicken thighs
(Cut into large bite-sized chunks if desired for faster cooking)

For the Vegetables:

1 cup baby red potatoes (halved) or regular potatoes (cubed)

1 cup carrots (peeled and cut into sticks or rounds)

1 cup broccoli florets

1 bell pepper (red or green, chopped)

1 small red onion (cut into wedges or large chunks)

Seasonings & Fats:

2–3 tablespoons olive oil or avocado oil

2 garlic cloves, minced (or 1 tsp garlic powder)

1 teaspoon fresh rosemary or thyme (or ½ tsp dried Italian seasoning)

Salt & black pepper, to taste

Optional: ½ teaspoon smoked paprika or chili powder for extra depth

Instructions:

Preheat oven to 450°F (230°C) or set to high broil for quicker roasting. Line a large baking sheet with parchment or foil for easy cleanup.

Prep the chicken & veggies:

Cut chicken into evenly sized pieces if needed.

Chop vegetables into similar-sized chunks for even roasting.

Toss ingredients:

In a large bowl, combine chicken, potatoes, carrots, broccoli, bell peppers, and onion.

Add olive oil, garlic, herbs, salt, pepper, and any optional spices. Toss to coat everything well.

Spread on a baking sheet:

Arrange the chicken and veggies in a single layer, leaving a bit of space between items for browning.

Roast or broil:

Roast for 15–18 minutes or broil for 12–15 minutes, stirring once halfway through, until the chicken is cooked through (internal temp 165°F/74°C) and veggies are tender with slight char.

  1. Serve hot:

Garnish with fresh herbs or a squeeze of lemon juice if desired. Enjoy warm straight from the pan or over couscous, quinoa, or salad.

Tips:

Cut even sizes:
Ensure chicken and veggies are chopped into uniform sizes so they roast evenly and finish at the same time.

Use high heat or broiler:
A high oven temp (450°F/230°C) or broiler setting creates crisp edges and quick cooking — ideal for a 15-minute meal.

Don’t overcrowd the pan:
Spread the ingredients out to avoid steaming and ensure browning. Use two pans if needed.

Dry ingredients before roasting:
Pat chicken and veggies dry before seasoning. This helps them crisp up rather than steam.

Meal prep friendly:
Chop everything ahead of time and store it in the fridge. You can marinate the chicken overnight for even more flavor.

Variations:

Protein swaps:
Try shrimp, turkey breast, or firm tofu for different dietary needs.

Vegetable flexibility:
Swap or add veggies like zucchini, cherry tomatoes, green beans, cauliflower, or eggplant.

Add a carb base:
Serve over cooked couscous, quinoa, brown rice, or even warm pita wedges for a heartier meal.

Spice it up:
Add a pinch of cayenne, harissa, or chili flakes for a spicy Mediterranean twist.

Finish with flavor:
Drizzle with balsamic glaze, tahini lemon sauce, or top with crumbled feta or olives before serving.

Make it creamy:
Add a dollop of tzatziki or hummus on the side for dipping.

Q&A

Q: Can I use frozen vegetables or chicken?
A: Yes! Just be sure to thaw and pat dry both chicken and veggies before roasting to avoid excess moisture and ensure crisping.

Q: How do I know when the chicken is cooked through?
A: Use a meat thermometer — the internal temperature should reach 165°F (74°C) for chicken breast and 170°F (77°C) for thighs.

Q: Can I meal prep this in advance?
A: Absolutely. Chop all veggies and marinate the chicken ahead of time. Store in separate containers or combined, and bake when ready.

Q: What herbs go best with this recipe?
A: Mediterranean herbs like oregano, thyme, rosemary, basil, and parsley add the most flavor. Dried Italian seasoning is a good shortcut.

Q: Can I make it vegan or vegetarian?
A: Yes — replace the chicken with chickpeas, tofu, or tempeh, and season generously.

Nutrition Facts

(Estimated Per Serving – 1 of 4)

Calories: ~350

Protein: ~30g

Fat: ~18g

Carbs: ~22g

Fiber: ~5g

Sugar: ~5g

Sodium: ~500mg (depending on salt used and veggies)

Values will vary slightly based on the vegetables and chicken cuts you use.

Conclusion

This Mediterranean 15-Minute Healthy Roasted Chicken and Veggies dish is a weeknight lifesaver — quick, colorful, and customizable. It’s packed with lean protein, antioxidant-rich veggies, and Mediterranean herbs that add tons of flavor without extra calories. Whether you’re meal-prepping or feeding a hungry family, this one-pan wonder is hearty, balanced, and endlessly versatile. Serve it as-is, or pair with grains, dips, or warm pita for a complete, crave-worthy meal!

Crunchy Harvest Slaw

Crunchy Harvest Slaw

Prep time: 15 minutes | Servings: 4

Ingredients

The Base:

  • 1 cup Cabbage (green or pointed), finely shredded

  • 1 medium Carrot, julienned or coarsely grated

  • 1 large Green Apple (like Granny Smith), julienned

  • 1 medium Cucumber, julienned (seeds removed if too watery)

  • 1/4 small Red Onion, very thinly sliced into half-moons

The Dressing (Zesty Vinaigrette):

  • 3 tbsp Extra virgin olive oil

  • 2 tbsp Apple cider vinegar (or lemon juice)

  • 1 tsp Honey or maple syrup

  • 1/2 tsp Dijon mustard (optional, for emulsification)

  • Salt & Black pepper to taste

  • Optional: A pinch of red pepper flakes for a tiny kick.


Instructions

  1. Prep the Veggies: Using a mandoline or a sharp knife, shred the cabbage. Grate the carrots. To get those beautiful “matchsticks” (julienne) seen in the photo for the apple and cucumber, slice them into thin planks first, then stack and slice into strips.

  2. Prevent Browning: Once the apple is sliced, immediately toss it with a teaspoon of lemon juice or a bit of the vinegar from the dressing to keep it from turning brown.

  3. Whisk the Dressing: In a small jar or bowl, combine the olive oil, vinegar, sweetener, mustard, salt, and pepper. Shake or whisk vigorously until well combined.

  4. Assemble: In a large mixing bowl, combine all the shredded vegetables and the red onion.

  5. Toss and Serve: Pour the dressing over the vegetables. Toss gently but thoroughly. For the best flavor, let it sit for about 10 minutes before serving so the cabbage can soften slightly.


Gemini’s Tips for Success

  • The Crunch Factor: If you want it even crunchier, add a handful of toasted sunflower seeds or crushed walnuts right before serving.

  • Storage: This salad holds up better than leaf-based salads, but it’s best eaten within 24 hours. The cucumber will release water over time, so if you’re making it ahead, add the cucumber and dressing right before serving.

🥗 Mediterranean Chicken Salad (Healthy & Flavorful)

🥗 Mediterranean Chicken Salad (Healthy & Flavorful)

📝 Ingredients

🥬 Salad Base

  • 1 cup cooked chicken (shredded or grilled strips)
  • 1 cup broccoli (small florets, lightly blanched)
  • ½ cup cherry tomatoes (halved)
  • ½ cup cucumber (chopped)
  • ¼ cup red onion (thin slices)
  • ¼ cup sweet corn (boiled)
  • 1 small avocado (cubes)
  • 2 tbsp fresh parsley or coriander
  • 2 tbsp croutons (optional for crunch)

🥣 Creamy Dressing

  • ½ cup mayonnaise or Greek yogurt (healthier)
  • 1 tbsp olive oil
  • 1 tbsp lemon juice
  • 1 tsp honey (optional)
  • Salt to taste
  • Black pepper to taste
  • 1 garlic clove (finely minced)

👩‍🍳 Step-by-Step Recipe

1️⃣ Prepare Chicken

  • Boil or grill chicken with a little salt & pepper
  • Let it cool, then shred or cut into bite-sized pieces

2️⃣ Prep Vegetables

  • Wash all vegetables properly
  • Cut tomatoes, cucumber, onion
  • Lightly blanch broccoli (1–2 minutes in hot water, then cool)

3️⃣ Make Dressing

In a bowl, mix:

  • Mayonnaise (or yogurt)
  • Olive oil
  • Lemon juice
  • Garlic
  • Honey (optional)
  • Salt & pepper

👉 Mix until smooth and creamy

4️⃣ Assemble Salad

  • In a large bowl add:
    • Chicken
    • Broccoli
    • Tomatoes
    • Cucumber
    • Onion
    • Corn
    • Avocado

5️⃣ Add Dressing

  • Pour dressing over salad
  • Toss gently until everything is well coated

6️⃣ Final Touch

  • Sprinkle parsley & croutons
  • Chill for 15 minutes (optional but enhances taste ❄️)

💪 Nutrition Benefits

🥦 Broccoli

  • Rich in fiber & vitamin C
  • Supports digestion & immunity

🍗 Chicken

  • High in protein
  • Helps muscle building & keeps you full

🥑 Avocado

  • Healthy fats (good for heart ❤️)
  • Improves skin & energy

🍅 Tomatoes

  • Loaded with antioxidants (like lycopene)
  • Good for skin & overall health

🥒 Cucumber

  • Hydrating & low calorie
  • Helps in weight loss

👉 Overall: High protein + nutrient-rich + balanced healthy meal

❓ Q / A Section

❓ Can I make this salad for weight loss?

✔ Yes! Use Greek yogurt instead of mayo and skip croutons.

❓ Can I eat it daily?

✔ Yes, it’s healthy and balanced—just vary ingredients for variety.

❓ How long can I store it?

✔ Store in fridge for 1–2 days in airtight container.

❓ Can I skip chicken?

✔ Yes! Replace with chickpeas or beans for a vegetarian version.

❓ Why is my salad watery?

✔ Vegetables release water—pat them dry before mixing.

❓ What dressing alternative can I use?

✔ Olive oil + lemon + herbs for a lighter version.

Tropical Sunshine Smoothie

Tropical Sunshine Smoothie

Ingredients

1 cup Fresh pineapple chunks (frozen works great for a thicker texture)


1 large Orange, peeled and deseeded (or ½ cup fresh orange juice)


½ cup Mango chunks (for that deep golden color and silkiness)


½ cup Greek yogurt or coconut milk (for creaminess)


1 tsp Freshly grated ginger (optional, for a little kick)


1 tbsp Honey or maple syrup (adjust to your sweetness preference)


½ cup Ice cubes


Instructions

Prep the Fruit: Start by slicing your pineapple and peeling the orange. If you are using a whole orange instead of juice, make sure to remove as much of the white pith as possible to keep the flavor bright and sweet.


Layer the Blender: Place your liquid base (yogurt or coconut milk) into the blender first. This helps the blades spin freely. Add the pineapple, mango, and orange on top.


The Secret Zing: Add the grated ginger and your sweetener of choice. The ginger pairs beautifully with the acidity of the fruit.


Blend: Start on a low speed to break up the large fruit chunks, then increase to high. Blend for about 45–60 seconds until the texture is completely smooth and velvety.


Serve: Pour into a tall glass. To match the photo, garnish with a thin orange wheel and a sprig of pineapple leaves or a bamboo straw.

Refreshing Lemon Honey Drink Recipe

Refreshing Lemon Honey Drink Recipe


Ingredients:


2 large fresh lemons


2–3 tablespoons honey (adjust to taste)


2 cups cold water or sparkling water


Ice cubes


Lemon slices and fresh mint (optional, for garnish)


Instructions:


Start by washing the lemons thoroughly. Cut them in half and squeeze out the juice into a bowl or measuring cup. Remove any seeds to keep the drink smooth. You should have about ¼ to ⅓ cup of fresh lemon juice.


In a glass or small jug, add the honey. Pour a small amount of warm water (about 2–3 tablespoons) over the honey and stir well until it dissolves completely. This step helps the honey mix evenly into the drink.


Pour the freshly squeezed lemon juice into the jug with the dissolved honey. Stir gently to combine the flavors.


Add the remaining cold water or sparkling water and mix again. Taste the drink and adjust the sweetness by adding a little more honey if desired.


Fill serving glasses with ice cubes. Pour the lemon honey drink over the ice, allowing it to chill instantly.


Garnish each glass with thin lemon slices and a few fresh mint leaves for a bright and appealing presentation.


Serve immediately while cold. This drink is perfect for family gatherings, afternoon relaxation, or as a refreshing companion to meals. It offers a pleasant balance of tangy and sweet flavors, making it enjoyable for both adults and children.

Moist Carrot Loaf Cake

Moist Carrot Loaf Cake

Ingredients

Dry: 1 ½ cups all-purpose flour, 1 tsp baking soda, 1 tsp baking powder, ½ tsp salt, 1 ½ tsp ground cinnamon, ½ tsp ground ginger.


Wet: 2 large eggs, ½ cup vegetable oil, ½ cup granulated sugar, ½ cup packed brown sugar, 1 tsp vanilla extract.


The Star: 2 cups finely grated fresh carrots (about 3–4 medium carrots).


Optional: ½ cup chopped walnuts or raisins.


Instructions

Prep: Preheat your oven to 350°F (175°C). Grease a 9×5-inch loaf pan or line it with parchment paper for easy removal.


Mix Dry Ingredients: In a medium bowl, whisk together the flour, baking soda, baking powder, salt, cinnamon, and ginger until well combined.


Mix Wet Ingredients: In a large bowl, beat the eggs with both sugars until smooth. Stir in the oil and vanilla extract.


Combine: Gently fold the dry ingredients into the wet mixture using a spatula. Do not overmix; stop once no flour streaks remain.


Fold in Carrots: Fold in the grated carrots (and nuts/raisins if using) until evenly distributed.


Bake: Pour the batter into the prepared pan. Bake for 50–60 minutes, or until a toothpick inserted into the center comes out clean.


Cool: Let the bread cool in the pan for 10 minutes, then transfer to a wire rack to cool completely before slicing.


Tip: For the best texture, grate your carrots by hand using the fine side of a box grater. Pre-shredded carrots from the store tend to be too dry for this recipe!

Golden Cheesy Potato Gratin

Golden Cheesy Potato Gratin

Ingredients

Potatoes: 2 lbs Yukon Gold (peeled and sliced 1/8 inch thick)


Cream Base: 1.5 cups heavy cream, 2 cloves minced garlic, 1 tsp salt, ½ tsp black pepper


Cheese: 1.5 cups shredded Gruyère or sharp Cheddar, ¼ cup grated Parmesan


Aromatics: 1 tbsp fresh thyme leaves and 2 tbsp butter


Instructions

Prep the Oven: Preheat your oven to 400°F (200°C). Lightly grease a 2-quart baking dish with butter.


Infuse the Cream: In a small saucepan, simmer the heavy cream, minced garlic, and thyme over low heat for 3 minutes. Do not let it boil over. Set aside.


Layer the Potatoes: Arrange the potato slices vertically in the dish (as seen in your photo) or layer them flat. Sprinkle half of the shredded cheese between the slices as you go.


Pour and Season: Pour the warm cream mixture evenly over the potatoes. Season the top with extra salt and pepper.


First Bake: Cover the dish tightly with foil. Bake for 30 minutes. This softens the potatoes without burning the tops.


The Golden Crust: Remove the foil. Sprinkle the remaining Gruyère and Parmesan cheese over the top. Bake uncovered for another 25–30 minutes until the cream has thickened and the top is deeply golden brown.


Rest: Let the dish sit for 10 minutes before serving. This allows the sauce to set so it isn’t runny.

Tropical Pineapple Coconut Muffins

Tropical Pineapple Coconut Muffins

Yields: 12 muffins | Prep time: 15 mins | Bake time: 20-25 mins


Ingredients

For the Streusel Topping:


1/4 cup shredded coconut (sweetened or unsweetened)


3 tbsp all-purpose flour


2 tbsp brown sugar


2 tbsp cold butter, cubed


For the Muffin Batter:


2 cups all-purpose flour


1/2 cup granulated sugar


1 tbsp baking powder


1/2 tsp salt


1 cup canned crushed pineapple (well-drained) or tidbits


1/2 cup shredded coconut


1 large egg


1/2 cup milk (coconut milk works great here!)


1/2 cup melted butter or vegetable oil


1 tsp vanilla extract


Instructions

Preheat & Prep: Heat your oven to 190°C (375°F). Line a 12-cup muffin tin with paper liners.


Make the Topping: In a small bowl, mix the flour, brown sugar, and coconut. Rub in the cold butter with your fingers until the mixture looks like coarse crumbs. Set aside.


Mix Dry Ingredients: In a large bowl, whisk together the flour, sugar, baking powder, and salt. Stir in the 1/2 cup of shredded coconut.


Mix Wet Ingredients: In another bowl, beat the egg, then stir in the milk, melted butter, vanilla, and the drained pineapple.


Combine: Gently fold the wet ingredients into the dry ingredients. Mix until just combined; do not overmix, or the muffins will be tough.


Bake: Scoop the batter into the muffin cups. Generously sprinkle the streusel topping over each one. Bake for 20–25 minutes or until a toothpick comes out clean.


Tip: Ensure the pineapple is very well-drained to prevent the muffins from becoming soggy.

Chicken Sausage, Zucchini, & Burst Tomato Pasta

Chicken Sausage, Zucchini, & Burst Tomato Pasta

Prep time: 10 mins | Cook time: 20 mins | Serves: 4


Ingredients

  • Pasta: 12 oz (340g) Fusilli or Rotini

  • Protein: 4-5 Pre-cooked Chicken Sausages (Italian herb or Garlic flavors work best), sliced into rounds

  • Vegetables: 2 medium Zucchinis (sliced into half-moons), 1 pint Cherry Tomatoes

  • Aromatics: 3 cloves Garlic (minced), 1 small Shallot (finely diced)

  • Sauce/Finish: 1/4 cup Olive oil, 1/2 cup Pasta water (reserved), Fresh Basil leaves, Grated Parmesan cheese

  • Seasoning: Salt, Black pepper, and a pinch of Red pepper flakes


Instructions

  1. Boil the Pasta: Bring a large pot of salted water to a boil. Cook the pasta according to package directions until al dente. Crucial step: Reserve at least 1/2 cup of the starchy pasta water before draining.

  2. Sear the Sausage: While the water boils, heat 1 tablespoon of olive oil in a large skillet over medium-high heat. Add the sausage slices and sear for 2–3 minutes per side until they have those nice dark grill marks. Remove and set aside.

  3. Char the Veggies: In the same skillet, add another tablespoon of oil. Add the zucchini in a single layer. Let them sit undisturbed for 2 minutes to get a golden-brown sear, then toss. Add the cherry tomatoes and cook until they begin to soften and “burst.”

  4. Build the Flavor: Lower the heat to medium. Stir in the shallots and garlic (and red pepper flakes if you like a kick). Sauté for 1 minute until fragrant—don’t let the garlic burn!

  5. Emulsify: Add the cooked pasta and seared sausage back into the skillet. Pour in the reserved pasta water and the remaining olive oil. Toss vigorously over medium heat for 1–2 minutes; the water and oil will combine with the tomato juices to create a light, glossy sauce.

  6. The Grand Finale: Turn off the heat. Fold in a generous handful of torn fresh basil and a dusting of Parmesan cheese. Season with extra salt and pepper to taste.


A Couple of Pro-Tips

  • The Sear: To get those “photo-ready” char marks on the zucchini, make sure your pan is quite hot before they hit the oil, and don’t overcrowd the pan.

  • The Sauce: If the pasta looks a bit dry, add an extra splash of olive oil or a squeeze of fresh lemon juice to brighten the fats.

Crispy Chickpea Greek Salad

Crispy Chickpea Greek Salad

Prep time: 15 mins | Cook time: 20 mins | Servings: 2-4

Ingredients

For the Crispy Chickpeas:

  • 1 can (15 oz) chickpeas, rinsed and patted very dry

  • 1 tbsp olive oil

  • 1/2 tsp dried oregano

  • 1/4 tsp garlic powder

  • Salt and black pepper to taste

For the Salad Base:

  • 1 large head of Romaine lettuce, chopped

  • 1 cup cherry tomatoes, halved

  • 1 English cucumber, sliced into half-moons

  • 1/2 red onion, thinly sliced into arcs

  • 1/2 cup Kalamata olives, pitted and halved

  • 1/2 cup high-quality feta cheese, crumbled

  • Fresh parsley, chopped (for garnish)

For the Lemon-Herb Vinaigrette:

  • 1/4 cup extra virgin olive oil

  • 2 tbsp fresh lemon juice

  • 1 tsp Dijon mustard

  • 1 clove garlic, minced

  • 1/2 tsp dried oregano


Instructions

  1. Roast the Chickpeas:

    • Preheat your oven to 200°C (400°F).

    • Toss the dried chickpeas with olive oil, oregano, garlic powder, salt, and pepper on a baking sheet.

    • Roast for 20–25 minutes, shaking the pan halfway through, until golden and crunchy. Let them cool slightly so they don’t wilt the lettuce.

  2. Whisk the Dressing:

    • In a small jar or bowl, whisk together the olive oil, lemon juice, mustard, minced garlic, and oregano until emulsified.

  3. Assemble the Bowl:

    • In a large salad bowl, layer the chopped Romaine lettuce.

    • Arrange the cucumbers, cherry tomatoes, red onions, and Kalamata olives over the greens.

  4. The Finishing Touches:

    • Top the salad with the warm, crispy chickpeas and the crumbled feta cheese.

    • Drizzle the vinaigrette over the top and garnish with a handful of fresh parsley and an extra crack of black pepper.

The Perfect Easy-Peel Hard-Boiled Egg

The Perfect Easy-Peel Hard-Boiled Egg

Prep time: 1 min | Cook time: 9–12 mins | Servings: Flexible

Ingredients

  • Large Eggs: Fresh or a few days old (older eggs actually peel better!)

  • Water: Enough to cover eggs by at least 1 inch

  • Ice Cubes: For the “shock” bath

  • Salt or Vinegar: 1 teaspoon (optional, helps prevent cracking)

Instructions

  1. The Boil: Fill a medium saucepan with enough water to submerge your eggs. Bring the water to a rolling boil over high heat.

  2. The Gentle Lower: Once boiling, reduce heat to low. Use a slotted spoon to gently lower the eggs into the water to prevent the shells from cracking against the bottom of the pot.

  3. The Simmer: Turn the heat back up slightly to maintain a gentle simmer. Set your timer based on your preference:

    • 9 Minutes: Slightly creamy, bright yellow yolk.

    • 12 Minutes: Fully set, light yellow yolk (best for salads).

  4. The Ice Bath: While the eggs cook, prepare a bowl with cold water and plenty of ice.

  5. The Shock: Immediately transfer the eggs from the boiling water to the ice bath. Let them sit for at least 10 minutes. This stops the cooking process and causes the egg to contract slightly away from the shell.

  6. The Peel: Gently tap the egg on a hard surface to crack the shell all over. Peel under cool running water or submerged in the water bowl—the water helps the shell slide right off.


Nutritional Benefits

  • Complete Protein: Eggs contain all nine essential amino acids needed for muscle repair and immune function.

  • Choline for Brain Health: Eggs are one of the best dietary sources of choline, which is vital for memory and mood regulation.

  • Eye Health: The yolks contain lutein and zeaxanthin, antioxidants that help protect eyes from age-related decline.

  • Satiety: The high protein and healthy fat content help you feel full longer, which can naturally assist with healthy weight management.


Q&A

Q: Why do some yolks have a green ring? A: That green ring is a harmless reaction between sulfur and iron. It usually happens when eggs are overcooked or not cooled quickly enough in an ice bath.

Q: How long can I keep boiled eggs in the fridge? A: Hard-boiled eggs (in the shell) stay fresh for up to 7 days when refrigerated. Once peeled, they should be eaten within a day.

Q: Are eggs okay for heart health? A: For most people, the cholesterol in eggs has a minimal impact on blood cholesterol. Most health organizations suggest that 1–2 eggs a day can be part of a healthy, balanced diet.

Q: Why are fresh eggs harder to peel? A: As eggs age, the pH level rises and the membrane loses some of its “stickiness” to the shell. If you have very fresh farm eggs, try steaming them for 12 minutes instead of boiling for an easier peel.

Crispy 3-Ingredient Savory Rolls

Crispy 3-Ingredient Savory Rolls

Prep time: 15 mins | Bake time: 25–30 mins | Servings: 4–6 rolls

Ingredients

  • Vegetable Base: 2 large Zucchini (or 2 large Potatoes for a heartier, non-keto version)

  • Cheese: 1 ½ cups shredded Mozzarella or Cheddar (divided)

  • Eggs: 2 large

  • Optional Seasonings: ½ tsp garlic powder, ¼ tsp black pepper, and a pinch of salt

  • Topping (Optional): 1 tsp poppy seeds or sesame seeds

Instructions

  1. Extract the Moisture: Grate the zucchini (or potatoes) using the large holes of a box grater. This is the most important step: place the shreds in a clean kitchen towel and squeeze as hard as you can over the sink. You want the vegetable shreds to be as dry as possible to ensure a crispy result.

  2. Mix the Base: In a medium bowl, combine the squeezed shreds, 1 cup of the shredded cheese, the two eggs, and your seasonings. Mix thoroughly until the egg is fully incorporated and the cheese is evenly distributed.

  3. The First Bake: Preheat your oven to 400°F (200°C). Line a large baking sheet with parchment paper. Spread the mixture onto the sheet, pressing it down into a thin, even rectangle (about ¼ inch thick).

  4. Set the “Dough”: Bake for 15–20 minutes. You are looking for the edges to turn golden brown and the center to feel firm to the touch.

  5. Fill and Roll: Remove from the oven. Sprinkle the remaining ½ cup of cheese evenly over the hot baked sheet. While it is still warm and pliable, carefully roll the sheet up tightly from one long end to the other, using the parchment paper to help you lift it if needed.

  6. The Final Crisp: Slice the long roll into individual smaller portions. Place them back on the baking sheet (seam side down). If desired, sprinkle with poppy or sesame seeds.

  7. Brown to Perfection: Return to the oven for another 5–10 minutes until the cheese inside is melted and the exterior is deep golden and crunchy.

  8. Serve: Let them rest for 2 minutes before serving so the cheese sets slightly.


Nutritional Benefits

  • High Protein: The combination of eggs and cheese provides a substantial amount of protein, making these very filling.

  • Low Carb & Gluten-Free: Perfect for those avoiding flour or grains, as the structure comes entirely from whole ingredients.

  • Vitamin Rich: Zucchini is high in Vitamin A and antioxidants, while potatoes provide potassium and Vitamin C.

  • Healthy Fats: Provides fat-soluble vitamins and keeps you satisfied longer than processed snacks.


Q&A

Q: Can I use other vegetables? A: Yes! Finely shredded carrots or even riced cauliflower (thoroughly squeezed) work well with this method.

Q: How do I keep them from sticking to the paper? A: Use high-quality parchment paper. If you find they stick, a very light spray of olive oil on the paper before spreading the mixture can help.

Q: Can I make these ahead of time? A: These are best served fresh for the ultimate crunch. However, you can store leftovers in the fridge for up to 3 days and crisp them back up in an air fryer or oven at 350°F for a few minutes.

Q: What should I serve these with? A: They are delicious on their own, but they also pair perfectly with a side of warm marinara sauce or a creamy Greek yogurt dip.

Easiest No-Knead Pantry Flatbread

Easiest No-Knead Pantry Flatbread

Prep time: 10 mins | Rest time: 1 hour | Cook time: 15 mins

Yields: 10–12 Flatbreads

Ingredients

  • All-Purpose Flour: 4 cups (500g)

  • Warm Water: 1 ½ cups (350ml) — ensure it is lukewarm, not hot

  • Instant Yeast: 2 ¼ teaspoons (1 packet)

  • Sugar: 1 tablespoon (helps activate the yeast)

  • Salt: 1 ½ teaspoons

  • Olive Oil: 2 tablespoons (plus a little extra for the bowl)

Instructions

  1. Activate the Yeast: In a large bowl, combine the warm water, sugar, and instant yeast. Let it sit for 5 minutes until it becomes slightly foamy on top.

  2. Mix the Dough: Add the olive oil and salt to the yeast mixture. Gradually stir in the flour with a wooden spoon or spatula. Mix until a shaggy, sticky dough forms and no dry flour remains. Do not knead.

  3. The First Rise: Lightly oil the top of the dough. Cover the bowl with a clean kitchen towel or plastic wrap. Place it in a warm, draft-free spot and let it rise for 1 hour, or until it has doubled in size.

  4. Shape the Bread: Gently deflate the dough with your hand. Turn it out onto a well-floured surface. Divide the dough into 10–12 equal portions. Roll each piece into a smooth ball.

  5. Flatten: Use your fingers or a rolling pin to flatten each ball into a circle about ½ inch thick.

  6. Bake or Pan-Sear:

    • Oven Method: Preheat your oven to 425°F (220°C). Place the circles on a parchment-lined baking sheet. Bake for 10–12 minutes until they puff up and turn golden brown.

    • Stovetop Method: Heat a non-stick skillet over medium-high heat. Place a circle of dough in the dry pan. Cook for 2 minutes until bubbles form, then flip and cook for another 1–2 minutes until golden spots appear.

  7. Keep Soft: As you remove the breads from the heat, stack them and wrap them in a clean towel. The steam will keep them soft and pliable.


Nutritional Benefits

  • Preservative-Free: Unlike store-bought bread, this contains zero additives, stabilizers, or hidden sugars.

  • Complex Carbohydrates: Provides a steady source of energy for your day.

  • Low Fat: By using a small amount of healthy olive oil instead of butter or lard, you keep the saturated fat content very low.

  • Digestive Friendly: The long fermentation (rising time) helps break down gluten slightly, making it easier on the digestive system for many people.


Q&A

Q: Can I use Whole Wheat flour? A: Yes! You can replace up to half of the all-purpose flour with whole wheat. You may need to add an extra tablespoon of water as whole wheat flour absorbs more moisture.

Q: My bread didn’t puff up, what happened? A: This usually means the water was either too cold (yeast didn’t wake up) or too hot (yeast was killed). Aim for “baby bath” temperature. Also, ensure your baking sheet or skillet is properly preheated.

Q: How do I store these? A: Once completely cool, store them in a zip-top bag at room temperature for 3 days. For longer storage, they freeze beautifully for up to 3 months. Just toast them briefly to revive the texture.

Q: Can I add flavors? A: Absolutely. Mix in 1 tablespoon of dried herbs (like rosemary or oregano) or 2 cloves of minced garlic into the dough for a savory twist.

2-Ingredient Strawberry Banana Ice Cream

2-Ingredient Strawberry Banana Ice Cream

Prep time: 5 mins | Freezing time: 2+ hours | Servings: 2

Ingredients

  • Bananas: 2 large (very ripe, peeled, and frozen in chunks)

  • Frozen Strawberries: 1 cup (hulled and frozen)

  • Liquid Base: 2–4 tablespoons of milk (almond, oat, or dairy) only if needed to help blending

  • Optional Flavor: ½ teaspoon vanilla extract or a squeeze of fresh lemon juice

Instructions

  1. Prep the Fruit: For the best texture, ensure your bananas are “cheetah spotted” (very ripe) before freezing. Peel them and cut them into small coins. Freeze both the banana coins and strawberries for at least 2–4 hours, or overnight, until rock solid.

  2. Initial Pulse: Place the frozen banana chunks and strawberries into a high-speed blender or food processor. Pulse a few times to break the large chunks into smaller, crumbly pieces.

  3. The Creaming Process: Blend on high. At first, the mixture will look like coarse meal or snow. Keep blending!

  4. Adjust Consistency: If your blender is struggling, add your liquid base one tablespoon at a time. Be careful not to add too much, or it will turn into a smoothie rather than ice cream.

  5. Achieve Soft Serve: Stop and scrape down the sides with a spatula as needed. Continue blending until the mixture suddenly transforms into a smooth, thick, and creamy “soft-serve” texture.

  6. Serve or Firm Up: You can enjoy it immediately as soft-serve. For scoopable ice cream, transfer the mixture to a freezer-safe container and freeze for an additional 30–60 minutes.


Nutritional Benefits

  • High Fiber: Both bananas and strawberries are excellent sources of dietary fiber, which supports healthy digestion and keeps you full.

  • Rich in Vitamin C: One serving provides a significant boost to your daily Vitamin C needs, supporting immune health and skin glow.

  • Natural Electrolytes: Bananas are famously high in potassium, which is vital for heart health and muscle function.

  • Antioxidant Power: Strawberries contain anthocyanins, which help protect your body from oxidative stress.


Q&A

Q: Can I make this without a high-speed blender? A: Yes! A standard food processor actually works best for “nice cream” because the wider blades handle the frozen chunks more efficiently than a narrow blender jar.

Q: My ice cream turned out like a liquid smoothie, what happened? A: This usually happens if the fruit wasn’t fully frozen or if too much liquid was added. Next time, try blending the fruit alone for a full minute before adding any milk.

Q: How do I store leftovers? A: Store in an airtight container in the freezer. Because this lacks the fats and stabilizers of store-bought ice cream, it will freeze very hard. Let it sit on the counter for 10–15 minutes to soften before scooping.

Q: Can I add protein to this? A: Absolutely. Adding a scoop of vanilla protein powder or 1/4 cup of Greek yogurt during the blending process makes this an excellent post-workout snack.

The Perfect Easy-Peel Hard-Boiled Egg

The Perfect Easy-Peel Hard-Boiled Egg

Prep time: 1 min | Cook time: 9–12 mins | Servings: Flexible

Ingredients

  • Large Eggs: Fresh or a few days old (older eggs actually peel better!)

  • Water: Enough to cover eggs by at least 1 inch

  • Ice Cubes: For the “shock” bath

  • Salt or Vinegar: 1 teaspoon (optional, helps prevent cracking)

Instructions

  1. The Boil: Fill a medium saucepan with enough water to submerge your eggs. Bring the water to a rolling boil over high heat.

  2. The Gentle Lower: Once boiling, reduce heat to low. Use a slotted spoon to gently lower the eggs into the water to prevent the shells from cracking against the bottom of the pot.

  3. The Simmer: Turn the heat back up slightly to maintain a gentle simmer. Set your timer based on your preference:

    • 9 Minutes: Slightly creamy, bright yellow yolk.

    • 12 Minutes: Fully set, light yellow yolk (best for salads).

  4. The Ice Bath: While the eggs cook, prepare a bowl with cold water and plenty of ice.

  5. The Shock: Immediately transfer the eggs from the boiling water to the ice bath. Let them sit for at least 10 minutes. This stops the cooking process and causes the egg to contract slightly away from the shell.

  6. The Peel: Gently tap the egg on a hard surface to crack the shell all over. Peel under cool running water or submerged in the water bowl—the water helps the shell slide right off.


Nutritional Benefits

  • Complete Protein: Eggs contain all nine essential amino acids needed for muscle repair and immune function.

  • Choline for Brain Health: Eggs are one of the best dietary sources of choline, which is vital for memory and mood regulation.

  • Eye Health: The yolks contain lutein and zeaxanthin, antioxidants that help protect eyes from age-related decline.

  • Satiety: The high protein and healthy fat content help you feel full longer, which can naturally assist with healthy weight management.


Q&A

Q: Why do some yolks have a green ring? A: That green ring is a harmless reaction between sulfur and iron. It usually happens when eggs are overcooked or not cooled quickly enough in an ice bath.

Q: How long can I keep boiled eggs in the fridge? A: Hard-boiled eggs (in the shell) stay fresh for up to 7 days when refrigerated. Once peeled, they should be eaten within a day.

Q: Are eggs okay for heart health? A: For most people, the cholesterol in eggs has a minimal impact on blood cholesterol. Most health organizations suggest that 1–2 eggs a day can be part of a healthy, balanced diet.

Q: Why are fresh eggs harder to peel? A: As eggs age, the pH level rises and the membrane loses some of its “stickiness” to the shell. If you have very fresh farm eggs, try steaming them for 12 minutes instead of boiling for an easier peel.

Perfectly Toasted Sea Salt Pumpkin Seeds

Perfectly Toasted Sea Salt Pumpkin Seeds

Prep time: 5 mins | Cook time: 10–15 mins | Servings: Multiple

Ingredients

  • Pumpkin Seeds: 1 cup raw, hulled (green pepitas)

  • Olive Oil: 1 teaspoon (or avocado oil)

  • Sea Salt: ½ teaspoon

  • Optional Seasoning: A pinch of cinnamon or smoked paprika for extra flavor

Instructions

  1. Prep the Pan: Place a wide skillet over medium-low heat. You can also use an oven preheated to 325°F (165°C) for a more even toast.

  2. Coat the Seeds: In a small bowl, toss the raw pumpkin seeds with the oil and sea salt until every seed is lightly coated.

  3. Toast: * Stovetop: Add the seeds to the warm skillet in a single layer. Stir frequently for 5–7 minutes. Listen for a slight “popping” sound and look for them to turn a light golden brown and become fragrant.

    • Oven: Spread seeds on a parchment-lined baking sheet and bake for 10–15 minutes, tossing halfway through.

  4. Cool: Immediately remove the seeds from the heat and spread them out on a plate or paper towel to cool. They will continue to crisp up as they reach room temperature.

  5. Store: Keep in an airtight glass jar for up to 2 weeks to maintain crunch.


Nutritional Benefits

  • Rich in Magnesium: One serving contains a significant amount of magnesium, a mineral that helps the body relax and supports over 300 biochemical reactions.

  • Natural Source of Tryptophan: Pumpkin seeds contain tryptophan, an amino acid that the body converts into serotonin and then into melatonin, the hormone that regulates sleep cycles.

  • High in Zinc: Zinc is vital for immune function and cell growth.

  • Heart-Healthy Fats: They are packed with omega-3 and omega-6 fatty acids, which are excellent for brain health and reducing inflammation.


Q&A

Q: How many seeds should I eat before bed? A: A small handful (about 1 to 2 tablespoons) is usually enough to reap the benefits without feeling too full before sleep.

Q: Are raw seeds better than toasted ones? A: Both are healthy. Raw seeds preserve more of the natural oils, while toasted seeds are often easier to digest and have a more pleasant, nutty flavor.

Q: Can these help with weight management? A: Yes. Because they are high in protein and fiber, they help you feel satisfied, which can prevent late-night cravings for sugary snacks.

Q: Do I need to soak them first? A: While not necessary, soaking seeds (sprouting) for a few hours before toasting can help reduce phytic acid, making the nutrients even easier for your body to absorb.