🍋 Lemon Ginger Detox Water

🍋 Lemon Ginger Detox Water

This recipe can be enjoyed cold as a refreshing tonic or warm like a soothing tea.

Ingredients

Item Amount Preparation
Fresh Ginger 2-inch knob Peeled and thinly sliced
Lemon 1 large Half sliced into rounds, half juiced
Water 4 cups (1 liter) Filtered or spring water
Honey (Optional) 1-2 tbsp To taste for sweetness

Preparation Steps

  1. Prep the Ginger: Peel the ginger skin using the edge of a spoon. Slice it into thin rounds to expose more surface area for the flavor to infuse.

  2. Boil the Water: Bring 4 cups of water to a boil in a small pot.

  3. Simmer: Add the ginger slices to the boiling water. Reduce heat and let it simmer for 5–10 minutes. (The longer you simmer, the “spicier” it will be).

  4. Add Lemon: Turn off the heat. Stir in the fresh lemon juice and add the lemon slices.

  5. Serve:

    • Hot: Pour directly into a mug and stir in honey if desired.

    • Cold: Let the mixture cool to room temperature, then refrigerate. Serve over ice for a crisp, refreshing drink.


Quick Tips for the Best Flavor

  • Mashing: For a stronger ginger kick, lightly crush the ginger slices with a muddler or the back of a knife before adding them to the water.

  • Zest: If you want an extra citrus punch, add a small strip of lemon zest (the yellow part of the peel) to the simmer.

  • Storage: This keeps well in the refrigerator for up to 3 days.

Note: Fresh ginger can be quite potent! If you find it too spicy, simply dilute it with a bit more water.
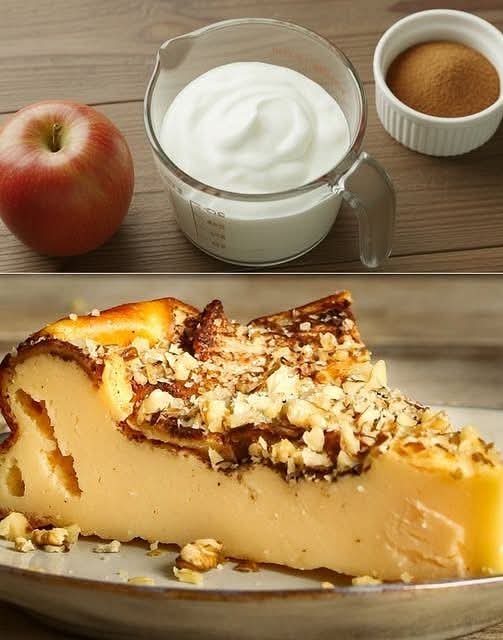

Creamy Apple Yogurt Cake

Creamy Apple Yogurt Cake

Prep time: 10 mins | Bake time: 45–50 mins | Servings: 8


Ingredients

Yogurt: 1 ½ cups (approx. 400g) Greek yogurt or thick plain yogurt.


Eggs: 4 large eggs.


Sugar: ½ cup (or honey/maple syrup to taste).


Cornstarch: 4 tablespoons (this gives it that smooth, flan-like texture).


Apple: 1 large apple (red or green), thinly sliced or diced.


Toppings: Cinnamon (as seen in your photo) and crushed walnuts or almonds for crunch.


Optional: 1 teaspoon vanilla extract.


Instructions

Prep the Oven: Preheat your oven to 350°F (175°C). Line a 7 or 8-inch round cake pan with parchment paper.


Mix the Base: In a large bowl, whisk the eggs and sugar together until pale and slightly frothy.


Add Creaminess: Whisk in the yogurt and vanilla extract until the mixture is smooth.


Sift in Dry Ingredients: Gently whisk in the cornstarch until no lumps remain.


Layer the Apples: Fold half of your chopped apples into the batter. Pour the batter into the prepared pan.


Decorate: Arrange the remaining apple slices on top. Sprinkle generously with the cinnamon and crushed walnuts seen in the image.


Bake: Place in the oven for 45 to 50 minutes. The cake should be set but still have a slight “jiggle” in the center, similar to a cheesecake.


Cool: Allow the cake to cool completely in the pan, then refrigerate for at least 2 hours. This cake is best served chilled, as it firms up into that beautiful creamy texture shown in your photo.


Pro Tips for Success

Texture: If you want it even creamier (like the photo), use Full-Fat Greek Yogurt.


The Crust: Since this is a flourless, “crustless” cake, the parchment paper is essential to prevent sticking!


Sweetness: If your apples are very tart, you can sprinkle a little extra sugar over the top before baking to caramelize them.

White Bean Chicken Soup

White Bean Chicken Soup

Ingredients:

2 boneless, skinless chicken breasts (or thighs)


4 cups chicken broth


1 can (15 oz) white beans (such as Great Northern or Cannellini), drained and rinsed


2 cups celery, chopped


1 medium onion, chopped


2 cloves garlic, minced


1 tsp dried thyme


1/2 tsp dried rosemary


Salt and pepper, to taste


2 tbsp olive oil


1/2 cup heavy cream (optional for creaminess)

Instructions:

  1. Sauté the Aromatics:
    In a large pot or Dutch oven, heat olive oil over medium heat. Add the chopped onion and celery and sauté until softened (about 5-7 minutes). Add minced garlic and cook for another 1 minute, until fragrant.

  2. Cook the Chicken:
    Add the chicken breasts (or thighs) to the pot and pour in the chicken broth. Bring to a simmer and cook until the chicken is fully cooked (about 20 minutes). Remove the chicken and shred it using two forks.

  3. Add the Beans and Seasonings:
    Return the shredded chicken to the pot. Add the drained white beans, thyme, rosemary, salt, and pepper. Stir to combine and let it simmer for 10 minutes to allow the flavors to meld together.

  4. Optional Creaminess:
    For a creamier soup, stir in 1/2 cup of heavy cream at the end of cooking. Taste and adjust seasoning with more salt and pepper if needed.

  5. Serve:
    Ladle the soup into bowls and serve hot. Garnish with fresh herbs or a sprinkle of grated cheese if desired.

Description:

This hearty and comforting White Bean Chicken Soup is the perfect dish for a chilly day. The white beans provide a creamy texture while the chicken adds protein and a satisfying flavor. The combination of celery, garlic, and herbs makes this soup aromatic and flavorful, while the chicken broth ensures it’s rich and savory. It’s simple to make and is a great source of protein and fiber.

Notes & Tips:

  • Variations: You can add other vegetables like carrots or spinach for added nutrition. Feel free to experiment with different herbs such as parsley or sage.

  • Chicken: You can substitute chicken breasts with chicken thighs for a more flavorful, slightly richer soup.

  • Make it Spicy: Add a pinch of red pepper flakes or a dash of hot sauce for some heat.

  • Storage: This soup stores well in the fridge for 3-4 days and can be frozen for up to 3 months. If freezing, leave out the cream and add it when reheating.

Servings:

This recipe makes about 4-6 servings, depending on portion size.

Nutritional Info (per serving) (Approximate):

  • Calories: ~350 kcal

  • Protein: 30g

  • Carbs: 25g

  • Fat: 12g

  • Fiber: 7g

  • Sodium: ~700mg (can vary based on chicken broth used)

Health Benefits:

  • Chicken: A lean source of protein that helps with muscle repair and supports immune function.

  • White Beans: High in fiber, which aids in digestion and helps control blood sugar levels. They also provide plant-based protein.

  • Celery: Low in calories but high in antioxidants and vitamins, celery is also hydrating and promotes good digestion.

  • Olive Oil: A source of healthy fats that supports heart health.

Q&A for the Recipe:

  • Q: Can I use canned chicken instead of fresh chicken breasts?

    • A: Yes, you can substitute canned chicken for a quicker preparation. Just add it to the pot when you add the beans and broth, and skip the step of cooking the chicken.

  • Q: Can I make this recipe ahead of time?

    • A: Yes, this soup can be made ahead of time and stored in the refrigerator for a few days. It actually tastes even better after the flavors have had time to develop overnight.

  • Q: Can I make this soup in a slow cooker?

    • A: Absolutely! Simply add all the ingredients to the slow cooker (except for the cream) and cook on low for 4-6 hours. Shred the chicken once it’s cooked through, stir in the beans and herbs, and let everything simmer together.

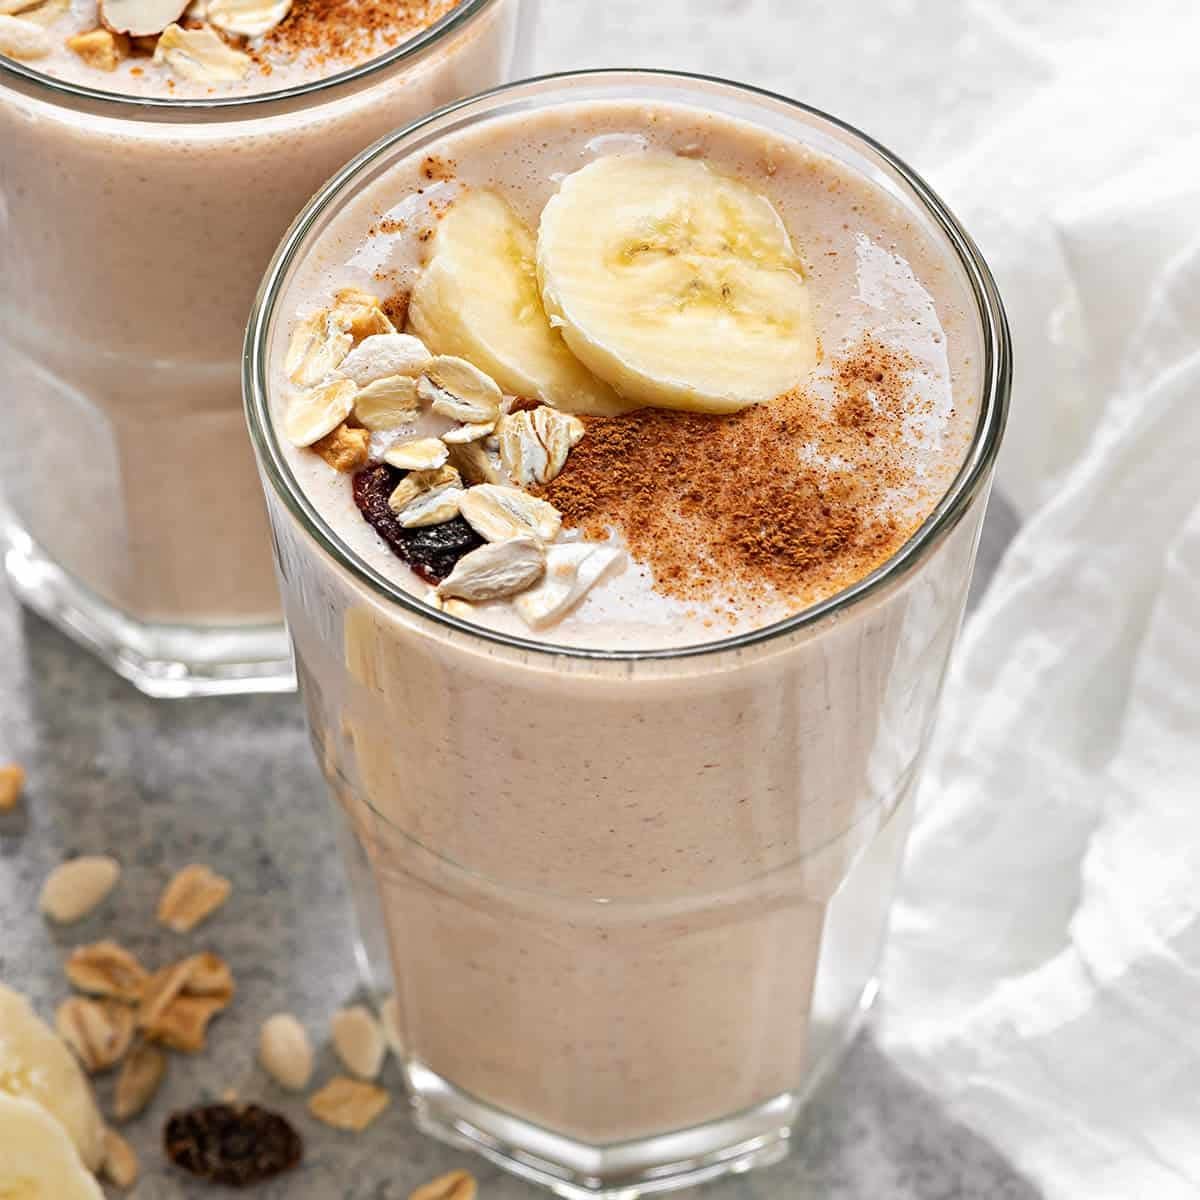
🍌 Cinnamon Banana Oat Smoothie


🍌 Cinnamon Banana Oat Smoothie

Prep time: 5 minutes | Servings: 1


Ingredients

1 ripe banana (frozen is best for a creamy texture)


1/4 cup rolled oats (old-fashioned)


1 cup milk of your choice (dairy, almond, or oat milk)


1/2 cup Greek yogurt (plain or vanilla)


1/2 tsp ground cinnamon


1/2 tsp vanilla extract


1 tsp honey or maple syrup (optional, for extra sweetness)


Handful of ice (if using a fresh banana)


Instructions

Prepare the Oats: For a smoother texture, you can pulse the dry oats in the blender first until they become a fine flour.


Combine: Add the banana, milk, yogurt, cinnamon, vanilla, and sweetener to the blender.


Blend: Blend on high until the mixture is completely smooth and creamy.


Adjust: If the smoothie is too thick, add a splash more milk. If it’s too thin, add more oats or ice.


Garnish: Pour into a glass and top it exactly like your photo with extra banana slices, a sprinkle of cinnamon, a few rolled oats, and a couple of raisins.


💡 Pro-Tips for the Best Smoothie

Creaminess: Using a frozen banana instead of ice keeps the flavor rich and the texture like soft-serve ice cream.


Make it Filling: Add a tablespoon of peanut butter or almond butter for extra protein and a nutty flavor that pairs perfectly with banana.


Soak the Oats: If you have a weaker blender, soak the oats in the milk for 5–10 minutes before blending to ensure there’s no “gritty” texture.

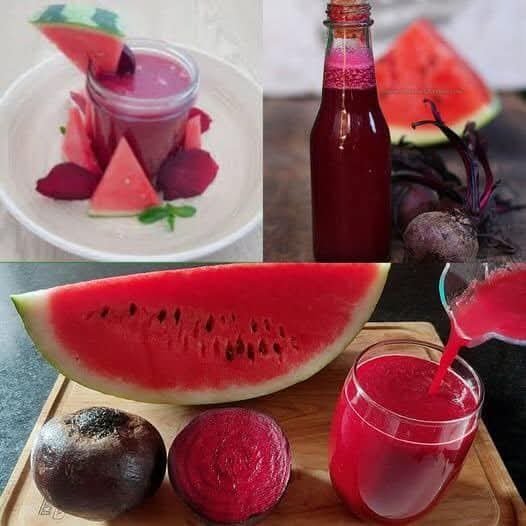
Watermelon & Beetroot Refresher


Watermelon & Beetroot Refresher

Ingredients

2 cups Watermelon (cubed and chilled, seeds removed if preferred)


1 small Beetroot (peeled and sliced)


1/2 Lime or Lemon (juiced, to balance the sweetness)


Optional: A small pinch of ginger or a few fresh mint leaves for an extra kick.


Instructions

Prep the Produce: Peel the beetroot and cut it into small pieces. If you are using a standard blender rather than a high-speed juicer, cutting the beetroot into very small cubes helps it blend smoothly.


Blend: Place the watermelon cubes and beetroot pieces into your blender. Add the lime juice and ginger/mint if you are using them.


Process: Blend on high until completely liquefied. Since watermelon is mostly water, you shouldn’t need to add any extra liquid.


Strain (Optional): If you prefer a clear juice, pour the mixture through a fine-mesh strainer or a nut milk bag into a glass. If you enjoy a thicker, fiber-rich smoothie texture, you can skip this step.


Serve: Pour into a chilled glass over ice and enjoy immediately for the best flavor and nutrient density.


Tips for the Best Results

Chill First: For the most refreshing taste, make sure your watermelon is very cold before you start.


Beetroot Ratio: Beetroot has a very strong, earthy flavor. If you are new to it, start with just half of a small beet and work your way up.


Storage: This juice is best consumed fresh but can be stored in an airtight glass jar in the fridge for up to 24 hours.

Mixed Berry Ricotta Cake


Mixed Berry Ricotta Cake

Prep time: 15 mins | Cook time: 50–60 mins | Yields: 8–10 servings


Ingredients

Butter: 1 stick (1/2 cup or 115g) unsalted, melted and cooled


Ricotta Cheese: 1 cup (approx. 250g) whole-milk ricotta


Berries: 1 ½ cups mixed fresh raspberries and blueberries


Sugar: 1 cup granulated sugar


Eggs: 3 large eggs, room temperature


Flour: 1 ½ cups all-purpose flour


Baking Powder: 2 teaspoons


Vanilla Extract: 1 teaspoon


Salt: ½ teaspoon kosher salt


Finishing: Powdered sugar for dusting


Instructions

Preparation: Preheat your oven to 350°F (175°C). Grease a 9-inch springform or round cake pan and line the bottom with parchment paper.


Mix Dry Ingredients: In a medium bowl, whisk together the flour, baking powder, and salt. Set aside.


Combine Wet Ingredients: In a large bowl, whisk the eggs, sugar, ricotta, and vanilla extract until the mixture is smooth and frothy.


Create Batter: Gently fold the dry ingredients into the wet ricotta mixture just until blended. Pour in the melted butter and fold until incorporated.


Add Berries: Gently fold about 1 cup of the mixed berries into the batter, taking care not to crush them.


Bake: Pour the batter into the prepared pan and smooth the top. Scatter the remaining ½ cup of berries over the surface, pressing them in slightly.


Final Step: Bake for 50 to 60 minutes, or until the top is golden brown and a toothpick inserted into the center comes out clean.


Cool and Serve: Let the cake cool in the pan for about 20 minutes before removing. Once completely cool, dust generously with powdered sugar before slicing.


Tips for Success

Dry Your Berries: After washing your fruit, ensure they are completely dry before adding them to the batter to prevent the cake from becoming soggy.


Don’t Overmix: To keep the cake light and pillowy, mix the batter only until the dry streaks disappear.


Ricotta Quality: Use full-fat ricotta for the richest flavor and best texture; if it seems very watery, you can drain it in a fine-mesh sieve for 15 minutes before use.

Cheesy Pepperoni Sourdough Pizza Bread

Cheesy Pepperoni Sourdough Pizza Bread

Total Time: Approx. 6 hours (plus overnight proof)

Yields: 1 Loaf

Ingredients

The Dough

  • 100 g (½ cup): Active sourdough starter (fed 4–6 hours prior)

  • 350 g (1 ½ cups): Water, room temperature

  • 500 g (5 cups): All-purpose flour, unbleached

  • 10 g (2 tsp): Salt

  • 3 g (1 tbsp): Italian seasoning

The Mix-ins

  • 80 g (1 cup): Fresh mozzarella cheese, grated

  • 45 g (½ cup): Pepperoni slices, quartered


Instructions

1. Prepare Add-ins & Initial Mix

  • Grate the mozzarella and quarter the pepperoni.

  • In a large bowl, whisk the starter and water, then stir in the flour, cheese, salt, and Italian seasoning until a shaggy dough forms.

  • Fold in the pepperoni in two stages to ensure even distribution without clumping.

  • Cover and let the dough rest for 30 minutes to hydrate.

2. Development (Stretch and Fold)

  • With wet hands, perform a “stretch and fold” by pulling the edge of the dough up and folding it over the center.

  • Repeat this for all four sides, then cover and rest for 30 minutes.

  • Perform two more rounds of stretches and folds (3 rounds total), resting 30 minutes between each.

3. Bulk Fermentation & Shaping

  • Cover and let the dough rise at room temperature for 4–6 hours until doubled in size.

  • Gently shape the dough into a ball or oval.

  • Place into a floured banneton or proofing basket, cover, and refrigerate overnight (at least 12 hours).

4. The Bake

  • Preheat your oven to 425°F (220°C) with a Dutch oven inside.

  • Transfer the cold dough onto parchment paper and score the top with a sharp blade.

  • Carefully lower the dough into the hot Dutch oven, cover with the lid, and bake for 55 minutes.

  • Remove the lid and bake for an additional 5 minutes if you prefer a deeper golden crust.

  • Crucial: Let the loaf cool on a wire rack for at least 1 hour before slicing to allow the interior structure to set.


Chef’s Tips for Success

  • Cheese Substitutes: While mozzarella is recommended for its meltability, you can swap it for provolone, cheddar, or fontina.

  • Starter Health: Ensure your starter is bubbly and active before starting; it should be used 4–6 hours after its last feeding.

  • Storage: You can freeze the finished bread for up to 3 months.

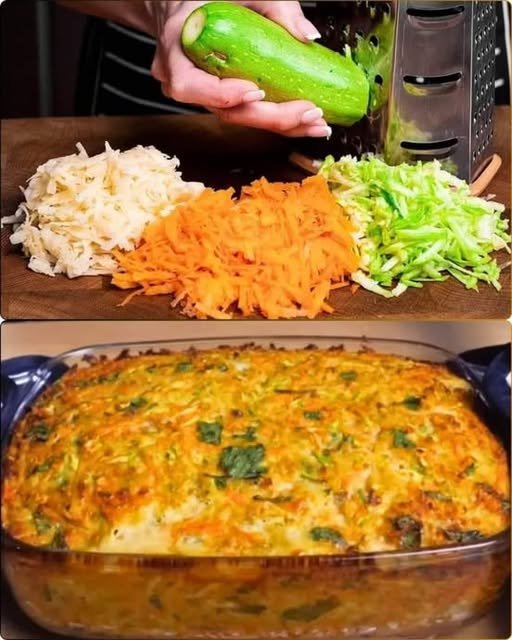
Baked Zucchini, Carrot, and Potato Casserole

Baked Zucchini, Carrot, and Potato Casserole

A fuss-free, meatless dish that is savory, tender, and incredibly easy to prep.

  • Prep time: 15 minutes

  • Bake time: 40–50 minutes

  • Yields: 4–6 servings

Ingredients

  • Vegetables: 12 oz (total) of carrots, potatoes, and zucchini

  • Onions: 5.5 oz, finely chopped

  • Protein: 3 eggs

  • Aromatics: 2-3 cloves of garlic, minced

  • Oil: 2 tbsp vegetable oil

  • Seasoning: 1 tsp salt, plus pepper to taste

  • Herbs: Fresh herbs (like parsley or dill) at your discretion

  • Breading: 3 tbsp ready-made breadcrumbs or 2 slices of crumbled bran bread


Instructions

1. Prepare the Vegetables

  • Grate the carrots, potatoes, and zucchini using a box grater.

  • Chef’s Tip: After grating the zucchini and potatoes, squeeze out the excess moisture with your hands or a kitchen towel to prevent the casserole from becoming soggy.

  • Finely chop the onions and mince the garlic.

2. Create the Mixture

  • In a large mixing bowl, beat the 3 eggs with the vegetable oil, salt, and pepper.

  • Stir in the grated vegetables, chopped onions, minced garlic, and your choice of fresh herbs.

  • Mix in the breadcrumbs (or crumbled bran bread) to help bind the ingredients together.

3. Assemble and Bake

  • Preheat your oven to 350°F (180°C).

  • Grease a glass baking dish and pour the vegetable mixture into it, smoothing the top with a spatula.

  • Bake for 40 to 50 minutes, or until the center is set and the top has turned a beautiful golden brown.

4. Serve

  • Let the casserole rest for 5 minutes after taking it out of the oven to allow the juices to redistribute.

  • Slice into squares and serve warm.


Perfect Pairings

Since you’ve been working on your Skillet Bread, this casserole is the ideal topping or side. You can scoop the warm vegetable bake directly onto a piece of the crusty bread for a complete, nutritious meal.

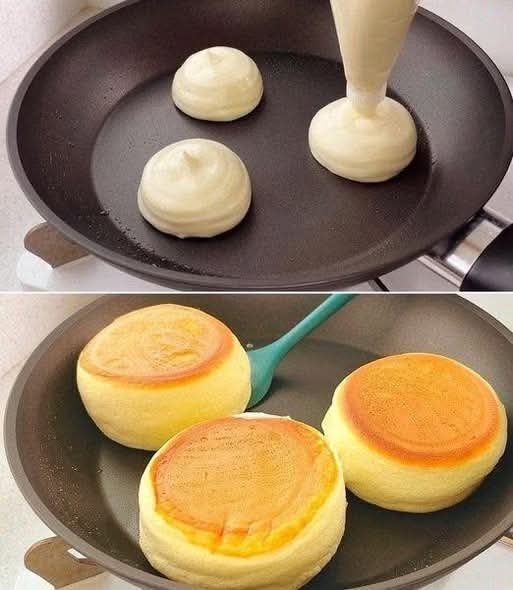
3 ingredient frying pancake: Simple, delicious recipe ready in minutes

3 ingredient frying pancake: Simple, delicious recipe ready in minutes

Hello, everyone, today we’re going to learn how to make pancake using simple ingredients. So grab your pen and paper to jot down the ingredients, then follow the complete preparation method.

Here’s a super easy 3-ingredient frying pan pancake recipe — soft, fluffy, and ready in minutes 🥞

No oven, no mixer, no fuss!

🥞 3-Ingredient Frying Pan Pancakes

⏱ Time

Prep: 2 minutes

Cook: 5–7 minutes

Total: ~10 minutes

🍽 Servings

4–6 small pancakes

📝 Ingredients (Only 3)

1 cup all-purpose flour

½ cup milk

1 egg

👩‍🍳 Instructions

1️⃣ Make the Batter

In a bowl, add egg and milk.

Whisk lightly.

Add flour and mix until smooth (no lumps).

2️⃣ Cook the Pancakes

Heat a non-stick frying pan on medium-low heat.

Lightly grease with oil or butter.

Pour small ladles of batter into the pan.

Cook until bubbles appear (about 1–2 minutes).

Flip and cook the other side for 1 minute until golden.

🍯 Serving Ideas (Optional)

Honey or maple syrup

Jam

Fresh fruit

Chocolate spread

🔥 Tips

For sweeter pancakes, add 1 tbsp sugar (optional)

For fluffier texture, add ½ tsp baking powder (optional)

Don’t overcook — keep heat medium-low

✅ Why You’ll Love This Recipe

✔ Only 3 ingredients

✔ Budget-friendly

✔ Kid-approved

✔ Ready in minutes


10-Minute Golden Skillet Bread

10-Minute Golden Skillet Bread

Crusty on the outside, soft and fluffy on the inside—no oven required.

  • Prep time: 5 minutes

  • Rest time: 10 minutes

  • Cook time: 10 minutes

  • Yields: 6–8 flatbreads (depending on size)

Ingredients

  • 4 cups All-purpose flour

  • 1 tbsp Sugar

  • 1 tbsp Salt

  • 2 tsp Active dry yeast (or instant yeast)

  • 1 ½ – 2 cups Warm water (approx. 100-110°F / 38-43°C)

  • Optional: 1 tbsp Olive oil or melted butter (for the dough or brushing)

Instructions

1. Mix the Dough

In a large mixing bowl, whisk together the flour, sugar, salt, and yeast. Slowly pour in the warm water while stirring. Stop adding water once the dough comes together into a cohesive ball. It should feel soft but not be sticking to your fingers.

2. Knead

Turn the dough out onto a lightly floured surface. Knead for 5–7 minutes. Do not skip this step! You want the dough to become smooth, springy, and elastic to ensure a chewy texture.

3. Rest

Cover the dough with a damp cloth and let it rest for 10 minutes. While this isn’t a full “rise,” it allows the gluten to relax so the dough doesn’t snap back when you shape it.

4. Shape

Divide the dough into even portions (about the size of a large lemon). Flatten each piece into a round disc roughly ¾-inch thickness. If they are too thick, the center may remain doughy; if too thin, they will be more like crackers.

5. Pan-Sear

Preheat a non-stick or cast iron skillet over medium heat. You do not need oil, though a light brush of butter can add flavor.

  • Place the dough rounds in the pan (don’t overcrowd).

  • Cook for 5 minutes per side.

  • Chef’s Tip: Use a lid during the first 3 minutes of cooking each side to trap steam; this ensures the middle cooks through perfectly.

6. Cool and Serve

Transfer the bread to a wire rack. This prevents the bottom from getting soggy. Let them cool for 2 minutes before tearing into them.


Flavor Variations

  • Garlic Herb: Knead 2 cloves of minced garlic and 1 tbsp of dried rosemary into the dough.

  • Cheesy Jalapeño: Fold in ½ cup shredded cheddar and 1 diced jalapeño before the rest period.

  • Cinnamon Sugar: Immediately after cooking, brush with melted butter and toss in a mix of cinnamon and sugar.

Troubleshooting

  • Bread is dense: Ensure your water was warm (not hot, which kills yeast, and not cold, which won’t activate it).

  • Raw center: Your heat is likely too high. Lower the flame and use a lid to help the radiant heat reach the center of the dough.

  • Sticky dough: Add flour one tablespoon at a time until the dough is manageable.

Ginger Water (Ginger–Lemon Detox Drink)

Ginger–Lemon Detox Drink)

Prep & Cook Time

  • Prep: 5 minutes

  • Cook: 10–15 minutes

  • Total: ~20 minutes

Servings

  • Makes 4–6 servings (or 1 large bottle for the day)

Ingredients

  • 2–3 inches fresh  ginger root

  • 1–2 lemons (optional but recommended)

  • 1 liter (4 cups) water

  • Optional:

    • 1 tsp raw honey (after cooling)

    • A pinch of turmeric

    • A few mint leaves

Instructions

  1. Wash and peel the ginger (peeling optional).

  2. Slice or grate the ginger thinly.

  3. Bring water to a boil.

  4. Add ginger, reduce heat, and simmer for 10–15 minutes.

  5. Turn off heat and let cool slightly.

  6. Strain into a bottle or jar.

  7. Add fresh lemon juice (and honey if using).

  8. Store in the refrigerator for up to 2 days.

Description

Ginger water is a warming herbal infusion known for its thermogenicdigestive, and anti-inflammatory properties. Lemon adds vitamin C and supports liver detox pathways.

Health Benefits (Evidence-Based)

✔ Supports Weight Loss

  • Boosts metabolism

  • Reduces appetite & craving

    • Improves fat oxidation

    ✔ Reduces Bloating & Water Retention

    • Aids digestion

    • Relieves gas and constipation

    ✔ Improves Blood Circulation

    • Helps mobilize stored fat

    • Supports cardiovascular health

    ✔ Anti-Inflammatory

    • Reduces chronic inflammation linked to obesity

    ✔ Blood Sugar Control

    • Helps stabilize insulin response

    What It Does NOT Do

    • ❌ Spot-reduce fat

    • ❌ Replace exercise or calorie control

    • ❌ Melt fat overnight

    How & When to Drink

    • Morning (best): 1 cup on an empty stomach

    • Before meals: Reduces overeating

    • Daily limit: 2–3 cups

    Tips for Best Results

    • Drink warm, not ice cold

    • Combine with:

      • Walking or light exercise

      • High-protein meals

      • Reduced sugar & refined carbs

    • Be consistent for 2–4 weeks

    Nutritional Information (per cup)

    • Calories: ~5–10

    • Carbs: ~2g

    • Sugar: 0g

    • Fat: 0g

    • Vitamin C: ~10–15%

    Q & A

  • Q: Can I drink it every day?
    ✔ Yes, in moderation.

    Q: Can pregnant women drink ginger water?
    ⚠️ Small amounts are usually safe, but consult a doctor.

    Q: Will it burn belly fat fast?
    👉 It supports fat loss over time, not instant results.
    Q: Can I drink it cold?
    ✔ Yes, but warm is more effective for digestion

Creamy High-Protein Herb Dip Fresh, flavorful, and packed with lean protein in every scoop.

Servings: 6

Total Time: 10 minutes

Difficulty: Easy

Calories per Serving: ~95

Macros (per serving): 12g Protein / 3g Net Carbs / 4g Fat / 1g Fiber

Intro

This Creamy High-Protein Herb Dip is the kind of snack that feels indulgent but fits perfectly into a keto, low-carb, and Weight Watchers–friendly lifestyle. It’s thick, cool, and packed with fresh herbs—like a cross between ranch dip and whipped Greek yogurt—yet made with clean, macro-balanced ingredients.

If you’re trying to stay low carb while keeping your protein intake high, this dip is a game changer. It pairs beautifully with crisp veggies, high-protein crackers, or grilled meats, making it a go-to for meal prep, parties, or everyday snacking.

The best part? It takes just 10 minutes to make and stays unbelievably creamy for days.

Look at the Recipe

• Thick, smooth, ultra-creamy texture that holds up on any veggie or cracker
• Fresh herb flavor with garlic, lemon, and cooling yogurt notes
• High-protein, low-carb ingredients that boost fullness and support clean eating goals

Ingredients Needed

Base

  • 1 ½ cups plain nonfat Greek yogurt
  • ½ cup low-fat cottage cheese
  • 1 scoop unflavored or savory whey protein powder
  • Herbs & Seasoning

    • 2 tbsp fresh parsley, finely chopped
    • 1 tbsp fresh dill, finely chopped
    • 1 tbsp fresh chives, minced
    • 1 clove garlic, grated
    • 1 tsp lemon zest
    • 1 tbsp lemon juice
    • ½ tsp onion powder
    • ½ tsp salt (adjust to taste)
    • ¼ tsp black pepper
  • Optional Add-Ins

    • 1–2 tsp olive oil for richness (optional for keto; skip for very low WW points)
    • Red pepper flakes for a little heat
    • Extra herbs for garnish
  • How to Make Our Creamy High-Protein Herb Dip

    1. Blend the base. Add Greek yogurt, cottage cheese, and protein powder to a blender or food processor. Blend until silky smooth and thick.
    2. Fold in flavor. Transfer the blended mixture to a bowl. Stir in the parsley, dill, chives, garlic, lemon zest, and lemon juice until evenly combined.
    3. Season to taste. Add salt, pepper, and onion powder. Mix well and adjust lemon or herbs if needed.
    4. Chill before serving. Let the dip rest for at least 20 minutes in the fridge so the flavors can bloom and the texture can firm up.
    5. Serve and enjoy. Pair with cucumbers, bell peppers, celery, or keto crackers for a high-protein, low-carb snack that satisfies every craving.
  • Storage & Serving Suggestions

    • Refrigeration: Keeps well for 3–4 days in an airtight container.
    • Meal Prep: Portion into small containers for easy grab-and-go protein snacks.
  • Freezing: Not ideal—dairy separates after thawing.
  • Serving Pairings: Veggie sticks, grilled chicken skewers, salmon bites, keto almond crackers.
  • Tips & FAQs

    Can I use only yogurt (no cottage cheese)?
    Yes, but cottage cheese adds thickness and extra protein. If skipping it, use a bit more protein powder.

    Can this be made dairy-free?
    Use a dairy-free Greek-style yogurt and a plant-based protein powder. Texture will be slightly looser.

  • What herbs work best?
    Parsley, dill, and chives are classic, but basil or cilantro work too.

    How do I make it richer for keto?
    Add 1–2 teaspoons of olive oil or a spoonful of cream cheese.

    Is this Weight Watchers friendly?
    Absolutely—use nonfat Greek yogurt and skip added oil for minimal points.


The Sunshine Citrus Smoothie

The Sunshine Citrus Smoothie

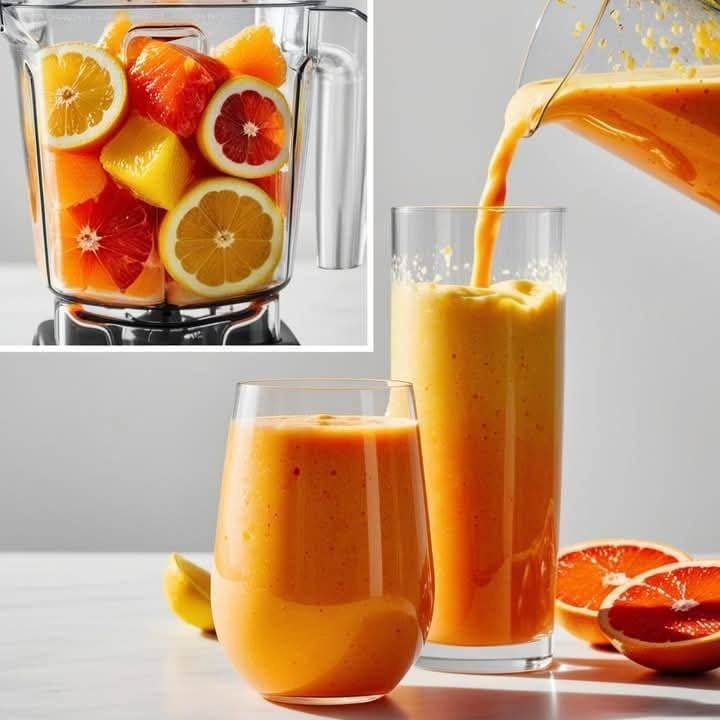
This recipe balances the tartness of the citrus with the natural sweetness and creaminess of mango.


Ingredients

  • 2 Navel Oranges: Peeled and roughly chopped (remove seeds).

  • 1 Blood Orange: Peeled and chopped (for that deep ruby color and berry-like flavor).

  • 1 cup Frozen Mango chunks: This provides the thick, creamy “smoothie” texture without needing much ice.

  • 1/2 cup Greek Yogurt or Coconut Milk: For extra creaminess.

  • 1/2 cup Water or Coconut Water: To help everything blend smoothly.

  • Optional: 1 teaspoon of honey or agave if you prefer it sweeter.


Instructions

  1. Prep the Fruit: Ensure all citrus is peeled thoroughly. Try to remove as much of the white pith as possible to avoid any bitterness.

  2. Layer the Blender: Place your liquid (water/coconut water) and yogurt in first, followed by the fresh oranges, and finally the frozen mango on top.

  3. Blend: Start on a low speed to break up the whole fruit chunks, then increase to high for 45–60 seconds until the mixture is completely silky.

  4. Serve: Pour into a tall glass as shown in the image and garnish with a fresh orange slice.


Pro Tips for the Best Texture

  • Freeze your fruit: If you use fresh mango instead of frozen, add 1/2 cup of ice to ensure the drink is cold and thick rather than liquid juice.

  • Zest it up: For a massive flavor boost, add a pinch of fresh orange zest into the blender before mixing.

Baked Cheesy Chicken Bread Rolls

Baked Cheesy Chicken Bread Rolls

A savory, melt-in-your-mouth snack featuring seasoned shredded chicken and bubbly melted cheese nestled in soft dinner rolls.

  • Prep time: 15 minutes

  • Cook time: 15 minutes

  • Total time: 30 minutes

Ingredients

For the Chicken Filling

  • Chicken: 1 cup boiled and shredded chicken (rotisserie chicken works great here)

  • Onion: 1 small, finely chopped

  • Capsicum (Bell Pepper): ½ cup, finely chopped

  • Garlic: 1 tsp garlic paste

  • Condiments: 2 tbsp ketchup (or pizza sauce) and 2 tbsp mayonnaise

  • Seasoning: Salt (to taste), ½ tsp black pepper, ½ tsp red chili powder, and ½ tsp chili flakes (optional for heat)

For the Rolls & Topping

  • Bread: 1 pack of dinner rolls or slider buns

  • Cheese: 1½ cups mozzarella or cheddar cheese, grated

  • Butter Mixture: 2 tbsp butter (melted) mixed with 1 tsp garlic powder

  • Garnish: Freshly chopped parsley or coriander


Detailed Instructions

1. Sauté the Savory Filling

Heat 1 tablespoon of oil in a non-stick pan over medium heat. Add the finely chopped onion and garlic paste, sautéing for about 2 minutes until the onion becomes translucent and soft. Add the shredded chicken and chopped capsicum.

2. Season and Combine

Stir in the salt, black pepper, red chili powder, and chili flakes. Mix thoroughly and cook for 3–4 minutes to allow the flavors to meld and the capsicum to soften slightly. Remove the pan from the heat. Once the mixture has cooled for a minute, stir in the ketchup (or pizza sauce) and mayonnaise until the chicken is evenly coated and creamy.

3. Prepare and Stuff the Rolls

Preheat your oven to 180°C (350°F). Take your dinner rolls and make a deep slit down the center of each, being careful not to cut all the way through to the bottom. Gently pull the bread apart and stuff each roll generously with the prepared chicken filling.

4. Add Cheese and Butter

Place the stuffed rolls side-by-side on a baking tray lined with parchment paper. Sprinkle the grated mozzarella or cheddar cheese over the top of the filling in each roll. Using a pastry brush, coat the tops and sides of the bread with the melted garlic butter.

5. Bake to Perfection

Place the tray in the center rack of the oven. Bake for 12–15 minutes, or until the cheese is completely melted and bubbling, and the edges of the rolls have turned a beautiful golden brown.

6. Garnish and Serve

Remove from the oven and immediately sprinkle with fresh parsley or coriander. Serve these rolls while hot, ideally paired with extra ketchup or a creamy garlic dipping sauce.


Tips for the Best Rolls

  • Don’t Overfill: While it’s tempting to pile the chicken high, keep the filling level with the top of the bread to ensure the cheese stays on the roll rather than sliding off onto the tray.

  • Soft vs. Crusty: If you prefer a softer roll, cover the tray loosely with aluminum foil for the first 8 minutes of baking, then remove it for the final 5 minutes to melt the cheese.

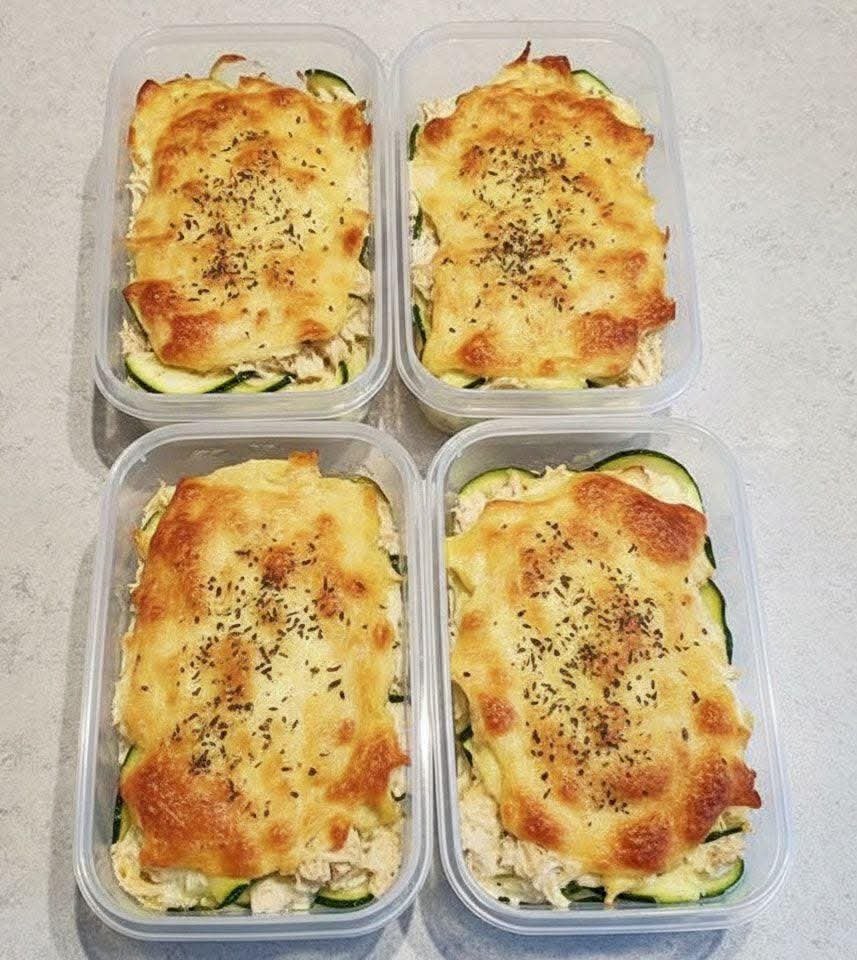
Zucchini & Creamy Chicken Melt


Zucchini & Creamy Chicken Melt

Prep time: 15 mins | Cook time: 25 mins | Servings: 4


Ingredients

Protein: 2 large chicken breasts (poached and shredded) or 1 rotisserie chicken.


Vegetables: 2 medium zucchinis, sliced into thin rounds or long ribbons.


Creamy Base: 1/2 cup Greek yogurt or sour cream, and 4 oz softened cream cheese.


Seasoning: 1 tsp garlic powder, 1 tsp onion powder, salt, and black pepper to taste.


Topping: 1.5 cups shredded mozzarella or cheddar cheese and dried oregano/parsley for the garnish.


Preparation Steps

Prep the Zucchini: Slice the zucchini into thin rounds (as seen in the photo). If you want to avoid extra liquid, sprinkle them with a pinch of salt, let them sit for 10 minutes, and pat them dry with a paper towel.


Mix the Filling: In a large bowl, combine the shredded chicken, Greek yogurt (or sour cream), cream cheese, and seasonings. Mix until the chicken is well-coated and creamy.


Layer the Containers:


Place a layer of zucchini slices at the bottom of your containers or a large baking dish.


Spread the chicken mixture evenly over the zucchini.


Top with another layer of zucchini (optional) and then a generous layer of shredded cheese.


Bake: Place the containers (ensure they are oven-safe!) or the baking dish in an oven preheated to 400°F (200°C). Bake for 15–20 minutes until the cheese is bubbly and golden brown.


Finish: Sprinkle with dried herbs while the cheese is still hot.


Pro-Tips for Success

The “Crunch” Factor: If you want a bit of texture, you can add a sprinkle of almond flour or crushed crackers on top of the cheese before baking.


Meal Prep: Let the meals cool completely before putting the lids on to prevent steam from making the zucchini too soft.


Spice it up: Add a dash of red pepper flakes or chopped jalapeños to the chicken mixture if you prefer a bit of heat.

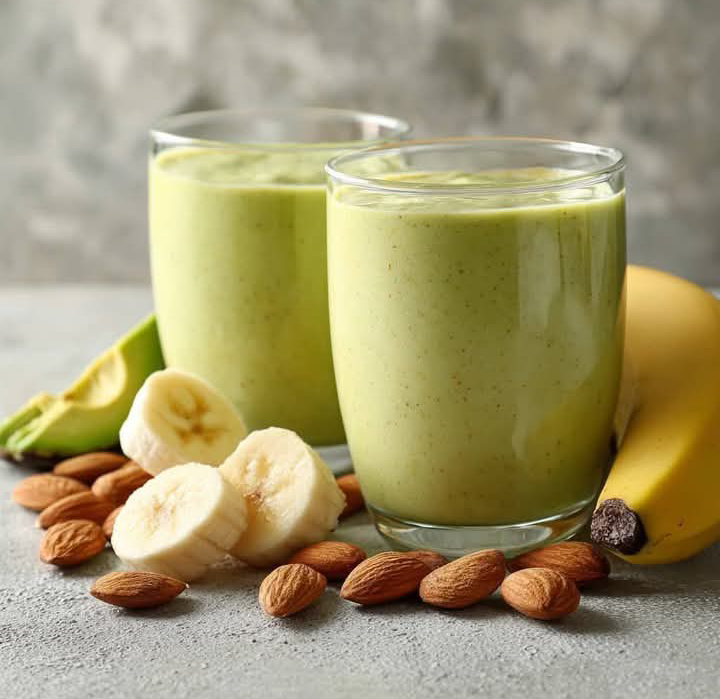
Creamy Avocado & Banana Power Smoothie


Creamy Avocado & Banana Power Smoothie

Prep time: 5 minutes | Servings: 1-2


Ingredients

1 ripe avocado (pitted and peeled)


1 large ripe banana (frozen slices work best for a thicker texture)


1/4 cup raw almonds (or 1 tablespoon of almond butter)


1 1/2 cups almond milk (unsweetened)


1 tablespoon honey or maple syrup (optional, for extra sweetness)


A handful of ice cubes (if using fresh fruit instead of frozen)


Instructions

Prep the base: Place the almonds in the blender first and pulse until they are finely ground to ensure a smooth texture.


Combine: Add the avocado, banana, almond milk, and sweetener (if using) to the blender.


Blend: Start on a low speed and gradually increase to high. Blend for about 45–60 seconds until the mixture is completely smooth and pale green.


Adjust: If the smoothie is too thick, add a splash more almond milk. If you prefer it colder, add a few ice cubes and blend again.


Serve: Pour into glasses and garnish with a few almond slivers or a slice of banana on top.


Nutritional Benefits

Healthy Fats: The avocado provides monounsaturated fats which are great for heart health.


Potassium: Both the banana and avocado are excellent sources of potassium.


Fiber: This combination keeps you feeling full and satisfied for longer.

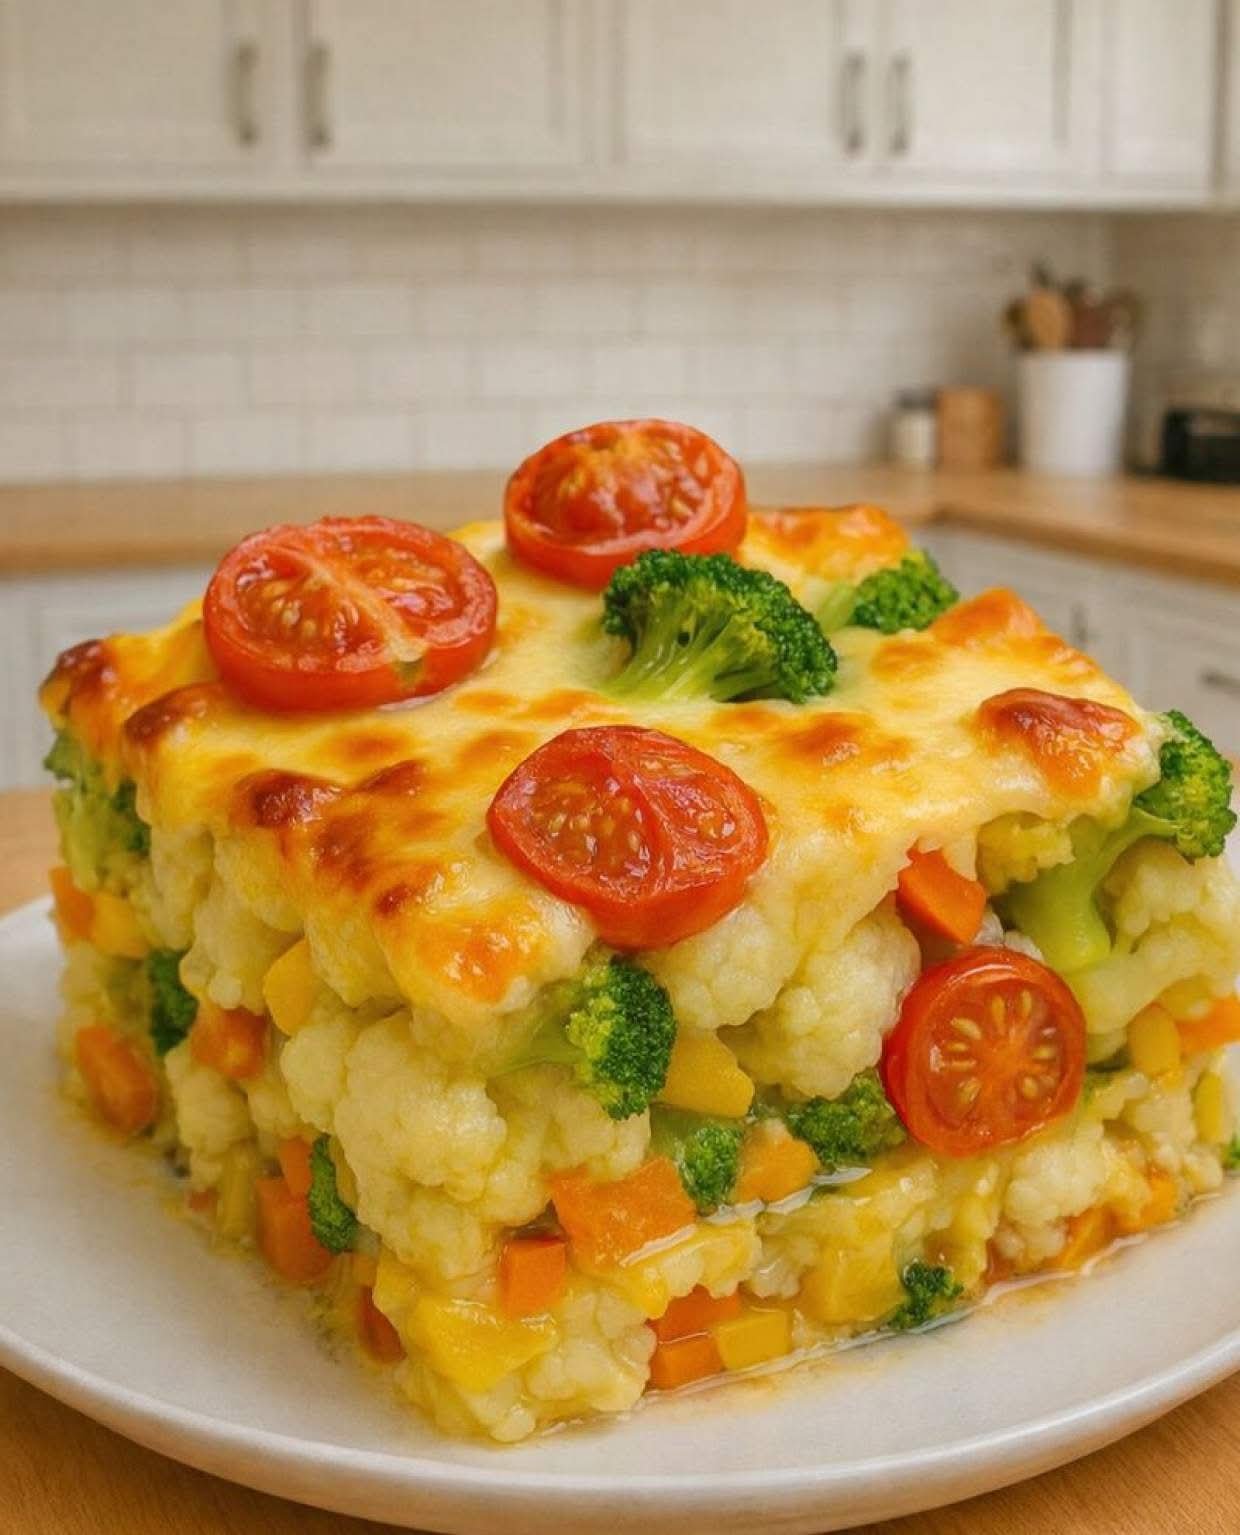
Cheesy Vegetable Bake Recipe

Cheesy Vegetable Bake Recipe

Ingredients

Vegetables: 1 large head of Cauliflower, 1 large head of Broccoli, 3 large Carrots (diced), and 1 yellow Bell Pepper (diced).


Topping: 3-4 Cherry tomatoes (halved) and 2 cups shredded Mozzarella or Cheddar cheese.


The Sauce (Béchamel):


4 tablespoons Butter


1/4 cup All-purpose flour


2 cups Whole milk


1/2 teaspoon Garlic powder


Salt and black pepper to taste


Instructions

Prepare the Vegetables: Cut the cauliflower and broccoli into medium-sized florets. Steam or par-boil the cauliflower, broccoli, and carrots for about 5 minutes until “fork-tender” but still firm. Drain well and pat dry (this prevents the dish from being watery).


Make the Cheese Sauce: In a saucepan, melt the butter over medium heat. Whisk in the flour and cook for 1 minute. Gradually pour in the milk, whisking constantly until the sauce thickens. Remove from heat and stir in half of the shredded cheese, garlic powder, salt, and pepper.


Assemble the Bake:


To get the “square” look from the photo, use a square springform pan or a deep square glass baking dish lined with parchment paper.


Toss the steamed vegetables and diced peppers together in a bowl, then pack them tightly into the dish.


Pour the cheese sauce evenly over the top, allowing it to seep down through the crevices.


The Topping: Sprinkle the remaining cheese over the top. Place the halved cherry tomatoes and a few small broccoli florets on top of the cheese for decoration.


Bake: Preheat your oven to 200°C (400°F). Bake for 20–25 minutes until the cheese is bubbly and golden brown.


Serving: If using a springform pan, let the dish rest for 10 minutes before removing the sides so the “vegetable block” holds its shape.


Pro Tips for Success

Avoid Sogginess: Make sure the vegetables are very well-drained after steaming. You can even roast them slightly beforehand to remove excess moisture.


Add Protein: You can easily add cooked chicken cubes or chickpeas between the vegetable layers for a more filling meal.


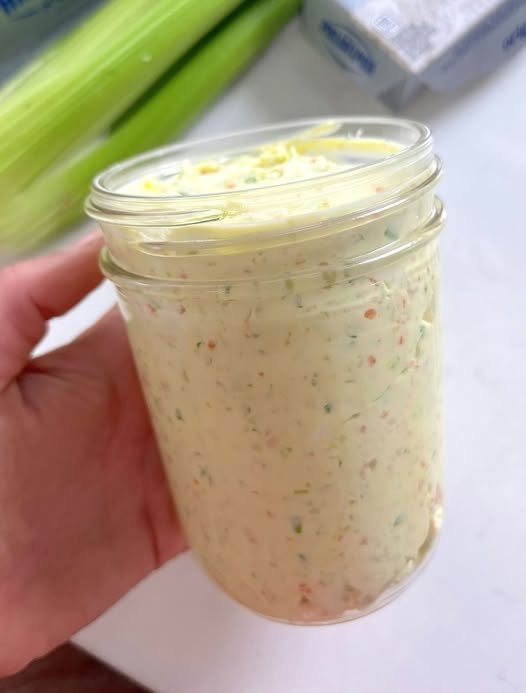
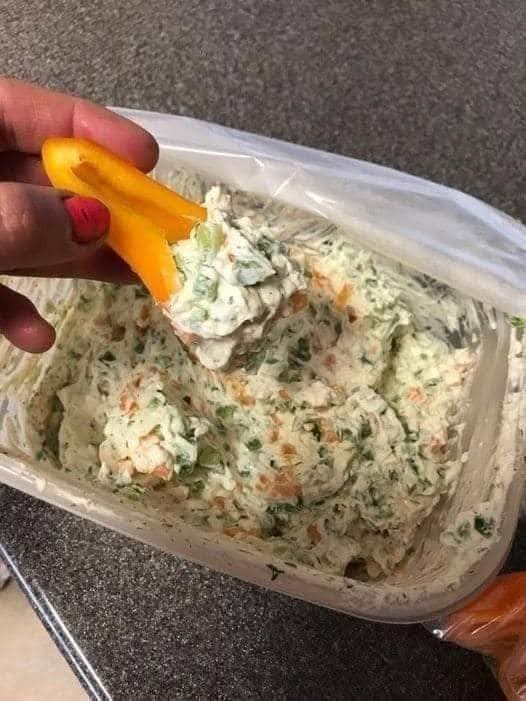
Homemade Garden Vegetable Spread

Homemade Garden Vegetable Spread

This spread is a vibrant, crunchy upgrade to plain cream cheese. It’s best when made at least an hour in advance to let the flavors meld.

  • Prep time: 10 minutes

  • Yields: Approx. 2 cups

Ingredients

  • Cream Cheese: 2 (8 oz) packages, softened to room temperature

  • Carrots: ¼ cup, roughly chopped (before processing)

  • Celery: ½ cup, roughly chopped (before processing)

  • Green Onions: 2 stalks, chopped

  • Salt: ½ teaspoon

  • Garlic Powder: ½ teaspoon

  • Onion Powder: ¼ teaspoon

Instructions

  1. Prep the Vegetables: Place the chopped carrots, celery, and green onions into a food processor. Pulse 4–6 times. You are looking for very small, uniform bits. Be careful not to over-process, or the vegetables will release too much water and turn into a “slush.”

  2. Combine: In a medium mixing bowl, add the softened cream cheese. Fold in the pulsed vegetables and the dry seasonings (salt, garlic powder, and onion powder).

  3. Mix: Using a sturdy spatula or a hand mixer on low speed, blend until the vegetables are evenly distributed throughout the cream cheese.

  4. Chill and Serve: Transfer to a serving bowl. Cover and refrigerate for at least 30 minutes before serving to allow the dried spices to hydrate and the flavors to develop.


Helpful Tips for Success

  • The “Water” Trick: If your vegetables seem very wet after pulsing, press them firmly between two paper towels before adding them to the cream cheese. This prevents the spread from becoming runny.

  • Softening: Make sure the cream cheese is truly at room temperature. If it’s too cold, you’ll end up with lumps that are hard to smooth out.

  • Storage: This will stay fresh in an airtight container in the refrigerator for up to 5 days.

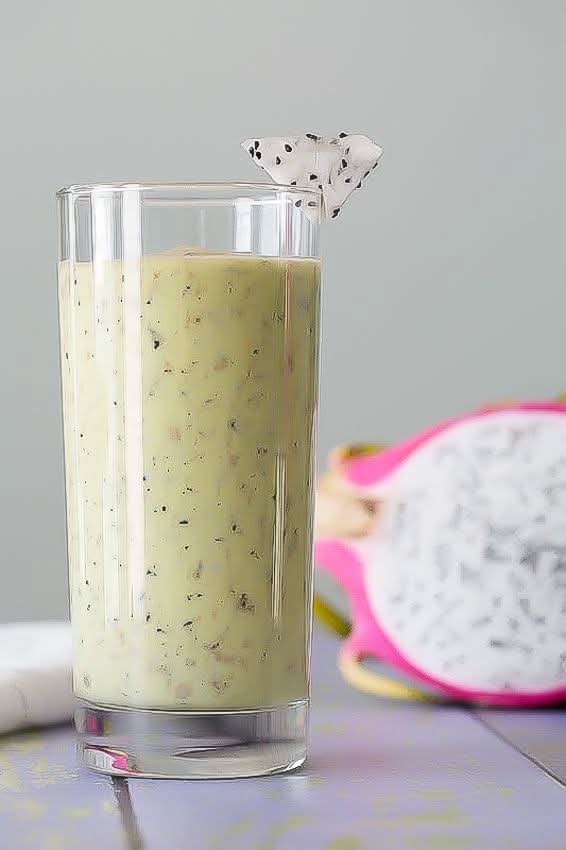
Creamy Avocado & Dragon Fruit Smoothie

Creamy Avocado & Dragon Fruit Smoothie

Ingredients

  • 1/2 medium Avocado (ripe, for creaminess)

  • 1/2 White Dragon Fruit (peeled and cubed; use frozen for a thicker texture)

  • 1 cup Milk of choice (Almond, Coconut, or Soy milk work best for this flavor profile)

  • 1 tbsp Honey or Maple Syrup (to taste)

  • 1/2 frozen Banana (optional, for extra sweetness and thickness)

  • Splash of Lime juice (optional, to brighten the flavor and keep the avocado green)

Instructions

  1. Prep the Fruit: Cut the dragon fruit in half and scoop out the white flesh with the black seeds. Do the same for the avocado.

  2. Blend: Place the avocado, dragon fruit, milk, and sweetener into a high-speed blender.

  3. Process: Blend on high until completely smooth. The black seeds will remain intact but smaller, giving it the signature speckled look seen in your photo.

  4. Serve: Pour into a tall glass.

  5. Garnish: To match the photo, cut a small triangular wedge or use a melon baller on a fresh piece of dragon fruit and place it on the rim of the glass.

Why this combination works:

  • The Texture: Avocado contains healthy fats that act as a natural thickener, making the smoothie feel like a milkshake.

  • The Flavor: Dragon fruit has a very mild, slightly sweet flavor (similar to a cross between a kiwi and a pear), which complements the buttery, neutral taste of the avocado perfectly.


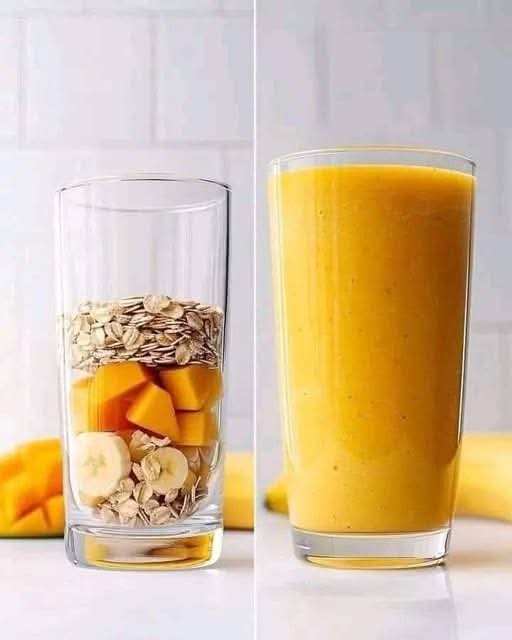
Mango Banana Oat Breakfast Smoothie


🥭 Mango Banana Oat Breakfast Smoothie

Ingredients

Category Ingredient Quantity
Fiber Rolled Oats (Old Fashioned) ¼ cup
Fruit Fresh or Frozen Mango (cubed) 1 cup
Fruit Ripe Banana ½ large
Liquid Orange Juice or Coconut Water ½ cup
Creaminess Milk or Yogurt (Dairy or Plant-based) ½ cup
Optional Honey or Agave Syrup 1 tsp
Optional Fresh Turmeric or Ginger A tiny pinch (for extra glow)


Instructions

  1. Soften the Oats (Optional): If you prefer a completely smooth texture without any “chew,” place the oats in the blender first and pulse them into a fine powder before adding other ingredients.

  2. Layer Your Ingredients: Add your liquid base (orange juice/milk) first. Follow with the oats, then the banana and mango chunks. Placing the frozen items on top helps push everything down into the blades.

  3. The Blend: Start on a medium speed to break down the oats and fruit, then finish on high for 45 seconds. You want to ensure the oats are fully pulverized for that “silk” finish seen in the second image.

  4. Adjust Consistency: * Too thick? Add a splash more orange juice.

    • Too thin? Add a few ice cubes or more frozen mango.


Why this combination works

  • The Oats: They act as a natural thickener and provide slow-release energy, preventing a “sugar crash” later in the morning.

  • The Mango: High in Vitamin C and fiber, it provides that intense tropical color and natural sweetness.

  • The Banana: This is the “glue” of the smoothie; it provides the creamy, emulsified texture that binds the oats and juice together.

Pro Tip for Texture

If you have the time, let the blended smoothie sit for 2–3 minutes before drinking. This allows the oats to hydrate slightly, making the drink even creamier!

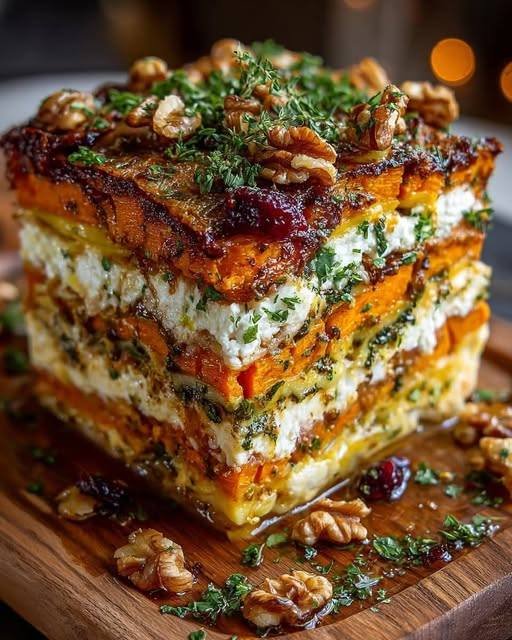
Layered Sweet Potato, Butternut Squash & Carrot Lasagna with Feta, Walnuts & Cranberry-Honey Glaze

Layered Sweet Potato, Butternut Squash & Carrot Lasagna with Feta, Walnuts & Cranberry-Honey Glaze
Ingredients
For the Vegetables
2 medium sweet potatoes, peeled and thinly sliced
1 small butternut squash, peeled and thinly sliced
3 medium carrots, peeled and thinly sliced
2 tbsp olive oil
½ tsp salt
¼ tsp black pepper
For the Feta & Walnut Layer
200 g feta cheese, crumbled
½ cup walnuts, chopped
2 tbsp fresh parsley, chopped
¼ tsp black pepper
For the Cranberry-Honey Glaze
¼ cup cranberry sauce or chopped dried cranberries
3 tbsp honey
1 tsp fresh lemon juice
Optional Seasoning & Garnish
1 tsp dried thyme or rosemary
Extra chopped walnuts and parsley for garnish
Directions
Preheat oven to 200°C (400°F). Line a baking sheet with parchment paper.
Toss sweet potato, butternut squash, and carrot slices with olive oil, salt, and black pepper. Roast for 20–25 minutes until slightly tender.
In a small bowl, mix crumbled feta, chopped walnuts, parsley, and black pepper.
In another small bowl, whisk together cranberry sauce, honey, and lemon juice to make the glaze.
In a baking dish, layer roasted vegetables, followed by a layer of the feta-walnut mixture. Repeat until all ingredients are used, finishing with a vegetable layer.
Drizzle cranberry-honey glaze evenly over the top. Sprinkle with thyme or rosemary if desired.
Bake for 15–20 minutes until the top is slightly caramelized and warm throughout.
Garnish with extra walnuts and parsley before serving.
Nutritional Information (Per Serving – Approximate, serves 6)
Calories: 350
Protein: 10 g
Carbohydrates: 45 g
Fat: 16 g
Fiber: 7 g
Calcium: 18% DV

“Baked Cottage Cheese Eggs: High-Protein Breakfast Perfection”

Servings 4 servings (2 egg cups each)
Total Time 25 minutes
Difficulty Easy
Calories per Serving Approx. 150 Calories
Macros P: 18g / C: 5g / F: 7g / Fiber: 0g

💖 Why This ZeroPoint Breakfast Is Your WW Secret Weapon

Breakfast is the most crucial meal for successful weight loss meals, and starting your day with pure protein is the best strategy for staying satisfied and on track. Most of us reach for scrambled eggs, but these Baked Cottage Cheese Egg Cups offer something even better: massive protein content and incredible satiety for minimal (or ZeroPoint) contribution!

This recipe transforms simple ingredients—eggs and cottage cheese—into a fluffy, savory, muffin-tin masterpiece. The cottage cheese melts and stabilizes the eggs, creating a custard-like texture that is miles better than a plain baked egg. It’s an easy meal prep idea you can make ahead, grab, and go. This is a quick, wholesome, macro-friendly breakfast designed to fuel your busy day while keeping your SmartPoints (or PersonalPoints) budget safely in check.


✨ Look at the Recipe (WW Focus)

  • Sensory Appeal: A light, airy, and fluffy texture with a rich, savory, slightly tangy flavor, thanks to the baked cottage cheese.
  • Flavor Highlight: Savory herbs (chives, parsley) and a touch of black pepper elevate the simple egg and cheese base into a genuinely satisfying dish.
  • Key WW Benefit: Utilizes two ZeroPoint foods (eggs and nonfat cottage cheese) as the base, making it extremely high in protein for maximum fullness and adherence to the Weight Watchers plan.

🛒 Ingredients Needed

For the Baked Egg Cups

  • 1 cup nonfat cottage cheese (ZeroPoint on many plans)
  • 8 large eggs (ZeroPoint on many plans)
  • 2 Tbsp finely chopped fresh chives
  • 1 Tbble chopped fresh parsley
  • $1/4$ tsp garlic powder
  • Salt and freshly ground black pepper to taste
  • Optional: Nonstick cooking spray or silicone liners for the muffin tin

Optional ZeroPoint Add-ins (Add $1/4$ cup total)

  • Diced bell peppers
  • Chopped spinach (squeeze out excess water)
  • Diced mushrooms

🔪 How to Make Our SmartPoints Egg Cups

  1. Prep the Batter: Preheat your oven to 375°F (190°C). Lightly spray a standard 12-cup muffin tin with nonstick spray, or line with silicone baking cups.
  2. Blend the Cottage Cheese: In a medium bowl, use an immersion blender, stand blender, or food processor to blend the nonfat cottage cheese until it is completely smooth and creamy. This prevents a chunky texture in the final product.
  3. Mix the Batter: Pour the blended cottage cheese into a large bowl. Whisk the 8 eggs lightly and add them to the cheese. Add the chives, parsley, garlic powder, salt, and pepper. Gently stir until just combined. You now have a macro-friendly meal batter!
  4. Fold in Fillings: If using optional ZeroPoint vegetables (like spinach or peppers), gently fold them into the mixture. Be careful not to over-mix.
  5. Bake: Pour the mixture evenly into the 8 or 10 prepared muffin cups (filling them about $3/4$ full).
  6. Cook: Bake for 18 to 22 minutes, or until the egg cups are set in the center and lightly golden around the edges. This is an excellent clean eating breakfast.
  7. Cool & Serve: Let the cups cool in the tin for 5 minutes before carefully removing them. They may deflate slightly upon cooling.

🧊 Storage & Serving Suggestions

  • Storing: Once completely cooled, the egg cups can be stored in an airtight container in the refrigerator for up to 4 days. This is the perfect easy meal prep idea.
  • Reheating: Reheat in the microwave for 30–60 seconds, or in a toaster oven for a few minutes until warm.
  • Freezing: Do not freeze. The cottage cheese can become rubbery and separate upon thawing.
  • Serving Pairings (WW-Approved): Serve with a side of fresh fruit (like berries or melon—ZeroPoint) and a slice of whole-wheat toast (points calculated separately) for a complete and filling weight loss meal.

❓ Tips & FAQs

Q: What is the best way to keep these ZeroPoint/low-point?

A: Always use nonfat cottage cheese and whole eggs. Avoid adding cheese (like cheddar or mozzarella), meat, or heavy cream to the recipe, as these will significantly increase the SmartPoints.

Q: How can I spice this recipe up?

A: Add a dash of hot sauce (ZeroPoint) before serving, or fold in a pinch of chili powder or smoked paprika before baking. You can also mix in some finely diced jalapeño for a healthy twist.

Q: My cottage cheese mixture looks chunky before baking. What did I do wrong?

A: If you skip the blending step, the large curds of cottage cheese will remain chunky. The secret to the super-fluffy texture is blending the cottage cheese until it is liquid smooth before mixing in the eggs.

Q: Are these suitable for meal prep for a whole week?

A: Yes! Making a batch of 8 to 12 of these makes for a simple, macro-friendly breakfast every morning. Store them in the fridge and reheat as needed.

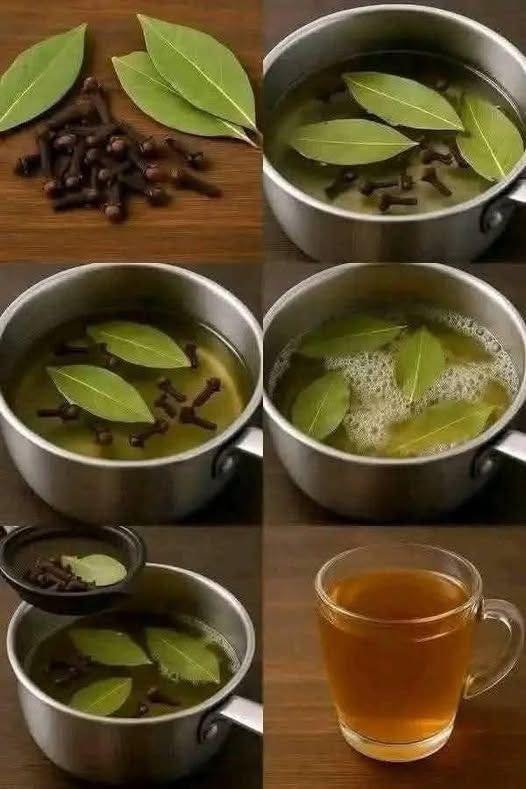
Bay Leaf & Clove Herbal Tea

Bay Leaf & Clove Herbal Tea

A warm, aromatic, caffeine-free beverage

Bay Leaf and Clove Herbal Tea is a simple, comforting drink made by gently simmering dried bay leaves and whole cloves in water. The result is a lightly golden infusion with a warm, earthy aroma and subtle spice. This tea is appreciated for its soothing character, pleasant fragrance, and ease of preparation.

Bay leaves bring a mild herbal depth with hints of eucalyptus and mint, while cloves add a gentle warmth and soft spice. Together, they create a balanced cup that can be enjoyed plain or customized with natural flavor additions like lemon, honey, ginger, or cinnamon.

This herbal tea contains no caffeine and can be enjoyed at any time of day. It is especially comforting during cool weather or quiet moments when a warm, aromatic drink is desired.


🧺 Ingredients

Base Ingredients

  • 3 dried bay leaves (whole)

  • 5–6 whole cloves

  • 2 cups water

Optional Flavor Add-Ins (choose as desired)

  • 1 teaspoon honey (for gentle sweetness)

  • 1 slice fresh ginger

  • 1 small cinnamon stick

  • 1 teaspoon lemon juice or a lemon wedge

  • 1 mint leaf


🧑‍🍳 Instructions

Step 1: Prepare Ingredients

Ensure the bay leaves and cloves are clean and free of dust.
If using ginger or cinnamon, prepare them by slicing or breaking them into small pieces.

Step 2: Heat the Water

Pour 2 cups of water into a small saucepan.
Place over medium heat and bring to a gentle boil.

Step 3: Add Spices

Once the water begins to boil, add the bay leaves and cloves.
Add any optional ingredients at this stage if using.

Step 4: Simmer

Reduce the heat to low and allow the mixture to simmer gently for 7–10 minutes.
The liquid will gradually take on a light golden color and release a pleasant aroma.

Step 5: Strain

Remove the saucepan from heat and let it rest for 1–2 minutes.
Strain the tea into a cup using a fine mesh strainer, removing all solids.

Step 6: Serve

Serve warm. Stir in honey or lemon juice if desired.
Garnish with a mint leaf or lemon slice for presentation.


🍽️ Servings

Makes 1 large mug or 2 small cups.
The recipe can be doubled or tripled as needed.


📝 Helpful Notes

  • Bay Leaves: Dried whole bay leaves are best. Avoid crushed or powdered leaves, which are difficult to strain.

  • Cloves: Use whole, aromatic cloves for best flavor.

  • Simmering: Gentle simmering preserves aroma and prevents bitterness.

  • Flavor Strength: Adjust steeping time to taste—shorter for mild, longer for stronger flavor.

  • Sweeteners: Honey complements the spice naturally without overpowering.

  • Serving: Best enjoyed warm, but may also be served chilled.

  • Storage: Prepared tea can be refrigerated for up to 24 hours and reheated gently.


🌿 Serving Ideas

  • Enjoy on its own as a calming beverage

  • Pair with light snacks or fruit

  • Serve in a clear glass mug to highlight the golden color

  • Add cinnamon and ginger for a richer, spiced version


Bay Leaf and Clove Herbal Tea is a simple drink made with care and intention. Its warm aroma, gentle flavor, and minimal ingredients make it a pleasant addition to any daily routine. Whether enjoyed alone or shared, this tea celebrates simplicity, tradition, and mindful preparation.

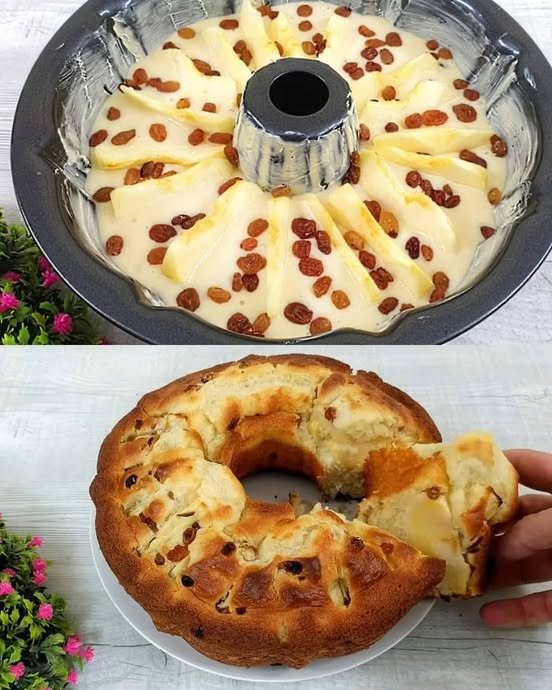
Grandmother’s Italian Apple & Lemon Cake

Grandmother’s Italian Apple & Lemon Cake

Prep Time: 15 minutes
Bake Time: 35–40 minutes
Cooling Time: 10–15 minutes
Servings: 8–10


Ingredients

  • 3 large eggs

  • 150 g (¾ cup) granulated sugar

  • 200 ml (¾ cup + 1 tbsp) milk

  • 370 g (3 cups) all-purpose flour

  • 20 g (4 tsp) baking powder

  • 1 large apple, peeled and sliced into thin wedges

  • 1 lemon, juiced (zest optional for extra flavor)

  • 50 g (¼ cup) raisins

  • Butter (for greasing the cake mold)

  • Optional: Powdered sugar for dusting


Instructions

1. Prepare the Fruit

  • Peel and slice the apple into thin wedges.

  • Place the slices in a small bowl and toss them with the lemon juice.

    • Tip: The lemon juice prevents the apples from browning and adds a gentle, fresh citrus flavor.

  • If using raisins that seem dry, soak them in warm water or a bit of lemon juice for 5 minutes to plump them up. Drain before using.


2. Mix the Batter

  • In a large mixing bowl, whisk the eggs and sugar together using a hand whisk or electric mixer until the mixture is pale and frothy.

    • This step traps air in the batter, making the cake light.

  • Gradually stir in the milk until fully combined.


3. Sift and Combine Dry Ingredients

  • Sift together the all-purpose flour and baking powder.

  • Gently fold the dry ingredients into the wet mixture using a spatula or whisk.

    • Tip: Fold carefully to avoid overmixing, which can make the cake dense. The batter should be smooth, slightly thick, and airy.

  • Optional: Grate the lemon zest into the batter for an extra layer of citrus aroma.


4. Assemble the Cake

  • Preheat your oven to 180°C (350°F).

  • Generously grease a bundt or ring cake mold with butter, making sure to coat the inner crevices.

  • Pour the prepared batter into the mold, spreading it evenly.

  • Arrange the apple wedges in a circular or spiral pattern on top of the batter. Press them lightly so they stay partially embedded during baking.

  • Sprinkle the raisins evenly over the top.


5. Bake the Cake

  • Place the cake in the center of the preheated oven.

  • Bake for 35–40 minutes, or until the top is golden brown and a toothpick inserted in the thickest part comes out clean.

    • Tip: If the top browns too quickly, cover loosely with aluminum foil for the last 5–10 minutes.


6. Cool and Serve

  • Let the cake cool in the pan for 10 minutes.

  • Carefully turn it out onto a plate or cooling rack.

  • Once fully cooled, dust generously with powdered sugar for a classic Italian finish.


Helpful Tips

  1. Apple Texture: Use a firm variety like Granny Smith or Gala to hold their shape while baking.

  2. Even Baking: Make sure the apple wedges are similar in size so they bake evenly.

  3. Flavor Boost: Adding ½ tsp cinnamon or a pinch of nutmeg to the batter pairs beautifully with apple and lemon.

  4. Storage: Keep the cake covered at room temperature for 2 days or in the fridge for up to 5 days.

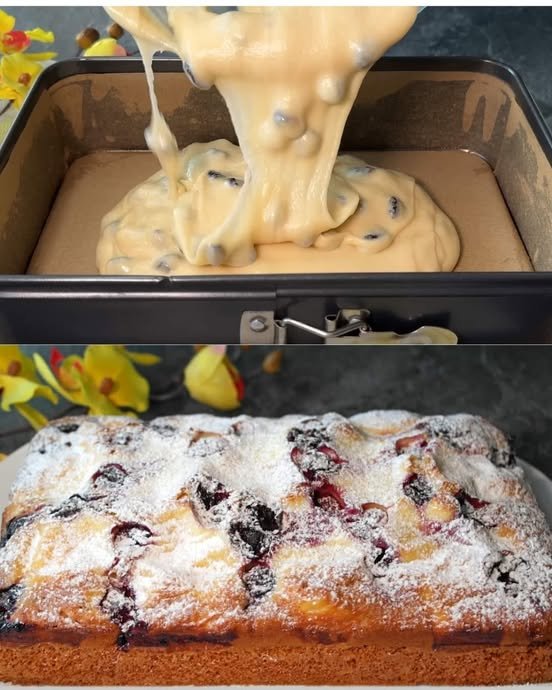
Fluffy Cherry Yogurt Cake

Fluffy Cherry Yogurt Cake

Prep Time: 15 minutes
Bake Time: 35–40 minutes
Cooling Time: 15–20 minutes
Servings: 8–10


Ingredients

The Batter

  • 3 large eggs

  • 150 g (4/5 cup) granulated sugar

  • A pinch of salt

  • 200 g plain Greek yogurt (full-fat preferred for extra moisture)

  • 100 ml neutral vegetable oil (sunflower, canola, or light olive oil)

  • 250 g (2 cups) all-purpose flour

  • 12 g (2 ½ tsp) baking powder

  • 1 tsp vanilla extract

The Fruit

  • 300 g fresh or frozen pitted cherries (if using frozen, do not thaw)

Optional

  • Powdered sugar, for dusting


Instructions

1. Prepare for Success

  • Preheat the oven to 180°C (350°F).

  • Grease a 20×30 cm (8×12 inch) rectangular or square baking pan with butter or oil.

  • Line the bottom with parchment paper to make removing the cake easier and prevent sticking.


2. Whisk the Base

  • In a large mixing bowl, combine the eggs, sugar, vanilla extract, and salt.

  • Using a hand whisk or electric mixer on high speed, whisk for 3–5 minutes until the mixture becomes pale, thick, and slightly frothy.

    • Tip: This step helps trap air in the batter, making the cake light and fluffy.


3. Add Wet and Dry Ingredients

  • Reduce the whisk speed to low.

  • Stir in the Greek yogurt and vegetable oil until just combined. Avoid overmixing.

  • Sift together the flour and baking powder.

  • Gently fold the dry ingredients into the wet mixture with a spatula, using a “cut-and-fold” motion to keep the batter airy.

    • Tip: Folding gently prevents the batter from losing air and keeps the crumb tender.


4. Incorporate the Cherries

  • Reserve about one-third of the cherries for the top.

  • Gently fold the remaining two-thirds of the cherries into the batter, ensuring even distribution.

    • Tip: If using frozen cherries, fold them directly into the batter without thawing to prevent extra moisture from making the cake soggy.


5. Assemble and Bake

  • Pour the batter into the prepared pan and spread it evenly.

  • Scatter the remaining cherries over the top and press them lightly into the surface.

  • Bake in the preheated oven for 35–40 minutes, or until:

    • The top is golden brown

    • A toothpick inserted into the center comes out clean

  • Pro-Tip: If the top starts browning too quickly, cover loosely with aluminum foil for the last 5–10 minutes.


6. Cooling and Serving

  • Let the cake cool in the pan for 15 minutes before transferring it to a wire rack.

  • Once completely cooled, dust the top with powdered sugar for a pretty, snowy finish.

  • Slice into squares or rectangles and serve.


Why This Cake Works

  1. Yogurt Magic: The acidity in the Greek yogurt reacts with the baking powder to create a soft, moist, and tender crumb that lasts for days.

  2. Light and Fluffy: Whisking the eggs and sugar well traps air in the batter, giving the cake a delicate, cloud-like texture.

  3. Versatile Fruit Base: You can replace cherries with blueberries, raspberries, or sliced peaches for seasonal variations.

  4. Easy Storage: Keep covered at room temperature for 2 days or refrigerate for up to 5 days.


Optional Enhancements

  • Add 1 tsp lemon zest to the batter for a bright, citrusy flavor.

  • Drizzle a simple glaze made from powdered sugar and milk over the cooled cake.