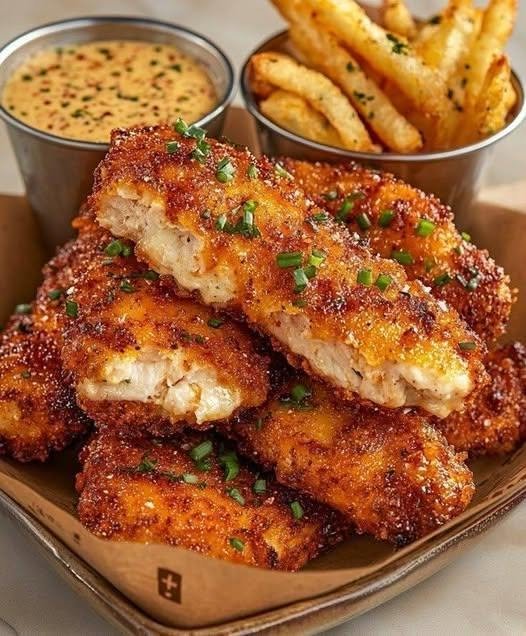
Crispy Honey Garlic Chicken Tenders
Description
These Crispy Honey Garlic Chicken Tenders are the perfect combination of crunchy, juicy, sweet, savory, and garlicky. Tender strips of chicken are coated in a seasoned crispy crust, fried or baked until beautifully golden, and then tossed in a glossy honey garlic sauce that clings to every bite.
The chicken stays juicy inside while the outside develops a delicious crunch. The sauce combines honey, fresh garlic, soy sauce, lemon juice, and a touch of butter for a rich, balanced flavor. The result is a restaurant-style meal that’s surprisingly easy to make at home.
These chicken tenders are perfect for busy weeknight dinners, family meals, game-day appetizers, lunch boxes, or party platters. Serve them with fries, roasted potatoes, steamed vegetables, rice, coleslaw, or a fresh salad.
The best part? The sweet honey glaze doesn’t overpower the chicken. Instead, it complements the crispy coating and adds a beautiful glossy finish.
Recipe Information
Recipe Name: Crispy Honey Garlic Chicken Tenders
Category: Main Course / Appetizer
Cuisine: American-inspired
Prep Time: 20 minutes
Cook Time: 20 minutes
Total Time: Approximately 40 minutes
Servings: 4
Yield: Approximately 16 chicken tenders
Difficulty: Easy to Moderate
Ingredients
For the Chicken
- 1½ pounds chicken tenders or boneless, skinless chicken breasts cut into strips
- 1 cup all-purpose flour
- ½ cup cornstarch
- 1 teaspoon paprika
- 1 teaspoon garlic powder
- 1 teaspoon onion powder
- ½ teaspoon smoked paprika, optional
- ½ teaspoon salt
- ½ teaspoon black pepper
- ½ teaspoon dried oregano
- 2 large eggs
- ½ cup milk or buttermilk
- 1 teaspoon hot sauce, optional
- Oil for frying, if using the fried method
For the Honey Garlic Sauce
- ⅓ cup honey
- 4–5 cloves garlic, finely minced
- 2 tablespoons low-sodium soy sauce
- 1 tablespoon lemon juice
- 1 tablespoon unsalted butter
- ½ teaspoon grated fresh ginger, optional
- ¼ teaspoon red pepper flakes, optional
- 1 teaspoon cornstarch
- 2 tablespoons water
For Garnishing
- Fresh parsley or green onions
- Sesame seeds, optional
- Lemon wedges
- Freshly cracked black pepper
Step-by-Step Instructions
Step 1: Prepare the Chicken
If you’re using chicken breasts instead of pre-cut tenders, place the chicken on a clean cutting board and cut it into strips of approximately equal thickness.
Try to keep the pieces similar in size so they cook evenly.
Pat the chicken dry with paper towels.
This small step makes a difference because excess moisture can prevent the coating from becoming properly crispy.
Step 2: Prepare the Seasoned Coating
In a wide bowl, combine:
- Flour
- Cornstarch
- Paprika
- Garlic powder
- Onion powder
- Smoked paprika
- Salt
- Black pepper
- Dried oregano
Whisk everything together thoroughly.
The cornstarch is particularly useful because it helps create a lighter, crunchier coating.
Step 3: Prepare the Wet Mixture
In another bowl, whisk together the eggs, milk or buttermilk, and hot sauce if you’re using it.
Buttermilk adds flavor and can help create a tender texture.
If you don’t have buttermilk, regular milk works perfectly well.
Step 4: Coat the Chicken
Take one chicken strip and dip it into the egg mixture.
Allow the excess liquid to drip away.
Then transfer it to the seasoned flour mixture.
Press the flour mixture gently onto the chicken so it sticks well.
For an extra-crispy coating, dip the chicken back into the wet mixture and then into the flour mixture a second time.
Place the coated chicken on a clean plate or wire rack.
Repeat with the remaining chicken.Step 5: Rest the Coated Chicken
Let the coated chicken rest for approximately 5–10 minutes before cooking.
This gives the coating a chance to adhere more securely.
It also helps reduce the amount of breading that falls off during cooking.
Fried Method
Step 6: Heat the Oil
Pour enough neutral cooking oil into a deep skillet or heavy-bottomed pan to provide a suitable frying depth.
Heat the oil to approximately 350°F / 175°C.
A cooking thermometer is helpful for maintaining the correct temperature.
If the oil is too cool, the chicken can absorb excessive oil.
If it’s too hot, the coating may brown before the chicken is fully cooked.
Step 7: Fry the Chicken
Carefully place several chicken tenders into the hot oil.
Don’t overcrowd the pan.
Fry in batches if necessary.
Cook until the tenders are golden brown and fully cooked, turning them as needed for even browning.
Depending on their thickness, they generally take approximately 4–6 minutes per batch.
The chicken should reach an internal temperature of 165°F / 74°C.
Transfer cooked tenders to a wire rack or paper-lined plate.
A wire rack is preferable because it allows excess oil to drain without making the bottom of the chicken soggy.
Oven-Baked Method
If you prefer not to fry the chicken, you can bake it.
Preheat the oven to 425°F / 220°C.
Place the coated chicken tenders on a lightly greased baking sheet or wire rack positioned over a baking sheet.
Lightly spray or brush the coating with oil.
Bake for approximately 18–22 minutes, turning halfway through cooking.
Cook until golden and the chicken reaches 165°F / 74°C internally.
For extra browning, you can use the broiler briefly at the end, but watch carefully to prevent burning.
Air-Fryer Method
Preheat the air fryer to approximately 400°F / 200°C.
Lightly spray the coated chicken with cooking oil.
Arrange the tenders in a single layer.
Avoid overlapping them.
Air fry for approximately 10–14 minutes, turning halfway through.
Cooking time depends on the size of the chicken strips and your air fryer.
Always confirm the internal temperature reaches 165°F / 74°C.
Step 8: Make the Honey Garlic Sauce
While the chicken is cooking, prepare the glaze.
Place a small saucepan over medium-low heat.
Add:
- Honey
- Soy sauce
- Minced garlic
- Lemon juice
- Butter
- Fresh ginger, if using
- Red pepper flakes, if using
Stir gently.
Allow the sauce to simmer for approximately 2–3 minutes.
Don’t cook it over high heat because honey can burn quickly.
Step 9: Thicken the Sauce
In a small bowl, combine the cornstarch and water.
Stir until completely smooth.
Slowly pour this mixture into the simmering honey garlic sauce while stirring.
Cook for approximately 1–2 minutes, until the sauce becomes glossy and slightly thick.
Remove from the heat.
The sauce will continue thickening slightly as it cools.
Step 10: Toss the Chicken
Place the crispy chicken tenders into a large bowl.
Pour the warm honey garlic sauce over them.
Toss gently until each tender is lightly coated.
Don’t leave the chicken sitting in the sauce for too long if you want maximum crunch.
For the crispiest texture, you can also drizzle the sauce over the tenders immediately before serving instead of fully tossing them.
Step 11: Garnish and Serve
Transfer the chicken tenders to a serving platter.
Sprinkle with chopped parsley or green onions.
Add sesame seeds if desired.
Serve with lemon wedges.
The contrast between the golden crispy chicken and shiny honey garlic glaze makes these tenders especially attractive for a family dinner or food reel.
Why You’ll Love This Recipe
Crispy Outside
The flour and cornstarch coating creates a crunchy exterior.
Juicy Inside
Properly cooked chicken remains tender and moist.
Sweet and Savory
Honey provides sweetness while soy sauce and garlic add savory depth.
Quick
The entire meal can be prepared in approximately 40 minutes.
Versatile
You can fry, bake, or air-fry the tenders.
Family-Friendly
The basic recipe has a mild flavor, while red pepper flakes or hot sauce can be added for spice.
Great for Meal Ideas
These tenders work as a main course, appetizer, sandwich filling, salad topping, or rice-bowl protein.
Important Recipe Notes
Don’t Skip the Cornstarch
Cornstarch helps make the coating lighter and crispier.
Don’t Overcrowd the Pan
Whether frying or air frying, leave space around the chicken.
This allows heat to circulate properly.
Keep the Sauce at a Gentle Simmer
High heat can burn the honey and garlic.
Sauce Just Before Serving
If maximum crispiness is your goal, sauce the tenders immediately before eating.
Use a Thermometer
Chicken should reach 165°F / 74°C internally for safe consumption.
Pro Tips for Extra Crispy Chicken
Tip 1: Pat the Chicken Dry
This helps the coating adhere better.
Tip 2: Double Coat
For an especially crunchy crust, coat the chicken twice.
Tip 3: Let the Coating Rest
Five to ten minutes gives the coating time to set.
Tip 4: Use a Wire Rack
After frying or baking, place the tenders on a wire rack instead of stacking them.
Tip 5: Don’t Sauce Too Early
Honey sauce can soften crispy breading if the chicken sits in it for too long.
Tip 6: Serve Immediately
These tenders are best when served hot and freshly glazed.
How to Adjust the Honey Garlic Sauce
Sweeter
Add another tablespoon of honey.
More Tangy
Add extra lemon juice.
More Savory
Add another teaspoon of soy sauce.
Spicier
Add red pepper flakes or hot sauce.
More Garlic Flavor
Add another clove or two of fresh garlic.
Thicker
Simmer slightly longer or add a small additional amount of cornstarch slurry.
Spicy Honey Garlic Chicken
For a spicy version, add:
- 1 teaspoon chili flakes
- 1–2 teaspoons hot sauce
- A pinch of cayenne pepper
You can also add a small amount of chili garlic sauce to the glaze.
The sweet honey helps balance the heat.
Lemon Honey Garlic Version
For a brighter citrus flavor, increase the fresh lemon juice slightly and add extra lemon zest.
Finish with fresh parsley and lemon slices.
This version works particularly well with roasted vegetables or a fresh green salad.
Serving Suggestions
These crispy chicken tenders are extremely versatile.
Serve them with:
- Steamed rice
- Fried rice
- Mashed potatoes
- French fries
- Sweet potato fries
- Roasted vegetables
- Coleslaw
- Garden salad
- Cucumber salad
- Corn on the cob
- Garlic bread
You can also slice the chicken and place it over rice with steamed broccoli for an easy honey garlic chicken bowl.
Make a Honey Garlic Chicken Salad
For a lighter meal, slice the crispy chicken tenders and place them over:
- Mixed greens
- Cucumber
- Cherry tomatoes
- Carrots
- Avocado
- Red onion
Drizzle with a light lemon dressing.
The sweet and savory chicken works beautifully with fresh vegetables.
Make Honey Garlic Chicken Sandwiches
Place crispy tenders inside toasted brioche buns.
Add:
- Lettuce
- Tomato
- Pickles
- Coleslaw
- Mayonnaise or spicy mayo
Drizzle additional honey garlic sauce over the chicken.
This turns the recipe into a delicious homemade chicken sandwich.
Storage Instructions
Store leftover chicken in an airtight container in the refrigerator for approximately 3–4 days.
For the best texture, store the crispy chicken separately from any remaining sauce.
This prevents the coating from becoming excessively soft.
Reheating Instructions
For the crispiest results, use an oven or air fryer.
Air Fryer
Reheat at approximately 375°F / 190°C for 4–7 minutes.
Oven
Reheat at approximately 400°F / 200°C for 8–12 minutes.
Avoid microwaving whenever possible because the breading can become soft.
Warm the honey garlic sauce separately and drizzle it over the reheated chicken.
Freezing Instructions
You can freeze cooked chicken tenders.
Allow them to cool completely.
Place them on a baking sheet in a single layer and freeze until firm.
Transfer to a freezer-safe container or bag.
For best quality, use within approximately 2–3 months.
Freeze the sauce separately whenever possible.
Reheat the chicken directly from frozen in an oven or air fryer until hot throughout.
Nutritional Information
Approximate nutrition per serving, assuming four servings and the fried preparation:
- Calories: 520–600 kcal
- Protein: 38–43 g
- Carbohydrates: 45–55 g
- Fat: 20–27 g
- Saturated Fat: Approximately 5–7 g
- Fiber: 1–2 g
- Sugar: 18–24 g
- Sodium: Approximately 700–950 mg
Nutrition varies depending on the amount of oil absorbed, chicken size, coating, sauce quantity, and specific brands of ingredients.
Serving the chicken with fries, rice, or additional sauces will increase the overall nutritional values.
Potential Benefits
Protein
Chicken provides a substantial amount of protein, which supports normal tissue maintenance and repair.
Garlic
Fresh garlic contributes flavorful sulfur-containing compounds and plant compounds.
Honey
Honey provides carbohydrates and sweetness, allowing the sauce to achieve its characteristic glossy finish.
Lemon
Fresh lemon adds citrus flavor and contributes vitamin C.
Spices
Paprika, black pepper, oregano, and ginger add flavor without requiring large amounts of additional ingredients.
For a more balanced meal, serve the chicken with plenty of vegetables, salad, or another nutrient-rich side.
These are general nutritional observations and are not medical advice.
Frequently Asked Questions
1. Can I use chicken breast instead of chicken tenders?
Yes. Simply cut boneless, skinless chicken breast into strips of similar thickness.
2. Can I bake these chicken tenders?
Absolutely. Bake at approximately 425°F / 220°C until golden and the internal temperature reaches 165°F / 74°C.
3. Can I air-fry them?
Yes. Air frying is an excellent way to achieve crispiness with less oil.
4. Can I make them gluten-free?
Yes. Use a gluten-free flour blend and certified gluten-free soy sauce or tamari.
5. Can I make the sauce without soy sauce?
Yes. You can substitute coconut aminos or another suitable savory sauce.
6. Why isn’t my chicken crispy?
Possible causes include excess moisture, overcrowding, low cooking temperature, or allowing the chicken to sit in sauce for too long.
7. Can I make the chicken ahead?
Yes. Cook the chicken ahead and refrigerate it. Reheat using an oven or air fryer to restore some crispness.
8. Can I prepare the honey garlic sauce ahead?
Yes. Refrigerate it in an airtight container and gently reheat before serving.
9. Can I make the sauce spicier?
Yes. Add chili flakes, cayenne, hot sauce, or chili garlic sauce.
10. Can I use bottled minced garlic?
You can, but fresh garlic generally provides a stronger and fresher flavor.
11. Can I use honey alternatives?
Maple syrup can work, although it will produce a somewhat different flavor.
12. Can I double the recipe?
Yes. If doubling, cook the chicken in batches rather than overcrowding your pan or air fryer.
13. Can I serve these as an appetizer?
Definitely. Cut the chicken into smaller pieces and serve with toothpicks and dipping sauce.
14. What dipping sauces go well with them?
Try ranch, spicy mayo, garlic aioli, sweet chili sauce, or extra honey garlic sauce.
15. How do I keep them crispy?
Keep the cooked chicken on a wire rack and sauce immediately before serving.