The Best Pico de Gallo
Description
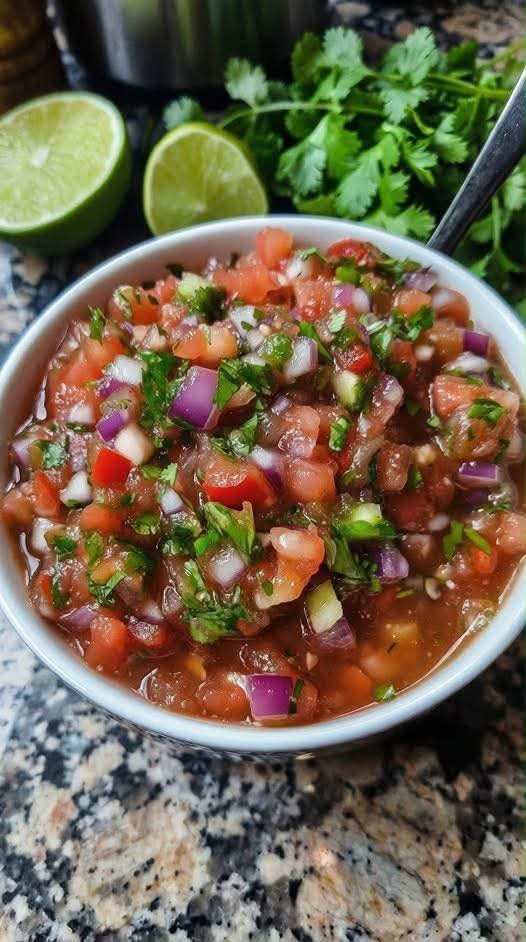
Pico de Gallo, also known as Salsa Fresca or Salsa Cruda, is a classic Mexican condiment made with fresh tomatoes, onions, jalapeños, cilantro, lime juice, and a touch of salt. Unlike blended salsas, Pico de Gallo is chunky, vibrant, and bursting with fresh flavors and textures.
This versatile recipe is perfect as a dip for tortilla chips, a topping for tacos, burritos, nachos, grilled meats, seafood, eggs, and countless other dishes. Made with simple ingredients and no cooking required, it is a healthy, refreshing addition to any meal.
Recipe Information
Prep Time: 15 minutes
Cook Time: 0 minutes
Total Time: 15 minutes
Difficulty: Easy
Servings: 6 servings (about 3 cups)
Ingredients
- 6 medium ripe Roma tomatoes, finely diced
- 1 small white onion, finely diced
- 1–2 jalapeño peppers, finely minced
- ½ cup fresh cilantro, chopped
- 2 tablespoons fresh lime juice
- ½ teaspoon sea salt
- ¼ teaspoon black pepper (optional)
Optional Add-Ins
- 1 clove garlic, minced
- 1 diced avocado
- ½ teaspoon cumin
- 1 serrano pepper for extra heat
- 1 teaspoon olive oil
Instructions
Step 1: Prepare the Vegetables
Wash and dry the tomatoes, jalapeños, and cilantro.
Dice the tomatoes into small, even pieces.
Finely chop the onion and cilantro.
Mince the jalapeños, removing seeds if you prefer less heat.
Step 2: Combine Ingredients
In a large mixing bowl, add:
- Tomatoes
- Onion
- Jalapeños
- Cilantro
Gently stir to combine.
Step 3: Season
Add:
- Lime juice
- Salt
- Black pepper (if using)
Mix thoroughly until all ingredients are evenly distributed.
Step 4: Rest
Allow the Pico de Gallo to sit for 10–15 minutes before serving.
This resting time helps the flavors meld together.
Step 5: Serve
Serve immediately or refrigerate until ready to use.
Stir before serving to redistribute the juices.
Chef’s Notes
- Roma tomatoes are ideal because they are less watery and have a firm texture.
- Fresh lime juice is essential for authentic flavor.
- White onion provides a traditional sharpness, but red onion can also be used.
- Adjust jalapeño quantity to suit your preferred spice level.
- Fresh cilantro is key to the classic flavor profile.
Tips for Success
1. Use Fresh Ingredients
The quality of Pico de Gallo depends entirely on the freshness of the produce.
2. Remove Excess Tomato Seeds
For a less watery salsa, remove some of the tomato seeds before dicing.
3. Dice Uniformly
Evenly sized pieces improve texture and presentation.
4. Taste Before Serving
Adjust salt, lime juice, and heat according to your preference.
5. Let It Rest
Allowing the mixture to sit briefly enhances flavor development.
6. Serve Chilled
Cold Pico de Gallo tastes especially refreshing.
Variations
Avocado Pico de Gallo
Fold in diced avocado just before serving.
Tropical Pico de Gallo
Add diced mango, pineapple, or peaches for a sweet twist.
Corn Pico
Mix in fresh grilled corn kernels.
Extra Spicy Version
Use serrano peppers or additional jalapeños.
Cucumber Pico
Add diced cucumber for extra crunch and freshness.
Nutritional Information
Approximate values per serving
| Nutrient |
Amount |
| Calories |
25 kcal |
| Protein |
1 g |
| Carbohydrates |
5 g |
| Dietary Fiber |
1.5 g |
| Sugars |
3 g |
| Fat |
0 g |
| Saturated Fat |
0 g |
| Sodium |
190 mg |
| Potassium |
180 mg |
| Vitamin C |
15% DV |
Values are estimates and may vary depending on ingredients used.
Health Benefits
Rich in Vitamin C
Tomatoes, lime juice, and peppers provide vitamin C, which supports immune function and collagen production.
Low in Calories
Pico de Gallo adds flavor and freshness without significantly increasing calorie intake.
Contains Antioxidants
Tomatoes contain lycopene, a powerful antioxidant associated with overall health.
Supports Digestion
Fresh vegetables and herbs contribute dietary fiber that supports digestive wellness.
Naturally Fat-Free
This salsa is naturally low in fat and suitable for many eating plans.
Hydrating
Tomatoes contain a high percentage of water, helping support hydration.
Nutrient-Dense
Provides vitamins A, C, K, potassium, and beneficial plant compounds.
Frequently Asked Questions (Q&A)
Q1: What is the difference between Pico de Gallo and salsa?
Pico de Gallo is chunky and made from fresh diced ingredients, while traditional salsa is often blended and more liquid.
Q2: How long does Pico de Gallo last?
It is best enjoyed within 2–3 days when stored in an airtight container in the refrigerator.
Q3: Can I make it ahead of time?
Yes. Prepare it a few hours ahead and refrigerate until serving.
Q4: Why is my Pico de Gallo watery?
Tomatoes naturally release juice over time. Removing some seeds and draining excess liquid can help.
Q5: Can I freeze Pico de Gallo?
Freezing is not recommended because the vegetables lose their fresh texture when thawed.
Q6: What tomatoes work best?
Roma tomatoes are preferred because they are firm and less watery.
Q7: How can I make it less spicy?
Remove the seeds and membranes from the jalapeños or reduce the quantity used.
Q8: Is Pico de Gallo healthy?
Yes. It is low in calories, rich in nutrients, and made from fresh whole-food ingredients.
Q9: Can I use bottled lime juice?
Fresh lime juice is strongly recommended for the best flavor.
Q10: What dishes pair well with Pico de Gallo?
It complements tacos, burritos, fajitas, grilled chicken, fish, eggs, nachos, rice bowls, and tortilla chips.
Serving Suggestions
- Serve with tortilla chips as an appetizer.
- Spoon over tacos, burritos, and quesadillas.
- Use as a topping for grilled chicken, steak, fish, or shrimp.
- Add to rice bowls and burrito bowls.
- Serve with scrambled eggs or omelets.
- Layer onto nachos or baked potatoes.
- Mix into salads for extra flavor and freshness.
Recipe Summary
The Best Pico de Gallo is a fresh, vibrant Mexican salsa made with ripe tomatoes, crisp onions, jalapeños, cilantro, and lime juice. Ready in just 15 minutes, this healthy and versatile recipe delivers bright flavors, refreshing texture, and endless serving possibilities. Whether used as a dip, topping, or side dish, Pico de Gallo is a simple staple that brings freshness to every meal.

 Tips for Best Results
 Use rolled oats, not instant flavored oats.
 Keeps You Full Longer
 Supports Digestion
 Helps Control Blood Sugar
 Boosts Metabolism
 Heart Healthy