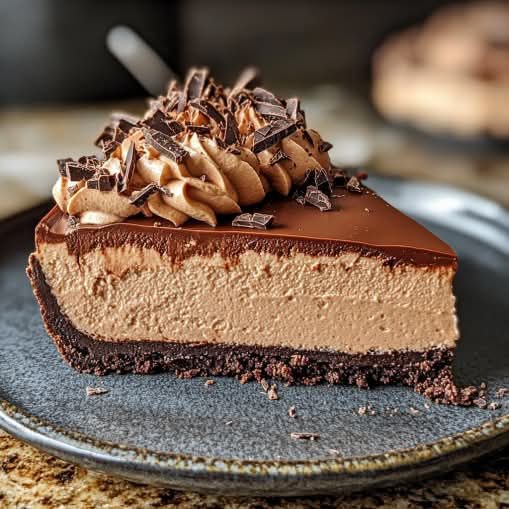
Sunshine Immunity Smoothie

Sunshine Immunity Smoothie


Ingredients

2 Large Oranges: Peeled and roughly chopped (remove seeds).


1 Medium Carrot: Peeled and sliced into thin rounds.


1 inch Fresh Ginger: Peeled and grated (or finely chopped).


1/2 cup Greek Yogurt: Plain or vanilla for a creamy texture.


1/2 cup Coconut Water: Or plain water for desired consistency.


1 tsp Honey or Maple Syrup: Optional, for a touch of extra sweetness.


1/2 cup Ice Cubes: To keep it chilled and frosty.


Instructions

Prep the Produce: Start by prepping your fresh ingredients. Peel the oranges, ensuring you remove as much of the bitter white pith as possible. Scrub and peel the carrot, slicing it thinly to help your blender process it smoothly. Peel the ginger using the edge of a spoon and grate it to ensure no spicy “strings” end up in your drink.


Layer the Blender: Place the liquid base—the coconut water and yogurt—into the blender first. This helps the blades spin freely. Add the oranges, carrots, ginger, and sweetener if using.


Blend Until Silky: Secure the lid and blend on high for about 60 seconds. Since carrots are fibrous, you want to give it enough time to become completely smooth.


Chill and Serve: Add the ice cubes and pulse or blend for another 20 seconds until the mixture is frothy and cold.


Pour into a tall glass, grab a straw, and enjoy this glass of liquid sunshine immediately!


Tip: If you want an even colder smoothie without diluting the flavor, freeze your carrot slices or orange segments for an hour before blending.

Healthy Blueberry Banana Protein Smoothie

Healthy Blueberry Banana Protein Smoothie

Ingredients

To keep this recipe to exactly 5 ingredients as shown, we focus on high-protein whole foods:

  1. Frozen Blueberries (1 cup): These provide deep color and a massive dose of antioxidants.

  2. Frozen Banana (1 large): This acts as the natural sweetener and creates a thick, milkshake-like consistency.

  3. Plain Greek Yogurt (1/2 cup): This is your secret protein weapon, offering a creamy base and gut-healthy probiotics.

  4. Unsweetened Almond Milk (1 cup): Use this to adjust the thickness. You can substitute with dairy or soy milk for even more protein.

  5. Chia Seeds or Hemp Hearts (1 tbsp): These add healthy fats and a final protein punch to keep you full longer.


Preparation Steps

  • Prep the Fruit: For the best results, use a frozen banana broken into chunks. This eliminates the need for ice, which can water down the flavor.

  • Layering: Place your liquid (almond milk) and Greek yogurt into the blender first. This ensures the blades move freely and prevents the frozen fruit from getting stuck.

  • Blend: Add the blueberries, banana, and seeds. Blend on high speed until the purple hue is vibrant and the texture is perfectly smooth.

  • Adjust: If the smoothie is too thick, splash in a little more milk. If you prefer it sweeter, add a tiny drizzle of honey or a pitted date.

Cheesy Chicken and Broccoli Bake,

Cheesy Chicken and Broccoli Bake


Ingredients

1 lb Chicken breast, cut into bite-sized pieces


3 cups Broccoli florets (fresh or lightly steamed)


2 cups Shredded Cheddar or Gruyère cheese


1 can (10.5 oz) Cream of chicken soup (or a homemade white sauce)


1/2 cup Sour cream or Greek yogurt


1 tsp Garlic powder & 1/2 tsp Onion powder


Salt and pepper to taste


Fresh chives for garnish


Instructions

Prep the Oven: Preheat your oven to 375°F (190°C). Lightly grease a 9×13 inch baking dish.


Sear the Chicken: In a skillet over medium-high heat, cook the chicken pieces with a little oil until golden brown on all sides. They don’t need to be fully cooked through yet, as they will finish in the oven. Season with salt and pepper.


Mix the Sauce: In a large bowl, whisk together the cream of chicken soup, sour cream, garlic powder, and onion powder. Fold in half of the shredded cheese.


Assemble: Toss the chicken and broccoli florets into the sauce until evenly coated. Spread the mixture into your prepared baking dish.


Top and Bake: Sprinkle the remaining cheese over the top. Bake for 20–25 minutes until the sauce is bubbly and the cheese has formed those beautiful golden-brown spots seen in your photo.


Garnish: Remove from the oven and let it sit for 5 minutes. Sprinkle with fresh chopped chives or parsley before serving.


Tip: If you prefer a crunch, add a layer of crushed butter crackers or panko breadcrumbs on top before baking!

Creamy Chicken and Spinach Casserole

Creamy Chicken and Spinach Casserole

Ingredients

Chicken: 1.5 lbs chicken breast or thighs, cooked and shredded (or rotisserie chicken).


Spinach: 10 oz fresh spinach (sautéed and drained) or frozen spinach (thawed and squeezed dry).


The Sauce: 8 oz cream cheese (softened), ½ cup sour cream, ¼ cup heavy cream.


Flavor Boosters: 3 cloves minced garlic, 1 tsp onion powder, salt, and black pepper to taste.


Topping: 1 ½ cups shredded mozzarella or Monterey Jack cheese, ½ cup grated Parmesan.


Garnish: Fresh chopped parsley.


Instructions

Prep: Preheat your oven to 375°F (190°C). Lightly grease a 9×13 inch baking dish.


Mix the Base: In a large mixing bowl, beat the softened cream cheese until smooth. Stir in the sour cream, heavy cream, garlic, onion powder, salt, and pepper until well combined.


Combine: Fold the shredded chicken and the well-drained spinach into the cream sauce. Ensure the spinach is very dry to prevent the casserole from becoming watery.


Assemble: Spread the mixture evenly into the prepared baking dish. Sprinkle the mozzarella and Parmesan cheese generously over the top.


Bake: Place in the oven for 20–25 minutes, or until the sauce is bubbling and the cheese is melted and golden brown. For extra color, broil for 1–2 minutes at the end.


Serve: Let it rest for 5 minutes before serving. Garnish with fresh parsley.


Quick Tips

Add Crunch: Top with crushed crackers or pork rinds before baking if you want a textured crust.


Veggies: Feel free to add sautéed mushrooms or sundried tomatoes for extra depth.

The Ultimate Creamy Coleslaw

The Ultimate Creamy Coleslaw

Prep time: 15 minutes | Servings: 4-6

🛒 Ingredients

• Veggie Base:

• 4 cups Shredded Cabbage (Green or a mix with Purple)

• 1 cup Grated Carrots 🥕

• 2 tbsp Chopped Parsley or Green Onions (optional)

• The Dressing:

• 1/2 cup Mayonnaise 🍦

• 1 tbsp Apple Cider Vinegar or Lemon Juice 🍋

• 1 tbsp Honey or Sugar (to taste) 🍯

• 1/2 tsp Celery Seed

• Salt & Pepper to taste 🧂

👩‍🍳 Step-by-Step Instructions

Step 1: Prep the Veggies 🔪

• Shred the cabbage thinly using a knife or a mandoline.

• Grate the carrots.

• ➡️ Tip: For the best texture, toss the shredded cabbage with a pinch of salt and let it sit for 10 minutes, then squeeze out the excess moisture. This keeps it crunchy!

Step 2: Whisk the Dressing 🥣

• In a small bowl, combine the mayonnaise, vinegar, sweetener, celery seed, salt, and pepper.

• ➡️ Whisk until the mixture is smooth and creamy.

Step 3: The Big Mix 🥗

• Place all the shredded vegetables into a large mixing bowl.

• Pour the dressing over the top.

• ➡️ Use tongs or a large spoon to toss everything together until every strand of cabbage is evenly coated.

Step 4: The Chill Factor ❄️

• Cover the bowl and refrigerate for at least 30 minutes before serving.

• ➡️ This allows the flavors to meld and the cabbage to soften just slightly.

Step 5: Serve & Enjoy 🍴

• Give it one last toss before serving.

• ➡️ Pair it with pulled pork, grilled chicken, or even on top of a burger!

💡 Variations

• Light Version: Swap half the mayo for Greek Yogurt.

• Extra Zing: Add a teaspoon of Dijon mustard to the dressing.

• Fruit Twist: Toss in some diced apples or dried cranberries for a sweet contrast.

Anti-Inflammatory Liquid Gold (Green Juice)

Ingredients

2 large cucumbers

1 bunch celery (about 6–8 stalks)

1 large bunch fresh parsley

1 large bunch fresh cilantro

2 cups fresh spinach or kale

1–2 inch piece fresh ginger, peeled

1 lemon, peeled (or juice only)

1 green apple (optional, for mild sweetness)

1 tsp turmeric powder or 1-inch fresh turmeric root

Pinch of black pepper (boosts turmeric absorption)

2–3 cups cold filtered water (adjust for thickness)

👩‍🍳Instructions

Wash & prep:

Thoroughly wash all produce. Roughly chop cucumbers, celery, greens, and apple.

Blend:

Add everything to a high-speed blender. Blend until completely smooth (1–2 minutes).

Strain (optional):

For a juice-like texture, strain through a nut milk bag or fine mesh sieve.

For maximum fiber, drink as-is.

Store:

Pour into airtight glass bottles or jars. Refrigerate up to 3–4 days.

Creamy Spinach and Parmesan Chicken Meatballs.

Creamy Spinach and Parmesan Chicken Meatballs.


Ingredients

For the Meatballs: 1 lb ground chicken (or turkey), 1/2 cup breadcrumbs (or almond flour for keto), 1/4 cup grated Parmesan, 1 egg, 1/2 cup chopped fresh spinach, 2 cloves minced garlic, salt, and pepper.


For the Cream Sauce: 1 cup heavy cream, 1/2 cup chicken broth, 1/2 cup shredded mozzarella, 1/4 cup grated Parmesan, 1 cup fresh spinach, and 1 tsp Italian seasoning.


Instructions

Prep and Mix: Preheat your oven to 400°F (200°C). In a large bowl, combine the ground chicken, breadcrumbs, Parmesan, egg, chopped spinach, and garlic. Season generously with salt and pepper.


Form and Sear: Roll the mixture into balls (about 1.5 inches). In an oven-safe skillet or baking dish lined with foil, lightly sear the meatballs on a stovetop with a bit of olive oil until browned on the outside (about 2 minutes per side).


Make the Sauce: In a separate pan or the same skillet, whisk together the heavy cream, chicken broth, and Italian seasoning. Bring to a light simmer, then stir in the fresh spinach and Parmesan until the spinach wilts and the sauce thickens slightly.


Bake: Pour the cream sauce over the meatballs in your baking dish. Top each meatball with a sprinkle of mozzarella cheese.


Finish: Bake for 15–20 minutes until the chicken is fully cooked through and the cheese is bubbly and golden brown, as seen in the photo.


Serve these over pasta, rice, or zoodles for a complete meal!

Cabbage & Veggie Savory Bake (Blood-Sugar Friendly)

Cabbage & Veggie Savory Bake (Blood-Sugar Friendly)

Description

This savory cabbage bake is a nutritious, budget-friendly dish made with shredded cabbage, onions, garlic, eggs, and herbs. It’s high in fiber, low in refined carbohydrates, and packed with vegetables—making it a smart choice for people looking to support stable blood sugar levels.
Perfect for breakfast, lunch, or a light dinner.

⚠️ Note: This recipe supports healthy blood sugar management, but it does not replace medical treatment or cause “instant” glucose drops.

 Ingredients

  • 400 g cabbage, finely shredded

  • 1 large onion, finely chopped

  • 3 cloves garlic, minced

  • 4 large eggs

  • ½ cup milk or unsweetened plant milk

  • ½ cup grated cheese (optional – mozzarella, cheddar, or feta)

  • 2 tablespoons olive oil

  • 2 tablespoons fresh parsley or green onions, chopped

  • ½ teaspoon salt

  • ½ teaspoon black pepper

  • ½ teaspoon paprika

  • Optional add-ins: grated carrot, zucchini, bell pepper, or herbs

 Instructions

  1. Prepare the vegetables
    Heat olive oil in a pan. Sauté onion until soft (3–4 minutes). Add garlic and cook 30 seconds.

  2. Soften the cabbage
    Add shredded cabbage to the pan. Cook 5–7 minutes until slightly wilted. Let cool slightly.

  3. Mix the batter
    In a bowl, whisk eggs, milk, salt, pepper, paprika, and herbs.

  4. Combine
    Add cooked cabbage mixture and cheese (if using). Mix well.

  5. Bake
    Pour into a greased baking dish.
    Bake at 180°C (350°F) for 35–40 minutes, until golden and set.

  6. Cool & serve
    Rest 10 minutes before slicing.

 Notes

  • For lower carbs, skip cheese and milk or use almond milk

  • For extra protein, add cottage cheese or Greek yogurt

  • Can be baked in muffin tins for meal prep

Tips for Best Results

  • Squeeze excess moisture from cabbage if very juicy

  • Don’t overbake—keeps it moist and tender

  • Pairs well with yogurt sauce or avocado

Servings

4–6 servings

 Approximate Nutritional Information (per serving, 1/6 recipe)

  • Calories: ~150–180

  • Protein: 8–10 g

  • Carbohydrates: 8–10 g

  • Fiber: 3–4 g

  • Fat: 9–11 g

  • Glycemic Load: Low

(Values vary depending on cheese and milk used)

 Health Benefits

  • Cabbage: High fiber → slows glucose absorption

  • Eggs: Stabilize blood sugar with protein & fats

  • Low refined carbs: No flour or sugar

  • Gut-friendly: Supports digestion and insulin sensitivity

✔ Suitable for:

  • Prediabetes

  • Type 2 diabetes (portion-controlled)

  • Low-carb & Mediterranean diets

 Q & A

Q: Does this instantly lower blood sugar?
A: No food works instantly. This dish helps prevent spikes and supports steady levels.

Q: Can I eat this for breakfast?
A: Yes! It’s excellent for breakfast because protein + fiber help prevent morning glucose spikes.

Q: Can I make it dairy-free?
A: Absolutely—use plant milk and skip cheese.

Q: How long does it keep?
A: 3–4 days refrigerated; freezes well up to 2 months.

Hearty Bean Stew for Blood Sugar Support

Hearty Bean Stew for Blood Sugar Support

Description

A warm, comforting bean stew made with fiber-rich legumes, vegetables, and mild spices. This dish helps slow sugar absorption, supports digestion, and keeps you full longer—making it a smart choice for people aiming to maintain stable energy levels.

Ingredients (Serves 4)

  • 2 cups cooked pinto beans or brown beans

  • 1 small onion, chopped

  • 2 cloves garlic, minced

  • 1 medium tomato, chopped (or ½ cup crushed tomato)

  • 1 tbsp olive oil

  • 1 tsp paprika

  • ½ tsp black pepper

  • ½ tsp cumin (optional)

  • Salt to taste

  • 2 cups water or low-sodium vegetable broth

  • Fresh herbs (parsley or cilantro, optional)

Instructions

  1. Heat olive oil in a pot over medium heat.

  2. Sauté onion until soft, then add garlic and stir for 30 seconds.

  3. Add tomatoes, spices, and salt. Cook for 5 minutes.

  4. Add cooked beans and water/broth.

  5. Simmer for 15–20 minutes until thick and flavorful.

  6. Garnish with fresh herbs and serve warm.

Tips & Notes

  • Use dry beans soaked overnight for better texture and digestion

  • Avoid adding sugar or refined carbs

  • Pair with vegetables instead of white rice for better blood sugar balance

  • Portion size matters—even healthy foods should be eaten in moderation

Nutritional Information (Approx. per serving)

  • Calories: ~220

  • Protein: 14g

  • Fiber: 12–15g

  • Fat: 5g

  • Carbohydrates: 30g (slow-digesting)

  • Added sugar: 0g

Health Benefits

  • High fiber → slows glucose absorption

  • Low glycemic index → helps prevent sugar spikes

  • Plant protein → supports muscle and fullness

  • Heart-healthy → helps cholesterol levels

  • Supports gut health

Beans don’t remove sugar from the body—but they help the body manage sugar more effectively.

Q & A

Q: Is this recipe good for people with diabetes?
A: Yes, when eaten in reasonable portions and as part of a balanced meal.

Q: Can this replace medication?
A: No. Food supports health but does not replace medical treatment.

Q: How often can I eat this?
A: 2–4 times per week is reasonable, depending on overall diet.

Q: Are canned beans okay?
A: Yes—rinse them well to reduce sodium.

Superfood Green Smoothie

Superfood Green Smoothie


Ingredients

  • 1/4 Avocado: Provides healthy fats and a creamy texture.

  • 1 cup Kale: Packed (stems removed for a smoother blend).

  • 1/2 Cucumber: Sliced (peeled or unpeeled based on preference).

  • 1/2 inch Fresh Ginger: Peeled and roughly chopped.

  • 1 cup Water or Unsweetened Nut Milk: To help everything blend smoothly.

  • Optional: A squeeze of fresh lemon juice for brightness or a few ice cubes for a chilled consistency.


Instructions

  1. Prep the Greens: Wash the kale thoroughly. If the stems are thick, strip the leaves off and discard the stems to ensure the smoothie isn’t too fibrous.

  2. Load the Blender: Add the liquid base first (water or nut milk), followed by the ginger, cucumber, kale, and finally the avocado on top.

  3. Blend: Start on a low speed and gradually increase to high. Blend for 45–60 seconds or until the kale is completely pulverized and the mixture is vibrant green and smooth.

  4. Adjust Consistency: If the smoothie is too thick, add a tablespoon of water at a time until it reaches your desired consistency.

  5. Serve: Pour into a glass and enjoy immediately to get the most benefit from the fresh ingredients.


Quick Tip: If you find kale too bitter, you can swap it for baby spinach, which has a much milder flavor while keeping the drink nutrient-rich.

Ham and Cheese Pastry Rolls.

Ingredients

1 sheet store-bought puff pastry (thawed)


6–8 slices deli ham (honey-roasted or smoked)


1 cup shredded Swiss, Gruyère, or Mozzarella cheese


1 large egg (beaten, for egg wash)


Optional: Fresh parsley (chopped), Dijon mustard, or poppy seeds for topping.


Preparation Steps

Preheat & Prep: Heat your oven to 200°C (400°F). Line a large baking sheet with parchment paper to prevent sticking.


Roll & Slice: On a lightly floured surface, roll out the puff pastry sheet. Cut it into long, even strips (about 2 inches wide). If you prefer a larger roll, you can cut the pastry into triangles like croissants.


Layer the Filling: If you like a kick, brush a thin layer of Dijon mustard onto the pastry. Place a slice of ham over each strip, followed by a generous sprinkle of cheese.


Roll it Up: Starting from one end, roll the pastry tightly around the filling. Ensure the seam is tucked underneath so they don’t unravel while baking.


The Golden Finish: Place the rolls on the baking sheet. Brush the tops thoroughly with the beaten egg wash. This is what creates that beautiful, professional shine. Sprinkle with poppy seeds or extra cheese if desired.


Bake: Bake for 15–20 minutes or until the pastry has puffed up and turned a deep golden brown.


Serve: Let them cool for 5 minutes. Garnish with fresh parsley before serving warm.


Pro Tip: For extra “crunch,” sprinkle a little Parmesan cheese on the outside of the pastry after the egg wash!

Papaya & Strawberry Glow Smoothie

Tropical Papaya & Strawberry Glow Smoothie

This blend is rich in vitamin C and digestive enzymes, making it as functional as it is delicious.


Ingredients

1 cup Fresh Papaya: Peeled, seeded, and cubed (frozen works great for a thicker texture).


1 cup Whole Strawberries: Hulled and fresh.


1/2 cup Greek Yogurt: Use plain or vanilla for a creamy protein boost.


1/2 cup Coconut Milk: Or any milk of your choice to achieve the desired consistency.


1 tablespoon Honey or Maple Syrup: Optional, depending on the sweetness of your fruit.


1 teaspoon Fresh Lime Juice: To brighten the tropical flavors.


Ice Cubes: A small handful if using fresh fruit.


Instructions

Prep the Fruit: Ensure your papaya is fully ripe (it should give slightly to pressure and have a sweet aroma). Slice it in half, scoop out the black seeds, and chop the flesh into chunks.


Layer the Blender: Start by pouring in your coconut milk and lime juice. Adding liquids first helps the blender blades move freely and prevents motor strain.


Add the Solids: Add the papaya chunks, strawberries, and yogurt. If you prefer a very cold, slushy texture, add your ice cubes last.


Blend until Silky: Secure the lid and start on a low speed, gradually increasing to high. Blend for about 45–60 seconds until the mixture is completely smooth and vibrant orange.


Taste and Adjust: Take a small sip. If it’s too thick, splash in a little more milk. If you want it sweeter, add your natural sweetener and pulse again.


Serve: Pour into a tall glass, grab a reusable straw like the one in your photo, and enjoy immediately!

Tropical Mango Lime Smoothie

Tropical Mango Lime Smoothie

Yields: 2 servings | Prep time: 5 minutes


The Ingredients


2 cups Frozen mango chunks (frozen is best for that thick, creamy texture)


1 cup Coconut milk (full-fat for richness, or light for a thinner drink)


½ cup Greek yogurt (plain or vanilla)


1 large Lime (you’ll need both the juice and a teaspoon of zest)


1 tbsp Honey or agave nectar (optional, depending on the mango’s sweetness)


½ tsp Freshly grated ginger (optional, for a spicy kick)


The Instructions

Zest and Juice: Start by zesting your lime to get about a teaspoon of green zest. Then, juice the entire lime. Fresh lime is key here—the bottled stuff just doesn’t have the same “pop.”


Layer the Blender: To keep your blender blades happy, add the liquids first. Pour in the coconut milk, lime juice, and honey. Follow with the yogurt, lime zest, and finally the frozen mango chunks.


Blend: Start on a low speed to break up the frozen fruit, then crank it up to high. Blend for about 45–60 seconds until the mixture is completely smooth and looks like liquid gold.


Adjust: If it’s too thick, add a splash more coconut milk. If you want it sweeter, add another drizzle of honey.


Serve: Pour into chilled glasses. Garnish with a fresh lime wheel and a straw just like in your photo!

Turmeric & Lemon Tea Recipe


Turmeric & Lemon Tea Recipe

Ingredients:

• 1 Cup of Warm Water

• 1 Tablespoon of Turmeric Powder

• 1 Fresh Lemon

Step-by-Step Instructions:

1. Prepare the Warm Water: Start by warming a cup of water. It should be warm, but not boiling, to ensure it’s comfortable to drink.

2. Add Turmeric: Add one tablespoon of turmeric powder to the warm water.

3. Squeeze in Fresh Lemon: Squeeze the juice of one entire fresh lemon into the mixture.

4. Stir Thoroughly: Use a spoon to stir the mixture well until the turmeric is fully incorporated and the lemon juice is evenly distributed.

5. Enjoy: Drink this mixture every morning for seven days to feel more energized and lighter.

Cheesy Baked Chicken and Peppers

This Cheesy Baked Chicken and Peppers is the ultimate one-pan comfort meal. It features juicy chicken breasts smothered in melted cheese and vibrant roasted peppers, making it perfect for a quick weeknight dinner.


Ingredients

Chicken: 4 boneless, skinless chicken breasts (pounded to even thickness).


Vegetables: 2 large red bell peppers (sliced into strips) and 1 small onion (sliced).


Cheese: 1.5 cups shredded mozzarella or a Monterey Jack blend.


Seasoning: 1 tsp garlic powder, 1 tsp dried oregano, ½ tsp paprika, salt, and black pepper.


Fats: 2 tbsp olive oil.


Garnish: Fresh cilantro or parsley, chopped.


Instructions

Prep the Oven: Preheat your oven to 200°C (400°F). Lightly grease a large 9×13 inch baking dish.


Season the Chicken: Pat the chicken breasts dry with paper towels. Season both sides generously with salt, pepper, garlic powder, oregano, and paprika.


Arrange the Dish: Place the seasoned chicken breasts into the baking dish. Scatter the sliced peppers and onions around and on top of the chicken. Drizzle the olive oil over everything.


Bake: Place the dish in the oven and bake for 20–25 minutes. The chicken should reach an internal temperature of 74°C (165°F).


Melt the Cheese: Remove the dish from the oven and top each chicken breast with a generous handful of shredded cheese. Switch the oven to “Broil” and return the dish for 2–3 minutes until the cheese is bubbly and golden brown.


Serve: Let the chicken rest for 5 minutes to keep the juices locked in. Garnish with fresh herbs and serve hot.


Serving Suggestion

This dish pairs beautifully with a side of fluffy white rice, buttery mashed potatoes, or a simple green salad to balance the richness of the cheese.

Zesty Blueberry Orange Smoothie

Zesty Blueberry Orange Smoothie

Prep time: 5 minutes | Servings: 2


Ingredients

Frozen Blueberries: 2 cups (provides the deep color and thick base)


Fresh Orange Juice: 1 cup (freshly squeezed is best for that zing)


Greek Yogurt: 1/2 cup (plain or vanilla for creaminess and protein)


Frozen Banana: 1 medium (peeled and sliced before freezing for sweetness)


Orange Zest: 1 teaspoon (to amplify the citrus aroma)


Honey or Maple Syrup: 1 tablespoon (optional, depending on fruit sweetness)


Instructions

Layer the Liquid: Pour the orange juice into your blender first. Adding liquids at the bottom helps the blades move freely and prevents “air pockets.”


Add the Base: Add the Greek yogurt, orange zest, and your choice of sweetener if you’re using one.


The Frozen Goods: Add the frozen blueberries and frozen banana slices on top.


Blend: Start on a low speed to break up the frozen fruit, then increase to high. Blend for about 45–60 seconds until the mixture is completely smooth and velvety.


Adjust: If it’s too thick, add a splash more juice. If you prefer it thicker, add a few more frozen berries.


Serve: Pour into two chilled glasses.


Garnish (As pictured)

Top each glass with a handful of fresh blueberries and a bright orange wedge tucked onto the rim for a professional, cafe-style finish.

Spinach Stuffed Chicken Breast

Spinach Stuffed Chicken Breast

Ingredients

Chicken: 2 large boneless, skinless chicken breasts.


The Filling: 2 cups fresh spinach (chopped), 4 oz cream cheese (softened), ¼ cup shredded mozzarella, 1 clove minced garlic.


The Topping: 1 medium tomato (sliced), ½ cup shredded mozzarella or provolone.


Seasoning: 1 tbsp olive oil, ½ tsp paprika, salt, and black pepper to taste.


Instructions

Prep the Chicken: Preheat your oven to 200°C (400°F). Pat the chicken dry. Using a sharp knife, slice a pocket into the side of each breast, being careful not to cut all the way through.


Make the Filling: In a small bowl, mix the chopped spinach, softened cream cheese, mozzarella, and garlic until well combined.


Stuff & Sear: Stuff the spinach mixture generously into the chicken pockets. Close with toothpicks if needed. Rub the outside of the chicken with olive oil, salt, pepper, and paprika.


The Pan: Heat an oven-safe skillet over medium-high heat. Sear the chicken for 3–5 minutes per side until golden brown.


Layer & Bake: Place tomato slices on top of each breast and cover with the remaining shredded cheese.


Finish: Transfer the skillet to the oven. Bake for 10–15 minutes, or until the internal temperature reaches 74°C (165°F) and the cheese is bubbly and browned.


Tip: Let the chicken rest for 5 minutes before serving to keep it extra juicy!

Strawberry-Banana Green Glow Smoothie.

Strawberry-Banana Green Glow Smoothie.


Ingredients

1 cup fresh baby spinach (densely packed)


1 cup unsweetened almond milk (or your preferred milk)


1 large ripe banana (frozen is best for a creamy texture)


1/2 cup fresh or frozen strawberries


1/2 cup Greek yogurt (for extra protein and creaminess)


Optional: 1 teaspoon of honey or maple syrup if you prefer a sweeter kick.


The Instructions

Liquid First: Pour your milk into the blender. Adding liquids first helps the blades move freely and prevents “air pockets” from forming.


The Greens: Add the spinach to the milk and blend on high for about 30 seconds. Pro-tip: Blending the greens and liquid first ensures you don’t have any leafy bits in your final drink—just a perfectly smooth texture.


The Fruit & Cream: Add the banana, strawberries, and yogurt.


The Final Blend: Pulse a few times to break up the frozen fruit, then blend on high until the mixture is thick, pale green, and completely smooth.


Serve: Pour into a glass jar, grab a straw, and enjoy immediately!


Why it Works

The banana provides a natural sweetness and “shake-like” consistency, while the strawberries add a bright, tart contrast. The spinach is the secret hero; it provides a massive boost of Vitamin K and Iron without changing the fruity flavor profile at all.

Melt-in-Your-Mouth Chicken

Melt-in-Your-Mouth Chicken

Ingredients

4 large boneless, skinless chicken breasts


1/2 cup mayonnaise (keeps the chicken incredibly moist)


1/4 cup grated Parmesan cheese


1/2 cup shredded Mozzarella or Monterey Jack cheese


1 tsp garlic powder


1/2 tsp onion powder


1/2 tsp dried parsley (plus fresh for garnish)


Salt and black pepper to taste


Instructions

Prep: Preheat your oven to 190°C (375°F). Lightly grease a baking dish with oil or non-stick spray.


Season: Pat the chicken breasts dry with paper towels. Season both sides with salt and pepper, then arrange them in a single layer in the baking dish.


Mix the Topping: In a small bowl, combine the mayonnaise, Parmesan cheese, garlic powder, onion powder, and dried parsley. Stir until smooth.


Coat: Spread the mayonnaise mixture evenly over the top of each chicken breast. This creates a protective seal that locks in the juices.


Add Cheese: Sprinkle the shredded Mozzarella generously over the mayo layer.


Bake: Place in the oven and bake for 25–30 minutes. The internal temperature should reach 74°C (165°F).


Brown: For that beautiful golden crust seen in your photo, turn on the broiler for the last 2–3 minutes until the cheese bubbles and browns.


Serve: Let the chicken rest for 5 minutes before serving. Garnish with freshly chopped parsley.


Tip: If the chicken breasts are uneven in thickness, pound them to a uniform width before seasoning to ensure they cook evenly without drying out.

Creamy Strawberry Vanilla Smoothie

Creamy Strawberry Vanilla Smoothie

This recipe balances the natural sweetness of strawberries with the rich, aromatic notes of real vanilla, finished with a crunch of omega-3-rich chia seeds.


Ingredients

Strawberries: 2 cups frozen (for a thick, frosty texture).


Milk of Choice: 1 ½ cups (Dairy, Almond, or Oat milk work beautifully).


Yogurt: ½ cup Greek yogurt or coconut cream (for that swirl).


Vanilla: 1 whole vanilla bean (scraped) or 1 tsp vanilla extract.


Chia Seeds: 1 tablespoon for topping and texture.


Sweetener: 1-2 dates or a drizzle of honey (optional, to taste).


Ice: A handful, if using fresh berries instead of frozen.


Instructions

Prep the Base: In your blender, combine the frozen strawberries, milk, vanilla, and your sweetener of choice. If using a fresh vanilla bean, slice it lengthwise and scrape the seeds into the jar.


Blend: Pulse until the mixture is completely smooth. If it’s too thick, add a splash more milk; if you prefer it thicker, add more frozen fruit.


The Swirl: Pour the pink smoothie into your glass or keep it in the blender. Gently pour a dollop of thick yogurt or cream onto the surface. Use a spoon or a toothpick to lightly swirl it into the top layer to create that artistic marble effect seen in your photo.


The Finishing Touch: Sprinkle the chia seeds directly into the center of the swirl.


Serve: Garnish with a fresh strawberry on the side and enjoy immediately while cold.


Pro Tip: For an extra protein boost, you can blend half the chia seeds into the smoothie and save the rest for the garnish!

Homemade Mozzarella Sticks

Homemade Mozzarella Sticks

Ingredients

12-16 Mozzarella string cheese sticks


½ cup All-purpose flour


2 Large eggs (beaten with 1 tbsp water)


1 ½ cups Italian seasoned breadcrumbs (or Panko for extra crunch)


½ tsp Garlic powder


Vegetable oil (for frying)


Marinara sauce (for dipping)


The Method

The Setup: Place the flour in one bowl, the beaten eggs in a second, and the breadcrumbs mixed with garlic powder in a third.


The Double Coat (Crucial): This prevents the cheese from leaking.


Dredge a cheese stick in flour, dip it into the egg, and then roll it in breadcrumbs.


For the best seal, dip it back into the egg and then the breadcrumbs one more time.


The Big Freeze: Place the coated sticks on a tray and freeze for at least 2 hours. If you skip this, the cheese will melt into a puddle before the crust gets crispy.


The Sizzle: Heat 2 inches of oil in a heavy skillet to 175°C (350°F).


The Fry: Fry 3 or 4 sticks at a time for about 1–2 minutes, turning once, until they are golden brown.


The Finish: Drain on paper towels and serve immediately with warm marinara sauce.


Pro-Tip for Success

Keep the oil temperature consistent. If it’s too cool, the sticks get greasy; if it’s too hot, the outside burns while the middle stays frozen.

Slow Cooker Smothered Pork Chops

Slow Cooker Smothered Pork Chops

Prep time: 10 minutes | Cook time: 4-7 hours | Servings: 4-6

Ingredients

  • 4 to 6 thick-cut pork chops (boneless or bone-in)

  • 1 can (10.5 oz) condensed cream of mushroom soup

  • 1 cup sliced white or cremini mushrooms (fresh or canned)

  • 1/2 cup chicken or beef broth (or water, to thin the soup)

  • 1 packet dry onion soup mix (Alternatively: 1 tsp garlic powder + 1 tsp onion powder)

  • 1/2 tsp black pepper

  • Salt to taste (go light, as the soup and broth are usually salty)

  • Optional: 2 cloves minced garlic


Instructions

  1. Prep the slow cooker: Lightly grease the insert of your slow cooker with non-stick spray to prevent sticking.

  2. Arrange the meat: Lightly season both sides of the raw pork chops with a little salt and pepper, then lay them flat at the bottom of the slow cooker. (Tip: While the photo shows them going in raw for an easy prep, you can quickly sear them in a hot skillet for 2 minutes per side first if you want deeper flavor!)

  3. Mix the gravy: In a separate mixing bowl, combine the cream of mushroom soup, broth, sliced mushrooms, dry onion soup mix (or spices), and minced garlic. Stir until well blended.

  4. Smother the chops: Pour the mushroom mixture evenly over the top of the pork chops, ensuring they are well covered—just like in your photo!

  5. Cook: Secure the lid and cook on LOW for 6 to 7 hours or on HIGH for 3 to 4 hours. The pork chops are done when they are fork-tender and reach a minimum internal temperature of 145°F.

  6. Serve: Plate the pork chops and spoon the rich, savory mushroom gravy generously over the top.

Chef’s Note: If you prefer a thicker gravy at the end of cooking, remove the pork chops, whisk in a slurry made of 1 tablespoon cornstarch and 1 tablespoon cold water, and let the sauce cook on HIGH for another 15 minutes.

Air Fryer Pizza Toste

Ingredients (Makes 2–4 Toasts)

Basic Ingredients

  • 2–4 slices of bread
    (White bread, whole wheat, or multigrain work well)
  • 2–3 tablespoons pizza sauce or tomato ketchup
  • 1 cup shredded cheese
    (Cheddar, mozzarella, or a mix for best melt)
  • 4–6 slices of ham or cooked chicken (optional)
  • 1 small tomato, thinly sliced (optional)
  • 1/2 teaspoon dried oregano or Italian seasoning
  • 1/4 teaspoon black pepper
  • 1 teaspoon olive oil or butter (optional, for brushing)

Optional Extras

  • Bell peppers, thinly sliced
  • Olives
  • Sweet corn
  • Onion slices
  • Fresh basil leaves

Equipment Needed

  • Air fryer
  • Cutting board
  • Knife
  • Spoon or small spatula
  • Grater (if shredding your own cheese)
  • Plate for assembling

Step 1: Preparing the Bread

Choose fresh slices of bread for best results.

If the bread is slightly stale, it can actually hold toppings better without becoming soggy.

Optional: Lightly toast the bread in a toaster or on a pan for 1–2 minutes.
This creates a slightly firmer base and reduces sogginess after adding toppings.


Step 2: Preparing the Sauce

Use pizza sauce or tomato ketchup as a base.

  • Spoon 1–2 tablespoons onto each slice of bread
  • Spread evenly with the back of the spoon, leaving a small border around the edges

Optional: Mix a pinch of dried oregano or garlic powder into the sauce for extra flavor.


Step 3: Layering the Toppings

  1. Start with the protein (ham, chicken, or cooked vegetables).
    Place evenly across the bread so every bite has some topping.
  2. Add any vegetables, such as bell peppers, onions, or tomatoes.
    Slice thinly to ensure they cook in the air fryer and do not release too much moisture.
  3. Sprinkle shredded cheese generously on top.
    Cover the toppings completely to create a melty, golden surface.
  4. Sprinkle a pinch of dried oregano or Italian seasoning over the top.
    Add black pepper if desired.

Optional: Drizzle a small amount of olive oil or brush the edges for extra crispiness.


Step 4: Preheating the Air Fryer

Preheat the air fryer to 180°C (360°F) for 3–5 minutes.

Preheating is important to help the bread crisp immediately and melt the cheese evenly.


Step 5: Placing the Toast in the Air Fryer

Place the assembled pizza toast slices in a single layer in the air fryer basket.

  • Ensure they do not overlap
  • Leave a small gap between slices for air circulation

If the basket is small, cook in batches to ensure even cooking.


Step 6: Air Frying the Pizza Toast

Set the air fryer to 180°C (360°F).

Cook for 6–8 minutes, depending on the thickness of the bread and amount of toppings.

  • Halfway through cooking, check the toast.
  • If needed, rotate or flip the basket for even browning.

The pizza toast is done when:

  • Cheese is fully melted
  • Edges of bread are golden brown
  • Toppings are warm and slightly cooked

Step 7: Checking and Finishing

Remove one slice carefully using tongs or a spatula.

Check that the cheese is melted and slightly bubbly.

If you want extra crispiness, cook for another 1–2 minutes, but watch closely to avoid burning.


Step 8: Serving the Pizza Toast

Place the pizza toast on a serving plate.

Optional: Garnish with fresh basil, a sprinkle of extra cheese, or chili flakes.

Serve immediately for the best texture.

Pizza toast can be enjoyed:

  • As a snack
  • For breakfast or brunch
  • As a quick meal with a side salad

Step 9: Storage and Reheating

  • Pizza toast is best eaten fresh
  • Leftovers can be stored in an airtight container in the refrigerator for up to 1 day
  • Reheat in the air fryer for 2–3 minutes to restore crispiness
  • Avoid microwaving if you want the bread to remain crunchy

Common Mistakes and How to Avoid Them

  • Soggy bread:
    • Bread not toasted beforehand
    • Too much sauce
    • Toppings too wet
  • Cheese not melted:
    • Air fryer temperature too low
    • Overcrowding the basket
  • Burnt edges:
    • Air fryer too hot
    • Cooking time too long
  • Uneven cooking:
    • Toppings unevenly distributed
    • Basket overcrowded

Nutritional Overview (Approximate per Slice)

  • Carbohydrates from bread
  • Protein from cheese and ham
  • Fat from cheese and olive oil
  • Can be made lighter by using low-fat cheese, less oil, or whole-grain bread

Final Notes

Air fryer pizza toast is extremely versatile. Once you understand timing, toppings, and temperature, you can create your own variations:

  • Vegetarian: mushrooms, bell peppers, olives
  • Spicy: chili flakes, jalapeños
  • Gourmet: add prosciutto, arugula, or caramelized onions

The key to success is even layering, not overcrowding the basket, and proper air fryer timing.

The Vitamin-Rich Night Glow Balm

The Vitamin-Rich Night Glow Balm

This luxurious nighttime treatment combines the deeply moisturizing properties of Coconut Oil with the antioxidant power of Vitamin E and the natural brightening potential of Citrus.

Ingredients

  • 1/2 cup Organic Cold-Pressed Coconut Oil: Acts as a deeply hydrating base.

  • 1 tbsp Extra Virgin Olive Oil: Adds Vitamins A and E to support skin repair.

  • 3 Vitamin E Capsules (400 IU): Helps protect the skin from oxidative stress.

  • 5 drops Lemon Essential Oil: Used for its natural brightening properties.

  • Optional: 1 tsp Beeswax pellets (use this if you prefer a firmer, traditional “balm” texture).


Step-by-Step Instructions

  1. Sanitize Your Workspace Ensure your mixing bowl and final storage jar are completely clean and dry. Since this recipe is oil-based and contains no water, keeping it bacteria-free will significantly extend its shelf life.

  2. Melt the Base Place the coconut oil (and beeswax, if using) in a heat-safe glass bowl. Use a double-boiler method by placing the bowl over a pot of simmering water. Gently melt until it is a clear liquid. Avoid high heat to preserve the delicate nutrients in the oils.

  3. Cool Slightly Remove the bowl from the heat. Let it sit for about 5 minutes until the oil is warm to the touch but no longer hot.

  4. Incorporate Vitamins Carefully puncture the Vitamin E capsules with a clean pin and squeeze the oil into the mixture. Stir in the olive oil.

  5. Add the Brightening Agent Add 5 drops of lemon essential oil. Stir thoroughly with a glass or silicone spatula to ensure the oils are fully blended.

  6. Set the Texture Pour the liquid into a dark glass jar (this protects the oils from light degradation). Place the jar in the refrigerator for 30–45 minutes until it solidifies into a creamy consistency.

  7. Final Whip (Optional) For a “fluffy” or “mousse” texture, remove the balm from the fridge once it is semi-solid. Whip it with a clean hand mixer for 2 minutes before returning it to the jar.


Application Guide

  • Night Use Only: Because citrus essential oils can cause photosensitivity (making skin more sensitive to the sun), only apply this balm as part of your evening routine.

  • Apply to Damp Skin: For the best absorption, massage a pea-sized amount onto skin that is still slightly damp from washing. This helps the balm lock in maximum moisture.

Creamy Veggie Sandwich

Creamy Veggie & Dill Garden Sandwich

The Ingredients

The Base:

  • 2 slices of multi-grain or seeded bread (toasted)

  • Fresh leaf lettuce or butter lettuce

  • 2-3 thick slices of beefsteak tomato

The Creamy Filling:

  • 1/2 cup English cucumber, thinly sliced

  • 1/4 cup red bell pepper, finely diced

  • 3 tbsp Greek yogurt or mayonnaise

  • 1 tsp fresh dill, chopped

  • A squeeze of lemon juice

  • Salt and black pepper to taste


Preparation Steps

  1. Prep the Veggies: Start by slicing your cucumber into thin rounds. Dice the bell pepper into small, uniform pieces. If your cucumber is very watery, pat the slices dry with a paper towel to keep the sandwich from getting soggy.

  2. Make the Spread: In a small bowl, whisk together the Greek yogurt (or mayo), fresh dill, lemon juice, salt, and pepper. Toss the cucumbers and diced peppers into this mixture until they are thoroughly coated.

  3. Toast the Bread: Lightly toast your seeded bread until golden brown. This provides a sturdy structure for the creamy filling.

  4. Assembly: * Place a generous layer of lettuce on the bottom slice of bread.

    • Add the tomato slices on top of the lettuce.

    • Spoon the creamy cucumber and pepper mixture over the tomatoes, spreading it evenly.

    • Top with the second slice of bread.


Pro Tip

For an extra boost of protein, you can add a thin layer of mashed avocado or a slice of provolone cheese. Serve immediately while the bread is still crisp!