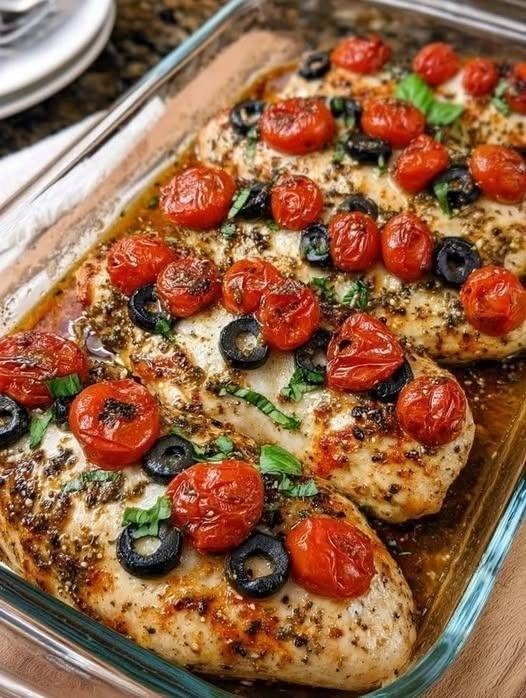
Mediterranean Baked Chicken is a wholesome, flavour-packed dinner featuring juicy chicken breasts baked with sweet cherry tomatoes, briny olives, garlic, fresh herbs, and a bright touch of lemon. This easy one-pan recipe brings together the vibrant flavours of the Mediterranean diet while keeping preparation simple and cleanup minimal. Perfect for busy weeknights or casual entertaining, this dish is high in protein, naturally low in carbohydrates, and bursting with fresh ingredients.
Ingredients
- 4 boneless, skinless chicken breasts
- 2 cups cherry tomatoes, halved
- ½ cup black olives, sliced
- 3 cloves garlic, minced
- 2 tablespoons olive oil
- 1 tablespoon Italian seasoning
- 1 teaspoon paprika
- Salt and black pepper, to taste
- 2 tablespoons fresh basil, chopped
- Juice of ½ lemon
Instructions
1. Prepare the Oven
Preheat oven to 400°F (200°C). Lightly grease a 9×13-inch baking dish or oven-safe skillet.
2. Season the Chicken
Pat the chicken breasts dry with paper towels. Rub with olive oil, then season evenly with Italian seasoning, paprika, salt, and pepper.
3. Assemble the Dish
Arrange the chicken breasts in the baking dish. Scatter the cherry tomatoes, sliced olives, and minced garlic around and over the chicken.
4. Bake
Bake uncovered for 25–30 minutes, or until the chicken reaches an internal temperature of 165°F (74°C).
5. Finish and Serve
Remove from the oven and drizzle with fresh lemon juice. Sprinkle chopped basil over the top. Let rest for 5 minutes before serving.
Description
This Mediterranean-inspired chicken dish combines tender, perfectly seasoned chicken with juicy roasted tomatoes and savoury olives. As the ingredients bake together, the tomatoes release their natural juices, creating a light and flavourful sauce infused with garlic, herbs, and lemon. The result is a healthy, colourful meal that pairs beautifully with rice, quinoa, couscous, roasted vegetables, or a fresh salad.
Servings
- Serves: 4
- Serving Size: 1 chicken breast with vegetables
Preparation Time
- Prep Time: 10 minutes
- Cook Time: 30 minutes
- Total Time: 40 minutes
Nutritional Information (Per Serving)
- Calories: 290
- Protein: 38g
- Carbohydrates: 6g
- Fat: 12g
- Saturated Fat: 2g
- Fiber: 2g
- Sugar: 3g
- Sodium: 420mg
Nutritional values are approximate and may vary depending on ingredients used.
Health Benefits
High in Protein
Chicken breast provides lean protein that supports muscle growth, repair, and satiety.
Heart-Healthy Fats
Olive oil contains monounsaturated fats that may support cardiovascular health.
Rich in Antioxidants
Tomatoes provide lycopene, while garlic and herbs contribute beneficial antioxidants.
Low-Carb Friendly
This recipe is naturally low in carbohydrates, making it suitable for many healthy eating plans.
Nutrient-Dense
The combination of vegetables, herbs, and lean protein offers vitamins, minerals, and fibre in every serving.
Notes
- Use chicken thighs if you prefer darker meat.
- Kalamata olives can be substituted for black olives for a more authentic Mediterranean flavour.
- Fresh basil is recommended, but dried basil may be used if necessary.
- Adjust lemon juice according to your taste preference.
Tips for Success
- Pound chicken breasts to an even thickness for uniform cooking.
- Avoid overcooking to keep the chicken juicy and tender.
- Let the chicken rest after baking to retain its natural juices.
- Add crumbled feta cheese before serving for extra Mediterranean flavour.
- For a complete meal, serve with roasted potatoes or a Greek-style salad.
Frequently Asked Questions
Can I make this recipe ahead of time?
Yes. Assemble the dish several hours ahead, cover, and refrigerate until ready to bake.
How do I store leftovers?
Store leftovers in an airtight container in the refrigerator for up to 3 days.
Can I freeze it?
Yes. Freeze cooked chicken and vegetables for up to 3 months. Thaw overnight before reheating.
What side dishes pair well with Mediterranean baked chicken?
Rice, quinoa, couscous, roasted vegetables, mashed cauliflower, or a fresh cucumber salad are excellent choices.
Can I add more vegetables?
Absolutely. Bell peppers, zucchini, red onions, and artichoke hearts make wonderful additions.
Mediterranean Baked Chicken is an easy, nutritious, and delicious meal that delivers bright Mediterranean flavours with minimal effort, making it a perfect addition to your weekly dinner rotation.