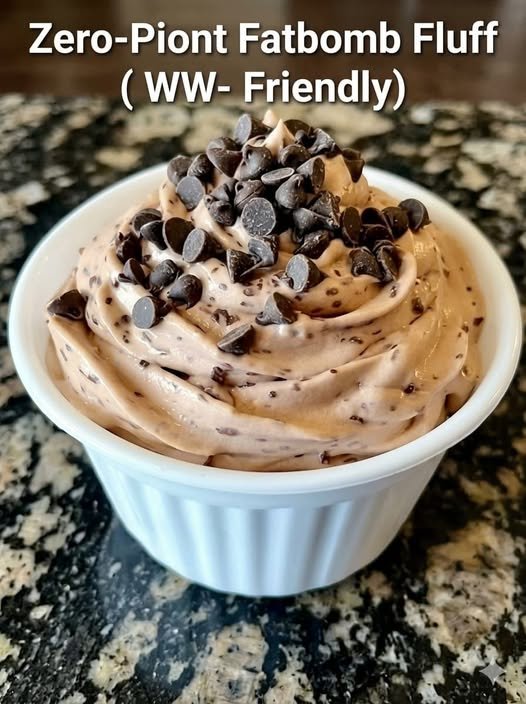
Blueberry Yogurt Parfait

Blueberry Yogurt Parfait 🫐🥄

Ingredients 🍴

  • 2 cups Greek yogurt
  • 1 cup fresh blueberries
  • 1 cup granola
  • 2 tbsp honey

Detailed Procedure 👩‍🍳

Step 1: Prepare the Blueberries 🫐

➡️ Wash the blueberries very well under cold water.
➡️ Let them dry for a few minutes using a clean towel.
➡️ Keep a few whole blueberries aside for the topping.


Step 2: Make the Blueberry Sauce 🍯

➡️ Add half of the blueberries to a small pan.
➡️ Add 1 tablespoon honey.
➡️ Cook on low heat for about 4–5 minutes while stirring gently.
➡️ The blueberries will become soft and juicy like a jam.
➡️ Turn off the heat and let the sauce cool slightly.


Step 3: Prepare the Glass 🥛

➡️ Take a clear glass or dessert cup for beautiful layers.
➡️ Add 2 tablespoons granola at the bottom.
➡️ Press lightly with a spoon to make the base even.


Step 4: Add the Yogurt Layer 🍦

➡️ Spoon a thick layer of Greek yogurt over the granola.
➡️ Spread gently so the layers look clean from the sides.


Step 5: Add Blueberries 🫐

➡️ Add some fresh blueberries over the yogurt.
➡️ Spoon a little blueberry sauce on top.


Step 6: Repeat the Layers ✨

➡️ Repeat the layers again:

  • Granola
  • Yogurt
  • Fresh blueberries
  • Blueberry sauce

➡️ Finish with extra blueberries on top for a fresh look.


Step 7: Chill & Serve ❄️

➡️ Place the parfait in the fridge for 10–15 minutes before serving.
➡️ Serve cold with a spoon and enjoy the creamy crunchy texture.


Quick Q&A ❓

Can I use frozen blueberries?

✅ Yes, just thaw them before making the sauce.

How do I keep granola crunchy?

✅ Add granola just before serving for the best crunch.

Can I make it healthier?

✅ Use unsweetened yogurt and skip extra honey.

Decadent Chocolate Layer Cake

Decadent Chocolate Layer Cake

🛒 Ingredients

For the Cake

  • 2 eggs 🥚
  • 1 cup sugar
  • 1/2 cup oil
  • 1 cup milk 🥛
  • 1 1/2 cups all-purpose flour
  • 1/3 cup cocoa powder 🍫
  • 1 tsp baking powder

For the Cream Layer

  • 1 cup whipped cream
  • 2 tbsp cocoa powder
  • 2 tbsp powdered sugar

For the Ganache

  • 1/2 cup chocolate chips 🍫
  • 1/4 cup warm milk

👩‍🍳 Detailed Step-by-Step Recipe

🍰 Step 1: Make the Chocolate Cake Batter

➡️ In a large bowl, crack the eggs and add sugar.
➡️ Beat for 2–3 minutes until light and slightly fluffy.

➡️ Add oil and milk. Mix well.

➡️ Add flour, cocoa powder, and baking powder.
➡️ Gently mix until smooth and lump-free.

💡 Do not overmix or the cake can become dense.


🔥 Step 2: Bake the Cake

➡️ Grease a square baking tray or line it with baking paper.

➡️ Pour the batter evenly into the tray.

➡️ Bake at 180°C (350°F) for about 25–30 minutes.

➡️ Insert a toothpick in the center. If it comes out clean, the cake is ready.

➡️ Let the cake cool completely. ❄️


🍫 Step 3: Prepare the Chocolate Cream

➡️ In a bowl, add whipped cream, cocoa powder, and powdered sugar.

➡️ Beat until thick and creamy.

➡️ Place in the fridge for 10 minutes for a firmer texture.


✂️ Step 4: Assemble the Layers

➡️ Slice the cake carefully into 2 thin layers.

➡️ Spread the chocolate cream evenly over the bottom layer.

➡️ Place the second cake layer on top gently.


🍮 Step 5: Make the Ganache

➡️ Add chocolate chips to a bowl.

➡️ Pour warm milk over them.

➡️ Stir slowly until smooth and glossy. ✨


🍫 Step 6: Final Touch

➡️ Pour the ganache over the cake.

➡️ Spread evenly with a spoon or spatula.

➡️ Chill for 20–30 minutes before slicing.

➡️ Cut into squares and enjoy! 😍


❓Quick Q&A

❓Can I use dark chocolate?

➡️ Yes! It gives a richer chocolate flavor.

❓How should I store it?

➡️ Keep in the fridge for up to 4 days.

❓Can I freeze it?

➡️ Yes, freeze slices in an airtight container for up to 1 month.

Baked Blueberry Cottage Cheese Breakfast Bowls

Baked Blueberry Cottage Cheese Breakfast Bowls 🫐🥣

These creamy blueberry breakfast bowls are soft, lightly sweet, and packed with juicy blueberries in every bite. Perfect for cozy mornings, meal prep, or a healthy dessert!

Ingredients 🥄

  • 1 cup cottage cheese
  • 2 eggs
  • 2 tbsp honey or maple syrup
  • 1 tsp vanilla extract
  • 1 cup blueberries
  • ½ cup oats or granola

Step-by-Step Instructions 👩‍🍳

🫐 Step 1: Prepare the Blueberries

  • Wash the blueberries gently under cool water.
  • Pat them dry with a paper towel.

👉 Keep a few extra blueberries for topping later.


🥣 Step 2: Make the Creamy Mixture

  • In a mixing bowl, add:
    • cottage cheese
    • eggs
    • honey
    • vanilla
  • Whisk everything together until creamy and smooth.

✨ The mixture should look thick and creamy.


🌾 Step 3: Add the Oats

  • Stir the oats or granola into the mixture.
  • Mix gently so everything combines evenly.

👉 This gives the bowls a soft baked texture.


🍇 Step 4: Fold in Blueberries

  • Add most of the blueberries into the bowl.
  • Carefully fold them into the batter so they don’t burst too much.

🧈 Step 5: Prepare Baking Dish

  • Lightly grease small ramekins or one baking dish.
  • Pour the mixture evenly into the dishes.
  • Sprinkle extra blueberries on top.

🔥 Step 6: Bake

  • Bake at 175°C (350°F) for about 25–30 minutes.

✅ The top should look lightly golden and the center should be set.


❄️ Step 7: Cool & Serve

  • Let the bowls cool for 5 minutes.
  • Add extra granola or honey on top if desired.

✨ Serve warm for the best cozy flavor.


Quick Q&A ❓

Can I use frozen blueberries?

Yes 👍 No need to thaw them first.

Is this good for meal prep?

Absolutely 😊 Store in the fridge for up to 3 days.

Can I make it sweeter?

Yes 🍯 Add a little extra honey or maple syrup.

Easy Lemon Cake 🍋🍰

Easy Lemon Cake 🍋🍰

Soft, fluffy, and full of fresh lemon flavor, this easy lemon cake is perfect for tea time, breakfast, or dessert. Even beginners can make it perfectly on the first try!

Ingredients 🥄

  • 4 eggs
  • 1 cup sugar
  • Juice & zest of 1 lemon
  • 1 cup vegetable oil
  • 4/5 cup milk
  • 4 tsp baking powder
  • 2½ cups all-purpose flour

Step-by-Step Instructions 👩‍🍳

🥚 Step 1: Beat the Eggs & Sugar

  • Crack the eggs into a large mixing bowl.
  • Add the sugar.
  • Beat with a whisk or mixer for 3–4 minutes until light, pale, and slightly fluffy.

👉 This helps make the cake soft and airy.


🍋 Step 2: Add Lemon Flavor

  • Grate the lemon zest carefully.
  • Squeeze the lemon juice.
  • Add both to the egg mixture.

✨ The zest gives the cake a strong fresh lemon aroma.


🥛 Step 3: Add Wet Ingredients

  • Pour in the vegetable oil and milk.
  • Mix slowly until smooth and fully combined.

👉 Do not overmix.


🌾 Step 4: Add Dry Ingredients

  • In another bowl, combine:
    • flour
    • baking powder
  • Gradually add the dry ingredients into the wet mixture.
  • Stir gently until the batter becomes smooth with no dry flour left.

✨ The batter should be thick but pourable.


🧈 Step 5: Prepare the Pan

  • Grease a loaf pan with oil or butter.
  • Lightly dust with flour to prevent sticking.

🔥 Step 6: Bake the Cake

  • Pour the batter into the prepared pan.
  • Bake at 170°C (340°F) for about 40–45 minutes.

✅ The cake is ready when:

  • the top is golden
  • a toothpick inserted in the center comes out clean

❄️ Step 7: Cool & Serve

  • Let the cake cool for 10 minutes before removing from the pan.
  • Slice and enjoy with tea or coffee ☕🍋

Quick Q&A ❓

Can I use butter instead of oil?

Yes 👍 Melted butter works well too.

How do I make it extra lemony?

Add a little extra lemon zest on top after baking.

Can beginners make this?

Absolutely 😊 This is one of the easiest homemade cakes.

Vibrant Berry Smoothie Bowl

Vibrant Berry Smoothie Bowl

Ingredients

Base: 1 cup frozen berries, 1 ripe banana, ½ cup milk (or yogurt).


Toppings: Fresh blueberries, sliced kiwi, diced mango, sliced strawberries, pomegranate seeds, granola, and shredded coconut.

Instructions

Blend: Add the frozen berries, banana, and milk to a blender. Blend on high until completely smooth and thick.

Pour: Spoon the thick smoothie base into a serving bowl and smooth out the top.

Arrange: Neatly line up your toppings (blueberries, kiwi, mango, strawberries, granola, coconut, and pomegranate) in rows across the top.

Enjoy immediately with a spoon!

Spicy Chicken and Cabbage Stir-Fry

Spicy Chicken and Cabbage Stir-Fry

– fast, savory, and works great over rice or noodles.

Serves 3-4*

Ingredients:

For the chicken:

  • – Chicken breast: 1 lb, sliced thin against the grain
  • Soy sauce: 1 tbsp
  • Cornstarch: 1 tsp
  • Oil: 1 tsp
  • Salt & pepper: To taste

For the stir-fry:

Cabbage: 3 cups, roughly chopped

Red bell pepper: 1, sliced

Green bell pepper: 1, sliced

Carrot: 1 medium, julienned

Onion: 1 small, sliced

Garlic: 3 cloves, minced

Ginger: 1 tsp, grated

Chili flakes or chili crisp: 1-2 tsp, adjust for heat

Oil 2 tbsp, for frying

For the sauce:

Soy sauce: 3 tbsp

Oyster sauce: 1 tbsp

Rice vinegar: 1 tbsp

Honey: 1 tsp

Water: 2 tbsp

Instructions:

1. Marinate chicken: Toss sliced chicken with soy sauce, cornstarch, 1 tsp oil, salt, and pepper. Let sit 10 min.

2. Mix sauce: Whisk soy sauce, oyster sauce, rice vinegar, honey, and water in a small bowl. Set aside.

3. Stir-fry chicken: Heat 1 tbsp oil in a wok or large pan over high heat. Cook chicken 2-3 min until just cooked through and lightly golden. Remove to a plate.

4. Cook veggies: Add remaining oil. Toss in onion, garlic, and ginger for 30 sec until fragrant. Add cabbage, peppers, and carrot. Stir-fry 3-4 min until veggies are tender-crisp.

5. Combine: Return chicken to the pan. Add sauce and chili flakes. Toss 1-2 min until everything is coated and sauce thickens slightly.

6. Serve: Eat immediately over rice or noodles.

Tip: High heat and a hot pan are key for that slight char without making the veggies soggy. Don’t overcrowd the pan – cook in batches if needed.


Buttermilk Cornbread Recipe

Buttermilk Cornbread Recipe


Ingredients

• 2 cups cornmeal (300g)

• 1 cup all-purpose flour (125g)

• ½ cup granulated sugar (100g)

• 1 tbsp baking powder

• ½ tsp baking soda

• ½ tsp salt

• 2 large eggs

• 2 cups buttermilk (480ml)

• ½ cup melted butter (113g)

• 2 tbsp vegetable oil

Instructions

Preheat oven to 190°C (375°F).

Grease an 8-inch or 9-inch baking pan.

In a large bowl, combine cornmeal, flour, sugar, baking powder, baking soda, and salt.

In another bowl, whisk together eggs, buttermilk, melted butter, and vegetable oil.

Pour the wet ingredients into the dry ingredients and mix until just combined.

Do not overmix.

Pour batter into the prepared baking pan and smooth the top.

Bake for 25–30 minutes or until golden brown and a toothpick inserted in the center comes out clean.

Allow to cool slightly before slicing.

Serve warm with butter, honey, or jam.

Tuna Niçoise Bowl

Tuna Niçoise Bowl

Ingredients

1 can tuna, drained

2 hard-boiled eggs, halved

1 cup roasted baby potatoes

½ cup steamed green beans

½ cup cherry tomatoes & Kalamata olives

Fresh parsley, lemon juice, olive oil, salt, and pepper

Instructions

Prep Veggies: Toss potatoes with olive oil, salt, and pepper; roast until golden. Steam green beans until tender-crisp.

Assemble: Arrange the warm roasted potatoes, green beans, tomatoes, and olives in a large serving bowl.

Finish: Flake the tuna into the center and add the egg halves. Top generously with fresh parsley, a squeeze of lemon juice, and a drizzle of olive oil.

Crunchy Apple Cranberry Walnut Salad

 Crunchy Apple Cranberry Walnut Salad

sweet, tart, and crunchy. It’s great as a side or light lunch.

*RecipeServes 4-6*

*Ingredients:*

*Apples*: 3 medium, diced. Honeycrisp or Fuji work well

*Celery*: 2 stalks, diced

– *Dried cranberries*: ½ cup

*Walnuts*: ½ cup, roughly chopped and toasted

– *Fresh parsley*: ¼ cup, chopped

– *Lemon juice*: 2 tbsp

– *Olive oil*: 3 tbsp

*Honey*: 1 tbsp

– *Dijon mustard*: 1 tsp

– *Salt & pepper*: To taste

*Instructions:*

1. *Toast walnuts*: Dry toast in a skillet over medium heat 2-3 min until fragrant. Let cool.

2. *Prep fruit*: Dice apples and toss immediately with lemon juice to prevent browning.

3. *Make dressing*: Whisk olive oil, honey, Dijon mustard, salt, and pepper in a bowl.

4. *Combine*: In a large bowl, mix apples, celery, cranberries, walnuts, and parsley. Pour dressing over and toss.

5. *Serve*: Eat right away for max crunch, or chill 20 min if you want the flavors to meld.

*Tip*: Use a mix of red and green apples for color and flavor contrast. Toasting the walnuts makes a big difference, don’t skip it.


Roasted Beet and Chickpea Salad with Feta*.

Roasted Beet and Chickpea Salad with Feta

Earthy, tangy, and holds up well in the fridge.

*RecipeServes 3-4*

*Ingredients:*

– *Beets*: 3 medium, roasted and diced

– *Chickpeas*: 1 can, 15 oz, rinsed, drained, patted dry

– *Feta cheese*: 4 oz, cubed

– *Fresh parsley*: ¼ cup, chopped

– *Olive oil*: 3 tbsp

– *Lemon*: 1 large, juiced

– *Garlic*: 1 clove, minced

– *Salt & pepper*: To taste

*Instructions:*

1. *Roast beets*: Wrap whole beets in foil and roast at 400°F for 45-60 min until tender. Let cool, peel, and dice into 1-inch cubes. If you’re short on time, use pre-cooked beets from the store.

2. *Prep chickpeas*: Pat chickpeas dry so they soak up the dressing better. Toss with 1 tbsp olive oil, salt, and pepper.

3. *Make dressing*: Whisk remaining olive oil, lemon juice, garlic, salt, and pepper in a bowl.

4. *Assemble*: In a large bowl, combine beets, chickpeas, feta, and parsley. Pour dressing over and toss gently so the feta doesn’t break up too much.

5. *Rest*: Let it sit 10-15 min before serving so flavors blend.

*Tip*: Roast chickpeas 10 min in the oven at 400°F if you want them a bit crispy.

*Storage*: Keeps 3-4 days in the fridge. The beets will stain everything red, but it still tastes great.


Turkish Pogaca

Turkish Pogaca

soft, savory pastries usually stuffed with cheese and herbs. The golden tops come from an egg wash before baking.

Makes 12 pastries

*Dough:*

– *Flour*: 3 ½ cups

– *Yogurt*: 1 cup, plain

– *Vegetable oil*: ½ cup

– *Milk*: ½ cup, lukewarm

– *Egg*: 1, plus 1 egg yolk for brushing

– *Baking powder*: 2 tsp

– *Salt*: 1 tsp

– *Sugar*: 1 tsp

*Filling:*

– *Feta or beyaz peynir*: 1 ½ cups, crumbled

– *Parsley*: ½ cup, finely chopped

– *Optional*: 1 tbsp black cumin seeds or nigella seeds

*Instructions:*

1. *Make dough*: In a bowl mix yogurt, oil, milk, 1 egg, sugar, and salt. Add flour and baking powder gradually. Knead until soft and slightly sticky but not sticking to hands. Cover and rest 15 min.

2. *Make filling*: Mix crumbled cheese with parsley. Taste and adjust salt – feta is already salty.

3. *Shape*: Take a golf ball sized piece of dough. Flatten it, put 1 tbsp filling in center, then seal and shape into a ball or crescent. Place seam side down on a lined baking tray.

4. *Bake*: Brush tops with egg yolk mixed with 1 tsp milk. Sprinkle nigella seeds if using. Bake at 375°F for 20-25 min until golden brown.

5. *Serve*: Best warm when the cheese is melty.

*Tip*: Don’t overfill or they’ll burst open. The dough should be soft, not stiff – that’s what makes them fluffy inside.


Garlic Bacon Roasted Cabbage Steaks

Garlic Bacon Roasted Cabbage Steaks

These savory roasted cabbage steaks are topped with crispy bacon,  garlic butter, and Parmesan cheese. The cabbage becomes tender in the center with delicious caramelized edges, making this an easy low-carb side dish or light main course.

Cheese

Discover more
salad
Cookware & Diningware
Slow Cooker

Description

Thick cabbage slices are roasted until golden and tender, then brushed with a rich mixture of garlic, crispy bacon, butter, and Parmesan. The result is a flavorful dish with smoky, buttery, and slightly sweet roasted cabbage flavor.

Preparation Time

  • Prep Time: 15 minutes
  • Cook Time: 35–40 minutes
  • Total Time: 50–55 minutes

Servings

  • Serves: 4–6 people

Ingredients

  • 1 large green cabbage
  • 6 slices bacon, diced
  • 4 tablespoons butter, melted
  • 4 cloves garlic, minced
  • 1/3 cup grated Parmesan cheese
  • 1 tablespoon olive oil
  • 1 teaspoon paprika
  • Salt, to taste
  • Black pepper, to taste
  • Fresh parsley for garnish (optional)

Instructions

Discover more
Dry Pasta & Noodles
Snacks
slow cooker

Step 1: Prepare the Cabbage

  1. Preheat oven to 400°F (200°C).
  2. Remove damaged outer cabbage leaves.
  3. Slice cabbage into 1-inch thick steaks.
  4. Arrange steaks on a parchment-lined baking sheet.
  5. Brush both sides lightly with olive oil.

Step 2: Cook the Bacon

  1. In a skillet over medium heat, cook diced bacon until crispy.
  2. Remove bacon and place on paper towels.
  3. Reserve 1 tablespoon bacon grease for extra flavor if desired.

Step 3: Make the Garlic Butter Topping

In a small bowl combine:

    • Melted butter
    • Garlic
    • Parmesan cheese
    • Bacon
    • Paprika
    • Bacon grease (optional)
Cheese

Discover more
Pasta
Slow Cookers
Herbs & Spices

Mix well.

Step 4: Roast

  1. Spoon mixture onto each cabbage steak.
  2. Season with salt and pepper.
  3. Roast for 30–40 minutes until cabbage is tender and edges are browned.

Step 5: Serve

  • Garnish with parsley.
  • Serve hot.

Recipe Notes

  • Keep the cabbage core intact so steaks stay together while roasting.
  • Thicker slices hold shape better.
  • Parmesan creates a crispy golden crust.
  • Bacon grease adds extra smoky flavor.

Tips for Best Results

Discover more
slow-cooked
pasta
Dairy & Eggs

1. Use Fresh Cabbage

Firm cabbage gives the best texture and cleaner slices.

2. Don’t Overcrowd

Leave space between steaks for caramelization.

3. Flip Halfway (Optional)

For even browning, carefully flip after 20 minutes.

4. Add Heat

Sprinkle red pepper flakes for spicy flavor.

5. Make It Vegetarian

Skip bacon and use smoked paprika instead.

Nutritional Information (Per Serving Approx.)

Nutrient Amount
Calories 220
Protein 8g
Carbohydrates 9g
Fiber 4g
Fat 17g
Saturated Fat 8g
Sodium 420mg

Health Benefits

Discover more
Salads
drink
bacon

Cabbage Benefits

  • Rich in vitamin C and K
  • High in antioxidants
  • Supports digestion with fiber
  • Low in calories and carbs

Garlic Benefits

  • Supports immune health
  • Contains natural anti-inflammatory compounds

Bacon & Parmesan

  • Add protein and savory flavor
  • Make the dish satisfying and hearty

Variations

Discover more
Beverages
Fruits & Vegetables
cheesy

Cheesy Version

Add mozzarella or cheddar during the last 10 minutes.

Spicy Version

Mix hot sauce into the butter mixture.

Keto-Friendly

Perfect low-carb side for keto meals.

Air Fryer Method

Cook at 375°F for 15–18 minutes.

Storage & Reheating

Refrigerator

Discover more
Food
muffins
Grains & Pasta

Store in airtight container for up to 3 days.

Reheating

  • Oven: 350°F for 10 minutes
  • Air fryer: 5 minutes
  • Microwave: 1–2 minutes

Frequently Asked Questions

Q1: Why are my cabbage steaks falling apart?

Keep part of the core attached when slicing.

Q2: Can I make this ahead?

Yes. Assemble ahead and roast when ready.

Q3: Can I use red cabbage?

Yes, though texture and sweetness differ slightly.

Q4: Is this recipe keto?

Yes, it is naturally low in carbohydrates.

Q5: What pairs well with cabbage steaks?

  • Grilled chicken
  • Steak
  • Roasted potatoes
  • Salmon

Creamy Pistachio Protein Gelato

Creamy Pistachio Protein Gelato

This creamy pistachio gelato is rich, nutty, high in protein, and incredibly refreshing 💚✨
Perfect for a healthy dessert without feeling heavy!

🛒 Ingredients

  • 2 cups Greek yogurt
  • 1 scoop vanilla protein powder
  • ½ cup pistachios (chopped)
  • 2 tbsp honey or maple syrup
  • ½ tsp vanilla extract
  • ¼ cup almond milk
  • Optional: chopped almonds for topping

👩‍🍳 Instructions

🥣 Step 1: Blend the Base

  • In a blender add:
    • Greek yogurt
    • Protein powder
    • Honey
    • Vanilla
    • Almond milk
  • Blend until smooth and creamy.

💚 Step 2: Add Pistachios

  • Stir in chopped pistachios gently.
  • Save a few for topping later.

❄️ Step 3: Freeze

  • Pour mixture into a freezer-safe container.
  • Freeze for 3–4 hours.
  • Stir once every hour for a smoother texture.

🍨 Step 4: Scoop & Serve

  • Let gelato sit for 5 minutes before scooping.
  • Top with extra pistachios and almonds 😍

💡 Tips

  • Use roasted pistachios for deeper flavor.
  • Add a few drops of pistachio extract for stronger taste.
  • Freeze overnight for firmer gelato texture.

🌟 Nutritional Benefits

  • High in protein 💪
  • Rich in healthy fats 🌰
  • Great energy-boosting dessert
  • Lower sugar than regular ice cream

❓Q/A

❓Can I make it dairy-free?

✅ Yes! Use dairy-free yogurt and plant protein powder.

❓How long does it last?

✅ Store in freezer for up to 1 week.

❓Can I use another nut?

✅ Yes! Almonds or cashews work well too.

Crispy Cheesy Zucchini Cups

🧀 Crispy Cheesy Zucchini Cups

These golden zucchini cups are cheesy, creamy, and perfectly crispy around the edges 😍 A delicious low-carb snack, appetizer, or side dish that’s easy to make and packed with flavor!

🛒 Ingredients

  • 2 medium zucchini, grated 🥒
  • 1 cup shredded mozzarella cheese 🧀
  • ½ cup grated Parmesan cheese
  • 2 eggs 🥚
  • 2 cloves garlic, minced
  • 2 tbsp chopped green onions 🌿
  • ½ tsp Italian seasoning
  • Salt & black pepper to taste 🧂
  • Butter or oil for greasing muffin tin

👩‍🍳 Instructions

🥒 1. Prep the Zucchini

Grate the zucchini and squeeze out as much moisture as possible using a clean towel.

➡️ Removing excess water helps the cups become crispy instead of soggy.


🧀 2. Make the Mixture

In a bowl, combine:

  • Grated zucchini
  • Mozzarella cheese
  • Parmesan cheese
  • Eggs
  • Garlic
  • Green onions
  • Italian seasoning
  • Salt & pepper

Mix until fully combined.


🧁 3. Fill the Muffin Tin

Grease a muffin tin lightly with butter or oil.

Spoon the mixture evenly into each cup and gently press down.


🔥 4. Bake

Bake at 190°C (375°F) for 20–25 minutes or until golden brown and crispy on top.

✨ For extra crispiness, broil for 1–2 minutes at the end.


🍽️ 5. Serve

Let cool slightly before removing from the muffin tin.

Serve warm with sour cream, garlic yogurt dip, or marinara sauce 😋


💡 Tips for Best Results

✅ Squeeze zucchini very well
✅ Use freshly shredded cheese for better melting
✅ Don’t overfill muffin cups
✅ Add chili flakes for a spicy kick 🌶️


🌟 Variations

🥓 Loaded Version

Add cooked turkey bacon bits or sautéed onions.

🌶️ Spicy Cheesy Cups

Mix in jalapeños or red pepper flakes.

🧄 Garlic Herb Style

Add extra garlic and fresh parsley.


❓FAQ

Can I make them ahead?

Yes! Store in the fridge for up to 3 days and reheat in the oven or air fryer.

Can I freeze them?

Absolutely — freeze in an airtight container for up to 2 months.

Why are my zucchini cups watery?

The zucchini likely wasn’t drained enough before mixing.

Homemade Coconut Chocolate Bars Recipe

Homemade Coconut Chocolate Bars Recipe

Ingredients

Coconut Filling

  • 3 cups shredded coconut
  • 1 can (14 oz / 395 g) sweetened condensed milk
  • 1 tsp vanilla extract
  • Pinch of salt

Chocolate Coating

  • 2 cups milk chocolate or dark chocolate
  • 1 tbsp coconut oil or butter (optional, for smoother coating)

Instructions

1. Make the Coconut Mixture

In a bowl, combine:

  • shredded coconut
  • sweetened condensed milk
  • vanilla
  • salt

Mix until thick and sticky.

2. Shape the Bars

Using your hands, form small logs/bars like in the photo.

Place them on a tray lined with parchment paper.

3. Freeze

Freeze for about 30–45 minutes until firm.

This helps them hold shape when dipping in chocolate.

4. Melt the Chocolate

Melt chocolate with coconut oil/butter:

  • in the microwave (30-second intervals), or
  • over a double boiler.

Stir until smooth.

5. Coat the Bars

Dip each frozen coconut bar into melted chocolate using forks/spoons.

Let excess chocolate drip off.

Place back on parchment paper.

6. Chill

Refrigerate for 15–20 minutes until chocolate hardens.


Optional Variations

  • Add chopped almonds inside for an Almond Joy version
  • Use dark chocolate for richer flavor
  • Add a few drops of coconut extract for extra coconut taste

Storage

  • Keep refrigerated up to 1 week
  • Freeze up to 2 months

Enjoy cold for the best texture!

Chickpea Feta Avocado Salad 🥑🧀🥗

Chickpea Feta Avocado Salad 🥑🧀🥗

🛒 Ingredients

  • 1 can (15 oz) chickpeas, drained and rinsed
  • 1 avocado, diced
  • 1 cup cucumber, chopped
  • 1 cup cherry tomatoes, halved
  • 1/2 red onion, thinly sliced
  • 1/2 cup feta cheese, crumbled
  • 2 tbsp fresh parsley, chopped

Dressing

  • 3 tbsp olive oil
  • 1 tbsp lemon juice
  • 1 tsp red wine vinegar
  • 1 clove garlic, minced
  • Salt and black pepper to taste

👩‍🍳 Instructions

  1. In a large bowl, combine chickpeas, cucumber, tomatoes, onion, and parsley.
  2. Add diced avocado and crumbled feta cheese gently.
  3. In a small bowl, whisk olive oil, lemon juice, vinegar, garlic, salt, and pepper.
  4. Pour dressing over the salad and toss lightly.
  5. Chill for 10–15 minutes before serving for best flavor.

✨ Tips

  • Add grilled chicken for extra protein.
  • Sprinkle chili flakes for a spicy kick.
  • Best served fresh to keep avocado creamy and green.

6 Benefits of Eating Cucumber at Night

6 Benefits of Eating Cucumber at Night

Cucumbers are incredibly low in calories but packed with essential vitamins, minerals, and water. Enjoying a few slices before bed can do wonders for your body while you sleep. Here is why it makes the perfect evening snack:

1. Promotes Deep Hydration

Cucumbers are made up of about 95% water. Eating them in the evening helps top off your hydration levels, ensuring your body stays refreshed and functions smoothly throughout the night.

2. Supports Better Digestion

Packed with soluble fiber and water, cucumbers help soothe the digestive tract. Eating them at night can promote regular bowel movements and help prevent that uncomfortable morning bloating.

3. Aids in Weight Management

If you get those late-night kitchen cravings, cucumbers are the ultimate guilt-free snack. They are extremely low in calories, meaning you can satisfy the urge to crunch without spiking your calorie intake or interrupting your health goals.

4. Flushes Out Toxins

The high water and potassium content in cucumbers acts as a natural diuretic. This helps your body flush out waste and excess sodium overnight, which can leave you feeling lighter and less puffy when you wake up.

5. Promotes Healthier, Glowing Skin

Cucumbers contain silica and antioxidants like vitamin C and beta-carotene. Nourishing your body with these nutrients before bed supports overnight skin cell rejuvenation, helping you wake up with a clearer, brighter complexion.

6. Helps Manage Blood Sugar Levels

Cucumbers have a very low glycemic index (GI), meaning they won’t cause a sudden spike in your blood sugar levels. Eating them at night helps keep your glucose stable, preventing late-night crashes and supporting overall metabolic health.


Quick Tip for Your Page: If you want to maximize the health benefits, encourage your followers to eat them with the peel on! Most of the fiber, vitamins, and minerals are packed right into that crisp green skin.

Golden Crispy Potato & Onion Cakes

🥔 Golden Crispy Potato & Onion Cakes ✨

These crispy potato cakes are golden on the outside, soft on the inside, and packed with savory onion flavor! Perfect as a snack, breakfast side, or cozy comfort meal. 😍🔥

🛒 Ingredients

  • 4 medium potatoes (boiled & mashed smoothly) 🥔
  • 1 large yellow onion (finely minced or grated) 🧅
  • 2 cloves garlic (minced) 🧄
  • 1 large egg 🥚
  • 3–4 tbsp cornstarch or almond flour
  • 2 tbsp fresh parsley or chives 🌿
  • 1 tsp salt 🧂
  • ½ tsp black pepper
  • ½ tsp paprika or onion powder ✨
  • 2–3 tbsp olive oil or butter (for frying) 🧈

👩‍🍳 Step-by-Step Instructions

🍳 Step 1: Sauté the Onion & Garlic

➡️ Heat a small splash of oil in a skillet over medium heat.

➡️ Add the minced onion and garlic.

➡️ Cook for 3–4 minutes until soft and lightly golden. ✨

😍 This step adds sweetness and removes extra moisture for crispier cakes!


🥣 Step 2: Make the Potato Mixture

➡️ In a large bowl, add:

  • mashed potatoes
  • sautéed onion & garlic
  • egg
  • cornstarch or almond flour
  • parsley
  • salt
  • pepper
  • paprika

➡️ Mix everything thoroughly until a thick, moldable mixture forms.

✨ The mixture should hold together easily when pressed.


✋ Step 3: Shape the Patties

➡️ Lightly grease your hands with oil.

➡️ Scoop a small portion of the mixture and roll into a ball.

➡️ Flatten gently into round or oval patties about ½-inch thick.

😍 Keeping them even helps them cook beautifully.


🔥 Step 4: Fry Until Crispy

➡️ Heat olive oil or butter in a skillet over medium-high heat.

➡️ Carefully place the patties into the hot pan without overcrowding.

➡️ Cook for 4–5 minutes on the first side until deeply golden and crispy.

➡️ Flip gently and cook another 3–4 minutes on the other side.

✨ Avoid moving them too early so a crispy crust can form!


🌿 Step 5: Garnish & Serve

➡️ Transfer the hot potato cakes to a serving plate.

➡️ Sprinkle with fresh parsley or chives. 🌿

➡️ Serve warm with:

  • sour cream
  • yogurt dip
  • ketchup
  • garlic sauce 😋

❓Q & A

❓How do I make them extra crispy?

➡️ Use medium-high heat and let them cook undisturbed for the first few minutes. This creates the perfect golden crust! 🔥

❓Can I add cheese?

➡️ Yes! Shredded cheddar or parmesan tastes amazing in these potato cakes. 🧀

❓What if the mixture feels too soft?

➡️ Add an extra tablespoon of cornstarch, almond flour, or breadcrumbs until easier to shape. 😊

❓Can I bake them instead of frying?

➡️ Absolutely! Bake at 400°F (200°C) for about 25–30 minutes, flipping halfway through. ✨

Creamy Banana Crumb Bars Recipe

Creamy Banana Crumb Bars Recipe

These soft dessert bars look like creamy banana cheesecake crumb bars with a buttery crumble topping and powdered sugar dusting. 😍

🛒 Ingredients

For the Crust & Crumble

  • 🧈 1 cup unsalted butter (melted)
  • 🍚 2 cups all-purpose flour
  • 🍬 ¾ cup brown sugar
  • 🧂 Pinch of salt

For the Creamy Banana Filling

  • 🍌 2 ripe bananas (mashed)
  • 🧀 8 oz cream cheese (softened)
  • 🍬 ½ cup sugar
  • 🥚 1 egg
  • 🌼 1 tsp vanilla extract

For Topping

  • ❄️ Powdered sugar

👩‍🍳 Step-by-Step Recipe

1️⃣ Prepare the Pan

  • Preheat oven to 175°C / 350°F.
  • Line an 8×8-inch baking pan with parchment paper.

2️⃣ Make the Crumble Mixture

  • In a bowl, mix:
    • flour
    • brown sugar
    • salt
    • melted butter
  • Stir until crumbly. ✨

3️⃣ Form the Bottom Crust

  • Press half of the crumble mixture firmly into the pan.
  • Bake for 10 minutes until lightly golden.

4️⃣ Prepare the Filling

  • In another bowl:
    • beat cream cheese and sugar
    • add egg and vanilla
    • mix in mashed bananas 🍌
  • Stir until smooth and creamy.

5️⃣ Assemble the Bars

  • Pour banana filling over the baked crust.
  • Sprinkle remaining crumble mixture evenly on top.

6️⃣ Bake

  • Bake for 30–35 minutes until the top is golden and center is set. 🔥

7️⃣ Cool & Serve

  • Let bars cool completely.
  • Chill for 1 hour for cleaner slices.
  • Dust with powdered sugar before serving ❄️

💡 Tips

  • Use ripe bananas for stronger flavor 🍌
  • Chill before slicing to keep layers neat.
  • Store in refrigerator for up to 4 days.

❓Q/A

❓Can I use graham crackers instead of flour crust?

✅ Yes, crushed graham crackers with butter work great.

❓Can I freeze these bars?

✅ Yes, freeze in an airtight container for up to 2 months.

❓How do I know they’re done baking?

✅ The edges should be golden and the center slightly firm.

Vibrant Pickled Beets

Vibrant Pickled Beets

Ingredients

  • 6-8 Medium Beets (fresh) 🌿

  • 1 cup Apple cider vinegar 🍎

  • ½ cup Water

  • 1 tsp Salt

  • ½ tsp Whole peppercorns

  • 1 Cinnamon stick (optional, for warmth)

  • 2 Whole cloves (optional)

  • Note: You can skip the sugar entirely for a tart, natural flavor!


Step-by-Step Instructions

  1. Cook the Beets ♨️

    • Leave about an inch of the stems on to prevent the color from “bleeding” out. Boil the beets in a large pot of water for 25–35 minutes until fork-tender.

    • ➡️ Pro Tip: Once cooked, plunge them into cold water. The skins will slide right off with just a little pressure from your thumbs!

  2. Slice and Pack 🔪

    • Slice the peeled beets into rounds or wedges as shown in your photo.

    • ➡️ Pack them tightly into clean, sterilized mason jars.

  3. Prepare the Brine 🧪

    • In a small saucepan, combine the vinegar, water, salt, peppercorns, and spices.

    • ➡️ Bring the mixture to a rolling boil for about 2 minutes to let the flavors infuse.

  4. Fill the Jars 🫙

    • Carefully pour the hot brine over the beets in the jars, ensuring they are completely submerged.

    • ➡️ Leave about half an inch of “headspace” at the top of the jar.

  5. Cool and Cure ❄️

    • Let the jars cool to room temperature on the counter.

    • ➡️ Seal the lids and place them in the refrigerator. For the best flavor, wait at least 24 hours before eating!


Common Questions & Answers

Q: How long do these stay fresh? A: These refrigerator pickled beets will stay delicious for up to 3–4 weeks when kept chilled.

Q: Can I add other vegetables to the jar? A: Absolutely! Sliced red onions or even cloves of garlic are wonderful additions that soak up that beautiful pink brine.

Q: Are these beets crunchy or soft? A: Since they are boiled before pickling, they will have a tender, smooth texture with just a slight “snap.”

Q: Do I have to use apple cider vinegar? A: You can use white vinegar for a sharper tang, but apple cider vinegar provides a smoother, fruitier finish that complements the earthiness of the beets. 🥗

Golden Beef & Herb Pastry Rolls

🥐 Golden Beef & Herb Pastry Rolls

Ingredients

For the Filling:

  • 500g Lean ground beef 🥩

  • 1 Small onion (finely diced)

  • 2 cloves Garlic (minced)

  • 1 cup Shredded mozzarella or cheddar cheese 🧀

  • ½ cup Fresh parsley (chopped) 🌿

  • 1 tsp Cumin

  • ½ tsp Paprika

  • Salt & Pepper to taste

For the Pastry & Assembly:

  • 1 pack Phyllo pastry or very thin flour tortillas/flatbreads 🫓

  • ¼ cup Melted butter or olive oil (for brushing)

  • 1 Egg (beaten, for the egg wash)


Step-by-Step Instructions

  1. Prepare the Filling 🍳

    • In a pan over medium heat, brown the ground beef with the diced onions and garlic.

    • ➡️ Drain any excess liquid to keep the pastry from getting soggy.

    • ➡️ Stir in the cumin, paprika, salt, and pepper. Let the mixture cool slightly.

  2. Layer the Pastry 📋

    • Lay out your pastry sheet or flatbread on a clean wooden board.

    • ➡️ If using phyllo, stack 3–4 sheets, brushing a little melted butter between each layer for extra flakiness.

  3. Assemble the Roll 👩‍🍳

    • Spread a thin, even layer of the beef mixture over the pastry, leaving a small border at the edges.

    • ➡️ Sprinkle the shredded cheese and a generous amount of fresh parsley over the meat.

    • ➡️ Starting from one end, roll the pastry tightly (as shown in your top photo) to create a long log.

  4. Baking 🔥

    • Place the rolls on a baking sheet lined with parchment paper.

    • ➡️ Brush the tops with the beaten egg wash for that shiny, golden finish.

    • ➡️ Bake at 190°C for 20–25 minutes until the pastry is puffed and deep golden brown.

  5. Slice and Garnish 🔪

    • Let the rolls rest for 5 minutes before slicing. This helps the cheese set so it doesn’t run out.

    • ➡️ Garnish with more fresh parsley and serve warm.


Common Questions & Answers

Q: Can I use a different meat for the filling? A: Definitely! Ground turkey or chicken works beautifully here as well. For a vegetarian version, a mix of sautéed mushrooms and spinach is a great choice.

Q: My pastry is breaking when I roll it. What should I do? A: If using phyllo, keep it covered with a damp cloth while working so it doesn’t dry out. If using flatbreads, a very light brush of oil can make them more pliable.

Q: Can I prepare these in advance? A: Yes! You can roll them up and keep them in the fridge (covered) for a few hours before baking. Just add the egg wash right before they go into the oven.

Q: What dip goes well with these? A: A cool yogurt dip with garlic or a simple marinara sauce complements the savory beef perfectly! 🥣

2-Ingredient Pineapple Soft Serve

🍦 2-Ingredient Pineapple Soft Serve (Creamy & Refreshing) 🍍✨

A quick, healthy frozen treat that tastes like tropical ice cream — made in just minutes with no ice cream machine needed! 🌴💛


🛒 Ingredients

  • 2 cups frozen pineapple chunks 🧊🍍
  • ½ cup unsweetened coconut milk 🥥

👉 Optional:

  • 1 tsp honey or maple syrup 🍯 (if extra sweetness is needed)
  • Tiny pinch of salt (enhances sweetness)

👩‍🍳 Step-by-Step Instructions

1️⃣ Freeze the Pineapple 🍍

If using fresh pineapple:
Cut into small chunks and freeze for at least 4–6 hours until solid.
(Pre-frozen store-bought pineapple works perfectly too!)


2️⃣ Add to Blender 🌪️

Place frozen pineapple and coconut milk into a high-speed blender or food processor.


3️⃣ Blend Slowly First 🥄

Start blending on low speed.
Stop occasionally to scrape down the sides so everything mixes evenly.


4️⃣ Make It Creamy ✨

Keep blending until the mixture becomes:

  • Smooth
  • Thick
  • Soft-serve texture 🍦

👉 If it’s too thick, add coconut milk 1 tablespoon at a time.


5️⃣ Adjust Taste 🍯

Taste and adjust:

  • Add a little honey if needed
  • Add a pinch of salt to enhance flavor

6️⃣ Serve Immediately 🍦✨

Scoop into bowls or glasses.
For a beautiful swirl look, pipe it using a star nozzle piping bag 🌀


❓ Q & A

Q: Can I use another milk instead of coconut milk?

➡️ Yes! Almond or oat milk works, but coconut milk gives the creamiest texture.

Q: Why is my soft serve not blending?

➡️ Let the pineapple sit for 3–5 minutes or add a splash more liquid.

Q: Can I store it?

➡️ It’s best fresh, but you can freeze it and re-blend before serving.


🌟 Pro Tip

Add a tiny pinch of salt or a splash of lime juice 🍋 — it makes the pineapple taste even more vibrant and tropical!


Enjoy your refreshing homemade pineapple soft serve! 🍍🍦💛

Roasted Beet & Feta Herb Salad

🥗 Roasted Beet & Feta Herb Salad

🛒 Ingredients

The Salad Base:

  • 3-4 medium Beets (peeled and cut into 1-inch cubes) ➡️ Red or golden beets work great!

  • 1 cup Feta cheese (cut into cubes or roughly crumbled) 🧀

  • 2 cups Fresh greens (arugula or mixed baby greens) 🥬

  • ½ cup Fresh dill and parsley (roughly chopped) 🌿

The Simple Vinaigrette:

  • 3 tbsp Extra virgin olive oil 🫒

  • 1 tbsp Balsamic vinegar or lemon juice 🍋

  • 1 tsp Honey or maple syrup 🍯

  • Salt and black pepper to taste


👩‍🍳 Step-by-Step Instructions

  1. Roast the Beets ➡️ Preheat your oven to 400°F (200°C). Toss the beet cubes with 1 tbsp of olive oil and a pinch of salt. Spread them on a baking sheet and roast for 35–45 minutes until tender when pierced with a fork. 🌡️🔥

  2. Cool Down ➡️ Let the beets cool to room temperature. This prevents the feta cheese from melting and the greens from wilting. ❄️

  3. Whisk the Dressing ➡️ In a small jar, combine the remaining olive oil, balsamic vinegar, honey, salt, and pepper. Shake well until combined. 🥣✨

  4. Layer the Greens ➡️ Place a bed of fresh greens on a large serving plate or in a shallow bowl. 🥬

  5. Assemble ➡️ Arrange the roasted beet cubes over the greens. Top with the feta cheese cubes. 🧀➡️🥗

  6. Garnish and Dress ➡️ Sprinkle the fresh dill and parsley generously over the top. Drizzle the vinaigrette evenly over the salad just before serving. 🌿🍯

  7. Serve ➡️ Toss lightly or serve as composed layers to maintain that striking color contrast! 🎨🍴


❓ Common Questions & Answers

Q: Can I use pre-cooked beets to save time? A: Absolutely! ➡️ You can find steamed or vacuum-packed beets in most grocery stores. Just cube them up and skip straight to the assembly! 🕒

Q: How do I stop the beets from staining the feta? A: To keep the white cheese looking bright, don’t toss the salad too vigorously. ➡️ Lay the beets down first, then place the feta on top right before serving. 🧀✨

Q: Can I add some crunch to this? A: Definitely. ➡️ Toasted walnuts, pine nuts, or even pumpkin seeds add a wonderful texture to this dish. 🥜

Q: Is this salad good for meal prep? A: Yes! ➡️ Keep the roasted beets, feta, and dressing in separate containers. Combine them when you’re ready to eat to keep everything fresh and crisp. 🥡

Enjoy your vibrant, nutrient-packed salad! 🥗🌿✨

Roasted Butternut Squash & Cranberry Medley

Roasted Butternut Squash & Cranberry Medley

🛒 Ingredients

The Roast:

  • 1 large Butternut squash (peeled and cubed into 1-inch pieces) ➡️ Look for a matte skin for the best ripeness!

  • 1 ½ cups Fresh or frozen cranberries 🍒

  • 2 tbsp Olive oil 🫒

  • 1 tbsp Maple syrup or honey 🍯

  • 1 tsp Dried thyme or rosemary (plus a fresh sprig for garnish) 🌿

  • Salt and black pepper to taste

The Toppings:

  • ½ cup Feta cheese (crumbled) 🧀

  • ½ cup Walnuts or pecans (toasted) 🥜

  • 2 tbsp Fresh parsley (chopped) 🌿


👩‍🍳 Step-by-Step Instructions

  1. Heat it Up ➡️ Preheat your oven to 400°F (200°C). Line a large rimmed baking sheet with parchment paper. 🌡️

  2. Toss and Season ➡️ In a large bowl, combine the butternut squash cubes, olive oil, maple syrup, dried herbs, salt, and pepper. Toss until every piece is glistening. 🥣✨

  3. The First Roast ➡️ Spread the squash in a single layer on the baking sheet. Roast for 20 minutes. 🎃🔥

  4. Add the Berries ➡️ Remove the tray and scatter the cranberries among the squash. Toss gently. Roast for another 10–15 minutes until the squash is tender and the cranberries have softened or burst. 🍒➡️⏲️

  5. Toast the Nuts ➡️ While the squash finishes, lightly toast your walnuts in a dry pan over medium heat for 3–5 minutes until fragrant. 🥜🍳

  6. Assemble ➡️ Transfer the warm squash and cranberries to a serving platter. Sprinkle generously with crumbled feta, toasted walnuts, and fresh parsley. 🧀✨

  7. Final Touch ➡️ Place a fresh rosemary sprig in the center for that beautiful professional look! 🌿📸


❓ Common Questions & Answers

Q: Can I use Sweet Potato instead of Butternut Squash? A: Absolutely! ➡️ Sweet potatoes or even Kabocha squash work perfectly with these exact same flavors.

Q: My cranberries are very tart—how can I balance that? A: You can toss the cranberries in a teaspoon of sugar or extra maple syrup before adding them to the tray. ➡️ This creates a lovely sweet-tart glaze! 🍯🍒

Q: Can I make this dish ahead of time? A: You can roast the squash and berries ahead of time. ➡️ However, wait to add the feta and walnuts until just before serving to keep the cheese fresh and the nuts crunchy. 🧀🥜

Q: Is this dish served hot or cold? A: It is delicious both ways! ➡️ It’s traditionally served warm as a side dish, but it also makes a fantastic cold salad the next day when tossed with some arugula or spinach. 🥗

Enjoy this vibrant and flavorful autumn-inspired dish! 🎃🍂✨

Healthy Creamy Avocado Ice Cream

Healthy Creamy Avocado Ice Cream 🥑🍦✨

Cool, silky, and naturally creamy — this avocado ice cream is a refreshing dessert packed with healthy fats and tropical flavor! 🌿💚

🛒 Ingredients

The Creamy Base 🥑🥥

  • 2 ripe avocados
  • 1 can (13.5 oz) full-fat coconut milk, chilled overnight
  • ½ cup honey or maple syrup
  • 1 tbsp lime juice
  • 1 tsp vanilla extract

Toppings 🌿

  • 2 tbsp chopped pistachios
  • Honey for drizzling
  • Fresh mint leaves

👩‍🍳 Step-by-Step Instructions

1️⃣ Prepare the Coconut Cream 🥥

Open the chilled coconut milk can carefully.
Scoop out only the thick cream from the top and place it into a blender. Save the liquid for smoothies or drinks.

2️⃣ Add the Main Ingredients 🥑

Add:

  • Avocado flesh
  • Coconut cream
  • Honey or maple syrup
  • Lime juice
  • Vanilla extract

3️⃣ Blend Until Creamy 🌪️

Blend everything on high speed until the mixture becomes completely smooth and fluffy.
The texture should look rich and silky with no avocado chunks remaining.

4️⃣ Churn or Freeze 🍦

If using an ice cream maker:
➡️ Churn for about 15–20 minutes until thick and creamy.

For the no-churn method:
➡️ Pour the mixture into a shallow container and freeze for at least 4 hours.

5️⃣ Keep It Smooth ❄️

During the first 2 hours of freezing, stir the mixture every 45 minutes.
This helps create a softer and creamier texture.

6️⃣ Soften Before Serving 🥄

Let the ice cream sit at room temperature for 5–10 minutes before scooping for the best texture.

7️⃣ Garnish & Enjoy 🌿✨

Top with chopped pistachios, honey drizzle, and fresh mint leaves before serving.


❓Q & A

Q: Does avocado make the ice cream taste savory?

➡️ No! The avocado mainly adds creaminess while the vanilla, honey, and lime create a sweet tropical flavor.

Q: Can I make this dairy-free?

➡️ Yes! This recipe is naturally dairy-free because it uses coconut milk instead of cream.

Q: How do I keep the green color bright?

➡️ Lime juice helps prevent browning and keeps the ice cream vibrant green.

Q: How long can I store it?

➡️ Keep it in the freezer for up to 1 week. Let it soften slightly before scooping.

Enjoy your creamy homemade avocado ice cream! 🥑🍦💚