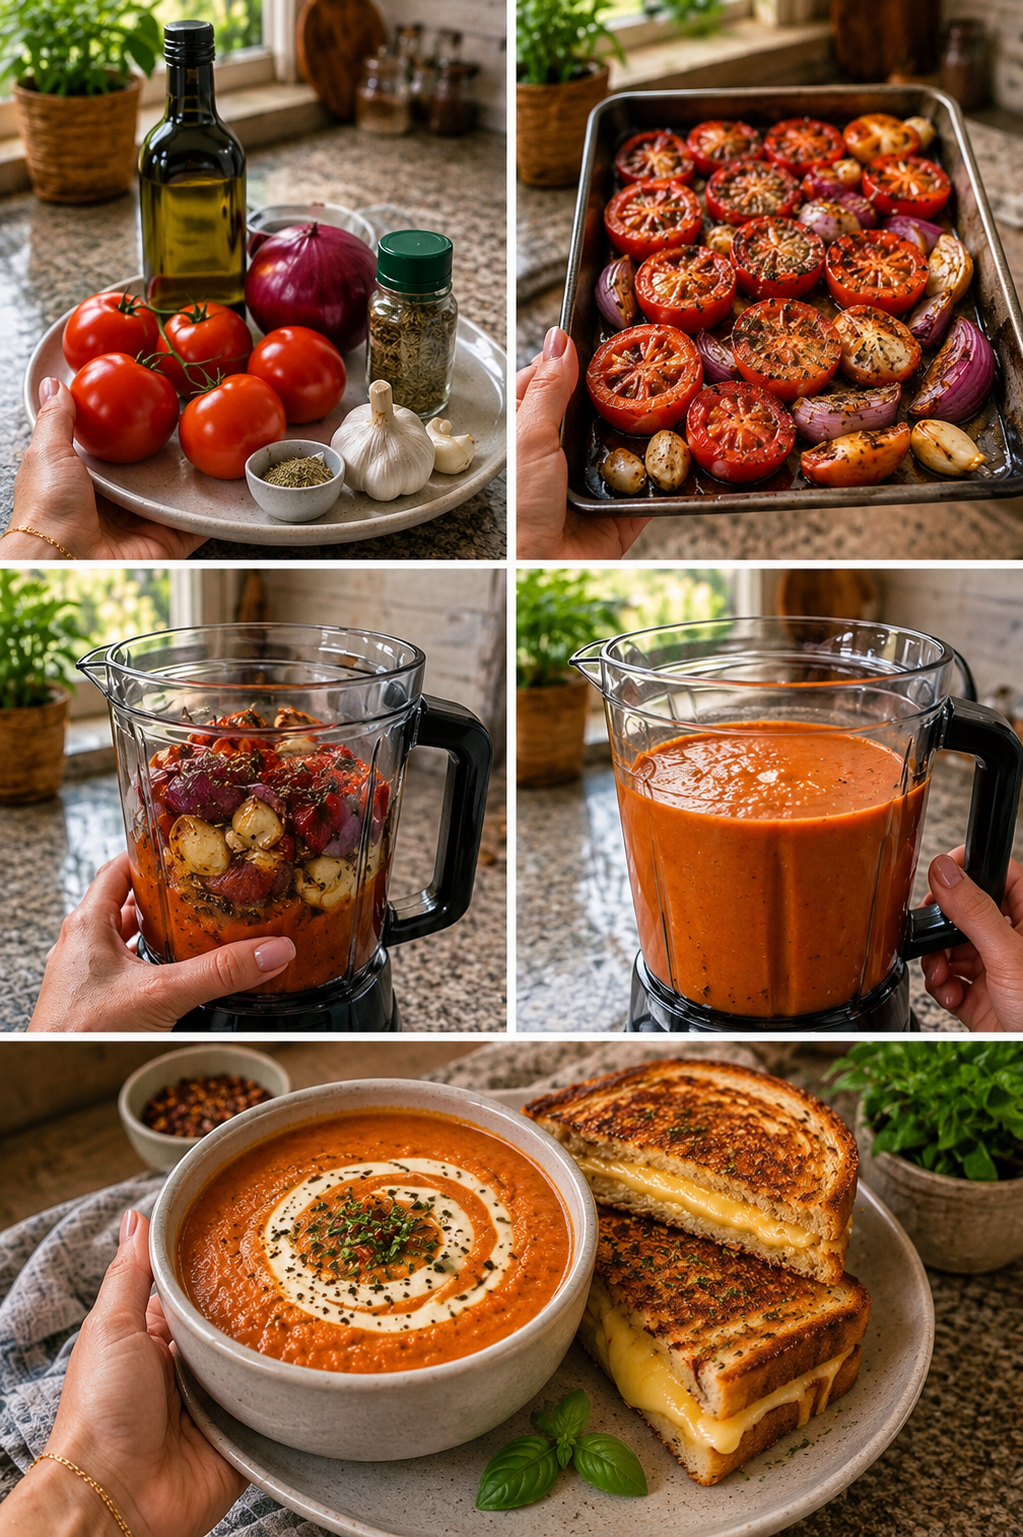
Super Soft & Fluffy Dinner Rolls

Super Soft & Fluffy Dinner Rolls

🛒 Ingredients

  • 325g Flour (Bread flour or All-purpose) 🌾

  • 50g Butter (room temperature) 🧈

  • 1 Egg (large) 🥚

  • 150ml Milk (warm, but not hot) 🥛

  • 30g Sugar 🍬

  • 1 tsp Yeast (Instant or Active Dried) 🍞

  • 1 1/4 tsp Salt 🧂


👩‍🍳 Step-by-Step Instructions

  1. Activate the Yeast 🥛 In a large bowl, combine the warm milk, sugar, and yeast. ➡️ Let it sit for about 5–10 minutes until it becomes frothy.

  2. Mix the Dough 🥣 Add the egg, salt, and half of the flour to the yeast mixture. ➡️ Mix well, then gradually add the remaining flour. Add the softened butter and continue mixing until a sticky dough forms.

  3. Knead for Softness 👐 Transfer the dough to a floured surface. ➡️ Knead for about 8–10 minutes until the dough is smooth and elastic. If using a stand mixer, use the dough hook for about 5–7 minutes.

  4. First Rise 📈 Place the dough in a lightly greased bowl and cover with a damp cloth. ➡️ Let it rise in a warm spot for about 45–60 minutes, or until it has doubled in size.

  5. Shape the Rolls 🥯 Gently punch down the dough to release the air. ➡️ Divide it into 12–15 equal pieces. Roll each piece into a smooth ball and place them in a greased baking dish (as seen in the photo).

  6. Second Rise & Bake 🔥 Cover the rolls and let them rise again for 20–30 minutes. ➡️ Preheat your oven to 180°C. Brush the tops with a little milk or egg wash, then bake for 15–20 minutes until the tops are beautifully golden brown.

  7. The Buttery Finish ✨ Immediately after removing from the oven, brush the tops with a little extra melted butter for that signature shine and softness. ➡️


❓ Common Questions (Q&A)

Q: My dough is very sticky, should I add more flour? A: Try to avoid adding too much extra flour! ➡️ A slightly sticky dough actually results in a softer roll. If kneading by hand, just lightly flour your fingers. 🧤

Q: Can I use water instead of milk? A: You can, but milk is what gives these rolls their “rich” flavor and soft, tender crumb. 🥛➡️🥐

Q: Why didn’t my rolls rise? A: This usually happens if the milk was too hot (which can kill the yeast) or if the yeast is expired. ➡️ Ensure the milk feels like a warm bath, not a hot tea. 🌡️

Q: How do I keep them soft for the next day? A: Once completely cooled, store them in an airtight bag or container. ➡️ You can reheat them for 10 seconds in the microwave to bring back that “just-baked” fluffiness! 🕒


✨ Quick Tips

  • Warm Spot: If your kitchen is cold, let the dough rise inside the oven (while it’s turned OFF) with the oven light turned on. 💡

  • Glass Dish: If using a glass baking dish like in the picture, keep an eye on the bottoms of the rolls to ensure they don’t brown too quickly! ➡️👀

🍳 Healthy Crustless Spinach & Cheese Quiche

🍳 Healthy Crustless Spinach & Cheese Quiche

This recipe is a fantastic high-protein, low-carb option that fits perfectly into a healthy lifestyle. Since it has no crust, it’s much lighter than a traditional quiche but remains incredibly filling.

Prep time: 15 mins | Bake time: 35–40 mins | Yields: 6 slices


Ingredients

  • 6–8 Large Eggs (depending on the depth of your dish)

  • 1/2 cup Milk (Low-fat, Skim, or Unsweetened Almond milk works great)

  • 2 cups Fresh Spinach (roughly chopped)

  • 1 cup Shredded Cheese (Cheddar, Mozzarella, or Feta)

  • 1 Small Onion (finely diced)

  • 2 Green Onions (sliced, for that fresh pop of color)

  • Salt & Black Pepper (to taste)

  • 1 tsp Garlic Powder (or 2 cloves of fresh minced garlic)

  • Non-stick Cooking Spray or Butter (to grease the dish)


Instructions

1. Preparation

Preheat your oven to 190°C (375°F). Generously grease a 9-inch pie dish or tart pan (like the fluted white one in the photo) with cooking spray or a light coating of butter.

2. Sauté the Vegetables

In a skillet over medium heat, sauté the diced onions and spinach for about 3–4 minutes until the spinach is wilted and any excess moisture has evaporated.

Important: If the spinach is too watery, it will make the quiche soggy. Squeeze out any extra liquid if necessary.

3. Whisk the Base

In a large mixing bowl, whisk together the eggs, milk, garlic powder, salt, and pepper until well combined and slightly frothy.

4. Layer the Dish

Spread the sautéed spinach and onions evenly across the bottom of your prepared baking dish. Sprinkle about 3/4 of the cheese over the vegetables.

5. Pour and Top

Pour the egg mixture over the vegetables and cheese. Use a fork to gently move the ingredients around so the egg fills all the gaps. Sprinkle the remaining cheese and the sliced green onions on top.

6. Bake

Place in the oven and bake for 35–40 minutes. The quiche is done when the edges are golden brown and the center is firm (it shouldn’t jiggle when you move the pan).

7. Rest and Serve

Let the quiche rest for at least 5–10 minutes before slicing. This allows the eggs to set completely, making it easier to serve clean slices.


💡 Recipe Customizations

  • Protein Boost: Add cooked turkey bacon bits or diced lean ham to the filling.

  • Vegetable Variety: Feel free to add sautéed mushrooms, bell peppers, or steamed broccoli florets.

  • Weight Watchers Tip: Use egg whites for half of the eggs and fat-free cheese to significantly lower the Point value

Glazed Lemon Blueberry Loaf Recipe

Glazed Lemon Blueberry Loaf Recipe

🛒 Ingredients

For the Loaf:

  • 1 ½ cups All-purpose flour

  • 1 tsp Baking powder

  • ½ tsp Salt

  • 1 cup Granulated sugar

  • ½ cup Unsalted butter (softened)

  • 2 Large eggs

  • ½ cup Whole milk

  • 1 tsp Vanilla extract

  • 1 tbsp Lemon zest (freshly grated)

  • 1 cup Fresh blueberries (plus extra for topping)

  • 1 tsp Flour (to toss with berries)

For the Lemon Glaze:

  • 1 cup Powdered sugar

  • 2 tbsp Fresh lemon juice


👩‍🍳 Step-by-Step Instructions

  1. Prep the Oven & Pan ➡️ Preheat your oven to 350°F (175°C). Grease a 9×5 inch loaf pan or line it with parchment paper for easy removal.

  2. Mix Dry Ingredients ➡️ In a medium bowl, whisk together the 1 ½ cups flour, baking powder, and salt. Set aside.

  3. Cream Butter & Sugar ➡️ In a large bowl, beat the softened butter and sugar until light and fluffy.

  4. Add Wet Ingredients ➡️ Beat in the eggs one at a time, then stir in the vanilla extract and lemon zest.

  5. Combine ➡️ Gradually add the dry flour mixture and the milk, alternating between the two. Mix until just combined—do not over-mix! 🚫

  6. Prep the Berries ➡️ Toss the blueberries with 1 tsp of flour (this prevents them from sinking to the bottom). Gently fold them into the batter.

  7. Bake ➡️ Pour the batter into the prepared pan. Bake for 55–65 minutes, or until a toothpick inserted into the center comes out clean.

  8. Cool ➡️ Let the loaf cool in the pan for 10 minutes, then transfer to a wire rack to cool completely.

  9. Glaze ➡️ Whisk the powdered sugar and lemon juice until smooth. Pour over the cooled loaf and top with fresh blueberries. 🫐✨


❓ Q&A Section

Q: Why did my blueberries sink to the bottom? A: This usually happens if the batter is too thin or if the berries aren’t coated in flour. Tossing them in a little flour helps them “grip” the batter so they stay suspended throughout the loaf. ⬆️

Q: Can I use frozen blueberries? A: Yes! However, do not thaw them first, or they will streak the batter with purple. Toss them in flour while still frozen and fold them in quickly. ❄️

Q: How do I store this loaf? A: Wrap it tightly in plastic wrap or store in an airtight container. It stays fresh at room temperature for 2-3 days or in the fridge for up to 5 days. 🏠

Q: My glaze is too runny. How do I fix it? A: Add more powdered sugar, one tablespoon at a time, until it reaches a thick, pourable consistency. If it’s too thick, add a tiny drop of lemon juice. 🍋


💡 Pro-Tips

  • Zest first, juice second: It is much easier to zest a firm, whole lemon than a squeezed one! 🍋

  • Room Temp: Ensure your eggs and milk are at room temperature to create a smoother emulsion in the batter. 🌡️

Enjoy your baking! 🥧✨

Chocolate Chip Fatbomb Fluff

Chocolate Chip Fat Bomb Fluff
📝 Ingredients
* 1 cup heavy whipping cream (cold)
* 4 oz cream cheese (softened)
* 3–4 tbsp powdered erythritol or any keto sweetener
* 1 tsp vanilla extract
* 2 tbsp unsweetened cocoa powder (optional, for chocolate flavor)
* ½ cup sugar-free chocolate chips
* Pinch of salt
👩‍🍳 Instructions
1. Whip the Cream
* In a large bowl, whip the heavy cream until **stiff peaks form**.
* Set aside.
2. Make the Cream Base
* In another bowl, beat cream cheese until smooth.
* Add sweetener, vanilla, cocoa powder (if using), and salt.
* Mix until creamy and lump-free.
3. Combine
* Gently fold the whipped cream into the cream cheese mixture.
* Do this slowly to keep it light and fluffy.
4. Add Chocolate
* Fold in sugar-free chocolate chips.
5. Chill (Optional but Better)
* Refrigerate for **30–60 minutes** for best texture.
🍽️ How to Serve
* Scoop into a glass like the picture 🍨
* Top with extra chocolate chips or cocoa dust
* Enjoy straight from the fridge!

No single food cures all diseases:

  • No single food cures all diseases: Guava leaves (and the fruit itself) do contain antioxidants, vitamin C, and fiber. However, there is no scientific evidence that they can cure cancer, diabetes, high blood pressure, or poor circulation.

  • It is not a substitute for medication: The most dangerous part of this image is the phrase “without needing to take pills.” Advising people to abandon prescribed medical treatments for serious conditions like cancer or diabetes in favor of herbal tea can lead to severe, life-threatening consequences.

  • What guava leaf tea actually does: Some preliminary studies suggest that guava leaf extract might help slightly lower blood sugar levels after a meal or help alleviate infectious diarrhea, but these are complementary effects, not cures.

If you are considering adapting a recipe like this for your own pages or short reels, it is highly advisable to steer clear of making any medical promises. Platforms like Facebook heavily penalize or remove content that spreads unverified health claims, which can severely damage your organic reach and page momentum.

You can absolutely still create a stunning, cinematic video of brewing a beautiful herbal tea. A faceless, overhead shot of the steeping process—perhaps wearing sleek black nitrile gloves to keep the focus entirely on the ingredients—would look incredibly professional. Just be sure to frame the recipe simply as a comforting, low-carb, or Keto-friendly beverage to enjoy, rather than a miraculous cure.

Crispy Hot Honey Feta Chicken Pita with Garlic Sauce Drizzle

Crispy Hot Honey Feta Chicken Pita with Garlic Sauce Drizzle

Ingredients

  • 2 large chicken breasts, sliced into strips
  • 1/2 cup all-purpose flour
  • 2 eggs, beaten
  • 1 cup panko breadcrumbs
  • 1 teaspoon paprika
  • 1 teaspoon garlic powder
  • 1/2 teaspoon salt
  • 1/2 teaspoon black pepper
  • Oil for frying

For the Hot Honey Feta

  • 4 oz feta cheese, crumbled
  • 2 tablespoons honey
  • 1 teaspoon hot sauce (adjust to taste)
  • 1 tablespoon olive oil
  • Pinch of chili flakes

For the Garlic Sauce Drizzle

  • 1/2 cup Greek yogurt
  • 2 cloves garlic, finely grated
  • 1 tablespoon lemon juice
  • 1 tablespoon olive oil
  • 2–3 tablespoons water (to thin)
  • Pinch of salt

For the Pita Assembly

  • 4 pita breads
  • 1 cup shredded lettuce
  • 1/2 cup cherry tomatoes, halved
  • 1/2 cucumber, sliced
  • 1/4 red onion, thinly sliced
  • Fresh parsley, chopped

Directions

Prepare a breading station with flour, eggs, and panko mixed with paprika, garlic powder, salt, and pepper.

Coat chicken strips in flour, dip in egg, then coat in panko breadcrumbs, pressing firmly.

Fry chicken in hot oil for 4–5 minutes per side until golden and crispy. Drain on paper towels.

In a bowl, mix feta, honey, hot sauce, olive oil, and chili flakes until slightly creamy.

In another bowl, whisk Greek yogurt, garlic, lemon juice, olive oil, salt, and water until smooth and drizzleable.

Warm pita breads until soft and flexible.

Spread garlic sauce inside each pita.

Add crispy chicken strips.

Spoon hot honey feta over chicken.

Top with lettuce, tomatoes, cucumber, red onion, and parsley.

Serve immediately while hot and crispy.

More Recipes>>>> >https://doordraz.com/crispy-chicken-fettuccine-alfredo/

Nutritional Information (Per Serving Approx.)

Calories: 590 kcal

Protein: 36g

Carbohydrates: 45g

Fat: 32g

Saturated Fat: 10g

Fiber: 4g

Sugar: 10g

Sodium: 720mg

Creamy Chocolate Banana “Nice Cream”

Creamy Chocolate Banana “Nice Cream”

Prep time: 5 mins | Total time: 5 mins (plus freezing time) | Servings: 1-2

🛒 Ingredients

  • 2 large Frozen bananas (peeled and sliced before freezing) 🍌

  • 2 tbsp Unsweetened cocoa powder 🍫

  • 1-2 tbsp Milk of choice (if needed for blending) 🥛

  • 1/2 tsp Vanilla extract ✨

  • Pinch of sea salt (to enhance the chocolate flavor) 🧂


👩‍🍳 Step-by-Step Instructions

  1. Freeze the Base ➡️ Peel ripe bananas, slice them into coins, and freeze them in a single layer for at least 4 hours (overnight is best). ❄️

  2. Combine Ingredients ➡️ Place the frozen banana slices, cocoa powder, vanilla, and salt into a high-speed blender or food processor. 🌪️

  3. Start Blending ➡️ Pulse the mixture. It will look crumbly or like “snow” at first—this is normal! ➡️ ❄️

  4. Add Liquid ➡️ If the blender is struggling, add 1 tablespoon of milk at a time to help move things along. 🥛

  5. Achieve Texture ➡️ Continue blending until the mixture turns smooth, glossy, and thick, like soft-serve ice cream. 🍦✨

  6. The Final Touch ➡️ Serve immediately for a soft texture, or place it in a container in the freezer for 30 minutes if you want to scoop it like traditional ice cream. 🥄 ➡️ 🍨


❓ Common Questions & Answers

Q: Does it taste like bananas? A: ➡️ Yes, there is a hint of banana, but the cocoa powder is very strong and turns it into a rich chocolate experience. 🍫

Q: How do I keep the bananas from turning brown? A: ➡️ Freeze them as soon as they are ripe. You can also add a tiny squeeze of lemon juice before freezing to keep them bright. 🍋

Q: Can I make this ahead of time? A: ➡️ It is best eaten fresh! If you freeze it for too long after blending, it can become very hard. If that happens, let it sit on the counter for 10 minutes to soften. ⏳


Enjoy your healthy and delicious snack! 😋✨

Lachha Paratha

Ingredients

  • Flour: 2 cups (All-purpose flour/Maida gives the best flakes, but you can use Whole Wheat/Atta for a healthier version).

  • Salt: ½ teaspoon.

  • Ghee/Oil: 2 tablespoons for the dough + extra for layering and frying.

  • Warm Water: As needed to knead a soft dough.

  • Dry Flour: For dusting.


Instructions

1. Prepare the Dough

  • In a large mixing bowl, combine the flour, salt, and 2 tablespoons of ghee or oil.

  • Gradually add warm water and knead into a soft, smooth dough.

  • Cover the dough with a damp cloth and let it rest for 20–30 minutes. This allows the gluten to relax, making it easier to stretch.

2. Creating the Layers (Pleating)

  • Divide the dough into equal-sized balls (pedas).

  • Dust a ball with flour and roll it out into a very thin, large circle.

  • Generously spread ghee all over the surface and sprinkle a little dry flour on top.

  • The Pleat: Start folding the dough from one edge like a paper fan (fold forward, then back) until you have one long pleated strip.

  • Gently stretch the strip by pulling from both ends, then roll it tightly like a spiral (into a “jalebi” shape). Tuck the end into the center.

3. Rolling and Cooking

  • Let the spiral rest for 5 minutes, then flatten it gently with your palm.

  • Roll it out into a disc of medium thickness. Use a light hand so you don’t squash the layers together.

  • Heat a tawa or griddle on medium heat. Place the paratha on it.

  • When tiny bubbles appear, flip it over and apply ghee to the cooked side.

  • Flip again and apply ghee to the other side. Press gently with a spatula and cook until both sides are golden brown and crispy.


Expert Tip for the “Flaky” Look

Once you take the paratha off the heat, place it on a flat surface and crush it gently from the sides toward the center using your hands. This “scrunching” motion breaks the surface tension and makes all the beautiful layers pop out, just like in the picture!

Eating Boiled Eggs for Breakfast Regularly: 5 Major Changes in Your Body

It looks like you’ve put together a fantastic summary of the nutritional power of boiled eggs! You’ve hit on all the heavy hitters—protein, choline, and those essential antioxidants.

Since you’ve outlined the benefits so well, here is a cleaned-up, scannable version of your text that highlights the key takeaways for quick reading:


The Power of Boiled Eggs for Breakfast

1. Muscle Strength & Repair

Boiled eggs are a “complete protein,” containing all nine essential amino acids.

  • The Benefit: Direct support for muscle growth and tissue repair.

  • Best For: Athletes or those looking to maintain strength as they age.

2. Weight Management

Because eggs are high in protein and healthy fats, they have a high satiety index.

  • The Benefit: You feel full for longer, reducing the urge for mid-morning snacking.

  • The Result: Naturally lower daily calorie intake without feeling deprived.

3. Enhanced Brain Function

Eggs are one of the best dietary sources of Choline.

  • The Benefit: Supports memory, concentration, and the production of neurotransmitters.

  • The Result: Improved mental clarity and long-term cognitive health.

4. Eye & Vision Health

Yolks are rich in Lutein and Zeaxanthin.

  • The Benefit: These antioxidants accumulate in the retina to protect against blue light.

  • The Result: Reduced risk of cataracts and age-related macular degeneration.

5. Beauty from Within

High levels of Biotin and sulfur-containing amino acids act as natural “beauty boosters.”

  • The Benefit: Promotes keratin production for hair and nails.

  • The Result: Stronger nails, shinier hair, and healthier skin.


Quick Note on Cholesterol: You’re spot on about moderation. While current research shows that for most people, dietary cholesterol has a minimal impact on blood cholesterol levels, it’s always smart to check with a doctor if you have a history of heart health concerns.

Crispy Fried Chicken Tenders

Crispy Fried Chicken Tenders

  • Prep time: 15 minutes


  • Cook time: ~4 minutes per side

  • Yield: Approx. 8–10 tenders


Ingredients

  • Chicken: 1.5–2 lbs chicken breast, cut into 1-inch thick strips, or store-bought tenderloins.

  • Dry Dredge: 1 cup all-purpose flour.

  • Wet Wash: 2–3 large eggs, beaten with 1 tbsp water or milk.

  • Final Coating: 2 cups Panko or plain breadcrumbs.

  • Seasoning: 1 tsp salt, ½ tsp black pepper, 1 tsp garlic powder, 1 tsp onion powder, and ½ tsp paprika.

  • Oil: Canola, vegetable, or peanut oil for frying.


Instructions

1. Prepare the Chicken

  • Pat the chicken strips very dry with paper towels.

    Season the raw chicken directly with a pinch of salt and pepper.

2. Set Up the Breading Station

  • Bowl 1: Flour mixed with half of the seasonings.

  • Bowl 2: Whisked eggs and water.

  • Bowl 3: Breadcrumbs mixed with the remaining seasonings.

3. Coat the Tenders

  • Dredge: Coat a chicken strip in flour and shake off the excess.

  • Dip: Submerge the floured strip into the egg wash until fully covered.


  • Crumb: Press the chicken firmly into the breadcrumbs, ensuring an even and thick coating.


4. Fry to Perfection

  • Heat about 1/2 inch of oil in a large skillet over medium-high heat until it reaches $375^\circ\text{F}$.


  • Fry the tenders in batches (3–4 at a time) to avoid overcrowding the pan.


  • Cook for 3–4 minutes per side until the crust is golden brown and the internal temperature reaches $165^\circ\text{F}$.


  • Drain on a wire rack or paper towels to maintain crispiness.


Quick Tips for Success

  • The “Dry Hand/Wet Hand” Rule: Use one hand for the dry flour/crumbs and the other for the egg wash to avoid your fingers getting heavily breaded.

  • Don’t Rush the Oil: If the oil isn’t hot enough, the breadcrumbs will soak up grease and become soggy.

  • Air Fryer Alternative: Spray breaded tenders with oil and cook at  10–12 minutes, flipping halfway through.

Bakery-Style Blueberry Streusel Muffins

Bakery-Style Blueberry Streusel Muffins

🛒 Ingredients

For the Streusel Topping:

  • 1/2 cup All-purpose flour

  • 1/2 cup Granulated sugar

  • 1/4 cup Unsalted butter (cold and cubed)

  • 1/4 tsp Cinnamon (optional)

For the Muffin Batter:

  • 2 cups All-purpose flour

  • 1/2 cup Granulated sugar

  • 2 tsp Baking powder

  • 1/2 tsp Salt

  • 1/2 cup Whole milk

  • 1/2 cup Sour cream (or Greek yogurt for moisture)

  • 1/2 cup Vegetable oil (or melted butter)

  • 1 Large egg

  • 1 tsp Vanilla extract

  • 1 1/2 cups Fresh or frozen blueberries (do not thaw if frozen)


👩‍🍳 Step-by-Step Instructions

1. Prep the Oven and Pan 🌡️

  • Preheat your oven to 400°F (200°C).

  • Line a 12-cup muffin tin with paper liners (tulip liners work best for that tall, bakery look!).

2. Make the Streusel 🥣

  • In a small bowl, mix the flour, sugar, and cinnamon.

  • Add the cold, cubed butter. Use a fork or your fingers to mash the butter into the dry ingredients until it looks like coarse crumbs. ➡️ Set aside in the fridge.

3. Mix Dry Ingredients 🌾

  • In a large bowl, whisk together the 2 cups flour, sugar, baking powder, and salt.

  • Pro Tip: Toss the blueberries in 1 tablespoon of this flour mixture. This prevents them from sinking to the bottom! ⬇️

4. Mix Wet Ingredients 🥛

  • In a separate medium bowl, whisk the egg, milk, sour cream, oil, and vanilla until smooth.

5. Combine 🔄

  • Gently pour the wet ingredients into the dry ingredients.

  • Use a spatula to fold them together until just combined. ⚠️ Do not overmix; the batter should be thick and slightly lumpy.

  • Gently fold in the floured blueberries.

6. Fill and Top 🥄

  • Scoop the batter into the muffin liners, filling them nearly to the top.

  • Generously sprinkle the chilled streusel topping over each muffin. ➡️ Press down lightly so it sticks.

7. Bake ⏲️

  • Bake for 18–22 minutes, or until a toothpick inserted into the center comes out clean.

  • Let them cool in the pan for 5 minutes before moving to a wire rack.


❓ Common Questions (Q&A)

Q: Why did my muffins come out tough? A: This usually happens from overmixing the batter. Once the flour is added, stir only until the white streaks disappear. 🛑

Q: Can I use frozen berries? A: Yes! Just don’t defrost them first, or they will bleed purple juice into your entire muffin. Add them straight from the freezer. ❄️

Q: How do I get those high, domed tops? A: Starting at a higher temperature (like 400°F) creates a “burst” of steam that lifts the batter quickly before the crust sets. 🚀


Enjoy your baking! 🥧✨

Blueberry Streusel Muffins

Blueberry Streusel Muffins

  • Prep time: 15 minutes

  • Cook time: 20-25 minutes

  • Servings: 12 Large Muffins

The Ingredients

For the Streusel Topping:

  • 1/2 cup all-purpose flour

  • 1/2 cup granulated sugar

  • 1/4 cup unsalted butter, melted

  • 1 tsp ground cinnamon

For the Muffin Batter:

  • 1 1/2 cups all-purpose flour

  • 3/4 cup granulated sugar

  • 1/2 tsp salt

  • 2 tsp baking powder

  • 1/3 cup vegetable oil

  • 1 large egg

  • 1/3 cup whole milk

  • 1 cup fresh blueberries (frozen works too, just don’t thaw them!)

  • 1 tsp vanilla extract

Instructions

  1. Prep the Oven: Preheat your oven to 200°C (400°F). Line a 12-cup muffin tin with paper liners.

  2. Make the Crunch: In a small bowl, mix the streusel ingredients with a fork until it looks like coarse crumbs. Set aside.

  3. Mix Dry & Wet: In a large bowl, whisk together the flour, sugar, baking powder, and salt. In a separate measuring jug, whisk the oil, egg, milk, and vanilla.

  4. Combine: Pour the wet ingredients into the dry. Fold gently with a spatula. Stop as soon as the flour streaks disappear—lumps are your friend here!

  5. Fold in Berries: Gently toss your blueberries in a teaspoon of flour (this stops them sinking) and fold them into the batter.

  6. Bake: Fill muffin cups to the brim. Pile that streusel on top generously. Bake for 20–25 minutes or until a toothpick comes out clean.

Nutritional Info (Per Muffin)

Calorie/Macro Amount
Calories 240 kcal
Total Fat 9g
Carbohydrates 36g
Protein 3g
Sugar 18g

Pro Tips for Success

  • The “No-Overmix” Rule: Overmixing develops gluten, which leads to tough, rubbery muffins. Mix until “just combined.”

  • High Heat Start: Starting at 200°C creates a rapid steam burst that lifts the muffin tops into those beautiful domes.

  • Fresh vs. Frozen: If using frozen berries, do not thaw them. If you do, they’ll bleed juice and turn your entire muffin grey-purple.

Benefits of this Recipe

  • Antioxidant Boost: Blueberries are packed with anthocyanins, which support heart health and brain function.

  • Texture Contrast: You get the soft, fluffy interior paired with a biscuit-like crunch on top.

  • Versatility: You can swap the blueberries for raspberries or blackberries using the exact same ratios.

Q&A

Q: Can I use Greek yogurt instead of milk?

A: Absolutely. It will make the muffins even more moist and slightly tangier. Use a 1:1 swap.

Q: My muffins didn’t rise, what happened?

A: Check your baking powder! If it’s older than 6 months, it might be expired. Also, ensure your oven was fully preheated before the tin went in.

Q: How do I store these?

A: Keep them in an airtight container at room temperature for 2 days. For longer storage, they freeze beautifully for up to 3 months.

Homemade Sweetened Condensed Milk Recipe

Homemade Sweetened Condensed Milk. It is a fantastic staple to have on hand, especially since the store-bought versions can sometimes have a metallic aftertaste from the canning process.

Here are a few tips to ensure yours turns out perfectly:

Pro-Tips for Success

  • The Simmer is Key: Keep the heat low during that 30–40 minute window. If the milk boils too vigorously, it can scorch or create a grainy texture. You want a very gentle “smile” on the surface of the liquid.

  • The “Thickening” Illusion: Don’t worry if it looks a bit thinner than expected while it’s still hot. Condensed milk thickens significantly as it cools in the refrigerator.

  • Preventing a Skin: If you want to avoid a “skin” forming on top as it cools, place a piece of plastic wrap directly onto the surface of the liquid until it reaches room temperature.


Quick Variations

Addition Result
Pinch of Salt Balances the intense sweetness and enhances the dairy flavor.
Cocoa Powder Stir in 2 tablespoons at the end for a chocolate condensed milk.
Coconut Milk Swap the whole milk for full-fat canned coconut milk for a dairy-free version.

Common Uses

  • Coffee & Tea: Use it as a rich creamer for Thai iced tea or Vietnamese iced coffee.

  • Quick Fudge: Melt it with chocolate chips for an almost instant fudge.

  • Fruit Dip: Mix it with a little lime juice and zest for a creamy dip for berries or apples.

Strawberry Cheesecake Dump Cake

🍓 Strawberry Cheesecake Dump Cake

(5 Ingredients, Zero Hassle)

✨ Description

This dessert is the ultimate “dump-and-bake” treat—sweet strawberry filling, rich creamy cheesecake pockets, and a buttery golden topping. No mixing bowls, no fuss… just layer, bake, and enjoy!


🛒 Ingredients (Only 5!)

  • 1 can (21 oz) strawberry pie filling
  • 1 box vanilla or yellow cake mix
  • 8 oz cream cheese (softened)
  • ½ cup granulated sugar
  • ½ cup (1 stick) butter, melted

👩‍🍳 Instructions

  1. Preheat oven to 180°C (350°F).
  2. Spread strawberry pie filling evenly in a greased baking dish.
  3. In a bowl, mix cream cheese + sugar until smooth.
  4. Drop spoonfuls of the cream cheese mixture over the strawberries.
  5. Sprinkle dry cake mix evenly on top (don’t stir).
  6. Drizzle melted butter over the cake mix as evenly as possible.
  7. Bake for 40–45 minutes until golden and bubbly.

🍰 Serving Ideas

  • Serve warm with vanilla ice cream 🍦
  • Or chill it for a firmer cheesecake-like texture
  • Add fresh strawberries on top for extra flavor

❓ Q & A

Q: Can I use fresh strawberries instead of canned?
A: Yes! Just cook them with a little sugar and cornstarch first to make a thick filling.

Q: Can I use other cake mix flavors?
A: Absolutely! Try white cake, strawberry cake, or even butter pecan.

Q: How do I store leftovers?
A: Keep in the fridge for up to 3 days. Reheat or enjoy cold!

Creamy White Chicken Chili 🍲✨

Creamy White Chicken Chili 🍲✨

This comforting white chicken chili is a hearty alternative to traditional red chili. It’s packed with tender chicken, creamy white beans, and a flavorful broth that is both light and satisfying.


🛒 Ingredients

  • Chicken: 1.5 lbs chicken breast or thighs (cooked and shredded) 🍗

  • White Beans: 2 cans (15 oz each) Cannellini or Great Northern beans (drained and rinsed) 🫘

  • Aromatics: 1 medium onion (diced), 2 cloves garlic (minced), and 1 cup diced celery 🧅🌿

  • Broth: 4 cups chicken broth 🥣

  • Green Chilies: 1 can (4 oz) diced mild green chilies 🌶️

  • Creaminess: 4 oz cream cheese (softened) and ½ cup sour cream or Greek yogurt 🥛

  • Spices: 1 tsp cumin, 1 tsp dried oregano, ½ tsp chili powder, salt, and pepper to taste 🧂


👩‍🍳 Instructions

  1. Sauté the Base ➡️ In a large pot or Dutch oven, heat a tablespoon of oil over medium heat. Sauté the diced onion and celery until softened (about 5 minutes). Add the garlic and cook for 1 more minute until fragrant. 🥘

  2. Simmer the Broth ➡️ Pour in the chicken broth and the diced green chilies. Add the cumin, oregano, and chili powder. Stir well. 🥣

  3. Add Beans and Chicken ➡️ Add the shredded chicken and the white beans to the pot. Bring the mixture to a gentle boil, then reduce the heat and simmer for 15–20 minutes to allow the flavors to meld. 🫘🍗

  4. Make it Creamy ➡️ Stir in the softened cream cheese until completely melted and smooth. Finally, stir in the sour cream (or Greek yogurt) and remove from heat. Note: Do not boil after adding the sour cream to keep the texture smooth. 🥛✨

  5. Serve ➡️ Ladle into bowls and garnish with fresh cilantro, avocado slices, or a squeeze of lime juice. 🍋🌿


❓ Q&A Section

Q: Can I make this in a slow cooker? A: ➡️ Yes! Place everything except the cream cheese and sour cream in the slow cooker. Cook on Low for 6–7 hours or High for 3–4 hours. Stir in the cream cheese and sour cream just before serving. 🕒🥘

Q: How can I make the broth even thicker? A: ➡️ Take ½ cup of the white beans and mash them with a fork before adding them to the pot. This naturally thickens the chili without adding extra flour or starch! 🥄✨

Q: Is this recipe very spicy? A: ➡️ No, it is quite mild. The canned green chilies provide flavor rather than heat. If you prefer more spice, you can add diced jalapeños or a pinch of cayenne pepper. 🌶️

Q: Can I use a rotisserie chicken? A: ➡️ Absolutely! Using a pre-cooked rotisserie chicken is a great way to save time and adds fantastic flavor to the dish. 🍗✅


💡 Tips for Success

  • Texture: For the best results, ensure your cream cheese is at room temperature before stirring it in to prevent small lumps. 🌡️

  • Variations: You can add corn or bell peppers for extra color and crunch! 🌽🫑

Slow Cooker Onion Butter Potatoes

Slow Cooker Onion Butter Potatoes

If you’re looking for an easy, comforting, and flavorful side dish that practically cooks itself,
these Slow Cooker Onion Butter Potatoes are exactly what you need. Tender baby potatoes,
sweet caramelized onions, rich butter, and aromatic garlic come together to create a simple yet satisfying dish.

Perfect for busy days, family dinners, or holiday meals, this slow cooker recipe delivers soft, buttery potatoes
infused with deep savory flavor—all with minimal effort.

Ingredients

  • 2 lbs (900g) baby potatoes, halved or quartered
  • 1 large onion, thinly sliced
  • 3 tablespoons unsalted butter, cubed
  • 3 cloves garlic, minced
  • Salt, to taste
  • Black pepper, to taste
  • Optional: fresh parsley, chopped (for garnish)

Instructions

Step 1: Prepare the Potatoes

Wash the potatoes thoroughly. Cut larger ones into halves or quarters so they cook evenly.

Step 2: Prepare Onion & Garlic

Thinly slice the onion and finely mince the garlic to ensure even flavor distribution.

Step 3: Assemble

Place potatoes in the slow cooker. Add onions and garlic on top, then scatter butter evenly.
Season with salt and black pepper.

Step 4: Cook

  • LOW: 6–7 hours
  • HIGH: 3–4 hours

Cook until potatoes are fork-tender.

Step 5: Serve

Gently stir to coat with butter and onions. Garnish with parsley if desired and serve warm.

Tips for Best Results

  • Use waxy potatoes like Yukon Gold for best texture.
  • Butter is essential—don’t skip it.
  • Add herbs like thyme or rosemary for extra flavor.
  • Sauté onions first for deeper taste.

Optional Variations

  • Cheesy: Add cheddar or Parmesan at the end.
  • Creamy: Stir in heavy cream before serving.
  • Spicy: Add red pepper flakes or paprika.
  • Garlic Boost: Double the garlic.

What to Serve With

  • Roasted or grilled chicken
  • Beef steak or roast
  • Baked fish
  • BBQ dishes

Final Result

Soft, buttery potatoes infused with garlic and sweet onions, delivering rich and comforting flavor in every bite.

🌼 Perfect Chamomile Tea (No Bitterness, Maximum Calm)

🌼 Perfect Chamomile Tea (No Bitterness, Maximum Calm)

https://images.openai.com/static-rsc-4/vNW5CYoRLuyjRCdhpjbNbuHwy1XgyxGlZhWbF5ivdQwW0Ot8YGPfM11Jx34FPRM5L-_ZhUJsltZeD241RePx0PcVo-uz48iiGf2F8Ryipxq470ynsKGA2mqATvoz1rP0mnFzsR--6qSLz56Us489dsLuvj_wwvpj2PP7hBq_bsF7uaTiVLfwAWbRwQb2QG1T?purpose=fullsize
https://images.openai.com/static-rsc-4/dWe6mDgxAsH0fbILB5HHb8zTS_TpK24V33iISq6_b5AYonDroSJ4algqAsA0J9phCcTP9cDXXuQvRldlY5PV8zfhmz7trS4ufNEuuzJJPmBV2NbibWBkcLhVGDOuZgGRZlyEFaGm0XvUUMR5xLKrPoKbJCX1LS4p1r3b190GGliWux2T_ToLJitxooEkXXaN?purpose=fullsize
https://images.openai.com/static-rsc-4/FZ87u7tDLVNOoGk1WkGC_82MPOn0b9Cr6UB5W_TqlE4YzqHE_liGmhHmk2GLBGY0JkYnc3ChQHkU7rjzpEpYxBd8uW3M9p5LWe49_z1JBNueFjd5LC8DGyQS5UC8oWpg5vSi1UTgE1FTHACMfvtFQuKzKAlY-LpIn44XlzXmkhSg0vxuUBzNrjAP1wfUXEz5?purpose=fullsize
https://images.openai.com/static-rsc-4/UTLXWTVdy6UbRllmyooBebYj2MfpHfKQTyfMPR0ivnTlC92f-pG-mTvl9ACS-ZJJ1oFb6jKy0mmmXBdIfRzc_yy4daw36APGxIwlsYM76azhH4Wy6_TiIHLE4JKT7asFrc8vxfscF0ymDgHDHRmOT2UK-CCCjFe23Fq0ZhRZNMxJniaDJ1D54ymrhWM2r2Vt?purpose=fullsize
https://images.openai.com/static-rsc-4/jEc8vVeNcQafxBQ5o8CCSdN2WYv2IfLiBeOv6lHB9rt_iP5e6LgrIrMU_w0jP500wFEyGbKuXGrJwSkNuLqL1LFvcB23PLEsolD6L3douEc5c4flNMoISw1reSQZ8kZ9pg7_4F-eRz42TNHT90U7eGGaXMVUvJzZTWMgUP0elqFCu62jt4Pneo4yXGd39-CY?purpose=fullsize

📝 Ingredients

  • 1 ½ cups filtered water (clean water = clean flavor)
  • 2 tbsp dried chamomile flowers (or 2 premium tea bags)
  • 1 tsp raw honey (optional, low-carb sweetness)
  • 1 thin slice lemon or fresh mint sprig (optional)

☕ Instructions (The Right Way)

1. Heat the Water
Bring water to about 90°C (not boiling).
👉 No thermometer? Let it rest 2 minutes after boiling.

2. The “Trap the Calm” Method
Add chamomile to your mug and pour hot water over it.
👉 Immediately cover with a lid or saucer.

3. Deep Steep (Don’t Rush This)
Let it steep for 5–7 minutes.
Chamomile needs time to release its full soothing compounds.

4. Strain & Finish
Remove flowers or tea bag gently.
Add honey and lemon/mint if desired.


🔬 Why This Method is Superior

✔ The Lid = Maximum Relaxation
Chamomile contains bisabolol, a delicate essential oil.
Without a lid → it evaporates → weaker tea.
With a lid → you keep the calming magic.

✔ Perfect Temperature = No Bitterness
Boiling water burns delicate floral notes → bitter taste.
90°C keeps it smooth, sweet, and apple-like.

✔ No Squeezing Rule
Squeezing tea bags releases tannins
🚫 bitter
🚫 grassy (“wet hay” taste)
✔ smooth if left alone


💡 Pro Tips (Next-Level Upgrade)

  • Use a glass or ceramic cup (keeps flavor pure)
  • Add a tiny pinch of cinnamon for warmth
  • Drink before bed for best calming effect 😴
  • Try double steeping (reuse flowers once for lighter second cup)

🌿 What It Tastes Like (When Done Right)

  • Lightly sweet
  • Soft apple-like notes
  • Smooth, buttery floral finish
  • Zero bitterness

Easiest No-Knead Pantry Flatbread

Easiest No-Knead Pantry Flatbread

Prep time: 10 mins | Rest time: 1 hour | Cook time: 15 mins

Yields: 10–12 Flatbreads

Ingredients

  • All-Purpose Flour: 4 cups (500g)

  • Warm Water: 1 ½ cups (350ml) — ensure it is lukewarm, not hot

  • Instant Yeast: 2 ¼ teaspoons (1 packet)

  • Sugar: 1 tablespoon (helps activate the yeast)

  • Salt: 1 ½ teaspoons

  • Olive Oil: 2 tablespoons (plus a little extra for the bowl)

Instructions

  1. Activate the Yeast: In a large bowl, combine the warm water, sugar, and instant yeast. Let it sit for 5 minutes until it becomes slightly foamy on top.

  2. Mix the Dough: Add the olive oil and salt to the yeast mixture. Gradually stir in the flour with a wooden spoon or spatula. Mix until a shaggy, sticky dough forms and no dry flour remains. Do not knead.

  3. The First Rise: Lightly oil the top of the dough. Cover the bowl with a clean kitchen towel or plastic wrap. Place it in a warm, draft-free spot and let it rise for 1 hour, or until it has doubled in size.

  4. Shape the Bread: Gently deflate the dough with your hand. Turn it out onto a well-floured surface. Divide the dough into 10–12 equal portions. Roll each piece into a smooth ball.

  5. Flatten: Use your fingers or a rolling pin to flatten each ball into a circle about ½ inch thick.

  6. Bake or Pan-Sear:

    • Oven Method: Preheat your oven to 425°F (220°C). Place the circles on a parchment-lined baking sheet. Bake for 10–12 minutes until they puff up and turn golden brown.

    • Stovetop Method: Heat a non-stick skillet over medium-high heat. Place a circle of dough in the dry pan. Cook for 2 minutes until bubbles form, then flip and cook for another 1–2 minutes until golden spots appear.

  7. Keep Soft: As you remove the breads from the heat, stack them and wrap them in a clean towel. The steam will keep them soft and pliable.


Nutritional Benefits

  • Preservative-Free: Unlike store-bought bread, this contains zero additives, stabilizers, or hidden sugars.

  • Complex Carbohydrates: Provides a steady source of energy for your day.

  • Low Fat: By using a small amount of healthy olive oil instead of butter or lard, you keep the saturated fat content very low.

  • Digestive Friendly: The long fermentation (rising time) helps break down gluten slightly, making it easier on the digestive system for many people.


Q&A

Q: Can I use Whole Wheat flour? A: Yes! You can replace up to half of the all-purpose flour with whole wheat. You may need to add an extra tablespoon of water as whole wheat flour absorbs more moisture.

Q: My bread didn’t puff up, what happened? A: This usually means the water was either too cold (yeast didn’t wake up) or too hot (yeast was killed). Aim for “baby bath” temperature. Also, ensure your baking sheet or skillet is properly preheated.

Q: How do I store these? A: Once completely cool, store them in a zip-top bag at room temperature for 3 days. For longer storage, they freeze beautifully for up to 3 months. Just toast them briefly to revive the texture.

Q: Can I add flavors? A: Absolutely. Mix in 1 tablespoon of dried herbs (like rosemary or oregano) or 2 cloves of minced garlic into the dough for a savory twist.

Flourless High-Protein Flatbreads

Flourless High-Protein Flatbreads

Ingredients

  • 1 cup Low-fat or fat-free cottage cheese (ensure it is well-drained)

  • 2 large Eggs

  • ½ cup Egg whites (liquid or from about 3–4 eggs)

  • ¼ teaspoon Salt

  • Optional: Garlic powder, onion powder, or dried herbs (rosemary or thyme) for extra flavor.

Instructions

  1. Blend the Base: In a high-speed blender or food processor, combine the cottage cheese, whole eggs, egg whites, and salt. Blend until the mixture is completely smooth and liquid, with no visible curds.

  2. Preheat the Pan: Heat a non-stick skillet or griddle over medium heat. Lightly coat with a quick spray of olive oil or avocado oil.

  3. Cook the Flatbreads: Pour about ¼ to ⅓ cup of the batter onto the hot pan, tilting the pan slightly to spread it into a thin, even circle (similar to a crepe).

  4. Flip with Care: Let it cook for about 3–4 minutes until the edges start to lift and the bottom is golden brown. Gently slide a spatula underneath and flip. Cook for another 2 minutes on the other side.

  5. Cool and Stack: Remove from the pan and place on a wire rack or plate. Repeat with the remaining batter. As they cool slightly, they will become more flexible and “bready.”


💡 Chef’s Tips for the Best Texture

  • The “Dry” Secret: To get that perfect flaky look shown in the photo, you can lightly brush the cooked flatbread with a tiny amount of ghee or butter while it’s still warm.

  • Storage: These stay fresh in the fridge for up to 4 days. You can reheat them quickly in a dry pan to bring back the slightly crisp exterior.

  • Savory Wraps: Use these as a base for a high-protein wrap—fill them with grilled chicken, avocado, and fresh greens.

⚠️ A Quick Note on Nutrition

While these are incredibly low in carbohydrates and high in protein, no food technically “eats sugar” or physically “dries out” the body on its own. They are, however, an excellent choice for maintaining a balanced, sugar-free lifestyle and staying full for longer.

🧀🥦 The Viral Cheesy Broccoli & Potato Bake

🧀🥦 The Viral Cheesy Broccoli & Potato Bake

https://images.openai.com/static-rsc-4/mQpU5DmugNwSaGoskvyjRv222UQqqsaFM05S4WNRo6VPEP6tESlWeJhsaJDhUpoHnM4nHWQiwjlLNb0kwjpiAXFzuv6ZRzGPgH5csoKagqlUaoop4VRCTYtMIFpxAcecGsWnCJwpAkZfDDdqkn4T7yK4MEbsp5uMCUQ3z5k9VNwKmBGbZ_sQtbHYuM3slwC8?purpose=fullsize
https://images.openai.com/static-rsc-4/vpYJYKvUoLiDbOSpi8Jj5_-mOeYYj5Z0R5vcpRU8FtTFxFj_SYiGZp0OUMuUICNYfd-nKwHl5aGp7J7NpEIPAA4BH6GdEVxzavirx3Uog0hzJzWZLUJOH5oyx0x4UYleVa-PmiwDyqV6_CWEgv1EvaU50ZBqcY0xewuxyZqHbUU3x2fpw5F9zBrRvuYnQzE5?purpose=fullsize
https://images.openai.com/static-rsc-4/XfC8d9F1zPyLf0SSbNunvnksWlsRWdLNFxYbMYybNYiSfNBCYV04exNM7Z2W7BZOm3coGGCupkypN2fjZg30GHAp2IU0TM1wmfO-tdYCXtXRnZKHGFYJ9DqW9jdlI4mg6n8Irxvaqt7LvISFKyrxBhnO1UDXCeYvBFo53HA9sl3JZAU5aX7efnBm3Rwe0ybC?purpose=fullsize
https://images.openai.com/static-rsc-4/eJExpF-VIE5ivdfsnp4jG9h3keUBCzIH6r0vEmGwEzmKIVK94t2OuofqrDVrp25w63MuxXy2xbmat1_AyOZMYmpfqGkbfdLA4S7MLi34DzzWudWp_uldcEJ3dp671zjVTUr10NQykN6JZ6EtsDGEq0B8vfmClM9oecGKOUssFjpNy4JAvH7Sj5qiYVTKqUBk?purpose=fullsize
https://images.openai.com/static-rsc-4/cQpXXBF2pUz7UbfkMw6_NkCDOXTJyRHg0qMZ_uTVi0K3Ri2_0_UH5XfmMEOffPgDxzL0xB9222ajAajqYcZ7Bo1P0gXochB7mf5V4LUdDORM_PWX0mubHe1bPc-oVghjUZBqCTP58QzVQ5zzf7Fm3dA3OOd6Aabe6niJ5MvPdYHYx-qx-sFSSZ_ysQixtU7o?purpose=fullsize
https://images.openai.com/static-rsc-4/6An1upW377Eno20xQsbhYW3peILSzn-o1RuqJLh_ESyIQ8jh5bwWwJyp_4eEOXQ1YGc-vzXEcF0uSSvPX7CmB674i4evO7URJAQf-d5625k2lOXx1G0EoTGEXGmI1XBggtTUwwdgJLVFtOTRb2A9AKWhKnryp6vRRx3QBYWDbZJRQE9OyAGT4CzZ4Db-c9Nj?purpose=fullsize

This dish is the definition of comfort food—creamy, cheesy, and perfectly golden on top. It’s simple enough for a weeknight but delicious enough to feel special. That little pinch of nutmeg? That’s the secret touch that makes it taste like a restaurant-style gratin.


❤️ Why This Recipe Goes Viral

  • ✔️ Super creamy + cheesy texture
  • ✔️ Simple ingredients, big flavor
  • ✔️ Perfect side dish or main meal
  • ✔️ Family-friendly & filling
  • ✔️ That crispy golden cheese top 🤤

🛒 Ingredients

🥔 Vegetables

  • 2 lbs potatoes (Yukon Gold or Russet), cubed or sliced
  • 1 large head broccoli, cut into florets

🥛 Sauce/Base

  • 3 large eggs
  • 1 cup milk
  • 1 cup heavy cream (optional but rich)
  • 2 tbsp olive oil or melted butter

🧂 Seasoning

  • 1 tsp salt
  • ½ tsp black pepper
  • 1 tsp garlic powder (or fresh garlic)
  • ½ tsp paprika or chili flakes (optional)
  • Pinch of nutmeg ⭐

🧀 Topping

  • 2 cups shredded cheese (cheddar, mozzarella, or Gruyère)
  • ¼ cup breadcrumbs (optional crunch)

👩‍🍳 Step-by-Step Instructions

1️⃣ Preheat & Prep

  • Preheat oven to 200°C (400°F)
  • Grease a baking dish

2️⃣ Par-Cook (Important Step!)

https://images.openai.com/static-rsc-4/F_481Hk9bfYuK_fOw15Sfl-94vhr9QaZ5AhOT_oz_fn8Uc7NVsFckY80_G8VUQIHdvVv4rN3FUXuBWqqNXsYTKHyu21gNt0Wf2MJr91FMbLpfxaYIcbEL4Us4rdZeoGVk4YhtJvRtUtzAUc82cPfxTCB8ec7OnMGrhThjoOUldsdHRcrJLFlCK9iCETKbQss?purpose=fullsize
https://images.openai.com/static-rsc-4/LTqN-51c5aNCu1OmVvKT8S_PQm7zGfX4mTGEeenvK4EiYkKvt2trS7e28bJTjiHbURfheJK6bioaNpuzI0EJJozybCfSBmHV0FN91R3EJGppGJtSmcSzr9TDMCfcABcYmszxtQB-W4ILMzrFvN3uamHC6F6TZlUY8tClhZqzpLF3e5-yjVJ76zryGtlxPtOI?purpose=fullsize
https://images.openai.com/static-rsc-4/US1Nl37tLd6nc6ooJN8AkmPEzFvwYhPlaM7JKGkRdyoDML5-QJvyjF1_6HRwMkTejmKQ5CY3nksabfsvxVaHUfQ_H0HL505F1XhZQficS-kJnZWW-k-8f_4oLO-H6m1AshEBRR8a8t7EXWUBDvtMnWRHLZP5xEB8apgbclx2vMZ14xRX6GHMsuE5jpPoYa2J?purpose=fullsize
https://images.openai.com/static-rsc-4/pFsc9VrVmNh8Mo5Ey4mo49mY_NGW2XVes5I-W7I_WZym0d2ZWr_o33ogfxlVwpEaYiHgWJAB3IMwhtKRy84PnDYWnToqFD55Slx9Lgy1hukk64TAH3Mo8ZjNaip0jXnDJZa_uIyuL1af_eEvwj9G8pGJaFlKY3Ggmm_kzg6K-Nor67Lf71Ll39hZFrvStTLf?purpose=fullsize
https://images.openai.com/static-rsc-4/DuYmrxvxD0yF-i4kF4pHUzleRJiiDuyG7sGDr84L_Q7ou0A9ZdI0UMVry5G7g_lTZorYwQESeE34mpdj_Arz_nt3A_9-TX1BvaSQb0Q7DqAcV0MhLChvx4K5auNG4DmJDvMai0kFfEIqLOIH2WG3NFv_xIBS1I6wrccylYmB5ZOHlY8MgQmpS-ld5WpBkQ2p?purpose=fullsize
https://images.openai.com/static-rsc-4/_0NUfVoelcwvZi8a3xa5bOItIS80Qr11bGrSZ1-hcXJ47tYmKgmlqTaSkCf1jn0eY0AfU_-tASTbPFlKsTtfLHd3yiSkXKFWKDSCoepAeA-thTMcECJKPKUis9e2zMmM-t_QjpvQmnrPWOoIO9ioVCjXVuwywennDFop1_FoEWtYyYPrM7lgZ5xh9AqIhMUt?purpose=fullsize
  • Boil potatoes in salted water for 8–10 minutes
  • Add broccoli in last 3 minutes
  • Drain well

✔️ This ensures soft, perfectly cooked veggies


3️⃣ Make the Creamy Mixture

  • Whisk together:
    • Eggs
    • Milk
    • Cream (optional)
    • Oil/butter
    • All seasonings

4️⃣ Assemble

  • Add potatoes + broccoli to baking dish
  • Pour sauce evenly over

5️⃣ Add the Magic 🧀

  • Sprinkle cheese generously
  • Add breadcrumbs (optional)

6️⃣ Bake to Perfection

https://images.openai.com/static-rsc-4/vcUYuSUPNvpPJg4mTwmUvh-o4GZBpddS44ulSDTWWdF9vl5YzuFTdJ0q4DOwl2QwaQlOLA3sAhRYmrZYSDDVkT9EsBQLSIce3aQwusCdvvNfnCfehxiduifUWCEu2vIXFoqFh1u3yoDK1GDE_Plf2KKtF-7A5ad5qtlA2H0RNPBb3iUfeLWtZcdbYcLUZtE2?purpose=fullsize
https://images.openai.com/static-rsc-4/QgWjnHzyXR6yh4Kb5CYLswAmc4m5RB9WJF3s37V9nrmSvvXx5FzKZf8eCCSIR1VSpO3Zj7laaK0Cn3nsQkvoo8_ZVWrPm5wpIK4fMdNrZNa4TGjH42UoH3tFP5vpvNXq6p0I1fw757w9HqqXeKTl64JRTgadLwvl6_L9KXvQyWNRONzymFK8Zi7wrfMQM7Q7?purpose=fullsize
https://images.openai.com/static-rsc-4/bfBzxHFVMhC_lRS-PH4KMSkoCNB6uAyAYUVMLnSaxDXRJvSqm3Sgt_BFeTM0-k5BwnxokFEoAsqzcoqdnE5pT-4tpxcrcJn6L1k6gUeUS0WAxBlpKvASN_hKF-gKgxyD50DjqoQjiRYALKhSb1pjJ37PNix7IKdLgWBn2VPsuyq137vJX26mkLBP3IcQwJ1D?purpose=fullsize
https://images.openai.com/static-rsc-4/XfC8d9F1zPyLf0SSbNunvnksWlsRWdLNFxYbMYybNYiSfNBCYV04exNM7Z2W7BZOm3coGGCupkypN2fjZg30GHAp2IU0TM1wmfO-tdYCXtXRnZKHGFYJ9DqW9jdlI4mg6n8Irxvaqt7LvISFKyrxBhnO1UDXCeYvBFo53HA9sl3JZAU5aX7efnBm3Rwe0ybC?purpose=fullsize
https://images.openai.com/static-rsc-4/zZg-7DuuDH6CyTHiT11Cli7I5c70aEMld39QE6MWdgz0OlZtUeHIBhjXCkNQiD8X1grZKKycHjdhtxXsFFbTYMTTWCLWfhnW62mIqJ6OT6h-GmhVc56V85sy9pc4Z5tOp0l_y5GWx8Fx5i0jNVvAFSd6qu6T0k3RnO74CW17t2vXiLTPFhNnIvaLIHIq3g0C?purpose=fullsize
https://images.openai.com/static-rsc-4/r5GyXdYgqbtWGznvQqzgCBgQXXyc4DgQkBE9gaVU5b3i1af2whNTpKvDhjPhwwOx5sEHM6sxfsPB5P2XMScXKLvDqFuZb0FJwMkH2fRN9S9G0LG4jMtfhg6O5V92nYVnwEx4ofcsJRc_MY4SBhdWm1hrcwEIxB9cWlOD6-dv4UMRoa1eT2ZEFIpo_syoJyZ_?purpose=fullsize
  • With par-cooking: Bake 20–25 mins
  • Without par-cooking:
    • Cover → 45 mins
    • Uncover → 10 mins for browning

✔️ Ready when golden, bubbly, and irresistible


7️⃣ Rest & Serve

  • Let it sit 5 minutes
  • Slice and serve warm

🍽️ Serving Ideas

  • 🍗 With grilled chicken
  • 🥩 Alongside steak
  • 🥗 With a fresh salad
  • 🍞 Or enjoy it as a main dish

🔥 Pro Tips

  • Slice potatoes thin for faster cooking
  • Mix cheeses for better flavor (cheddar + mozzarella = 🔥)
  • Add cooked chicken or beef for a full meal
  • Don’t skip nutmeg—small but powerful

🧊 Storage

  • Fridge: 3–4 days
  • Freeze: Up to 2 months
  • Reheat: Oven for best texture

⏱️ Quick Info

  • Prep: 15 mins
  • Bake: 45–55 mins
  • Serves: 4–6

🍦 Keto Butter Pecan Ice Cream

🍦 Keto Butter Pecan Ice Cream

No Churn (No machine needed), Gluten-Free, Low-Carb

Ingredients

For the Buttery Pecans:

  • 1 cup Pecans (halves or chopped)

  • 2 tbsp Butter (salted is best for flavor)

  • 1 tbsp Keto Sweetener (Allulose or Erythritol)

  • Pinch of Sea Salt

For the Ice Cream Base:

  • 2 cups Heavy Whipping Cream (cold)

  • 1/2 cup Unsweetened Almond Milk (or more heavy cream for extra richness)

  • 1/2 cup Powdered Keto Sweetener (Allulose is recommended for a softer scoop)

  • 1 tsp Vanilla Extract

  • 1/2 tsp Butter Extract (optional, but gives it that “bakery” taste)


Instructions

1. Prep the Pecans

In a small skillet over medium heat, melt the 2 tbsp butter. Add the pecans and a pinch of salt. Sauté for 3–5 minutes until fragrant and toasted. Stir in 1 tbsp sweetener at the very end until melted. Remove from heat and let them cool completely on parchment paper.

2. Whip the Base

In a large chilled bowl, use a hand mixer to beat the heavy whipping cream and powdered sweetener until stiff peaks form (it should look like thick whipped cream).

3. Combine

Gently fold in the almond milk, vanilla extract, and butter extract using a spatula. Be careful not to deflate the cream. Once smooth, fold in most of your cooled pecans (save a few for the top!).

4. Freeze

Transfer the mixture into a loaf pan or freezer-safe container. Smooth the top and sprinkle the remaining pecans. Cover tightly with plastic wrap or a lid.

  • Freeze for 4–6 hours. > Pro Tip: Since homemade keto ice cream doesn’t have chemical softeners, let it sit on the counter for 5–10 minutes before scooping so it softens up perfectly!


Why this works:

  • No Flour: We use heavy cream and air (whipping) to create structure.

  • No Sugar: Keto sweeteners don’t spike insulin, helping you stay in fat-burning mode.

  • The “Dry Out” Effect: By keeping carbs very low, your body drops excess water weight (often called “drying out” in fitness circles).

Broccoli Salad

Broccoli Salad


A fresh broccoli salad tossed in a quick & easy homemade dressing!

Salad Ingredients:

  • 8 cups fresh broccoli, cut into bite-sized pieces
  • 1 cup cheddar cheese, shredded
  • ½ cup bacon bits
  • ⅓ cup red onion, diced (optional)
  • ½ cup dried cranberries (optional)
  • ¼ cup sunflower seeds (optional)

Dressing:

  • 2 tbsp vinegar
  • 1/2 c sweetener granulated sugar
  • 1 cup mayonnaise
  • salt & pepper

Instructions

Whisk together vinegar, sugar, mayonnaise, salt and pepper in a medium bowl. Set aside.

In a large bowl, combine broccoli, onion, cranberries, sunflower seeds, and bacon bits. Pour the prepared dressing over and mix well.

Refrigerate for at least one hour before serving.

TIP: I also use this dressing for coleslaw

Fluffy Custard-Filled Braid Buns

Fluffy Custard-Filled Braid Buns

  • Prep time: 1 hour 30 minutes (including rising)

  • Cook time: 20–25 minutes

  • Servings: 8–10 buns

Ingredients

For the Dough

  • 180 ml Lukewarm milk

  • 1 Egg (room temperature)

  • 3 tbsp Sugar

  • 1 tsp Instant dry yeast

  • ½ tsp Salt

  • 40 g (2 tbsp) Unsalted butter, melted and cooled

  • 400 g (approx. 2½ cups) All-purpose flour

For the Custard Filling

  • 250 ml Milk

  • 1 Egg yolk

  • 2 tbsp Sugar

  • 1 tbsp Cornstarch

  • ½ tsp Vanilla extract

For the Finish

  • 1 Egg yolk mixed with 1 tsp milk (for egg wash)

  • Powdered sugar (for dusting)

Instructions

  1. Activate the Yeast: In a large mixing bowl, combine the lukewarm milk, sugar, and instant yeast. Stir gently and let it sit for about 5 minutes until the mixture becomes slightly foamy.

  2. Mix the Dough: Whisk in the egg and melted butter. Gradually add the flour and salt. Stir until a shaggy dough forms, then move it to a floured surface.

  3. Knead and Rise: Knead the dough for 8–10 minutes until it is smooth and elastic. Place it in a lightly greased bowl, cover with a damp cloth, and let it rise in a warm spot for 1 hour, or until it has doubled in size.

  4. Prepare the Custard: While the dough rises, whisk the egg yolk, sugar, and cornstarch in a small saucepan. Slowly pour in the milk while whisking constantly. Place over medium heat and stir until the mixture thickens into a smooth custard. Remove from heat, stir in the vanilla, and cover with plastic wrap (pressed directly onto the custard surface) to cool completely.

  5. Shape the Buns: Gently deflate the risen dough and divide it into 8–10 equal portions. Roll each piece into a rope about 10–12 inches long. Fold the rope in half and twist the strands together, then join the ends to form a braided loop or a figure-eight shape.

  6. Second Rise: Place the shaped buns on a baking tray lined with parchment paper. Cover and let them rest for another 20 minutes.

  7. Fill and Bake: Preheat your oven to 180°C (350°F). Brush the dough lightly with the egg wash. Pipe the cooled custard into the center loops of each braid. Bake for 20–25 minutes until the buns are a deep golden brown.

  8. Serve: Allow the buns to cool slightly on a wire rack. Lightly dust the bread edges with powdered sugar before serving.


Common Questions & Answers

Q: Why must the custard be fully cooled before piping? A: If the custard is still warm, it can cause the dough to “melt” or become soggy during the second rise. Cooling the custard also ensures it stays in place during the baking process rather than running out of the loops.

Q: Can I use bread flour instead of all-purpose flour? A: Yes, bread flour will give the buns a slightly chewier, more structured texture, while all-purpose flour keeps them very soft and tender. Both options work well for this recipe.

Q: My dough isn’t rising; what happened? A: Yeast is sensitive to temperature. If the milk was too hot (above 45°C), it may have deactivated the yeast. Conversely, if the room is too cold, the rise will just take much longer. Try placing the bowl in a turned-off oven with the light on.

Q: How do I store these? A: Because they contain a milk-and-egg-based custard, these buns are best stored in an airtight container in the refrigerator for up to 2 days. You can briefly microwave them for 10–15 seconds to restore their softness before eating.

Q: Is there a way to make these lower in sugar? A: You can substitute the sugar in both the dough and the custard with a granulated sugar alternative like erythritol. Note that yeast needs a tiny bit of real sugar or honey to feed on, so you may want to keep at least 1 teaspoon of real sugar in the milk mixture to ensure a good rise.

Homemade Chili Garlic Sauce

Homemade Chili Garlic Sauce

This vibrant sauce balances heat with savory and tangy notes.

Ingredients:

  • 5-6 fresh red chilies (adjust for your preferred heat level)

  • 4 cloves of garlic, minced

  • 1 tablespoon olive oil or vegetable oil

  • 1 tablespoon vinegar (white or rice vinegar)

  • ½ teaspoon salt (or to taste)

  • ½ teaspoon sugar (optional, for balance)

Instructions:

  1. Mince the fresh chilies and garlic into fine pieces.

  2. Heat the oil in a small saucepan over medium heat.

  3. Add the minced chilies and garlic, and sauté for 1–2 minutes until they become fragrant (do not let them brown).

  4. Stir in the vinegar, salt, and sugar (if using).

  5. Allow the mixture to simmer gently for about 3–5 minutes until it thickens slightly and the flavors meld.

  6. Taste and adjust the salt or sugar as needed.

  7. Let the sauce cool before transferring it to a jar. Enjoy it as a marinade, dipping sauce, or stir-fry addition.

Creamy Baked Rice Pudding

Creamy Baked Rice Pudding

📝 

Ingredients

  • ½ cup rice (short grain or basmati)
  • 4 cups milk
  • ½ cup sugar (adjust to taste)
  • 2 tbsp butter
  • 2 eggs
  • 1 tsp vanilla essence
  • ¼ tsp salt
  • ½ tsp cinnamon or cardamom (optional)
  • 2 tbsp cream (optional, for extra richness)

👩‍🍳 

Step-by-Step Method

Step 1: Cook the rice

  • Wash rice and cook it with 2 cups of milk on low heat.
  • Stir occasionally until rice becomes soft and creamy.

Step 2: Add remaining milk & sugar

  • Pour in remaining milk and sugar.
  • Cook on low heat, stirring continuously until mixture thickens.

Step 3: Prepare egg mixture

  • In a separate bowl, beat:
    • Eggs
    • Vanilla essence
    • Salt

👉 This gives the pudding a custard-like texture.

Step 4: Combine carefully

  • Slowly add a little hot rice mixture into the eggs (to avoid scrambling).
  • Then pour the egg mixture back into the pot and mix well.

Step 5: Add butter & flavor

  • Add butter and optional cinnamon/cardamom.
  • Mix until smooth and creamy.

Step 6: Bake for golden top

  • Pour mixture into a greased baking dish or ramekins.
  • Bake at 180°C (350°F) for 25–30 minutes until top is golden brown.

Step 7: Cool & serve

  • Let it cool slightly — it thickens more as it rests.
  • Serve warm or chilled 😋


Q/A – Common Questions

❓ 1. Which rice is best?

✔ Short grain rice is best for creamy texture, but basmati also works.

❓ 2. Can I skip eggs?

✔ Yes! It will still taste good but less custardy.

❓ 3. Why is my pudding watery?

✔ It needs more cooking time or cooling time to thicken.

❓ 4. Can I make it without baking?

✔ Yes, cook longer on stove until thick — baking just gives that golden top.

❓ 5. How long can I store it?

✔ Keep in fridge for 3–4 days in airtight container.

❓ 6. Can I add toppings?

✔ Yes! Add raisins, nuts, or caramel for extra flavor.