There are some recipes that become a part of your routine without you even realizing it, and for me, Mint & Lemon Tea is one of them. It isn’t a fancy drink, and it doesn’t require expensive ingredients, but somehow it always manages to make my day a little better.
I was first introduced to this tea by my aunt a few years ago. She was the kind of person who always seemed to have a natural remedy for everything. If someone had a cold, she had tea for it. If someone were stressed, she had another tea. One afternoon, after a particularly exhausting week, she handed me a warm cup of mint & lemon tea and said, “Just sit down and enjoy this for a few minutes.”
I still remember that first sip. The freshness of mint combined with the bright citrus flavor of lemon felt incredibly soothing. It was light, refreshing, and comforting all at once. Since then, this tea has become one of my favorite homemade drinks.
Last weekend, I decided to make a large pot for my family after dinner. The weather was pleasant, and we were all spending time together in the living room. As the mint leaves simmered on the stove, the entire kitchen filled with a fresh herbal aroma that immediately caught everyone’s attention.
My younger brother walked in and asked what I was making because the house smelled amazing. A few minutes later, everyone had a warm cup in their hands. We sat together talking, laughing, and enjoying the simple pleasure of homemade tea. It was one of those ordinary moments that somehow become special memories.
Whenever I’m feeling stressed, overwhelmed, or simply need a little break from a busy day, this mint & lemon tea is usually my first choice. On happy days, I make it as a treat. On quiet weekends, I enjoy it while reading a book. During colder months, I drink it warm, and during summer, I serve it chilled over ice.
That’s one of the reasons I love this recipe so much—it’s simple, versatile, and always satisfying.
Why You’ll Love This Mint & Lemon Tea
There are countless tea recipes available, but this one stands out because of its simplicity and freshness.
Refreshing Flavor
The coolness of fresh mint pairs beautifully with the tangy brightness of lemon. Together, they create a naturally refreshing drink that never feels heavy.
Quick and Easy
You only need a handful of ingredients and about 10 minutes of your time.
Naturally Low in Calories
Unlike many store-bought beverages that contain excessive sugar and artificial ingredients, this tea is naturally light and wholesome.
Perfect for Every Season
Serve it warm during chilly mornings or cold evenings, or enjoy it over ice on hot summer afternoons.
Family-Friendly
Everyone in my family enjoys it, from adults to teenagers. It’s one of those drinks that appeals to almost everyone.
Ingredients
This recipe serves 2 cups.
Ingredient Quantity
Water 2 cups
Fresh mint leaves 10–12 leaves
Fresh lemon juice 1 tablespoon
Honey (optional) 1 teaspoon
Lemon slices For garnish
Fresh mint sprigs For garnish,
Ingredient Notes: Fresh Mint Leaves
Fresh mint is the star of this recipe. The leaves provide a cooling and refreshing flavor that makes the tea feel incredibly uplifting.
If possible, use freshly picked mint leaves because they offer the strongest aroma and flavor.
Lemon Juice
Fresh lemon juice is always the best choice. Bottled lemon juice can work in a pinch, but fresh lemons provide a brighter and more natural citrus flavor.
Honey
Honey is completely optional. I often skip it when I want a lighter drink, but sometimes I add a small amount when I’m craving a hint of sweetness.
Water
Since tea is mostly water, using clean filtered water can noticeably improve the final taste.
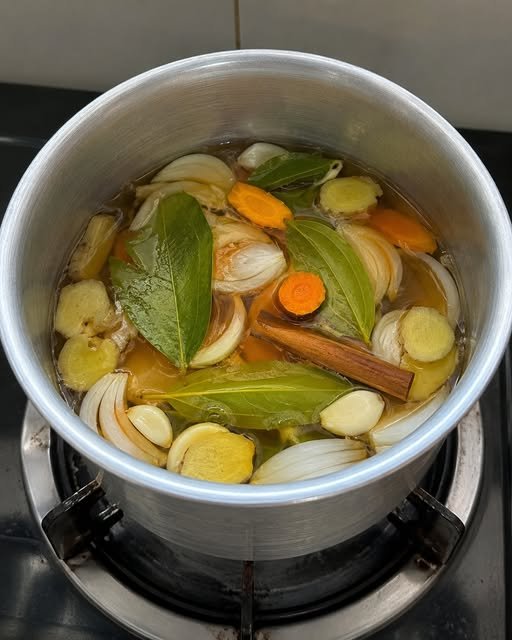
How to Make Mint & Lemon Tea Step 1: Prepare the Ingredients
Wash the mint leaves thoroughly under running water to remove any dirt or debris.
Roll the lemon on the counter before cutting it. This helps release more juice.
Step 2: Boil the Water
Pour 2 cups of water into a saucepan and place it over medium-high heat.
Allow the water to come to a gentle boil.
Step 3: Add the Mint Leaves
Once the water reaches a boil, add the fresh mint leaves.
Reduce the heat slightly and allow the leaves to simmer for 4–5 minutes.
During this time, you’ll notice the water taking on a light green tint and the kitchen filling with a wonderful mint aroma.
Step 4: Steep for Extra Flavor
Turn off the heat and let the mint steep for another 2–3 minutes.
This extra steeping time allows more flavor to develop without making the tea too strong.
Step 5: Strain the Tea
Using a fine mesh strainer, pour the tea into serving cups or mugs.
Discard the used mint leaves.
Step 6: Add Fresh Lemon Juice
Stir in the lemon juice while the tea is still warm.
Adding lemon after cooking helps preserve its fresh taste and natural nutrients.
Step 7: Sweeten if Desired
Add honey and stir until fully dissolved.
Taste and adjust sweetness according to your preference.
Step 8: Garnish and Serve
Add a slice of lemon and a fresh mint sprig to each cup.
Serve immediately and enjoy.
Pro Tips for the Best Mint & Lemon Tea: Don’t Overboil the Mint
Overcooking mint can sometimes create a slightly bitter taste. Five minutes is usually enough.
Use Fresh Ingredients
Fresh mint and fresh lemon make a huge difference in flavor.
Add Ginger for extra warmth.
A few slices of fresh ginger create a comforting variation that’s especially enjoyable during cooler months.
Make an Iced Version
Allow the tea to cool completely, refrigerate it, and serve over ice for a refreshing summer beverage.
Adjust the lemon.
Some people prefer a stronger citrus flavor while others enjoy a milder taste. Feel free to customize it.
Variations You Can Try: Mint Lemon Ginger Tea
Add 1 teaspoon freshly grated ginger while simmering.
Mint Lemon Green Tea
Steep a green tea bag along with the mint leaves.
Mint Lemon Honey Tea
Increase honey slightly for a naturally sweet version.
Mint Lemon Cucumber Cooler
Chill the tea and add cucumber slices for an extra refreshing summer drink.
Health Benefits of Mint & Lemon Tea
Many people enjoy this tea not only because it tastes great but also because of the ingredients it contains.
Mint May Help You Feel Refreshed
Mint is known for its cooling sensation and pleasant aroma.
Lemons Provide Vitamin C
Fresh lemons naturally contain vitamin C and antioxidants.
Hydrating and Light
This tea is a flavorful way to increase your daily fluid intake.
Naturally Caffeine-Free
Unlike coffee or traditional black tea, this recipe contains no caffeine.
Nutrition InformationApproximate Nutrition Per Serving (1 Cup)
Nutrient Amount
Calories 12 kcal
Total Carbohydrates 3.2 g
Sugars 1.8 g
Protein 0.3 g
Total Fat 0 g
Saturated Fat 0 g
Fiber 0.4 g
Sodium 2 mg
Potassium 28 mg
Vitamin C: 12–15% Daily Value
Calcium 1% Daily Value
Iron 1% Daily Value
Nutrition With Honey Added
Nutrient Amount
Calories: 33 kcal
Carbohydrates 8.8 g
Sugars 7.4 g
Protein 0.3 g
Fat 0 g
Nutrition values are estimates and may vary depending on ingredient brands and serving sizes.
Frequently Asked Questions Can I prepare this tea in advance?
Yes. Store it in an airtight container in the refrigerator for up to 48 hours.
Can I drink it cold?
Absolutely. In fact, it’s one of my favorite summer drinks.
Can I use dried mint?
Yes. Replace fresh mint with approximately 1 teaspoon of dried mint.
Is this tea caffeine-free?
Yes, this recipe contains no caffeine.
Can children drink this tea?
Yes, the ingredients are simple and family-friendly.
Final Thoughts
Mint & lemon tea is proof that the simplest recipes are often the most enjoyable. Every time I make it, it reminds me of relaxing weekends, family conversations, and those small moments of peace that make life feel a little lighter.
Whether I’m celebrating a good day, dealing with a stressful one, or simply looking for something warm and refreshing to sip on, this tea never disappoints. The combination of fresh mint and bright lemon creates a drink that feels comforting, revitalizing, and homemade in the best possible way.
 Juice Ingredients
 Optional Add-Ins
 Supports Hydration
 Rich in Antioxidants
 Source of Vitamin A
 Refreshing & Light


 Instructions:
 Why This Helps: