Blueberry Fluff Salad
Description
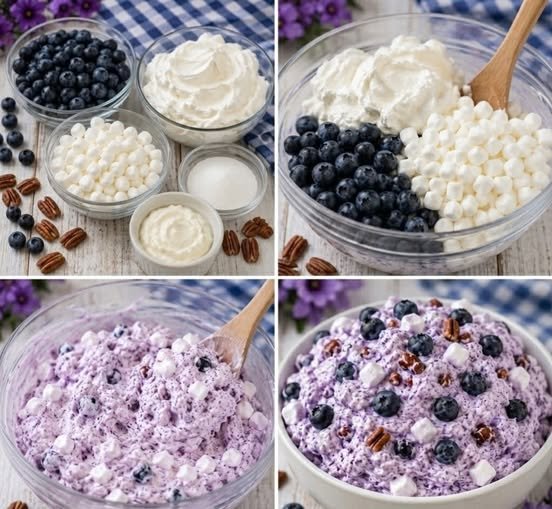
Blueberry Fluff Salad is a light, creamy, and refreshing no-bake dessert salad that combines juicy blueberries, fluffy whipped topping, and soft mini marshmallows into a sweet and irresistible treat. Perfect for potlucks, picnics, holiday gatherings, baby showers, or summer cookouts, this easy dessert comes together in just minutes with minimal ingredients. The blueberries provide bursts of fresh fruity flavor, while the marshmallows add a soft, chewy sweetness that pairs perfectly with the airy whipped topping. Despite its name, this classic fluff salad is more like a dessert than a traditional salad, making it a favorite among both kids and adults. Whether served as a side dish on a holiday table or enjoyed as a quick sweet treat, Blueberry Fluff Salad is always a crowd-pleaser.
Ingredients
Main Ingredients
- 2 cups fresh blueberries
- 1 cup mini marshmallows
- 1 cup whipped topping, thawed
Optional Add-Ins
- ½ cup vanilla yogurt
- ¼ cup cream cheese, softened
- ½ cup crushed pineapple, drained
- ¼ cup chopped pecans or walnuts
- 1 teaspoon vanilla extract
For Garnish
- Extra blueberries
- Mini marshmallows
- Fresh mint leaves
Step-by-Step Instructions
Step 1: Wash the Blueberries
Rinse the blueberries thoroughly under cold water and pat them dry with paper towels.
Step 2: Prepare the Base
In a medium mixing bowl, add the whipped topping. If using vanilla yogurt or cream cheese, blend them into the whipped topping until smooth.
Step 3: Add the Marshmallows
Fold the mini marshmallows into the whipped mixture, stirring gently to keep the texture light and fluffy.
Step 4: Add the Blueberries
Carefully fold in the blueberries, ensuring they are evenly distributed throughout the mixture without crushing them.
Step 5: Chill
Cover the bowl and refrigerate for at least 1 hour. Chilling allows the marshmallows to soften slightly and the flavors to blend together.
Step 6: Garnish and Serve
Before serving, top with additional blueberries, marshmallows, or fresh mint if desired.
Tips & Notes
- Fresh blueberries provide the best texture, but frozen blueberries can be used if thawed and drained well.
- For extra creaminess, mix in softened cream cheese.
- Allow the salad to chill thoroughly before serving for the best flavor.
- Add crushed pineapple for a tropical twist.
- Stir gently to prevent breaking the blueberries.
- This recipe can be prepared several hours in advance.