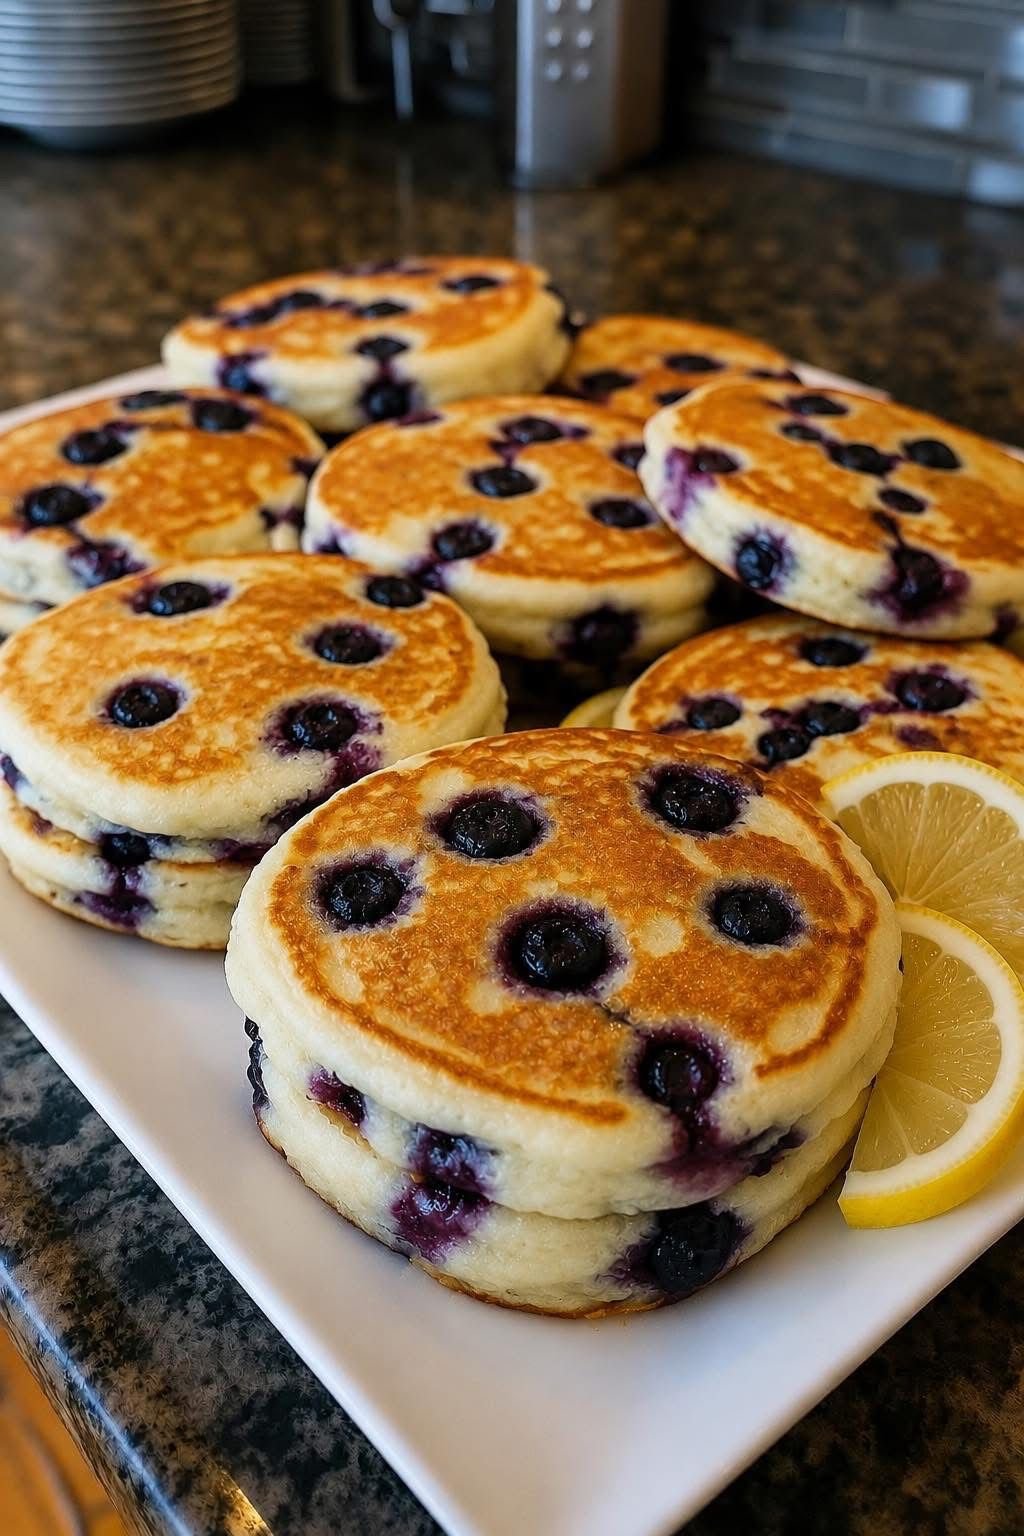
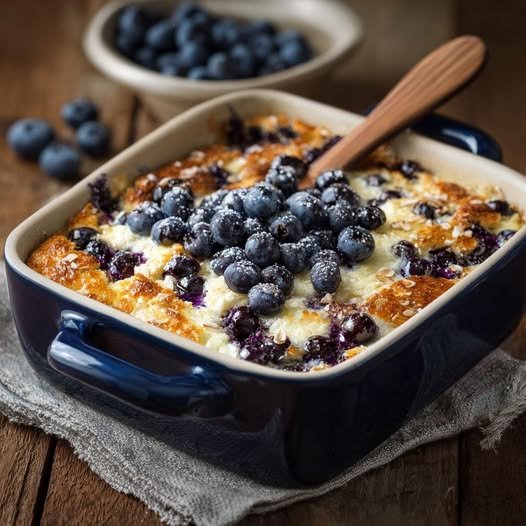
2-Ingredient Orange Protein Fluff

2-Ingredient Orange Protein Fluff


Ingredients

  • 2 cups Non-fat plain Greek yogurt

  • 1 package (0.3 oz) Sugar-free orange gelatin powder (like Jell-O)

  • Optional: 1 cup sugar-free whipped topping (for extra fluffiness) or a splash of vanilla extract.


Instructions

  1. Prep the Yogurt: Scoop the Greek yogurt into a medium-sized mixing bowl. If there is any liquid (whey) on top of the yogurt, drain it off first to keep the fluff thick.

  2. Combine: Sprinkle the dry gelatin powder directly onto the yogurt.

  3. Whip It: Using a hand mixer or a vigorous whisk, blend the yogurt and powder together for about 2 to 3 minutes. Whipping it well incorporates air, which gives it that “fluff” texture.

  4. Optional Fold-in: If you are using whipped topping, gently fold it in now with a spatula so you don’t deflate the air.

  5. Chill: Place the bowl in the refrigerator for at least 30 minutes. This allows the gelatin to set slightly and the flavors to meld.

  6. Serve: Enjoy it on its own, or use it as a dip for fresh fruit like strawberries or apple slices.


Q&A: Tips for Success

Q: Can I use other flavors of gelatin? A: Absolutely! Strawberry, lime, or raspberry all work beautifully. Orange is just a classic because it tastes exactly like a dream bar.

Q: Why is my fluff grainy? A: This usually happens if the powder hasn’t dissolved fully. Make sure to whip it long enough, or let it sit for 10 minutes and then give it one final stir before chilling.

Q: Is this a good replacement for high-calorie desserts? A: Definitely. It’s very high in protein and low in carbs, making it a great late-night snack that won’t spike your blood sugar.

Q: How long does it stay fresh? A: You can store this in an airtight container in the fridge for up to 3 days. If it separates a little, just give it a quick stir before eating.

Flourless Apple Chocolate Cake

Flourless Apple Chocolate Cake


Ingredients

  • 4 Medium Sweet apples (Red Delicious or Gala work best)

  • 4 Large Eggs

  • 5 tbsp Unsweetened cocoa powder

  • 1 tsp Baking powder

  • Olive oil (just a small amount for greasing the mold)


Instructions

  1. Prepare the Apples: Peel and core the apples, then cut them into small chunks. Steam or microwave the apple pieces until they are very soft.

  2. Blend the Base: Place the cooked apples into a blender or food processor. Blend until you have a completely smooth apple puree. Let it cool slightly so it doesn’t scramble the eggs.

  3. Mix the Batter: Add the 4 eggs, cocoa powder, and baking powder to the blender with the apple puree. Blend again until the mixture is well-combined and frothy.

  4. Prepare the Mold: Lightly grease a silicone mold or a small baking pan with a little olive oil. Pour the batter into the mold.

  5. Bake: Preheat your oven to 180°C (350°F). Bake for approximately 40 to 45 minutes, or until a toothpick inserted into the center comes out clean.

  6. Cool and Serve: Allow the cake to cool completely in the mold before flipping it onto a plate. This helps the structure set. You can top it with a little melted sugar-free chocolate or a dusting of cocoa powder if desired.


Q&A: Tips for Success

Q: Why did my cake sink in the middle after cooling? A: Because this recipe has no flour, it relies on the eggs for structure. It is normal for it to deflate slightly as it cools, similar to a souffle. Cooling it slowly helps minimize this.

Q: Can I make this in the microwave? A: Yes! You can “bake” it in a microwave-safe dish for about 8 to 10 minutes on high, checking every minute after the 7-minute mark until it is firm.

Q: Which apples are best to use? A: Since there is no added sugar, use the sweetest apples you can find, like Fuji, Gala, or Honeycrisp. Avoid tart apples like Granny Smith for this specific recipe.

Q: How should I store the leftovers? A: Since this cake is very moist due to the fruit, it should be kept in an airtight container in the refrigerator. it stays fresh for up to 3 days.

Morning Ginger Lemon Morning Tonic

Morning Ginger Lemon Morning Tonic


Ingredients

  • 1 cup Warm water (not boiling, to preserve the nutrients)

  • ½ Fresh lemon (juiced)

  • 1 inch Fresh ginger root (peeled and grated or sliced)

  • 1 pinch Cayenne pepper (optional, for a little kick)

  • 1 tsp Raw honey or a dash of Stevia (optional for sweetness)


Instructions

  1. Prepare the Ginger: Place your sliced or grated ginger into a mug.

  2. Steep: Pour the warm water over the ginger and let it steep for about 3 to 5 minutes to draw out the flavor and natural oils.

  3. Add Citrus: Squeeze the fresh lemon juice into the mug. Stir well.

  4. Optional Seasoning: If you like a bit of heat, add a tiny pinch of cayenne pepper. If you prefer it slightly sweet, stir in your sweetener of choice.

  5. Serve: Strain the ginger pieces out if you prefer a smooth drink, or leave them in for a stronger infusion. Drink it while warm for the best experience.


Q&A: Tips for Success

Q: Can I make a big batch of this for the week? A: Yes! You can juice several lemons and ginger roots ahead of time and keep the concentrate in a glass jar in the fridge. Just add warm water to a portion of the concentrate each morning.

Q: Why use warm water instead of boiling water? A: Boiling water can sometimes make the lemon taste bitter and may reduce some of the Vitamin C content. Warm or room-temperature water is gentler and easier to drink first thing in the morning.

Q: Can I drink this cold? A: Absolutely. It makes a very refreshing iced tea. Simply follow the steps and let it cool, then pour it over ice with a few sprigs of fresh mint.

Q: Is it okay to eat the ginger pieces? A: Yes, ginger is perfectly edible. If you grate it finely, you can swallow it with the drink for a more intense ginger experience.

Vanilla Milkshake 🍦🥤

Vanilla Milkshake 🍦🥤

Vanilla milkshakes are a timeless American classic, made with vanilla ice cream and milk. Known for their smooth, creamy flavor, they’re popular at diners and fast-food spots, often topped with whipped cream and sprinkles for a nostalgic treat.

Chocolate Milkshake 🍫🥤

Chocolate milkshakes are a rich and indulgent favorite in the USA, blending chocolate ice cream or syrup with milk. Loved for their deep flavor, they’re commonly served in diners and burger joints, often topped with whipped cream and chocolate shavings.

Strawberry Milkshake 🍓🥤

Strawberry milkshakes are a fruity American favorite, made with fresh or flavored strawberries and creamy ice cream. Their sweet, refreshing taste makes them especially popular in summer, often served with whipped cream in diners and dessert shops.

Mint Chocolate Chip Milkshake 🌿🍫🥤

Mint chocolate chip milkshakes combine cool mint flavor with chocolate chips for a refreshing twist. Popular in the USA, especially during warmer months, they’re loved for their unique taste and vibrant green color, often topped with whipped cream.

Perfect Air Fryer Cod

Perfect Air Fryer Cod 

I picked up fresh cod from ALDI and decided to test it in the air fryer — and honestly, this method makes it crispy on the outside, flaky and tender on the inside every single time. It’s quick, healthy, and packed with flavor.

📝 Ingredients

  • 2–4 fresh cod fillets
  • 1½ tablespoons olive oil
  • 1 teaspoon garlic powder
  • 1 teaspoon smoked paprika
  • ½ teaspoon onion powder
  • ½ teaspoon salt (adjust to taste)
  • ½ teaspoon black pepper
  • ½ teaspoon dried oregano (optional)
  • Lemon wedges, for serving

Optional Creamy Dip:

  • ½ cup Greek yogurt or mayonnaise
  • 1 tablespoon lemon juice
  • 1 teaspoon Dijon mustard
  • Pinch of salt and pepper
  • Fresh parsley, chopped

👩‍🍳 Instructions

1. Prep the Fish
Pat the cod fillets dry with paper towels. Removing excess moisture helps create a better crust. Lightly brush both sides with olive oil.

2. Season Well
In a small bowl, combine garlic powder, smoked paprika, onion powder, salt, pepper, and oregano. Sprinkle evenly over both sides of the fillets, gently pressing the seasoning in.

3. Air Fry
Preheat the air fryer to 400°F (200°C) for 3 minutes.
Place the cod in the basket in a single layer, leaving space between pieces.

Cook for 8–10 minutes, depending on thickness. The fish is done when it flakes easily with a fork and reaches an internal temperature of 145°F (63°C). No flipping is usually needed.

4. Make the Dip (Optional)
Mix yogurt (or mayo), lemon juice, Dijon, salt, pepper, and parsley until smooth.

See also  Air Fryer Whole Chicken

Serve immediately with a squeeze of fresh lemon. It’s crispy, juicy, and honestly one of the easiest fish recipes you’ll ever make!

No-Bake Chocolate Chip Protein Balls

No-Bake Chocolate Chip Protein Balls


Ingredients

  • 1 ½ cups Rolled oats (old-fashioned)

  • ½ cup Natural peanut butter (or almond butter)

  • ⅓ cup Honey or maple syrup

  • ½ cup Semi-sweet chocolate chips (mini chips work best)

  • ¼ cup Ground flaxseed or chia seeds (optional for extra fiber)

  • 1 tsp Vanilla extract

  • A pinch of sea salt


Instructions

  1. Combine Base Ingredients: In a large mixing bowl, stir together the rolled oats, peanut butter, honey (or syrup), and vanilla extract.

  2. Add Mix-ins: Fold in the chocolate chips and the flax/chia seeds until everything is evenly distributed.

  3. Chill the Dough: Place the bowl in the refrigerator for about 30 minutes. This allows the oats to soften slightly and makes the mixture much easier to roll.

  4. Form the Balls: Scoop about one tablespoon of the mixture at a time and roll it between your palms to form a ball (approximately 1 inch in diameter).

  5. Store: Place the finished protein balls in an airtight container. They will stay fresh in the refrigerator for up to 1 week or in the freezer for up to 3 months.


Q&A: Tips for Success

Q: My mixture is too dry and won’t stick together. What should I do? A: If the mixture is crumbling, add an extra tablespoon of peanut butter or honey. If it’s too sticky, add a few more tablespoons of oats.

Q: Can I use quick oats instead of rolled oats? A: Yes, you can. Quick oats will result in a softer, less chewy texture, but they work perfectly well for this recipe.

Q: Are these gluten-free? A: To ensure they are gluten-free, make sure your package of oats is certified gluten-free, as cross-contamination can occur during processing.

Q: Can I add protein powder? A: Absolutely. You can add 1 scoop of your favorite protein powder. If you do, you may need to add a splash of milk or extra honey to maintain the right consistency.

The Ultimate Zesty Cucumber Salad

The Ultimate Zesty Cucumber Salad

Prep time: 10 minutes | Chilling time: 30+ minutes

Ingredients

  • 2 lbs Persian or English cucumbers (the thin-skinned, seedless kind)

  • 4-5 cloves garlic, finely minced

  • 2 tbsp fresh dill, chopped

  • 1/4 cup Rice vinegar (or Apple Cider Vinegar)

  • 1 tbsp Sesame oil (optional, for a deeper flavor)

  • 1 tbsp Soy sauce

  • 1 tsp Sugar or honey (to balance the acidity)

  • 1 tsp Red pepper flakes (adjust for your spice preference)

  • 1/2 tsp Salt (plus more for sweating the cucumbers)

  • 1 tsp Toasted sesame seeds (optional)


Preparation Instructions

  1. Prep the Cucumbers: Slice the cucumbers into 1/4-inch rounds (as seen in your photo). To get the most flavor, you can lightly “smash” them with the side of a knife before slicing; this creates crannies for the dressing to hide in.

  2. The “Sweat” (Important Step): Place the slices in a bowl and sprinkle with a generous pinch of salt. Let them sit for 10 minutes, then drain the excess water. This ensures your salad stays crunchy and doesn’t get watery.

  3. Make the Dressing: In a small jar or bowl, whisk together the minced garlic, vinegar, soy sauce, sugar, red pepper flakes, and sesame oil.

  4. Toss and Marinate: Pour the dressing over the cucumbers. Add the fresh dill and toss well until every slice is coated.

  5. Chill: While you can eat it immediately, it is best after 30 minutes in the fridge. The cucumbers will marinate and turn that vibrant, translucent green seen in your image.


Pro-Tips for Success

  • The Garlic: If you find raw garlic too “sharp,” let it sit in the vinegar for 5 minutes before adding the other ingredients to mellow it out.

  • The Crunch: Use Persian cucumbers (the small ones) if possible. They have the best “snap” and don’t require peeling.

Note: If you want a creamier version, you can add a dollop of Greek yogurt or sour cream to the mix, though the version in your photo appears to be a clear, vinegar-based marinade.

Creamy 5-Ingredient Dessert: Easy to prepare and very tasty, everyone will love it

Creamy 5-Ingredient Dessert: Easy to prepare and very tasty, everyone will love it

Hi, everyone, today we’re going to learn how to make a 5-Ingredient Dessert using simple ingredients. So grab your pen and paper to jot down the ingredients, then follow the complete preparation method.

How to Make Creamy 5-Ingredient Dessert

Discover more
Tea
Cake
juice

With a creamy texture and sweet flavor, this dessert wins everyone over. It’s easy to make with simple ingredients. See below the list of all ingredients and required quantities. And then, a very complete preparation method with details of the recipe.


Recipe Ingredients:

  • 1 container of table cream or heavy cream (7 oz / 200g)
  • 1 can of sweetened condensed milk (14 oz / 395g)
  • Graham crackers or tea  biscuits (bolacha Maizena)
  • Juice of 3 fresh limes (or store-bought lime juice)
  • Milk for soaking the biscuits
  • Chocolate for grating (optional)

Instructions:

Cream Layer Preparation:
First, in a mixing bowl, combine the heavy cream with the sweetened condensed milk. Then, gradually stir in the lemon juice until the mixture becomes thick and creamy.

Milk

Dessert Assembly:
Next, use a 900 ml (about 3.8 cups) glass dish. After that, spread a layer of the cream mixture on the bottom. Then, lightly dip the lady finger cookies (or Maria cookies) in milk and arrange them over the cream layer. Continue alternating layers of cream and cookies until the dish is full.

Finishing Touch:
Finally, if you like, grate some chocolate over the top of the dessert. Lastly, place it in the refrigerator and chill for about 1 hour before serving.

Tips:
You can use powdered drink mix instead of freshly squeezed lemon juice. A blender is not needed for this recipe, as the cream thickens quickly due to the lemon juice. The cookies stay slightly crispy even after being chilled. This dessert is perfect served cold on hot days. You can also make individual servings in small cups or jars.

Cheesy Vegetable Rolls

Cheesy Vegetable Rolls


Ingredients

  • The Mix: * 1 medium zucchini, grated (squeeze out excess water)

    • 1 large carrot, grated

    • 1 cup shredded cheese (mozzarella or cheddar)

    • 2 large eggs

    • A handful of chopped green onions

    • Salt and black pepper to taste

  • The Base:

    • Tortillas, spring roll wrappers, or a thin flour batter (crepe style)

  • For Frying: 2 tbsp vegetable oil


Instructions

  1. Prep the Veggies: Grate the zucchini and place it in a clean kitchen towel. Squeeze firmly to remove as much liquid as possible—this prevents the rolls from getting soggy.

  2. Make the Filling: In a large bowl, combine the squeezed zucchini, grated carrots, shredded cheese, chopped green onions, and eggs. Season with salt and pepper. Mix until well combined.

  3. Assemble: * Place a generous amount of the mixture onto your wrap of choice.

    • Roll them up tightly, tucking in the sides like a burrito or a spring roll.

  4. Cook: Heat oil in a large skillet over medium heat. Place the rolls seam-side down first to seal them.

  5. Golden Finish: Fry for 3–4 minutes per side until the outside is golden brown and crispy, and the cheese inside has melted.


Pro Tip

If you want them extra crispy without the extra oil, you can brush them with a little butter and pop them in the air fryer at 200°C for 8–10 minutes.

Cheesy Texas Toast

This Cheesy Texas Toast is the ultimate sidekick for your favorite meals. Whether you’re pairing it with a saucy pasta or a backyard BBQ, these thick, buttery slices topped with a duo of melty cheeses are guaranteed to steal the show.


Recipe Highlights

  • Prep time: 15 minutes

  • Cook time: 15 minutes

  • Servings: 6 slices

  • Texture: Crispy, golden edges with a soft, buttery center.


Ingredients You’ll Need

  • 6 Slices of Texas Toast: Or any thick-cut bread.

  • 4 tbsp butter: melted for easy spreading.

  • 2 tbsp Parmesan: Grated for a salty, nutty kick.

  • 1 cup Mozzarella: Shredded for that classic cheese pull.

  • 6 Slices of Provolone: For a creamy, slightly tangy finish.

  • Seasonings: 1/2 tsp garlic powder, 1 tsp dried oregano, and optional dried parsley for garnish.


Simple Step-by-Step

  1. Prep the Butter: In a small bowl, whisk together the melted butter, grated Parmesan, garlic powder, and oregano.

  2. Coat the Bread: Lay your bread slices in a single layer on a baking sheet or air fryer rack. Spread the garlic butter mixture evenly over every slice.

  3. Layer the Cheese: Sprinkle the shredded mozzarella generously over the butter, then top each piece with a full slice of provolone.

  4. The Melt:

    • Air Fryer: Cook at 350°F for about 5 minutes.

    • Oven (Convection): Bake at 375°F for 6–7 minutes.

    • Aim for bubbly cheese and light golden edges!

  5. Finish & Serve: Garnish with dried parsley and serve while hot and gooey.


Storage & Make-Ahead Tips

  • In the Fridge: Store cooled leftovers in an airtight container for 3–4 days. Reheat at 350°F to bring back the crunch.

  • In the Freezer: Flash-freeze slices on a baking sheet before transferring to a freezer bag. Bake directly from frozen at 375°F for 8–10 minutes for a quick snack!


Flavor Variations

  • The “Kick”: Add red chili flakes or smoked paprika to your butter mixture.

  • The “Garden”: Top with thin tomato slices or fresh basil after baking.

  • The “Deluxe”: Sprinkle with crispy bacon bits or caramelized onions before the cheese layer.

Cheesy Sloppy Joe Garlic Bread

This Cheesy Sloppy Joe Garlic Bread is a brilliant twist on two classic comfort foods. By using a sturdy ciabatta base instead of traditional buns, you get a satisfying crunch that holds up perfectly against the savory, saucy beef and melted cheese.


Recipe Highlights

  • Prep time: 15 minutes

  • Cook time: 25 minutes

  • Servings: 6

  • Flavor Profile: Savory, tangy, and buttery with a cheesy finish.


Ingredients

The Garlic Bread Base

  • 1 Ciabatta loaf: Split lengthwise.

  • 2 tbsp Unsalted butter: Softened for easy spreading.

  • 1 tsp Garlic powder: For that essential punch.

  • 1 cup Mozzarella & 1 cup Sharp Cheddar: Shredded (the blend provides both “pull” and “tang”).

  • Salt & Pepper: To taste.

The Sloppy Joe Topping

  • 1 lb Ground beef: Lean (80/20 or 90/10) works best.

  • 1/2 cup Yellow onion: Finely diced.

  • 2 cloves Garlic: Minced.

  • 1 1/2 cups Ketchup: The base of your tangy sauce.

  • 2 tbsp Brown sugar: For a deep, caramelized sweetness.

  • 1 tsp Yellow mustard & 1/2 tsp Worcestershire: For acidity and umami.

  • 1/4 cup Water: To adjust consistency.


Step-by-Step Preparation

  1. Prep the Oven: Preheat to 350°F (180°C). Line a baking sheet with parchment paper for easy cleanup.

  2. Toast the Base: Spread the softened butter over the cut sides of the ciabatta. Sprinkle with garlic powder, salt, and pepper.

  3. Brown the Meat: In a large skillet, heat olive oil over medium-high. Brown the ground beef until no longer pink. Drain the excess fat—this prevents the bread from getting soggy later.

  4. Sauté Aromatics: Stir in the onions and cook until translucent (about 4 minutes). Add the minced garlic for the final 30 seconds.

  5. Simmer the Sauce: Add ketchup, water, brown sugar, mustard, and Worcestershire. Let it simmer for 10 minutes until thick and glossy.

  6. Assemble: Generously spread the beef mixture over the garlic bread. Top with the mozzarella and cheddar blend.

  7. Bake: Bake for 10-15 minutes.

    Pro Tip: If you want those golden-brown cheese bubbles, switch the oven to Broil for the last 2 minutes (watch it closely!).

  8. Serve: Slice into thick batons and garnish with fresh parsley.


Quick Variations to Try

  • The “Heat” Wave: Add chopped jalapeños or a teaspoon of red chili flakes into the beef mixture.

  • The Veggie Swap: Substitute ground beef with lentils or a plant-based crumble for a vegetarian-friendly version.

  • The Zesty Crunch: Add a layer of thin-sliced pickles on top of the meat before adding the cheese.

Greek Bean Salad with Lemon (Clear Recipe)

Greek Bean Salad with Lemon (Clear Recipe)

Ingredients:

1 cup chickpeas (cooked or canned, drained)

1 cup cannellini beans (drained)

1 cup green beans (cooked, chopped)

1 cup cherry tomatoes (halved)

½ cup cucumber (diced)

¼ cup red onion (finely chopped)

¼ cup black olives (sliced)

2 tbsp fresh parsley (chopped)

Dressing:

3 tbsp olive oil

Juice of 1 lemon

1 garlic clove (minced)

1 tsp dried oregano

Salt and black pepper (to taste)

Instructions:

Prepare the beans:

Rinse and drain chickpeas and cannellini beans if using canned. Cook and chop green beans if not already prepared.

Combine base ingredients:

In a large bowl, add chickpeas, cannellini beans, and green beans.

Add vegetables:

Add cherry tomatoes, cucumber, red onion, olives, and parsley to the bowl.

Make the dressing:

In a small bowl, whisk together olive oil, lemon juice, garlic, oregano, salt, and pepper until well combined.

Mix the salad:

Pour the dressing over the salad. Toss gently to coat all ingredients evenly.

Rest the salad:

Let the salad sit for 15–20 minutes so the flavors blend together.

Serve:

Toss again lightly before serving. Taste and adjust seasoning if needed.

Optional:

Top with crumbled feta cheese for extra flavor. #mediterraneandietrecipes #usareels #usafoodies #mediterraneanlife

Eggplant Lasagna with Ricotta – No Pasta Needed

Eggplant Lasagna with Ricotta – No Pasta Needed


Description:

This Eggplant Lasagna is a healthy, low-carb twist on classic lasagna. Thinly sliced eggplant replaces traditional pasta, layered with creamy ricotta, marinara sauce, and melted cheese. Perfect for a comforting dinner without the extra carbs.


Ingredients:


2 large eggplants


1 ½ cups ricotta cheese


1 ½ cups marinara sauce (homemade or store-bought)


1 cup shredded mozzarella


¼ cup grated Parmesan


1 egg


1 tsp Italian herbs (oregano, basil)


Salt and pepper to taste


Olive oil for brushing


Instructions:


Preheat oven to 375°F (190°C). Slice eggplants lengthwise into ¼-inch strips. Brush lightly with olive oil and sprinkle with salt.


Roast or grill eggplant slices for 5–7 minutes per side until tender. Remove and let cool slightly.


In a bowl, mix ricotta with egg, Italian herbs, salt, and pepper.


Spread a thin layer of marinara in a baking dish. Layer eggplant slices, then ricotta mixture, and a sprinkle of mozzarella. Repeat layers until all ingredients are used, finishing with mozzarella and Parmesan on top.


Cover with foil and bake 25 minutes. Remove foil and bake an additional 10–15 minutes until cheese is golden and bubbly.


Let it rest 5 minutes before slicing.


Serving Tip: Garnish with fresh basil for color. Enjoy a comforting, creamy, and low-carb lasagna that everyone will love!

Roasted Beet & Sweet Potato Salad

Roasted Beet & Sweet Potato Salad (Inspired by TheKitchenGulp)
📝 Description

This Roasted Beet & Sweet Potato Salad is a vibrant, wholesome dish packed with earthy, naturally sweet flavors. Roasting brings out the richness of beets and the caramelized sweetness of sweet potatoes, while a light dressing ties everything together. It’s perfect as a healthy side dish or a light meal.

🧾 Ingredients
For the Roasted Veggies:

2 medium beets (peeled & cubed)

2 medium sweet potatoes (peeled & cubed)

2 tbsp olive oil

Salt & black pepper (to taste)

For the Salad:

2 cups mixed greens or arugula

¼ cup feta cheese (crumbled)

¼ cup walnuts or pecans

2 tbsp pumpkin seeds (optional)

For the Dressing:

2 tbsp olive oil

1 tbsp balsamic vinegar

1 tsp honey (optional)

1 tsp Dijon mustard

Salt & pepper to taste

👨‍🍳 Instructions

Preheat oven to 200°C (400°F) and line a baking tray.

Roast vegetables:

Toss beets and sweet potatoes with olive oil, salt, and pepper.

Spread evenly on the tray.

Roast for 25–30 minutes,

Asparagus Salad with Lemon Vinaigrette

Asparagus Salad with Lemon Vinaigrette

Asparagus Salad with Lemon Vinaigrette is a fresh, vibrant, and nutrient-rich dish that highlights tender-crisp asparagus tossed in a bright citrus dressing. This salad is light yet satisfying, making it perfect as a spring side dish, healthy lunch, or elegant starter for dinner gatherings. The combination of earthy asparagus and zesty lemon vinaigrette creates a refreshing balance that feels both simple and gourmet.


Prep Time: 15 minutes


Cook Time: 5–7 minutes


Total Time: ~20 minutes


Ingredients (Serves 4)

Salad:

1 bunch fresh asparagus (trimmed, cut into 2–3 inch pieces)


1 cup cherry tomatoes (halved)


½ small red onion (thinly sliced)


¼ cup shaved parmesan cheese (optional)


2 tbsp toasted almonds or walnuts (optional)


1 boiled egg (optional, sliced)


Fresh parsley or basil for garnish


Lemon Vinaigrette:

3 tbsp olive oil


2 tbsp fresh lemon juice


1 tsp lemon zest


1 tsp Dijon mustard


1 small garlic clove (minced)


1 tsp honey or maple syrup


Salt and black pepper to taste


1–2 tsp water (to balance acidity if needed)

Instructions

Wash asparagus thoroughly and trim the woody ends.


Cut asparagus into bite-sized pieces.


Bring salted water to a boil and blanch asparagus for 2–3 minutes.


Immediately transfer asparagus to ice water to retain color and crunch.


Drain well and pat dry.


In a small bowl, whisk together olive oil, lemon juice, lemon zest, Dijon mustard, garlic, and honey.


Season vinaigrette with salt and pepper, adjusting acidity to taste.


In a large bowl, combine asparagus, cherry tomatoes, and red onion.


Pour dressing over salad and toss gently to coat evenly.


Top with parmesan, nuts, and herbs before serving fresh.


Tips

Do not overcook asparagus—keep it crisp for best texture.


Ice bath is essential to preserve bright green color.


Use fresh lemons instead of bottled juice for best flavor.


Slice asparagus diagonally for a more elegant presentation.


Toast nuts lightly to enhance flavor and crunch.


Let dressing sit 5–10 minutes before using for better infusion.


Add vinaigrette gradually to avoid overdressing.


Use young, thin asparagus for tenderness.


Serve chilled or room temperature for best taste.


Add parmesan just before serving to prevent sogginess.

Variations

Mediterranean version: Add olives and feta cheese.


Protein-rich version: Add grilled chicken or chickpeas.


Vegan version: Skip parmesan and use maple syrup.


Creamy version: Add Greek yogurt to vinaigrette.


Asian twist: Replace lemon with rice vinegar and sesame oil.


Spicy version: Add chili flakes or mustard seeds.


Fruit version: Add strawberries or orange segments.


Nut-free version: Skip almonds and use seeds.


Egg-based version: Add poached eggs for richness.


Pasta salad version: Mix with cooked orzo or penne.


Q&A

Can I use frozen asparagus?

Fresh is best, but frozen can be used if properly thawed.


Do I have to blanch asparagus?

No, you can also grill or sauté it.


Can I make it ahead?

Yes, but add dressing just before serving.


How long does it last?

Up to 2 days refrigerated.


Can I skip mustard in dressing?

Yes, but it helps emulsify the vinaigrette.


What can replace lemon?

Lime or apple cider vinegar works well.


Is it served warm or cold?

Best served chilled or room temperature.


Can I add cheese alternatives?

Yes, feta or goat cheese works great.


How do I keep asparagus crunchy?

Don’t over-boil and always use ice bath.


Is it weight-loss friendly?

Yes, it is low-calorie and nutrient-dense.


Nutrition (Per Serving Approx.)

Calories: 160–220 kcal


Protein: 5–8 g


Carbohydrates: 10–14 g


Fat: 12–16 g


Fiber: 4–6 g


Vitamin C & K: High


Folate: High


Conclusion

Asparagus Salad with Lemon Vinaigrette is a simple yet elegant dish that delivers freshness, crunch, and bright citrus flavor in every bite. It’s quick to prepare, highly nutritious, and endlessly customizable, making it perfect for healthy eating, seasonal menus, or light entertaining.

Roasted Cauliflower with Garlic & Mushrooms

🥦 Roasted Cauliflower with Garlic & Mushrooms

Description

Roasted cauliflower with garlic and mushrooms is a simple yet deeply flavorful side dish. The cauliflower turns golden and slightly crispy, the mushrooms become juicy and savory, and the garlic ties everything together with rich aroma. It’s perfect alongside grilled meats, rice dishes, or even enjoyed on its own as a light vegetarian meal.


📝 Ingredients

1 large head cauliflower, cut into florets

250 g (8–9 oz) mushrooms (button or cremini), halved

4–5 cloves garlic, minced

3 tbsp olive oil

½ tsp salt (or to taste)

½ tsp black pepper

½ tsp paprika (optional)

½ tsp dried thyme or oregano

2 tbsp chopped fresh parsley

2 tbsp grated Parmesan (optional)

1 tsp lemon juice (optional, for finishing)

👩‍🍳 Instructions

Preheat oven to 220°C / 425°F.

In a large bowl, add cauliflower florets and mushrooms.

Add olive oil, garlic, salt, pepper, paprika, and herbs. Toss well to coat evenly.

Spread everything on a baking tray in a single layer.

Roast for 25–30 minutes, flipping halfway, until cauliflower is golden and mushrooms are tender.

Remove from oven, sprinkle with parsley and Parmesan (if using).

Finish with a squeeze of lemon juice and serve warm.

🍽️ Servings

Serves: 4

Serving size: ~1 cup

🧠 Notes

Use fresh mushrooms, not canned, for best texture.

Spreading veggies in one layer is key for crisp roasting.

Parmesan adds depth, but the dish is delicious without it.

🔥 Tips & Variations

Add chili flakes for heat 🌶️

Toss in sliced onions or bell peppers for extra sweetness

Make it vegan by skipping cheese or using nutritional yeast

Air-fryer option: Cook at 190°C (375°F) for 15–18 minutes

🥗 Nutritional Info (per serving, approx.)

Calories: 150–170 kcal

Carbohydrates: 12 g

Protein: 5 g

Fat: 10 g

Fiber: 4 g

Sugar: 3 g

💪 Health Benefits

Cauliflower is rich in fiber and antioxidants

Mushrooms support immune health and gut function

Garlic helps with heart health and inflammation

Low-carb and great for weight management

❓ Q & A

Q: Can I make this ahead of time?

Yes! Store in the fridge for up to 3 days and reheat in the oven or air fryer.


Q: Can I use frozen cauliflower?

You can, but fresh gives better texture. If using frozen, thaw and pat dry first.


Q: What does this pair well with?

Grilled chicken, steak, fish, rice, quinoa, or even stuffed into wraps.

Honey-Balsamic Roasted Brussels Sprouts

🍯 Honey-Balsamic Roasted Brussels Sprouts

Prep time: 10 mins | Cook time: 20–25 mins | Serves: 4

Ingredients

  • The Veg: 1.5 lbs Brussels sprouts (halved, loose leaves kept for extra crunch).

  • The Glaze: 2 tbsp Extra virgin olive oil, 2 tbsp Honey (or Maple syrup), 1 tbsp Balsamic glaze.

  • The Crunch: ½ cup Toasted pecan halves.

  • The Tartness: ⅓ cup Dried cranberries.

  • Seasoning: ½ tsp Sea salt, ¼ tsp Cracked black pepper, pinch of Red pepper flakes (optional).


Step-by-Step Method

  1. High-Heat Prep: Preheat your oven to 400°F (200°C). Place a large rimmed baking sheet inside while the oven heats up—putting the sprouts on a hot pan ensures they sear and get crispy immediately.

  2. The Toss: In a large bowl, whisk together the olive oil, honey, salt, pepper, and red pepper flakes. Add the halved Brussels sprouts and toss until every nook and cranny is coated.

  3. The Roast: Carefully pull the hot tray from the oven and spread the sprouts in a single layer, flat-side down. Roast for 20–25 minutes.

    Tip: Don’t stir them! Keeping them flat-side down creates that deep, dark caramelization shown in your photo.

  4. The Mix-Ins: During the last 5 minutes of roasting, scatter the pecans and cranberries onto the tray. This warms the berries and toasts the nuts without burning them.

  5. The Finishing Touch: Remove from the oven and, while still hot, drizzle with the balsamic glaze and an extra touch of honey if you like it extra “candy-like.” Give it one final toss and serve.


Why this works:

  • The Maillard Reaction: The honey helps the flat surfaces of the sprouts caramelize into a crispy, almost savory-candy crust.

  • Texture Balance: You get the “snap” of the pecans, the chew of the cranberries, and the tender-crisp heart of the sprout.

Rustic No-Knead Rosemary Garlic Bread Recipe

Thermomix Rustic No-Knead Rosemary Garlic Bread

A fragrant, crusty artisan-style loaf with minimal effort. No kneading required — the Thermomix mixes everything in seconds.

🔸 Ingredients

Bread Dough

  • 3 cups (450 g) bread flour (or plain flour)
  • 1 ½ tsp salt
  • 1 tsp sugar (optional, helps browning)
  • ½ tsp instant yeast
  • 1 ½ cups (360 g) warm water (about 40°C)

Flavor Add-Ins

  • 3–4 cloves garlic, finely chopped or minced
  • 1–2 tbsp fresh rosemary leaves, chopped
    (or 1 tsp dried rosemary)
  • 1–2 tbsp olive oil
  • Optional: cracked black pepper, sea salt flakes for topping

🔸 Equipment

  • Thermomix (TM5/TM6/TM31)
  • Large bowl
  • Plastic wrap or reusable cover
  • Dutch oven or heavy oven-safe pot with lid

🥣 Step-by-Step Instructions

1. Sauté the Garlic & Rosemary (Optional but amazing)

This step gives deeper flavor.

  1. Add garlic and rosemary to the mixing bowl.
    5 sec / Speed 5
  2. Add olive oil.
    2 min / 100°C / Speed 1
  3. Scrape out and set aside to cool slightly.

2. Mix the Dough

  1. Add to the Thermomix bowl:
    • Flour
    • Salt
    • Sugar
    • Yeast
    • Sautéed garlic + rosemary mixture
    • Warm water
  2. Mix: 10 sec / Speed 6
  3. Final mix to bring it together:
    20 sec / knead mode (dough function)
    (This is mixing, not kneading — dough will be sticky and loose, perfect for no-knead bread.)

3. First Rise (Slow Fermentation)

Creates flavor and open crumb.

  • Transfer sticky dough to a lightly oiled bowl.
  • Cover tightly.
  • Rise for 12–18 hours at room temperature, or until doubled and bubbly.

If you need a quicker option:
Rise 2–3 hours in a warm spot → proceed normally.

4. Shape the Dough

  1. Dust a surface with flour.
  2. Gently scrape dough out — do not knead.
  3. Fold edges to the center 3–4 times to form a loose ball.
  4. Place seam-side down on baking paper.
  5. Rest for 30–40 minutes while the oven heats.

5. Preheat Oven + Dutch Oven

  • Place your pot (with lid) in the oven.
  • Heat to 230°C (450°F) for 30 minutes.

6. Bake the Bread

  1. Carefully lift dough using baking paper and place into the hot Dutch oven.
  2. Cover with lid and bake:
    30 minutes at 230°C (450°F)
  3. Remove lid and bake:
    10–15 more minutes
    until golden and crusty.

🌿 Optional Enhancements

  • Brush dough with olive oil and sprinkle with sea salt before baking.
  • Add ½ cup grated Parmesan into the dough.
  • Mix in roasted garlic instead of raw for a sweeter flavor.

✨ Tips for Best Results

  • Hydration is high, so dough will be sticky — don’t add more flour.
  • Long fermentation gives the rustic holes and chewy texture.
  • Dutch oven traps steam → crispy artisan crust.
  • For extra crunch, let baked loaf cool on a rack for at least 1 hour.

Morning Mini Pizzas

Morning Mini Pizzas

Prep time: 15 mins | Rising time: 60 mins | Bake time: 15–20 mins

The Ingredients

For the Dough:

  • Warm Water: 1.5 cups (300 ml) — Make sure it’s lukewarm, not hot, to avoid killing the yeast.

  • Vegetable Oil: 1/2 cup (100 ml)

  • Dry Yeast: 1 tablespoon (10 grams)

  • Granulated Sugar: 1 tablespoon (20 grams)

  • Flour: 4 cups (480 grams) — All-purpose or bread flour works best.

  • Salt: 1 teaspoon (8 grams)

For the Topping:

  • Peppers: 2 yellow, 1 red, 2 green (finely diced)

  • Braided Cheese: 150 grams (shredded or finely chopped)

  • Cheddar Cheese: 150 grams (grated)

  • Optional: 1 egg yolk (for brushing the crust)


Step-By-Step Instructions

1. Activate the Yeast

In a large mixing bowl, combine the warm water, sugar, and dry yeast. Stir gently and let it sit for about 5–10 minutes until it becomes frothy. This ensures your yeast is active and your bread will rise properly.

2. Mix the Dough

Add the vegetable oil and salt to the yeast mixture. Begin adding the flour one cup at a time. Mix with a wooden spoon or your hands until a soft, slightly sticky dough forms.

3. Knead and First Rise

Turn the dough onto a lightly floured surface. Knead for 5–8 minutes until it is smooth and elastic. Place the dough in a lightly greased bowl, cover with a damp cloth or plastic wrap, and let it rise in a warm, draft-free spot for 1 hour (it should double in size).

4. Prepare the Topping

While the dough is rising, finely dice all your peppers. In a separate bowl, mix the braided cheese and cheddar. Combine the peppers and cheese together so the colors are evenly distributed.

5. Shape the Pizzas

Once the dough has risen, punch it down to release air. Divide the dough into 10–12 equal-sized balls. Place them on a baking tray lined with parchment paper. Use the palm of your hand or your fingers to flatten each ball into a disk (about 10 cm wide), pressing down more in the center than the edges.

6. Assemble and Bake

Preheat your oven to 200°C. Divide the pepper and cheese mixture evenly among the dough disks, pressing the topping firmly into the center.

  • Pro Tip: Brush the exposed edges of the dough with a beaten egg yolk for that professional, shiny golden-brown finish seen in your photo.

7. Bake

Bake for 15–20 minutes or until the cheese is melted and bubbly and the crust is a deep golden brown.


Storage Tip

These stay soft for a couple of days if kept in an airtight container. You can also freeze them after they cool and just pop them in the toaster oven for a quick breakfast!

Spinach  and Feta Egg Muffins – Healthy, Fluffy, and Delicious

Spinach  and Feta Egg Muffins – Healthy, Fluffy, and Delicious

These Spinach and Feta egg  Muffins are a perfect blend of healthy greens, creamy feta, and fluffy eggs. Ideal for breakfast, brunch, or even a quick snack, they are protein-packed, easy to make, and highly customizable. With fresh spinach providing essential vitamins and minerals and feta cheese  adding a tangy, salty flavor, these muffins are not only nutritious but also irresistibly tasty. Bake a batch and enjoy a convenient, grab-and-go meal throughout the week.

Dairy & Eggs

Ingredients:

  • 6 large eggs
  • 1/4 cup milk (any kind: dairy or plant-based)
  • 1 cup fresh spinach, finely chopped
  • 1/2 cup feta cheese, crumbled
  • 1/4 cup red bell pepper, finely diced (optional for extra color and sweetness)
  • 1/4 cup onion, finely diced
  • 1 clove garlic, minced
  • 1/2 teaspoon salt (adjust to taste)
  • 1/4 teaspoon black pepper
  • 1/4 teaspoon paprika (optional for a smoky flavor)
  • 1 tablespoon olive oil or cooking spray (for greasing the muffin tin)

Instructions:

  1. Preheat the oven: Preheat your oven to 180°C (350°F) and lightly grease a 6- or 12-cup muffin tin with olive oil or non-stick cooking spray.
  2. Prepare the vegetables: Wash and finely chop the fresh spinach. Dice the red bell pepper and onion, and mince the garlic. You can lightly sauté the onions, garlic, and bell pepper in a small pan for 2–3 minutes to soften and enhance their flavor, though this step is optional.
  3. Whisk the eggs: In a medium bowl, crack all six eggs. Add the milk, salt, black pepper, and paprika. Whisk vigorously until the mixture is smooth and slightly frothy. This ensures your muffins will be fluffy.
  4. Combine ingredients: Gently fold the chopped spinach, crumbled feta, and sautéed vegetables (if using) into the egg  mixture. Stir just enough to distribute the ingredients evenly without overmixing.
  5. Fill the muffin tin: Pour the egg mixture into the prepared muffin cups, filling each about 3/4 full. Avoid overfilling, as the muffins will expand as they bake.
  6. Bake: Place the muffin tin in the preheated oven and bake for 18–22 minutes, or until the muffins are fully set and lightly golden on top. A toothpick inserted into the center should come out clean.
  7. Cool and serve: Allow the muffins to cool for 5 minutes in the tin before removing them. Serve warm for breakfast or store in an airtight container in the refrigerator for up to 4 days. They can also be frozen for up to 2 months and reheated in the microwave or oven.

Tips:

  • For extra flavor, add herbs such as parsley, dill, or chives.
  • Swap feta with goat cheese or cheddar for a different taste profile.
  • Make these muffins more filling by adding cooked quinoa, mushrooms, or diced cooked chicken.
  • Ensure muffins are not overbaked to keep them soft and moist.
  • Perfect for meal prep: bake a batch on Sunday, and you have ready-to-eat breakfast for the week.

Nutrition (per muffin, approx.):

  • Calories: 120–140 kcal
  • Protein: 8–10 g
  • Carbohydrates: 2–3 g
  • Fat: 8–10 g
  • Fiber: 0.5–1 g
  • Sugar: 1 g
  • Sodium: 220–250 mg

Cloud Bread (Zero-Carb Flourless Loaf)

Cloud Bread (Zero-Carb Flourless Loaf)

This “Cloud Bread” loaf is a fantastic option for anyone looking for a light, airy, and flourless alternative to traditional bread. It relies on the protein from eggs to create structure, making it a wonderful fit for low-carb or gluten-free lifestyles.

Dairy & Eggs

Ingredients

  • 3 Large eggs (separated into whites and yolks)

  • 3 tbsp Cream cheese   (softened to room temperature)

  • ¼ tsp Baking powder (or Cream of Tartar for stability)

  • 1 pinch Salt

  • Optional: Garlic powder, dried herbs, or a pinch of stevia for a sweet version.


Step-by-Step Instructions

  1. Preheat and Prep: Preheat your oven to 150°C. Lightly grease a small loaf pan or line it with parchment paper to ensure the bread releases easily after baking.

    Cheese
  2. Separate the Eggs: Carefully separate the egg whites from the yolks into two clean, dry bowls. Tip: Ensure there is no yolk in the whites, as even a small drop will prevent them from fluffing up.

  3. Mix the Yolks: In the bowl with the egg yolks, add the softened cream cheese and a pinch of salt. Whisk or blend until the mixture is completely smooth and no lumps of cream cheese remain.

  4. Whip the Whites: In the other bowl, add the baking powder (or cream of tartar) to the egg whites. Using a hand mixer or stand mixer, beat the whites on high speed until stiff peaks form. The whites should be thick and glossy, standing straight up when you lift the beaters.

  5. Fold Gently: Slowly and carefully fold the yolk mixture into the whipped egg whites using a spatula. Use a “light hand” to keep as much air in the mixture as possible—this is what gives the bread its height without using flour.

  6. Bake: Gently pour the batter into the prepared loaf pan. Bake for 25–30 minutes.

  7. Golden Finish: The bread is done when the top is a beautiful golden brown and it feels firm but springy to the touch.

    Dairy & Eggs
  8. Cool: Let the loaf cool in the pan for at least 10 minutes. As it cools, the texture will become more “bread-like” and easier to slice.


Why This Works

  • Zero Flour: By using whipped egg whites, you achieve a bubbly, airy texture that mimics a soft sponge  cake  or light bread without any grains.

  • High Protein: This recipe is almost entirely protein and healthy fats, making it very satisfying while staying within a low-point or low-carb budget.

Lemon Pudding Cakes

Lemon Pudding Cakes

Light, zesty, and surprisingly easy.

  • Prep time: 15 minutes

  • Bake time: 35–40 minutes

  • Servings: 6 individual cakes

Ingredients

  • 3 large eggs, separated (room temperature)

  • 1 cup granulated sugar

  • 2 tablespoons unsalted butter, melted and slightly cooled

  • ¼ cup all-purpose flour

  • 1 cup whole milk

  • ½ cup fresh lemon juice (approx. 2–3 lemons)

  • 1 tablespoon lemon zest

  • ¼ teaspoon salt

Instructions

  1. Prep: Preheat your oven to 350°F (175°C). Grease six 6-ounce ramekins and place them in a large roasting pan or 9×13 baking dish.

  2. Cream the Base: In a large bowl, whisk together the sugar, melted butter, flour, and salt.

  3. Add Liquids: Whisk in the egg yolks, lemon juice, lemon zest, and milk until the mixture is smooth.

  4. Whip the Whites: In a separate clean bowl, beat the egg whites until stiff peaks form.

  5. Fold: Gently fold about one-third of the egg whites into the lemon mixture to lighten it. Then, fold in the remaining whites until just combined (don’t over-mix, or you’ll lose the fluff!).

  6. The Water Bath: Divide the batter evenly among the ramekins. Pour hot water into the roasting pan until it reaches halfway up the sides of the ramekins.

  7. Bake: Bake for 35–40 minutes until the tops are golden and springy to the touch.

  8. Cool: Remove from the water bath and let cool for 10–15 minutes. Serve warm or chilled.

Notes & Tips

  • The Water Bath is Non-Negotiable: This (technically called a bain-marie) ensures the custard bottom stays creamy and doesn’t curdle while the cake top bakes.

  • Zest First: Always zest your lemons before squeezing them. It’s significantly harder to zest a squished lemon!

  • Egg Whites: Ensure your bowl and whisk are completely grease-free, or the egg whites won’t whip properly.

Nutritional Info (Per Serving)

Calories Total Fat Carbs Protein Sugar
215 kcal 7g 35g 4g 31g

The Benefit

Aside from being a massive crowd-pleaser, these cakes are relatively light compared to heavy cheesecakes or chocolate tortes. The high lemon content provides a nice hit of Vitamin C, and because they are portion-controlled in ramekins, they’re great for mindful eating.

Q&A

Q: Can I make this in one large dish instead of ramekins?

A: Yes! You can use a 1-quart soufflé dish. Increase the baking time to about 45–50 minutes.

Q: Why is my cake “weeping” or soggy?

A: This usually happens if the egg whites weren’t whipped to stiff enough peaks or if they were folded in too vigorously, causing the air bubbles to collapse.

Q: Can I make these ahead of time?

A: Absolutely. They are delicious served cold the next day. Just cover them with plastic wrap once they’ve cooled completely.

Tropical Green Power Smoothie

Tropical Green Power Smoothie

Ingredients

  • 1 cup Frozen mango chunks (for that bright yellow pop and chill)

  • 1/2 Ripe banana (provides the creamy base)

  • 1 cup Fresh kale or spinach (loosely packed)

  • 1 tbsp Peanut butter or almond butter (seen on the spoon in your photo)

  • 1 cup Unsweetened almond milk, coconut milk, or water

  • Optional: A drizzle of honey or agave (if you prefer it sweeter)


Instructions

  1. Layer the Liquid: Pour your milk or water into the blender first. This helps the blades spin freely and prevents “freezing up.”

  2. Add the Greens: Toss in the kale. Blending the greens with the liquid first can help ensure there are no leafy bits left behind.

  3. Add the Fruit & Fat: Add the frozen mango, banana, and that dollop of peanut butter.

  4. Blend: Start on a low speed and gradually increase to high. Blend for about 45–60 seconds until the texture is completely silky.

  5. Adjust: If it’s too thick, add a splash more liquid. If it’s too thin, add a few more frozen mango chunks or a couple of ice cubes.


Quick Tips for the Best Results

  • Remove Kale Stems: For the smoothest texture, pull the kale leaves off the woody center stems before blending.

  • The “Glow”: That bright lime-green color in your photo usually comes from the combination of yellow mango and green kale. If you use berries, the color will turn purple/brown!

  • Protein Boost: Feel free to add a scoop of vanilla protein powder or Greek yogurt to make it more filling.

🍎 Apple Pie Smoothie Recipe

🍎 Apple Pie Smoothie Recipe

Prep time: 5 minutes | Servings: 1-2

Ingredients

Category Ingredient Amount
Fruit Crisp Red Apple (eaten whole or chopped) 1 large
Base Milk of choice (Oat, Almond, or Dairy) 1 cup
Thickener Rolled Oats ¼ cup
Creaminess Greek Yogurt or Frozen Banana ½ cup / 1 small
Spice Ground Cinnamon ½ tsp
Sweetener Maple Syrup or Honey (optional) 1 tsp
Garnish Extra oats and a sprinkle of cinnamon To taste

Instructions

  1. Prep the Apple: Core the apple and chop it into chunks. You can leave the skin on for extra fiber and nutrients, as long as you have a decent blender!

  2. Combine: Add the apple, oats, milk, yogurt (or banana), and cinnamon into your blender.

  3. Blend: Start on a low speed and gradually increase to high. Blend for about 45–60 seconds until the oats are completely pulverized and the texture is silky smooth.

  4. Taste Test: If you prefer it sweeter, add your maple syrup or a pitted date and pulse again.

  5. Serve: Pour into glasses. Top with a pinch of dry rolled oats and an extra dusting of cinnamon to match the photo.


💡 Pro-Tips for the Best Texture

  • Keep it Cold: Use a frozen banana or add a handful of ice cubes to give it that “milkshake” thickness.

  • Soak the Oats: If you don’t have a high-speed blender, let the oats soak in the milk for 5 minutes before blending to ensure there’s no “gritty” aftertaste.

  • The Apple Choice: Honeycrisp, Fuji, or Gala apples work best for sweetness, while Granny Smith adds a nice tart kick.

The Ultimate Blueberry Banana Smoothie

The Ultimate Blueberry Banana Smoothie

This recipe makes one large or two small servings. It’s naturally sweet, creamy, and packed with antioxidants.

Ingredients

  • 1 Large ripe banana (frozen chunks work best for a thicker texture)

  • 1 cup Blueberries (fresh or frozen)

  • ½ cup Greek yogurt or plain yogurt (for creaminess)

  • ¾ cup Milk of your choice (dairy, almond, oat, or soy)

  • 1 tsp Honey or maple syrup (optional, if you want extra sweetness)

  • A splash of vanilla extract (optional)


Instructions

  1. Prep the Fruit: Peel your banana and break it into chunks. If you prefer a colder, thicker smoothie, use frozen blueberries and a frozen banana.

  2. Layer the Blender: Add the liquid (milk) first to help the blades spin easily, then add the yogurt, followed by the blueberries and banana.

  3. Blend: Secure the lid and blend on high for about 45–60 seconds until the mixture is completely smooth and vibrant purple.

  4. Adjust Consistency: If it’s too thick, add a little more milk. If it’s too thin, add a few more frozen fruit pieces or a couple of ice cubes and blend again.

  5. Serve: Pour into a glass and enjoy immediately.


Pro Tips for the Best Texture

  • Use Ripe Bananas: The more brown spots on the peel, the sweeter your smoothie will be without needing added sugar.

  • Boost the Nutrition: You can easily add a tablespoon of chia seeds or flax seeds for extra fiber without changing the flavor.