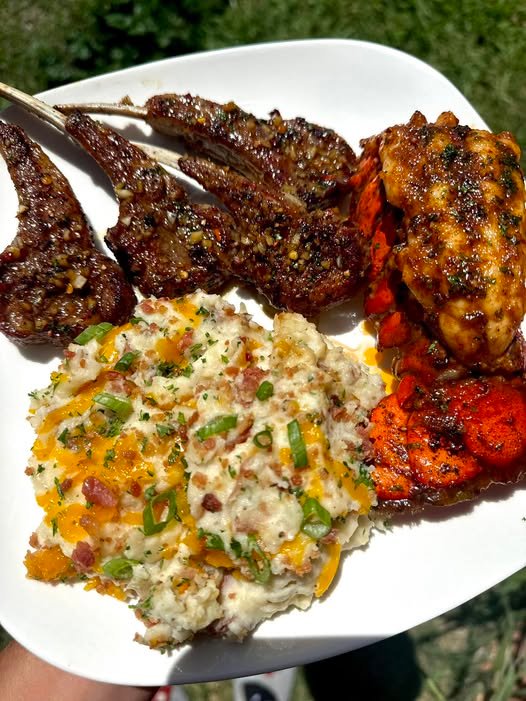
Refreshing Lemon & Ginger Tonic

Refreshing Lemon & Ginger Tonic

  • Prep time: 5 minutes

  • Servings: 2 cups

Ingredients

  • 2 cups Water (filtered)

  • 1 inch Fresh ginger root, peeled and sliced or grated

  • 1 whole Lemon (half sliced, half juiced)

  • 1 tbsp Raw honey (optional)

  • Pinch of Cayenne pepper (optional)

Instructions

  1. Prepare the Ginger: Peel the fresh ginger root and slice it into thin rounds or grate it for a more intense flavor.

  2. Boil the Water: Bring 2 cups of filtered water to a gentle boil in a small pot or kettle.

  3. Infuse the Ginger: Add the ginger to the hot water. For a mild tea, remove from heat and let it steep for 5 minutes. For a stronger, spicier tonic, let the ginger simmer in the water for 3 to 5 minutes before turning off the heat.

  4. Add Lemon: Stir in the fresh lemon juice and drop in the remaining lemon slices. The lemon adds a bright acidity and a boost of antioxidants.

  5. Sweeten and Season: Allow the liquid to cool slightly. Once it is warm (not boiling), stir in the raw honey and a pinch of cayenne pepper if you enjoy a little heat.

  6. Serve: This drink can be enjoyed warm in a mug or poured over ice for a chilled, refreshing version. Drink one cup in the morning and one in the evening.


Common Questions & Answers

Q: Can I use ground ginger instead of fresh ginger root? A: Yes, you can use ground ginger if fresh is unavailable. Use about 1/4 to 1/2 teaspoon of ground ginger for 2 cups of water. However, fresh ginger provides a more vibrant, spicy flavor and contains higher levels of gingerol, the active compound known for aiding digestion.

Q: Why should I wait for the water to cool before adding honey? A: Boiling water can neutralize the beneficial enzymes and antioxidants found in raw honey. By letting the tonic cool to a warm temperature, you preserve these natural properties while still allowing the honey to dissolve easily.

Q: Is it okay to leave the lemon peels in the drink? A: Absolutely. The peel contains lemon oils and additional nutrients. Just ensure you wash the lemon thoroughly before slicing to remove any wax or residue.

Q: Can I make a large batch of this to keep in the fridge? A: Yes. You can triple or quadruple the recipe and store it in a glass jar in the refrigerator for up to 3 days. It is delicious served cold as a replacement for sugary juices or sodas.

Q: What are the benefits of adding cayenne pepper? A: Cayenne pepper contains capsaicin, which can help support a healthy metabolism and add a warming sensation that complements the spice of the ginger.

Broccoli Cheddar Chicken Rollups

Broccoli Cheddar Chicken Rollups

The Rest of the Ingredients

  • 6 thin chicken breast cutlets (pounded to about ¼-inch thickness)

  • ½ cup cream cheese (softened—helps bind the filling)

  • 1 tsp garlic powder

  • ½ tsp paprika

  • Salt and pepper to taste

  • 2 tbsp olive oil (for searing)

Instructions

  1. Prep the Filling: In a medium bowl, mix the finely chopped broccoli, shredded cheddar, and softened cream cheese. Season with a pinch of salt and the garlic powder.

  2. Prepare the Chicken: Season both sides of your chicken pieces with salt, pepper, and paprika.

  3. Stuff and Roll: Place a generous scoop of the broccoli mixture onto the wider end of each chicken piece. Roll it up tightly and secure it with a toothpick if it’s feeling unruly.

  4. The Sear: Heat olive oil in an oven-safe skillet over medium-high heat. Sear the roll-ups for 3–4 minutes per side until golden brown.

  5. The Finish: Transfer the skillet to a preheated oven at 375°F (190°C). Bake for 12–15 minutes or until the internal temperature reaches 165°F (74°C).


Pro-Tips for Success

  • Steam the Broccoli: If you like your broccoli very soft, microwave the chopped bits with a splash of water for 60 seconds before mixing them with the cheese.

  • Don’t Overstuff: It’s tempting to pile on the cheese, but it will leak out into the pan (though crispy cheese “skirts” aren’t exactly a bad thing!).

  • Resting: Let the chicken rest for 5 minutes after taking it out of the oven so the cheese sets and the juices redistribute.

Refreshing Root & Green Juice

Refreshing Root & Green Juice

This vibrant juice combines the sweetness of carrots and beets with the crispness of cucumber and celery.


Ingredients

  • 5 Medium carrots

  • 8 Ribs of celery

  • 1 Medium cucumber

  • 1 Small beetroot

  • 1/4 Lemon (peeled)

  • 1-inch piece Fresh ginger


Instructions

1. Prepare the Produce

  • Wash all your vegetables thoroughly under cold water.

  • Peel the beetroot and the lemon (leaving the white pith is fine, but the yellow zest can sometimes be too bitter for juice).

  • If your carrots and cucumber are organic, you can leave the skins on; otherwise, give them a quick peel.

2. Juice the Ingredients

  • Pass the carrots, celery, cucumber, and beetroot through your juicer one by one.

  • Follow with the ginger and lemon to make sure all the flavorful juices are pushed through the machine.

3. Stir and Serve

  • Stir the juice well to combine all the vibrant layers.

  • Serve immediately over ice for the best flavor and nutrient boost.


A Quick Note on Wellness Tonics

The first image you shared mentions a tonic that can help with several conditions, including nerve pain, anxiety, and fatigue. While fresh vegetable juices and herbal infusions are a wonderful way to support your overall health and hydration, they work best as a part of a healthy lifestyle. For serious conditions like chronic depression or severe nerve pain, it’s always important to keep following the specialized care from your doctor alongside these healthy habits!


Helpful Tips

  • No Juicer? You can blend all the ingredients with a half-cup of water and then strain the mixture through a nut milk bag or a fine-mesh sieve.

  • Flavor Balance: If the beet flavor is too strong for you, try adding half a green apple to the mix for a little extra natural sweetness.

Two-Ingredient Apple Chocolate Cake

Two-Ingredient Apple Chocolate Cake

A dense, fudge-like dessert that relies on the natural pectin in apples to set. No flour, no eggs, and no added sugar needed!


Ingredients

  • 4 large Apples (sweet varieties like Fuji, Gala, or Honeycrisp work best)

  • 1/2 cup (50g) Unsweetened cocoa powder (high-quality cocoa will give the best flavor)

  • Optional: A pinch of cinnamon or 1/2 teaspoon vanilla extract for extra depth.


Instructions

Step 1: Prepare the Apples

  1. Peel and core the apples, then cut them into small, even chunks.

  2. Place the apple pieces in a saucepan with 2 tablespoons of water. Cover and cook over medium-low heat for about 10–12 minutes until they are very soft and can be easily mashed with a fork.

  3. Alternatively, you can steam the apples until tender.

Step 2: Blend until Smooth

  1. Transfer the hot, softened apples into a blender or food processor.

  2. Blend until you have a completely smooth apple puree. It is important to do this while the apples are still warm.

Step 3: Add the Cocoa

  1. Add the unsweetened cocoa powder (and optional cinnamon or vanilla) to the blender.

  2. Blend again until the cocoa is fully incorporated and the mixture looks like a thick chocolate ganache.

Step 4: Set the Cake

  1. Line a small loaf pan or a round 6-inch silicone mold with parchment paper (or lightly grease with a tiny bit of coconut oil).

  2. Pour the chocolate-apple mixture into the mold and smooth the top with a spatula.

  3. Let it cool to room temperature, then place it in the refrigerator for at least 4–6 hours (overnight is best) to allow the natural pectin to set the cake into a firm, sliceable texture.

Step 5: Serve

  1. Once firm, carefully lift the cake out of the mold.

  2. Slice into thick pieces. You can enjoy it plain or dust the top with a little extra cocoa powder or some fresh raspberries.


Helpful Tips

  • Sweetness: Since there is no added sugar, the sweetness depends entirely on your apples. If your apples are tart, you may want to stir in 1 tablespoon of honey or a few drops of stevia during the blending stage.

  • Texture: Ensure the apple puree is very smooth. Any lumps will affect the “fudge” consistency of the final cake.

  • Storage: Keep this cake in an airtight container in the refrigerator. It stays fresh and delicious for up to 4 days.

Eggless Buttermilk Fruit Cake

Eggless Buttermilk Fruit Cake

This moist and tender loaf is packed with warm spices and sweet dried fruits. It’s the perfect “quick bread” style fruit cake for when you want a holiday-worthy treat without the extra work.


Ingredients

  • 1 1/2 cups (200g) All-purpose flour

  • 3/4 cup (150g) Light brown sugar (firmly packed)

  • 2 cups (300g) Dried or candied fruits (raisins, currants, dates, figs, cranberries, apricots, or mixed peel)

  • 1 cup (240ml) Buttermilk (room temperature)

  • 1/2 cup (113g) Unsalted butter (melted and cooled)

  • 1 teaspoon Baking soda

  • 1/2 teaspoon Salt

  • 1/2 teaspoon Pure vanilla extract

  • Spices: 3/4 tsp cinnamon, 1/2 tsp nutmeg, 1/4 tsp ginger, 1/4 tsp cloves


Instructions

Step 1: Prep and Mix Dry Ingredients

  1. Preheat your oven to 175°C (350°F). Grease a 9×5 inch loaf pan and line it with parchment paper.

  2. In a large bowl, whisk together the flour, baking soda, salt, cinnamon, nutmeg, ginger, and cloves.

Step 2: Prepare the Fruit

  1. Add your 2 cups of dried/candied fruits to the flour mixture.

  2. Toss them gently so the fruit is coated in flour—this prevents the fruit from sinking to the bottom of the cake while baking.

Step 3: Mix Wet Ingredients

  1. In a separate bowl, whisk the melted butter and brown sugar until smooth.

  2. Stir in the buttermilk and vanilla extract.

Step 4: Combine and Bake

  1. Pour the wet ingredients into the dry fruit-and-flour mixture.

  2. Stir gently just until combined. Do not overmix, or the cake will be tough.

  3. Pour the batter into your prepared loaf pan and smooth the top.

  4. Bake for 55–65 minutes, or until a toothpick inserted into the center comes out clean.

Step 5: Cool

  1. Let the cake cool in the pan for about 10 minutes, then lift it out onto a wire rack to cool completely before slicing.

Creamy No-Bake 3-Ingredient Dessert

Creamy No-Bake 3-Ingredient Dessert

A silky, pudding-like dessert topped with a crunchy biscuit crumble.


Ingredients

  • 2 cups (500 ml) Whole milk

  • 1 can (395 g) Condensed milk

  • 1 packet (approx. 200 g) Marie biscuits (or any plain tea biscuits/graham crackers)

  • Optional Thickener: 3 tablespoons cornstarch (if you prefer a firmer, sliceable texture rather than a soft pudding).


Instructions

Step 1: Prepare the Biscuit Base and Topping

  1. Take about half of the biscuits and crush them into fine crumbs. You can do this by placing them in a zip-top bag and rolling over them with a rolling pin.

  2. If you want a base, press some of the crumbs into the bottom of a glass dish. Reserve the rest of the crumbs for the top.

Step 2: Cook the Creamy Filling

  1. In a medium saucepan, combine the whole milk and the condensed milk.

  2. (Optional) If using cornstarch for a thicker set, whisk it into the cold milk before turning on the heat to ensure there are no lumps.

  3. Place the pan over medium heat and stir constantly.

  4. Bring the mixture to a gentle simmer. Continue stirring for about 5–8 minutes until the mixture thickens and coats the back of a spoon.

Step 3: Assemble

  1. Pour the warm creamy mixture into your prepared glass dish (over the bottom biscuit layer, if you made one).

  2. Smooth the top with a spatula.

  3. Sprinkle the remaining biscuit crumbs evenly over the entire surface.

Step 4: Chill

  1. Let the dessert cool to room temperature for about 20 minutes.

  2. Place in the refrigerator for at least 2–3 hours (or overnight) to set completely.

  3. Serve chilled directly from the dish.


Helpful Tips

  • Texture Variation: For more texture, you can layer whole biscuits between the cream layers instead of just using crumbs on top.

  • Flavor Boost: While not part of the 3 ingredients, a teaspoon of vanilla extract stirred into the cream at the end adds a lovely depth of flavor.

  • Serving: This is best enjoyed within 2 days to keep the biscuit topping from getting too soft from the moisture of the cream.

Spiced Wellness Infusion

Spiced Wellness Infusion

A warm, aromatic drink featuring ginger, cloves, cinnamon, and bay leaves.


Ingredients

  • 1 small piece Fresh ginger root (about 1 inch, sliced)

  • 3–5 Whole cloves

  • 1 Cinnamon stick (or 1/2 teaspoon ground cinnamon)

  • 2 Dried bay leaves

  • 2 cups Water

  • Optional: A slice of lemon or a small amount of honey for taste


Instructions

Step 1: Prepare the Spices

  1. Wash the fresh ginger and slice it into thin rounds (no need to peel if it is clean).

  2. Lightly crush the cloves and the cinnamon stick to help release their natural oils.

Step 2: Simmer the Mixture

  1. Pour 2 cups of water into a small saucepan and bring it to a gentle boil.

  2. Add the sliced ginger, cloves, cinnamon stick, and bay leaves.

  3. Reduce the heat to low and let the mixture simmer for 10–15 minutes.

Step 3: Strain and Serve

  1. Remove the saucepan from the heat.

  2. Strain the liquid into a mug, discarding the whole spices.

  3. If desired, add a squeeze of lemon or a touch of honey once the drink has cooled slightly.

  4. Enjoy while warm, typically in the morning or before bed.


Helpful Tips & Notes

  • Flavor Profile: This drink has a strong, spicy, and slightly woody flavor. If it is too intense, you can dilute it with more warm water.

  • Storage: You can make a larger batch and store it in the refrigerator for up to 2 days, reheating it gently when you’re ready to drink.

  • Safety Note: While these kitchen spices are generally safe for cooking, it is always a good idea to check with a healthcare professional before drinking herbal tonics daily, especially if you are taking medications for blood pressure or blood sugar.

Tropical Delight: Fruity Tapioca Jelly Drink

Tropical Delight: Fruity Tapioca Jelly Drink

A colorful and refreshing chilled drink featuring creamy milk, soft tapioca pearls, and fruity jelly cubes.


Ingredients

For the Jelly:

  • 4 cups Water

  • 25 grams White unflavored jelly powder

  • 1/4 cup White sugar

  • Food coloring: Red, Yellow, and Green

For the Drink Base:

  • 835 grams Fruit cocktail (well-drained) or fresh chopped mango, pineapple, and strawberries

  • 1 cup Small tapioca pearls (cooked)

  • 250 ml All-purpose cream (or heavy cream)

  • 300 ml Condensed milk

  • 2 cups Evaporated milk (or fresh milk)


Instructions

Step 1: Prepare the Jelly

  1. In a medium pot, bring 4 cups of water to a boil.

  2. Stir in the jelly powder and 1/4 cup sugar, continuing to stir until the powder is fully dissolved and the liquid is clear.

  3. Remove from heat and divide the hot mixture into three separate heat-safe bowls.

  4. Add a few drops of red coloring to the first bowl, yellow to the second, and green to the third. Stir each until the color is even.

  5. Pour each color into a shallow container. Let them cool at room temperature, then refrigerate until firm.

  6. Once set, cut the jelly into small, even cubes and set aside.

Step 2: Create the Creamy Base

  1. In a large mixing bowl, whisk together the all-purpose cream, condensed milk, and evaporated milk.

  2. Stir gently until the mixture is smooth and well-combined.

Step 3: Assemble the Drink

  1. Add the drained fruit cocktail (or your fresh fruit pieces) into the creamy milk base and stir.

  2. Carefully fold in the cooked tapioca pearls and the colored jelly cubes.

  3. Use a gentle folding motion to ensure the jelly cubes stay intact and don’t break apart.

Step 4: Chill and Serve

  1. Transfer the mixture into a large pitcher or individual serving glasses.

  2. Refrigerate for at least 1 hour before serving. This allows the flavors to meld and the drink to become perfectly chilled.

  3. Serve cold, ideally with a wide straw or a long spoon to enjoy the fruit and jelly bits.


Helpful Tips for Success

  • Drain Well: Ensure your canned fruit is thoroughly drained. Excess syrup can thin out the creamy base and make the drink overly sweet.

  • Sweetness Control: You can easily adjust the sweetness by adding more or less condensed milk to suit your preference.

  • Texture: For the best results, make sure your jelly is completely firm before you attempt to slice it into cubes.

  • Storage: This drink is best enjoyed fresh but can be stored in a covered container in the refrigerator for up to 2 days. Give it a very gentle stir before serving again.

Creamy Broccoli Cauliflower Salad

Creamy Broccoli Cauliflower Salad

A refreshing, hearty salad that combines crisp vegetables with a smooth, flavorful dressing.


Ingredients

The Salad Base:

  • 3 cups Fresh broccoli florets (cut into bite-sized pieces)

  • 3 cups Fresh cauliflower florets (cut into small pieces)

  • 6 slices Bacon (cooked until crisp and crumbled)

  • 3/4 cup Sharp cheddar cheese (freshly grated)

  • 1/3 cup Red onion (finely diced)

  • 1/2 cup Roasted sunflower seeds (or chopped almonds)

The Creamy Dressing:

  • 3/4 cup Mayonnaise

  • 1/4 cup Plain Greek yogurt (or sour cream)

  • 2 tablespoons Apple cider vinegar

  • 2 tablespoons Granulated sweetener (monk fruit or stevia work well here)

  • 1/2 teaspoon Salt

  • 1/4 teaspoon Black pepper


Instructions

1. Prepare the Vegetables

  • Wash the broccoli and cauliflower thoroughly.

  • Important: Pat them completely dry with a clean towel. Drying the vegetables ensures the dressing clings to them instead of sliding off.

  • Chop them into small, even pieces so you get a bit of everything in every bite.

2. Cook the Bacon

  • Fry the bacon in a skillet or bake in the oven until it is very crispy.

  • Drain on paper towels, let it cool, and then crumble it into small pieces.

  • Pro Tip: Keep the bacon separate until you are ready to serve to ensure it stays crunchy.

3. Whisk the Dressing

  • In a medium bowl, whisk together the mayonnaise, Greek yogurt, apple cider vinegar, sweetener, salt, and pepper.

  • Stir until the dressing is completely smooth and creamy.

4. Assemble the Salad

  • In a large mixing bowl, toss together the broccoli, cauliflower, red onion, cheese, and sunflower seeds.

  • Pour the dressing over the vegetables and fold gently until everything is evenly coated.

5. Chill and Serve

  • Cover the bowl and refrigerate for at least 30 minutes. For the best flavor, let it chill for 3–4 hours to allow the flavors to meld.

  • Just before serving, stir in the crumbled bacon (or sprinkle it on top for a nice presentation).


Variations & Storage

  • Low-Carb Tip: This recipe is naturally low-carb if you use a sugar-free sweetener and skip any added dried fruit like raisins.

  • Make Ahead: You can chop the vegetables and make the dressing up to 24 hours in advance. Keep them in separate containers and mix them 1–2 hours before your meal.

  • Storage: Store leftovers in an airtight container in the fridge for up to 3 days. Stir well before serving as the vegetables may release a little moisture over time.

Homemade Whipped Chocolate Bars

Homemade Whipped Chocolate Bars

A creamy, high-protein snack with a fluffy whipped center and a crisp chocolate shell.


Ingredients

For the Filling:

  • 1 cup Thick Greek yogurt (plain)

  • 1/2 cup Whipped topping (thawed)

  • 2 tablespoons Unsweetened cocoa powder

  • 2 to 3 tablespoons Granulated sweetener (such as monk fruit or stevia)

  • 1/2 teaspoon Vanilla extract

  • Optional: 1 scoop chocolate protein powder for extra body

For the Chocolate Coating:

  • 1/2 cup Chocolate chips (sugar-free or dark)

  • 1 teaspoon Coconut oil


Instructions

Step 1: Prepare the Chocolate Base

  1. In a medium mixing bowl, combine the Greek yogurt, cocoa powder, sweetener, and vanilla extract.

  2. Whisk thoroughly until the mixture is completely smooth and there are no cocoa lumps.

Step 2: Fold for Fluffiness

  1. Gently add the whipped topping to the chocolate yogurt mixture.

  2. Using a spatula, fold it in slowly. If you are using protein powder, fold it in now as well.

  3. Note: Use a light hand here; you want to keep as much air in the mixture as possible to ensure the bars stay “whipped” and light.

Step 3: Shape and Initial Freeze

  1. Line a small loaf pan or rectangular dish with parchment paper, leaving a bit of overhang on the sides.

  2. Spread the mixture evenly into the pan, aiming for about 1 inch of thickness.

  3. Place in the freezer for at least 2 hours until it is completely firm.

Step 4: Slice the Bars

  1. Once frozen solid, use the parchment paper to lift the slab out of the pan.

  2. Place it on a cutting board and slice into 8 equal bars.

  3. Return the bars to the freezer immediately while you prepare the coating so they don’t soften.

Step 5: Melt the Coating

  1. In a microwave-safe bowl, combine the chocolate chips and coconut oil.

  2. Microwave in 30-second intervals, stirring between each, until the chocolate is silky and fully melted.

Step 6: Dip and Set

  1. Work with one bar at a time. Use a fork to dip the frozen bar into the melted chocolate, coating all sides.

  2. Let the excess chocolate drip off, then place the bar back onto parchment paper.

  3. Because the bars are frozen, the chocolate shell should harden almost instantly.


Helpful Tips

  • Serving: For the best “mousse-like” texture, let the bar sit at room temperature for 3–5 minutes before eating.

  • Storage: Keep these stored in an airtight container in the freezer. They make a perfect grab-and-go dessert!

  • Flavor Boost: If you want a richer taste, you can stir a tablespoon of powdered peanut butter into the yogurt base in Step 1.

Flourless Golden Breakfast Bites

Flourless Golden Breakfast Bites

These are quick, high-protein, and naturally gluten-free. They have a soft, airy texture and a beautiful golden crust.


Ingredients

  • 2 large eggs

  • 1 cup Cottage cheese (or smooth Ricotta for a finer texture)

  • 1/2 cup Almond flour (or coconut flour, though use only 3 tablespoons if choosing coconut)

  • 1 teaspoon Baking powder

  • 1 tablespoon Honey or Maple syrup (optional, for a hint of sweetness)

  • 1/2 teaspoon Vanilla extract

  • A pinch of salt

  • Butter or oil (for the pan)


Instructions

Step 1: Mix the Base

  1. In a medium bowl, whisk the eggs together with the cottage cheese (or ricotta) until well combined.

  2. If you prefer a smoother texture, you can pulse these two ingredients in a blender for a few seconds.

Step 2: Add Dry Ingredients

  1. Stir in the almond flour, baking powder, vanilla, and a pinch of salt.

  2. Mix until you have a thick, consistent batter. Let the batter sit for 2–3 minutes so the flour can absorb the moisture.

Step 3: Cook

  1. Heat a non-stick skillet over medium-low heat and add a small amount of butter or oil.

  2. Drop large tablespoons of the batter onto the pan. Do not overcrowd, as they need space to be flipped.

  3. Cook for about 3–4 minutes on the first side. You will see small bubbles forming and the edges looking set.

Step 4: Flip and Finish

  1. Carefully flip each piece. They should be a deep, golden brown.

  2. Cook for another 2–3 minutes on the other side until they feel firm to the touch and are cooked through.


Helpful Tips

  • Texture Variation: If you like them more savory, skip the honey and vanilla and add a pinch of garlic powder or dried herbs instead.

  • Serving: These are delicious served warm with fresh berries, a dollop of Greek yogurt, or even a little nut butter.

  • Storage: These keep well in the refrigerator for up to 3 days and can be quickly reheated in a toaster or pan.

Homemade Crusty Baguettes

Homemade Crusty Baguettes

A simple, reliable recipe for fresh bread with a crispy crust and soft interior.


Ingredients

  • 1 1/3 cups (320 ml) Warm water (ensure it is lukewarm, not hot)

  • 1 tablespoon (10 g) Dry yeast

  • 4 tablespoons (60 ml) Olive oil

  • 1 teaspoon Salt

  • 4 3/4 cups (570 g) Plain flour (plus extra for dusting)


Instructions

Step 1: Activate the Yeast

  1. In a large mixing bowl, combine the warm water and dry yeast.

  2. Let it sit for about 5–10 minutes until it becomes frothy and bubbly.

  3. Stir in the olive oil.

Step 2: Mix the Dough

  1. Gradually add the flour and the salt to the yeast mixture.

  2. Stir with a wooden spoon until a shaggy dough forms.

  3. Turn the dough out onto a lightly floured surface and knead by hand for 8–10 minutes (or use a stand mixer with a dough hook) until the dough is smooth, elastic, and no longer sticky.

Step 3: First Rise

  1. Lightly grease a large bowl with a little olive oil.

  2. Place the dough inside, cover with a clean damp cloth or plastic wrap, and let it rise in a warm, draft-free spot for 1 to 1.5 hours, or until it has doubled in size.

Step 4: Shape the Baguettes

  1. Gently punch down the dough to release the air.

  2. Divide the dough into 3 equal portions.

  3. Roll each piece into a long log shape (baguette style).

  4. Place the loaves on a baking tray lined with parchment paper. Cover and let them rise again for another 30 minutes.

Step 5: Prepare for Baking

  1. Preheat your oven to 200°C (400°F).

  2. Using a very sharp knife or a razor, make 3 to 4 diagonal slashes across the top of each loaf.

  3. Optional: Lightly dust the tops with a little flour for a rustic look.

Step 6: Bake

  1. Place the tray in the oven. For a crispier crust, you can place a small oven-safe pan with an inch of water on the bottom rack to create steam.

  2. Bake for 20–25 minutes or until the loaves are deep golden brown and sound hollow when tapped on the bottom.

  3. Let the bread cool on a wire rack before slicing.


Helpful Tips

  • The “Windowpane” Test: To see if you’ve kneaded enough, stretch a small piece of dough; it should be thin enough to see light through without tearing.

  • Storage: Homemade bread has no preservatives, so it is best enjoyed the same day. To keep it longer, wrap it tightly and store it in a cool place, or freeze slices to toast later.

Garlic & Ginger Wellness Tonic

Garlic & Ginger Wellness Tonic

This concentrated blend is often used in traditional wellness routines. Since it is highly acidic, it is best enjoyed diluted in a glass of water.


Ingredients

  • 1 cup Fresh lemon juice (approx. 4–6 lemons)

  • 1 cup Garlic juice (freshly blended and strained)

  • 1 cup Ginger juice (freshly blended and strained)

  • 1 cup Raw Apple Cider Vinegar (with “the mother”)

  • 1 cup Raw honey (optional, to balance the strong flavors)


Instructions

1. Prepare the Juices

  • Peel the garlic and ginger.

  • Blend them separately (adding a tiny splash of water only if needed to get the blades moving).

  • Strain through a fine-mesh cloth or sieve to extract one cup of clear juice for each.

2. Simmer the Mixture

  • In a non-reactive saucepan (stainless steel or ceramic), combine the lemon juice, garlic juice, ginger juice, and apple cider vinegar.

  • Bring the mixture to a very gentle simmer over low heat.

3. Reduce the Liquid

  • Allow the mixture to simmer uncovered for 20–30 minutes.

  • The goal is to reduce the liquid by about one-quarter to concentrate the ingredients.

4. Cool and Sweeten

  • Remove the pot from the heat and let it cool completely to room temperature.

  • Important: Once cooled, stir in the raw honey. Adding honey to hot liquid can destroy its natural enzymes.

5. Storage

  • Pour the finished tonic into a clean glass bottle or jar and store it in the refrigerator.


Usage and Safety

  • How to take: A common way to use this is to stir 1 to 2 tablespoons into a glass of warm water in the morning.

  • Consistency: Use a glass container for storage, as the acidity can react with plastic or certain metals over time.

  • Note: Because garlic and ginger can have natural blood-thinning effects, it is a good idea to check with a healthcare professional if you are taking any daily medications for blood pressure or heart health.

Lemon, Ginger & Turmeric Wellness Drink

Lemon, Ginger & Turmeric Wellness Drink

A warm, refreshing tonic designed to support digestion and hydration.


Ingredients

  • 1 fresh lemon

  • 1 inch piece of fresh ginger root

  • 1/2 teaspoon turmeric powder (or 1 teaspoon freshly grated turmeric)

  • 2 cups water

  • 1 teaspoon honey (optional, for sweetness)


Instructions

Step 1: Prepare the Ingredients

  1. Wash the lemon, ginger, and turmeric (if using fresh).

  2. Slice the lemon into thin rounds.

  3. Peel and grate the ginger (and the turmeric root, if using).

Step 2: Simmer the Drink

  1. Pour the water into a saucepan and bring it to a gentle boil.

  2. Add the lemon slices, grated ginger, and turmeric.

  3. Lower the heat and let the mixture simmer for 10 minutes to allow the flavors and nutrients to infuse.

Step 3: Strain and Serve

  1. Remove the saucepan from the heat and strain the liquid into a cup or mug.

  2. Stir in the honey if you prefer a touch of sweetness.

  3. Enjoy while warm, ideally in the morning or between meals.


Quick Tips for Success

  • Fresh is Best: Use fresh lemon juice and ginger rather than bottled or dried versions for the most vibrant flavor.

  • Acid Sensitivity: If you have a sensitive stomach, try drinking this after a light snack rather than on a completely empty stomach.

  • Absorption Boost: Adding a tiny pinch of black pepper can actually help your body absorb the curcumin found in the turmeric more effectively.

Crispy-Top Buttery Cake Squares

Crispy-Top Buttery Cake Squares

Description

Golden on the outside, soft and fluffy inside, these cake squares have a delicate crisp sugar crust and a moist, buttery crumb. Perfect as a snack, dessert, or with coffee/tea.

 Servings

  • Makes: 16 squares
  • Serving size: 1 square

 Ingredients

  • 1 cup (225g) unsalted butter, melted
  • 1 ½ cups (300g) granulated sugar
  • 3 large eggs
  • 1 tbsp vanilla extract
  • 1 ½ cups (190g) all-purpose flour
  • 1 tsp baking powder
  • ½ tsp salt
  • ½ cup (120ml) milk
  • 2–3 tbsp sugar (for topping, optional but recommended)

 Instructions

1. Prep

  • Preheat oven to 350°F (175°C)
  • Grease or line an 8×8 or 9×9 baking pan

2. Mix Wet Ingredients

  • Whisk melted butter + sugar until smooth
  • Add eggs one at a time
  • Stir in vanilla

3. Combine Dry Ingredients

  • In a separate bowl: flour, baking powder, salt

4. Make Batter

  • Add dry ingredients to wet mixture
  • Pour in milk and mix until smooth (do not overmix)

5. Bake

  • Pour batter into pan
  • Sprinkle sugar evenly on top (creates that crispy crust)
  • Bake 30–35 minutes until golden and set

6. Cool & Slice

  • Let cool 10–15 minutes
  • Cut into squares and serve warm or at room temp

 Tips for Best Results

  • Use real butter for best flavor
  • Don’t skip the sugar topping—it creates that signature crust
  • Slightly underbake for extra moist centers
  • Add lemon zest or almond extract for variation
  • For extra crisp edges, bake in a metal pan (not glass)

 Optional Variations

  • Cinnamon Sugar: Mix cinnamon with topping sugar
  • Coconut Twist: Add shredded coconut to batter
  • Glaze: Drizzle with powdered sugar + milk icing

 Nutritional Info (Approx per serving)

  • Calories: 220
  • Fat: 11g
  • Carbs: 28g
  • Sugar: 18g
  • Protein: 3g

Benefits

  • Simple pantry ingredients
  • Quick to make (under 45 minutes)
  • Versatile base recipe
  • Kid-friendly and crowd-pleasing

Q&A

Q: Why is my cake dense?
A: Overmixing or too much flour can make it dense. Mix just until combined.

Q: How do I make it crispier?
A: Add more sugar on top or broil for 1–2 minutes at the end (watch closely).

Q: Can I store it?
A: Yes! Store in an airtight container for up to 3 days at room temp.

Q: Can I freeze it?
A: Absolutely—freeze up to 2 months and thaw at room temperature.

Q: Can I make it dairy-free?
A: Substitute butter with plant-based butter and milk with almond/oat milk.

🥘 Slow Cooker 5-Ingredient Poor Man’s Stew

🥘 Slow Cooker 5-Ingredient Poor Man’s Stew

Servings: 6 | Prep time: 15 mins | Cook time: 4-8 hours

Ingredients

  • 1 1/2 lbs Ground beef (leaner blends like 90/10 work best here)

  • 4 medium Russet potatoes, peeled and diced

  • 3 medium Carrots, peeled and sliced

  • 1 medium Yellow onion, diced

  • 4 cups Beef broth

  • Pantry Staples: 1 tsp salt, 1/2 tsp black pepper


Instructions

  1. Layer the Base: Place the raw ground beef at the bottom of a 6-quart slow cooker. Break it up slightly into large chunks.

  2. Add Vegetables: Scatter the potatoes, carrots, and onions over the beef. Season evenly with salt and pepper.

  3. The Slow Simmer: Pour the beef broth over the mixture. Cover and cook on LOW for 7–8 hours or HIGH for 4–5 hours.

  4. The “Finish”: About 1 hour before serving, use a sturdy spoon to break the beef into smaller crumbles. Stir the pot thoroughly.

  5. Adjust Texture: Taste for seasoning. If you prefer a thicker consistency, mash a few of the tender potato pieces directly into the broth to create a natural thickener.

  6. Serve: Ladle into bowls and top with shredded cheese or parsley if desired.


Quick Tips for Success

  • Fat Content: Because the beef isn’t drained, using a lean ground beef prevents the stew from becoming too oily. If you use a higher fat percentage (like 80/20), you can skim any excess oil off the top with a spoon before serving.

  • Potato Choice: Russets are great for thickening the stew (they fall apart easily), but if you prefer potatoes that hold their shape perfectly, try Yukon Golds.

  • The “Diner” Secret: If you try the tomato-style variation mentioned in your notes, adding a splash of Worcestershire sauce along with the tomato sauce adds a massive boost of savory “umami” flavor.


Serving Suggestions

The Classic The Hearty Side The Fresh Balance
Saltine crackers Warm garlic butter biscuits Steamed green beans
Shredded cheddar Crusty sourdough bread Simple garden sala

Classic Shepherd’s Pie

That photo looks incredibly cozy—there’s nothing quite like those crispy, fork-patterned peaks on a well-baked potato crust.

Since your list cut off at the half-and-half, I’ve rounded out the rest of the recipe for you. Here is the complete breakdown to get that golden-brown finish and savory filling.


Classic Shepherd’s Pie

Ingredients

For the Mashed Potato Topping:

  • 2 lbs russet potatoes, peeled and cubed

  • ¼ cup half-and-half (or whole milk)

  • 4 tbsp unsalted butter

  • 1 egg yolk (the secret for that golden color)

  • Salt and pepper to taste

For the Filling:

  • 1 ½ lbs ground lamb (use beef for “Cottage Pie”)

  • 1 large onion, diced

  • 2 carrots, diced

  • 2 cloves garlic, minced

  • 1 cup frozen peas and corn

  • 2 tbsp all-purpose flour

  • 1 cup beef broth

  • 1 tbsp Worcestershire sauce

  • 1 tsp fresh thyme (plus sprigs for garnish)


Instructions

  1. Prepare the Topping: Boil the potatoes in salted water until tender (about 15 minutes). Drain and mash with butter, half-and-half, and the egg yolk until smooth. Set aside.

  2. Sauté the Base: In a large skillet, brown the ground lamb over medium-high heat. Drain excess fat, then add onions and carrots. Cook until softened (about 5 minutes).

  3. Build the Sauce: Stir in the garlic, thyme, and flour. Cook for 1 minute to toast the flour, then slowly pour in the broth and Worcestershire sauce. Simmer until thickened, then fold in the peas and corn.

  4. Assemble: Pour the meat mixture into a baking dish. Spread the mashed potatoes over the top. Use a fork to create ridges—those are what get crispy in the oven!

  5. Bake: Bake at 400°F (200°C) for 25–30 minutes, or until the top is golden and the edges are bubbling.


Pro-Tip for the Texture

If the top isn’t as brown as you’d like after 25 minutes, pop it under the broiler for 2–3 minutes at the very end. Keep a close eye on it so it doesn’t burn!

Grandmother’s Zucchini & Egg Tortilla

Grandmother’s Zucchini & Egg Tortilla

What You’ll Need

  • 1 Large Zucchini (grated)

  • 2-3 Large Eggs (The photo looks quite thick, so 3 might give you that extra lift)

  • 1 Small Onion (finely diced)

  • 1/4 cup Shredded Cheese (Parmesan or Mozzarella work best)

  • 2 tbsp Flour or Breadcrumbs (This is the secret to getting that solid, cake-like structure)

  • Salt, Pepper, and Garlic Powder to taste

  • Fresh Herbs (Parsley or Chives for the garnish)


The Step-by-Step

  1. The Squeeze: This is the most important step! Grate your zucchini, sprinkle with a little salt, and let it sit for 5 minutes. Then, use a clean kitchen towel to squeeze out every drop of water. If it’s too wet, it won’t get that golden crust.

  2. The Mix: In a bowl, beat the eggs. Stir in the squeezed zucchini, onions, cheese, flour, and seasonings.

  3. The Sear: Heat a small non-stick skillet with a drizzle of olive oil over medium-low heat. Pour the mixture in and flatten it with a spatula.

  4. The Flip: Cover with a lid and cook for 5–7 minutes until the bottom is golden. Carefully flip it (use a plate to help!) and cook the other side for another 3–5 minutes.

  5. Finish: Garnish with fresh herbs and slice it like a cake.


Pro Tip: For that extra “puffy” look in the photo, you can separate the egg whites, whisk them to soft peaks, and fold them back into the zucchini mixture before frying!

🍪 Traditional Michigan Rocks

🍪 Traditional Michigan Rocks

Yields: About 4–5 dozen cookies

The Ingredients

  • 1 cup Unsalted butter, softened

  • 1 ½ cups Brown sugar, firmly packed

  • 3 Large eggs

  • 1 tsp Vanilla extract

  • 3 cups All-purpose flour

  • 1 tsp Baking soda (dissolved in 1 Tbsp warm water or milk)

  • 1 ½ tsp Ground cinnamon

  • ½ tsp Ground allspice or nutmeg (optional, for extra warmth)

  • 1 lb (approx. 2 cups) Pitted dates, chopped

  • 1 ½ cups Walnuts, chopped

  • 1 cup Raisins (optional—some families used half dates/half raisins)


The Instructions

  1. Prep: Preheat your oven to 350°F (175°C). Lightly grease your cookie sheets or line them with parchment paper.

  2. Cream: In a large bowl, cream together the softened butter and brown sugar until light and fluffy. Add the eggs one at a time, beating well after each, then stir in the vanilla.

  3. The Secret Step: Dissolve the baking soda in the tablespoon of warm water/milk and stir it into the creamed mixture. (This was an old-school trick to ensure the soda distributed evenly in thick doughs!)

  4. Dry Ingredients: Whisk the flour, cinnamon, and spices together. Gradually add this to the wet ingredients, mixing until just combined.

  5. The “Rocks”: Fold in the chopped dates, walnuts, and raisins by hand. The dough will be very thick and heavy—this is normal!

  6. Bake: Drop by rounded tablespoonfuls (about 2 inches apart) onto the baking sheets. Bake for 10–12 minutes.

  7. Finish: They are done when the edges are set and the tops spring back slightly when touched. Let them cool on the pan for a few minutes before moving to a wire rack.


A Few “Mom” Tips:

  • The Date Trick: If your dates are sticky and hard to chop, toss them in a little bit of the flour from the recipe first. It keeps them from clumping together in the dough.

  • Texture: These cookies actually get better after a day or two in an airtight container as the moisture from the fruit softens the cookie even more.

  • Variations: Some versions of this recipe from the 1950s used a splash of white wine or bourbon instead of water to dissolve the soda for a deeper holiday flavor!

Ham and Cheese Egg Cups

These Ham and Cheese Egg Cups are a fantastic way to start the morning with something savory and simple. They are naturally high in protein and can be customized to fit various dietary goals.

Instructions

  1. Prep: Preheat your oven to 400°F (200°C) and lightly grease a standard 6-cup muffin tin.

  2. The “Crust”: Press one slice of ham into each muffin cup, molding it against the sides and bottom to create a little bowl.

  3. Cheese & Fillings: Divide the shredded cheese (about 2-3 tablespoons per cup) and any optional add-ins like onions evenly among the ham cups.

  4. The Eggs: Carefully crack one egg into each cup on top of the cheese. Season with salt and pepper to taste.

  5. Bake: Place in the oven for 12–15 minutes. For runny yolks, check them around 12 minutes; for fully set eggs, leave them in for the full 15.

  6. Serve: Let them cool for a minute before using a knife to pop them out. Garnish with fresh herbs if desired!


Why They’re a Great Choice

  • Protein-Packed: Each cup provides a solid dose of protein, keeping you energized.

  • Low Carb: These are naturally low in carbohydrates, making them ideal for keto or low-carb lifestyles.

  • Meal Prep Friendly: You can easily double the batch and keep them in the fridge for a quick grab-and-go breakfast during the week.

Bean and Ham Hock Soup

🥣 Bean and Ham Hock Soup

Description

This traditional  soup is slow-simmered to develop deep flavor from smoked ham hocks, tender beans, and aromatic vegetables. It’s thick, nourishing, and budget-friendly—often even better the next day as the flavors deepen.

Grains & Pasta

Get updates on the latest posts and more from https://techiecycle.com/ straight to your inbox.

We use your personal data for interest-based advertising, as outlined in our Privacy Notice.

Ingredients

🍲 Main Ingredients:

  • 2 smoked ham hocks

  • 2 cups dried white beans (navy or great northern), soaked overnight

  • 1 onion, chopped

  • 2 carrots, diced

  • 2 celery stalks, chopped

  • 3 cloves garlic, minced

  • 6–8 cups water or low-sodium chicken broth

  • 1 bay leaf

  • 1 tsp dried thyme

  • ½ tsp black pepper

  • Salt (add later, since ham is salty)

🌿 Optional Add-ins:

  • 1 potato, diced (for extra thickness)

  • 1 cup chopped spinach or kale

  • 1 tsp smoked paprika for deeper flavor

 Instructions

Discover more
Food
salad
Meat

1. Prepare Beans

  • Soak dried beans overnight

  • Drain and rinse before cooking

2. Sauté Base

  • In a large pot, sauté onion, carrots, and celery until softened

    Fruits & Vegetables
  • Add garlic and cook for 1 minute

Subscribe to https://techiecycle.com/!

Get updates on the latest posts and more from https://techiecycle.com/ straight to your inbox.

We use your personal data for interest-based advertising, as outlined in our Privacy Notice.

3. Simmer Soup

  • Add beans, ham hocks, broth/water, bay leaf, thyme, and pepper

  • Bring to a boil, then reduce to low heat

  • Simmer for 1.5–2.5 hours, until beans are tender

4. Shred Meat

  • Remove ham hocks

  • Shred  meat, discard bones and excess fat

    Grains & Pasta
  • Return meat to the pot

5. Finish

  • Adjust salt if needed

  • Add greens if using, cook for 5–10 minutes more

Notes

  • The soup thickens naturally as beans break down

  • Stir occasionally to prevent sticking

    Garlic
  • Flavor improves after resting

Tips for Best Results

  • Use smoked ham hocks for authentic flavor

  • Don’t add salt early—it can toughen beans

  • Mash some beans for a creamier texture

  • Add a splash of vinegar or lemon juice before serving to brighten flavor

  • Makes 6–8 servings

    Meat & Seafood

 Nutritional Info (Approx. per serving)

  • Calories: 300–350 kcal

  • Protein: 20–25 g

  • Carbohydrates: 30–35 g

  • Fat: 10–15 g

  • Fiber: 8–10 g

 Benefits

  • High in protein and fiber (great for fullness)

    Soups & Stews
  • Supports gut health

  • Provides iron and essential minerals

  • Budget-friendly and meal-prep friendly

Q&A

Q: Can I make this in a slow cooker?
A: Yes—cook on low for 7–8 hours or high for 4–5 hours.

Q: Can I skip soaking beans?
A: You can, but cooking time will increase significantly.

Get updates on the latest posts and more from https://techiecycle.com/ straight to your inbox.

We use your personal data for interest-based advertising, as outlined in our Privacy Notice.

Q: Can I use canned beans?
A: Yes—reduce cooking time to about 45 minutes and use 3–4 cans (drained).

Pork

Q: How do I store it?
A: Refrigerate up to 4 days or freeze for up to 3 months.

Q: What can I serve with it?
A: Crusty bread, cornbread, or a simple side salad

🍗 3-Ingredient Cranberry Chicken

🍗 3-Ingredient Cranberry Chicken

  • Chicken Breasts: Approximately 1.5 to 2 lbs.

  • 1 Can Cranberry Sauce: Jellied or whole berry works.

  • The Secret 3rd Ingredient: French Onion Soup Mix (1 packet) or French Dressing (1 bottle). Both are popular for creating that savory-sweet glaze.

Instructions:

  1. Layer: Place the chicken breasts in the bottom of your slow cooker.

  2. Top: Dump the canned cranberry sauce over the chicken and sprinkle the soup mix (or pour the dressing) on top.

  3. Cook: Set your slow cooker to Low for 6-8 hours or High for 3-4 hours.

  4. Serve: Once the chicken is tender, you can shred it or serve the breasts whole, spooning the thickened sauce over the top.


Pro-Tips for Your Social Media:

  • Engagement: Using phrases like “say yum for the recipe” is a great way to boost your page’s reach and interaction.

  • Tagging: This would fit perfectly under tags like “Meat,” “Salty,” and “Crockpot.”

Bacon Mushroom Swiss Cheese Meatloaf!!! 🍖🍄🧀

Bacon Mushroom Swiss Cheese Meatloaf!!! 🍖🍄🧀


Ingredients:


1 pound ground beef

1/2 pound ground pork

1 cup breadcrumbs

1/2 cup milk

1/2 cup grated Parmesan cheese

1/2 cup finely chopped onions

1 cup finely chopped mushrooms

4 slices bacon, cooked and crumbled

1 cup shredded Swiss cheese

2 large eggs

1 tablespoon Worcestershire sauce

1 tablespoon ketchup

1 teaspoon garlic powder

1 teaspoon dried thyme

1/2 teaspoon salt

1/2 teaspoon black pepper

1/2 cup ketchup (for topping)


Instructions:


Preheat the Oven: Set your oven to 375°F (190°C) so it’s hot and ready for the meatloaf.


Prepare the Ingredients: Cook the bacon in a skillet until it’s crispy, then crumble it. In the same skillet, sauté the chopped onions and mushrooms until the mushrooms are soft and the onions are translucent. Remove from heat and let them cool.


Mix the Meatloaf: In a large mixing bowl, combine the ground beef, ground pork, breadcrumbs, milk, Parmesan cheese, crumbled bacon, shredded Swiss cheese, and the cooled sautéed onions and mushrooms. Add the eggs, Worcestershire sauce, ketchup, garlic powder, dried thyme, salt, and black pepper. Mix everything together until well combined, but be gentle to avoid overmixing.


Shape and Bake: Form the meat mixture into a loaf shape and place it in a baking dish or on a lined baking sheet. Spread the remaining 1/2 cup of ketchup evenly over the top of the meatloaf.


Bake: Place the meatloaf in the preheated oven and bake for 60 to 70 minutes, or until the internal temperature reaches 160°F (71°C) and the meatloaf is thoroughly cooked.


Rest and Serve: Once done, allow the meatloaf to rest for 10 minutes before slicing. This resting period helps the juices redistribute, making it easier to slice and more delicious.


Prep Time: 20 minutes | Total Time: 1 hour 30 minutes | Servings: 6-8

Classic Strawberry Chia Smoothie

Classic Strawberry Chia Smoothie

Prep time: 5 minutes | Servings: 2


Ingredients

Frozen Strawberries: 2 cups (using frozen makes it creamy without needing ice).


Banana: 1 ripe banana (adds natural sweetness and a smooth texture).


Milk of Choice: 1 ½ cups (dairy, almond, oat, or coconut milk all work great).


Greek Yogurt: ½ cup (plain or vanilla for extra protein and thickness).


Chia Seeds: 2 tablespoons.


Honey or Maple Syrup: 1-2 teaspoons (optional, depending on how sweet your berries are).


Instructions

Combine: Place the frozen strawberries, banana, milk, yogurt, and sweetener (if using) into your blender.


Add the “Specs”: Add the chia seeds last so they don’t all get stuck to the bottom of the blender blades.


Blend: Start on a low speed and gradually increase to high. Blend for about 45–60 seconds until the mixture is completely smooth and the chia seeds are evenly distributed.


Adjust: If it’s too thick, add a splash more milk. If you prefer it thicker, add a few more frozen berries.


Serve: Pour into tall glasses and garnish with a fresh strawberry slice on the rim, just like in the picture!


Pro-Tips for the Best Texture

The “Soak” Method: If you have time, let the smoothie sit in the fridge for 5–10 minutes after blending. The chia seeds will expand slightly, creating a thicker, pudding-like consistency.


Layering: Always put your liquid in the blender first. This helps the blades move freely and prevents “air pockets” that stop the blending process.

Ginger Apple Morning Infusion

Ginger Apple Morning Infusion


Ingredients

  • 1 cup Warm filtered water

  • ½ cup Pure apple juice (organic and unsweetened is best)

  • 2 tbsp Freshly squeezed lemon juice

  • 1 tsp Freshly grated ginger (or ginger juice)

  • ½ tsp Sea salt (optional)


Instructions

  1. Warm the Water: Heat your water until it is warm to the touch, but not boiling. This helps the ingredients mix better without destroying the nutrients in the lemon.

  2. Combine Juices: In a tall glass or mug, stir together the apple juice, fresh lemon juice, and the grated ginger.

  3. Mix: Add the warm water to the juice mixture and stir thoroughly.

  4. Optional Seasoning: Add a small pinch of sea salt if you like a balanced, electrolyte-style drink.

  5. Serve: Drink this immediately while warm for the best flavor profile. It is a very zesty and energizing way to start the morning.


Q&A: Tips for Success

Q: Can I use a whole apple instead of juice? A: Yes! If you have a high-speed blender, you can blend a whole cored apple with the water and other ingredients for added fiber. Just be sure to strain it if you prefer a smooth juice consistency.

Q: Is it okay to drink this every day? A: Most people can enjoy this daily. However, because lemon and apple juice contain natural acids and sugars, it’s a good idea to rinse your mouth with plain water afterward to protect your tooth enamel.

Q: Does the ginger need to be peeled? A: If you are grating it to stir in, peeling is usually better for texture. If you are just steeping slices of ginger in the water, you can leave the skin on as long as it is washed well.

Q: Can I add honey? A: Certainly. A teaspoon of raw honey pairs perfectly with the ginger and lemon if you prefer a sweeter tonic.