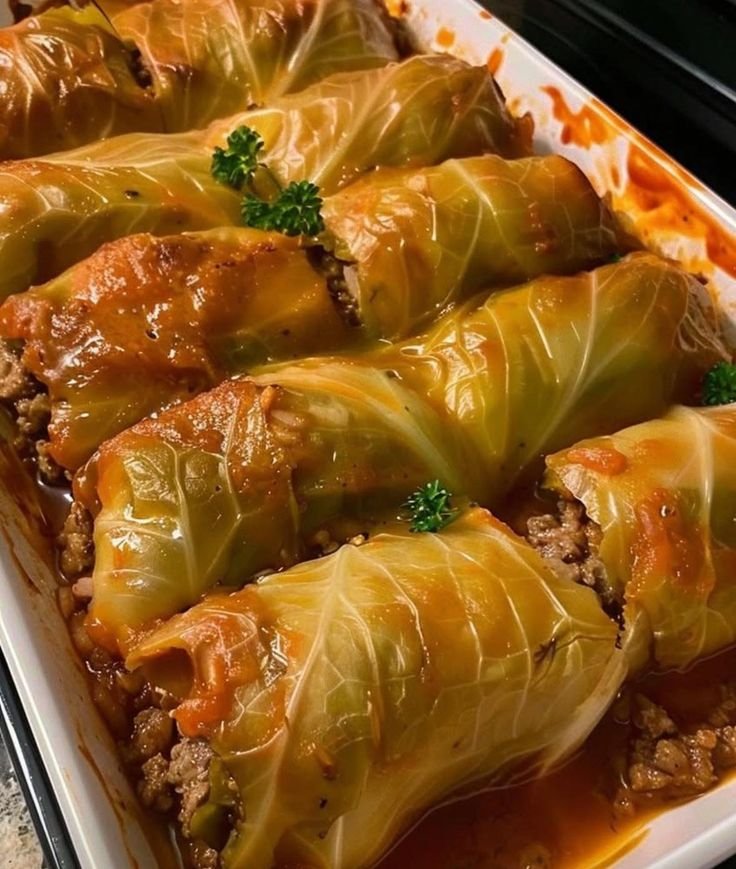
Yogurt Soufflé Cake

Recipe: The Ultimate Yogurt Soufflé Cake

  • Prep time: 15 minutes

  • Cook time: 50–60 minutes

  • Servings: 6–8 slices

Ingredients

  • 4 Large Eggs (separated into yolks and whites)

  • 400g (1.5 cups) Greek Yogurt (plain, full-fat works best)

  • 50g (1/4 cup) Sugar (divided)

  • 40g (1/3 cup) Cornstarch (sifted)

  • 1 tsp Vanilla Extract

  • 1 tsp Lemon Juice (to stabilize the egg whites)

  • Optional: Zest of one lemon for extra brightness

Instructions

  1. Prep: Preheat your oven to 150°C (300°F). Line the bottom and sides of a 6-inch or 7-inch round cake pan with parchment paper. (Pro tip: Let the paper rise 1–2 inches above the rim, as the cake will rise significantly).

  2. The Base: In a large bowl, whisk the egg yolks with half the sugar, yogurt, vanilla, and lemon zest until smooth. Sift in the cornstarch and whisk until no lumps remain.

  3. The Meringue: In a separate, clean bowl, beat the egg whites and lemon juice. Gradually add the remaining sugar, beating until stiff peaks form (the peaks should stand straight up when you lift the beaters).

  4. The Fold: Gently fold 1/3 of the egg whites into the yogurt mixture to lighten it. Then, fold in the remaining whites using a spatula. Use a “cut and fold” motion to keep the air in—do not stir!

  5. The Bake: Pour the batter into the pan. Place the cake pan inside a larger baking dish filled with 1 inch of hot water (Bain-marie). Bake for 50–60 minutes until the top is golden and the cake is set but still slightly jiggly.

  6. Cooling: Turn off the oven and leave the door cracked for 10 minutes. Remove and let it cool completely in the pan before refrigerating for at least 3 hours.

Notes & Tips

  • Room Temp Matters: Ensure your yogurt and eggs are at room temperature to prevent the batter from curdling or the egg whites from collapsing.

  • The Water Bath: Don’t skip the Bain-marie! The steam ensures the cake stays moist and prevents the top from cracking.

  • Sifting: Always sift the cornstarch. Because there is no flour, cornstarch provides the entire structure; any lumps will result in a grainy texture.

Nutritional Info (Per Serving)

Based on 8 servings.

  • Calories: 125 kcal

  • Protein: 7g

  • Fat: 5g

  • Carbohydrates: 13g

  • Sugar: 8g

Benefits

  • High Protein: Thanks to the Greek yogurt and eggs, this is much more satiating than a standard flour-based cake.

  • Gluten-Free: Naturally wheat-free, making it a safe bet for those with sensitivities.

  • Lower Calorie: It lacks the heavy cream and cream cheese found in traditional cheesecakes, making it a “lighter” indulgence.

Q&A

Q: Why did my cake sink after cooling? A: A slight sink is normal (it’s a soufflé, after all!), but a total collapse usually means the egg whites weren’t beaten to stiff peaks or the cake was cooled too quickly. Let it rest in the warm oven with the door open first.

Q: Can I use flavored yogurt? A: You can, but keep an eye on the sugar content. If using sweetened vanilla or strawberry yogurt, reduce the added sugar in the recipe by half.

Q: Is it okay to eat warm? A: It’s edible, but the flavor and texture are 100% better after chilling. Refrigeration allows the “soufflé” structure to set into a creamy, fudge-like consistency.

🥤 The Tropical Trio Recipes

1. The Pink Delight (Strawberry)

A sweet, creamy classic that’s always a crowd-pleaser.

  • 1 cup fresh or frozen strawberries

  • 1/2 cup Greek yogurt (plain or vanilla)

  • 1/2 cup milk of your choice (dairy, almond, or oat)

  • 1 tsp honey or maple syrup (optional)

  • Garnish: One strawberry slice on the rim.

2. The Golden Glow (Banana & Pineapple)

Bright, sunny, and packed with tropical energy.

  • 1 ripe banana (frozen works best for texture)

  • 1/2 cup pineapple chunks

  • 1/2 cup orange juice or coconut milk

  • 1/4 tsp vanilla extract

  • Garnish: One thick banana coin on the rim.

3. The Zesty Green (Kiwi & Green Apple)

A crisp, tangy refresher to wake up your palate.

  • 2 peeled kiwis

  • 1/2 green apple (chopped)

  • 1/2 cup coconut water or white grape juice

  • A squeeze of fresh lime juice

  • A handful of ice cubes

  • Garnish: One circular kiwi slice on the rim.


🥣 Preparation Steps

  1. Prep the Fruit: Wash all fruits thoroughly. Peel the kiwis and banana, and hull the strawberries.

  2. Layer the Blender: Always start with your liquid base first, then add the powders or sweeteners, and finally the frozen or hard fruits. This helps the blades spin freely.

  3. Blend: Pulse on low for 10 seconds, then switch to high speed for about 30–45 seconds until the texture is completely smooth.

  4. Serve: Pour into a tall glass and add the fruit garnish immediately to get that “vacation in a glass” look.


Pro-Tips for Success:

  • Consistency: If the smoothie is too thick, add a splash more liquid. If it’s too thin, add a few more frozen fruit pieces or ice.

  • Natural Sweetness: Use very ripe bananas for the middle smoothie; they act as a natural sweetener so you don’t need to add sugar.

Refreshing Green Smoothie Recipe

Refreshing Green Smoothie Recipe

This recipe creates a silky, thick consistency (like the one in your photo) by using a mix of healthy fats and frozen fruit.

Ingredients

Ingredient Amount Why it’s here
Spinach or Kale 1 packed cup For that deep green color and vitamins.
Frozen Banana 1 medium Provides the creamy, “shake-like” texture.
Avocado 1/4 of a fruit Adds healthy fats and extra silkiness.
Almond Milk 1 cup The liquid base (unsweetened works best).
Greek Yogurt 1/2 cup For a boost of protein and thickness.
Honey or Maple Syrup 1 tsp Optional, for a touch of natural sweetness.
Fresh Mint 2-3 leaves For that garnish and a burst of freshness.

Instructions

  1. Layer the Liquid: Pour your almond milk into the blender first. Adding liquid first helps the blades move more easily and prevents “air pockets.”

  2. Add the Greens: Toss in the spinach or kale. Blend just the greens and milk for 20 seconds to ensure there are no leafy bits left behind.

  3. Add Solids: Add the frozen banana, avocado, and yogurt.

  4. Blend: Start on a low speed and gradually increase to high. Blend until the mixture is perfectly smooth and vibrant green.

  5. Serve: Pour into a tall glass. Garnish with a fresh mint leaf and a straw, just like in your picture!


Quick Tips for Success

  • Too thick? Add an extra splash of almond milk.

  • Not cold enough? Use a few ice cubes, but be aware it might dilute the flavor slightly.

  • Want more protein? Feel free to add a scoop of your favorite vanilla protein powder.

Note: If you prefer a Matcha Latte version, simply swap the spinach and fruit for 1 teaspoon of high-quality matcha powder and a little extra sweetener!

🍌 Banana Walnut Smoothie Recipe

🍌 Banana Walnut Smoothie Recipe

Ingredients

  • 1 large banana (frozen bananas make it extra creamy!)

  • 1/4 cup walnuts (raw or lightly toasted)

  • 1 cup milk of choice (dairy, almond, oat, or soy)

  • 1/4 cup Greek yogurt (optional, for extra thickness and protein)

  • 1/2 tsp vanilla extract

  • A pinch of cinnamon (to enhance the walnut flavor)

  • 1 tsp honey or maple syrup (optional, if you prefer it sweeter)


Instructions

  1. Prep the Walnuts: If you have a high-speed blender, you can toss them in whole. If your blender is less powerful, soak the walnuts in warm water for 10 minutes beforehand to soften them.

  2. Combine: Add the liquid (milk) to the blender first. This helps everything blend smoothly without getting stuck.

  3. Add Solids: Add the banana, walnuts, yogurt, and spices.

  4. Blend: Pulse on low, then increase to high speed for about 45–60 seconds until the mixture is completely smooth and no walnut bits remain.

  5. Serve: Pour into a tall glass and top with a few extra crushed walnuts for a bit of crunch.


Quick Tips for the Best Texture

  • Use Overripe Bananas: The ones with brown spots are the sweetest and blend the best.

  • Keep it Cold: If you aren’t using a frozen banana, add 3–4 ice cubes before blending to get that chilled, milkshake-like consistency.

Creamy Strawberry Lemon Smoothie

Creamy Strawberry Lemon Smoothie

This recipe makes approximately 2 servings. It’s balanced with natural sweetness and a bright, zesty finish.


Ingredients

  • 2 cups Fresh strawberries (hulled and sliced)

  • 1 cup Greek yogurt or coconut yogurt (for that thick, creamy texture)

  • 1/2 cup Milk of your choice (dairy, almond, or oat)

  • 1 tbsp Fresh lemon juice (about half a small lemon)

  • 1 tsp Lemon zest (optional, for extra fragrance)

  • 1-2 tbsp Honey or maple syrup (adjust to your preferred sweetness)

  • 1/2 cup Ice cubes (if you want it extra chilled)


Instructions

  1. Prep the Fruit: Wash the strawberries and remove the green tops. Slice a few extra to use as a garnish if you like.

  2. Combine: Place the strawberries, yogurt, milk, lemon juice, and sweetener into a high-speed blender.

  3. Blend: Start on a low setting and gradually increase to high. Blend for about 45–60 seconds until the mixture is completely smooth and no strawberry seeds are visible.

  4. Adjust: If the smoothie is too thick, add a splash more milk. If you want it colder, add the ice and pulse until smooth.

  5. Serve: Pour into a glass or a small carafe, just like in your photo.


Pro Tips for the Perfect Texture

  • For a thicker “Smoothie Bowl” feel: Use frozen strawberries instead of fresh ones and reduce the milk by half.

  • Zest is Best: Adding a tiny bit of the yellow lemon zest (avoiding the white bitter part) really makes the strawberry flavor “pop.”

Cinnamon Sugar French Toast Bites

Cinnamon Sugar French Toast Bites

🕒 The Basics

  • Prep time: 10 minutes

  • Cook time: 10 minutes

  • Servings: 4 people

  • Calories: ~340 kcal per serving

🛒 Ingredients

The Bites

  • 6 slices Thick-cut Brioche or Challah bread (stale is better!)

  • 3 large Eggs

  • 1/2 cup Whole milk or heavy cream

  • 1 tsp Vanilla extract

  • 1/2 tsp Ground cinnamon

  • Pinch of salt

  • 2-3 tbsp Unsalted butter (for frying)

The Coating

  • 1/2 cup Granulated sugar

  • 1 tbsp Ground cinnamon

🍳 Instructions

  1. Prep the Bread: Cut your bread slices into 1-inch squares. If the bread is very fresh, leave the cubes out on a baking sheet for 30 minutes to dry out slightly.

  2. Whisk the Custard: In a medium bowl, whisk together the eggs, milk, vanilla, 1/2 tsp cinnamon, and salt until smooth.

  3. Mix the Coating: In a separate small bowl, combine the 1/2 cup sugar and 1 tbsp cinnamon. Set aside.

  4. The Soak: Working in batches, toss a handful of bread cubes into the egg mixture. Let them soak for about 15–20 seconds—long enough to absorb liquid, but not so long they fall apart.

  5. The Sizzle: Melt butter in a large non-stick skillet over medium heat. Add the soaked cubes in a single layer (don’t crowd the pan!).

  6. Brown & Flip: Fry for 1–2 minutes per side until golden brown and slightly crisp on all edges.

  7. The Toss: Immediately drop the hot French toast bites into the cinnamon sugar bowl and toss to coat thoroughly.

  8. Serve: Pile them high and serve warm with maple syrup, Nutella, or fresh berries.

💡 Tips for Success

  • Don’t Over-Soak: Unlike full slices of French toast, these small bites have more surface area. If you soak them too long, they’ll turn into mush in the pan.

  • The Bread Matters: Use a sturdy, “eggy” bread like Brioche. Standard white sandwich bread is often too thin and will collapse.

  • Clean the Pan: If you’re cooking in multiple batches, wipe the skillet between rounds. Burnt butter and leftover sugar can make the second batch taste bitter.

🥗 Nutritional Info (Per Serving)

Nutrient Amount
Calories 340
Total Fat 14g
Carbohydrates 46g
Protein 8g
Sugar 22g

✨ Why You’ll Love These (Benefits)

  • Kid-Friendly: No knives required! These are the ultimate finger food for little ones.

  • Texture Heaven: You get a much higher “crunch-to-soft” ratio than traditional French toast.

  • Customizable: You can easily swap the milk for almond or oat milk, or use gluten-free brioche.

❓ Common Questions

Q: Can I make these in an Air Fryer?

A: Yes! Lightly grease the basket. Place the soaked bites in a single layer (do not stack) and air fry at 190°C for 6–8 minutes, shaking halfway through. Toss in sugar after they come out.

Q: Can I make the bread cubes ahead of time?

A: You can cut the bread a day early, which actually helps them dry out and absorb the custard better. However, don’t soak them until you are ready to fry.

Q: What is the best dipping sauce?

A: While maple syrup is king, a simple glaze made of powdered sugar and a splash of milk (like a donut glaze) takes these to the next level.

Lemon & Ginger Wellness Tonic

Lemon & Ginger Wellness Tonic

📝 Ingredients:

  • 1 cup warm water
  • 1 tablespoon fresh lemon juice 🍋
  • ½ teaspoon grated ginger
  • 1 teaspoon honey (optional) 🍯
  • Pinch of black pepper (optional, boosts absorption)

👩‍🍳 Step-by-Step Instructions:

  1. Heat water until warm (not boiling).
  2. Add freshly squeezed lemon juice.
  3. Mix in grated ginger.
  4. Stir well and let it sit for 1–2 minutes.
  5. Add honey and black pepper if using.
  6. Drink slowly, preferably at night or early morning.

🌿 Benefits:

  • Helps with digestion & bloating
  • Supports metabolism slightly
  • Boosts immunity
  • Keeps you hydrated & refreshed

❗ Reality Check (Important):

  • This is not liposuction and won’t remove belly fat in 3 days.
  • It may reduce bloating, so your stomach can look a bit flatter temporarily.
  • Real fat loss needs healthy diet + exercise + consistency.

❓ Q & A

Q: How many times should I drink it?

👉 Once daily is enough.

Q: Can I drink it for a week?

👉 Yes, it’s safe in moderation.

Q: When is the best time?

👉 Morning (empty stomach) or before bed.

Q: Will it help weight loss?

👉 Slightly, as part of a healthy routine — not alone.

🍎 4-Ingredient Apple Glazed Pork Roast

🍎 4-Ingredient Apple Glazed Pork Roast

The Ingredients

  1. 2-3 lb Pork Loin or Pork Butt (Pork butt/shoulder “falls apart” more easily).

  2. 2-3 large appleslarge apples (Granny Smith or Honeycrisp hold up best), sliced into wedges.

  3. 1 cup apple juice or apple cider.

  4. 1/2 cup brown sugar (or a packet of onion soup mix for a more savory vibe).

Note: Most people assume salt, pepper, and a splash of oil are “free” pantry staples, so don’t forget to season the meat!


👨‍🍳 Instructions

Option 1: The Slow Cooker (Best for “Falling Apart”)

  • Season: Rub the pork with salt and pepper.

  • Layer: Place the pork in the slow cooker. Arrange the apple wedges all around it.

  • Pour: Mix the brown sugar into the apple juice and pour it over the top.

  • Cook: Set to LOW for 6–8 hours. By the end, you should be able to shred it with a fork.

Option 2: The Oven (Best for that Crispy Glaze)

  • Sear: (Optional but recommended) Brown the pork in a pan for 2 minutes per side.

  • Assemble: Place pork and apples in a deep baking dish (lined with foil like your photo). Pour the juice/sugar mixture over it.

  • Bake: Cover with foil and bake at 150°C (300°F) for about 3–4 hours.

  • Finish: Remove the foil for the last 30 minutes and baste with the juices to get that dark, sticky glaze shown in your picture.


A Quick Tip for “Juiciness”

If you use a pork loin (leaner meat), be careful not to overcook it, or it can get dry. If you want that shredded, “fall apart” texture specifically, pork shoulder (butt) is your best friend because the fat breaks down into the sauce.

Yum! That glaze looks absolutely incredible.

☕ The “Metabolism Boost” Tonic

☕ The “Metabolism Boost” Tonic

Ingredients

  • 1 cup Water

  • 1 tsp Coffee (Instant or grounds)

  • 1 inch Fresh Ginger (sliced or grated)

  • 1/2 Lemon (juiced)

  • Optional: 1 clove of Garlic (shown in your image, though many omit it for taste)

  • Optional: 1 tsp Raw Honey (to cut the bitterness)

Instructions

  1. Boil: Place the water and the sliced ginger (and garlic, if using) in a small pot. Bring to a boil and let it simmer for about 5 minutes to extract the nutrients.

  2. Brew: Place your coffee in a mug. Pour the hot ginger water over the coffee (use a strainer to catch the ginger bits).

  3. Mix: Stir in the fresh lemon juice.

  4. Drink: Sip it warm.


⚠️ A Few Important Notes

  • Caffeine & Sleep: The image suggests drinking this “before sleep,” but because it contains coffee (caffeine), it may actually keep you awake. Poor sleep is linked to weight gain, so you might prefer drinking this in the morning instead.

  • Digestion: Ginger and lemon are excellent for “debloating,” which can make your stomach feel flatter almost immediately, but this is usually a loss of water weight or gas, not fat.

  • Acidity: Drinking coffee and lemon on an empty stomach or right before bed can cause acid reflux for some people.

Flaxseed Microwave Bread

Flaxseed Microwave  Bread


This  bread is hearty, slightly nutty, and holds up perfectly to being toasted or loaded with avocado. Because it relies on flaxseed meal rather than flour, it’s naturally gluten-free and packed with Omega-3s.

Prep time: 1 minute

Cook time: 90 seconds

Servings: 1 (makes 2 slices when cut in half)

Ingredients

1/4 cup Ground flaxseed meal (golden or brown)

1/2 tsp Baking powder

1 large Egg

1 tsp Melted butter or Avocado oil

1 tsp Water (optional, for a softer crumb)

Pinch Salt

Instructions

Prep the Mug: Grease a microwave-safe mug or a small square glass container with a little oil or butter. (A square container makes “bread-shaped” slices!)

Mix: Add the flaxseed meal, baking powder, and salt to the container. Stir to combine.

Combine: Add the egg and the melted butter/oil. Whisk with a fork until completely smooth and no dry clumps remain.

Microwave: Cook on high for 90 seconds.

Cool & Slice: Let it sit for 30 seconds before sliding it out. Slice it in half and—this is the pro move—toast it in a  pan or toaster until golden brown.

Nutritional Info (Per Serving)

Values are approximate based on standard ingredients.

Metric Amount

Calories 225 kcal

Net Carbs 1g

Fiber 8g

Protein 10g

Healthy Fats 18g

Benefits & Tips

Why It’s Good For You

Digestive Health: With 8g of fiber, this is an excellent way to keep your digestion moving.

Brain Power: Flaxseeds are a top plant-based source of alpha-linolenic acid (ALA), an essential Omega-3 fatty acid.

Blood Sugar Friendly: Since it contains almost zero net carbs, it won’t cause the insulin spike typical of white bread.

Pro Tips


The “Toast” Factor: Straight out of the microwave, the texture can be a bit “spongy.” Slicing and toasting it in a skillet with a little butter transforms it into a crispy, artisanal-style toast.

Golden vs. Brown: Golden flaxseed meal has a milder, more buttery flavor. Brown flaxseed is more “earthy.” Use golden if you want it to taste more like traditional wheat bread.


Flavor Boost: Add a pinch of garlic powder or dried herbs for a savory bread, or a dash of cinnamon and stevia for a “French toast” vibe.


Q&A


Q: Can I make this without an egg?


A: You can try a “flax egg” (1 tbsp ground flax + 3 tbsp water), but the bread will be much denser and may not rise as well. The egg provides the essential structure here.


Q: Why did my bread come out rubbery?


A: This usually happens if it’s overcooked. Microwaves vary in power; try 70–80 seconds next time if 90 was too much.


Q: How do I store leftovers?


A: It’s best fresh, but you can store it in an airtight container in the fridge for up to 3 days. Always toast it when reheating to fix the texture.

Sausage Muffins with Bisquick

Sausage Muffins with Bisquick – When you get sick of the same old breakfasts, this is a recipe that you really need to try. This is not your ordinary breakfast. This is one that is going to please and satisfy all those who try it. This recipe is going to give you some of the best muffins.

Ingredients


1 pound ground breakfast sausage, any flavor is good


1 cup Cheddar Cheese, shreddedCheese


4 large eggs


1 cup Bisquick Baking Mix


How to Make Sausage Muffins with Bisquick


FIRST STEP:


Brown the ground sausage in a skillet on the stove top. Drain any excess fat


Preheat the oven to 350*


In a large bowl combine the eggs, cheddar cheese and Bisquick Mix, whisk until combined well


Stir in the precooked sausage


SECOND STEP:

Grease 12 cups in a muffin panBaked Goods


Fill the cups about ¾ of the way to the top


THIRD STEP:


Bake for 18 to 20 minutes


Enjoy!


Do I have to use Cheddar Cheese?


You could use any type of cheese you prefer. My family prefers Cheddar Cheese. Mozzarella, Swiss or Monterey Jack are all good choices.Cheese


Do these muffins need to cook longer?


The total baking time is 18 to 20 minutes. The sausage is cooked on the stove top prior to mixing in the batter.


How do I store these muffins?

These muffins can sit on the counter for a short amount of time. However it is best to keep these muffins in the refrigerator, in a tightly covered container or wrapped tightly with plastic. You can store the muffins for 3 to 4 days in the refrigerator.

Can these muffins be frozen?

You can wrap these tightly wrapped, or placed into a freezer safe container. They will last for up to 3 months in the freezer.

Cheesy Oven-Baked Meatballs

Cheesy Oven-Baked Meatballs

Ingredients

For the Meatballs:

1 1/2 lbs ground beef

1/2 cup breadcrumbs

1/2 cup milk

1 egg

2 teaspoons Worcestershire sauce

1 small onion minced

1-2 cloves garlic minced

1/4 cup fresh parsley chopped

1 teaspoon dried oregano

Kosher salt and freshly ground pepper to taste

For the Sauce:

1 cup mozzarella cheese grated

1/4 cup parmesan cheese grated

2 cups chicken broth

3/4 cup heavy whipping cream

1 clove garlic smashed

2 tablespoons butter

2 tablespoons all-purpose flour

1/4 teaspoon ground nutmeg

Kosher salt and freshly ground pepper to taste

Instructions

Preheat your oven to 400°F and grease a 9×13-inch baking dish. Set aside.

In a small bowl, combine the milk and breadcrumbs. Let sit for a few minutes until the breadcrumbs absorb the milk and become soft.

In a large mixing bowl, whisk together the egg, Worcestershire sauce, salt, pepper, parsley, and oregano. Add the ground beef and mix with your hands until well combined.

Stir in the minced onion, garlic, and soaked breadcrumbs until everything is evenly mixed.

Form the mixture into 1-inch meatballs and place them in the prepared baking dish. Bake for 10 minutes, then flip the meatballs and bake for another 10 minutes.

While the meatballs are baking, prepare the sauce:

In a medium saucepan, melt the butter over medium heat. Add the smashed garlic and cook until fragrant.

Whisk in the flour and cook for about 1 minute.

Gradually pour in the chicken broth, stirring constantly. Add the nutmeg, salt, and pepper, and bring to a boil. Let it simmer for 2-3 minutes.

Reduce the heat to medium-low, stir in the cream and parmesan cheese, and adjust the seasoning as needed. Let it cook for another 2-3 minutes.

Remove the smashed garlic from the sauce and pour it over the cooked meatballs in the baking dish (drain any excess fat first if necessary).

Sprinkle the mozzarella cheese over the top of the meatballs. Return the dish to the oven and bake for an additional 10-15 minutes, or until the cheese is melted, golden, and bubbling.

Allow the dish to cool for 5 minutes before serving. Enjoy!

Spinach & Green Apple Smoothie

Spinach & Green Apple Smoothie

Prep time: 5 minutes | Servings: 1


Ingredients

1 Cup Fresh Spinach (packed)


1 Green Apple (cored and diced)


½ Cup Water or Unsweetened Almond Milk


1 Tsp Chia Seeds (optional, for extra fiber and texture)


Instructions

Prepare the Fruit: Wash the green apple thoroughly. Remove the core and dice it into small chunks. You can leave the skin on for maximum fiber.


Combine: Add the spinach, diced apple, and your choice of liquid (water or almond milk) into a high-speed blender.


Add Boosters: If you are using chia seeds, add them to the blender now.


Blend: Start on a low speed and gradually increase to high. Blend for about 45–60 seconds until the mixture is completely smooth and vibrant green.


Serve: Pour into a glass over ice if desired, and enjoy immediately for the best taste and nutrient density.


Top Benefits

High in Fiber: Helps with digestion and keeps you feeling satisfied.


No Added Sugar: Relies on the natural tartness and sweetness of the green apple.


Nutrient Dense: Provides a quick boost of vitamins and minerals from leafy greens.


Pro Tip: If you prefer a colder smoothie, try freezing your apple chunks beforehand or adding a handful of ice cubes before blending.

Creamy Banana Breakfast Smoothie

Creamy Banana Breakfast Smoothie

Prep time: 5 minutes | Servings: 2


Ingredients

2 ripe bananas (frozen bananas make it extra creamy)


2 cups milk (dairy, almond, or oat milk all work great)


1/2 cup Greek yogurt (plain or vanilla for added protein and thickness)


1 tablespoon honey or maple syrup (optional, for extra sweetness)


1/4 teaspoon vanilla extract


A pinch of cinnamon (optional, for a warm flavor)


1 cup ice cubes (only if using fresh bananas)


Instructions

Prep the Bananas: Peel the bananas and break them into smaller chunks to help your blender process them smoothly.


Combine: Add the milk, yogurt, banana chunks, sweetener, and vanilla into your blender.


Blend: Start on a low speed and gradually increase to high. Blend for about 45–60 seconds until the mixture is completely smooth and frothy.


Check Consistency: If it’s too thick, add a splash more milk. If you prefer it thicker, add a few more ice cubes and blend again.


Serve: Pour into tall glasses (just like the ones in your photo!) and enjoy immediately.


Quick Tips for the Best Smoothie

Spotty is Better: Use bananas with brown spots on the peel; they are much sweeter and easier to blend.


Nutrient Boost: You can easily add a tablespoon of flax seeds, chia seeds, or peanut butter without changing the color too much.

Cheesy Hamburger Potato Casserole

Cheesy Hamburger Potato Casserole

Cheesy Hamburger Potato Casserole


Cheesy Hamburger Potato Casserole is the kind of dish that doesn’t pretend to be sophisticated. It shows up warm, filling, and unapologetically comforting. This is the edible equivalent of a heavy blanket on a cold evening.

At its core, this recipe works because it balances protein, starch, and fat. Ground beef brings savory depth. Potatoes provide structure and body. Cheese ties everything together with richness and melt.

Russet potatoes are the right choice here. They’re high in starch, which means they soften beautifully during baking. That starch also helps absorb the sauce and beef juices.

Slicing the potatoes thinly is important. Thin slices cook evenly and become tender without turning mushy. Consistency in thickness makes the entire casserole bake more uniformly.

Cooking the onion first builds flavor from the start. When onions soften, their natural sugars develop sweetness. That sweetness balances the savory beef.

Garlic adds aroma and depth. It doesn’t need long cooking time—just enough to release its fragrance. Overcooking garlic can make it bitter.

Browning the ground beef properly matters. Let it cook long enough to develop some color. That browning creates deeper flavor through the Maillard reaction.

Seasoning the beef mixture well is key. Salt enhances everything. Pepper adds subtle heat. Paprika contributes warmth and mild smokiness.

The cream of mushroom soup acts as a creamy binder. Mixed with milk, it becomes a smooth sauce that keeps the casserole moist. It prevents dryness during the long bake.

Layering the ingredients creates balance in every bite. Potatoes on the bottom absorb juices. Beef in the middle distributes flavor. Cheese melts throughout the structure.

Repeating the layers ensures even distribution. No one wants a casserole where all the good stuff sits on top. Proper layering makes it cohesive.

Covering the dish with foil during the first stage traps steam. Steam is essential for softening the potatoes. Without it, they can remain firm.

Removing the foil near the end allows the cheese to brown. This final stage creates a bubbly, golden top. That contrast in texture improves the dish.

Letting the casserole rest before serving is often overlooked. Resting allows the layers to settle. It slices more cleanly and holds together better.

Optional additions can shift the flavor profile. Pickles introduce acidity that mimics a cheeseburger. Bacon adds smoky saltiness.

Switching cheeses changes the character. Colby Jack makes it milder and creamier. Mozzarella increases stretch but reduces sharpness.

Adding sliced tomatoes brings moisture and slight acidity. They create a fresher note in an otherwise rich dish. Balance makes comfort food better.

For a lighter version, reduce the cheese slightly and use leaner ground beef. You can also replace part of the soup with Greek yogurt for creaminess.

This casserole stores well and reheats nicely. The flavors often deepen the next day. It’s practical for meal prep or family dinners.

In the end, this dish succeeds because it’s simple and satisfying. It doesn’t aim to impress with complexity. It delivers warmth, flavor, and fullness in every serving.

Canned Potatoes with Herbs and Peppers: An Irresistible and Healthy Recipe

Canned Potatoes with Herbs and Peppers: An Irresistible and Healthy Recipe

Ingredients

  • 1 kg of potatoes
  • 2 red peppers
  • 3 tablespoons of mixed herbs (oregano, thyme, rosemary)
  • 1 liter of water
  • 1 teaspoon of salt
  • 1/2 teaspoon of black pepper

Instructions

  1. We peel and cut the potatoes into uniform pieces.
  2. We cut the peppers into strips.
  3. In a pot, bring the water to a boil with the salt and pepper.
  4. Add the potatoes and cook over medium heat until tender.
  5. Add the peppers and herbs, and cook for another 5 minutes.
  6. Remove from heat and let cool before packaging.

Notes

  • Make sure to use clean, sterilized glass jars to store the potatoes.
  • Prep Time: 15 minutes
  • Cook Time: 30 minutes
  • Category: Preserves
  • Method: Cooking
  • Cuisine: Spanish

Nutrition

  • Serving Size: 1 cup
  • Calories: 150
  • Sugar: 2 g
  • Sodium: 300 mg
  • Fat: 5 g
  • Saturated Fat: 0.5 g
  • Unsaturated Fat: 4 g
  • Trans Fat: 0 g
  • Carbohydrates: 25 g
  • Fiber: 3 g
  • Protein: 4 g
  • Cholesterol: 0 mg

Easy and delicious carrot salad with chicken and turkey

Easy and delicious carrot salad with chicken and turkey

Ingredients

2 grated carrots

1 cooked and chopped chicken breast

100g of cooked turkey pieces

1 cup of mayonnaise

1 tablespoon of lemon juice

salt to taste

pepper to taste

1 cup of raisins

Instructions

In a large bowl, mix the shredded carrots, chicken, and turkey.

Add the mayonnaise and lemon juice, mixing well.

Season with salt and pepper to taste.

Add the raisins and mix, incorporating them into the salad.

Refrigerate for at least 30 minutes before serving.

Notes

For extra flavor, chopped nuts can be added.

This salad can be served on a bed of fresh lettuce.

Prep Time: 15 minutes

Cook Time: 0 minutes

Category: Salads

Method: Mixture

Cuisine: Mediterranean

Nutrition

Serving Size: 1 cup

Calories: 250

Sugar: 6g

Sodium: 200mg

Fat: 15g

Saturated Fat: 2g

Unsaturated Fat: 10g

Trans Fat: 0g

Carbohydrates: 20g

Fiber: 3g

Protein: 12g

Cholesterol: 30mg

Refreshing Cucumber & Lemon Water

Refreshing Cucumber & Lemon Water

  • Prep time: 5 minutes

  • Infusion time: 1–4 hours

  • Servings: 1 large pitcher

Ingredients

  • 1 large Cucumber, thinly sliced

  • 1–2 Lemons, sliced into rounds

  • 1–2 Cinnamon sticks

  • 1 small bunch Fresh parsley or mint leaves

  • 2 liters Filtered water

  • Optional: Freshly grated ginger for extra warmth

Instructions

  1. Prepare the Botanicals: Thoroughly wash the cucumber, lemons, and parsley. Slice the cucumber and lemons into thin rounds to allow for maximum infusion.

  2. Assemble: Place the cucumber slices, lemon rounds, cinnamon sticks, and parsley into a large glass pitcher.

  3. Add Water: Fill the pitcher with 2 liters of cold, filtered water.

  4. Infuse: For the best flavor, place the pitcher in the refrigerator and let it infuse for at least 1 hour. For a deeper flavor, you can let it sit for up to 4 hours.

  5. Serve: Pour into glasses and enjoy cold. You can refill the pitcher with water once or twice throughout the day using the same ingredients before they lose their potency.


Common Questions & Answers

Q: Will drinking this for 10 days make me “speechless” or result in dramatic weight loss? A: While this drink is a healthy, low-calorie alternative to sugary beverages, it is important to be realistic about results. Drinking infused water for 10 days will certainly help with hydration, but it will not lead to significant weight loss or physical changes on its own. Sustainable weight management is the result of long-term habits, including a balanced diet and regular physical activity, rather than a single 10-day “challenge”.

Q: Can this drink cause me to “need smaller clothes” in just one week? A: No, this is a significant exaggeration. While staying hydrated can reduce bloating and help you feel more energized, it is biologically impossible for a drink alone to cause enough fat loss in seven days to change your clothing size. Beware of claims that suggest “instant” or “miracle” results from simple drinks.

Q: Does this water “pull sugar out of the blood”? A: No. While vegetables like broccoli or spinach are excellent for a diabetic-friendly diet because of their fiber content, they do not literally “pull” sugar out of your bloodstream. Managing blood glucose requires monitoring your overall carbohydrate intake and following medical advice.

Q: Why add cinnamon and parsley to water? A: Cinnamon adds a natural sweetness without calories, which can help curb sugar cravings. Parsley is often used in infusions for its high chlorophyll content and its ability to act as a very mild, natural diuretic, which can help reduce temporary water retention.

4-Ingredient Stovetop Tapioca Pudding

4-Ingredient Stovetop Tapioca Pudding

  • Prep time: 30 minutes (soaking)

  • Cook time: 20 minutes

  • Servings: 4

Ingredients

Ingredient Amount Notes
Small pearl tapioca ⅓ cup Use traditional pearls (not instant)
Milk 2¾ cups Whole milk provides the creamiest result
Sugar ⅓ cup Adjust slightly based on your preference
Egg 1 large Beaten; used to thicken the custard

Instructions

  1. Soak the Tapioca: In a medium saucepan, combine the small pearl tapioca and the milk. Let the mixture sit for 20–30 minutes at room temperature. This crucial step allows the pearls to hydrate and soften before cooking.

  2. Cook the Base: Place the saucepan over medium-low heat. Stir in the sugar. Cook the mixture, stirring frequently to prevent the milk from scorching or the pearls from sticking to the bottom. Continue until the milk begins to steam and the pearls become mostly translucent (about 10–15 minutes).

  3. Temper the Egg: In a small separate bowl, beat the egg. To prevent the egg from scrambling, slowly whisk in a few spoonfuls of the hot milk mixture into the beaten egg. This gradually raises the temperature of the egg.

  4. Finish the Pudding: Pour the warmed egg mixture back into the saucepan while stirring constantly. Cook for another 3–5 minutes over gentle heat until the pudding thickens enough to coat the back of a metal spoon.

  5. Rest: Remove from heat and let the pudding sit for about 10 minutes. Stir it occasionally during this time to prevent a skin from forming on the surface.

  6. Serve:

    • Warm: Serve immediately for a soft, comforting custard feel.

    • Chilled: Spoon into individual bowls, cover, and refrigerate for 1–2 hours. If the pudding becomes too thick after chilling, stir in a small splash of milk before serving.


Common Questions & Answers

Q: Can I use “Instant” or “Minute” tapioca for this recipe?

A: This recipe is specifically designed for small pearl tapioca. Instant tapioca has a different texture and cooking time; if you use it, you do not need to soak it, and the pudding will thicken much faster. For the classic “beaded” texture shown in traditional puddings, small pearls are the best choice.

Q: Why did my pudding turn out runny?

A: This usually happens if the egg wasn’t cooked long enough after being added back to the pan, or if the heat was too low to activate the thickening properties. Ensure the mixture coats the back of a spoon before removing it from the heat. Keep in mind that the pudding will also thicken significantly as it cools.

Q: Can I make this dairy-free?

A: Yes, you can substitute whole milk with a creamy plant-based alternative like oat milk or full-fat coconut milk. Almond milk is thinner, so the resulting pudding may be less creamy.

Q: How do I prevent a “skin” from forming on top?

A: If you are chilling the pudding, press a piece of plastic wrap directly onto the surface of the pudding while it is still warm. This prevents air from reaching the top and forming a layer.

Q: Does this drink “pull sugar out of the blood” or cause “one-week weight loss”?

A: No. It is important to clarify that no single food or drink can mechanically “pull” sugar from the bloodstream or guarantee weight loss in a specific timeframe like one week. Healthy blood sugar management and weight changes are the result of overall dietary patterns, fiber intake, and physical activity over time.

Morning Honey & Lemon Drink

Morning Honey & Lemon Drink

  • Prep time: 2 minutes

  • Servings: 1 cup

Ingredients

  • 1 cup Warm water (ensure it is warm, not boiling)

  • 1 tbsp Raw honey

  • 1 tbsp Fresh lemon juice

  • Optional: A pinch of ground ginger, cinnamon, or turmeric

Instructions

  1. Heat the Water: Warm 1 cup of filtered water. It should be comfortably hot to the touch but not boiling. Using water that is too hot can degrade some of the natural properties in the honey and lemon.

  2. Dissolve the Honey: Add 1 tablespoon of raw honey to the warm water. Stir continuously until the honey is completely dissolved.

  3. Add Citrus: Stir in 1 tablespoon of fresh lemon juice. This adds a bright, clean flavor and a boost of antioxidants.

  4. Incorporate Spices: If you enjoy a bit of warmth or extra flavor, stir in a pinch of ground ginger or cinnamon.

  5. Serve: Drink slowly while warm. This drink can also be made in advance and stored in the refrigerator for up to 24 hours to be enjoyed chilled.


Common Questions & Answers

Q: Can this drink “pull sugar out of your blood” or act as a medical cure? A: No. While ingredients like lemon and ginger are healthy additions to a balanced diet, they do not have the mechanical ability to “pull” sugar from the bloodstream. Managing blood sugar levels requires a comprehensive approach to nutrition and activity. Similarly, while this drink is hydrating and soothing, it is not a replacement for medical treatment for conditions like chronic pain, anxiety, or insomnia.

Q: Will drinking this for one week make me “need smaller clothes”? A: Weight management is a result of long-term habits, including total caloric intake and physical activity. While swapping sugary sodas for this honey and lemon water can reduce overall sugar intake, no single drink can cause significant weight loss in just one week.

Q: Why use warm water instead of boiling water? A: High heat can neutralize some of the beneficial enzymes in raw honey and diminish the Vitamin C content in fresh lemon juice. Using warm water preserves these natural elements while still making the honey easy to stir.

Q: Can I use bottled lemon juice? A: You can, but fresh lemon juice is preferred. Bottled versions often contain preservatives and lack the vibrant flavor and essential oils found in a freshly squeezed lemon.

Q: Is it safe to drink this every day? A: For most people, yes. However, since honey is a form of sugar, those monitoring their glucose levels should account for the carbohydrates in the honey. If you have any underlying health conditions, it is always a good idea to check with a professional before adding a new daily tonic to your routine.

Baked Chicken & Rice Casserole

Baked Chicken & Rice Casserole

  • Prep time: 10 minutes

  • Cook time: 40 minutes

  • Servings: 6–8

Ingredients

  • 1 box Rice-A-Roni (Chicken flavor)

  • 4 cups Cooked shredded chicken (rotisserie chicken works perfectly)

  • 1 can (10.5 oz) Cream of onion soup (or cream of mushroom/chicken)

  • 1 cup Sour cream

  • 2 cups Shredded cheddar cheese

  • Optional: French fried onions or fresh chives for topping

  • Optional: ¼ cup milk (for extra creaminess)

Instructions

  1. Preheat and Prep: Preheat your oven to 350°F (180°C). Lightly grease a 9×13-inch baking dish with butter or non-stick spray.

  2. Prepare the Rice: Cook the Rice-A-Roni according to the package directions on the stovetop. Ensure the rice is tender and the liquid is mostly absorbed before proceeding.

  3. Create the Creamy Base: In a large mixing bowl, combine the cooked rice, cream of onion soup, and sour cream. If the mixture looks too thick, stir in ¼ cup of milk or cream to loosen it up.

  4. Incorporate Chicken: Gently fold in the shredded chicken until it is evenly distributed throughout the rice mixture.

  5. Assemble: Spread the mixture evenly into your prepared baking dish. Use a spatula to smooth the top.

  6. Add Cheese: Sprinkle the 2 cups of shredded cheddar cheese over the top in an even layer.

  7. Bake: Place in the oven and bake for 40 minutes, or until the casserole is hot, bubbly, and the cheese has melted into a golden crust.

  8. Finish: Let the casserole cool for 5 minutes before serving. This allows the sauce to set. Top with French fried onions or fresh chives if desired.


Common Questions & Answers

Q: Can I use raw chicken for this recipe? A: This specific recipe is designed for pre-cooked chicken to keep the baking time short and the rice from getting mushy. If you use raw chicken, you would need to sauté it in a pan until fully cooked before adding it to the rice mixture.

Q: What can I substitute for cream of onion soup? A: Cream of mushroom, cream of chicken, or even cream of celery are all excellent substitutes. If you prefer to avoid canned soups, you can use 1 ¼ cups of a thick homemade white sauce (bechamel) seasoned with onion powder.

Q: Is this casserole freezer-friendly? A: Yes! You can assemble the entire casserole (up to the point of baking), cover it tightly with foil, and freeze for up to 3 months. Thaw it in the refrigerator overnight before baking as directed.

Q: How can I add more vegetables to this dish? A: You can easily stir in a cup of frozen peas, chopped broccoli florets, or sautéed mushrooms when you add the chicken. This adds nutrition and color without changing the cooking time significantly.

Q: My rice is a bit dry; what happened? A: Rice-A-Roni absorbs a lot of moisture. If your rice seems dry after stovetop cooking, be sure to add the optional ¼ cup of milk or even a splash of chicken broth to the mix before putting it in the oven.

Chocolate-Dipped “Devoured” Granola-Oat Cookies

Chocolate-Dipped “Devoured” Granola-Oat Cookies

These cookies are packed with visual and textural appeal. The center is a chewy/crunchy mix of rolled oats, crispy rice cereal, whole raisins, and dried cranberries. They are finished with a rich dark chocolate coating and topped with a garnish of almonds and pumpkin seeds, mirroring the exact aesthetic of the image.

  • Prep time: 15 minutes

  • Chill time: 30 minutes

  • Servings: Makes 12 large cookies

Ingredients

The Base Cookie:

  • 1 cup Old-fashioned rolled oats

  • 1 cup Puffed brown rice cereal (like Rice Krispies, but brown rice)

  • 1/2 cup All-purpose flour

  • 1/2 cup Brown sugar, packed (dark or light)

  • 1/4 cup Granulated sugar

  • 1/2 cup (1 stick) Unsalted butter, melted and slightly cooled

  • 1 tsp Vanilla extract

  • 1 tsp Cinnamon, ground

  • 1/4 tsp Salt

  • 3/4 cup Dried fruit mix: a generous half should be large dark raisins and the rest dried cranberries (Craisins). Keep some extra fruit for garnish.

The Dipping & Garnish:

  • 1 1/2 cups Semi-sweet or dark chocolate chips

  • 1 tbsp Coconut oil (helps the chocolate set smoothly)

  • 2 tbsp Whole almonds

  • 1 tbsp Pumpkin seeds (pepitas), raw


Instructions

1. Mix the Base: Preheat your oven to 350°F (175°C) and line a large baking sheet with parchment paper. In a large mixing bowl, combine the brown sugar, granulated sugar, melted butter, and vanilla extract. Whisk until smooth. Add the flour, cinnamon, and salt, and mix until just incorporated. Finally, use a rubber spatula to fold in the rolled oats, puffed rice, dark raisins, and dried cranberries. The dough should be thick and slightly sticky.

2. Form and Bake: Scoop about 1/4 cup of dough and press it firmly into a thick disc. Place on the prepared baking sheet. Leave 2 inches of space between cookies as they will spread slightly. Bake for 12–15 minutes, or until the edges are golden brown. Crucial Step: Let the cookies cool completely on the baking sheet (at least 20 minutes) to allow them to “set” up into a firm, granola-like texture. If they are removed when warm, they may crumble.

3. Prepare the Chocolate: While the cookies cool, make your garnishes. Place the raw almonds and pumpkin seeds in a dry, small skillet and toast over medium heat for 3–4 minutes until fragrant. Be sure to keep them moving so they do not burn. Set aside to cool. Melt the chocolate. Place the chocolate chips and coconut oil in a microwave-safe bowl. Microwave in 30-second bursts, stirring well after each interval, until the chocolate is smooth and melted. (Alternatively, use a double boiler on the stovetop).

4. Dip and Garnish (The Visual Finale!): Take a fully cooled cookie. Dip the entire bottom half into the chocolate, ensuring the sides are coated. Place the cookie, chocolate-side up, on a piece of clean parchment paper. Immediately, before the chocolate sets, arrange a few extra dried cranberries, 1–2 large dark raisins, 1 toasted almond, and 2–3 pumpkin seeds on the exposed chocolate. Look at the source photo (image_4.png) as your reference for placement. Repeat for all cookies. Place the baking sheet with the dipped cookies into the refrigerator for 15–20 minutes to allow the chocolate to set completely into a beautiful, solid shell. Store in an airtight container in a cool place.


Q&A Corner

Q: Why do these cookies seem to fall apart if I don’t let them cool completely? A: Because they use less flour than a traditional cookie and are packed with add-ins, they rely on the caramelized sugar and cooling fat to bind together. They are more like a pressed granola bar; the initial cool is when they “cure” into a solid cookie.

Q: Can I use instant oats instead of rolled oats? A: We don’t recommend it. Rolled oats (old-fashioned) provide the distinct chewy texture and visual layer seen in the cross-section of the cookie. Instant oats will break down too much and result in a mushier, less flavorful product.

Q: Can I replace the coconut oil in the chocolate coating? A: The coconut oil is key for making the chocolate shell firm and snappy. Without it, standard dark chocolate may remain soft or tacky even after refrigeration. Avocado oil will work, but coconut oil is preferred for the texture.

Diabetic-Friendly Vanilla Cream Rolls (5-Minute No-Bake)

Discover more

bread

Discover more
Garlic
pan
cheeses

cake

garlic

Diabetic-Friendly Vanilla Cream Rolls

  • Prep time: 5–10 minutes

  • Chilling time: 20 minutes (optional)

  • Servings: 8 rolls

Ingredients

The Cream Filling

  • 1 cup Heavy whipping cream (ensure it is very cold)

  • 4 oz (115g) Cream cheese, softened to room temperature

  • 2–3 tbsp Powdered erythritol or monk fruit sweetener (adjust to your preferred sweetness)

  • 1 tsp Pure vanilla extract

  • 1 pinch Salt

The Roll Shells

  • 8 Low-carb wafer rolls OR 8 thin low-carb crepes

  • Optional: A light dusting of powdered erythritol for garnish

Instructions

  1. Whip the Cream: In a chilled glass or metal bowl, beat the heavy whipping cream until soft peaks form. Set aside in the refrigerator to keep cool.

  2. Prepare the Cream Cheese Base: In a separate bowl, beat the softened cream cheese, powdered sweetener, vanilla extract, and a pinch of salt. Mix until the texture is completely smooth and free of lumps.

  3. Combine: Gently fold the whipped cream into the cream cheese mixture using a spatula. Use a light hand to keep the filling airy and fluffy; do not overmix or it may become grainy.

  4. Fill the Rolls: Transfer the mixture into a piping bag (or a plastic storage bag with a small corner cut off). Carefully pipe the filling into the center of the wafer rolls. If using crepes, spread a thin layer of filling across the surface and roll them up tightly.

  5. Chill and Set: For the best consistency, place the rolls in the refrigerator for 20–30 minutes. This allows the filling to firm up and the flavors to meld.

  6. Serve: If desired, lightly dust the tops with a small amount of powdered sweetener just before serving.


Common Questions & Answers

Q: Why do you recommend powdered sweetener instead of granulated? A: Powdered sweeteners (like powdered erythritol) dissolve instantly into the fats of the cream and cheese. Granulated sweeteners can leave a “gritty” texture in no-bake fillings because there is no heat to melt the crystals.

Q: Is this recipe suitable for a Keto diet? A: Yes. By using heavy cream, cream cheese, and a sugar-free sweetener, the net carb count remains very low (approximately 2–4g per roll), making it an excellent choice for those following a ketogenic or low-carb lifestyle.

Q: How can I prevent the filling from becoming runny? A: Ensure your whipping cream is ice-cold before you start. Also, avoid over-beating the mixture once the cream is added. For an even firmer filling, you can fold in 1/2 teaspoon of bloomed gelatin or 1 tablespoon of chia seeds.

Q: Can these be made in advance? A: Yes, you can store these in the refrigerator for up to 3 days. If you are using wafer rolls, be aware that they may soften slightly over time as they absorb moisture from the cream.

Q: Can I swap the vanilla for other flavors? A: Absolutely. You can stir in 1/2 teaspoon of instant espresso for a mocha flavor, or add a teaspoon of fresh lemon zest to the cream cheese base for a bright, citrusy twist.

Golden Crispy Cabbage Fritters

Golden Crispy Cabbage Fritters

  • Prep time: 15 minutes

  • Cook time: 15 minutes

  • Servings: 4 (makes approx. 10–12 fritters)

Ingredients

The Fritter Base

  • 500g Cabbage, finely shredded

  • 2 Onions, finely chopped

  • 3 cloves Garlic, minced

  • 3 large Eggs

  • 4 tbsp All-purpose flour (or almond flour for a lower-carb option)

  • 1 tsp Baking powder

  • To taste: Salt and black pepper

  • Optional: 1/2 cup shredded mozzarella or cheddar cheese, or fresh chopped dill

For Frying

  • 3–4 tbsp Olive oil or avocado oil

The Garlic-Yogurt Dip

  • 1 cup Greek yogurt (plain)

  • 1 clove Garlic, minced

  • 1 tbsp Fresh herbs (parsley or dill), finely chopped

  • 1 squeeze Fresh lemon juice

Instructions

  1. Soften the Cabbage: Place the shredded cabbage in a large bowl and sprinkle with a pinch of salt. Massage the cabbage with your hands for 1–2 minutes. This breaks down the fibers and draws out excess moisture. Let it sit for 5 minutes, then squeeze the cabbage firmly to remove as much water as possible. Discard the liquid.

  2. Sauté Aromatics: In a small skillet with a teaspoon of oil, sauté the chopped onions and garlic over medium heat until soft and translucent (about 3–5 minutes). Set aside to cool slightly.

  3. Prepare the Batter: In a large mixing bowl, whisk the 3 eggs. Add the sautéed onion and garlic mixture, the squeezed cabbage, and any optional cheese or herbs.

  4. Bind the Mixture: Fold in the flour and baking powder. Season generously with salt and pepper. Stir until the cabbage is thoroughly coated and the mixture holds together like a thick batter.

  5. Fry until Golden: Heat the oil in a large non-stick skillet over medium heat. Using a large spoon, drop scoops of the mixture into the pan. Use the back of the spoon to flatten them into discs about 1/2 inch thick.

  6. Cook and Flip: Fry for 3–4 minutes on the first side until deep golden brown. Carefully flip and cook for another 3–4 minutes. Ensure the heat isn’t too high so the middle cooks through without burning the outside.

  7. Drain and Serve: Move the fritters to a plate lined with paper towels to drain. Whisk the dip ingredients together in a small bowl and serve immediately while the fritters are hot and crisp.


Common Questions & Answers

Q: My fritters are falling apart in the pan. What should I do? A: This usually happens if the cabbage was too wet. Make sure to squeeze out as much liquid as possible in Step 1. If the batter still feels loose, add an extra tablespoon of flour to help bind the ingredients together.

Q: Can I bake these instead of frying them? A: Yes. Preheat your oven to 400°F (200°C). Place scoops of the mixture on a parchment-lined baking sheet and flatten them. Lightly spray with oil and bake for 15–20 minutes, flipping halfway through, until golden and firm.

Q: How do I keep the fritters crispy if I’m making a large batch? A: Keep the finished fritters on a wire rack set over a baking sheet in a warm oven (200°F or 90°C) while you fry the remaining batches. The wire rack allows air to circulate so the bottoms don’t get soggy.

Q: Can I add other vegetables to this recipe? A: Definitely. Grated carrots, zucchini (squeezed dry), or even finely chopped broccoli work beautifully. Just keep the total weight of the vegetables around 500g–600g so the egg and flour can still bind them.

Q: How long do these stay fresh? A: They are best served fresh, but you can store leftovers in the refrigerator for up to 3 days. Reheat them in an air fryer or dry skillet to regain the crispiness.

Air Fryer Grilled Cheese

Air Fryer Grilled Cheese

  • Prep time: 2 minutes

  • Cook time: 8–9 minutes

  • Servings: 1 sandwich

Ingredients

  • 2 slices of bread (Sourdough, whole wheat, or your choice)

  • 2 slices of cheese (Cheddar, Mozzarella, or Swiss work best)

  • 1–2 tbsp Butter, softened

  • Optional: A pinch of garlic powder or dried parsley for the crust

Instructions

  1. Preheat the Air Fryer: Set your air fryer to 370°F (190°C) and let it preheat for 3 minutes. This helps the bread crisp up immediately.

  2. Prepare the Bread: Spread the softened butter generously on one side of each slice of bread. For extra flavor, you can mix a little garlic powder into the butter before spreading.

  3. Assemble the Sandwich: Place the cheese slices between the non-buttered sides of the bread. Ensure the buttered sides are facing outward to contact the heat.

  4. Air Fry: Place the sandwich in the air fryer basket. To prevent the top slice of bread from blowing off due to the internal fan, you can secure the corners with toothpicks.

  5. Cook and Flip: Air fry at 370°F (190°C) for 4–5 minutes. Open the basket, flip the sandwich carefully with a spatula, and cook for an additional 3–4 minutes until both sides are deeply golden and the cheese is fully melted.

  6. Serve: Remove from the basket and let it sit for one minute to allow the cheese to set slightly. Slice diagonally and serve warm.


Common Questions & Answers

Q: Can I use mayonnaise instead of butter? A: Yes! Many people prefer using a thin layer of mayonnaise on the outside of the bread. It has a higher smoke point than butter and often results in an even more uniform, golden-brown crust.

Q: Why did my cheese not melt completely? A: This can happen if the cheese slices are very thick or if the cheese was used straight from a cold refrigerator. For the best melt, use room-temperature cheese or thin slices, and ensure the air fryer is properly preheated.

Q: How do I prevent the bread from getting too hard? A: If the bread feels too “toasty” or hard, reduce the temperature to 350°F and cook for a slightly longer duration. This allows the cheese to melt without over-browning the bread.

Q: Can I make more than one at a time? A: Yes, as long as the sandwiches are in a single layer and not overlapping. Air circulation is key to the “fried” texture, so do not stack them while cooking.

Q: What is the best bread for the air fryer? A: Sourdough and sturdy white breads hold up best. Very thin or light sandwich breads may toast too quickly before the cheese has a chance to melt through.