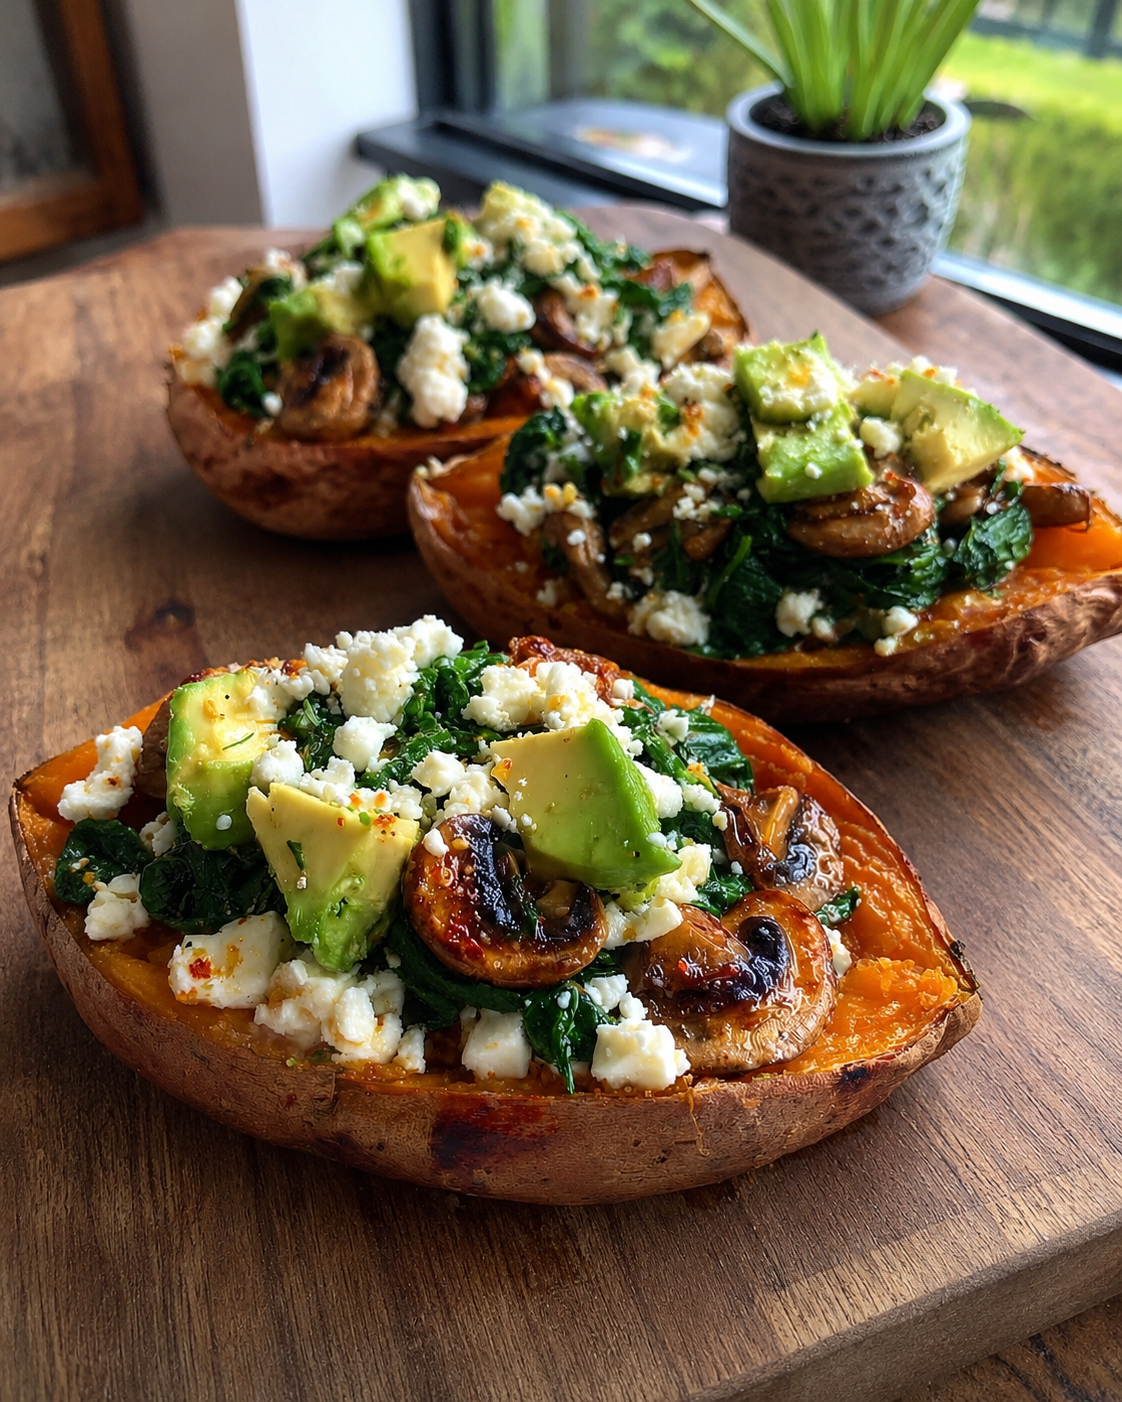
Blueberry Lemon Loaf Cake

Blueberry Lemon Loaf Cake

Ingredients

For the Cake

  • 1½ cups all-purpose flour
  • 1 tsp baking powder
  • ¼ tsp salt
  • ½ cup unsalted butter, softened
  • ¾ cup sugar
  • 2 eggs
  • ½ cup milk
  • 1 tbsp lemon zest
  • 1 tsp vanilla extract
  • 1 cup fresh blueberries

For the Lemon Glaze

  • 1 cup powdered sugar
  • 2–3 tbsp lemon juice

Instructions

➡️ Preheat oven to 350°F (175°C). Grease and line a loaf pan.

➡️ In a bowl, whisk together flour, baking powder, and salt.

➡️ In another bowl, beat butter and sugar until light and fluffy.

➡️ Add eggs one at a time, mixing well after each addition.

➡️ Mix in vanilla extract and lemon zest.

➡️ Add the dry ingredients and milk alternately, mixing until just combined.

➡️ Gently fold in the blueberries.

➡️ Pour batter into the prepared loaf pan and smooth the top.

➡️ Bake for 50–60 minutes or until a toothpick inserted in the center comes out clean.

➡️ Let the loaf cool completely.

➡️ Mix powdered sugar and lemon juice until smooth.

➡️ Drizzle the glaze over the cooled loaf and top with extra blueberries if desired.

➡️ Slice and serve.

Q & A

Q: Can I use frozen blueberries?
A: Yes, add them frozen and lightly coat them with flour before mixing into the batter.

Q: How do I store this loaf?
A: Keep it in an airtight container at room temperature for up to 3 days.

Q: Can I skip the glaze?
A: Yes, the loaf is delicious on its own, but the glaze adds extra lemon flavor and sweetness.

Air Fryer Crispy Potatoes

Air Fryer Crispy Potatoes

Ingredients

  • 6 medium potatoes, sliced into thick rounds
  • 2 tbsp olive oil
  • 1 tsp garlic powder
  • 1 tsp dried parsley
  • ½ tsp paprika
  • ½ tsp salt
  • ¼ tsp black pepper
  • Fresh parsley for garnish

Instructions

🔹 Wash and slice the potatoes into thick, even rounds.

🔹 Place the potatoes in a bowl and add olive oil, garlic powder, parsley, paprika, salt, and black pepper.

🔹 Toss well until all potato slices are evenly coated.

🔹 Preheat the air fryer to 200°C (400°F) for 3 minutes.

🔹 Arrange the potato slices in a single layer in the air fryer basket.

🔹 Air fry for 18–22 minutes, flipping halfway through cooking.

🔹 Cook until the potatoes are golden brown and crispy on the outside.

🔹 Remove from the air fryer and garnish with fresh parsley.

🔹 Serve hot with your favorite dipping sauce.

Q & A

Q: How do I make them extra crispy?
A: Soak the sliced potatoes in cold water for 20–30 minutes, then dry thoroughly before seasoning.

Q: Can I use sweet potatoes?
A: Yes, but reduce the cooking time by 2–4 minutes and check frequently.

Q: How should I store leftovers?
A: Refrigerate in an airtight container for up to 3 days and reheat in the air fryer for best crispiness.

Creamy Chicken Apple Cranberry Salad

Creamy Chicken Apple Cranberry Salad

A refreshing salad packed with tender chicken, crisp apples, juicy cranberries, and a creamy dressing.

🛒 Ingredients

  • 2 cups cooked chicken, diced
  • 1 apple, diced
  • 1 cup celery, chopped
  • ½ cup red grapes or dried cranberries
  • ½ cup mayonnaise
  • 1 tbsp lemon juice
  • Salt & black pepper

👩‍🍳 Step-by-Step Recipe

1️⃣ Prepare the Ingredients

➡️ Dice the cooked chicken into bite-sized pieces.

➡️ Wash and dice the apple into small cubes.

➡️ Chop the celery into thin slices.

➡️ Halve the grapes if using fresh grapes.

2️⃣ Make the Dressing

➡️ In a large bowl, combine mayonnaise and lemon juice.

➡️ Add a pinch of salt and black pepper.

➡️ Stir until smooth and creamy.

3️⃣ Mix the Salad

➡️ Add the chicken, apples, celery, and grapes/cranberries to the bowl.

➡️ Gently toss until everything is evenly coated with the dressing.

4️⃣ Chill

➡️ Cover and refrigerate for at least 30 minutes.

➡️ This helps the flavors blend together beautifully.

5️⃣ Serve

➡️ Spoon onto a serving plate.

➡️ Enjoy on its own, in lettuce cups, or as a sandwich filling.

❓ Quick Q&A

Q: Can I use Greek yogurt instead of mayonnaise?
✅ Yes! Greek yogurt makes a lighter version.

Q: How long does it keep in the fridge?
✅ Up to 3 days in an airtight container.

Q: Can I add nuts?
✅ Absolutely! Chopped pecans or walnuts add a delicious crunch.

🍽️ Creamy, crunchy, sweet, and savory—perfect for lunch, picnics, or meal prep! 😋

Viral Dubai Chocolate Pistachio Bar

Viral Dubai Chocolate Pistachio Bar 🍫💚

🛒 Ingredients

  • 2 cups milk chocolate
  • 1½ cups kataifi pastry (shredded phyllo)
  • 1 cup pistachio cream
  • 2 tbsp butter
  • Crushed pistachios for topping

👩‍🍳 Step-by-Step Instructions

1️⃣ Toast the Kataifi

  • Cut the kataifi pastry into smaller pieces using scissors or your hands.

➡️ Heat butter in a pan over medium heat.
➡️ Add the kataifi pastry.

🔥 Stir continuously for about 8–10 minutes until golden brown and crispy.

The pastry should look crunchy and lightly toasted. ✨


2️⃣ Make the Pistachio Filling

  • Transfer toasted kataifi to a bowl.

➡️ Add pistachio cream and mix well.

The mixture should become thick, crunchy, and creamy at the same time. 💚


3️⃣ Melt the Chocolate

  • Break chocolate into small pieces.

➡️ Melt using a microwave in short intervals or over a double boiler.
➡️ Stir until completely smooth and glossy.


4️⃣ Build the Chocolate Bar

  • Pour a thin layer of melted chocolate into a mold or lined tray.

➡️ Spread evenly and chill for 5 minutes.

➡️ Add the pistachio kataifi filling on top.
➡️ Press gently into an even layer.

➡️ Cover everything with remaining melted chocolate.

The top should look smooth and thick. 🍫


5️⃣ Decorate & Chill

  • Sprinkle crushed pistachios on top.

➡️ Refrigerate for at least 1 hour until fully set.
➡️ Slice or break into bars before serving.

When cut open, the inside should look crispy and creamy. 🤤


💡 Tips

  • Use good-quality chocolate for the best taste.
  • Don’t burn the kataifi while toasting.
  • Keep chilled for a firmer crunch. ❄️

❓Q/A

❓What is kataifi pastry?

✅ It’s thin shredded phyllo dough used in many Middle Eastern desserts.

❓Can I use Nutella instead of pistachio cream?

✅ Yes, but the flavor will be different and less nutty.

Cheesy Potato Gratin Stack 🥔🧀

Cheesy Potato Gratin Stack 🥔🧀

🛒 Ingredients

  • 4 medium potatoes
  • 1½ cups shredded cheddar cheese
  • 1 cup heavy cream
  • 2 garlic cloves (minced)
  • 2 tbsp butter
  • Salt & black pepper
  • Chopped chives (for topping)

👩‍🍳 Step-by-Step Instructions

1️⃣ Prepare the Potatoes

  • Wash and peel the potatoes.

➡️ Slice them very thinly using a knife or mandoline slicer.
➡️ Try to keep slices even so they cook at the same speed.

Thin slices make the gratin creamy and soft. ✨


2️⃣ Make the Cream Mixture

  • In a bowl, combine:
    • heavy cream
    • minced garlic
    • salt
    • black pepper

➡️ Stir everything together well.


3️⃣ Layer the Potatoes

  • Grease a baking dish or small round pans with butter.

➡️ Place one layer of potato slices at the bottom.
➡️ Spoon a little cream mixture over the potatoes.
➡️ Sprinkle some cheese on top.

Repeat the layers until all potatoes are used.

➡️ Finish with extra cheese on top for a golden crust. 🧀


4️⃣ Bake the Gratin

  • Cover the dish loosely with foil.

🔥 Bake at 190°C / 375°F for 40 minutes.

➡️ Remove the foil and bake another 15–20 minutes until the top is deep golden brown and bubbling.

The potatoes should feel soft when pierced with a knife. 😋


5️⃣ Rest & Serve

  • Let the gratin rest for 10 minutes before slicing.

➡️ Sprinkle chopped chives on top.
➡️ Serve warm while creamy and cheesy.


💡 Tips

  • Use starchy potatoes for the creamiest texture.
  • Don’t rush the resting time or it may fall apart.
  • Add cooked onions or bacon for extra flavor. 🥓

❓Q/A

❓Why is my gratin watery?

✅ Potatoes may have released extra moisture or the dish was not baked long enough.

❓Can I prepare it ahead of time?

✅ Yes! Assemble it earlier and bake before serving.

2-Ingredient Pineapple Soft Serve

2-Ingredient Pineapple Soft Serve

Creamy, fruity, and refreshing — this easy pineapple soft serve tastes like tropical ice cream with only 2 ingredients! 😍🍦

🛒 Ingredients

  • 2 cups frozen pineapple chunks 🍍
  • ½ cup coconut milk 🥥

👩‍🍳 Detailed Step-by-Step Instructions

❄️ Step 1: Freeze the Pineapple

  • If using fresh pineapple:
    • Peel and cut into chunks.
    • Spread pieces on a tray so they don’t stick together.
    • Freeze for at least 4 hours until completely solid.

👉 Fully frozen pineapple creates the thick soft-serve texture.


🌪️ Step 2: Add to Blender

  • Place frozen pineapple into a blender or food processor.
  • Pour in the coconut milk.

👉 Start with less liquid first. You can always add more later.


🥄 Step 3: Blend Slowly

  • Blend on low speed first.
  • The mixture will look crumbly at the beginning — this is normal.
  • Stop occasionally and scrape down the sides with a spoon or spatula.

👉 This helps everything blend evenly.


🍦 Step 4: Make It Creamy

  • Continue blending until the texture becomes:
    • Smooth
    • Thick
    • Creamy like soft-serve ice cream 😍
  • If too thick:
    • Add 1 tablespoon coconut milk at a time.

⚠️ Don’t add too much liquid or it will become runny.


🌀 Step 5: Serve

  • Scoop into bowls or glasses.
  • For a fancy swirl look:
    • Put mixture into a piping bag.
    • Pipe in circles like ice cream shop soft serve. ✨
  • Serve immediately before melting. 😋

💡 Tips

✅ Freeze pineapple in small chunks for easier blending.
✅ A tiny pinch of salt makes the pineapple taste sweeter.
✅ Add a little vanilla for extra flavor.


❓Q&A

❓Can I use another milk?

✅ Yes! Almond milk or oat milk also works.

❓Can I freeze leftovers?

✅ Yes, but let it soften for 10 minutes before eating again.

❓Do I need added sugar?

✅ Usually no — pineapple is naturally sweet enough.

French Onion Meatloaf Bake

French Onion Meatloaf Bake

A juicy meatloaf loaded with rich onion flavor, topped with melted cheese, and baked until golden and bubbly — perfect comfort food! 😋

🛒 Ingredients

  • 1½ lbs ground beef
  • 1 onion, thinly sliced
  • 1 cup shredded mozzarella or Swiss cheese
  • 1 egg
  • ½ cup breadcrumbs
  • 2 tbsp ketchup
  • 1 tsp garlic powder
  • Salt & black pepper to taste
  • 1 tbsp butter

👩‍🍳 Step-by-Step Instructions

🔥 Step 1: Cook the Onions

  • Melt butter in a pan over medium heat.
  • Add sliced onions and cook slowly for 12–15 minutes until soft and caramelized.
  • Stir occasionally so they don’t burn.

🥣 Step 2: Make the Meatloaf Mixture

  • In a large bowl combine:
    • Ground beef
    • Egg
    • Breadcrumbs
    • Ketchup
    • Garlic powder
    • Salt & pepper
  • Mix gently until combined. Do not overmix.

🍖 Step 3: Shape the Meatloaf

  • Place mixture into a baking dish or loaf pan.
  • Shape into a loaf.
  • Spread half the caramelized onions on top.

🧀 Step 4: Add Cheese

  • Sprinkle shredded cheese generously over the top.
  • Add remaining onions over the cheese.

🔥 Step 5: Bake

  • Bake at 375°F (190°C) for about 45–55 minutes until fully cooked.
  • Broil for 2–3 minutes at the end for extra golden melted cheese.

🌿 Step 6: Serve

  • Let rest for 5 minutes.
  • Garnish with fresh parsley and serve warm. 😍

💡 Tips

  • Swiss cheese gives the best French onion flavor.
  • Serve with mashed potatoes or roasted veggies.
  • Add a splash of beef broth for extra juiciness.

❓Q&A

❓Can I use turkey instead of beef?

✅ Yes! Ground turkey works great for a lighter version.

❓How do I store leftovers?

✅ Keep refrigerated in an airtight container for up to 3 days.

❓Can I freeze it?

✅ Yes, freeze slices individually for easy meals later.

Creamy Garlic Parmesan Herb Chicken

🍗 Creamy Garlic Parmesan Herb Chicken

🛒 Ingredients

  • 2 large chicken breasts 🍗
  • 2 tbsp olive oil
  • 4 garlic cloves, minced 🧄
  • 1 tsp paprika
  • 1 tsp Italian seasoning
  • Salt & black pepper
  • 2 tbsp butter
  • 1/2 cup heavy cream
  • 1/3 cup parmesan cheese 🧀
  • 1 tbsp chopped parsley 🌿
  • Fresh rosemary sprigs
  • Lemon wedges 🍋

👩‍🍳 Step-by-Step Recipe

🔥 Step 1: Season the Chicken

➡️ Pat chicken dry with paper towels.
➡️ Rub with olive oil, paprika, Italian seasoning, salt, and black pepper.


🍳 Step 2: Sear the Chicken

➡️ Heat a large skillet over medium-high heat.
➡️ Add chicken breasts and cook 5–6 minutes per side until golden brown and cooked through ✨

➡️ Add butter and minced garlic during the last minute.
➡️ Spoon the garlic butter over the chicken while cooking 🤤


🧀 Step 3: Make the Creamy Sauce

➡️ Lower heat to medium-low.
➡️ Pour in heavy cream.
➡️ Stir in parmesan cheese and parsley.

➡️ Simmer for 2–3 minutes until thick and creamy.


🔪 Step 4: Slice & Serve

➡️ Slice chicken into thick pieces.
➡️ Spoon creamy parmesan herb sauce over the top.
➡️ Garnish with rosemary and lemon wedges 🌿🍋


🌟 Serving Tips

✅ Serve with mashed potatoes or pasta 🍝
✅ Pair with roasted vegetables 🥦
✅ Add extra parmesan for richer flavor 🧀


❓Q/A

❓Can I use chicken thighs?

✅ Yes! Chicken thighs are extra juicy and flavorful.

❓How do I keep chicken tender?

✅ Let the chicken rest 5 minutes before slicing.

Creamy Mandarin Orange Fluff Salad

Creamy Mandarin Orange Fluff Salad

🛒 Ingredients

  • 2 cups mandarin orange segments 🍊
  • 1 cup whipped topping
  • 1 cup cottage cheese or cream cheese
  • 1 small can crushed pineapple, drained
  • 1 cup mini marshmallows
  • 1 tsp vanilla extract

👩‍🍳 Step-by-Step Recipe

🥣 Step 1: Mix the Creamy Base

➡️ In a large bowl, combine:

  • whipped topping
  • cottage cheese or softened cream cheese
  • vanilla extract

Mix until smooth and creamy ✨


🍍 Step 2: Add Fruits

➡️ Gently fold in:

  • mandarin oranges 🍊
  • crushed pineapple 🍍
  • mini marshmallows

Mix carefully so the oranges stay whole.


❄️ Step 3: Chill

➡️ Cover the bowl and refrigerate for 1–2 hours.
➡️ This helps the flavors blend together perfectly 🤤


🌟 Serving Tips

✅ Serve cold for best taste
✅ Top with extra orange slices before serving
✅ Perfect for holidays and summer parties ☀️


❓Q/A

❓Can I make it ahead?

✅ Yes! It tastes even better after chilling overnight.

❓Can I use fresh oranges?

✅ Absolutely — peeled fresh mandarins work great.

Air Fryer Grilled Cheese Sandwiches

Air Fryer Grilled Cheese Sandwiches

🛒 Ingredients

  • 8 slices bread 🍞
  • 4 slices cheddar or mozzarella cheese 🧀
  • 2 tbsp butter

👩‍🍳 Step-by-Step Recipe

🧈 Step 1: Butter the Bread

➡️ Spread butter on one side of each bread slice.
➡️ This helps make the sandwiches crispy and golden ✨


🧀 Step 2: Add Cheese

➡️ Place cheese slices between two pieces of bread.
➡️ Keep buttered sides facing outward.


🔥 Step 3: Prepare Air Fryer

➡️ Line air fryer basket with parchment paper.
➡️ Place sandwiches in a single layer.


🍞 Step 4: Air Fry

➡️ Cook at 370°F (188°C) for 4–5 minutes.
➡️ Flip sandwiches carefully.
➡️ Cook another 3–4 minutes until golden brown and melty 🤤


🌟 Serving Tips

✅ Serve hot with tomato soup 🍅
✅ Add ham or cooked chicken for extra flavor
✅ Use thick bread for extra crunch


❓Q/A

❓Can I use different cheese?

✅ Yes! Cheddar, mozzarella, provolone, or Swiss work great.

❓Why use parchment paper?

✅ It helps prevent cheese from sticking and makes cleanup easier.

Cheesy Philly Cheesesteak Sliders

Cheesy Philly Cheesesteak Sliders

🛒 Ingredients

  • 12 slider buns
  • 1 lb (450g) thinly sliced beef steak
  • 1 small onion, sliced
  • 1 small red bell pepper, sliced
  • 2 cups mozzarella or provolone cheese
  • 2 tbsp butter
  • 1 tsp garlic powder
  • Salt & black pepper

👩‍🍳 Step-by-Step Recipe

🔥 Step 1: Cook the Filling

➡️ Heat 1 tbsp butter in a pan.
➡️ Add onions and bell peppers 🌶️
➡️ Cook until soft and slightly golden.

➡️ Add sliced beef.
➡️ Season with salt, pepper, and garlic powder.
➡️ Cook 4–5 minutes until beef is browned.


🍞 Step 2: Prepare the Sliders

➡️ Slice slider buns in half without separating them.
➡️ Place bottom half on a baking tray.

➡️ Spread the beef mixture evenly over the buns.
➡️ Top generously with cheese 🧀

➡️ Place top buns over the cheese layer.


🧈 Step 3: Butter the Tops

➡️ Melt remaining butter.
➡️ Brush over the buns for a golden finish ✨


🔥 Step 4: Bake

➡️ Bake at 375°F (190°C) for 10–12 minutes.
➡️ Cheese should be melted and buns perfectly toasted 🤤


🌟 Serving Tips

✅ Serve hot with fries or dipping sauce
✅ Add jalapeños for spicy flavor 🌶️
✅ Perfect for parties and game nights 🎉


❓Q/A

❓Can I use chicken instead of beef?

✅ Yes! Thinly sliced chicken works great.

❓What cheese melts best?

✅ Provolone and mozzarella give the best gooey texture.

Crinkle Cookies 🍪✨

Crinkle Cookies 🍪✨

These soft crinkle cookies are crispy outside, soft inside, and covered with powdered sugar. Perfect for tea time or dessert!

🛒 Ingredients

🍫 Chocolate Crinkle Cookies

  • 1 cup chocolate cake mix
  • 1 egg
  • 2 tbsp oil
  • Powdered sugar

🍋 Lemon Crinkle Cookies

  • 1 cup lemon cake mix
  • 1 egg
  • 2 tbsp oil
  • Powdered sugar

👩‍🍳 Instructions

🍫 Chocolate Crinkle Cookies

  • 🥣 Add chocolate cake mix, egg, and oil to a bowl.
  • 🥄 Mix until a soft dough forms.
  • ❄️ Chill dough for 15 minutes.
  • ✋ Scoop small balls of dough.
  • 🤍 Roll each ball in powdered sugar generously.
  • 🧁 Place on a baking tray with space between them.
  • 🔥 Bake at 180°C (350°F) for 10–12 minutes.
  • 😍 Let cool before serving.

🍋 Lemon Crinkle Cookies

  • 🥣 Mix lemon cake mix, egg, and oil in a bowl.
  • 🥄 Stir until smooth dough forms.
  • ❄️ Chill for 15 minutes.
  • ✋ Roll dough into balls.
  • 🤍 Coat well with powdered sugar.
  • 🧁 Arrange on baking tray.
  • 🔥 Bake at 180°C (350°F) for 10–12 minutes.
  • ✨ Cool and enjoy soft lemon cookies.

💡 Tips

  • ❄️ Chilling the dough helps create beautiful cracks.
  • 🤍 Use extra powdered sugar for a brighter crinkle effect.
  • 🍪 Do not overbake or cookies may become dry.

❓Q&A

Q: Why did my cookies not crack?

➡️ The dough may be too warm. Chill it before baking.

Q: Can I store these cookies?

➡️ Yes! Store in an airtight container for 4–5 days.

Q: Can I freeze the dough?

➡️ Yes, freeze dough balls for up to 1 month.

Cheesy Green Onion Patties

Cheesy Green Onion Patties 🧀🌿

Ingredients 🍴

  • 2 cups shredded potatoes
  • 1 cup shredded cheese
  • 2 green onions (chopped)
  • 1 egg
  • 3 tbsp flour
  • Salt & black pepper
  • Oil for frying

Detailed Procedure 👩‍🍳

Step 1: Prepare the Potatoes 🥔

➡️ Peel and wash the potatoes very well.
➡️ Grate them using the large side of a grater.
➡️ Place the grated potatoes in a clean towel and squeeze out as much water as possible.
➡️ This step is very important because dry potatoes make crispy patties.


Step 2: Mix the Ingredients 🥣

➡️ Add the potatoes to a large bowl.
➡️ Add shredded cheese and chopped green onions.
➡️ Crack in the egg.
➡️ Sprinkle flour, salt, and black pepper.
➡️ Mix everything very well until the mixture sticks together.


Step 3: Shape the Patties ✋

➡️ Take a small amount of mixture in your hands.
➡️ Shape into thick finger-like rolls or oval patties.
➡️ Press gently so they stay firm and do not break while cooking.


Step 4: Heat the Pan 🔥

➡️ Add a little oil to a non-stick pan.
➡️ Heat over medium flame for 2 minutes.
➡️ The pan should be hot but not smoking.


Step 5: Fry the Patties 🧈

➡️ Carefully place the patties into the pan.
➡️ Do not overcrowd the pan.
➡️ Cook for about 4–5 minutes on one side until deep golden brown.
➡️ Flip gently using a spatula.
➡️ Cook the other side for another 4 minutes until crispy and fully cooked inside.


Step 6: Remove Extra Oil ✨

➡️ Place cooked patties on paper towels for 1 minute.
➡️ This helps remove extra oil and keeps them crispy.


Step 7: Serve Hot 🍽️

➡️ Serve warm with ketchup, yogurt dip, or garlic sauce.
➡️ Best enjoyed fresh and crispy.


Quick Q&A ❓

Why are my patties breaking?

✅ The potatoes may have too much water. Squeeze them well before mixing.

Can I bake them instead?

✅ Yes! Bake at 200°C (400°F) for about 20–25 minutes.

Can I add extra vegetables?

✅ Absolutely. Finely chopped spinach or carrots work great.

Zero Point Fatbomb Fluff

Zero Point Fatbomb Fluff 🍫✨

Ingredients 🍴

  • 1 cup Greek yogurt
  • 2 tbsp cocoa powder
  • 2 tbsp sugar-free sweetener or honey
  • 2 tbsp mini chocolate chips

Detailed Procedure 👩‍🍳

Step 1: Prepare the Mixing Bowl 🥣

➡️ Take a medium bowl and make sure it is clean and dry.
➡️ Cold bowls help the fluff stay thick and creamy.


Step 2: Add the Yogurt 🍦

➡️ Spoon the Greek yogurt into the bowl.
➡️ Stir it slowly for a few seconds to make it smooth.


Step 3: Mix the Chocolate Flavor 🍫

➡️ Add cocoa powder to the yogurt.
➡️ Add the sweetener or honey.
➡️ Mix very well using a whisk or spoon until the color becomes fully chocolatey with no dry powder left.


Step 4: Make It Fluffy ✨

➡️ Whisk the mixture for about 2–3 minutes.
➡️ The more you whisk, the lighter and fluffier it becomes.
➡️ Scrape the sides of the bowl while mixing so everything blends evenly.


Step 5: Add Chocolate Chips 🍪

➡️ Fold in half of the chocolate chips gently.
➡️ Do not overmix or the fluff may lose some airiness.


Step 6: Chill the Fluff ❄️

➡️ Place the bowl in the fridge for 15–20 minutes.
➡️ Chilling helps the texture become thicker and creamier.


Step 7: Serve & Decorate 🍴

➡️ Spoon the fluff into a serving bowl or ramekin.
➡️ Sprinkle the remaining chocolate chips on top.
➡️ Serve cold and enjoy the creamy chocolate texture.


Quick Q&A ❓

Can I freeze it?

✅ Yes, freeze for 1–2 hours for an ice-cream-like texture.

Can I use regular yogurt?

✅ Yes, but Greek yogurt makes it thicker and creamier.

How long does it last?

✅ Store in the fridge for up to 2 days.

Cheesy Spinach & Veggie Egg Bake

Cheesy Spinach & Veggie Egg Bake 🥚🧀

Ingredients 🍴

  • 6 eggs
  • 1 cup spinach (chopped)
  • 1/2 cup shredded cheese
  • 2 green onions (sliced)
  • 1/4 cup diced chicken or turkey pieces
  • Salt & black pepper

Detailed Procedure 👩‍🍳

Step 1: Prepare the Oven 🔥

➡️ Preheat your oven to 180°C (350°F).
➡️ Lightly grease a baking dish or pie plate with a little oil or butter.


Step 2: Prepare the Ingredients 🥬

➡️ Wash and chop the spinach into small pieces.
➡️ Slice the green onions.
➡️ Cut the chicken or turkey into tiny cubes for even cooking.


Step 3: Beat the Eggs 🥚

➡️ Crack all the eggs into a large bowl.
➡️ Add a pinch of salt and black pepper.
➡️ Whisk well until the mixture becomes smooth and slightly foamy.


Step 4: Mix Everything Together 🧀

➡️ Add spinach, green onions, and chicken into the egg mixture.
➡️ Stir gently so everything spreads evenly.
➡️ Add shredded cheese and mix again.


Step 5: Pour into Baking Dish 🍽️

➡️ Pour the mixture into the prepared dish.
➡️ Spread it evenly using a spoon.


Step 6: Bake Until Golden ✨

➡️ Place the dish in the oven.
➡️ Bake for 30–35 minutes until the top becomes golden and fluffy.
➡️ Insert a knife in the center — if it comes out clean, it’s ready.


Step 7: Cool & Serve 🍴

➡️ Let it rest for 5 minutes before slicing.
➡️ Serve warm for breakfast, lunch, or dinner.


Quick Q&A ❓

Can I use another vegetable?

✅ Yes! Bell peppers, mushrooms, or tomatoes work great.

Can I make it without meat?

✅ Absolutely. Just add extra vegetables instead.

How do I store leftovers?

✅ Keep in the fridge for up to 3 days and reheat before serving.

Blueberry Yogurt Parfait

Blueberry Yogurt Parfait 🫐🥄

Ingredients 🍴

  • 2 cups Greek yogurt
  • 1 cup fresh blueberries
  • 1 cup granola
  • 2 tbsp honey

Detailed Procedure 👩‍🍳

Step 1: Prepare the Blueberries 🫐

➡️ Wash the blueberries very well under cold water.
➡️ Let them dry for a few minutes using a clean towel.
➡️ Keep a few whole blueberries aside for the topping.


Step 2: Make the Blueberry Sauce 🍯

➡️ Add half of the blueberries to a small pan.
➡️ Add 1 tablespoon honey.
➡️ Cook on low heat for about 4–5 minutes while stirring gently.
➡️ The blueberries will become soft and juicy like a jam.
➡️ Turn off the heat and let the sauce cool slightly.


Step 3: Prepare the Glass 🥛

➡️ Take a clear glass or dessert cup for beautiful layers.
➡️ Add 2 tablespoons granola at the bottom.
➡️ Press lightly with a spoon to make the base even.


Step 4: Add the Yogurt Layer 🍦

➡️ Spoon a thick layer of Greek yogurt over the granola.
➡️ Spread gently so the layers look clean from the sides.


Step 5: Add Blueberries 🫐

➡️ Add some fresh blueberries over the yogurt.
➡️ Spoon a little blueberry sauce on top.


Step 6: Repeat the Layers ✨

➡️ Repeat the layers again:

  • Granola
  • Yogurt
  • Fresh blueberries
  • Blueberry sauce

➡️ Finish with extra blueberries on top for a fresh look.


Step 7: Chill & Serve ❄️

➡️ Place the parfait in the fridge for 10–15 minutes before serving.
➡️ Serve cold with a spoon and enjoy the creamy crunchy texture.


Quick Q&A ❓

Can I use frozen blueberries?

✅ Yes, just thaw them before making the sauce.

How do I keep granola crunchy?

✅ Add granola just before serving for the best crunch.

Can I make it healthier?

✅ Use unsweetened yogurt and skip extra honey.

Cheesy Green Onion Patties 🧀🌿

🥔 Cheesy Green Onion Patties 🧀🌿

🛒 Ingredients

  • 3 medium potatoes 🥔
  • 1 cup mozzarella cheese 🧀
  • 2 tbsp cornflour
  • 2 green onions, chopped 🌿
  • Salt & black pepper
  • 2 tbsp oil for frying

👩‍🍳 Step-by-Step Recipe

🥔 Step 1: Boil the Potatoes

➡️ Peel and cut the potatoes into chunks.

➡️ Boil in salted water for about 15 minutes until soft.

➡️ Drain all the water completely.

➡️ Mash the potatoes until smooth with no lumps.


🧀 Step 2: Make the Mixture

➡️ Add mozzarella cheese to the mashed potatoes.

➡️ Add cornflour, chopped green onions, salt, and black pepper.

➡️ Mix everything well until a soft dough forms.

💡 If the mixture feels sticky, add a little more cornflour.


✋ Step 3: Shape the Sticks

➡️ Take small portions of the mixture.

➡️ Roll and shape them into thick finger-sized sticks.

➡️ Place them on a plate.


🔥 Step 4: Cook Until Golden

➡️ Heat a little oil in a non-stick pan.

➡️ Place the potato sticks gently in the pan.

➡️ Cook on medium heat for 3–4 minutes on each side.

➡️ Turn carefully until all sides become crispy and golden brown. 😍


🍽️ Step 5: Serve

➡️ Serve hot with ketchup, garlic sauce, or spicy mayo.

➡️ Enjoy the crispy outside and cheesy soft inside! 🧀✨


❓Quick Q&A

❓Can I bake them instead?

➡️ Yes! Bake at 200°C (400°F) for 20–25 minutes.

❓Can I use cheddar cheese?

➡️ Absolutely, cheddar gives a richer flavor.

❓How do I store leftovers?

➡️ Keep in the fridge for up to 2 days and reheat in a pan.

Decadent Chocolate Layer Cake

Decadent Chocolate Layer Cake

🛒 Ingredients

For the Cake

  • 2 eggs 🥚
  • 1 cup sugar
  • 1/2 cup oil
  • 1 cup milk 🥛
  • 1 1/2 cups all-purpose flour
  • 1/3 cup cocoa powder 🍫
  • 1 tsp baking powder

For the Cream Layer

  • 1 cup whipped cream
  • 2 tbsp cocoa powder
  • 2 tbsp powdered sugar

For the Ganache

  • 1/2 cup chocolate chips 🍫
  • 1/4 cup warm milk

👩‍🍳 Detailed Step-by-Step Recipe

🍰 Step 1: Make the Chocolate Cake Batter

➡️ In a large bowl, crack the eggs and add sugar.
➡️ Beat for 2–3 minutes until light and slightly fluffy.

➡️ Add oil and milk. Mix well.

➡️ Add flour, cocoa powder, and baking powder.
➡️ Gently mix until smooth and lump-free.

💡 Do not overmix or the cake can become dense.


🔥 Step 2: Bake the Cake

➡️ Grease a square baking tray or line it with baking paper.

➡️ Pour the batter evenly into the tray.

➡️ Bake at 180°C (350°F) for about 25–30 minutes.

➡️ Insert a toothpick in the center. If it comes out clean, the cake is ready.

➡️ Let the cake cool completely. ❄️


🍫 Step 3: Prepare the Chocolate Cream

➡️ In a bowl, add whipped cream, cocoa powder, and powdered sugar.

➡️ Beat until thick and creamy.

➡️ Place in the fridge for 10 minutes for a firmer texture.


✂️ Step 4: Assemble the Layers

➡️ Slice the cake carefully into 2 thin layers.

➡️ Spread the chocolate cream evenly over the bottom layer.

➡️ Place the second cake layer on top gently.


🍮 Step 5: Make the Ganache

➡️ Add chocolate chips to a bowl.

➡️ Pour warm milk over them.

➡️ Stir slowly until smooth and glossy. ✨


🍫 Step 6: Final Touch

➡️ Pour the ganache over the cake.

➡️ Spread evenly with a spoon or spatula.

➡️ Chill for 20–30 minutes before slicing.

➡️ Cut into squares and enjoy! 😍


❓Quick Q&A

❓Can I use dark chocolate?

➡️ Yes! It gives a richer chocolate flavor.

❓How should I store it?

➡️ Keep in the fridge for up to 4 days.

❓Can I freeze it?

➡️ Yes, freeze slices in an airtight container for up to 1 month.

Baked Blueberry Cottage Cheese Breakfast Bowls

Baked Blueberry Cottage Cheese Breakfast Bowls 🫐🥣

These creamy blueberry breakfast bowls are soft, lightly sweet, and packed with juicy blueberries in every bite. Perfect for cozy mornings, meal prep, or a healthy dessert!

Ingredients 🥄

  • 1 cup cottage cheese
  • 2 eggs
  • 2 tbsp honey or maple syrup
  • 1 tsp vanilla extract
  • 1 cup blueberries
  • ½ cup oats or granola

Step-by-Step Instructions 👩‍🍳

🫐 Step 1: Prepare the Blueberries

  • Wash the blueberries gently under cool water.
  • Pat them dry with a paper towel.

👉 Keep a few extra blueberries for topping later.


🥣 Step 2: Make the Creamy Mixture

  • In a mixing bowl, add:
    • cottage cheese
    • eggs
    • honey
    • vanilla
  • Whisk everything together until creamy and smooth.

✨ The mixture should look thick and creamy.


🌾 Step 3: Add the Oats

  • Stir the oats or granola into the mixture.
  • Mix gently so everything combines evenly.

👉 This gives the bowls a soft baked texture.


🍇 Step 4: Fold in Blueberries

  • Add most of the blueberries into the bowl.
  • Carefully fold them into the batter so they don’t burst too much.

🧈 Step 5: Prepare Baking Dish

  • Lightly grease small ramekins or one baking dish.
  • Pour the mixture evenly into the dishes.
  • Sprinkle extra blueberries on top.

🔥 Step 6: Bake

  • Bake at 175°C (350°F) for about 25–30 minutes.

✅ The top should look lightly golden and the center should be set.


❄️ Step 7: Cool & Serve

  • Let the bowls cool for 5 minutes.
  • Add extra granola or honey on top if desired.

✨ Serve warm for the best cozy flavor.


Quick Q&A ❓

Can I use frozen blueberries?

Yes 👍 No need to thaw them first.

Is this good for meal prep?

Absolutely 😊 Store in the fridge for up to 3 days.

Can I make it sweeter?

Yes 🍯 Add a little extra honey or maple syrup.

Easy Lemon Cake 🍋🍰

Easy Lemon Cake 🍋🍰

Soft, fluffy, and full of fresh lemon flavor, this easy lemon cake is perfect for tea time, breakfast, or dessert. Even beginners can make it perfectly on the first try!

Ingredients 🥄

  • 4 eggs
  • 1 cup sugar
  • Juice & zest of 1 lemon
  • 1 cup vegetable oil
  • 4/5 cup milk
  • 4 tsp baking powder
  • 2½ cups all-purpose flour

Step-by-Step Instructions 👩‍🍳

🥚 Step 1: Beat the Eggs & Sugar

  • Crack the eggs into a large mixing bowl.
  • Add the sugar.
  • Beat with a whisk or mixer for 3–4 minutes until light, pale, and slightly fluffy.

👉 This helps make the cake soft and airy.


🍋 Step 2: Add Lemon Flavor

  • Grate the lemon zest carefully.
  • Squeeze the lemon juice.
  • Add both to the egg mixture.

✨ The zest gives the cake a strong fresh lemon aroma.


🥛 Step 3: Add Wet Ingredients

  • Pour in the vegetable oil and milk.
  • Mix slowly until smooth and fully combined.

👉 Do not overmix.


🌾 Step 4: Add Dry Ingredients

  • In another bowl, combine:
    • flour
    • baking powder
  • Gradually add the dry ingredients into the wet mixture.
  • Stir gently until the batter becomes smooth with no dry flour left.

✨ The batter should be thick but pourable.


🧈 Step 5: Prepare the Pan

  • Grease a loaf pan with oil or butter.
  • Lightly dust with flour to prevent sticking.

🔥 Step 6: Bake the Cake

  • Pour the batter into the prepared pan.
  • Bake at 170°C (340°F) for about 40–45 minutes.

✅ The cake is ready when:

  • the top is golden
  • a toothpick inserted in the center comes out clean

❄️ Step 7: Cool & Serve

  • Let the cake cool for 10 minutes before removing from the pan.
  • Slice and enjoy with tea or coffee ☕🍋

Quick Q&A ❓

Can I use butter instead of oil?

Yes 👍 Melted butter works well too.

How do I make it extra lemony?

Add a little extra lemon zest on top after baking.

Can beginners make this?

Absolutely 😊 This is one of the easiest homemade cakes.

Matthew McConaughey’s Viral Tuna Salad

Matthew McConaughey’s Viral Tuna Salad

🛒 Ingredients

  • 2 cans tuna, drained
  • ½ cup mayonnaise
  • ½ cup frozen peas
  • ½ cup cheddar cheese cubes
  • 2 tbsp red onion, chopped
  • 1 tbsp pickle relish
  • 1 tsp mustard
  • Salt & black pepper
  • Crackers for serving

👩‍🍳 Detailed Step-by-Step Recipe

🐟 1. Prepare the Tuna

➡️ Open the tuna cans and drain all the liquid well.
➡️ Add the tuna to a large mixing bowl.

💡 Break the tuna apart gently with a fork so it becomes flaky.


🧀 2. Add the Mix-Ins

➡️ Add:

  • Frozen peas
  • Cheddar cheese cubes
  • Chopped red onion
  • Pickle relish

➡️ Stir lightly so everything spreads evenly.


🥣 3. Make It Creamy

➡️ Add mayonnaise and mustard to the bowl.
➡️ Sprinkle a little salt and black pepper.

➡️ Mix slowly until the salad becomes creamy and fully combined.

💡 Don’t overmix — keeping some texture makes it extra delicious.


❄️ 4. Chill the Salad

➡️ Cover the bowl and refrigerate for at least 20 minutes.

➡️ This helps the flavors blend together beautifully.


🍽️ 5. Serve

➡️ Scoop onto crackers, toast, sandwiches, or lettuce cups.
➡️ Serve cold and enjoy!


💡 Tips

✅ Add chopped celery for extra crunch.
✅ A squeeze of lemon makes it brighter and fresher.
✅ Best served chilled.


❓Q&A

Q: Can I make it ahead of time?

➡️ Yes! It tastes even better after a few hours in the fridge.

Q: Can I use canned chicken instead?

➡️ Absolutely — the recipe works great with chicken too.

Q: How long does it last?

➡️ Store in the fridge for up to 3 days in an airtight container.

Cheesy Zucchini Egg Muffins

Cheesy Zucchini Egg Muffins

🛒 Ingredients

  • 2 small zucchinis, grated
  • 4 eggs
  • 1 cup shredded mozzarella cheese
  • 2 green onions, chopped
  • Salt & black pepper
  • 1 tbsp olive oil or butter

👩‍🍳 Detailed Step-by-Step Recipe

🔪 1. Prepare the Zucchini

➡️ Wash the zucchinis well.
➡️ Grate them using a box grater.

➡️ Place the grated zucchini in a clean towel or paper towel.
➡️ Squeeze out as much water as possible.

💡 This step is important so the muffins stay firm and not watery.


🥚 2. Make the Egg Mixture

➡️ Crack the eggs into a large bowl.
➡️ Add salt and black pepper.
➡️ Whisk until smooth.

➡️ Add:

  • Grated zucchini
  • Mozzarella cheese
  • Chopped green onions

➡️ Mix everything together well.


🧁 3. Prepare the Muffin Tray

➡️ Preheat oven to 375°F (190°C).
➡️ Grease a muffin tray lightly with olive oil or butter.

➡️ Spoon the mixture evenly into each muffin cup.

💡 Fill each cup almost to the top.


🔥 4. Bake

➡️ Bake for 20–25 minutes until:
✅ Golden on top
✅ Firm in the center
✅ Cheese becomes bubbly and slightly crispy

➡️ Let them cool for 5 minutes before removing from the tray.


🍽️ 5. Serve

➡️ Serve warm for breakfast, snacks, or meal prep.


💡 Tips

✅ Add cooked chicken or turkey for extra protein.
✅ Use cheddar cheese for a stronger flavor.
✅ Store leftovers in the fridge and reheat easily.


❓Q&A

Q: Can I freeze these muffins?

➡️ Yes! Freeze in an airtight container for up to 2 months.

Q: Why squeeze the zucchini?

➡️ Removing water helps the muffins bake properly and stay fluffy.

Q: Can I make them without cheese?

➡️ Yes, but the texture will be less creamy.

Easy Crunchy Chickpea Cucumber Salad

🥗 Easy Crunchy Chickpea Cucumber Salad

🛒 Ingredients

  • 2 cucumbers 🥒
  • 1 cup chickpeas
  • 1 carrot 🥕
  • 2 tbsp olive oil
  • 1 tbsp lemon juice 🍋
  • Salt & black pepper
  • Sesame seeds & parsley (optional)

👩‍🍳 Detailed Step-by-Step Instructions

🔪 1. Slice the Vegetables

  • Wash the cucumbers well under cold water.
  • Cut them into thin round slices.
  • Peel the carrot and shred it using a grater.

👉 Thin slices help the salad absorb more dressing and taste better.


🥣 2. Prepare the Chickpeas

  • Open the canned chickpeas and drain the water.
  • Rinse them under cold water for 30 seconds.
  • Let them sit for a minute so extra water drains away.

👉 Dry chickpeas keep the salad crunchy instead of watery.


🍋 3. Make the Dressing

  • In a small bowl, add:
    • Olive oil
    • Lemon juice
    • Salt
    • Black pepper
  • Mix well with a spoon until combined.

👉 Taste the dressing before adding it. Add more lemon if you like tangy flavor.


🥗 4. Combine Everything

  • Add cucumbers, chickpeas, and carrots into a large bowl.
  • Pour the dressing slowly over the salad.
  • Toss gently using two spoons until everything is coated evenly.

👉 Mix gently so cucumbers stay fresh and crisp.


✨ 5. Final Touch

  • Sprinkle sesame seeds and chopped parsley on top.
  • Let the salad rest for 5–10 minutes before serving.

👉 This resting time helps the flavors blend beautifully.


❓Q/A

❓Can I store this salad?

✅ Yes, keep it in the fridge for up to 2 days.

❓Can I make it spicy?

✅ Yes! Add chili flakes or black pepper for extra heat 🌶️


🌟 Tips

  • Use cold cucumbers for the freshest taste.
  • Fresh lemon juice tastes much better than bottled juice.
  • Serve chilled for the best flavor ☀️

Spicy Mediterranean Glazed Fish Platter

Spicy Mediterranean Glazed Fish Platter

This colorful Mediterranean fish platter is packed with bold flavors, fresh vegetables, creamy cheese, and a spicy garlic sauce 🌶️🐟✨
Perfect for lunch, dinner, or party platters!

🛒 Ingredients

For the Fish

  • 4 fish fillets (cod, tilapia, or white fish)
  • 2 tbsp olive oil
  • 2 garlic cloves (minced)
  • 1 tsp paprika
  • ½ tsp chili flakes
  • Salt & black pepper

For the Platter

  • Cherry tomatoes
  • Sliced cucumbers
  • Kalamata olives
  • Feta cheese
  • Pita bread
  • Fresh parsley or dill

Sauce

  • 2 tbsp olive oil
  • 1 tbsp lemon juice
  • 1 tsp chili flakes
  • 1 garlic clove

👩‍🍳 Instructions

🐟 Step 1: Season the Fish

  • Pat fish dry with paper towel.
  • Rub with olive oil, garlic, paprika, chili flakes, salt, and pepper.

🔥 Step 2: Cook the Fish

  • Heat a pan over medium heat.
  • Cook fish for 3–4 minutes per side until golden and flaky.
  • Brush with extra spicy sauce while cooking for glossy flavor 😍

🥗 Step 3: Prepare the Sides

  • Slice cucumbers and tomatoes.
  • Arrange olives, feta cheese, and pita bread on a large platter.

✨ Step 4: Make the Sauce

  • Mix olive oil, lemon juice, garlic, and chili flakes in a bowl.

🌿 Step 5: Assemble

  • Place cooked fish onto the platter.
  • Drizzle sauce over the fish.
  • Garnish with parsley or dill.

💡 Tips

  • Use fresh white fish for best flavor.
  • Add hummus or tzatziki on the side.
  • Warm pita bread before serving.

🌟 Nutritional Benefits

  • High in protein 💪
  • Rich in omega-3 nutrients 🐟
  • Fresh vegetables provide fiber and vitamins 🥒🍅

❓Q/A

❓Can I bake the fish instead?

✅ Yes! Bake at 200°C (400°F) for 12–15 minutes.

❓What fish works best?

✅ Cod, tilapia, halibut, or salmon all work great.

❓Can I make it less spicy?

✅ Absolutely! Reduce the chili flakes.

Creamy Pistachio Protein Gelato

Creamy Pistachio Protein Gelato

This creamy pistachio gelato is rich, nutty, high in protein, and incredibly refreshing 💚✨
Perfect for a healthy dessert without feeling heavy!

🛒 Ingredients

  • 2 cups Greek yogurt
  • 1 scoop vanilla protein powder
  • ½ cup pistachios (chopped)
  • 2 tbsp honey or maple syrup
  • ½ tsp vanilla extract
  • ¼ cup almond milk
  • Optional: chopped almonds for topping

👩‍🍳 Instructions

🥣 Step 1: Blend the Base

  • In a blender add:
    • Greek yogurt
    • Protein powder
    • Honey
    • Vanilla
    • Almond milk
  • Blend until smooth and creamy.

💚 Step 2: Add Pistachios

  • Stir in chopped pistachios gently.
  • Save a few for topping later.

❄️ Step 3: Freeze

  • Pour mixture into a freezer-safe container.
  • Freeze for 3–4 hours.
  • Stir once every hour for a smoother texture.

🍨 Step 4: Scoop & Serve

  • Let gelato sit for 5 minutes before scooping.
  • Top with extra pistachios and almonds 😍

💡 Tips

  • Use roasted pistachios for deeper flavor.
  • Add a few drops of pistachio extract for stronger taste.
  • Freeze overnight for firmer gelato texture.

🌟 Nutritional Benefits

  • High in protein 💪
  • Rich in healthy fats 🌰
  • Great energy-boosting dessert
  • Lower sugar than regular ice cream

❓Q/A

❓Can I make it dairy-free?

✅ Yes! Use dairy-free yogurt and plant protein powder.

❓How long does it last?

✅ Store in freezer for up to 1 week.

❓Can I use another nut?

✅ Yes! Almonds or cashews work well too.