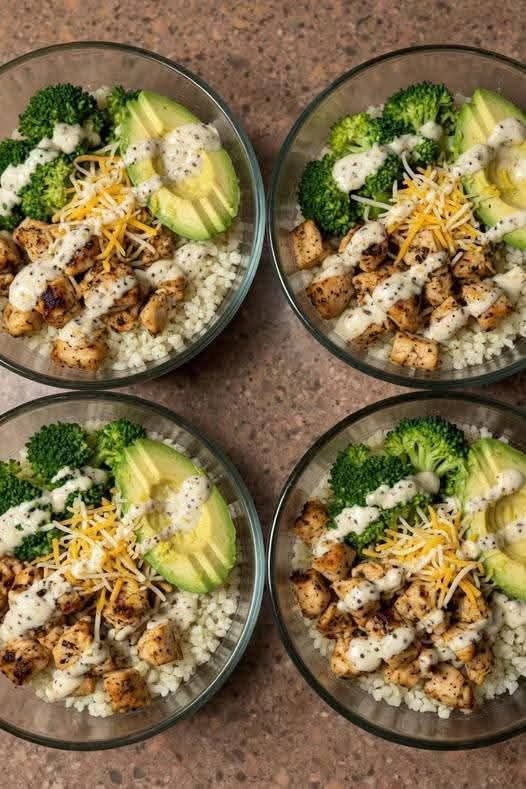
Berry Cacao Smoothie Recipe

Ingredients

  • Frozen Base: 1 ½ cups frozen mixed berries (blueberries, blackberries, and strawberries).

  • Creaminess: 1 frozen banana (peeled and sliced before freezing) or ½ an avocado for a lower-sugar option.

  • Liquid: ½ to 1 cup unsweetened almond milk or coconut water (add slowly to keep it thick).

  • Flavor & Protein: 1 tablespoon raw cacao powder and 1 scoop of your favorite chocolate or vanilla protein powder (optional).

  • Sweetener: 1 teaspoon maple syrup or 1 pitted date (optional, depending on the sweetness of your fruit).

Toppings (as seen in the image)

  • A handful of fresh or frozen blueberries.

  • Sliced strawberries.

  • A sprinkle of cacao powder or shaved dark chocolate.

  • A spoonful of chocolate granola or cacao nibs for crunch.


Instructions

  1. Layer the Blender: Place your liquid in first, followed by the cacao powder and protein powder. This prevents the powder from sticking to the lid.

  2. Add Frozen Fruit: Add the frozen berries and frozen banana/avocado on top.

  3. Blend: Start on a low speed and gradually increase. If you want that thick, “soft-serve” consistency shown in the jar, use a tamper to push the frozen fruit down into the blades or stop and stir frequently.

  4. Adjust: If it’s too thick to blend, add liquid one tablespoon at a time.

  5. Assemble: Pour into a glass or mason jar. Top with the extra berries and cacao shavings to match the photo!


Pro Tip: For the best texture, use fruit that is completely frozen. This gives it that “diamond” textured look in the jar rather than a runny juice consistency.

Rainbow Garden Vegetable Soup

Rainbow Garden Vegetable Soup

Prep time: 15 mins | Cook time: 30 mins | Servings: 6–8

Ingredients

Category Ingredients
The Base 1 tbsp Olive Oil, 1 medium Onion (diced), 2 cloves Garlic (minced)
The Colors 2 large Carrots (diced), 2 stalks Celery (sliced), 1 cup Broccoli florets
The Hearty Bits 1 large Potato (cubed), 1 cup Green Cabbage (shredded)
The Liquid 6–8 cups Low-sodium Vegetable Broth or Filtered Water
The Seasoning 1 tsp Sea Salt, ½ tsp Black Pepper, 1 tsp Dried Oregano
The Fresh Finish ¼ cup Fresh Parsley (chopped), a squeeze of fresh Lemon juice

Step-by-Step Instructions

  1. Sauté the Foundation:

    In a large pot, heat the olive oil over medium heat. Add the onion and celery. Sauté for about 5 minutes until the onions are soft and translucent. Stir in the minced garlic and cook for 1 minute more until fragrant.

  2. Add Hearty Vegetables:

    Add the diced carrots and cubed potatoes to the pot. Stir them into the aromatics for 2–3 minutes. This light “toasting” helps the vegetables hold their shape and stay firm during the simmering process.

  3. Simmer the Broth:

    Pour in the vegetable broth or water. Add the salt, pepper, and dried herbs. Bring the mixture to a gentle boil, then reduce the heat to low. Cover and simmer for 15 minutes, or until the potatoes are just beginning to soften.

  4. Add the Delicate Greens:

    Stir in the shredded cabbage and the small broccoli florets. These cook quickly and stay vibrant if added toward the end. Simmer for an additional 5–7 minutes until the broccoli is tender but still bright green.

  5. Adjust and Brighten:

    Taste the broth and add a little more salt or pepper if needed. Stir in the fresh parsley and a squeeze of fresh lemon juice just before turning off the heat. This adds a “pop” of brightness that balances the savory broth.

  6. Serve:

    Ladle the soup into bowls, ensuring a good mix of all the colorful vegetables in every serving.


💡 Pro-Tips for Your Page

  • Uniformity: Cutting the vegetables into similar small sizes ensures that every spoonful has a bit of everything and cooks evenly.

  • Make it a Meal: For extra protein, you can add a can of rinsed cannellini beans or chickpeas during step 3.

  • Storage: This soup keeps beautifully in the fridge for up to 4 days, and the flavors often deepen by the second day!

Refreshing Strawberry Coconut Smoothie

Refreshing Strawberry Coconut Smoothie

Ingredients

Item Quantity
Frozen Strawberries 1.5 cups
Coconut Milk (canned or carton) 1 cup
Banana (fresh or frozen) 1 medium
Honey or Maple Syrup 1-2 tsp (optional)
Shredded Coconut For garnish

Instructions

  1. Prep the Fruit: If you’re using a fresh banana, peel it and break it into chunks. Using a frozen banana will make the smoothie extra thick and creamy.

  2. Combine: Add the strawberries, banana, and coconut milk into your blender.

  3. Sweeten: Taste a small amount of the mixture. If your strawberries are a bit tart, add your choice of honey or maple syrup.

  4. Blend: Start on a low speed and gradually increase to high. Blend until the texture is completely smooth and there are no large fruit chunks left.

  5. Serve: Pour the smoothie into glasses.

  6. Garnish: Sprinkle a generous amount of shredded coconut on top, just like in your photo!


Pro Tips for the Best Texture

  • For a “Milkshake” Feel: Use full-fat canned coconut milk. It contains more natural healthy fats which create a velvety mouthfeel.

  • For a Lighter Version: Use coconut water or refrigerated coconut milk (the kind found in cartons).

  • Stay Cold: Use at least one frozen fruit component so you don’t have to add ice, which can sometimes water down the flavor.

Homemade Cheddar Quick Bread

Homemade Cheddar Quick Bread

Prep time: 10 mins | Bake time: 45 mins | Yields: 1 Loaf

Ingredients

The Dry Base:

  • 2 cups All-purpose flour

  • 1 tbsp Baking powder

  • ½ tsp Salt

  • 1 tsp Garlic powder (optional, but highly recommended)

  • 1 ½ cups Shredded sharp cheddar cheese (plus extra for the top)

The Wet Mix:

  • 1 cup Milk

  • 1 Large egg

  • ¼ cup Unsalted butter (melted)

  • 1 tbsp Honey or sugar

Optional Topping:

  • ¼ cup Extra shredded cheddar

  • 1 tbsp Fresh chopped parsley


Instructions

  1. Prep: Preheat your oven to 175°C (350°F). Grease a 9×5 inch loaf pan thoroughly with butter or non-stick spray.

  2. The Flour/Cheese Toss: In a large bowl, whisk together the flour, baking powder, salt, and garlic powder. Stir in the 1 ½ cups of shredded cheese.

    • Pro-Tip: Coating the cheese in the flour prevents the shreds from sinking to the bottom of the pan during baking.

  3. Wet Ingredients: In a separate medium bowl, whisk together the milk, egg, melted butter, and honey until smooth.

  4. Combine: Pour the wet mixture into the dry ingredients. Stir gently using a spatula until just combined.

    • Note: The batter will be thick and lumpy. Do not overmix, or the bread will become tough!

  5. Bake: Spread the batter evenly into the prepared loaf pan. Sprinkle the extra ¼ cup of cheese and the parsley over the top.

  6. Check for Doneness: Bake for 40–45 minutes. The bread is ready when the top is a deep golden brown and a toothpick inserted into the center comes out clean.

  7. Cool: Let the bread rest in the pan for 10 minutes before transferring it to a wire rack to cool completely.


✨ Customization Ideas

This bread is incredibly versatile. To make it a more substantial meal, try folding in:

  • Spicy Kick: ½ cup of diced jalapeños.

  • Savory Crunch: ¼ cup of cooked, crumbled bacon bits.

  • Herb Twist: Swapping parsley for fresh chives or rosemary.

Creamy Almond & Stone Fruit Porridge

Creamy Almond & Stone Fruit Porridge

Prep time: 5 mins | Cook time: 10 mins | Servings: 1

Ingredients

The Base:

  • 1/2 cup Rolled oats (or steel-cut for more texture)

  • 1 cup Almond milk (or your preferred milk)

  • 1/2 tsp Vanilla extract

  • A pinch of Sea salt

The Toppings:

  • 2 Fresh apricots, halved and pitted

  • 3-4 Fresh cherries

  • 1 tbsp Creamy almond butter

  • A handful of whole and sliced almonds

  • 1 tsp Hemp seeds or amaranth grain (for that fine crunch seen in the photo)

  • Optional: A drizzle of maple syrup or honey


Instructions

  1. Cook the Oats: In a small saucepan, combine the oats, milk, vanilla, and salt. Bring to a gentle simmer over medium heat.

  2. Thicken: Stir frequently for about 5–8 minutes until the oats have absorbed the liquid and become creamy. If it gets too thick, add a splash more milk.

  3. Prepare the Fruit: While the oats cook, slice your apricots in half and remove the pits. Wash the cherries, leaving the stems on for that aesthetic “café” look.

  4. Assemble: Pour the hot porridge into a wide bowl.

  5. Layer the Flavors: * Place the apricot halves on one side.

    • Nestle the cherries in the center.

    • Scatter the whole and sliced almonds generously across the other side.

    • Drizzle the almond butter in a circular motion over the fruit and oats.

    • Finish with a sprinkle of hemp seeds or grains for texture.


Pro Tip

For extra flavor, you can lightly toast the almonds in a dry pan for 2 minutes before adding them to the bowl. It brings out a smoky, nutty aroma that pairs beautifully with the fresh apricots.

Fruit & Yogurt Power Bowl

Fruit & Yogurt Power Bowl

Prep time: 10 minutes

Servings: 1

Ingredients

  • Base: 1 cup Greek yogurt (plain or vanilla works best for the white background).

  • Green Section: ½ Granny Smith apple or green melon (honeydew), cubed.

  • Orange Section: ½ cup Cantaloupe or papaya, cubed.

  • Crunch: 3 tbsp Honey-toasted granola or rolled oats.

  • Blue Section: ½ cup Fresh blueberries.


Preparation Steps

  1. The Base: Spoon the yogurt into a shallow wide bowl. Use the back of the spoon to smooth the surface until it is perfectly flat and level.

  2. The “Blue” Side: Carefully pile the blueberries on the right third of the bowl. Keep them in a tight, rounded cluster.

  3. The “Crunch” Divider: Sprinkle a vertical line of granola down the center. This acts as a “buffer” between the wet fruit and the berries.

  4. The Warm Colors: On the left side, place the orange fruit (cantaloupe) in the middle column.

  5. The Cool Colors: Finish by placing the green fruit (apple or melon) on the far left edge.

  6. The Finishing Touch: If you want a bit more sweetness, drizzle a thin line of honey or agave nectar specifically over the granola line.


Tips for the Perfect Look

  • Uniformity: Try to cut your cantaloupe and green fruit into cubes of roughly the same size (about 1.5 cm).

  • Dry the Fruit: After washing the blueberries, pat them completely dry. This prevents blue juice from “bleeding” into the white yogurt.

  • Yogurt Choice: A thicker yogurt, like Icelandic skyr or Greek yogurt, holds the weight of the fruit better so they don’t sink.

Tropical Pineapple Coconut Smoothie

Tropical Pineapple Coconut Smoothie

Prep time: 5 minutes | Servings: 1-2

Ingredients

  • Frozen Pineapple: 2 cups (using frozen chunks makes it extra thick and frosty).

  • Coconut Milk: 1 cup (canned full-fat coconut milk gives the creamiest texture, but carton coconut milk works for a lighter version).

  • Banana: 1 ripe banana (adds natural sweetness and a smooth base).

  • Honey or Maple Syrup: 1-2 teaspoons (optional, depending on how sweet your fruit is).

  • Shredded Coconut: For the rim and garnish.

  • Ice: A handful (only if using fresh pineapple instead of frozen).


Instructions

  1. Prep the Glass: Dip the rim of your glass into a bit of honey or water, then press it into a small plate of shredded coconut to create that snowy rim seen in the photo.

  2. Blend: Add the pineapple, coconut milk, banana, and sweetener into a high-speed blender.

  3. Process: Blend on high until the mixture is completely smooth and creamy. If it’s too thick, add a splash more coconut milk.

  4. Serve: Pour into your prepared glass.

  5. Garnish: Top with a small piece of fresh pineapple and a sprinkle of shredded coconut. Add two fun straws to complete the look!


Pro-Tips for the Best Texture

  • Creaminess: For an even richer “milkshake” feel, you can add 1/4 cup of Greek yogurt.

  • Brightness: A small squeeze of fresh lime juice can help balance the sweetness and bring out the tropical flavors.

  • Pineapple Core: If you are using a whole fresh pineapple, don’t throw away the core! It contains bromelain and blends up easily in a powerful blender.

Flourless High-Protein Flatbreads

Flourless High-Protein Flatbreads

Ingredients

  • 1 cup Low-fat or fat-free cottage cheese (ensure it is well-drained)

  • 2 large Eggs

  • ½ cup Egg whites (liquid or from about 3–4 eggs)

  • ¼ teaspoon Salt

  • Optional: Garlic powder, onion powder, or dried herbs (rosemary or thyme) for extra flavor.

Instructions

  1. Blend the Base: In a high-speed blender or food processor, combine the cottage cheese, whole eggs, egg whites, and salt. Blend until the mixture is completely smooth and liquid, with no visible curds.

  2. Preheat the Pan: Heat a non-stick skillet or griddle over medium heat. Lightly coat with a quick spray of olive oil or avocado oil.

  3. Cook the Flatbreads: Pour about ¼ to ⅓ cup of the batter onto the hot pan, tilting the pan slightly to spread it into a thin, even circle (similar to a crepe).

  4. Flip with Care: Let it cook for about 3–4 minutes until the edges start to lift and the bottom is golden brown. Gently slide a spatula underneath and flip. Cook for another 2 minutes on the other side.

  5. Cool and Stack: Remove from the pan and place on a wire rack or plate. Repeat with the remaining batter. As they cool slightly, they will become more flexible and “bready.”


💡 Chef’s Tips for the Best Texture

  • The “Dry” Secret: To get that perfect flaky look shown in the photo, you can lightly brush the cooked flatbread with a tiny amount of ghee or butter while it’s still warm.

  • Storage: These stay fresh in the fridge for up to 4 days. You can reheat them quickly in a dry pan to bring back the slightly crisp exterior.

  • Savory Wraps: Use these as a base for a high-protein wrap—fill them with grilled chicken, avocado, and fresh greens.

⚠️ A Quick Note on Nutrition

While these are incredibly low in carbohydrates and high in protein, no food technically “eats sugar” or physically “dries out” the body on its own. They are, however, an excellent choice for maintaining a balanced, sugar-free lifestyle and staying full for longer.

Sponge cupcakes recipe

Sponge cupcakes recipe

🧁 Ingredients (for 12 cupcakes)
1 cup (125g) all-purpose flour
1/2 cup (100g) sugar
1/2 cup (113g) butter (softened)
2 large eggs
1/4 cup (60ml) milk
1 tsp vanilla extract
1 tsp baking powder
1/4 tsp salt

🍰 Instructions
Preheat oven to 180°C (350°F) and line a cupcake tray with paper liners.
Cream butter & sugar
Beat the butter and sugar together until light, pale, and fluffy.
Add eggs
Add eggs one at a time, mixing well after each addition.
Add vanilla
Stir in the vanilla extract.
Mix dry ingredients
In another bowl, combine flour, baking powder, and salt.
Combine everything
Gradually add the dry ingredients to the batter, alternating with milk. Mix gently—don’t overmix.
Fill cups
Spoon batter into liners, filling about 2/3 full.
Bake
Bake for 18–22 minutes or until a toothpick inserted comes out clean.
Cool
Let cupcakes cool before frosting or serving.

Anti-Inflammatory Orange Turmeric Juice

Anti-Inflammatory Orange Turmeric Juice

Ingredients

2 Large Oranges: Peeled and seeds removed.


1 tbsp Turmeric Powder: The star anti-inflammatory ingredient.


1-inch Ginger Root: Peeled (fresh ginger adds a nice zing).


1/4 tsp Black Pepper: Essential for turmeric absorption.


1 tbsp Honey: To balance the earthiness with a touch of sweetness.


Optional: 1/2 cup of water or coconut water if you prefer a thinner consistency.


Instructions

Prep the Produce: Peel the oranges and the ginger root. If you are using a blender rather than a juicer, roughly chop the ginger into smaller pieces to ensure it blends smoothly.


Combine: Place the oranges, ginger, turmeric powder, black pepper, and honey into a high-speed blender.


Blend: Process on high until the mixture is completely smooth. If it feels too thick, add a small splash of water and blend again.


Strain (Optional): If you prefer a clear juice rather than a “smoothie” style, pour the mixture through a fine-mesh strainer or nut milk bag into a glass.


Serve: Pour over ice and enjoy immediately for the freshest flavor.


Pro-Tip

Turmeric can stain countertops and plastic blender jars easily. It’s a good idea to rinse your equipment with warm, soapy water immediately after making this!

The 6-Seed Wellness Blend

The 6-Seed Wellness Blend

This combination is designed to be a “nutrient powerhouse” that you can easily add to meals.

The Ingredients

1. Flaxseeds (3 tbsp): Rich in alpha-linolenic acid (Omega-3) and lignans, which support heart health and cellular function.

2. Chia Seeds (2 tbsp): Packed with soluble fiber to help maintain healthy digestion and steady energy levels.

3. Pumpkin Seeds (2 tbsp): An excellent source of magnesium and zinc, which are vital for immune support.

4. Hemp Hearts (1 tbsp): A complete plant-based protein containing all nine essential amino acids.

5. Sesame Seeds (1 tbsp): High in calcium and sesamin, which support bone density and metabolic health.

6. Sunflower Seeds (1 tbsp): Rich in Vitamin E, a potent antioxidant that helps protect cells from oxidative stress.

Preparation & Use

• Grind for Absorption: Flax and sesame seeds are best consumed ground. You can pulse them in a clean coffee grinder so your body can fully absorb their nutrients.

• Storage: Store the blend in a dark, airtight glass jar in the refrigerator to keep the delicate oils from going rancid.

• Serving: Sprinkle 2 tablespoons daily onto oatmeal, yogurt, salads, or blend them into a morning smoothie.

Questions & Answers (Q/A)

Q: Can these seeds replace medical prescriptions for high blood pressure or diabetes?

A: No. These seeds are a high-quality food source that supports a healthy lifestyle, but they are not a substitute for medication or professional medical advice. Always consult with your healthcare provider before making major dietary changes if you have a pre-existing condition.

Q: Is there a “best” time of day to eat this seed mix?

A: Most people find it easiest to incorporate them into breakfast. The high fiber and protein content help you feel full longer and provide steady energy throughout the morning.

Q: Do I need to drink more water when eating these seeds?

A: Yes. Since chia and flaxseeds are very high in fiber, they absorb water in your digestive tract. Drinking an extra glass of water helps the fiber move through your system comfortably.

Q: What is the most important “rule” for buying these seeds?

A: Look for raw, unsalted versions. Roasting seeds at high temperatures can sometimes damage the healthy Omega-3 fats, and added salt can work against heart-health goals.

Healthy Roasted Pumpkin (Blood-Sugar Friendly)

Healthy Roasted Pumpkin (Blood-Sugar Friendly)

Ingredients

  • 2 cups pumpkin or winter squash (peeled and cubed into 1-inch pieces)

  • 1 tablespoon olive oil

  • ½ teaspoon cinnamon (adds natural sweetness without sugar)

  • ¼ teaspoon black pepper

  • ¼ teaspoon salt

  • Optional: Garlic powder or fresh herbs (like rosemary or thyme)

Instructions

  1. Prep: Preheat your oven to 200°C (400°F).

  2. Season: In a large bowl, toss the pumpkin cubes with the olive oil, salt, pepper, and cinnamon until evenly coated.

  3. Arrange: Spread the cubes in a single layer on a baking tray lined with parchment paper.

  4. Roast: Bake for 25–30 minutes, turning the cubes once halfway through to ensure they get golden and caramelized on all sides.

  5. Serve: Enjoy warm as a side dish.


🥗 How to Make it a Balanced Meal

To keep your blood sugar stable, the “Golden Rule” is to never eat carbohydrates alone.

  • Pair with Protein: Serve alongside grilled chicken, baked tofu, or a couple of poached eggs.

  • Add Healthy Fats: Top with a dollop of Greek yogurt or a sprinkle of toasted pumpkin seeds (pepitas) for extra crunch and fiber.

  • Legume Boost: Toss the roasted cubes into a bowl of lentils or chickpeas.

You said

where is Q/A

Gemini said

Q & A

Q: Does pumpkin cure diabetes? A: No. No food can cure diabetes.

Q: Can people with diabetes eat pumpkin? A: Yes, in moderate portions and without added sugar.

Q: Is pumpkin better than potatoes? A: Often yes, because it has more fiber and a lower glycemic impact.

Q: Can teenagers eat this safely? A: Yes, as part of a balanced diet.

Q: Why do people say it “eats sugar”? A: That is false marketing language, not science.

💡 Why This Works

Unlike boiling, roasting intensifies the flavor without adding water, and the olive oil helps your body absorb the fat-soluble Vitamin A (beta-carotene) found in the pumpkin. At only 12g of carbs per serving and a good hit of fiber, it’s a much lighter alternative to roasted potatoes.

Flat Belly Blueberry Smoothie

Flat Belly Blueberry Smoothie

Ingredients

1 cup Fresh or frozen blueberries


1/2 Banana (frozen makes it creamier!)


1/2 cup Yogurt (Greek yogurt is a great choice for extra protein)


1 tbsp Chia seeds


1 tsp Cinnamon


Optional Liquid: 1/2 cup water, almond milk, or coconut water (to help with blending)


Optional Garnish: Fresh mint leaves or a few extra blueberries


Instructions

Prep: If you are using a fresh banana, you can peel and slice it beforehand.


Combine: Add the blueberries, banana, yogurt, chia seeds, and cinnamon into your blender.


Blend: Start on a low setting and gradually increase to high. Blend until the mixture is completely smooth and the chia seeds are well-incorporated.


Adjust: If the smoothie is too thick, add a splash of your preferred liquid and pulse again.


Serve: Pour into a tall glass or mason jar. Top with fresh mint or extra berries if you’re feeling fancy!


Why These Ingredients?

Blueberries: Packed with antioxidants that help fight oxidative stress.


Chia Seeds: High in fiber and Omega-3 fatty acids, which keep you feeling full.


Cinnamon: Known for its ability to help support healthy blood sugar levels.


Yogurt: Provides probiotics that are excellent for gut health and digestion.

3-Ingredient Whipped Milk Mousse

3-Ingredient Whipped Milk Mousse

Ingredients

  • 2 cups Powdered Milk (Nido or similar full-cream milk powder works best)

  • 1 can (14 oz) Sweetened Condensed Milk (chilled for at least 2 hours)

  • 2 containers (approx. 14-16 oz total) Heavy Whipping Cream or “Media Crema” (must be very cold)

  • Optional: Cinnamon or cocoa powder for dusting the top.

Instructions

  1. Prep the Base: In a large chilled mixing bowl, combine the cold heavy cream and the cold condensed milk.

  2. Whip: Using an electric hand mixer or a stand mixer, beat the mixture on medium-high speed. As it starts to thicken, gradually add the powdered milk one cup at a time.

  3. Build Volume: Continue beating for about 3–5 minutes. You are looking for the mixture to double in volume and become thick enough to hold a soft peak (it should look like a dense, heavy whipped cream).

  4. Set: Pour the mixture into a glass dish. Smooth the top with a spatula.

  5. Chill: While it’s “ready” in 5 minutes, it tastes best if chilled in the freezer for 30 minutes or the fridge for 2 hours to get that “melt-in-your-mouth” consistency.

  6. Finish: Dust with cinnamon or extra powdered milk just before serving.


💡 Pro-Tips for Success

  • Temperature is Key: The secret to getting it thick without gelatin is having your cream and condensed milk ice cold.

  • The “Air” Factor: Don’t stop mixing until it looks fluffy. The air bubbles trapped by the milk powder are what give it that structure.

  • Flavor Twist: If you want to cut the sweetness, you can fold in some lime zest or a splash of vanilla extract at the very end.

🍋🫐 Blueberry Lemon Pudding Cakes

Prep Time: 15 mins
Cook Time: 40–45 mins
Servings: 4–6


🛒 Ingredients

🫐 The Fruit

  • 1½ cups fresh blueberries
  • Extra blueberries (for garnish)

🥣 The Batter

  • 3 large eggs (separate whites & yolks)
  • ¾ cup sugar
  • 2 tbsp unsalted butter (melted & cooled)
  • ¼ cup all-purpose flour
  • 1 tsp lemon zest
  • ¼ cup fresh lemon juice
  • 1 cup whole milk
  • ¼ tsp salt

🌿 Optional Garnish

  • Powdered sugar
  • Mint leaves

👩‍🍳 Instructions

1. 🔥 Prep Oven & Ramekins

  • Preheat oven to 175°C (350°F)
  • Lightly butter 4–6 ramekins
  • Add blueberries evenly into each

2. 🥄 Make the Batter Base

  • In a bowl, whisk egg yolks + sugar until creamy
  • Add:
    • melted butter
    • lemon juice & zest
    • flour
  • Slowly mix in milk + salt

👉 Don’t worry — batter will be thin (this is correct!)


3. ☁️ Whip Egg Whites

  • Beat egg whites until stiff peaks form
  • Gently fold into batter

⚠️ Important: Fold slowly — don’t overmix (keeps cake fluffy)


4. 💧 Water Bath (Very Important!)

  • Pour batter over blueberries
  • Place ramekins in a large tray
  • Fill tray with hot water (halfway up ramekins)

👉 This creates:

  • Soft cake on top
  • Creamy pudding underneath

5. 🍰 Bake

  • Bake for 40–45 minutes
  • Ready when:
    • top is golden
    • slightly springy to touch

6. 🍽️ Serve

  • Cool for 10 minutes
  • Serve:
    • warm (best texture) OR
    • chilled (firmer pudding)

💡 Pro Tips (Don’t Skip!)

✔️ Water bath = perfect texture
✔️ Room temp eggs whip better
✔️ Frozen blueberries? Use directly (don’t thaw)
✔️ Don’t overmix egg whites — keeps it light & airy

Peppermint Lemon Drink – Benefits

Peppermint Lemon Drink – Benefits

1. Aids Digestion

Peppermint helps relax digestive muscles, reducing bloating and gas.

2. Refreshes & Hydrates

Combined with Lemon, it keeps you cool and hydrated—great for hot weather.

3. Mild Detox Support

Lemon contains vitamin C and antioxidants that support your body’s natural detox process (but not a “deep cleanse”).

4. Boosts Energy Naturally

The fresh aroma of peppermint can help reduce fatigue and improve alertness.

5. Supports Weight Management

Low in calories and can reduce cravings when used instead of sugary drinks.

🍋 How to Prepare It (Step-by-Step)

📝 Ingredients

  • 1 cup fresh peppermint leaves
  • 1 lemon (sliced or juiced)
  • 2–3 cups cold water
  • 1 tsp honey (optional)
  • Ice cubes (optional)

👩‍🍳 Instructions

  1. Wash the peppermint leaves thoroughly.
  2. Slightly crush the leaves to release flavor.
  3. Add them to a jug of water.
  4. Add lemon slices or fresh lemon juice.
  5. Let it sit for 15–20 minutes (or refrigerate for stronger flavor).
  6. Add honey if you prefer a little sweetness.
  7. Serve chilled with ice.

⚠️ Important Notes

  • This drink is healthy but not a cure for diseases.
  • If someone has fatty liver or diabetes, proper medical care and diet are essential.
  • Avoid excess lemon if you have acidity issues.

💬 Quick Q/A

Q1: Can I drink it daily?

Yes, 1 glass daily is safe for most people.

Q2: Best time to drink?

Morning or after meals for digestion.

Q3: Can I use dried mint?

Fresh mint is better, but dried can work (use less).

Q4: Does it help in weight loss?

It supports hydration and reduces cravings, but not a magic solution.­

🥬 Slow Cooker Chicken and Cabbage

🛒 Ingredients

Main Ingredients

  • 1½ lbs (700g) chicken (breasts or thighs)
  • 1 medium green cabbage (chopped)
  • 1 onion (sliced)
  • 3 garlic cloves (minced)
  • 2 carrots (optional)
  • 1 cup chicken broth

Seasonings

  • 2 tbsp olive oil or butter
  • 1 tsp salt
  • ½ tsp black pepper
  • 1 tsp paprika
  • 1 tsp dried thyme
  • ½ tsp onion powder
  • ½ tsp garlic powder

Optional Add-ins

  • Chili flakes 🌶️ (for heat)
  • Lemon juice 🍋 (for freshness)
  • Fresh parsley 🌿 (for garnish)

👩‍🍳 Step-by-Step Instructions

1. Prepare the Base

  • Chop cabbage into chunks
  • Slice onion and carrots
  • Add cabbage, onion, garlic, and carrots to slow cooker

2. Add Liquid

  • Drizzle olive oil (or butter)
  • Pour in chicken broth

3. Season Chicken

  • Pat chicken dry
  • Rub with all spices

4. Layer It

  • Place chicken on top of cabbage

5. Cook

  • LOW: 6–7 hours
  • HIGH: 3–4 hours

✔️ Chicken should be tender and juicy
✔️ Cabbage soft and flavorful

6. Finish

  • Shred chicken slightly (optional)
  • Mix everything together
  • Add lemon juice or parsley

🍽️ Serving Ideas

https://images.openai.com/static-rsc-4/BJOo9Bg7eVsifZq8B5daB2Oc1Da4GqjACxHCkMCMkN8SlZVpDdQNty9zCnMspXTdOS22MJaQZeIUkGX0vfjoPCXvJDt0_wxCcjrKZX70ZAhuGidPbKOERSrOaWanCpDxb3RMRsdKhq4_8FaG9OYvKjtKsM2uXs1qfQ7VAh9nHbSVj00YQ_fQcfnp1j0YV7kn?purpose=fullsize
https://images.openai.com/static-rsc-4/XxD3dGZNYdZvhZGDZpe6eakhQaQ17K3qnRWS94Zlt7J_WgHTLMk_V-NH4eIHeBb6LhJk57d_9Z3woF419YuFzF4eeR0__s5-vr0hK7Z1ibQN4HbGTT9Fj3K0UpG8aJC3uapOQGvDLMr7WbofLGcGsgMPtJJtsTBhZ46EFtBxMtaqMu6W2czqREAxwSzHiecD?purpose=fullsize
https://images.openai.com/static-rsc-4/EucZaML8CySxS8FU41yA_6WzbCrLdsC1F5ILBb0tx91h7irMv1QRC3u9ofYKjvn7nSU0QkJsOYPct5wIgoKZkT1fJsqQ-eVVcrXQ70PBEiGcReXV4W2umP5Hu8HGONqkRgChPP-VBCUAoLW9J-rae64i1bMIhqGQDGlSGnA0U_s6JZLjq8-HLMO8nWd8x6LY?purpose=fullsize
https://images.openai.com/static-rsc-4/j-ECKjleJHYMY0KY4Dhc2XyfEjHfZ5EvUDHO4aXbZHF5BY85_YEhHJBctVKqXJMii2WY9RuYLXpU2_tZE_govUecE36CqLwDpN6f7evPK4ASRB5bOV9DgVuRo1_LSX45nTXsMe1JOPA_iZBEdlVrgIp46xVwIBeaj-gsGR00K4PxIIJSvCfjS_YyrQHB26y8?purpose=fullsize
https://images.openai.com/static-rsc-4/ickz546c9KYB0tz7AIrQTk7AxDqFQ_LW_nWHJ0Om6p-3JPerQfJYnEkE1n8aaIO8uF2TAXebTyjjt3_998NvYN5I2112_IosTEnlxIay3E7HVUirCCy1ZB-8DAlcFbv4L3h35KMeSXS13CkqO1SgjZvgH04pVyf9WAS434l2XPO2dsuhQnUzRewJWS1BzEt2?purpose=fullsize
https://images.openai.com/static-rsc-4/KxDWaSL8ZDnRl8LE4sTgR2iq-lWFur34GL5ldeEaq1ASEdcM-FIcYlqMFvprtfsAeRyMqx9p3k4nVO_EAzk_-W5ykbK6R6AGZ2WZl6AJG2XGd9iP5p1Ye3fOWXDIMmPPVMue6sCaznn9Or13ngoRd6ttYOCiXnVfuMMPJN43j5zViyU-xiAXFHdMzT7n1OG3?purpose=fullsize
https://images.openai.com/static-rsc-4/4zXYFDI0xgaBSoewOWHIMS_h-tmVxXztlqEEto_I5m-8ocLpgkxhBndhXLbHF0exL-nDHvhKsiZk5D9i5BQfqQwS4Tymfbu0XktpmeOjJ8stR7gSv3IX7VemqrUbog69vI9MW8TH0Rm-uJ55N_9gD4UVrzfy-b6KLqrdWntHduCt6THfAJbGD9BGS9wmPYM0?purpose=fullsize

Serve with:

  • 🥖 Fresh bread
  • 🍚 Rice or quinoa
  • 🥦 Mashed cauliflower (low carb option)
  • 🥗 Light green salad

❓ FAQ

Can I use chicken breasts?
Yes, but thighs are juicier.

Is it keto-friendly?
Yes (skip carrots).

Why is cabbage watery?
It releases natural moisture—reduce broth if needed.

Can I make it ahead?
Yes, great for meal prep.


🧊 Storage Tips

  • Fridge: Up to 4 days
  • Freezer: Up to 3 months
  • Reheat: Add a little broth if dry

🔥 Variations

  • 🧄 Garlic Butter → add butter + extra garlic
  • 🌶️ Spicy → chili flakes or cayenne
  • 🧀 Creamy → mix in cream cheese
  • 🍅 Tomato → add diced tomatoes
  • 🥓 Bacon → sprinkle crispy bacon on top

⏱️ Quick Info

  • Prep Time: 15 mins
  • Cook Time: 6 hours
  • Servings: 6

No Flour Bread in a Jar

🍯 The Core “Bread in a Jar” (The 5-Minute Method)

This version is perfect for a quick, soft, and moist individual loaf.

Ingredients

  • 3 Large eggs

  • 1 cup (240 ml) Milk (dairy or unsweetened almond/oat milk)

  • 2 tbsp Flax seeds (whole or ground for a smoother texture)

  • 2 tbsp Psyllium husk (use husk, not powder, for best results)

  • 1 tsp Baking powder (highly recommended for a lighter rise)

  • Pinch of salt

Instructions

  1. Preheat: Set your oven to 180°C (350°F).

  2. Mix Wet: In a bowl, whisk the eggs and milk until completely smooth.

  3. Combine Dry: Stir in the flax seeds, psyllium, baking powder, and salt.

  4. The “Magic” Rest: Let the batter sit for 3 minutes. The psyllium will absorb the liquid and turn it into a thick, jelly-like batter.

  5. Jar Prep: Grease a wide-mouth glass jar (like a 16 oz Mason jar) or a small ceramic ramekin with olive oil or butter.

  6. Bake: Pour the batter in (it should fill about ¾ of the jar). Bake for 25–30 minutes.

  7. Cool: Let it cool in the jar for 10 minutes before sliding a knife around the edge to pop it out.


🥜 The “Gourmet” Grain-Free Loaf (High Protein & Fiber)

If you want something heartier that feels like a dense Nordic stone-age bread, follow this variation.

Ingredients

  • The Base: 3 Eggs + 1 cup Milk

  • The Binders: 2 tbsp Psyllium + 2 tbsp Flax seeds

  • The Crunch: ½ cup (70g) Chopped almonds + 2 tbsp Pumpkin seeds + 1 tbsp Sunflower seeds

  • The Flavor: ½ tsp Garlic powder + ½ tsp Dried oregano

Instructions

  1. Toast the Seeds: For extra flavor, lightly toast the almonds and seeds in a dry pan for 3–5 minutes until fragrant before adding them.

  2. Combine: Mix everything together as in the core recipe.

  3. Rest Longer: Let this version sit for 10–15 minutes; the extra seeds need time to settle into the psyllium gel.

  4. Bake: Since this is denser, bake for 35–40 minutes at 180°C (350°F).


💡 Pro-Tips for Success

  • Avoid “Purple Bread”: Some brands of psyllium husk can turn bread a slight purple or grey color when baked. It is perfectly safe to eat, but if you want it to look “white,” look for “Blonde Psyllium Husk.”

  • Slicing: Because there is no gluten, the bread is fragile while hot. Wait until it is completely cool to get those perfect, clean slices.

  • Storage: Since this bread is very moist, it’s best kept in the fridge (up to 4 days) or sliced and frozen.

Creamy Chicken Power Wraps ( Low-Carb)

Creamy Chicken Power Wraps ( Low-Carb)

Lunch today hit all the right notes — creamy, crunchy, and full of flavor without a single carb bomb! These Creamy Chicken Power Wraps are light, fresh, and loaded with protein — perfect for meal prep or a quick bite with friends.

Ingredients:

  • 2 cups shredded chicken breast
  • ½ cup plain Greek yogurt (or light cream cheese for extra richness)
  • ¼ cup finely chopped cucumber
  • ¼ cup diced bell pepper
  • 1 tsp lemon juice
  • Dash of garlic powder, salt, and pepper
  • Butter lettuce leaves or romaine for wrapping

Directions:

Mix all the ingredients in a bowl until creamy and well combined. Spoon into lettuce leaves and roll up like mini wraps.

High-protein, low-carb, and full of freshness — you’ll want these on repeat!

Lower your high blood sugar

Lower your high blood sugar

This isn’t your average detox—this powerhouse blend supports your pancreas, calms inflammation, and boosts insulin response!

How to Make (1 Serving)

Blend together:

– 1 green apple (deseeded)

– 1 small bitter gourd (peeled, seeds removed)

– ½ cucumber

– 2 sticks celery

– Juice of ½ lemon

Strain if needed. Sip slowly on an empty stomach.

Bonus Tip:

Add a pinch of black salt + 1 tulsi leaf for enhanced blood purification & taste.

Disclaimer:

Consult your doctor if on blood sugar medication—this may enhance its effects. Avoid if pregnant or with low BP.

Just ~90 kcal—bitter, refreshing, and deeply healing for your blood sugar balance

Grilled Watermelon Steak with Warm Goat Cheese & Pomegranate Pearls

Grilled Watermelon Steak with Warm Goat Cheese & Pomegranate Pearls

Ingredients:

For the watermelon:

  • 4 thick slices of watermelon (about 1–1.5 inch thick, rind removed)
  • 2 tbsp olive oil
  • 1/2 tsp salt
  • 1/2 tsp black pepper


For the warm goat cheese:

  • 150g goat cheese
  • 2 tbsp heavy cream
  • 1 tbsp honey
  • 1/2 tsp dried thyme


For topping:

  • 1/2 cup pomegranate seeds
  • 1 tbsp balsamic glaze
  • Fresh mint leaves (optional)


Directions:

Pat the watermelon slices dry with paper towels to remove excess moisture.

Brush both sides with olive oil and season lightly with salt and black pepper.

Heat a grill pan or outdoor grill over medium-high heat. Grill the watermelon for 2–3 minutes per side until grill marks appear and the texture slightly firms.

In a small saucepan over low heat, combine goat cheese, heavy cream, honey, and thyme. Stir until warm and creamy.

Transfer the grilled watermelon steaks to a serving plate.

Spoon the warm goat cheese over the top of each slice.

Sprinkle with pomegranate seeds and drizzle with balsamic glaze.

Garnish with fresh mint if desired and serve immediately.


Nutritional Information (per serving, approximate):

Calories: 220 kcal

Protein: 6g

Carbohydrates: 20g

Fat: 14g

Saturated Fat: 7g

Sugar: 16g

Fiber: 1g

Sodium: 210mg

High-Protein Blueberry Biscuits

The Recipe: High-Protein Blueberry Biscuits

  • Prep time: 15 minutes

  • Cook time: 18–22 minutes

  • Servings: 8 Biscuits

Ingredients

  • 2 cups All-purpose flour (or white whole wheat flour)

  • 2 scoops (~60g) Unflavored or Vanilla whey protein powder

  • 1 tbsp Baking powder

  • ½ tsp Salt

  • ¼ cup Cold unsalted butter, cubed

  • 1 cup Non-fat plain Greek yogurt

  • ¼ cup Milk of choice (if dough is too dry)

  • 1 cup Fresh blueberries

  • 1 tsp Lemon zest (optional)

Instructions

  1. Preheat & Prep: Heat your oven to 200°C (400°F). Line a baking sheet with parchment paper.

  2. Mix Dry: In a large bowl, whisk together the flour, protein powder, baking powder, and salt.

  3. Cut the Butter: Add the cold cubed butter. Use a pastry cutter or your fingers to work the butter into the flour until it looks like coarse crumbs with some pea-sized chunks remaining.

  4. Fold in Berries: Gently toss the blueberries and lemon zest into the dry mix so they are coated in flour (this prevents them from sinking/bleeding).

  5. Add Wet: Stir in the Greek yogurt. Use a spatula to fold until a shaggy dough forms. If it’s too crumbly, add milk one tablespoon at a time. Do not overmix.

  6. Shape: Turn dough onto a floured surface. Gently pat it into a 1-inch thick rectangle. Fold it in half once (for layers), then pat down again. Use a biscuit cutter or a glass to cut 8 circles.

  7. Bake: Place on the baking sheet and bake for 18–22 minutes or until the tops are golden brown.

Nutritional Info (Per Biscuit)

Estimates based on non-fat Greek yogurt and whey protein.

Calories Protein Carbs Fat Fiber
195 kcal 12g 24g 6g 2g

Tips for Success

  • Keep it Cold: The secret to flakiness is cold butter. When the cold fat hits the hot oven, it creates steam, which lifts the dough.

  • Don’t Overwork the Dough: If you knead it like bread, you’ll develop too much gluten, resulting in a “hockey puck” instead of a biscuit.

  • Protein Choice: Use a Whey-Casein blend if possible; 100% Whey can sometimes make baked goods a bit rubbery if overbaked.

Benefits

  • Satiety: With 12g of protein per biscuit, these keep you full much longer than a standard muffin.

  • Antioxidants: Blueberries provide a burst of Vitamin C and Vitamin K.

  • Lower Fat: Using Greek yogurt replaces a significant amount of the butter/heavy cream found in traditional recipes while adding probiotics and calcium.

Q&A

Q: Can I use frozen blueberries?

A: Yes! Don’t thaw them first, or they will turn your dough completely purple. Add them straight from the freezer.

Q: Can I make these vegan?

A: You can use a plant-based protein and vegan butter/yogurt, but be aware that plant proteins absorb more moisture, so you may need extra milk.

Q: How do I store these?

A: Keep them in an airtight container at room temperature for 2 days, or freeze them for up to 3 months. To reheat, use a toaster oven to bring back the crisp exterior.

Tropical Mango & Banana Smoothie

Tropical Mango & Banana Smoothie

To get that thick, soft-serve consistency seen in the picture, it’s best to use frozen fruit where possible.


Ingredients

  • Mango: 1 cup (peeled and cubed)

  • Banana: 1 medium (sliced)

  • Yogurt: 1/2 cup (Greek yogurt works best for thickness)

  • Pineapple: 1/2 cup (fresh or frozen chunks)

  • Milk: 1/2 cup to 1 cup (adjust based on your preferred thickness; any milk variety works)

Instructions

  1. Prep: If you have time, freeze your banana slices and mango chunks for at least 2 hours. This creates a much creamier texture without needing ice.

  2. Layer: Add the milk and yogurt to the blender first. Adding liquids first helps the blades move more easily.

  3. Combine: Add the mango, banana, and pineapple chunks.

  4. Blend: Start on a low speed and gradually increase to high. Blend until the mixture is completely smooth and no fruit chunks remain.

  5. Serve: Pour into a tall glass. For that “swirled” look, you can use a spoon to smooth the top.


Quick Tips for Success

  • For a thicker smoothie: Use less milk or add an extra 1/4 cup of yogurt.

  • For a thinner smoothie: Add a splash more milk until it reaches the consistency you like.

  • Natural Sweetness: If your fruit isn’t very ripe, you can add a drizzle of honey or maple syrup.

Zucchini Lasagna Roll-Ups

Zucchini Lasagna Roll-Ups

These roll-ups are elegant enough for a dinner party but simple enough for a Tuesday night. They are naturally gluten-free, keto-friendly, and packed with hidden nutrients.

Recipe Details

  • Prep time: 25 minutes

  • Cook time: 30 minutes

  • Servings: 4 (about 3 rolls per person)

  • Calories: ~280 kcal per serving

Ingredients

  • 3 large zucchinis (straight ones are easiest to slice)

  • 15 oz Ricotta cheese (whole milk or part-skim)

  • 1 large egg (lightly beaten)

  • 1/2 cup Parmesan cheese, freshly grated

  • 2 cups Shredded Mozzarella, divided

  • 2 cups Marinara sauce (look for no-sugar-added)

  • 2 cloves Garlic, minced

  • 1 tsp Dried Oregano

  • 1/4 cup Fresh Basil, chopped

  • Salt & Black Pepper to taste

Instructions

  1. Prep the Zucchini: Slice the ends off the zucchinis. Using a mandoline or a very sharp knife, slice them into thin, flexible ribbons (about 1/8 inch thick).

  2. Sweat the Veggies: This is the most important step! Sprinkle the slices with salt and let them sit on paper towels for 15 minutes. Pat them dry to remove excess moisture.

  3. Make the Filling: In a medium bowl, combine the ricotta, egg, parmesan, 1 cup of mozzarella, garlic, oregano, and fresh basil. Season with pepper.

  4. Assemble: Spread about 1/2 cup of marinara sauce on the bottom of a 9×13 inch baking dish. Lay out 2-3 zucchini slices (slightly overlapping) to create a wider strip. Spread a tablespoon of the ricotta mixture along the length of the slice.

  5. Roll: Carefully roll the zucchini from one end to the other and place it seam-side down in the baking dish. Repeat until the dish is full.

  6. Top & Bake: Pour the remaining sauce over the rolls and sprinkle with the remaining mozzarella. Bake at 200°C (400°F) for 25-30 minutes, or until the cheese is bubbly and slightly browned.

Nutritional Info (Per Serving)

Nutrient Amount
Calories 280
Net Carbs 9g
Protein 18g
Fat 16g
Fiber 3g

Benefits of This Dish

  • Low Glycemic Index: Won’t cause a massive blood sugar spike.

  • High Protein: Keeps you full longer thanks to the ricotta and egg.

  • Hydration: Zucchini is over 90% water, making this a hydrating meal.

  • Micronutrients: High in Vitamin A, Vitamin C, and Potassium.

Pro-Tips for Success

  • Don’t Skip the Salt: If you don’t “sweat” the zucchini, your lasagna will turn into a watery soup.

  • Grill Option: For extra flavor, flash-sear the zucchini strips on a grill pan for 30 seconds per side before rolling. This adds a smoky depth.

  • Meat Version: You can add 1/2 lb of browned ground turkey or Italian sausage to the marinara sauce for extra heartiness.

Q&A

Q: Can I make this ahead of time?

A: Yes! You can assemble the rolls up to 24 hours in advance. Keep them covered in the fridge and bake when ready.

Q: Why is my sauce watery?

A: Zucchini releases water as it cooks. To prevent this, ensure you pat the slices dry thoroughly and use a thick, high-quality marinara sauce.

Q: Can I freeze these?

A: I wouldn’t recommend it. Zucchini loses its texture and becomes “mushy” once frozen and thawed. This dish is best enjoyed fresh or from the fridge.

The Homemade Dole Whip

🍍 The Homemade Dole Whip

This recipe mimics the iconic dairy-free dessert that has reached legendary status. It’s naturally vegan, gluten-free, and contains no refined sugars (unless you choose to add them).

  • Prep time: 5 minutes

  • Servings: 2 to 3

  • Texture: Thick, velvety, and soft-serve style

Ingredients

  • Frozen Pineapple: 4 cups (frozen is non-negotiable for the texture)

  • Unsweetened Pineapple Juice: 1/2 cup (add a splash more if your blender struggles)

  • Coconut Milk or Oat Milk: 1/2 cup (use the canned full-fat coconut milk for maximum creaminess)

  • Lemon or Lime Juice: 1 tbsp (brightens the flavor and cuts the sweetness)

  • Optional: A pinch of salt to enhance the fruitiness.

Instructions

  1. Layer the Liquid: Pour the pineapple juice, plant milk, and citrus juice into the blender first. This helps the blades move.

  2. Add the Fruit: Dump the 4 cups of frozen pineapple on top.

  3. The Blend: Start on low speed and gradually increase. Use a tamper (the plastic stick that comes with many blenders) to push the frozen fruit down into the blades.

  4. Check Consistency: Stop as soon as it looks smooth. Over-blending will create heat and turn your “whip” into a “smoothie.”

  5. The “Swirl”: To get that classic look, transfer the mixture to a piping bag with a large star tip and swirl it into bowls.

Tips for Success

  • Don’t use fresh pineapple: You won’t get the “whip” texture. It has to be rock-solid frozen.

  • The Tamper is your friend: If you don’t have a blender with a tamper, you’ll need to stop every 20 seconds to scrape down the sides.

  • Freeze the Bowls: To prevent melting while you eat, pop your serving bowls in the freezer for 10 minutes before serving.

Nutritional Info (Per Serving)

Estimated based on 3 servings.

Nutrient Amount
Calories 145 kcal
Total Fat 3g
Carbohydrates 31g
Fiber 3.5g
Sugars 22g (Natural)
Vitamin C 110% DV

Benefits

  • Anti-Inflammatory: Pineapple contains bromelain, an enzyme that helps reduce inflammation and aids digestion.

  • Hydrating: High water content and electrolytes from the pineapple and coconut milk.

  • Immune Boost: A massive dose of Vitamin C in every spoonful.

Common Questions (Q&A)

Q: Can I make this ahead of time?

A: It is best enjoyed immediately. If you freeze it for later, it will turn into a solid block of ice. If that happens, let it thaw for 15 minutes and re-blend it.

Q: Can I use a different fruit?

A: Absolutely. Mango or strawberry work beautifully with this exact ratio, though it won’t be a “pineapple” whip anymore!

Q: How do I make it even creamier?

A: Swap the pineapple juice for a scoop of vanilla protein powder and a little extra coconut cream.