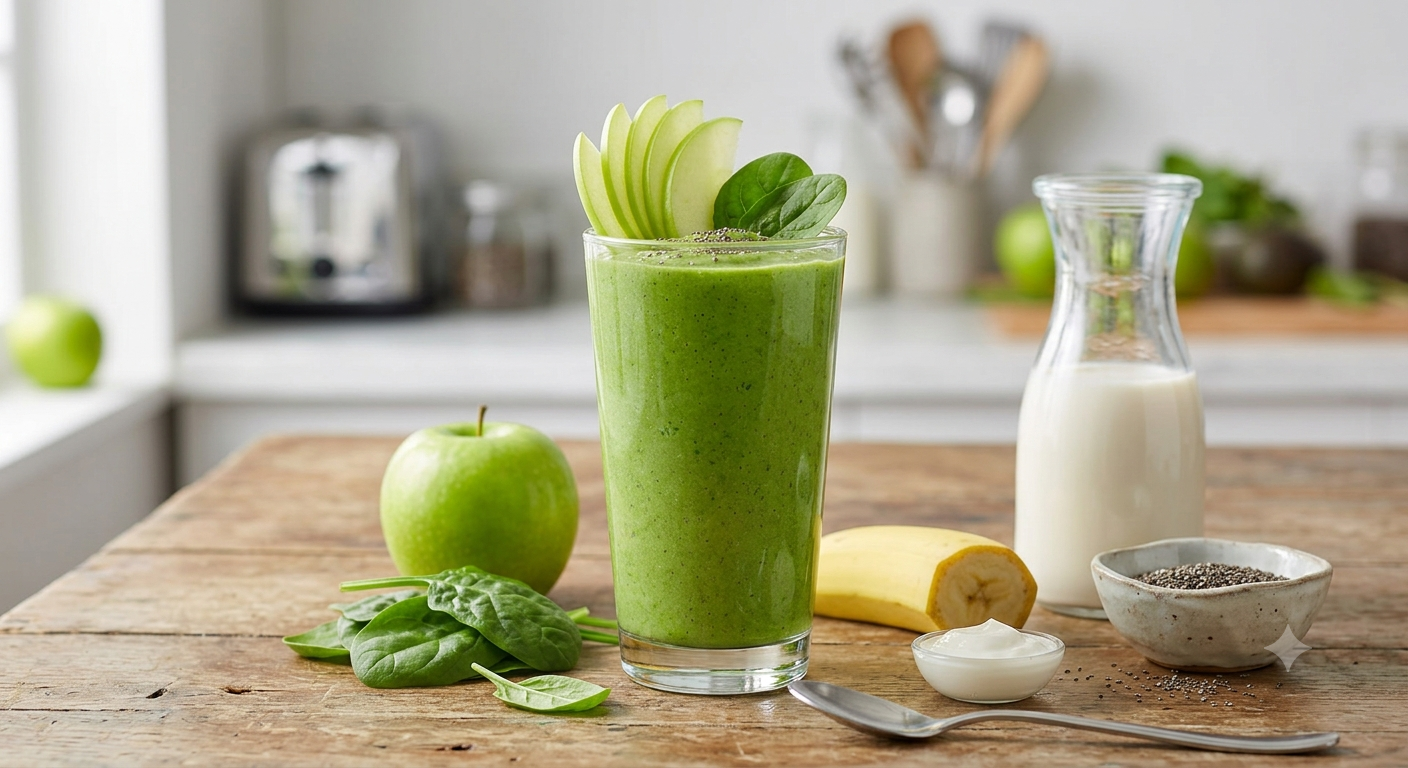
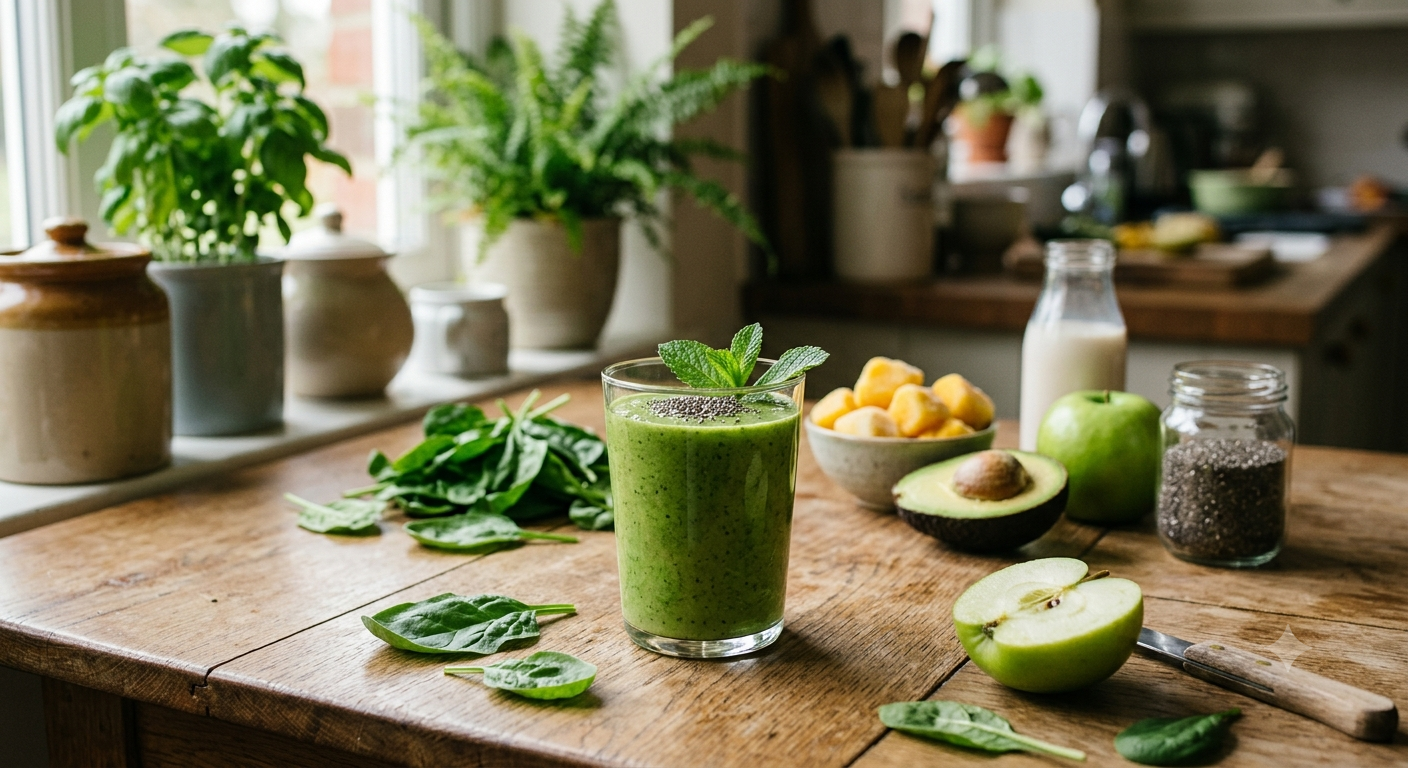
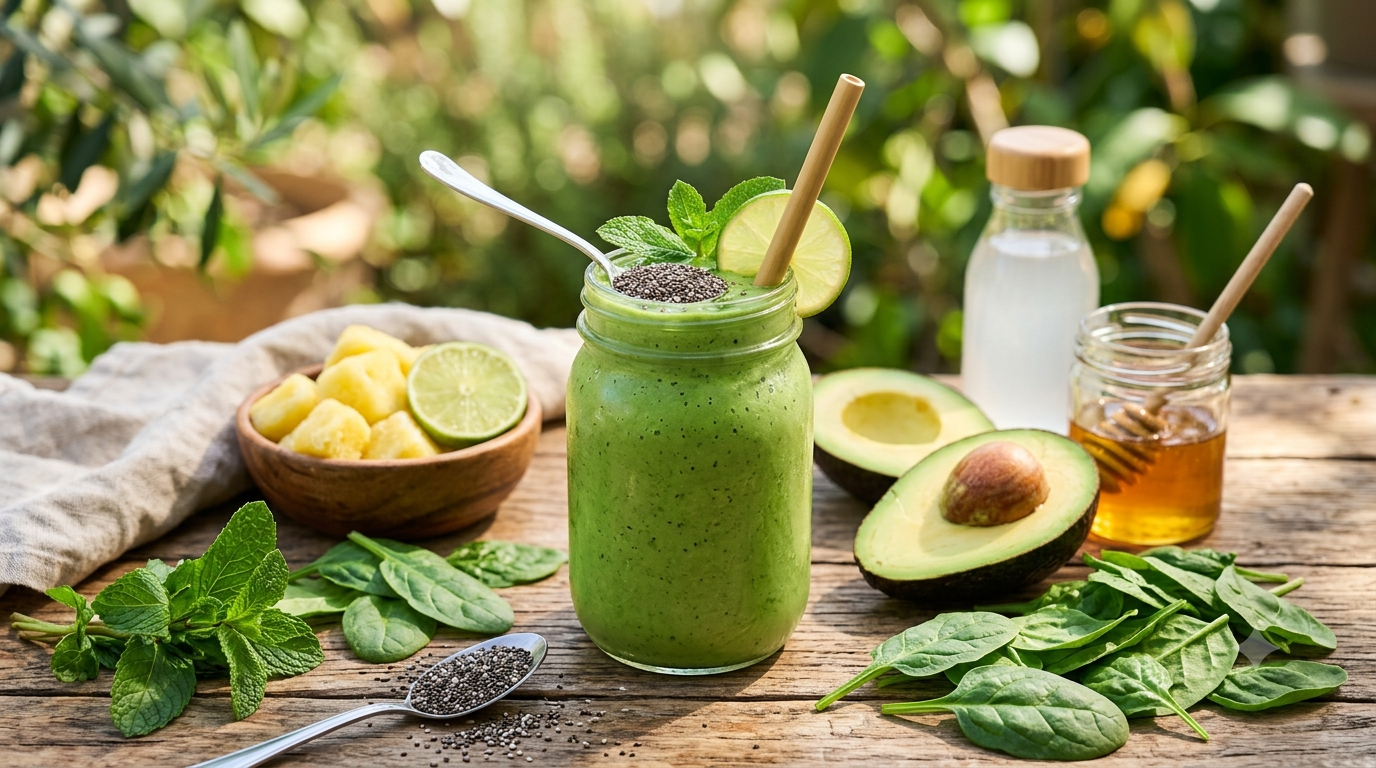
Apple Salad with Honeycrisp Apples, Celery, Grapes, Pecans, and Dried Cranberries
Don’t Lose This
I love this quick & easy recipe.
Ingredients
This layered delight is best served chilled, allowing the biscuits to soften into a cake-like texture.
2 packs Digestive biscuits or Graham crackers 🍪
2 cups Fresh or frozen raspberries (sweetened slightly) 🍓
2 cups Heavy whipping cream (cold) 🥛
1 cup Cream cheese (softened) 🧀
1/2 cup Powdered sugar 🤍
1 tsp Vanilla extract
1/2 cup Chocolate shavings or grated chocolate 🍫
1/4 cup Milk (for dipping the biscuits)
Prepare Raspberry Layer: Mash the raspberries with a spoon. If they are very tart, stir in a tablespoon of sugar. Set aside. 🍓 ➡️
Make the Cream: In a large bowl, whip the heavy cream, powdered sugar, and vanilla until stiff peaks form. In a separate bowl, beat the cream cheese until smooth, then gently fold it into the whipped cream. 🥣 ➡️
First Layer: Quickly dip biscuits into the milk (just a second!) and line the bottom of a glass dish. ➡️
Fruit Layer: Spread half of the mashed raspberries evenly over the biscuit base. ➡️
Cream Layer: Spread half of the cream mixture over the raspberries. ☁️ ➡️
Repeat: Add another layer of milk-dipped biscuits, the remaining raspberries, and the rest of the cream. ➡️
Topping: Generously cover the top with chocolate shavings or grated chocolate for that beautiful finish. 🍫 ➡️
Chill: Cover and refrigerate for at least 4–6 hours (overnight is best!). This allows the layers to set so you can cut perfect squares. ⏱️ ➡️
Q: Can I use other fruits?A: Absolutely! Strawberries, blueberries, or even a layer of lemon curd would work beautifully with this cream base. 🥭 ➡️ 🫐
Q: How do I get clean slices?A: Make sure the dessert is very cold. Wipe your knife with a warm, damp cloth between every single cut to keep the layers looking sharp. 🔪 ✨
Q: My cream is too runny. What happened?A: Ensure your heavy cream is ice-cold before whipping and that you beat the cream cheese separately first to remove lumps before combining them. 🥛
Q: Can I make this more “chocolatey”?A: You can fold 2 tablespoons of cocoa powder into the cream mixture or use chocolate-flavored biscuits for the base layers! 🍫
Enjoy every creamy bite!
A gentle, nourishing soup that’s easy on the stomach and full of natural goodness.
1 onion, chopped
1–2 tbsp olive oil
2 leeks, cleaned and chopped
2 celery stalks, chopped
1 carrot, diced
1 red bell pepper, diced
1 zucchini, diced
2 potatoes, diced
2 garlic cloves, minced
6 cups vegetable broth (or water + bouillon)
1 tsp dried thyme or Italian seasoning
Salt & black pepper to taste
Fresh parsley for garnish
Optional: squeeze of lemon juice
Sauté aromatics
Heat olive oil in a large pot over medium heat. Add onion, leeks, and garlic. Cook 3–4 minutes until softened.
Add vegetables
Stir in celery, carrot, red pepper, zucchini, and potatoes. Cook 2–3 minutes.
Add broth & seasonings
Pour in vegetable broth. Add thyme, salt, and pepper.
Simmer
Bring to a boil, then reduce heat and simmer 20–25 minutes, until vegetables are tender.
Finish & serve
Adjust seasoning. Add fresh parsley and a squeeze of lemon if desired. Serve warm.
This light vegetable soup is comforting, hydrating, and easy to digest. It’s packed with fiber-rich vegetables, antioxidants, and natural anti-inflammatory ingredients like garlic, celery, and olive oil. Perfect when you want something soothing, especially for sensitive stomach days.
Chop vegetables evenly for consistent cooking
For extra protein, add white beans or lentils
Blend half the soup for a creamier texture
Store in fridge up to 4 days
Freezes well up to 2 months
Makes: 4–6 servings
Serving size: About 1½ cups
Calories: 150–180
Carbohydrates: 30g
Fiber: 5–7g
Protein: 3–4g
Fat: 4–6g
Sodium: Depends on broth used
Supports digestion – High fiber helps regulate digestion
Hydrating – Broth-based soups support hydration
Low calorie & filling – Great for weight management
Rich in antioxidants – From carrots, peppers, and garlic
Heart-friendly – Olive oil contains healthy fats
Q: Can I make this soup for weight loss?
Yes! It’s low-calorie, high-fiber, and very filling.
Q: Is it good for bloating?
Yes — especially when eaten warm. You can skip potatoes if sensitive to starch.
Q: Can I add protein?
Absolutely. Add beans, shredded chicken, or tofu.
Q: Can I make it in a slow cooker?
Yes. Cook on LOW for 6–7 hours or HIGH for 3–4 hours.
Q: Is it freezer-friendly?
Yes, just cool completely before freezing.
Ingredients
2 large cucumbers (thinly sliced)
1 tbsp apple cider vinegar
Juice of 1 lemon
1 tbsp olive oil
1 clove garlic (minced)
½ tsp chili flakes (optional)
Salt & black pepper (to taste)
1 tbsp fresh dill or parsley (optional)
🔥 Instructions
1. Prep cucumbers
Wash and slice cucumbers thinly
Place in a bowl
2. Make dressing
Mix apple cider vinegar, lemon juice, olive oil, garlic, salt, and pepper
3. Combine
Pour dressing over cucumbers
Toss well to coat
4. Add extras
Sprinkle chili flakes and fresh herbs
5. Chill & serve
Let sit for 10–15 minutes before serving
🍽️ Servings
Serves: 2–3 people
The secret to this height is a thick batter and not over-mixing the flour!
2 cups All-purpose flour 🌾
2 tbsp Sugar 🤍
2 tsp Baking powder
1/2 tsp Baking soda
1/2 tsp Salt 🧂
2 cups Buttermilk (room temperature) 🥛
2 Large eggs 🥚
4 tbsp Unsalted butter (melted and cooled) 🧈
1 tsp Vanilla extract
1 tbsp Lemon zest (optional, for that bright flavor) 🍋
1 ½ cups Fresh blueberries 🫐
Oil or butter for the griddle
Whisk Dry Ingredients: In a large bowl, whisk together the flour, sugar, baking powder, baking soda, and salt. 🥣 ➡️
Mix Wet Ingredients: In a separate medium bowl, whisk the buttermilk, eggs, melted butter, vanilla, and lemon zest until smooth. ➡️
Combine: Pour the wet ingredients into the dry ingredients. Stir gently with a spatula just until combined. Stop while you still see a few lumps! Over-mixing makes pancakes tough. ➡️
Rest the Batter: Let the batter sit for 5–10 minutes. You will see bubbles forming; this makes them extra fluffy. ⏱️ ➡️
Heat the Pan: Heat a non-stick skillet or griddle over medium heat. Lightly grease with a little butter or oil. 🍳 ➡️
Cook: Pour about 1/3 cup of batter onto the griddle. Gently press a handful of blueberries into the top of each pancake while the bottom cooks. 🫐 ➡️
Flip: Wait until bubbles form on the surface and the edges look set and dry (about 2–3 minutes). Flip carefully and cook the other side until golden brown (about 1–2 minutes). ➡️
Serve: Stack them high and serve with maple syrup, honey, or a squeeze of fresh lemon! 🍯 ➡️
Q: Can I use frozen blueberries? A: Yes! Do not thaw them first, or they will turn your batter purple. Add them directly to the pancake on the griddle just like fresh ones. ❄️
Q: I don’t have buttermilk. What can I use? A: Mix 2 cups of regular milk with 2 tablespoons of lemon juice or white vinegar. Let it sit for 5 minutes until it curdles slightly before using! 🥛🍋
Q: Why are my pancakes flat? A: This usually happens if your baking powder is old or if you over-mixed the batter. Stir just until the flour disappears to keep that airy structure. 📈
Q: How do I keep them warm while cooking the rest? A: Place a wire rack on a baking sheet in the oven at its lowest setting (around 90°C or 200°F). Transfer the finished pancakes there to stay crisp and warm! 🌡️
Enjoy your delicious breakfast! ✨🥞
This recipe creates a flexible, fluffy bread that works perfectly for wraps, dipping into soups, or making quick personal pizzas.
2 cups Warm water (not boiling!) 💧
1 tbsp Sugar 🤍
1 tbsp Dry yeast
4 cups All-purpose flour 🌾
1 tsp Salt 🧂
2 tbsp Vegetable oil (optional, for the dough surface) 🫒
Activate Yeast: In a large bowl, mix the warm water, sugar, and yeast. Let it sit for about 5–10 minutes until it becomes frothy. 🫧 ➡️
Mix the Dough: Add the flour and salt to the bowl. Stir with a sturdy spoon until a sticky dough forms. There is no need to knead; just ensure all the flour is hydrated. ➡️
First Rise: Cover the bowl with a damp cloth or plastic wrap. Let it rest in a warm spot for about 1 hour or until it has doubled in size. 📈 ➡️
Shape: Turn the dough onto a floured surface. Gently divide it into 10–12 equal pieces. Roll each piece into a smooth ball and then flatten into a disc using your fingers or a rolling pin. ➡️
Second Rest: Place the discs on a baking tray lined with parchment paper. Cover and let them rest for another 15–20 minutes. ➡️
Bake: Preheat your oven to 220°C (425°F). Bake for 10–15 minutes until they puff up and the tops are beautifully golden brown. 🥧 ➡️
Alternative: You can also cook these on a hot, dry skillet over medium heat for 2 minutes per side!
Keep Soft: As soon as they come out of the oven, stack them and wrap them in a clean kitchen towel. The steam will keep them soft and pliable. ➡️
Q: Can I use whole wheat flour? A: Yes! You can replace up to half of the all-purpose flour with whole wheat. You may need an extra tablespoon of water as whole wheat absorbs more liquid. 🌾
Q: Why didn’t my bread puff up? A: Usually, this is because the oven wasn’t hot enough or the yeast was old. Make sure your oven is fully preheated before putting the tray in! 🔥
Q: How do I store these? A: Once completely cool, store them in a zip-top bag at room temperature for 2 days or freeze them for up to 3 months. Reheat in a toaster or skillet for that “just baked” taste! 🧊
Q: Can I add toppings? A: Absolutely! Before baking, you can brush the tops with a little water and sprinkle on sesame seeds, dried herbs, or even a little sea salt. ✨
Happy baking! 🥖🧤
This cake is the ultimate base for any dessert. It relies on the air whipped into the eggs to get that incredible lift without any baking powder or soda!
5 Large Eggs (at room temperature) 🥚
1 Cup (200g) Sugar 🤍
1 Cup (125g) All-purpose Flour (sifted) 🌾
Preheat & Prep: Preheat your oven to 170°C (340°F). Grease a 7 or 8-inch round cake pan and line the bottom with parchment paper. ➡️
Whip the Eggs & Sugar: In a large bowl, combine the 5 eggs and the sugar. Use an electric mixer on high speed to beat them together for about 10–12 minutes. ⏱️ ➡️
Tip: The mixture should become pale, thick, and triple in volume. When you lift the whisk, it should leave a “ribbon” trail that stays on the surface for a few seconds.
Sift the Flour: Sift the all-purpose flour into the egg mixture in three separate batches. ➡️
Fold Gently: Use a spatula to gently fold the flour into the eggs using a figure-eight motion. Be very careful not to deflate the air bubbles you just created! 🥣 ➡️
Bake: Pour the batter into your prepared pan. Bake for 25–30 minutes or until a toothpick inserted into the center comes out clean and the top is golden brown. 🥧 ➡️
Cool: Let the cake cool in the pan for 10 minutes, then run a knife around the edge and turn it out onto a wire rack to cool completely. ➡️
Serve: Slice it plain, or top it with fresh fruit and whipped cream! 🍓 ➡️
Q: Why didn’t my cake rise? A: This usually happens if the eggs weren’t whipped long enough or if the flour was stirred in too roughly. The air in the eggs is the only thing making it rise, so handle the batter like a cloud! ☁️
Q: Can I add flavor to this? A: Yes! You can add 1 teaspoon of vanilla extract or some lemon zest to the egg mixture while whipping for extra aroma. 🍋
Q: Does the pan need to be greased on the sides? A: For the tallest sponge, some bakers only grease the bottom parchment. This allows the cake to “climb” the sides of the pan as it bakes! 📈
Q: How do I store it? A: Keep it in an airtight container at room temperature for up to 2 days, or wrap it tightly and freeze for up to one month. 🧊
Enjoy your baking!
Frozen Blueberries: 1.5 cups (frozen gives it that thick, creamy texture).
Frozen Banana: 1 medium (peeled and sliced before freezing).
Greek Yogurt: 1/2 cup plain or vanilla (for protein and creaminess).
Milk of Choice: 1 cup (oat, almond, or dairy milk work perfectly).
Natural Peanut Butter: 2 tablespoons (plus extra for the “drip” effect).
Optional: 1 teaspoon of honey or maple syrup if you prefer it sweeter.
Toppings: Fresh blueberries and a sprinkle of crushed peanuts.
Combine the Base: Place the frozen blueberries, frozen banana slices, Greek yogurt, and 1 tablespoon of peanut butter into a high-speed blender.
Add Liquid: Pour in your chosen milk. Start with 1 cup; if you prefer a thinner consistency, you can add a splash more later.
Blend: Pulse until the large chunks are broken down, then blend on high for about 45–60 seconds until the mixture is completely smooth and vibrant purple.
The “Aesthetic” Pour: To get the look in the photo, take a spoonful of slightly warmed peanut butter and drizzle it around the inside rim of your glass or mason jar.
Serve: Pour the smoothie into the jar. Top with a handful of fresh blueberries, the remaining tablespoon of peanut butter, and a few crushed peanuts for crunch.
Pro-Tip: If the smoothie is too thick to blend, let it sit for two minutes to soften slightly before trying again. Enjoy immediately!
Optional Add-ins (highly recommended):
There is a certain comfort in knowing that the same ingredients used by previous generations are being validated by modern interest in phytochemicals.
The remedy you described—combining purple onion, garlic, and honey—is a classic example of synergistic natural ingredients. From a biological standpoint, you’re essentially creating a concentrated infusion of sulfur compounds and antioxidants.
While these shouldn’t replace a doctor’s visit for serious infections, the chemistry of this mixture explains why it feels so effective:
Quercetin in Purple Onions: Purple onions are particularly high in quercetin, a flavonoid that has been studied for its ability to stabilize mast cells (which release histamine), potentially helping with the “drippy” part of a cold.
Allicin in Garlic: When you crush garlic (as noted in Step 2 of your guide), an enzyme called alliinase converts alliin into allicin. This is the compound responsible for garlic’s antimicrobial reputation.
Hygroscopic Nature of Honey: Honey is “hygroscopic,” meaning it draws moisture out of its environment. In this recipe, the honey physically pulls the nutrient-rich juice out of the onion cells through osmosis, creating that syrup without needing to add water.
To get the most out of this traditional syrup, keep these small but important details in mind:
| Tip | Why it Matters |
| Raw Honey is Best | Processed honey is often heat-treated, which can destroy the beneficial enzymes and propolis traces that provide antibacterial support. |
| Wait 10 Minutes | After crushing the garlic, let it sit for about 10 minutes before adding the honey. This “rest” allows the maximum amount of allicin to develop. |
| Small Batches | Because this is a fresh product without chemical preservatives, it can ferment quickly. Making enough for just 48–72 hours is the safest bet. |
As you mentioned, the “No honey for infants” rule is the most critical safety point here. This is due to the risk of botulism spores, which a baby’s developing digestive system cannot handle, even though they are harmless to adults.
Additionally, while onions and garlic are great for humans, remember to keep this mixture far away from pets. Onions and garlic are toxic to dogs and cats, as they can cause oxidative damage to their red blood cells.
Eggs: 3–4 large eggs.
Potatoes: 1 cup of baby potatoes (or 2 medium potatoes, cubed).
Fresh Veggies: 1 small cucumber (sliced), 4–5 cherry tomatoes (halved), and a handful of fresh curly lettuce.
Seasoning: Sea salt and coarsely ground black pepper.
Optional Dressing: A drizzle of extra virgin olive oil or a squeeze of fresh lemon juice.
The Potatoes: Place potatoes in a pot of cold salted water. Bring to a boil and cook for about 10–12 minutes until fork-tender. Drain and let them air dry for a minute so the seasoning sticks better.
The Eggs: Boil the eggs to your preference. For the slightly jammy yolk seen in the photo, place eggs in boiling water for 7–8 minutes, then immediately plunge them into an ice bath to stop the cooking and make peeling easier.
Wash and dry the lettuce leaves. Arrange them on one side of a large plate to create a fresh, crunchy bed for the other ingredients.
Place the sliced cucumbers and halved tomatoes next to the greens.
Add the warm boiled potatoes and the halved eggs to the plate.
The Secret: While the potatoes and eggs are still slightly warm, sprinkle a generous amount of salt and cracked black pepper over the top. This allows the seasoning to penetrate better than if they were cold.
Finish with a light drizzle of olive oil if desired for a boost of healthy fats.
High Satiety: The combination of protein from the eggs and complex carbohydrates from the potatoes keeps you full for longer.
Micronutrients: The raw vegetables provide essential fiber and Vitamin C, which helps with the absorption of nutrients.
Balanced Energy: This plate offers a great balance of macros, making it an excellent post-workout meal or a steady energy source for a busy afternoon.
Mediterranean Style: Add a few Kalamata olives and some crumbled feta cheese.
Spicy Kick: Swap the black pepper for red chili flakes or a dash of hot sauce.
Creamy Texture: Add half a sliced avocado for extra creaminess and heart-healthy monounsaturated fats.
3–4 Fresh Limes: High in Vitamin C and antioxidants.
1 tsp Whole Cloves: Known for anti-inflammatory properties.
1 handful Fresh Mint Leaves: Aids digestion and adds freshness.
2 cups Water: Filtered or coconut water for extra electrolytes.
Optional: A small pinch of cinnamon or a teaspoon of raw apple cider vinegar.
Prep the Limes: Wash the limes thoroughly. You can either peel them or leave the zest on for more nutrients (though the white pith will make it bitter). Chop them into small chunks.
Infuse or Blend:
For a smooth juice: Blend the lime chunks, mint, cloves, and water until liquified. Strain through a fine-mesh sieve or nut milk bag into a glass bottle.
For a lighter infusion: Boil the cloves in the water for 5 minutes, let it cool, then blend that “clove tea” with the lime and mint.
Store: Keep in a glass bottle in the refrigerator.
Serve: Drink one small glass (about 150ml – 200ml) in the morning.
It’s easy to get excited about “miracle” recipes, but managing health requires a bigger picture:
Diabetes: Managing blood sugar relies on fiber intake, carbohydrate control, and often medication. While lime juice is low-glycemic, it won’t replace insulin or metformin.
Fatty Liver: The most effective way to reverse fatty liver is through gradual weight loss, reducing added sugars (especially fructose), and staying active.
The “Cure” Claim: Always consult with your doctor before using herbal tonics as a replacement for prescribed treatments, especially since cloves can interact with certain blood-thinning medications.
Tip: If you find the drink too tart or bitter, avoid adding sugar or honey, as that would counteract the goal of helping with diabetes or fatty liver. Use a bit of stevia or simply dilute it with more water.
Prep time: 10 mins | Chilling time: 1 hour | Servings: 6-8
1 lb (450g) Strawberries, hulled and sliced
6 oz (170g) Blueberries
6 oz (170g) Raspberries
6 oz (170g) Blackberries
The Creamy Base:
1 cup Heavy whipping cream, chilled
8 oz (225g) Cream cheese, softened to room temperature
1/2 cup Powdered sugar (adjust to your sweetness preference)
1 tsp Vanilla extract
Optional: 1 cup Mini marshmallows for extra fluffiness
Prep the Fruit: Gently wash all the berries. Pat them completely dry with paper towels. Moisture is the enemy here; if the berries are wet, the cream will become runny. Slice the larger strawberries into bite-sized pieces.
Whip the Cream: In a chilled bowl, beat the heavy whipping cream until stiff peaks form. Set this aside.
Cream the Base: In a large mixing bowl, beat the softened cream cheese, powdered sugar, and vanilla extract until the mixture is smooth and completely free of lumps.
Fold Together: Gently fold the whipped cream into the cream cheese mixture using a spatula. If you are using marshmallows, fold them in now.
Combine: Carefully fold the dried berries into the creamy mixture. Use a light hand so you don’t crush the raspberries or turn the whole bowl purple/pink.
Chill & Serve: Refrigerate for at least 1 hour before serving. This allows the flavors to meld and the mixture to set properly.
The “Lighter” Version: Swap the cream cheese and heavy cream for 2 cups of Greek yogurt and a bit of honey for a high-protein breakfast version.
Keep it Fresh: Only fold the berries in shortly before you plan to serve it to keep the fruit crisp and the cream white.
Add Crunch: Sprinkle some toasted pecans, sliced almonds, or granola on top just before serving for a nice texture contrast.
Option 1: Berry bliss in every bite! 🍓✨ This Creamy Berry Cloud is the ultimate refreshing treat for a warm afternoon.
Option 2: Forget the cake—I’ll take a bowl of this! 🫐 Low-effort, high-flavor, and packed with all the best summer berries.
Prep time: 10 mins | Chilling time: 30 mins | Servings: 4
2 Large English Cucumbers, thinly sliced into rounds
1 cup Sweet corn (canned or frozen/thawed)
2-3 Green onions, chopped
3 cloves Garlic, minced
1 tsp Red pepper flakes (adjust for your spice preference)
1 tbsp Fresh parsley or cilantro, chopped
The Dressing:
2 tbsp Rice vinegar (or Apple Cider Vinegar)
1 tbsp Extra virgin olive oil
1 tsp Honey (or maple syrup)
Salt & Black pepper to taste
Optional: A splash of sesame oil for extra depth
Prep the Cucumbers: Slice the cucumbers thinly. If you prefer them extra crunchy and less watery, sprinkle the slices with a little salt, let them sit for 5 minutes, then pat them dry with a paper towel.
Combine: In a large mixing bowl or glass dish, toss together the cucumbers, corn, green onions, and minced garlic.
Whisk the Dressing: In a small jar or bowl, whisk together the vinegar, oil, honey, salt, pepper, and red pepper flakes until well combined.
Marinate: Pour the dressing over the vegetables and toss thoroughly to ensure everything is coated.
Chill: For the best flavor, cover and refrigerate for at least 30 minutes. This allows the cucumbers to soak up the garlic and spice.
Serve: Give it one last toss before serving. Sprinkle with fresh herbs or extra red pepper flakes for garnish.
Creamy Style: Add 2 tablespoons of Greek yogurt or light mayo to the dressing for a richer texture.
Protein Boost: Toss in a can of chickpeas or some chilled edamame.
Tangy Twist: Add some crumbled feta cheese or sliced kalamata olives for a salty, Mediterranean vibe.
It looks like you’ve put together a fantastic summary of the nutritional power of boiled eggs! You’ve hit on all the heavy hitters—protein, choline, and those essential antioxidants.
Since you’ve outlined the benefits so well, here is a cleaned-up, scannable version of your text that highlights the key takeaways for quick reading:
Boiled eggs are a “complete protein,” containing all nine essential amino acids.
The Benefit: Direct support for muscle growth and tissue repair.
Best For: Athletes or those looking to maintain strength as they age.
Because eggs are high in protein and healthy fats, they have a high satiety index.
The Benefit: You feel full for longer, reducing the urge for mid-morning snacking.
The Result: Naturally lower daily calorie intake without feeling deprived.
Eggs are one of the best dietary sources of Choline.
The Benefit: Supports memory, concentration, and the production of neurotransmitters.
The Result: Improved mental clarity and long-term cognitive health.
Yolks are rich in Lutein and Zeaxanthin.
The Benefit: These antioxidants accumulate in the retina to protect against blue light.
The Result: Reduced risk of cataracts and age-related macular degeneration.
High levels of Biotin and sulfur-containing amino acids act as natural “beauty boosters.”
The Benefit: Promotes keratin production for hair and nails.
The Result: Stronger nails, shinier hair, and healthier skin.
Quick Note on Cholesterol: You’re spot on about moderation. While current research shows that for most people, dietary cholesterol has a minimal impact on blood cholesterol levels, it’s always smart to check with a doctor if you have a history of heart health concerns.
Prep time: 15 mins | Cook time: 20-25 mins | Servings: 2-3
The Base:
2 medium zucchinis, shredded or spiralized (about 3-4 cups)
1 large carrot, grated
1/2 small red onion, thinly sliced
1/2 tsp salt (to draw out moisture)
The Batter:
2 large eggs
1/2 cup Greek yogurt (or sour cream)
1/2 cup All-purpose flour (or almond flour for keto)
1 tsp Baking powder
Salt & Pepper to taste
Optional: Garlic powder or fresh dill
The Topping:
1 cup Shredded Mozzarella (or cheddar)
Fresh dill for garnish
Prep the Veggies: Grate the zucchini and carrot. Place them in a bowl with 1/2 tsp salt and let sit for 10 minutes. This is the most important step: Squeeze the vegetables firmly with your hands or a cheesecloth to remove as much water as possible. If you skip this, the “crust” will be soggy.
Mix the Batter: In a separate bowl, whisk the eggs, yogurt, flour, baking powder, and seasonings until smooth.
Combine: Add the squeezed zucchini, carrots, and sliced onions into the batter. Fold everything together until the vegetables are evenly coated.
Bake the Base: Preheat your oven to 400°F (200°C). Grease a round baking pan or line it with parchment paper. Spread the mixture evenly into a circle (about 1/2 inch thick).
Bake for 15-20 minutes until the edges are golden and the center is firm.
Add Cheese & Finish: Remove from the oven. Sprinkle the shredded cheese and fresh dill over the top. Return to the oven for another 5-8 minutes, or until the cheese is bubbly and browned.
Serve: Let it cool for 5 minutes so it sets, then slice it into wedges just like a pizza!
The Squeeze: Seriously, squeeze that zucchini like you mean it. Zucchinis are roughly 95% water.
Extra Crisp: If you want a crispier bottom, pre-heat your baking stone or pan before spreading the mixture on.
Variations: Feel free to add chopped bell peppers or even some crumbled feta into the mix for a Mediterranean twist.
Prep time: 10 mins | Cook time: 15 mins | Serves: 4
The Chicken:
1.5 lbs chicken breast or thighs, cut into bite-sized pieces
1/2 cup cornstarch (for that signature crunch)
Salt and black pepper to taste
2 tbsp vegetable oil
The Sauce:
1/2 cup honey
4 cloves garlic, minced
1/4 cup soy sauce (use low-sodium if preferred)
1 tbsp rice vinegar (or apple cider vinegar)
1 tsp fresh ginger, grated (optional)
1 tsp sriracha (optional, for a hint of heat)
Prep the Chicken: Toss the chicken pieces in a bowl with salt, pepper, and cornstarch until evenly coated.
Sear: Heat oil in a large skillet over medium-high heat. Add chicken in a single layer (work in batches if needed). Cook for 3–5 minutes per side until golden brown and crispy. Remove chicken and set aside.
Make the Sauce: In the same skillet, turn heat down to medium. Add garlic and ginger; sauté for 30 seconds until fragrant. Pour in the honey, soy sauce, and vinegar.
Thicken: Let the sauce simmer for 2–3 minutes until it starts to bubble and thicken into a sticky glaze.
Combine: Toss the crispy chicken back into the pan. Stir quickly to coat every piece in the glaze.
Serve: Garnish with sesame seeds and sliced green onions. Serve over a bed of fluffy white rice.
If you prefer a tender, “melt-in-your-mouth” texture without the frying:
Place un-breaded chicken pieces in the slow cooker.
Whisk the sauce ingredients together and pour over the chicken.
Cook on Low for 3–4 hours or High for 1.5–2 hours.
Pro-Tip: 30 minutes before serving, whisk 1 tbsp of cornstarch with 2 tbsp of water and stir it into the crockpot to thicken the sauce into that beautiful glossy finish seen in your photo.
For a Veggie Boost: Stir-fry some broccoli or snap peas in the same glaze.
For Extra Crunch: Double-dredge the chicken (dip in whisked egg, then cornstarch) before frying.
Prep time: 10 minutes
Yield: Approx. 2 cups
Flour: 1 cup all-purpose flour (Note: Must be heat-treated for safety).
Butter: ½ cup (1 stick) unsalted butter, softened to room temperature.
Sugar: ¾ cup packed light brown sugar and 2 tbsp granulated sugar.
Milk: 2–3 tbsp milk (add one at a time until you reach your desired consistency).
Vanilla: 1 tsp vanilla extract.
Salt: ¼ tsp salt.
Chocolate: ½ cup mini chocolate chips (or regular chips).
Raw flour can carry bacteria, so you must cook it first.
Microwave: Place flour in a bowl and microwave in 30-second bursts, stirring in between, until it reaches 160°F.
Oven: Spread flour on a baking sheet and bake at 350°F for 5–7 minutes.
Cool: Let the flour cool completely before using, then sift it to remove any clumps.
In a large bowl, beat the softened butter with the brown sugar and granulated sugar until light and fluffy (about 2 minutes).
Mix in the vanilla extract and salt.
Add 1 tablespoon of milk and mix well.
Add the heat-treated, cooled flour to the bowl. Mix until just combined.
If the dough is too dry or crumbly, add more milk one tablespoon at a time until it’s creamy and scoopable.
Stir in the chocolate chips by hand.
Serve: Scoop it into a cup or bowl just like in the photo!
Store: Keep in an airtight container in the fridge for up to 1 week, or freeze for up to 2 months.
Pro Tip: For a “Cookie Dough Sundae,” layer this with vanilla ice cream and extra chocolate syrup!
Prep time: 15 minutes
Cook time: ~4 minutes per side
Yield: Approx. 8–10 tenders
Chicken: 1.5–2 lbs chicken breast, cut into 1-inch thick strips, or store-bought tenderloins.
Dry Dredge: 1 cup all-purpose flour.
Wet Wash: 2–3 large eggs, beaten with 1 tbsp water or milk.
Final Coating: 2 cups Panko or plain breadcrumbs.
Seasoning: 1 tsp salt, ½ tsp black pepper, 1 tsp garlic powder, 1 tsp onion powder, and ½ tsp paprika.
Oil: Canola, vegetable, or peanut oil for frying.
Pat the chicken strips very dry with paper towels.
Season the raw chicken directly with a pinch of salt and pepper.
Bowl 1: Flour mixed with half of the seasonings.
Bowl 2: Whisked eggs and water.
Bowl 3: Breadcrumbs mixed with the remaining seasonings.
Dredge: Coat a chicken strip in flour and shake off the excess.
Dip: Submerge the floured strip into the egg wash until fully covered.
Crumb: Press the chicken firmly into the breadcrumbs, ensuring an even and thick coating.
Heat about 1/2 inch of oil in a large skillet over medium-high heat until it reaches $375^\circ\text{F}$.
Fry the tenders in batches (3–4 at a time) to avoid overcrowding the pan.
Cook for 3–4 minutes per side until the crust is golden brown and the internal temperature reaches $165^\circ\text{F}$.
Drain on a wire rack or paper towels to maintain crispiness.
The “Dry Hand/Wet Hand” Rule: Use one hand for the dry flour/crumbs and the other for the egg wash to avoid your fingers getting heavily breaded.
Don’t Rush the Oil: If the oil isn’t hot enough, the breadcrumbs will soak up grease and become soggy.
Air Fryer Alternative: Spray breaded tenders with oil and cook at 10–12 minutes, flipping halfway through.
If you are looking for a simple and refreshing way to support your digestive wellness, this homemade lemon and mint drink is a great place to start. Light, cooling, and easy to prepare, it is a gentle option for people who want to feel more refreshed after meals or throughout the day. With fresh lemon, mint, and water, this natural drink fits beautifully into a healthy routine focused on hydration, balance, and everyday comfort.
This drink is quick to make, naturally refreshing, and made with simple ingredients that are easy to find. Lemon adds bright flavor, mint gives a cooling finish, and staying well hydrated can help support normal digestion. It is a lovely choice for warm days, after meals, or whenever you want a clean and light homemade drink without anything complicated.
Wash the lemon and mint well. Slice the lemon into thin rounds and lightly crush the mint leaves with your fingers to help release their flavor.
Place the lemon slices, lemon juice, and mint leaves into a large glass jar or pitcher.
Add the cold water and stir gently. If you want a touch of sweetness, stir in the honey until dissolved.
Place the drink in the refrigerator for at least 20 to 30 minutes so the flavors can infuse.
Pour into glasses over ice if desired and enjoy cold.
Use fresh lemon and mint for the brightest flavor. Letting the drink chill for a little while helps the ingredients blend better. For a stronger mint taste, add a few extra leaves. If you prefer a warmer option, you can make a similar drink with warm water instead of cold.
This drink may help you feel refreshed and hydrated, and it can be a soothing part of a balanced lifestyle. However, it is not a cure for digestive disorders or a replacement for medical care. If you have frequent bloating, pain, reflux, or other ongoing stomach problems, it is best to speak with a healthcare professional.
This drink is a great choice:
This homemade lemon and mint drink is a simple way to support a feel-good daily routine. It is fresh, light, easy to make, and perfect for anyone who wants a natural beverage that feels clean and refreshing. Add it to your day when you want something easy, soothing, and pleasantly flavorful.
Prep time: 5 mins | Serves: 1 large bowl
1 cup (250g) Fat-free plain Greek yogurt or blended cottage cheese
1 scoop (30g) Chocolate whey or casein protein powder
1–2 tbsp Unsweetened cocoa powder (for extra richness)
Optional: A splash of almond milk if it’s too thick; stevia or honey if you prefer it sweeter.
Combine: In a medium mixing bowl, add the Greek yogurt (or blended cottage cheese for a “cheesecake” vibe), protein powder, and cocoa powder.
Whip: Use a hand mixer or a vigorous whisk to beat the mixture for 2–3 minutes. If using casein protein, it will naturally become very thick and “fluffy.”
The Secret Step: For maximum “fluff,” add a tiny pinch (1/4 tsp) of xanthan gum while mixing. This creates that airy, voluminous texture seen in the photo.
Chill: Place in the freezer for 10–15 minutes before eating to get that perfect chilled, soft-serve consistency.
Prep time: 20 mins | Chill time: 4 hours (minimum) | Serves: 9-12
1 box (approx. 7 oz) Ladyfinger biscuits or chocolate graham crackers
2 cups Heavy whipping cream (cold)
1/4 cup Powdered sugar
1 tsp Vanilla extract
2 tbsp Cocoa powder (sifted)
1 can (21 oz) Cherry pie filling
1/2 cup Semi-sweet chocolate shavings or sprinkles (for topping)
1/4 cup Milk (for dipping ladyfingers)
Prepare the Cream: In a large bowl, beat the cold heavy cream, powdered sugar, and vanilla until soft peaks form. Gently fold in the cocoa powder and continue beating until stiff peaks form.
Base Layer: Lightly dip ladyfinger biscuits into the milk (just a quick dunk to avoid sogginess) and line the bottom of a 9×9 inch glass dish.
Fruit Layer: Spread the entire can of cherry pie filling evenly over the biscuit base.
Second Biscuit Layer: Add another layer of milk-dipped ladyfingers directly on top of the cherries.
Top Layer: Spread the chocolate whipped cream over the top, smoothing it out with a spatula.
Garnish: Generously cover the top with chocolate shavings or sprinkles to match the photo.
Chill: Refrigerate for at least 4 hours (overnight is best) to allow the biscuits to soften into a cake-like texture.
Prep time: 10 mins | Infusion time: 3–5 days
1 cup Apple cider vinegar (preferably raw with “the mother”)
1 cup Raw honey
8–10 cloves Fresh garlic
Prep the Garlic: Peel the garlic cloves and crush or mince them. Let the crushed garlic sit for about 10 minutes before mixing; this activates allicin, the beneficial compound in garlic.
Combine: In a glass jar, combine the garlic, honey, and apple cider vinegar.
Mix: Stir or shake the jar vigorously for about 2 minutes until the honey and vinegar are well blended.
Infuse: Seal the jar and store it in the refrigerator. Let it sit for at least 3 to 5 days to allow the flavors and properties to infuse.
Consume: The standard suggestion is to take 1 to 2 tablespoons in the morning, often diluted in a glass of warm water.
While these ingredients are staple pantry items with individual health benefits, it is important to keep a few things in mind:
Consult a Professional: Natural remedies should supplement, not replace, professional medical advice or prescribed treatments for conditions like high blood pressure, arthritis, or infections.
Acidity: Apple cider vinegar is highly acidic. Always dilute it in water to protect your tooth enamel and stomach lining.
Honey Safety: Never give honey to infants under one year old due to the risk of botulism.
For your Facebook page, this type of “all-in-one” tonic is excellent for engagement. You might consider posting a video of the assembly process, as wellness “hacks” tend to get shared frequently!
A velvety smooth dessert featuring a chilled custard base and a warm, gooey caramelized banana topping.
Prep time: 15 minutes
Cook time: 15 minutes
Chilling time: 2–4 hours
Servings: 4–6 ramekins
| Component | Ingredients |
| Custard Base | 2 cups Whole Milk, 3 Egg Yolks, 1/3 cup Sugar, 2 tbsp Cornstarch, 1 tsp Vanilla Extract, Pinch of Salt |
| Caramelized Topping | 2 large Ripe Bananas (sliced), 1/4 cup Butter, 1/2 cup Brown Sugar, 2 tbsp Heavy Cream |
In a medium saucepan, whisk together the milk, egg yolks, sugar, cornstarch, and salt.
Place over medium heat, whisking constantly until the mixture thickens and just begins to bubble (usually about 5–7 minutes).
Remove from heat and stir in the vanilla extract.
Pour the custard into individual glass bowls or ramekins.
Cover with plastic wrap (press it directly onto the surface to prevent a skin from forming) and refrigerate for at least 2 hours.
In a skillet over medium heat, melt the butter and brown sugar together until bubbly.
Add the sliced bananas and cook for 2–3 minutes until they soften and the sauce turns a deep amber.
Stir in the heavy cream to create a silky caramel consistency. Remove from heat.
Just before serving, spoon the warm caramelized bananas generously over the chilled custard pots.
The “Skin” Trick: If you prefer a “skin” on your custard (some people love it!), don’t cover it with plastic wrap while it cools.
Banana Ripeness: Use bananas that have a few brown spots. They hold their shape better during caramelization than overripe ones but are sweeter than green ones.
Serving Temperature: The contrast between the ice-cold custard and the warm banana topping is what makes this dessert professional-grade.
Calories: 310 kcal
Total Fat: 14g
Carbohydrates: 42g
Protein: 5g
Sugar: 32g
Potassium Boost: Bananas are famously high in potassium, which helps with heart health and muscle function.
Gluten-Free: Since this uses cornstarch as a thickener instead of flour, it is naturally gluten-free.
Energy: The combination of simple and complex sugars provides a quick energy lift.
Q: Can I make this vegan?
A: Yes! Replace the milk with coconut milk, the eggs with an extra tablespoon of cornstarch, and use vegan butter for the topping.
Q: How long does it stay fresh?
A: The custard lasts 3 days in the fridge. However, the banana topping is best made fresh, as bananas tend to brown and release water over time.
Q: Can I add a “crunch” element?
A: Absolutely. Crushed digestive biscuits or graham crackers at the very bottom of the cup will turn this into a true Banoffee Pie experience.
2 Ripe Kiwis: Peeled and sliced (save a round for garnish!).
1 cup Fresh Baby Spinach: Packed tightly.
1 Frozen Banana: Sliced (this provides the creamy, “ice cream” texture).
1/2 cup Greek Yogurt: Plain or vanilla for protein and thickness.
1/2 cup Coconut Water: Or unsweetened almond milk for a lighter taste.
1 tsp Honey or Maple Syrup: Optional, depending on your preferred sweetness.
A squeeze of Lime: To brighten the flavors.
Prep the Greens: Place the spinach and your liquid base (coconut water or milk) into the blender first. Pulse until the leaves are completely liquefied. This prevents “leafy bits” from getting stuck in your straw.
Add the Fruit: Toss in the kiwi chunks, frozen banana slices, and yogurt. The frozen banana is the secret to a chilled, thick consistency without needing ice, which can sometimes water down the flavor.
Blend: Secure the lid and blend on high for 45–60 seconds until the mixture is vibrant green and perfectly uniform.
Adjust: Taste the smoothie. If it’s too tart, add your natural sweetener. If it’s too thick, splash in a little more liquid and pulse again.
Serve: Pour into a tall glass. Garnish with a kiwi slice on the rim or float a few seeds on top for that professional look.
Pro Tip: If you want an extra nutritional boost, add a tablespoon of chia seeds or flaxseeds before blending!
Prep time: 5 minutes | Servings: 1 large smoothie