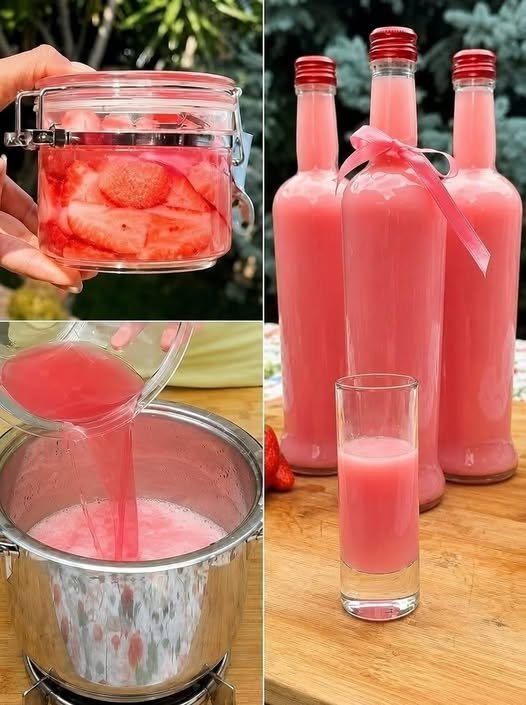
Tropical Kiwi-Banana-Pineapple Smoothie

Tropical Kiwi-Banana-Pineapple Smoothie

This blend offers a perfect balance of tart kiwi, creamy banana, and sweet pineapple.


Ingredients

2 Ripe Kiwis: Peeled and sliced (save a few rounds for garnish).


1 Large Banana: Frozen slices work best for a thicker, creamier texture.


1 cup Pineapple Chunks: Fresh or frozen.


1/2 cup Coconut Water or Orange Juice: For a tropical liquid base.


1/4 cup Greek Yogurt (Optional): To add protein and extra creaminess.


A splash of Lime Juice: To brighten the flavors.


Ice: Only if you are using room-temperature fruit.


Instructions

Prepare the Fruit: Peel the kiwis and the banana. If you want the smoothie to look exactly like the photo, keep a few kiwi seeds intact by blending on a lower speed at the end.


Combine: Place the banana, pineapple, kiwi, and your choice of liquid into a high-speed blender.


Blend: Start on a low speed and gradually increase to high. Blend for about 45–60 seconds until completely smooth.


Check Consistency: If it’s too thick, add a splash more liquid. If it’s too thin, add a few more frozen pineapple chunks or a handful of ice.


Serve: Pour into a chilled glass. Garnish with banana slices on the rim and kiwi rounds as shown in the image.


Pro Tips for the Best Result

The “Seed” Look: If you want those distinct black kiwi seeds visible (like in the picture) without them being pulverized, add the kiwi last and pulse the blender just a few times.


Natural Sweetness: Ensure your bananas have a few brown spots; they provide more natural sweetness, so you won’t need to add honey or sugar.

Ground Beef & Red Onion Pizza

Ground Beef & Red Onion Pizza

Prep time: 20 mins | Cook time: 12-15 mins | Serves: 2-4


Ingredients

The Base:


1 lb Pizza dough (store-bought or homemade)


1/2 cup Pizza sauce (tomato-based)


1 1/2 cups Shredded mozzarella cheese


1 tbsp Olive oil


The Toppings:


1/2 lb Ground beef (lean)


1/2 Red onion, thinly sliced into rings


Fresh parsley or cilantro, chopped (for garnish)


Beef Seasoning: 1/2 tsp salt, 1/2 tsp black pepper, 1/2 tsp garlic powder, and 1/4 tsp smoked paprika.


Instructions

Prepare the Beef:

In a skillet over medium-high heat, brown the ground beef until fully cooked. Drain any excess fat. Stir in the salt, pepper, garlic powder, and paprika. Set aside.


Preheat & Prep:

Preheat your oven to 425°F (220°C). If you have a pizza stone, place it in the oven while it heats. Lightly grease a pizza pan or baking sheet with olive oil.


Stretch the Dough:

On a lightly floured surface, stretch or roll your dough into a 12-inch circle. Transfer it to your prepared pan.


Layer the Flavors:


Spread a thin, even layer of pizza sauce over the dough, leaving a 1-inch border for the crust.


Sprinkle about 1 cup of mozzarella over the sauce.


Distribute the seasoned ground beef and red onion rings evenly across the top.


Add the remaining cheese over the toppings to “lock” them in.


Bake:

Place in the oven and bake for 12–15 minutes, or until the crust is golden brown and the cheese is bubbly and starting to brown in spots.


The Finishing Touch:

Remove from the oven and let it sit for 2 minutes. Sprinkle with the fresh herbs before slicing.


Pro Tips for a Better Crust

Room Temp Dough: If using store-bought dough, let it sit on the counter for 30 minutes before stretching; it will be much easier to work with.


Crispy Bottom: For an extra crispy base, pre-bake the plain dough for 3 minutes before adding your sauce and toppings.

Golden Ham & Cheese Calzones

Golden Ham & Cheese Calzones

Prep time: 20 mins | Cook time: 15–20 mins | Yields: 4 large calzones


Ingredients

For the Dough:


1 lb (450g) Pizza dough (store-bought or homemade)


1 tbsp Olive oil (for brushing)


1 tsp Dried parsley or Italian seasoning


Optional: A pinch of garlic powder and sea salt for the crust


For the Filling:


1.5 cups Shredded mozzarella cheese


1/2 cup Ricotta cheese (makes it extra creamy)


1 cup Cooked ham, diced or chopped


1/2 cup Sharp cheddar or Swiss cheese (for extra flavor)


1 Egg (beaten, for egg wash)


Instructions

Preheat & Prep:

Preheat your oven to 200°C (400°F). Line a large baking sheet with parchment paper so the cheese doesn’t stick if it oozes out.


Divide the Dough:

Divide your pizza dough into 4 equal portions. On a lightly floured surface, roll each piece into a circle about 8 inches (20cm) wide.


Layer the Goodness:

On one half of each circle, spread a dollop of ricotta. Top with a generous handful of mozzarella, cheddar, and the diced ham. Tip: Leave about a 1-inch border around the edge so you can seal it properly.


Fold and Seal:

Fold the empty half of the dough over the filling to create a half-moon shape. Use your fingers to pinch and “roll” the edges (as seen in your photo) or simply press down firmly with the tines of a fork to seal.


The Secret to the Glow:

Brush the tops of the calzones with the beaten egg wash. This is what gives them that shiny, professional bakery look. Sprinkle the top with dried parsley, garlic powder, and a little extra salt.


Bake:

Cut 2 small slits in the top of each calzone to let steam escape. Bake for 15–20 minutes, or until the crust is a deep golden brown and the cheese is bubbling inside

Serve: Let them cool for about 5 minutes before biting in—the melted cheese inside will be very hot!

Air Fryer Crab Shack Style Crab Cakes

These crab cakes are inspired by the classic Crab Shack style: light, flaky, and packed with crab flavor, with a crispy exterior from the air fryer instead of deep frying. Perfect as an appetizer or main course.


Ingredients

Crab Cakes

  • 1 pound lump crab meat, picked over for shells
  • ½ cup mayonnaise
  • 1 large egg
  • 1 tablespoon Dijon mustard
  • 1 teaspoon Worcestershire sauce
  • 1 teaspoon Old Bay seasoning (or seafood seasoning)
  • ½ teaspoon garlic powder
  • ½ teaspoon onion powder
  • 1 teaspoon fresh lemon juice
  • 2 tablespoons chopped fresh parsley
  • ½ cup breadcrumbs (plus extra for coating)
  • Salt and black pepper, to taste

For Air Frying

  • 1–2 tablespoons olive oil or melted butter (for brushing)
  • Nonstick cooking spray

Optional Serving

  • Lemon wedges
  • Tartar sauce, remoulade, or aioli
  • Fresh herbs for garnish

Instructions

1. Prepare the crab mixture

In a large mixing bowl, gently combine the crab meat, mayonnaise, egg, Dijon mustard, Worcestershire sauce, Old Bay seasoning, garlic powder, onion powder, lemon juice, parsley, and ½ cup breadcrumbs. Be careful not to break up the crab too much—you want chunks for texture.

Taste the mixture and adjust salt and pepper as needed.

2. Form the crab cakes

Divide the mixture into 8 equal portions (for smaller cakes) or 4 larger portions. Shape each portion into a patty about ¾–1 inch thick. For extra crispiness, lightly coat each patty with additional breadcrumbs.

Place the formed crab cakes on a plate or tray lined with parchment paper. Chill in the refrigerator for 15–30 minutes. Chilling helps the crab cakes hold together during air frying.

3. Preheat the air fryer

Preheat your air fryer to 375°F (190°C) for 3–5 minutes. Preheating ensures even cooking and crisping.

4. Prepare for air frying

Lightly spray the air fryer basket with nonstick cooking spray. Brush the crab cakes with a small amount of olive oil or melted butter on both sides. This will help them brown evenly.

5. Air fry the crab cakes

Carefully place the crab cakes in a single layer in the air fryer basket, leaving space between them. Cook at 375°F (190°C) for 10–12 minutes, flipping halfway through.

The crab cakes should be golden brown and firm to the touch. If they are larger or thicker, cook for an extra 2–3 minutes.

6. Serve

Remove the crab cakes from the air fryer and let them rest for 1–2 minutes. Serve hot with lemon wedges and your favorite dipping sauce, such as tartar sauce, remoulade, or a garlic aioli. Garnish with fresh parsley if desired.


Tips for Best Results

  • Use lump crab meat for a premium texture; avoid imitation crab.
  • Chill the patties before air frying to prevent them from falling apart.
  • Do not overcrowd the air fryer; cook in batches if necessary.
  • Light brushing of oil helps achieve that golden, crispy exterior without deep frying.
  • Add chopped green onions or bell peppers to the mixture for extra flavor.

Storage and Reheating

  • Store leftover crab cakes in an airtight container in the refrigerator for up to 2 days.
  • Reheat in the air fryer at 350°F (175°C) for 3–5 minutes to restore crispiness. Avoid microwaving to keep the exterior crunchy.

Crispy Golden Fried Fish & Chips

Crispy Golden Fried Fish & Chips

Serves: 2-3 | Prep time: 20 mins | Cook time: 15 mins


1. The Ingredients

For the Fish:


Fish: 1 lb (450g) white fish fillets (Cod, Haddock, or Pollock), cut into large chunks.


Breading: 1 cup All-purpose flour + 1 cup Panko breadcrumbs (for extra texture).


Seasoning: 1 tsp Garlic powder, 1 tsp Paprika, ½ tsp Salt, and ½ tsp Black pepper.


Binder: 2 Large eggs (beaten).


Oil: Vegetable or Canola oil for frying.


For the Chips:


Potatoes: 3-4 Large Russet potatoes, cut into thick batons.


Seasoning: Sea salt to taste.


For the Quick Tartar Sauce:


½ cup Mayonnaise.


1 tbsp Finely chopped pickles or capers.


1 tsp Fresh lemon juice.


1 tsp Dried or fresh parsley.


2. Cooking Instructions

Step 1: Prep the Chips

Peel and cut your potatoes into fries. Soak them in cold water for 30 minutes to remove excess starch (this makes them crispier!).


Pat them completely dry with a paper towel.


Fry them in oil at 325°F (160°C) for about 5 minutes until soft but not browned. Remove and drain.


Increase oil heat to 375°F (190°C) and fry again for 2–3 minutes until golden and crispy. Salt immediately.


Step 2: Bread the Fish

Dry the fish: Use paper towels to remove all moisture from the fillets. This prevents the breading from falling off.


Dredge: Coat each piece of fish in flour (mixed with your seasonings), then dip into the beaten egg, and finally press firmly into the Panko breadcrumbs.


Step 3: Fry to Perfection

Carefully place the fish into the hot oil (350°F / 175°C).


Fry for 3–5 minutes per side depending on thickness. You are looking for a deep mahogany gold color like the image.


Drain on a wire rack (rather than a plate) to keep the bottom from getting soggy.


3. Serving Suggestions

Garnish: Sprinkle with fresh chopped parsley and serve with at least 4–5 lemon wedges to cut through the richness.


The Dip: Mix your tartar sauce ingredients in a small bowl and chill until ready to serve.


Pro Tip: For the most authentic “pub” look, serve your meal on parchment paper over a wooden board or in a small basket.

Fresh Amla Juice Recipe

Fresh Amla Juice Recipe

Ingredients

4–5 Fresh Amlas (Indian Gooseberries)


2 cups Water (chilled or room temperature)


1 inch Ginger (peeled and sliced)


1–2 tbsp Honey or Jaggery (optional, to balance the tartness)


A pinch of Black Salt (optional, for a savory kick)


4–5 Mint leaves (for extra freshness)


Step-by-Step Instructions

Prep the Fruit: Wash the amlas thoroughly. Use a knife to cut them into small pieces and discard the hard inner seeds.


Blend: Put the amla pieces, ginger, and mint leaves into a blender. Add about half a cup of water to help it blend smoothly into a fine paste.


Strain: Use a fine-mesh strainer or a clean muslin cloth to strain the pulp into a bowl or pitcher. Press down with a spoon to extract every bit of juice.


Dilute: Add the remaining 1.5 cups of water to the concentrated juice.


Season: Stir in your sweetener (honey/jaggery) and a pinch of black salt if you like.


Serve: Pour into a glass and enjoy immediately for the best flavor and nutrient retention.


Quick Tips

Drink it Fresh: Amla juice can oxidize and turn brown if left out too long, so it’s best to drink it right after making it.


Dilution is Key: Pure amla juice is very strong. If it feels too “sharp” on your tongue, simply add a little more water.

Classic Fresh Carrot Juice

Classic Fresh Carrot Juice

Yields: Approximately 1 large glass


Ingredients

Carrots: 6–8 large carrots (organic is preferred if you don’t want to peel them).


Water: 1/2 cup (only needed if using a blender).


Optional Boosters:


Lemon: 1/2 a lemon (peeled) for brightness.


Ginger: A 1-inch knob for a spicy kick.


Apple: 1 green apple if you prefer a bit more sweetness.


Equipment

A high-speed juicer OR a powerful blender and a nut milk bag (or fine-mesh strainer).


Instructions

Step 1: Prep the Carrots

Wash the carrots thoroughly under cold water. Scrub off any dirt. If they aren’t organic, you may want to peel them to remove any bitterness from the skin. Trim off the green tops (though you can save a small sprig for garnish like in your photo!).


Step 2: Juice or Blend

If using a Juicer: Simply feed the carrots through the chute one by one. The machine will separate the pulp automatically.


If using a Blender: Chop the carrots into 1-inch chunks. Place them in the blender with 1/2 cup of water. Blend on high until it becomes a thick puree.


Step 3: Strain (Blender Method only)

Place a nut milk bag or a fine-mesh strainer over a pitcher. Pour the carrot puree into the bag and squeeze firmly until all the liquid is extracted. You’ll be left with dry pulp in the bag and smooth juice in the pitcher.


Step 4: Serve

Pour the juice into a tall glass over ice if desired. Drink it immediately to get the maximum nutrient benefit, as fresh juice oxidizes quickly.


Pro Tip: Adding a tiny drop of high-quality oil (like olive or avocado oil) to your juice can actually help your body absorb the fat-soluble Vitamin A in the carrots more effectively!

🥭 The Ultimate Mango Cream Parfait

🥭 The Ultimate Mango Cream Parfait

Ingredients

For the Mango Base: 2 cups frozen mango chunks, 1/2 cup mango nectar (or orange juice), and 1 tbsp honey or condensed milk (optional).


For the Cream Layers: 1 cup heavy whipping cream (cold), 2 tbsp powdered sugar, and 1/2 tsp vanilla extract.


For the Topping: 1 fresh ripe mango (cubed) and extra whipped cream.


Instructions

Prep the Cream: In a chilled bowl, whip the heavy cream, powdered sugar, and vanilla until stiff peaks form. You want it thick enough to hold those beautiful white layers without sinking.


Blend the Mango: Place the frozen mango and nectar into a blender. Blend until completely smooth and thick—it should have a “soft serve” consistency. If it’s too thin, add more frozen mango.


The “Swirl” Technique: * Start by dropping a generous spoonful of mango puree into the bottom of a clear glass.


Add a layer of whipped cream, using a spoon to push it against the sides of the glass so the layers are visible.


Repeat until you reach the top.


The Grand Finale: Pipe a high swirl of whipped cream on top. Pile on the fresh mango cubes and perhaps a drizzle of mango syrup if you’re feeling extra indulgent.


Pro-Tips for Success

Temperature is Key: Keep your whipped cream in the fridge until the very second you are ready to layer. If it gets warm, the layers will bleed together.


The Mango: For that bright yellow color, use Alphonso or Ataulfo (Honey) mangoes. They are less fibrous and much sweeter.


Texture Add-on: To turn this into a “Mango Graham” style, sprinkle crushed graham crackers between the layers for a nice crunch.

The Best Spinach and Cheese Omelette Recipe

The Best Spinach and Cheese Omelette Recipe

Ingredients

3 large eggs

1 teaspoon of butter or olive oil

1 cup of fresh spinach

½ cup of shredded cheese (mozzarella, cheddar, or your preferred cheese)

1 tablespoon of milk (optional)

Salt and pepper to taste

Instructions

Wash and drain the spinach.

Beat the eggs with the milk, salt and pepper.

In a frying pan with oil or butter, sauté the spinach for 1-2 minutes.

Pour the beaten eggs over the spinach in the pan.

Add the grated cheese on top.

Fold it with a spatula and cook for another 1-2 minutes.

Serve hot, alone or with company.

Notes

Use well-drained frozen spinach if you don’t have fresh.

Try different types of cheese to vary the flavor.

Ideal with a salad or toasted bread.

Prep Time: 5 minutes

Cook Time: 5 minutes

Nutrition

Serving Size: 1 tortilla

Calories: 280 kcal

Sugar: 1 g

Sodium: 360 mg

Fat: 20 g

Saturated Fat: 8 g

Unsaturated Fat: 10 g

Trans Fat: 0 g

Carbohydrates: 3 g

Fiber: 1 g

Protein: 18 g

Cholesterol: 220 mg

French Dip Bicuits

French Dip Bicuits

Why You’ll Love This French Dip Bicuits

You’ll love these French Dip Biscuits because they’re the perfect combo of tender, flaky biscuits and savory roast beef, all drenched in flavorful au jus. They’re easy to make, super satisfying, and ideal for a quick weeknight meal or a cozy weekend treat. Plus, they have that melt-in-your-mouth goodness with a touch of elegance!

Easy to Make: These French Dip Biscuits come together quickly with simple ingredients, perfect for busy weeknights.

Comforting Flavors: The tender beef, gooey cheese, and savory au jus create a cozy, irresistible bite every time.

Crowd-Pleaser: Whether for a family dinner or a casual gathering, everyone will love these handheld treats!

Customizable: You can easily add your favorite cheeses or seasonings to make them your own!

Ingredients for French Dip Bicuits


Refrigerated biscuits (16.3 oz, 8-count): Make sure to use canned biscuits for convenience, preferably flaky or buttermilk varieties for texture.

Thinly sliced deli roast beef (1 lb): Opt for a high-quality deli roast beef, preferably one with a good balance of fat and lean for the best flavor.

Creamy horseradish sauce (2 Tbsp or to taste): Adjust to taste depending on how much of a spicy kick you prefer.

Provolone cheese (8 slices): Use a mild or sharp provolone depending on the flavor intensity you prefer.

Au Jus Gravy mix (1 oz packet): A dry mix that typically just needs water to prepare, great for dipping.

How To Make This French Dip Bicuits


Preheat the oven to 400ºF and line a baking sheet with parchment paper.

Separate each biscuit into two layers. Spread horseradish sauce on each layer.

Assemble by placing a slice of provolone cheese and some roast beef on half of the biscuit layers. Top with the remaining biscuit layers and pinch the edges to seal.

Place the assembled biscuits on the prepared baking sheet.

Bake for 12 to 15 minutes, or until golden brown.

Prepare the Au Jus gravy according to the package directions while the biscuits are baking.

Storage Options


To store French Dip Biscuits, follow these tips:

  1. Refrigerator: Place biscuits in an airtight container and refrigerate for up to 3-4 days. Reheat in the oven for a crispier texture.
  2. Freezer: Wrap individually in plastic wrap or foil, then place in a freezer-safe bag. They can be frozen for up to 2 months. Thaw overnight in the fridge before reheating.
  3. Reheating: For the best results, reheat in the oven at 350°F until warmed through, about 10-15 minutes.

This keeps them fresh and delicious for later!

Variations and Substitutions

Looking to mix things up with your French Dip Biscuits? Try swapping out the roast beef for turkey or shredded chicken for a lighter twist. For a cheesy upgrade, use Swiss, provolone, or even pepper jack if you like a little heat! You can also add sautéed mushrooms, onions, or a hint of horseradish for extra flavor. Want to make it gluten-free? Use your favorite gluten-free biscuit mix, and you’re good to go!

Ingredients

  • 1 16.3 oz can of refrigerated biscuits (8-count)
  • 1 lb thinly sliced deli roast beef
  • 2 Tbsp creamy horseradish sauce adjust to taste
  • 8 slices provolone cheese
  • 1 1 oz packet of Au Jus gravy mix

Instructions

  • Preheat the oven to 400°F and line a baking sheet with parchment paper.
  • Split each biscuit in half horizontally. Spread a layer of horseradish sauce on each piece.
  • On half of the biscuit layers, place a slice of provolone cheese followed by a portion of roast beef. Cover with the remaining biscuit layers and press the edges together to seal.
  • Arrange the biscuits on the lined baking sheet and bake for 12-15 minutes, or until they turn golden brown.
  • While the biscuits bake, prepare the Au Jus gravy according to the package instructions. Serve alongside the biscuits for dipping.

Banana Breakfast Smoothie Recipe

Banana Breakfast Smoothie Recipe

Ingredients

1 ripe banana (frozen bananas make for a creamier, colder texture)


1 cup milk (dairy or your favorite plant-based alternative like almond or oat)


2 tbsp rolled oats (adds fiber and keeps you full longer)


1 tbsp peanut butter (provides healthy fats and protein)


1 tsp honey (optional, for a touch of natural sweetness)


Optional Garnish: A sprinkle of chia seeds, extra oat flakes, or banana slices.


Instructions

Prep the Banana: Peel the banana. If you have time, slicing and freezing it beforehand will give the smoothie a milkshake-like consistency without needing ice.


Combine: Add the milk to your blender first (this helps the blades spin more easily), followed by the banana, oats, peanut butter, and honey.


Blend: Pulse until the oats are fully broken down and the mixture is completely smooth. This usually takes about 45 to 60 seconds depending on your blender’s power.


Adjust: If the smoothie is too thick, add a splash more milk. If it’s too thin, add a few more oats or a couple of ice cubes and blend again.


Serve: Pour into a tall glass. Top with a few banana slices and a pinch of oats or chia seeds as shown in the image for that “cafe-style” look.


Pro Tips

Boost the Protein: You can add a scoop of vanilla protein powder or 1/4 cup of Greek yogurt for an extra protein kick.


Make it Vegan: Simply use a plant-based milk and swap the honey for maple syrup or a pitted date.

🍪 Healthy Pumpkin Seed Oat Cookies (Kid-Approved!)

These crispy-chewy cookies are naturally sweetened, packed with nutrients, and perfect for lunchboxes or guilt-free snacking. The best part? Kids love them—and they’ll never guess they’re actually healthy!


🧾 Ingredients

  • 1 ½ cups rolled oats
  • ½ cup pumpkin seeds
  • ¼ cup sesame seeds
  • ½ cup honey
  • ¼ cup coconut oil (melted)
  • 1 tsp vanilla extract
  • 1 tsp cinnamon
  • Pinch of salt

👩‍🍳 Step-by-Step Instructions

1. Prep Your Oven

  • Preheat oven to 180°C (350°F)
  • Line a baking tray with parchment paper

2. Mix Dry Ingredients

  • In a large bowl, combine:
    • Rolled oats
    • Pumpkin seeds
    • Sesame seeds
    • Cinnamon
    • Salt
  • Stir well so everything is evenly distributed

3. Add Wet Ingredients

  • Pour in:
    • Honey
    • Melted coconut oil
    • Vanilla extract
  • Mix until everything is fully coated and sticky

4. Shape the Cookies

  • Scoop about 1–2 tablespoons of mixture
  • Place on tray and flatten with a spoon or your fingers
  • Keep them thin for extra crispiness

5. Bake to Perfection

  • Bake for 10–15 minutes
  • Edges should turn golden brown
  • Let them cool completely (they’ll crisp up more!)

🔥 Pro Tips (Secret to Perfect Cookies)

  • For crunchier cookies: bake a little longer
  • For softer cookies: reduce baking time slightly
  • Add-ins idea:
    • Raisins 🍇
    • Dark chocolate chips 🍫
    • Chopped nuts 🌰

💪 Why These Cookies Are Healthy

  • Oats → fiber for digestion
  • Pumpkin seeds → rich in protein & magnesium
  • Sesame seeds → healthy fats & calcium
  • Honey → natural sweetener (no refined sugar!)

👶 Kid-Friendly Hack

Tell your kids they’re “energy cookies” or “superhero snacks” — works every time 😄


🧊 Storage Tips

  • Store in an airtight container:
    • Room temp: up to 5 days
    • Fridge: up to 10 days
  • You can also freeze them for 1 month

🍌 Chocolate Chip Banana Bread Recipe

🍌 Chocolate Chip Banana Bread Recipe

Ingredients

Bananas: 3 large ripe bananas (the spottier, the better!)


Butter: 1/2 cup unsalted butter, melted and slightly cooled


Sugar: 3/4 cup granulated sugar (or brown sugar for a richer flavor)


Egg: 1 large egg, beaten


Vanilla: 1 teaspoon vanilla extract


Baking Soda: 1 teaspoon


Salt: A pinch of salt


Flour: 1 1/2 cups all-purpose flour


Chocolate Chips: 1/2 cup semi-sweet chocolate chips (plus extra for sprinkling on top)


Instructions

Preheat & Prep: Preheat your oven to 350°F (175°C). Grease a 4×8-inch loaf pan with butter or non-stick spray.


Mash: In a large mixing bowl, mash the ripe bananas with a fork until smooth.


Mix Wet Ingredients: Stir the melted butter into the mashed bananas. Add the sugar, beaten egg, and vanilla extract. Mix until well combined.


Add Dry Ingredients: Sprinkle the baking soda and salt over the mixture and stir. Gently fold in the flour until just combined.


Tip: Don’t overmix! Overmixing makes the bread tough instead of fluffy.


Fold: Gently fold in the chocolate chips.


Bake: Pour the batter into your prepared loaf pan. Bake for 50 to 60 minutes, or until a toothpick inserted into the center comes out clean.


Cool: Let the bread cool in the pan for 10 minutes, then remove it and place it on a wire rack to cool completely before slicing.


💡 Pro-Tips for the Best Loaf

The Bananas: If your bananas aren’t ripe enough, you can bake them (in their peels) at 300°F for about 15 minutes until they turn black and soft.


Add-ins: If you want some crunch like the loaf in the photo, you can add 1/2 cup of chopped walnuts or pecans.


Storage: Wrap the cooled bread in plastic wrap; it actually tastes even better the second day as the flavors settle!

Mediterranean Burger Bowl Recipe (Healthy Greek-Style Bowl)

🥗 The Ultimate Mediterranean Burger Bowl

High-Protein | Low-Carb | 30-Minute Meal

The Components

Part Key Ingredients
The Patties Ground turkey, spinach, feta, garlic, oregano, and cumin.
The Base Chopped Romaine or Mixed Greens.
The Toppings Cucumber, cherry tomatoes, red onion, and Kalamata olives.
The Sauce Greek yogurt, fresh dill, lemon juice, and garlic.

Quick Execution Guide

  1. Mix & Prep: Combine patty ingredients gently (don’t overwork the meat!). Form 4 patties with a thumbprint dimple in the center.

  2. The “Zing” Sauce: Whisk the yogurt, dill, and lemon. Let it chill in the fridge—it tastes better the longer it sits!

  3. Sear: Cook patties in olive oil for 5–6 minutes per side (until internal temp hits 165°F).

  4. Assemble: Layer greens → veggies → warm patty → huge dollop of tzatziki.

💡 Pro-Tip: If you are meal-prepping this, keep the warm patties and the cold yogurt sauce in separate containers. Nothing ruins a good bowl faster than wilted lettuce from a hot burger!


Customization Ideas

  • The “Keto” Flip: Add half an avocado and an extra drizzle of extra virgin olive oil.

  • The “Gourmet” Flip: Swap the turkey for ground lamb for an even more authentic Greek taverna flavor.

  • The “Crunch” Factor: Add a tablespoon of toasted pine nuts on top.

3-Ingredient Weight Watchers Blueberry Cobbler

3-Ingredient Weight Watchers Blueberry Cobbler

Estimated Points: Approx. 4–5 Points per serving (depending on your specific plan)

Ingredients:

  • 2 cups Fresh or frozen blueberries (Zero Points!)

  • 1 box Sugar-free or “Light” Yellow Cake Mix (like Pillsbury Sugar-Free)

  • 1 can (12 oz) Diet Lemon-Lime Soda (Zero Points!)

  • Optional: A dash of cinnamon or lemon zest for extra zing.

Instructions:

  1. Preheat your oven to 350°F (175°C).

  2. Layer the Berries: Spray a baking dish with non-stick spray and spread the blueberries evenly across the bottom.

  3. Add the Mix: Sprinkle the dry cake mix evenly over the top of the berries. Do not stir!

  4. The Soda Trick: Slowly pour the diet soda over the cake mix. Try to cover as much of the dry powder as possible. Again, do not stir—the bubbling soda reacts with the mix to create that “cobbler” texture.

  5. Bake: Pop it in the oven for 35–45 minutes until the top is golden brown and the blueberries are bubbling through.


Pro-Tips for Your Next Batch:

  • The “Crunch” Factor: If you like a little crunch, you can spray the top of the cake mix lightly with some zero-point butter spray before baking.

  • The Scoop: Pair it with a scoop of Fat-Free Cool Whip or Halo Top Vanilla to keep that “delish” feeling without the guilt.

Creamy Chicken & Garlic Cannelloni

Creamy Chicken & Garlic Cannelloni

Prep time: 20 mins | Cook time: 30 mins | Serves: 4


Ingredients

The Filling:


2 cups cooked chicken, shredded or finely chopped (rotisserie works great)


1 cup Ricotta cheese


1 cup Shredded Mozzarella


1/4 cup Grated Parmesan


1 tsp Italian seasoning


12-14 Cannelloni tubes (or manicotti)


The White Garlic Sauce:


3 tbsp Butter


3 cloves Garlic, minced


3 tbsp All-purpose flour


2 ½ cups Whole milk


½ cup Heavy cream


½ cup Parmesan cheese


Salt & Pepper to taste


Topping:


1 cup Shredded Mozzarella (for that golden crust)


Fresh parsley, chopped (for the garnish seen in your photo)


Instructions

Prep the Sauce: In a saucepan, melt the butter over medium heat. Add the garlic and sauté for 1 minute until fragrant. Whisk in the flour to form a paste (roux) and cook for 1 minute. Slowly whisk in the milk and cream. Simmer until thickened, then stir in the Parmesan until melted. Set aside.


Make the Filling: In a large bowl, mix the shredded chicken, ricotta, mozzarella, Parmesan, and Italian seasoning. Season with a pinch of salt and pepper.


Stuff the Tubes: Transfer the chicken mixture into a piping bag (or a sturdy plastic bag with the corner snipped off). Pipe the filling into the uncooked cannelloni tubes.

The Ultimate Peanut Butter Banana Smoothie

The Ultimate Peanut Butter Banana Smoothie

Prep time: 5 minutes


Servings: 1 large glass


Ingredients

Category Ingredient Quantity

The Base Frozen Bananas (peeled before freezing) 2 medium

Protein/Fat Creamy Peanut Butter 2 tbsp

Liquid Almond milk (or milk of choice) 1 cup

Sweetener Honey or Maple Syrup (optional) 1 tsp

Texture Greek Yogurt (plain or vanilla) 1/4 cup

Toppings Fresh banana slices, crushed peanuts, extra peanut butter drizzle As desired

Instructions

Prep the Glass: For that professional “dripping” look shown in your photo, take a spoonful of room-temperature peanut butter and swirl it around the inside rim of your glass, letting it naturally drip down the sides. Place the glass in the freezer for 2 minutes to “set” the drips.


Blend: Add the frozen bananas, 2 tablespoons of peanut butter, milk, and yogurt into a high-speed blender.


Adjust Consistency: Blend until completely smooth. If it’s too thick, add a splash more milk. If you want it thicker (like a milkshake), add a few ice cubes or another half of a frozen banana.


Assemble: Pour the mixture into your prepared glass.


Garnish: Top with fresh banana slices and a sprinkle of crushed peanuts for that satisfying crunch.


Pro Tips for the Best Result

Use Overripe Bananas: The spottier the banana, the sweeter the smoothie!


Frozen is Key: Using frozen bananas instead of ice ensures the flavor isn’t “watered down” and creates that creamy, soft-serve texture.


Add a Boost: Want more protein? Toss in a scoop of vanilla protein powder or a tablespoon of chia seeds.

🥤 The Ultimate Blueberry Swirl Milkshake

🥤 The Ultimate Blueberry Swirl Milkshake

Prep time: 10 mins | Servings: 1


Ingredients

Component Items Needed

The Base 2 cups Vanilla bean ice cream, 1/2 cup Frozen blueberries, 1/4 cup Whole milk (or heavy cream for extra thickness)

The Swirl 2 tbsp Blueberry jam or a quick homemade reduction

Toppings Whipped cream (stiff peaks), Fresh blueberries, 1 Mint sprig

Instructions

Prep the Glass:

Take a spoon and drizzle the blueberry jam or syrup around the inside walls of your glass. Place the glass in the freezer for 5 minutes so the “swirl” stays in place when you pour the shake.


Blend the Shake:

In a high-speed blender, combine the vanilla ice cream, frozen blueberries, and milk.


Tip: Start with less milk. You want it thick enough that it doesn’t immediately collapse. Blend until completely smooth and a deep lavender color.


The Assembly:

Remove your chilled glass from the freezer. Pour the blended mixture into the glass, leaving about an inch at the top.


The “Soft Serve” Top:

To get that perfect swirl on top like the photo, use a piping bag with a large star tip filled with either extra-thick whipped cream or slightly softened blueberry-tinted ice cream.


Garnish:

Drop a few fresh blueberries into the folds of the cream, add a tiny bit more syrup, and finish with a fresh mint leaf and a clear straw.


Pro-Tips for the Best Texture

The Temperature: Use a chilled glass! It prevents the shake from melting against the sides, keeping those purple streaks sharp and beautiful.


The Color: If your blueberries aren’t giving you that “electric” purple, a tiny splash of beet juice or a purple food-grade tint works wonders without changing the flavor.

🍓 Creamy Strawberry Smoothie Recipe

🍓 Creamy Strawberry Smoothie Recipe

Ingredients

Frozen Strawberries: 2 cups (using frozen is key for that thick, frosty texture).


Milk of Choice: 1 cup (Whole milk, almond, or oat milk all work great).


Greek Yogurt: 1/2 cup (Vanilla or Plain) for creaminess and protein.


Sweetener: 1–2 tablespoons of honey, maple syrup, or agave (adjust to your preference).


Vanilla Extract: 1/2 teaspoon for a “strawberries and cream” flavor.


Optional: 1 scoop of vanilla protein powder for an extra boost.


Instructions

Layer the Liquid First: Pour the milk, yogurt, sweetener, and vanilla extract into your blender. Adding liquids first helps the blades move more easily.


Add the Fruit: Add the frozen strawberries on top of the liquid base.


Blend: Start on a low speed to break up the frozen berries, then increase to high.


Check Consistency: * Too thick? Add a splash more milk.


Too thin? Add a few more frozen berries or a handful of ice.


Serve: Pour into a tall glass or clear plastic cup. To get the “swirled” look on top like the photo, use a spoon to gently peak the surface of the smoothie before putting on the lid.


Pro-Tips for the Best Result

The “Swirl” Effect: If you want that thick, soft-serve look shown in the image, use slightly less milk. You may need to stop the blender and stir it a few times to get it perfectly smooth.


Fresh Garnish: Keep a few fresh strawberries aside to place around your glass for that professional aesthetic!

Strawberry Banana Bliss Smoothie


Strawberry Banana Bliss Smoothie

Serves: 1


Prep time: 5 minutes


Ingredients

1 cup fresh or frozen strawberries


1 medium banana


1 cup milk of your choice (dairy or plant-based like almond, oat, or soy)


1 tablespoon honey (optional, for added sweetness)


1/2 cup ice cubes (optional, for a thicker, chilled texture)


Instructions

Prep the Fruit: If using fresh strawberries, remove the green stems. Peel the banana (you can break it into chunks to help your blender out).


Layer the Blender: To ensure a smooth blend, add your liquid (milk) first, followed by the honey, then the fruit and ice.


Blend: Secure the lid and blend on high until the mixture is completely smooth and creamy.


Adjust: If the smoothie is too thick, add a splash more milk. If it’s too thin, add a few more ice cubes or frozen fruit and blend again.


Serve: Pour into a glass and enjoy immediately.


Pro-Tip

For an extra creamy texture without using ice, try using a frozen banana. Just peel and freeze your overripe bananas ahead of time!

🥣 Berry Smoothie Power Bowl Recipe

🥣 Berry Smoothie Power Bowl Recipe

🌟 Ingredients

For the smoothie base:


1 cup frozen blueberries


1 cup frozen strawberries


½ banana (for natural sweetness and creaminess)


½ cup yogurt (plain or vanilla)


¼–½ cup milk (dairy or plant-based like almond or oat)


For the toppings:


Fresh strawberry slices


Fresh blueberries and raspberries


Chia seeds


Hemp seeds


Flax seeds


Chopped pecans and walnuts


Coconut flakes


A drizzle of mango puree or honey (optional)


🥄 Instructions

1. Prepare the smoothie base

Add the frozen blueberries, frozen strawberries, banana, yogurt, and milk to a blender. Blend until the mixture becomes thick, smooth, and creamy. The consistency should be thicker than a regular smoothie so it holds toppings well.


If it is too thick, add a small amount of milk. If it is too thin, add a few more frozen fruits and blend again.


2. Pour into a bowl

Once blended, pour the smoothie mixture into a wide bowl. Use a spoon to gently smooth the surface so it is even and ready for decorating with toppings.


3. Add the toppings

Arrange the toppings in neat rows or sections for a colorful and appealing look:


Place sliced strawberries on one side


Add blueberries and raspberries next to them


Sprinkle chia, hemp, and flax seeds in small lines


Add nuts and coconut flakes for crunch


Finish with a light drizzle of mango puree or honey for natural sweetness


🍽️ Serving Tips

Serve immediately while the smoothie is cold and thick. This bowl is perfect for breakfast, a light lunch, or a refreshing snack on warm days. It is packed with fiber, vitamins, healthy fats, and natural energy to keep you feeling satisfied. 💪✨

10-Minute Yogurt Flatbread (No-Oven Recipe)

10-Minute Yogurt Flatbread (No-Oven Recipe)

This quick and versatile flatbread is a perfect solution for busy days. Using just a few simple ingredients, you can create a soft, chewy bread that pairs beautifully with savory dishes or works perfectly as a stand-alone snack.


Ingredients

Yields 6–8 Flatbreads

  • 4 cups (480g) Flour (All-purpose or whole wheat)

  • 1 cup (220g) Plain Yogurt (Unsweetened)

  • 1 cup (200ml) Water

  • 1 tbsp Oil (Optional, for added softness)

  • A pinch of Salt


Step-by-Step Instructions

  1. Prepare the Dough: In a large mixing bowl, combine the flour, yogurt, and water. Add the salt and oil if using. Mix until a cohesive dough forms.

  2. Knead: Transfer the dough to a lightly floured surface. Knead for 5–7 minutes until the texture is smooth and elastic. If the dough feels too sticky, add a tablespoon of flour at a time; if too dry, add a splash of water.

  3. Shape: Divide the dough into 6–8 equal-sized balls. Use a rolling pin to flatten each ball into a thin, round circle.

  4. Cook: Heat a non-stick pan or a cast-iron skillet over medium-high heat. Place one flatbread in the pan and cook for 2–3 minutes. Once golden-brown spots appear on the bottom, flip and cook the other side for another 2 minutes. Use a spatula to press down gently, ensuring even browning.

  5. Serve: Remove from the heat and keep the cooked bread wrapped in a clean kitchen towel to maintain softness. Serve warm.


Pro-Tips for Success

  • Flavor Variations: To elevate the taste, try kneading fresh herbs (like rosemary or cilantro), garlic powder, or a pinch of paprika directly into the dough.

  • Storage: Store leftovers in an airtight container at room temperature for up to 3 days. These also freeze exceptionally well; simply reheat in a dry pan for a few seconds to restore the texture.

  • Flour Choice: Using whole wheat flour will provide a heartier texture and increase the fiber content, while all-purpose flour yields a lighter, more classic “café-style” flatbread.


Nutritional Highlights

  • High Protein: The inclusion of yogurt adds a boost of protein and promotes a softer crumb.

  • No Added Sugar: A clean, simple alternative to store-bought breads.

  • Digestive Friendly: Using yogurt as a base introduces beneficial cultures to the dough.

Triple Fruit Smoothie Recipe (Green, Berry, and Tropical)

Triple Fruit Smoothie Recipe (Green, Berry, and Tropical)

Ingredients

1. Green Smoothie (Spinach–Kiwi)

1 cup fresh spinach


1 ripe banana


1 kiwi, peeled


1 cup milk or yogurt


1 teaspoon chia seeds (optional)


3–4 ice cubes


2. Pink Berry Smoothie (Strawberry–Banana)

1 cup fresh or frozen strawberries


1 ripe banana


1 cup milk or yogurt


1 teaspoon honey or dates for natural sweetness


3–4 ice cubes


3. Yellow Tropical Smoothie (Mango–Orange)

1 cup chopped mango


½ cup fresh orange juice


½ banana


½ cup yogurt


3–4 ice cubes


Instructions

Step 1: Prepare the Fruits

Wash all fruits thoroughly. Peel the banana, kiwi, and mango. Chop them into smaller pieces so they blend smoothly.


Step 2: Blend the Green Smoothie

Add spinach, banana, kiwi, milk, and ice into a blender. Blend for 30–40 seconds until smooth and creamy. Pour into a jar and set aside.


Step 3: Blend the Pink Smoothie

Add strawberries, banana, milk, honey, and ice to the blender. Blend until the mixture turns smooth and slightly thick. Pour into another jar.


Step 4: Blend the Yellow Smoothie

Add mango, orange juice, banana, yogurt, and ice into the blender. Blend until creamy and bright yellow in color.


Serving

Pour each smoothie into separate jars or glasses. You can garnish with:


sliced strawberries


chia seeds


small spinach leaves or fruit slices


Serve immediately while chilled for the best taste and texture.


Tips for Best Results

Use frozen fruits if you prefer thicker smoothies.


Yogurt makes the texture creamier and adds protein.


You can replace dairy milk with almond, soy, or oat milk for a lighter option.


These three smoothies provide a great mix of vitamins, fiber, and natural sweetness—perfect for breakfast, a refreshing snack, or a post-exercise drink. 🌈

Naturally Sweet Oatmeal, Apple & Carrot Bake

Naturally Sweet Oatmeal, Apple & Carrot Bake

This wholesome bake is a nourishing, flourless, and sugar-free treat. The sweetness is derived entirely from the natural sugars in the apples, carrots, apricots, and raisins, making it an excellent choice for a clean-eating lifestyle. It is soft, filling, and perfect for breakfast, snacks, or a healthy dessert.


Ingredients

Serves 6–8

  • 2 cups (200g) Rolled Oats (pulsed in a blender)

  • 1 tsp Baking Powder

  • 1 cup (240ml) Milk (unsweetened)

  • 1 large Carrot (finely grated)

  • 1 Apple (grated with peel for extra fiber)

  • 9 Dried Apricots (rinsed with hot water and chopped)

  • 4 tbsp Raisins (rinsed with hot water)

  • Optional: A pinch of cinnamon or a splash of vanilla extract (ensure they are sugar-free)


Step-by-Step Instructions

  1. Preparation: Preheat your oven to 180°C (350°F). Lightly grease a round baking tin or a rectangular baking dish with a small amount of oil or butter.

  2. Prepare the Oats: Place the rolled oats in a blender and pulse briefly until they reach a coarse, meal-like consistency. Do not blend them into a fine flour; keeping some texture is key for this bake.

  3. Mix Dry Ingredients: In a large mixing bowl, whisk together the pulsed oats and the baking powder until well combined.

  4. Add Wet & Fruit Ingredients: Stir in the milk, grated carrot, and grated apple. Add the chopped apricots and raisins.

  5. Combine: Mix all ingredients thoroughly. The batter should be thick, heavy, and moist.

  6. Bake: Pour the mixture into your prepared dish, smoothing the top with a spatula. Bake for 35–40 minutes, or until the bake is firm to the touch and the edges are lightly golden.

  7. Cool & Serve: Allow the bake to cool significantly before slicing. The texture improves and firms up as it cools, making it easier to serve.


Chef’s Notes for Best Results

  • The “Rinse” Secret: Rinsing the dried apricots and raisins in hot water before adding them to the batter softens the fruit and draws out their natural sweetness, which helps flavor the entire bake.

  • Texture: Ensure you grate the apple and carrot finely. This distributes moisture evenly so every bite is soft rather than chunky.

  • Storage: Store leftovers in an airtight container in the refrigerator to keep the bake moist. It can be enjoyed cold or gently reheated.


Health Benefits

  • Whole Oats: High in fiber to support digestion and heart health.

  • Carrots & Apples: Rich in vitamins and essential antioxidants.

  • No Added Sugar: A balanced option for those monitoring sugar intake or following specific nutritional programs.

Ginger Cinnamon Lemon Infusion

Ginger Cinnamon Lemon Infusion

This warm herbal drink combines fresh ginger, cinnamon, and lemon for a naturally aromatic and refreshing beverage. While it is a wonderful way to stay hydrated and support digestion, it is important to remember that no single drink can “guarantee” a flat stomach or spot-reduce fat. A balanced lifestyle and consistent nutritional habits are what truly lead to long-term results!


Ingredients

Yields 1 Cup

  • 1½ cups Water

  • 1 inch Fresh Ginger Root (thinly sliced) or ½ tsp Ground Ginger

  • 1 Cinnamon Stick or ½ tsp Ground Cinnamon

  • Juice of ½ Fresh Lemon

  • 1 tsp Honey (optional, for natural sweetness)


Equipment

  • Small saucepan

  • Knife and cutting board

  • Strainer

  • Mug


Step-by-Step Instructions

  1. Boil the Water: Pour the water into a small saucepan and bring it to a rolling boil over medium heat.

  2. Add Aromatics: Carefully add the sliced ginger and the cinnamon stick to the boiling water.

  3. Simmer: Reduce the heat to low. Let the mixture simmer gently for 10 to 15 minutes. This slow simmer is essential to allow the flavors and natural oils from the ginger and cinnamon to fully infuse into the water.

  4. Strain: Remove the saucepan from the heat. Use a fine-mesh strainer to pour the tea into your mug, removing the ginger pieces and the cinnamon stick.

  5. Final Touch: Stir in the fresh lemon juice. If you prefer a bit of sweetness, add the honey and mix well until dissolved.

  6. Serve: Enjoy this infusion while it is warm.


Optional Variations

  • Fresh Aroma: Add a few fresh mint leaves during the simmering process.

  • Warmth Boost: Add a small piece of fresh turmeric or a pinch of ground turmeric for extra depth of flavor.

  • Citrus Swap: Use fresh orange juice instead of lemon for a sweeter, milder citrus profile.


Storage

  • Freshness: This drink is best enjoyed immediately after preparation.

  • Refrigeration: You can store any leftovers in the refrigerator for up to 24 hours. Reheat it gently on the stovetop or in the microwave before serving.