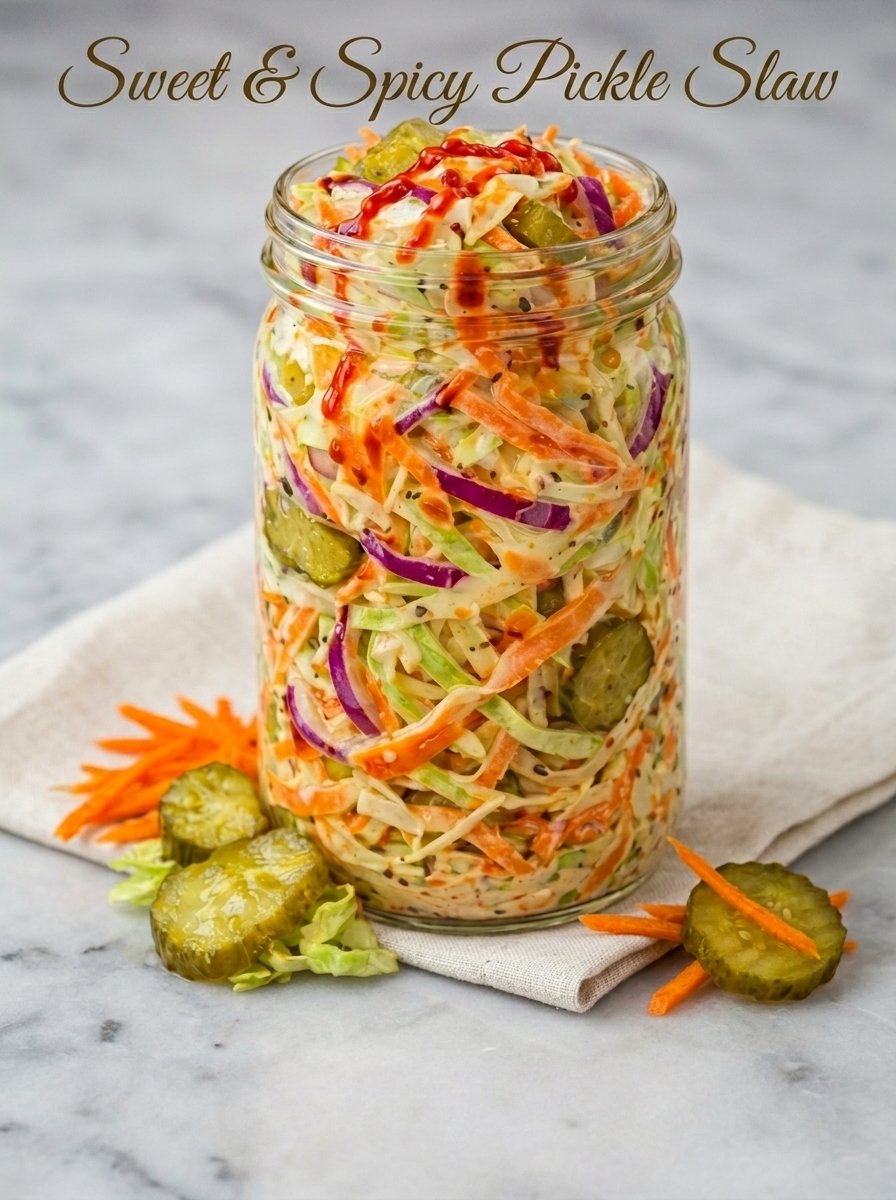
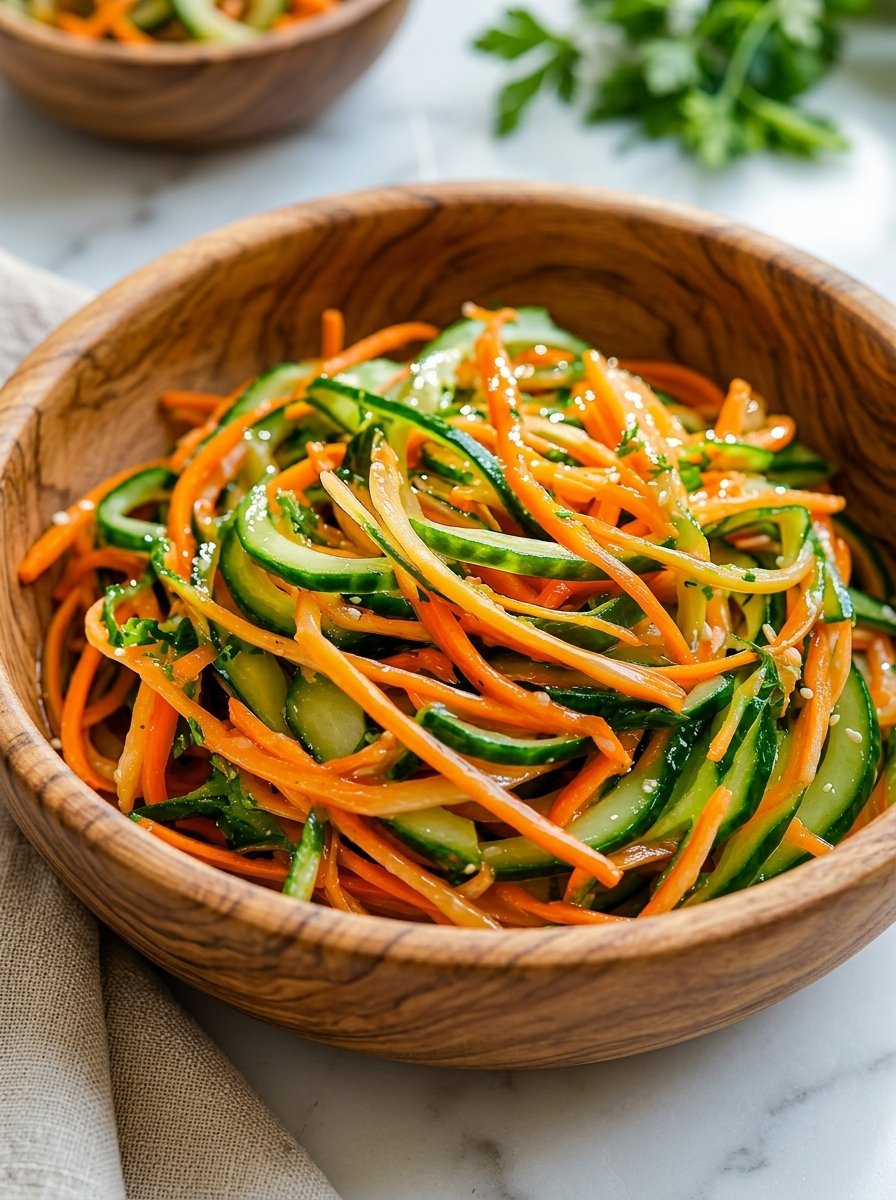
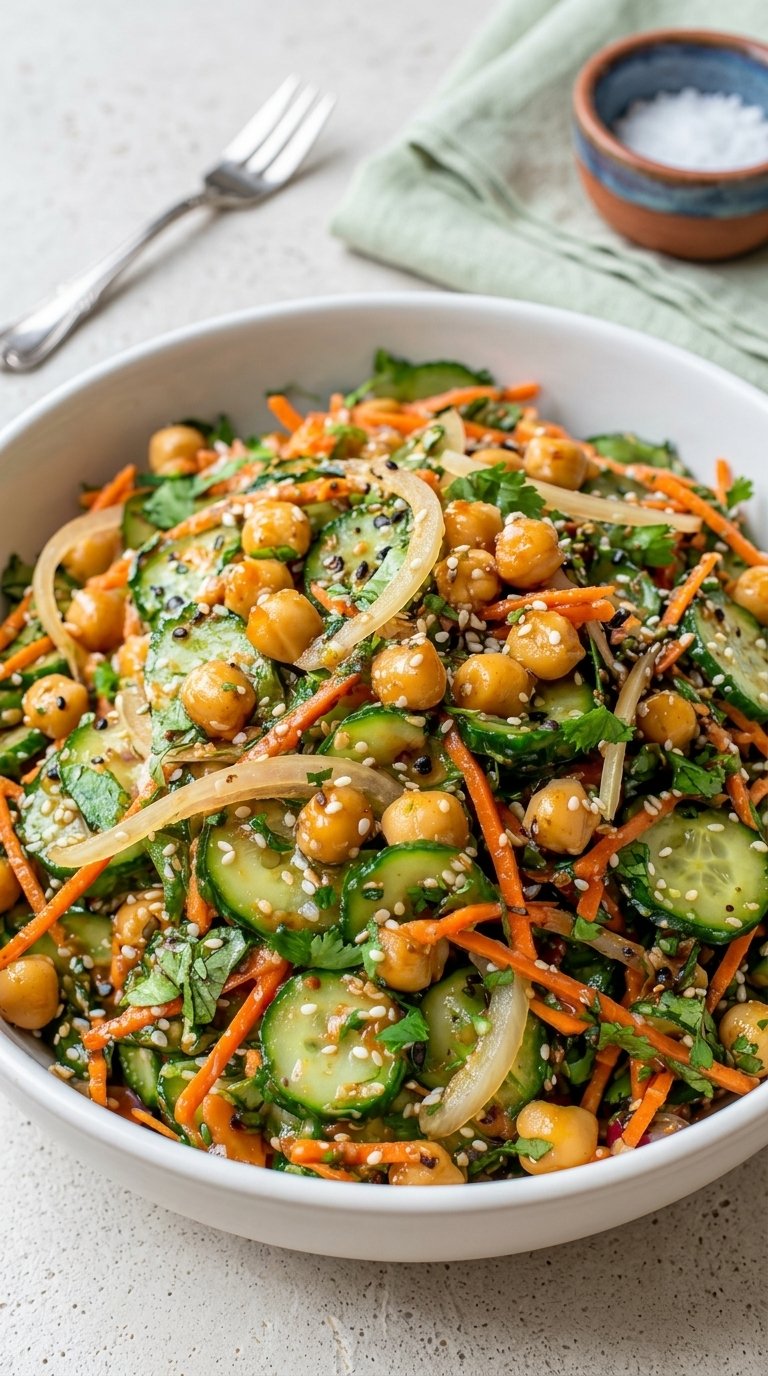
Asian Cucumber Carrot Salad 

🥒🥕 Asian Cucumber Carrot Salad

🛒 Ingredients

  • English cucumbers
  • Carrots
  • Rice vinegar
  • Sesame oil
  • Sesame seeds
  • Fresh cilantro or parsley
  • Salt

👩‍🍳 Step-by-Step Instructions

  • 🔪 Prep the vegetables
    → Wash cucumbers and carrots thoroughly
    → Use a julienne peeler or sharp knife to cut them into thin matchstick strips
    → Try to keep the size even so everything mixes well and looks neat
  • 🥒 Remove excess moisture
    → Place cucumber strips in a colander
    → Sprinkle a small pinch of salt over them
    → Let sit for about 10 minutes
    → Gently squeeze or press to remove extra water (this keeps salad crisp, not soggy)
  • 🥣 Prepare the dressing
    → In a large mixing bowl, add rice vinegar and sesame oil
    → Whisk or stir well until nicely combined
    → The dressing should smell light, tangy, and slightly nutty
  • 🥗 Combine everything
    → Add drained cucumbers and julienned carrots into the bowl
    → Toss gently using tongs or hands
    → Make sure every strip is evenly coated with dressing
  • Add toppings
    → Sprinkle sesame seeds over the salad
    → Add freshly chopped cilantro or parsley for freshness
    → Toss lightly again to distribute flavors
  • ❄️ Chill for best taste
    → Cover and place in the fridge for at least 15–20 minutes
    → This allows flavors to blend and enhances crunch
  • 🍽️ Serve & enjoy
    → Serve cold as a refreshing side dish
    → Mix lightly before serving if any liquid settles at the bottom

❓ Common Questions

Q1: Can I make this ahead of time?
✔️ Yes, but keep dressing separate and mix before serving for best crunch.

Q2: How can I add protein?
✔️ Add grilled chicken, tofu, or chickpeas to make it more filling.

Q3: What can I use instead of rice vinegar?
✔️ Apple cider vinegar or lemon juice works as a good substitute.


✨ Light, tangy, and super refreshing salad perfect for any meal!

Fresh Cucumber Beetroot Salad 

Fresh Cucumber Beetroot Salad

🛒 Ingredients

  • Cucumber (thinly sliced)
  • Beetroot (thinly sliced, raw or cooked)
  • Olive oil
  • Lemon juice
  • Salt
  • Black pepper
  • Fresh dill or basil leaves

👩‍🍳 Step-by-Step Instructions

  • 🥒 Prepare the cucumber
    → Wash thoroughly and slice into thin, even rounds
    → If seeds are too watery, lightly pat slices dry
  • ❤️ Prepare the beetroot
    → If using raw beetroot: peel and slice very thin (use a sharp knife or slicer)
    → If using cooked beetroot: boil until tender, cool, then slice thinly
    → Keep slices uniform for a beautiful look and balanced taste
  • 🥗 Combine the base
    → In a large bowl, add cucumber and beetroot slices
    → Gently toss to mix the colors evenly
  • 🍋 Make the dressing
    → In a small bowl, mix olive oil with fresh lemon juice
    → Add a pinch of salt and black pepper
    → Stir well until slightly combined
  • 🫒 Dress the salad
    → Pour the dressing over the vegetables
    → Toss gently so every slice is lightly coated
  • 🌿 Add fresh herbs
    → Chop dill or basil leaves finely
    → Sprinkle on top for freshness and aroma
  • Let it rest (optional but recommended)
    → Leave the salad for 5–10 minutes
    → This allows flavors to blend and enhances taste
  • 🍽️ Serve fresh
    → Serve immediately for a crisp texture
    → Or chill slightly for a refreshing cold salad

❓ Q&A

Q1: Can I use cooked beetroot instead of raw?
✔️ Yes! Cooked beetroot gives a softer texture and sweeter taste.

Q2: How do I keep the salad from getting watery?
✔️ Pat cucumber slices dry and avoid over-mixing after adding dressing.

Q3: Can I store this salad?
✔️ Best eaten fresh, but you can refrigerate for up to 1 day.

Q4: Can I add extra ingredients?
✔️ Yes! Feta cheese, nuts, or onions can enhance flavor and texture.


✨ Light, refreshing, and packed with natural goodness!

Oven-Roasted Veggie Tray

Oven-Roasted Veggie Tray

🛒 Ingredients

  • Carrots (whole or halved)
  • Butternut squash (cubed)
  • Brussels sprouts (halved)
  • Potatoes (cubed)
  • Cranberries (fresh or dried)
  • Olive oil
  • Garlic (minced)

👩‍🍳 Step-by-Step Instructions

  • 🔥 Preheat the oven
    → Set oven to 200°C (400°F)
    → Line a large baking tray with parchment paper or lightly grease it
  • 🔪 Prep all vegetables
    → Peel and cube the butternut squash into medium-sized chunks
    → Cut potatoes into similar-sized cubes for even cooking
    → Trim and halve Brussels sprouts
    → Wash carrots and leave whole or slice lengthwise
  • 🧄 Make garlic oil mix
    → In a bowl, combine olive oil with minced garlic
    → Let it sit for 2–3 minutes so the flavor infuses nicely
  • 🥕 Arrange veggies on tray
    → Place each vegetable in separate sections (like in the image)
    → Keep carrots together, squash together, sprouts together, etc.
    → This helps control cooking and gives a beautiful presentation
  • 🫒 Coat with flavor
    → Drizzle garlic olive oil over all vegetables
    → Toss lightly or brush so every piece is coated
    → Make sure not to overcrowd—leave a little space between pieces
  • 🍇 Add cranberries
    → Scatter cranberries over one section (or across the tray)
    → They’ll become soft and slightly jammy when baked
  • 🫕 Roast to perfection
    → Place tray in oven and bake for 25–30 minutes
    → Flip/stir vegetables halfway through for even roasting
  • 🔥 Final roasting touch
    → Bake another 10–15 minutes until edges are golden and slightly crispy
    → Carrots should be tender, squash soft, and sprouts nicely browned
  • Rest & serve
    → Let the tray rest for 5 minutes after removing from oven
    → Serve warm directly from tray or plate beautifully

❓ Q&A

Q1: Why are my veggies not crispy?
✔️ Overcrowding causes steaming. Keep space between pieces for roasting.

Q2: Can I add nuts like in the image?
✔️ Yes! Add chopped nuts in the last 5 minutes for crunch.

Q3: Can I use other vegetables?
✔️ Absolutely! Sweet potatoes, zucchini, or bell peppers work great too.

Q4: How do I store leftovers?
✔️ Keep in fridge for up to 3 days and reheat in oven for best texture.


✨ A colorful, healthy, and super satisfying roasted veggie tray!

Oven-Baked Layered Ratatouille

Oven-Baked Layered Ratatouille (Colorful & Flavorful)

🛒 Ingredients

  • Zucchini (thinly sliced)
  • Eggplant (thinly sliced)
  • Tomatoes (thinly sliced)
  • Yellow squash (thinly sliced)
  • Olive oil
  • Garlic (minced)

👩‍🍳 Step-by-Step Instructions

  • 🔥 Preheat & prepare the dish
    → Preheat your oven to 180°C (350°F) so it’s evenly hot before baking
    → Take a baking dish (round or rectangular) and grease it well with olive oil
    → Make sure every corner is lightly coated to prevent sticking and enhance flavor
  • 🧄 Create a flavorful base layer
    → In a small bowl, mix minced garlic with 2–3 tablespoons of olive oil
    → Let it sit for 2–3 minutes so the garlic infuses into the oil
    → Spread this mixture evenly across the bottom of your baking dish
    → This layer will act as a rich, aromatic base for all the vegetables
  • 🔪 Prepare the vegetables carefully
    → Wash all vegetables thoroughly
    → Slice zucchini, eggplant, tomatoes, and yellow squash into thin, even rounds (about 2–3 mm thick)
    → Try to keep all slices similar in size so they cook evenly
    → If eggplant feels too watery, lightly pat slices dry with a paper towel
  • 🎨 Arrange the vegetables beautifully
    → Start stacking the slices in a repeating pattern:
    zucchini → eggplant → tomato → yellow squash
    → Place them upright (slightly tilted) in the dish
    → Pack them tightly together so they support each other and create that classic layered look
    → You can arrange in straight rows or a spiral pattern for a more aesthetic presentation
  • 🫒 Season and add moisture
    → Drizzle olive oil evenly over all the vegetables
    → Make sure every slice gets a light coating so it doesn’t dry out
    → Gently brush or spread oil if needed for even coverage
    → The oil helps in roasting and brings out natural sweetness
  • 🫕 Cover and start baking
    → Cover the dish tightly with foil
    → Bake in the preheated oven for 30–35 minutes
    → This step helps soften the vegetables and allows flavors to blend together
  • 🔥 Uncover for roasting finish
    → Remove the foil carefully
    → Continue baking for another 20–25 minutes
    → Watch for lightly golden edges and tender texture
    → The top should look slightly roasted but not burnt
  • Rest before serving
    → Remove from oven and let it sit for 5–10 minutes
    → This helps the juices settle and enhances flavor
    → It also makes serving easier without the layers collapsing
  • 🍽️ Serve and enjoy
    → Serve warm as a main dish or side
    → Scoop gently to keep the layered look intact
    → Enjoy the soft, rich, and naturally sweet flavors

❓ Q&A

Q1: Why is my ratatouille watery?
✔️ This happens if vegetables release too much moisture. Slice thinly and avoid overcrowding with too much oil.

Q2: Can I make it ahead of time?
✔️ Yes! You can assemble it earlier and bake when needed, or reheat before serving.

Q3: Can I add herbs?
✔️ Absolutely! Herbs like thyme or basil can enhance the flavor beautifully.

Q4: How do I know it’s fully cooked?
✔️ The vegetables should be soft when pierced with a fork and slightly golden on top.

Blueberry Cream Cheese Bake

Blueberry Cream Cheese Bake

📝 Ingredients:

➡️ 2 cups fresh or frozen blueberries
➡️ 200g cream cheese (softened)
➡️ ½ cup sugar
➡️ 1 tsp vanilla extract
➡️ 1 cup milk
➡️ 1 cup all-purpose flour
➡️ 1½ tsp baking powder
➡️ ¼ tsp salt
➡️ ½ cup melted butter
➡️ 2–3 tbsp powdered sugar (for topping)


👩‍🍳 Steps:

1️⃣ Preheat & Prepare

➡️ Preheat oven to 180°C (350°F)
➡️ Grease a baking dish


2️⃣ Make Cream Layer

➡️ In a bowl, mix:
✔️ cream cheese
✔️ sugar
✔️ vanilla
➡️ Beat until smooth and creamy


3️⃣ Prepare Batter

➡️ In another bowl, mix:
✔️ flour
✔️ baking powder
✔️ salt
➡️ Add milk + melted butter
➡️ Stir until smooth (don’t overmix)


4️⃣ Assemble 🍰

➡️ Pour batter into baking dish
➡️ Spoon cream cheese mixture over it
➡️ Add blueberries on top (and slightly press in)


5️⃣ Bake 🔥

➡️ Bake for 35–45 minutes
➡️ Top should turn golden brown and bubbly


6️⃣ Finish ✨

➡️ Let it cool slightly
➡️ Sprinkle powdered sugar
➡️ Add fresh blueberries on top (optional)


❓ Q & A

Q: Can I use frozen blueberries?
👉 Yes! No need to thaw—just use directly.

Q: Why is the texture soft in the middle?
👉 That’s normal—it’s a cobbler-style dessert with a creamy center.

Q: Can I reduce sugar?
👉 Yes, adjust to your taste.

Q: What can I serve it with?
👉 Vanilla ice cream 🍦 or whipped cream 😋

Boiled Eggs in the Morning: What They Really Do for Your Heart

🥚 Boiled Eggs in the Morning: What They Really Do for Your Heart ❤️

Starting your day with a boiled egg is simple, affordable, and packed with nutrition—but what does it actually mean for your heart health?

For years, eggs were blamed for their cholesterol. Today, science paints a more balanced picture: for most healthy people, eggs can absolutely be part of a heart-friendly diet when eaten in moderation.


❤️ How Boiled Eggs Support Heart Health

🥩 1. High-Quality Protein

Eggs contain complete protein with all essential amino acids.

  • Supports muscle health (including your heart 💓)
  • Keeps you full longer
  • Helps maintain metabolism

👉 A well-fueled body puts less stress on the heart.


🥗 2. Rich in Essential Nutrients

Eggs may be small, but they’re nutrient powerhouses:

  • Choline – Supports metabolism & heart-related processes
  • Vitamin D – Important for immune & vascular health
  • Vitamin B12 – Helps form red blood cells
  • Selenium – Protects cells from damage

👉 These nutrients support overall cardiovascular function.


🍽️ 3. Helps Control Appetite

Eggs are naturally filling:

  • Reduce hunger later in the day
  • Help control calorie intake
  • Support healthy weight management

👉 Maintaining a healthy weight lowers heart disease risk.


🧠 The Cholesterol Truth

🥚 One egg contains about 186 mg of cholesterol.

  • For most people, dietary cholesterol has limited impact on blood cholesterol
  • Your body adjusts by producing less cholesterol

👉 Modern research focuses more on overall diet quality, not avoiding eggs completely.


⚠️ Who Should Be Careful?

Some individuals may need to monitor egg intake:

  • People with type 2 diabetes
  • Those with high LDL cholesterol
  • Individuals with existing heart disease
  • Familial cholesterol conditions

👉 In these cases, it’s best to follow personalized medical advice.


🍳 Why Boiled Eggs Are a Smart Choice

Compared to fried eggs:

Boiled Eggs ✔️

  • No added fats
  • Lower calories
  • Cleaner cooking method

Fried Eggs ⚠️

  • Often cooked in oil or butter
  • Higher in calories
  • May include less healthy fats

👉 Boiling keeps things light and heart-friendly.


🥗 Build a Heart-Healthy Breakfast

Pair your eggs with:

  • 🌾 Whole grains (oats, whole-grain toast)
  • 🍓 Fruits (berries, apples)
  • 🥬 Vegetables (spinach, tomatoes)
  • 🥑 Healthy fats (avocado, nuts, olive oil)

👉 Balance matters more than any single food.


⚖️ Final Verdict

✔ One boiled egg per day is generally safe for healthy adults
✔ Nutrient-dense and satisfying
✔ Supports a balanced, heart-conscious diet

Dill Pickle Saltines

Dill Pickle Saltines 🧂✨

🛒 Ingredients

  • 1 sleeve saltine crackers
  • 1 packet ranch seasoning
  • 1 tsp dried dill
  • 1 tsp garlic powder
  • 1/2 tsp onion powder
  • 1/2 tsp crushed red pepper flakes
  • 1/3 cup pickle juice
  • 1/3 cup vegetable oil

👩‍🍳 Instructions

🥣 Mix the flavor base
In a bowl, whisk together pickle juice, oil, ranch seasoning, dill, garlic powder, onion powder, and red pepper flakes until well combined.

🍘 Add crackers
Place saltine crackers into a large zip-top bag or a container with a tight lid.

🧂 Coat evenly
Slowly pour the seasoning mixture over the crackers.

🔄 Distribute flavor
Gently turn or shake the bag/container so every cracker gets fully coated without breaking.

Rest time
Let them sit for about 1 hour, flipping or shaking occasionally so the flavor absorbs evenly.

🔥 Bake for crunch
Preheat oven to 250°F (120°C). Spread crackers in a single layer on a baking tray.

⏱️ Crisp them up
Bake for 15–20 minutes until dry, crispy, and lightly golden.

🌿 Cool down
Let them cool completely before serving so they get extra crunch.

😋 Serve & enjoy
Crunchy, tangy, and full of bold pickle flavor!


❓ Q&A

Q: Can I make them more spicy?
👉 Yes! Add extra red pepper flakes or a splash of hot sauce to the mix.

Q: Is baking necessary?
👉 Not strictly, but baking gives them a crispier, longer-lasting crunch.

Q: How should I store them?
👉 Keep in an airtight container for up to 1 week for best freshness.

Oven-Baked Layered Ratatouille

Oven-Baked Layered Ratatouille

🛒 Ingredients

  • Zucchini (thinly sliced)
  • Eggplant (thinly sliced)
  • Tomatoes (thinly sliced)
  • Yellow squash (thinly sliced)
  • Olive oil
  • Garlic (minced)
  • Salt
  • Black pepper
  • Dried thyme or oregano
  • Fresh rosemary or parsley
  • Crumbled feta cheese (optional)
  • Chili flakes (optional)

👩‍🍳 Step-by-Step Recipe

  • 🔪 Prepare the vegetables
    ➡️ Wash all vegetables thoroughly.
    ➡️ Slice zucchini, eggplant, tomatoes, and squash into thin, even rounds for uniform cooking.
    ➡️ Keep slices similar in thickness to ensure even baking.
  • 🧄 Prepare the base flavor
    ➡️ Lightly grease a baking dish with olive oil.
    ➡️ Spread a thin layer of olive oil and sprinkle minced garlic evenly across the base.
    ➡️ Add a pinch of salt, pepper, and dried herbs to create a flavorful foundation.
  • 🎨 Arrange the layers
    ➡️ Start placing vegetable slices vertically in a circular pattern.
    ➡️ Alternate between zucchini, eggplant, tomato, and squash for a beautiful layered effect.
    ➡️ Pack them tightly so they support each other while baking.
  • 🫒 Season generously
    ➡️ Drizzle olive oil evenly over the arranged vegetables.
    ➡️ Sprinkle salt, black pepper, dried thyme or oregano, and chili flakes if using.
    ➡️ Ensure the seasoning reaches all layers.
  • 🧀 Add topping (optional)
    ➡️ Sprinkle crumbled feta cheese over the top for a creamy, slightly tangy finish.
  • 🔥 Bake to perfection
    ➡️ Cover the dish with foil and place in a preheated oven at 180°C (350°F).
    ➡️ Bake for about 30–35 minutes until vegetables are tender.
    ➡️ Remove the foil and bake another 10–15 minutes until the top is slightly golden.
  • 🌿 Garnish & serve
    ➡️ Remove from oven and let it rest for a few minutes.
    ➡️ Garnish with fresh rosemary or parsley for aroma and freshness.
    ➡️ Serve warm and enjoy the rich, layered flavors!

❓ Q/A

  • Q: Can I make it ahead of time?
    ➡️ Yes! Assemble it earlier and bake when ready to serve.
  • Q: What if I don’t have all vegetables?
    ➡️ You can use any combination available; just keep slices thin and uniform.
  • Q: How to store leftovers?
    ➡️ Store in an airtight container in the fridge and reheat before serving.

Fresh Cucumber Beetroot Salad

🥗 Fresh Cucumber Beetroot Salad

🛒 Ingredients

  • Cucumber (thinly sliced)
  • Beetroot (thinly sliced, raw or cooked)
  • Olive oil
  • Lemon juice
  • Salt
  • Black pepper
  • Fresh dill or basil leaves

👩‍🍳 Step-by-Step Recipe

  • 🔪 Prepare the vegetables
    ➡️ Wash everything thoroughly under running water.
    ➡️ Slice the cucumber into thin, even rounds.
    ➡️ Peel and slice the beetroot into very thin rounds (use a sharp knife or slicer for uniform pieces).
  • 🥗 Assemble the base
    ➡️ Take a large plate or bowl and arrange the cucumber and beetroot slices in an overlapping pattern.
    ➡️ Mix them gently to distribute colors evenly.
  • 🍋 Make the dressing
    ➡️ In a small bowl, combine olive oil and fresh lemon juice.
    ➡️ Add a pinch of salt and black pepper, then whisk until slightly emulsified.
  • 🫒 Dress the salad
    ➡️ Drizzle the dressing evenly over the arranged vegetables.
    ➡️ Make sure all slices get lightly coated without soaking them.
  • 🌿 Add fresh herbs
    ➡️ Sprinkle freshly chopped dill or place whole basil leaves on top.
    ➡️ This adds freshness and aroma to the salad.
  • ❄️ Chill & serve
    ➡️ Let the salad sit for 5–10 minutes so flavors blend.
    ➡️ Serve fresh for a crisp and refreshing taste.

❓ Q/A

  • Q: Can I use cooked beetroot?
    ➡️ Yes! Cooked beetroot gives a softer texture and slightly sweeter taste.
  • Q: How do I keep the salad crunchy?
    ➡️ Add dressing just before serving to maintain crispness.
  • Q: Can I store leftovers?
    ➡️ It’s best eaten fresh, but you can refrigerate for a few hours in an airtight container.

Cheesy Garlic Herb Bread

🧄🍞 Cheesy Garlic Herb Bread (Crispy & Soft)

🛒 Ingredients

  • Bread loaf (unsliced)
  • Butter (softened)
  • Garlic (minced)
  • Mozzarella cheese (shredded)
  • Parmesan cheese (grated)
  • Fresh parsley or rosemary (chopped)
  • Salt

👩‍🍳 Step-by-Step Recipe

  • 🔪 Prepare the bread
    ➡️ Place the loaf on a board and cut diagonal slices across the top, then repeat in the opposite direction to create a crisscross pattern.
    ➡️ Be careful not to cut all the way through; keep the base intact.
  • 🧈 Make the garlic butter
    ➡️ In a bowl, mix softened butter with minced garlic, chopped herbs, and a pinch of salt.
    ➡️ Stir until smooth and evenly combined.
  • 🧄 Stuff the bread
    ➡️ Gently open each cut section and spread the garlic butter deep into the cracks.
    ➡️ Make sure every pocket gets coated for maximum flavor.
  • 🧀 Add the cheese
    ➡️ Stuff shredded mozzarella and a sprinkle of parmesan into all the cuts.
    ➡️ Don’t hold back—this is what makes it extra gooey and delicious!
  • 🔥 Bake to perfection
    ➡️ Wrap the bread loosely in foil and place it in a preheated oven at 180°C (350°F).
    ➡️ Bake for about 15 minutes until the cheese melts.
    ➡️ Open the foil and bake for another 5–10 minutes until the top turns golden and crispy.
  • 🌿 Final touch
    ➡️ Remove from oven and sprinkle extra fresh herbs on top.
    ➡️ Serve warm and pull apart easily!

❓ Q/A

  • Q: Can I use different cheese?
    ➡️ Yes! Cheddar or a cheese blend works great for a richer taste.
  • Q: How do I store leftovers?
    ➡️ Wrap in foil and refrigerate. Reheat in the oven to keep it crispy.
  • Q: Can I make it ahead of time?
    ➡️ Yes! Prepare everything, refrigerate, and bake just before serving.

Crispy Salmon Bites with Creamy Herb Sauce

🐟🔥 Crispy Salmon Bites with Creamy Herb Sauce

🧾 Ingredients

  • Salmon (boneless, skinless)
  • Olive oil
  • Garlic
  • Salt
  • Black pepper
  • Paprika (optional)
  • Fresh parsley (or herbs)
  • Mayonnaise or yogurt
  • Lemon juice

👩‍🍳 Step-by-Step Recipe

  • 👉 Step 1:
    Cut the salmon into evenly sized bite cubes for even cooking 🔪🐟
  • 👉 Step 2:
    Place pieces in a bowl and drizzle olive oil over them 🫒
  • 👉 Step 3:
    Add minced garlic, salt, black pepper, and paprika, then toss well to coat every piece 🤲✨
  • 👉 Step 4:
    Heat a pan on medium-high until hot 🔥
  • 👉 Step 5:
    Place salmon pieces in the pan, leaving space between them (don’t overcrowd) 🍳
  • 👉 Step 6:
    Cook for 2–3 minutes on each side until golden, crispy outside and tender inside 🔄😋
  • 👉 Step 7:
    Remove from heat and sprinkle fresh chopped herbs on top 🌿
  • 👉 Step 8:
    In a small bowl, mix mayonnaise (or yogurt) with lemon juice, garlic, and herbs 🥣🍋
  • 👉 Step 9:
    Stir until smooth and creamy sauce forms 🥄
  • 👉 Step 10:
    Serve salmon bites hot with the dipping sauce in the center 🤤🔥

❓ Q&A

Q1: Can I bake instead of pan-fry?
👉 Yes! Bake at 200°C (400°F) for about 10–12 minutes 🔥

Q2: How do I keep salmon juicy?
👉 Don’t overcook—remove as soon as it flakes easily 🐟

Q3: Can I air-fry this?
👉 Yes! Air fry at 180°C for 8–10 minutes for a crispy finish 🍃


Enjoy your crispy, juicy salmon bites! 😍🐟✨

Cucumber Pineapple Fresh Salad

🍍🥒 Cucumber Pineapple Fresh Salad

🧾 Ingredients

  • Pineapple
  • Cucumber
  • Red onion
  • Fresh coriander (or parsley)
  • Lemon juice
  • Olive oil
  • Salt
  • Black pepper

👩‍🍳 Step-by-Step Recipe

  • 👉 Step 1:
    Peel and cut the pineapple into bite-sized cubes 🍍🔪
  • 👉 Step 2:
    Slice the cucumber into thin rounds for a crisp texture 🥒
  • 👉 Step 3:
    Finely chop a small amount of red onion for a mild sharp flavor 🧅
  • 👉 Step 4:
    Add everything into a large mixing bowl 🥗
  • 👉 Step 5:
    Drizzle fresh lemon juice evenly over the mixture 🍋
  • 👉 Step 6:
    Add a light drizzle of olive oil for smoothness 🫒✨
  • 👉 Step 7:
    Sprinkle salt and black pepper to taste 🧂
  • 👉 Step 8:
    Toss everything gently so all ingredients are well coated 🤲
  • 👉 Step 9:
    Add freshly chopped coriander on top for freshness 🌿
  • 👉 Step 10:
    Let it sit for 5–10 minutes, then serve chilled for best flavor ❄️😋

❓ Q&A

Q1: Can I skip onion?
👉 Yes, it’s optional if you prefer a sweeter taste 👍

Q2: How do I keep it fresh longer?
👉 Store in an airtight container in the fridge for up to 1 day ❄️

Q3: Can I add spice?
👉 Yes! A pinch of chili flakes adds a nice kick 🌶️


Enjoy your refreshing, juicy salad! 🍍🥒✨

Garlic Herb Cheese Bread Loaf

🧄🍞 Garlic Herb Cheese Bread Loaf

🧾 Ingredients

  • Bread loaf
  • Butter
  • Garlic (minced)
  • Fresh herbs (parsley/rosemary)
  • Mozzarella cheese
  • Salt

👩‍🍳 Step-by-Step Recipe

  • 👉 Step 1:
    Preheat your oven to 180°C (350°F) 🔥
  • 👉 Step 2:
    In a bowl, mix softened butter with minced garlic, chopped herbs, and a pinch of salt until smooth 🧈🧄🌿
  • 👉 Step 3:
    Place the bread on a cutting board and make deep diagonal cuts across the loaf (don’t slice all the way through) 🔪🍞
  • 👉 Step 4:
    Gently open each cut and spread the garlic butter mixture inside every slit 🧄➡️
  • 👉 Step 5:
    Add cheese into each cut, filling it generously 🧀✨
  • 👉 Step 6:
    Wrap the loaf loosely in foil to keep it soft while heating 🔄
  • 👉 Step 7:
    Bake for 15 minutes until the butter melts and the bread is heated through ⏳
  • 👉 Step 8:
    Open the foil and bake for another 5–10 minutes until the top becomes golden and slightly crispy 🟡🔥
  • 👉 Step 9:
    Remove from oven and let it rest for a couple of minutes before serving 😋
  • 👉 Step 10:
    Pull apart the slices and enjoy warm, cheesy bites 🤤🍞

❓ Q&A

Q1: Can I use other cheeses?
👉 Yes! Cheddar or a mix of cheeses works great 🧀

Q2: How do I make it extra crispy?
👉 Bake uncovered a little longer at the end 🔥

Q3: Can I prepare it earlier?
👉 Yes! Assemble ahead and bake just before serving ⏰


Enjoy your warm, cheesy garlic bread! 🧄🍞✨

Roasted Veggie Tray Bake 

🥕🥦 Roasted Veggie Tray Bake

🧾 Ingredients

  • Carrots
  • Broccoli
  • Cauliflower
  • Brussels sprouts
  • Butternut squash (cubed)
  • Dried cranberries
  • Walnuts
  • Olive oil
  • Salt
  • Black pepper
  • Garlic (fresh or powder)
  • Dried herbs (thyme/rosemary)

👩‍🍳 Step-by-Step Recipe

  • 👉 Step 1:
    Preheat oven to 200°C (400°F) 🔥 and line a large tray with parchment paper
  • 👉 Step 2:
    Wash and cut everything into similar-sized pieces so they cook evenly 🔪🥕
  • 👉 Step 3:
    Spread vegetables on the tray in a single layer with space between them (this helps crispiness) ✨
  • 👉 Step 4:
    Drizzle olive oil evenly over everything 🫒
  • 👉 Step 5:
    Add salt, black pepper, garlic, and herbs 🌿🧂
  • 👉 Step 6:
    Toss well until all pieces are nicely coated 🤲
  • 👉 Step 7:
    Roast for 25–30 minutes, flipping halfway for even browning 🔄⏳
  • 👉 Step 8:
    Roast until edges are golden and slightly crispy 🔥🥦
  • 👉 Step 9:
    Add dried cranberries and walnuts while still hot 🍇🌰
  • 👉 Step 10:
    Let rest for 2–3 minutes, then serve warm 😋

❓ Q&A

Q1: Why aren’t my veggies crispy?
👉 Most likely overcrowding or too little heat—give them space and keep oven hot 🔥

Q2: When should I add nuts?
👉 Always at the end to keep them crunchy 🌰

Q3: Can I make this ahead?
👉 Yes, but reheat in oven (not microwave) for best texture ♨️

Moist Chocolate Cake

Moist Chocolate Cake

🛒 Ingredients

  • 2 eggs
  • 1 cup sugar
  • 1/2 cup oil
  • 1 cup milk
  • 1 tsp vanilla essence
  • 1 1/2 cups all-purpose flour
  • 1/2 cup cocoa powder
  • 1 tsp baking powder
  • 1/2 tsp baking soda
  • Pinch of salt
  • Melted chocolate or chocolate spread for topping

👩‍🍳 Step-by-Step Recipe

  • 🥚 Crack the eggs into a large mixing bowl and whisk until slightly frothy.
  • 🍬 Add the sugar and whisk well until the mixture becomes light and smooth.
  • 🛢️ Pour in the oil, milk, and vanilla essence. Mix until fully combined.
  • 🍫 Sift in the flour, cocoa powder, baking powder, baking soda, and salt.
  • 🥄 Gently fold everything together until a smooth chocolate batter forms. Do not overmix.
  • 🧈 Grease a loaf pan or cake mold properly to prevent sticking.
  • 🫗 Pour the batter evenly into the prepared pan and tap it lightly on the counter to remove air bubbles.
  • 🔥 Bake in a preheated oven at 170°C (340°F) for about 30–35 minutes or until a toothpick comes out clean.
  • ❄️ Let the cake cool for a few minutes before removing it from the pan.
  • 🍫 Spread or drizzle melted chocolate on top while the cake is slightly warm for a glossy finish.
  • 🔪 Slice carefully and serve soft, rich, and moist chocolate cake pieces.

❓Q/A

❓Why is my cake dry?

👉 Overbaking or adding too much flour can make the cake dry.

❓Can I make it without eggs?

👉 Yes, replace each egg with 1/4 cup yogurt or mashed banana.

❓How do I store the cake?

👉 Keep it in an airtight container for 2–3 days at room temperature or refrigerate for longer freshness.

No-Added-Sugar Blueberry Yogurt Bake

🫐🍰 No-Added-Sugar Blueberry Yogurt Bake

A light, creamy dessert with a soft custard-like texture and natural sweetness from juicy blueberries.


🛒 Ingredients

  • Plain Greek yogurt 🥛
  • Eggs 🥚
  • Blueberries 🫐

👩‍🍳 Step-by-Step Recipe

🔹 Step 1: Prepare the Baking Dish

  • 🔥 Preheat the oven to 350°F (175°C).
  • 🧈 Lightly grease a small baking dish to prevent sticking.
  • 📏 An 8×8-inch dish works perfectly for this recipe.

🔹 Step 2: Make the Creamy Base

  • 🥣 Add the Greek yogurt and eggs into a large mixing bowl.
  • 🥄 Whisk thoroughly until the mixture becomes silky smooth and fully combined.
  • ✨ Make sure there are no egg streaks remaining.

🔹 Step 3: Add the Blueberries

  • 🫐 Gently fold the blueberries into the yogurt mixture.
  • 🥄 Stir carefully so the berries stay whole and evenly distributed.
  • 🌟 The blueberries will burst beautifully while baking and naturally sweeten the dessert.

🔹 Step 4: Fill the Baking Dish

  • 🍰 Pour the mixture into the prepared baking dish.
  • 🥄 Spread evenly using the back of a spoon or spatula.
  • ✨ Smooth the top gently for even baking.

🔹 Step 5: Bake Until Set

  • 🔥 Bake for 30–40 minutes until the center is set.
  • 🌟 The top should look lightly golden and slightly puffed.
  • 👀 The middle may jiggle slightly but will firm up while cooling.

🔹 Step 6: Cool & Serve

  • ❄️ Let the bake cool for 10–15 minutes before slicing.
  • 🍽️ Serve warm for a soft custard-like texture.
  • 🧊 Or chill in the refrigerator for a firmer cheesecake-style dessert.
  • 😋 Enjoy plain or topped with extra blueberries.

💡 Tips

  • 🥛 Thick Greek yogurt gives the best creamy texture.
  • 🫐 Frozen blueberries can be used directly without thawing.
  • ✨ For a firmer texture, mix in a little cornstarch if desired.
  • 🧊 Store covered in the refrigerator for up to 4 days.

❓Q/A

❓Can I use frozen blueberries?

✅ Yes! Add them straight from the freezer.

❓Why did my bake turn watery?

✅ Thin yogurt contains extra moisture, so thick Greek yogurt works best.

❓Can I make it ahead of time?

✅ Absolutely! It tastes even better chilled the next day.

❓Can I double the recipe?

✅ Yes! Use a larger baking dish and bake slightly longer.

Cucumber Tea Sandwiches

🥒 Cucumber Tea Sandwiches

🛒 Ingredients

  • 🍞 8 slices whole wheat or white bread
  • 🥒 1 cucumber
  • 🧀 4 oz cream cheese
  • 🌿 1 tbsp fresh dill
  • 🍋 1 tsp lemon juice
  • 🧂 Salt
  • 🌶️ Black pepper

👩‍🍳 Step-by-Step Recipe

🔹 Step 1: Prepare the Cucumber

  • 🥒 Wash the cucumber thoroughly.
  • 🔪 Slice it into very thin rounds for easy layering.
  • 🧻 Pat the slices dry with paper towels to remove excess moisture.
  • ✨ This helps keep the sandwiches fresh and prevents sogginess.

🔹 Step 2: Make the Creamy Filling

  • 🧀 Add cream cheese to a mixing bowl.
  • 🌿 Stir in chopped fresh dill and lemon juice.
  • 🧂 Season lightly with salt and black pepper.
  • 🥄 Mix until smooth, creamy, and evenly combined.

🔹 Step 3: Prepare the Bread

  • 🍞 Lay the bread slices flat on a clean surface.
  • 🔪 Trim the crusts off for a classic tea sandwich appearance.
  • 🧈 Spread an even layer of the creamy mixture onto each slice.

🔹 Step 4: Add the Cucumber

  • 🥒 Arrange cucumber slices evenly over half of the bread slices.
  • 🌿 Add a few extra dill leaves for fresh flavor if desired.
  • 📏 Keep the cucumber in a single layer for neat sandwiches.

🔹 Step 5: Assemble the Sandwiches

  • 🍞 Place the remaining bread slices on top, cream cheese side down.
  • ✋ Press gently to hold everything together without squeezing out the filling.

🔹 Step 6: Slice & Serve

  • 🔪 Cut each sandwich diagonally into triangles.
  • ✨ Wipe the knife between cuts for clean edges.
  • 🍽️ Arrange neatly on a serving plate.
  • 🥒 Garnish with extra cucumber or dill before serving.

❓ Q/A

❓ How do I keep tea sandwiches from getting soggy?

✅ Dry the cucumber slices well and spread the filling evenly to create a moisture barrier.

❓ Can I make these ahead of time?

✅ Yes, prepare them a few hours in advance and store covered in the refrigerator.

❓ What bread works best?

✅ Soft sandwich bread or whole wheat bread works perfectly for tea sandwiches.

Creamy Homemade Vanilla Custard Ice Cream

🍮 Creamy Homemade Vanilla Custard Ice Cream

🛒 Ingredients

  • 🥛 2 cups milk
  • 🥛 2 cups heavy cream
  • 🥚 4 egg yolks
  • 🍬 3/4 cup sugar
  • 🍦 1 tbsp vanilla extract
  • 🧂 Pinch of salt

👩‍🍳 Step-by-Step Recipe

🔹 Step 1: Heat the Milk Mixture

  • 🥛 Pour the milk and heavy cream into a saucepan.
  • 🔥 Warm the mixture over medium heat until it becomes hot but not boiling.
  • 🥄 Stir gently to prevent sticking.

🔹 Step 2: Prepare the Egg Mixture

  • 🥚 Add egg yolks to a mixing bowl.
  • 🍬 Pour in the sugar and whisk until smooth, pale, and creamy.
  • ✨ Continue whisking for a few minutes to create a silky texture.

🔹 Step 3: Temper the Eggs

  • 🥄 Slowly pour a little of the warm milk mixture into the eggs while whisking continuously.
  • 🔄 Keep whisking to avoid curdling.
  • 🥛 Gradually add more warm mixture until fully combined.

🔹 Step 4: Cook the Custard

  • 🍲 Pour everything back into the saucepan.
  • 🔥 Cook on low heat while stirring constantly.
  • 🥄 Continue stirring until the mixture thickens enough to coat the back of a spoon.
  • ⚠️ Do not let it boil.

🔹 Step 5: Add Flavor

  • 🍦 Stir in the vanilla extract and a pinch of salt.
  • ✨ Mix until smooth and fragrant.

🔹 Step 6: Chill the Mixture

  • ❄️ Transfer the custard into a bowl or container.
  • 🧊 Cover and refrigerate for at least 4 hours until completely cold.
  • ⏳ Chilling helps create a creamier texture.

🔹 Step 7: Freeze the Ice Cream

  • 🥣 Pour the chilled custard into a freezer-safe dish.
  • 📏 Smooth the top evenly.
  • ❄️ Freeze for 6–8 hours or overnight until firm and scoopable.

🔹 Step 8: Scoop & Serve

  • 🍨 Let the ice cream sit for 3–5 minutes before scooping.
  • 🥄 Serve in bowls, cones, or alongside desserts.
  • ✨ Enjoy the rich and creamy texture.

❓ Q/A

❓ Why is my custard not thickening?

✅ It usually needs more gentle cooking and constant stirring on low heat.

❓ Can I add flavors or toppings?

✅ Yes! Chocolate chips, caramel, nuts, or fruit work wonderfully.

❓ How do I keep the ice cream soft?

✅ Store it in an airtight container and let it rest briefly before scooping.

Creamy Strawberry Ice Cream

Creamy Strawberry Ice Cream

🛒 Ingredients

  • 🍓 2 cups strawberries
  • 🥛 2 cups heavy cream
  • 🥛 1 cup condensed milk
  • 🍦 1 tsp vanilla extract
  • 🍬 3–4 tbsp sugar
  • 🧂 Pinch of salt

👩‍🍳 Step-by-Step Recipe

🔹 Step 1: Prepare the Strawberries

  • 🍓 Wash the strawberries thoroughly under cold water.
  • ✂️ Remove the green tops and slice them into small pieces.
  • 🥣 Place them in a bowl and sprinkle sugar over the top.
  • ⏳ Let them rest for 10–15 minutes until juicy and soft.

🔹 Step 2: Blend the Strawberry Mixture

  • 🌀 Add the strawberries to a blender.
  • 🍓 Blend until smooth and creamy.
  • 👀 If you like tiny fruit bits in your ice cream, leave the mixture slightly chunky.

🔹 Step 3: Make the Cream Base

  • 🥛 Pour heavy cream into a large mixing bowl.
  • 🥄 Whisk until slightly thick and fluffy.
  • 🍦 Add condensed milk, vanilla extract, and a pinch of salt.
  • 🔄 Mix gently until smooth and fully combined.

🔹 Step 4: Combine Everything

  • 🍓 Pour the strawberry puree into the cream mixture.
  • 🥄 Fold everything together slowly to keep the texture light and airy.
  • 🎀 Continue mixing until the color becomes evenly pink.

🔹 Step 5: Freeze the Ice Cream

  • 🧊 Transfer the mixture into a freezer-safe container.
  • 📏 Smooth the top using a spoon or spatula.
  • 🛑 Cover tightly with a lid or plastic wrap.
  • ❄️ Freeze for at least 6–8 hours or overnight until firm.

🔹 Step 6: Scoop & Serve

  • 🍨 Remove the container from the freezer.
  • ⏳ Let it sit for 3–5 minutes for easier scooping.
  • 🥄 Scoop into bowls or cones.
  • 🍓 Garnish with fresh strawberries if desired.

❓ Q/A

❓ Can I use frozen strawberries?

✅ Yes, thaw them slightly before blending for a smoother texture.

❓ How long does homemade ice cream last?

✅ It stays fresh in the freezer for about 2 weeks when stored properly.

❓ Can I make it without an ice cream machine?

✅ Absolutely! This recipe is completely no-churn.

Festive Cream Cheese Appetizer Log

🧀🌿 Festive Cream Cheese Appetizer Log

🛒 Ingredients

  • 🧀 2 blocks cream cheese
  • 🫒 ½ cup green olives
  • 🫒 ½ cup black olives
  • 🌶️ ½ red bell pepper (finely chopped)
  • 🌿 Fresh parsley (chopped)
  • 🌿 Fresh rosemary sprigs
  • 🍇 2 tbsp dried cranberries
  • 🧄 1 garlic clove (minced)
  • 🧂 Salt
  • 🌶️ Black pepper
  • 🍘 Crackers for serving

👩‍🍳 Step-by-Step Recipe

🔹 Step 1: Soften the Cream Cheese

  • 🧀 Leave the cream cheese at room temperature for a few minutes until soft.
  • 🥄 Place it into a mixing bowl and stir gently until creamy and smooth.

🔹 Step 2: Prepare the Mix-Ins

  • 🔪 Finely chop the olives and red bell pepper into tiny pieces.
  • 🌿 Chop the parsley for freshness and color.
  • 🧄 Mince the garlic very finely so it blends smoothly into the mixture.

🔹 Step 3: Mix Everything Together

  • 🥣 Add the chopped olives, peppers, parsley, cranberries, and garlic into the cream cheese.
  • 🧂 Season lightly with salt and black pepper.
  • 🥄 Fold everything together gently until evenly mixed.

🔹 Step 4: Shape the Cheese Log

  • 🧻 Place the mixture onto plastic wrap or parchment paper.
  • ✋ Roll and shape it carefully into a log shape.
  • ✨ Smooth the sides gently so it looks neat and firm.

🔹 Step 5: Decorate the Outside

  • 🌿 Press extra chopped parsley, peppers, olives, and cranberries around the outside for a colorful coating.
  • 🌱 Add rosemary sprigs on top for a festive look.
  • 😍 The brighter and more colorful, the prettier it will look when served!

🔹 Step 6: Chill & Serve

  • ❄️ Refrigerate the cheese log for at least 1 hour to firm up.
  • 🍘 Serve chilled with crackers or toasted bread slices.
  • 😋 Spread onto crackers and enjoy the creamy, savory flavor!

❓ Q/A

❓ Can I make this appetizer ahead of time?

  • ⏰ Yes! It can be prepared a day in advance and kept chilled.

❓ What else can I add?

  • 🌰 Chopped nuts or shredded cheese add extra flavor and texture.

❓ How should I store leftovers?

  • 🧊 Wrap tightly and refrigerate for up to 3 days.

Creamy No-Churn Vanilla Bean Ice Cream

Creamy No-Churn Vanilla Bean Ice Cream

Prep time: 15 minutes | Freezing time: 6+ hours | Yields: Approx. 1.5 quarts

Detailed Ingredients List

  • The Base: 2 cups (16 oz) Heavy whipping cream.

    • Crucial: Ensure the cream is very cold (straight from the fridge) to achieve maximum volume.

  • The Sweetener: 1 can (14 oz) Sweetened condensed milk. This acts as both the sugar and the softener, preventing large ice crystals from forming.

  • Flavoring: 1–2 tsp Pure vanilla extract (or the seeds from one vanilla bean for a gourmet look).

  • Optional Textures: ½ cup of mix-ins (crushed cookies, chocolate chunks, or fruit swirls).


Comprehensive Preparation Instructions

1. Whipping the Cream to Perfection

Pour the cold heavy whipping cream into a large, chilled glass or metal bowl. Using a hand mixer or a stand mixer fitted with the whisk attachment, beat the cream on medium-high speed. Continue until stiff peaks form—this means when you lift the whisk, the cream stands straight up without drooping.

  • Tip: Be careful not to over-beat, or the cream will turn into butter.

2. Preparing the Condensed Milk Base

In a separate large bowl, empty the entire can of sweetened condensed milk. Stir in the vanilla extract and any other liquid flavorings or food colorings you choose to use. If you are making chocolate ice cream, sift in your cocoa powder at this stage to ensure there are no lumps.

3. The “Light & Airy” Fold

This is the most important step. Take a large scoop of the whipped cream and stir it vigorously into the condensed milk to lighten the mixture. Then, add the remaining whipped cream. Using a rubber spatula, gently fold the cream into the base by cutting through the center and lifting from the bottom. Continue until no white streaks remain.

  • Goal: You want to keep as much air in the mixture as possible.

4. Customizing Your Flavor

If you are adding “chunky” ingredients like crushed cookies, fruit puree, or nuts, fold them in gently now. For a “ribbon” effect (like a caramel or fudge swirl), pour half the mixture into your container, drizzle the sauce, and then add the remaining mixture, swirling once or twice with a knife.

5. Freezing for Success

Transfer the mixture into a shallow, freezer-safe container (an 8×4-inch loaf pan works perfectly). Smooth the top with your spatula. To prevent ice crystals from forming on the surface, press a piece of plastic wrap or wax paper directly onto the surface of the cream, then cover the container tightly with a lid or foil.

6. The Waiting Period

Place the container in the coldest part of your freezer. Freeze for at least 6 hours, though overnight is recommended for a firm, traditional ice cream texture.


Expert Tips for Serving

  • The Tempering Step: Because homemade ice cream doesn’t contain the chemical softeners found in store-bought tubs, it may be quite firm. Let it sit on the counter for 3–5 minutes before scooping.

  • The Scoop: Dip your ice cream scoop in warm water between each serving to get those perfect, professional-looking spheres.

Creamy Coconut Sorbet

Creamy Coconut Sorbet

A smooth, cold, creamy coconut dessert with just a few ingredients ✨

🛒  Ingredients

  • 🥥 2 cans coconut milk (about 28 oz total)
  • 🥥 1 can coconut cream (14 oz)
  • 💧 1 cup coconut water
  • 🍬 1/2 to 1 cup sugar

👩‍🍳 Step-by-Step Recipe

  • 1️⃣ Chill the ingredients
    • Place the coconut milk, coconut cream, and coconut water in the fridge for a little while if possible. ❄️
    • Cold ingredients help the mixture freeze better.
  • 2️⃣ Mix the base
    • In a large bowl, add:
      • coconut milk
      • coconut cream
      • coconut water
      • sugar
    • Whisk everything together until smooth. 🥣
  • 3️⃣ Dissolve the sugar
    • Keep whisking until the sugar is fully dissolved.
    • Make sure there are no grainy bits left. ✨
  • 4️⃣ Taste the mixture
    • Taste the base with a spoon.
    • Add more sugar if you want it sweeter. 🍬
  • 5️⃣ Chill before freezing
    • Cover the bowl and place it in the fridge for about 30 minutes to 1 hour.
    • This helps the mixture get nice and cold before freezing. ❄️
  • 6️⃣ Freeze the sorbet
    • Pour the mixture into a freezer-safe container.
    • Cover it well.
    • Freeze for about 4 to 6 hours.
  • 7️⃣ Stir for a smoother texture
    • Every 1 to 2 hours, take it out and stir well with a fork or spoon. 🥄
    • This helps break up ice crystals and makes it creamier.
  • 8️⃣ Let it firm up
    • Freeze again until the sorbet is scoopable and set.
  • 9️⃣ Soften before serving
    • Remove it from the freezer about 5 to 10 minutes before serving.
    • This makes scooping easier. 🍨
  • 🔟 Serve
    • Scoop into bowls or coconut shells if you want a pretty presentation. 🥥✨

✅ Quick Tips

  • ❄️ Stirring during freezing helps make the sorbet smoother.
  • 🥥 Full-fat coconut milk gives the creamiest result.
  • 🍬 Start with less sugar, then adjust after tasting.
  • 🍨 Let it sit a few minutes before scooping if it freezes very hard.

❓Q / A Related to the Recipe

  • Q: Do I need an ice cream machine?
    • A: No, this version can be made in the freezer without one.
  • Q: Why is my sorbet icy?
    • A: It may not have been stirred during freezing, or the mixture may need a little more sugar or coconut cream.
  • Q: Can I use only coconut milk?
    • A: Yes, but the coconut cream makes it richer and creamier.
  • Q: How sweet should it be before freezing?
    • A: It should taste slightly sweeter than you want, because frozen desserts taste less sweet once frozen.
  • Q: How long does it last in the freezer?
    • A: It is best within 1 to 2 weeks for the best texture.
  • Q: What if it freezes too hard?
    • A: Let it sit at room temperature for 5 to 10 minutes before scooping.
  • Q: Can I make it less sweet?
    • A: Yes, start with 1/2 cup sugar and add more only if needed.
  • Q: Can I serve it with toppings?
    • A: Yes, but it is also delicious plain. Shredded coconut or mint work nicely. 🌿
  • Q: Can I use fresh coconut water?
    • A: Yes, fresh coconut water works very well.

Easy Chocolate Mini Croissants

Easy Chocolate Mini Croissants

A super simple version with very few ingredients and a bakery-style look ✨

🛒 Ingredients

  • 🥐 1 sheet puff pastry, thawed
  • 🍫 4–5 tbsp chocolate spread or chocolate filling
  • 🥚 1 egg
  • 🍬 Optional: a little powdered sugar for topping

👩‍🍳 Step-by-Step Recipe

  • 1️⃣ Prep the oven
    • Preheat your oven to 400°F (200°C).
    • Line a baking tray with parchment paper. 🔥
  • 2️⃣ Prepare the pastry
    • Place the thawed puff pastry sheet on a clean surface.
    • If needed, lightly roll it out just a little so it becomes even.
  • 3️⃣ Add the chocolate
    • Spread a thin layer of chocolate spread over the pastry.
    • Do not spread too much, or it may leak out while baking. 🍫
  • 4️⃣ Cut into triangles
    • Use a knife or pizza cutter to cut the pastry into small triangles.
    • For mini croissants, make the triangles smaller.
    • Each triangle should have a wide base and a pointed tip. 🔺
  • 5️⃣ Roll the croissants
    • Start from the wide end of each triangle.
    • Roll gently toward the pointed tip.
    • Curve the ends slightly inward to create that croissant shape. 🥐
  • 6️⃣ Place on the tray
    • Put each rolled croissant on the lined tray.
    • Leave a little space between them because they will puff up.
  • 7️⃣ Brush with egg wash
    • Beat the egg in a small bowl.
    • Brush the tops of the croissants with the egg.
    • This gives them a shiny, golden finish. ✨
  • 8️⃣ Bake
    • Bake for 12–15 minutes or until the croissants are puffed and deep golden brown.
    • Keep an eye on them near the end so they do not overbake. ⏲️
  • 9️⃣ Cool slightly
    • Remove from the oven and let them cool for 5 minutes.
    • The filling will be very hot right away. ⚠️
  • 🔟 Finish and serve
    • Dust lightly with powdered sugar if using.
    • Serve warm for the best melty chocolate center. 🍫💛

✅ Quick Tips

  • 🥐 Cold puff pastry is easier to cut and roll.
  • 🍫 Use only a thin layer of filling to prevent leaking.
  • 🥚 Egg wash helps make them glossy and golden.
  • ❄️ If the pastry gets too soft, chill it for 10 minutes before baking.

❓Q / A Related to the Recipe

  • Q: Can I use Nutella?
    • A: Yes, Nutella or any chocolate spread works well.
  • Q: Can I make them without egg wash?
    • A: Yes, but they will be less shiny and slightly less golden.
  • Q: Why did the chocolate leak out?
    • A: You probably used too much filling or rolled them too loosely.
  • Q: Can I use crescent dough instead of puff pastry?
    • A: Yes, but the texture will be softer and less flaky.
  • Q: How do I store leftovers?
    • A: Keep them in an airtight container for up to 2 days.
  • Q: How do I reheat them?
    • A: Warm in the oven for a few minutes so they stay crisp.
  • Q: Can I freeze them?
    • A: Yes, freeze before baking or after baking once cooled.
  • Q: How do I make them extra chocolatey?
    • A: Add a few chocolate chips before rolling. 🍫

Gooey Double Chocolate Chip Cookies

Gooey Double Chocolate Chip Cookies

🛒  Ingredients

  • 🍫 1 cup all-purpose flour
  • 🍫 1/2 cup unsweetened cocoa powder
  • 🥄 1/2 tsp baking soda
  • 🧂 1/4 tsp salt
  • 🧈 1/2 cup unsalted butter, softened
  • 🍬 1/2 cup brown sugar
  • 🍚 1/4 cup white sugar
  • 🥚 1 egg
  • 🍦 1 tsp vanilla extract
  • 🍫 3/4 cup chocolate chips
  • 🍫 8 to 10 extra chocolate chunks or chips for the gooey centers

👩‍🍳 Step-by-Step Recipe

  • 1️⃣ Prep the oven
    • Preheat your oven to 350°F (175°C).
    • Line a baking tray with parchment paper. 🔥
  • 2️⃣ Mix the dry ingredients
    • In a bowl, add:
      • flour
      • cocoa powder
      • baking soda
      • salt
    • Whisk until combined. 🥣
  • 3️⃣ Cream the butter and sugars
    • In another bowl, beat the softened butter, brown sugar, and white sugar.
    • Mix until smooth and creamy. 🧈✨
  • 4️⃣ Add the wet ingredients
    • Add the egg and vanilla extract.
    • Mix again until fully combined. 🥚
  • 5️⃣ Make the cookie dough
    • Add the dry ingredients into the wet mixture.
    • Stir until a thick chocolate dough forms.
    • Fold in the chocolate chips. 🍫
  • 6️⃣ Fill the centers
    • Scoop a small amount of dough into your hand.
    • Flatten it slightly.
    • Place a few extra chocolate chunks or chips in the center.
    • Cover with a little more dough and roll gently into a ball.
    • Repeat for all cookies. 🤲
  • 7️⃣ Shape and top
    • Place the dough balls on the tray, leaving space between them.
    • Press a few extra chocolate chips on top of each cookie for that bakery-style look. ✨
  • 8️⃣ Bake
    • Bake for 9 to 11 minutes.
    • The edges should look set, but the centers should still be soft. ⏲️
  • 9️⃣ Cool slightly
    • Let the cookies rest on the tray for 5 to 10 minutes.
    • This helps them finish setting while keeping the middle gooey. 🍪
  • 🔟 Serve
    • Enjoy warm for the best melty center. 🤎

✅ Quick Tips

  • 🍫 Do not overbake or the center will lose its gooey texture.
  • 🧈 Softened butter mixes more smoothly than cold butter.
  • ❄️ If the dough feels too soft, chill it for 10 to 15 minutes before baking.
  • 🍪 Slightly underbaked cookies will stay fudgy inside.

❓Q / A Related to This Recipe

  • Q: How do I get the gooey center?
    • A: Put extra chocolate in the middle and avoid overbaking the cookies.
  • Q: Can I use only chocolate chips instead of chunks?
    • A: Yes, chocolate chips work fine for both the dough and the center.
  • Q: Why are my cookies dry?
    • A: They were likely baked too long or had too much flour.
  • Q: Can I chill the dough first?
    • A: Yes, chilling helps make thicker cookies.
  • Q: How do I know when they are done?
    • A: The edges should look set, but the centers should still look soft.
  • Q: Can I make them ahead of time?
    • A: Yes, you can refrigerate the dough for up to 24 hours before baking.
  • Q: How should I store them?
    • A: Keep them in an airtight container at room temperature for up to 3 days.
  • Q: How do I make them gooey again later?
    • A: Warm one in the microwave for about 8 to 10 seconds. 🔥
  • Q: Can I freeze the dough?
    • A: Yes, freeze the dough balls and bake later straight from frozen, adding 1 to 2 extra minutes.

Creamy Herbed Veggie Cheese Spread

Creamy Herbed Veggie Cheese Spread
🛒 Necessary ingredients
🧀 200 g cream cheese, softened
🥄 2 tbsp mayonnaise or thick yogurt
🫑 3 tbsp finely diced bell peppers
🌿 2 tbsp finely chopped parsley
🧅 1 tbsp very finely chopped onion or green onion
🧂 1/2 tsp salt
⚫ 1/4 tsp black pepper
🧄 1 small garlic clove, grated or minced
🍋 1 tsp lemon juice
👩‍🍳 Method
🥣 Add the softened cream cheese to a bowl.
🥄 Mix in the mayonnaise or yogurt until smooth and fluffy.
🧄 Add garlic, lemon juice, salt, and black pepper.
🫑 Stir in the finely diced bell peppers.
🌿 Add parsley and onion/green onion.
🌀 Mix everything well until evenly combined.
❄️ Chill for 20–30 minutes so the flavors blend.
🍞 Serve as a spread for bread, crackers, toast, or sandwiches.
✨ Tips
🔪 Chop the vegetables very finely so the spread stays smooth.
🌶️ Add a little chili if you want it spicy.
🧊 Keep it in a sealed jar in the fridge for up to 3 days.
🥪 It works well as a sandwich filling too.
❓Q/A about the recipe
Q: Can I make it without mayonnaise?
✅ Yes, use thick yogurt instead.
Q: Can I use different herbs?
✅ Yes, cilantro, dill, or chives work well.
Q: Why should the cream cheese be softened?
✅ It mixes more easily and gives a smooth texture.
Q: Can I make it ahead of time?
✅ Yes, making it a few hours earlier actually improves the flavor.
Q: What can I serve it with?
✅ Crackers, toasted bread, veggie sticks, wraps, or sandwiches.
Q: Can I make it lighter?
✅ Yes, use low-fat cream cheese and yogurt instead of mayonnaise.
Q: How do I make it more colorful like the picture?
✅ Use red, yellow, and orange bell peppers finely diced.
Q: Can I blend it completely smooth?
✅ Yes, but leave a few chopped veggies for texture if you like.