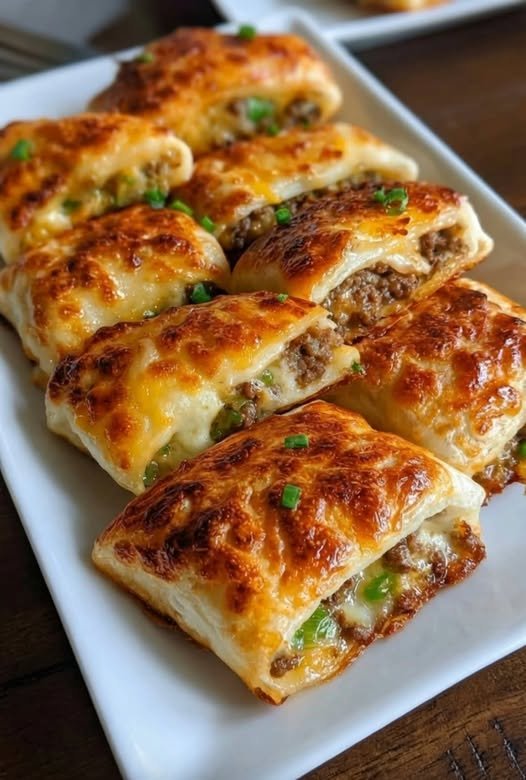
“Bake These Cinnamon Sugar Donut Muffins for the Ultimate Comfort Treat”

All the flavor of classic cinnamon sugar donuts, baked into fluffy, guilt-free muffins!
image 107 Recipe
  • Servings: 12 muffins
  • Total Time: 25 minutes
  • Difficulty: Easy
  • Calories per Muffin: ~120 kcal
  • Macros (Per Muffin): 7g Protein / 4g Net Carbs / 8g Fat / 2g Fiber

Introduction

Craving a warm, cozy treat without blowing your healthy goals? These Cinnamon Sugar Donut Muffins taste just like a classic bakery donut — soft, tender, and coated in that irresistible cinnamon “sugar” blend — but with a clean, macro-friendly twist.

Made with almond flour, Greek yogurt, and a touch of vanilla, these muffins bring comfort to your morning coffee, post-workout snack, or sweet afternoon pick-me-up. Whether you’re following KetoSlimming Weight Watchers, or a Mediterranean-inspired, high-protein lifestyle, these fit perfectly into your plan.

They deliver all the joy of a donut — minus the guilt, sugar crash, and carb overload.


Look at the Recipe

  • Texture & Visual: Fluffy, golden, cake-like muffins with a melt-in-your-mouth coating.
  • Flavor Highlight: Warm cinnamon spice and sweet vanilla comfort.
  • Diet Benefit: Naturally gluten-free, low in carbs, high in protein, and made with wholesome fats.

Ingredients Needed

For the Muffins

  • 2 cups almond flour
  • 2 tbsp coconut flour
  • 1 ½ tsp baking powder
  • ½ tsp baking soda
  • ½ tsp salt
  • 2 large eggs
  • ⅓ cup Greek yogurt (or sour cream)
  • ¼ cup unsweetened almond milk
  • ¼ cup granulated erythritol (or sugar substitute of choice)
  • 1 tsp vanilla extract
  • 1 tbsp melted butter or olive oil (Mediterranean version)

For the Cinnamon “Sugar” Coating

  • 2 tbsp melted butter (or olive oil for Mediterranean twist)
  • ¼ cup erythritol (or stevia blend)
  • 1 ½ tsp ground cinnamon

How to Make Our Cinnamon Sugar Donut Muffins

  1. Preheat oven to 350°F (175°C). Line a 12-cup muffin tin with paper liners or grease lightly.
  2. Mix dry ingredients: In a large bowl, whisk together almond flour, coconut flour, baking powder, baking soda, salt, and sweetener.
  3. Add wet ingredients: Stir in eggs, Greek yogurt, almond milk, vanilla, and melted butter. Mix until smooth and thick.
  4. Fill muffin cups: Divide batter evenly among muffin cups, filling each about ¾ full.
  5. Bake: Bake for 15–18 minutes, or until a toothpick inserted comes out clean and tops are golden.
  6. Cool slightly: Let muffins rest for 5 minutes before removing.
  7. Coat: Brush each muffin with melted butter and roll in the cinnamon “sugar” mixture.

Storage & Serving Suggestions

  • Store: Keep in an airtight container at room temperature for 2 days or refrigerate up to 5 days.
  • Freeze: Freeze muffins (uncoated) for up to 1 month. Reheat and coat fresh for the best texture.
  • Serve With:
    • A hot cup of coffee or matcha for a cozy breakfast.
    • Fresh fruit or Greek yogurt for a balanced snack.
    • Drizzle with almond butter for extra protein and richness.

Tips & FAQs

1. Can I make this Slimming -friendly?
Yes! Use fat-free Greek yogurt and light butter spray. Each muffin is roughly 1–2 syns, depending on your ingredients.

2. How many Weight Watchers points are these?
Around 2–3 WW points per muffin, using fat-free yogurt and zero-calorie sweetener.

3. Can I make them dairy-free?
Absolutely — replace Greek yogurt with coconut yogurt and butter with olive oil or coconut oil.

4. Can I use oat flour or whole-wheat flour instead?
Yes, for Mediterranean-style — though it increases carbs slightly, it adds fiber and a nutty flavor.

5. How do I make them extra fluffy?
Don’t overmix! A quick fold of wet into dry ingredients gives the best light texture.

“Rich Homemade Turtle Candy — Gooey Caramel, Crunchy Pecans, and Smooth Chocolate Bliss”

  • Servings: 16 candies
  • Total Time: 30 minutes (plus cooling)
  • Difficulty: Easy
  • Calories per Candy: ~95 kcal
  • Macros (Per Piece): 2g Protein / 3g Net Carbs / 8g Fat / 1g Fiber

Introduction

Nothing says comfort like the sweet crunch of Homemade Turtle Candy — those irresistible bites of buttery caramel, toasted pecans, and rich chocolate. This version keeps all the decadence of the original but trims out the sugar and heaviness, making it guilt-free yet completely satisfying.

Our healthier Turtle Candy recipe uses sugar-free chocolate, creamy low-carb caramel, and heart-healthy pecans for a treat that fits into Keto, Slimming , Weight Watchers, High-Protein, and Mediterranean lifestyles. It’s a perfect balance of sweetness, crunch, and smooth chocolate indulgence — and best of all, it’s quick, easy, and requires no special equipment.

Keep a batch in the fridge for when you need a little something sweet — because healthy living should still taste like joy.


Look at the Recipe

  • Texture & Visual: Gooey caramel center with crisp pecans and glossy chocolate on top.
  • Flavor Highlight: Buttery caramel sweetness and roasted nut depth with rich dark chocolate.
  • Diet Benefit: Low in carbs, free of refined sugar, and made with healthy fats and natural ingredients.

Ingredients Needed

For the Base

  • 1 cup whole pecan halves (toasted lightly for best flavor)

For the Low-Carb Caramel

  • ¼ cup unsalted butter
  • ¼ cup heavy cream (or coconut cream for dairy-free Mediterranean style)
  • ¼ cup allulose or monk fruit sweetener
  • ½ tsp vanilla extract
  • Pinch of sea salt

For the Chocolate Topping

  • ½ cup sugar-free dark chocolate chips (or 85% dark chocolate)
  • 1 tsp coconut oil or olive oil (for smooth melting)

How to Make Our Homemade Turtle Candy with Pecans and Caramel

  1. Toast the pecans: Preheat your oven to 350°F (175°C). Arrange pecans on a baking sheet and toast for 5–6 minutes until fragrant. Let cool.
  2. Make the caramel: In a small saucepan over medium heat, melt butter and sweetener. Stir constantly until golden and bubbly (about 4–5 minutes). Slowly add cream, whisking until smooth. Add vanilla and salt. Remove from heat and let cool slightly.
  3. Assemble the turtles: On a parchment-lined tray, arrange 3–4 pecans in small clusters (like turtle “legs”). Spoon a small dollop of caramel over each cluster.
  4. Melt the chocolate: Combine chocolate and coconut oil in a bowl. Microwave or melt gently over a double boiler until smooth.
  5. Top and set: Spoon melted chocolate over each caramel-pecan cluster, covering the caramel completely.
  6. Chill: Place the tray in the fridge for 20–30 minutes to firm up. Once set, peel off and store in an airtight container.

Storage & Serving Suggestions

  • Store: Keep refrigerated for up to 2 weeks or freeze up to 2 months.
  • Serve: Enjoy straight from the fridge for a firm snap or let them rest at room temperature for 5 minutes for a softer bite.
  • Gift Idea: Wrap a few turtles in parchment and tie with twine — perfect for healthy homemade holiday treats.

Tips & FAQs

1. Can I make this Slimming -friendly?
Yes! Use light butter and count the nuts and cream according to your syn values — usually 2–3 syns per turtle.

2. How many Weight Watchers points are these?
Each piece is around 2–3 WW points, depending on your chocolate and butter choices.

3. Can I make dairy-free or vegan turtles?
Absolutely — substitute coconut cream for heavy cream and use vegan butter or coconut oil.

4. How can I make them Mediterranean-style?
Use dark chocolate (85%+ cocoa), olive oil instead of butter, and a sprinkle of sea salt flakes on top.

5. Can I use store-bought sugar-free caramel?
Yes, but homemade gives better flavor control and avoids unnecessary additives.

🍥 Soft & Fluffy Cinnamon-Walnut Rolls with Cream Cheese Frosting

Warm, buttery, and packed with cinnamon-sugar and crunchy walnuts — these homemade rolls are bakery-style soft and perfect for breakfast or dessert.


🛒 Dough Ingredients:

  • 1 cup (240ml) warm milk (not hot)
  • 2 ¼ tsp (7g) active dry yeast
  • ¼ cup (50g) sugar
  • 1 large egg
  • ¼ cup (60g) melted butter
  • 3 cups (375g) all-purpose flour
  • 1 tsp (4g) salt

🥄 Filling:

  • 1/3 cup (80g) softened butter
  • 1/2 cup (80g) sugar
  • Cinnamon to taste (about 1–2 tbsp)
  • ¾ cup chopped walnuts

🧁 Cream Cheese Frosting:

  • 4 oz (115g) cream cheese, softened
  • 2 tbsp butter, softened
  • 1 cup (120g) powdered sugar
  • ½ tsp vanilla extract
  • 1–2 tbsp milk (to adjust consistency)

👩‍🍳 Instructions

1️⃣ Activate the Yeast

In a bowl, combine warm milk and yeast. Let sit 5–10 minutes until foamy. Stir in sugar, egg, and melted butter.

2️⃣ Make the Dough

Add flour and salt. Mix until a soft dough forms. Knead for 8–10 minutes (by hand or mixer) until smooth and elastic.

Place in a greased bowl, cover, and let rise for 1–1½ hours until doubled in size.


3️⃣ Prepare the Filling

Mix sugar and cinnamon together. Set aside.

Roll dough into a large rectangle (about 9×14 inches).
Spread softened butter evenly over the surface.
Sprinkle cinnamon-sugar mixture evenly.
Top with chopped walnuts.


4️⃣ Roll & Slice

Roll tightly from the long side into a log.
Slice into 9–12 rolls.
Place in a greased baking dish.

Cover and let rise again for 30–45 minutes.


5️⃣ Bake

Preheat oven to 180°C (350°F).
Bake 20–25 minutes, until golden brown.


6️⃣ Make Frosting

Beat cream cheese and butter until smooth.
Add powdered sugar and vanilla.
Add milk gradually until creamy and spreadable.

Spread over warm rolls.


✨ Tip: For extra soft rolls, pour 2–3 tablespoons warm cream over the rolls right before baking.

Baked Blueberry Greek Yogurt Cups

High-Protein, WW-Friendly, and Low Sugar – Creamy baked yogurt with a juicy blueberry base and a lightly golden top

Servings & Timing

  • Yield: 1 large serving or 2 smaller cups
  • Prep Time: 10 minutes
  • Cook Time: 22–26 minutes
  • Total Time: 35 minutes
  • Dietary Badges: High-Protein, WW-Friendly, Low Sugar, Gluten-Free (if using GF protein powder/granola)
image 346 High Protein Diet, High Protein Recipe, Recipe, WW Recipes

Ingredients

Blueberry Layer

  • 1 cup fresh blueberries
  • 1–2 tbsp sugar-free syrup or monk fruit sweetener, to taste
  • 1 tbsp water
  • Optional: zest or squeeze of lemon

Protein Yogurt Layer

  • ¾ cup nonfat plain Greek yogurt
  • ¾ cup fat-free cottage cheese, blended until smooth
  • ½ scoop vanilla or unflavored protein powder
  • 1–2 tbsp sugar-free syrup or monk fruit sweetener
  • ½ tsp vanilla extract
  • 1 tbsp cornstarch

Light Crunch Topping (Optional)

  • 2 tbsp high-protein granola or crushed high-protein cereal
  • Pinch of cinnamon

Serving Suggestions

  • Enjoy warm or chilled. Perfect on its own or topped with extra fresh blueberries.

Notes:

  • Use fully cooled blueberry base to prevent curdling in yogurt layer.
  • Can be made in ramekins, oven-safe jars, or a small baking dish.

Brief Introduction

If you love a protein-packed breakfast or a healthy dessert, these Baked Blueberry Greek Yogurt Cups are for you. Creamy and rich like a cheesecake but lighter, they combine juicy blueberries with a smooth, high-protein yogurt layer. I created these for a busy morning when I wanted a satisfying, low-sugar breakfast I could make ahead. The lightly golden top and optional crunchy topping give it a fun texture that makes this treat feel indulgent without the guilt.


Step-by-Step Cooking Guide

1. Make the Blueberry Base

  • Combine blueberries, sweetener, and water in a small saucepan.
  • Cook over low heat for 3–4 minutes until berries soften and release their juices.
  • Remove from heat and allow to cool slightly; the mixture will thicken as it rests.

Tip: For extra brightness, add a teaspoon of lemon juice or a pinch of zest.


2. Prepare the Protein Yogurt

  • Blend the cottage cheese until smooth to remove any lumps.
  • In a bowl, whisk together the blended cottage cheese, Greek yogurt, protein powder, sweetener, vanilla, and cornstarch.
  • Mix until thick, smooth, and pourable, with a cheesecake-batter consistency.

Tip: Ensure the blueberry mixture has cooled so it doesn’t affect the yogurt layer’s texture.


3. Assemble the Cups

  • Lightly grease oven-safe glass jars or ramekins.
  • Spoon the blueberry mixture evenly into the bottom of each dish.
  • Pour the protein yogurt mixture on top of the berries.
  • Sprinkle lightly with the optional crunchy topping.

Tip: Use a spatula to smooth the yogurt layer for a clean, professional look.


4. Bake

  • Bake at 350°F (175°C) for 22–26 minutes.
  • Centers should be set but slightly jiggly; tops should be lightly golden and puffed.
  • Let cool for 5–10 minutes before serving.

Tip: For a chilled version, refrigerate for 30–60 minutes after baking.

image 347 High Protein Diet, High Protein Recipe, Recipe, WW Recipes

Ingredient Details & Substitutions

  • Cottage Cheese: Blending removes texture for a smooth custard. Use low-fat if desired.
  • Protein Powder: Any whey or plant-based protein works. Adjust sweetener if using flavored powder.
  • Cornstarch: Helps the yogurt layer set without baking into a solid. Arrowroot powder works as a substitute.
  • Sweetener: Sugar-free syrup or monk fruit can be swapped for stevia or erythritol blends.
  • Crunchy Topping: Optional, but adds texture. Nuts, seeds, or granola work.

Recipe Variations & Serving Suggestions

  • Flavor Twists: Add ½ tsp cinnamon or nutmeg to the yogurt layer.
  • Berry Swap: Use raspberries, blackberries, or mixed berries instead of blueberries.
  • Vegan Option: Replace Greek yogurt and cottage cheese with a thick, unsweetened plant-based yogurt and silken tofu; use plant-based protein powder.
  • Serving Ideas: Great with fresh fruit, a drizzle of sugar-free syrup, or a sprinkle of chia seeds.

Storage & Make-Ahead Tips

  • Refrigeration: Store in an airtight container for up to 3 days.
  • Freezing: Not recommended, as texture may change.
  • Make-Ahead: Blueberry base can be made 1 day ahead; assemble and bake the next morning.

Nutrition Facts (Approximate per large serving)

  • Calories: 260–280
  • Protein: 47–50 g
  • Fat: 2–3 g
  • Net Carbs: ~15 g
  • WW SmartPoints: 2–3 points

Dietary Highlights: High-protein, low-sugar, WW-friendly, gluten-free (if protein powder is GF).


Frequently Asked Questions (FAQs)

Q: Can I use frozen blueberries?
A: Yes, thaw slightly and drain excess liquid before cooking to avoid a watery base.

Q: Can I skip the cornstarch?
A: You can, but the yogurt layer will be softer and less custard-like.

Q: Can this be doubled?
A: Yes, double all ingredients and bake in a larger dish; bake time may need 3–5 minutes longer.

Q: Can I make these dairy-free?
A: Use plant-based yogurt and silken tofu; adjust protein powder if needed.

Q: Can I add extra sweetener?
A: Taste before assembling; adjust to your preference.


Optional Personal Notes

I developed these Baked Blueberry Greek Yogurt Cups as a healthier alternative to cheesecake cups. After a few trials, I found that blending the cottage cheese gives a creamy texture without curdling and keeps the protein content high. The optional topping adds a touch of fun without ruining the low-sugar profile. It’s my go-to make-ahead breakfast for busy mornings or a post-workout treat.


Call-to-Action: Try this recipe, leave a comment with your favorite berry swap, and share your version with friends. These cups are flexible, delicious, and perfect for anyone chasing high-protein, low-sugar meals.

Zesty Avocado & Egg Salad


🥗 Zesty Avocado & Egg Salad

This recipe serves 2 as a main dish or 4 as a side.


Ingredients

The Base:


2 large avocados, diced into bite-sized chunks


4 hard-boiled eggs, peeled and halved or quartered


1 cup cherry tomatoes, halved


1/4 small red onion, thinly sliced


2 tbsp fresh cilantro or parsley, finely chopped


The Zesty Dressing:


1/2 fresh lemon (juiced)


2 tbsp extra virgin olive oil


1/2 tsp sea salt


1/4 tsp cracked black pepper


Optional: A pinch of red chili flakes for a tiny kick


Instructions

Prep the Eggs: Place your eggs in a pot of cold water. Bring to a boil, then cover and remove from heat. Let them sit for 9–10 minutes for a perfect firm yolk. Cool them in an ice bath, peel, and slice.


Assemble the Bowl: In a large shallow bowl, gently toss the diced avocado, halved cherry tomatoes, and sliced red onions.


Add the Protein: Carefully nestle the egg slices into the salad. (Adding them last keeps the yolks from smearing and keeps the salad looking beautiful).


Whisk & Drizzle: In a small jar or bowl, whisk together the lemon juice, olive oil, salt, and pepper. Drizzle the dressing evenly over the salad.


Garnish: Sprinkle with the fresh cilantro (or parsley) and an extra crack of black pepper if you like that bold look from the video.


Pro Tips for the Best Salad

Avocado Choice: Use avocados that are slightly firm to the touch so they hold their shape when tossed.


Serve Immediately: Because of the avocado and the fresh lemon juice, this salad is best enjoyed right after it’s made.


Add-ins: Feel free to add some cucumber slices for extra crunch or a sprinkle of feta cheese for a salty finish.

Cheesy Mashed Potato Muffins with eggs

This sounds like the ultimate “comfort food hack.” There is something incredibly satisfying about turning leftovers—which can sometimes be a bit sad and lumpy—into a crispy, golden appetizer that looks intentional.

I’ve reorganized your recipe into a cleaner, more “scannable” format so you can easily reference it while your hands are covered in potato mixture.


🧀 Cheesy Mashed Potato Muffins

Crispy on the outside, fluffy on the inside, and the perfect use for leftovers.

🛒 Ingredients

Item Quantity
Mashed Potatoes 3 cups (chilled)
Egg 1 large
Cheddar Cheese 1 cup (shredded)
Parmesan Cheese 1/2 cup (grated, for coating)
All-purpose Flour 1/4 cup
Fresh Chives 1/4 cup (chopped)
Garlic Powder 1/2 tsp
Seasoning Salt & pepper to taste

👩‍🍳 Instructions

  1. Prep: Preheat your oven to 200°C (400°F). Generously grease a mini muffin pan with cooking spray or butter.

  2. Mix: In a large bowl, combine the chilled potatoes, egg, cheddar, chives, flour, and spices. Stir until the mixture is uniform.

  3. Coat: Roll the mixture into 1-inch balls. Roll each ball in the grated Parmesan until fully coated.

  4. Shape: Place balls into the muffin tin cavities. Press down slightly to ensure they take the shape of the pan.

  5. Bake: Bake for 15–20 minutes. You’re looking for a deep golden-brown crust and a visible crunch.

  6. Cool & Serve: Let them sit for 5 minutes (this helps them set so they don’t fall apart). Serve warm!


💡 Pro-Tips for Success

  • The “Chilled” Factor: Using cold mashed potatoes is key. If the potatoes are warm, the starch hasn’t set, and your muffins might turn into a “potato puddle” rather than a puff.

  • The Mix-In Matrix: * Loaded: Add crumbled bacon and a dollop of sour cream on top after baking.

    • Spicy: Fold in canned diced jalapeños and use Pepper Jack cheese.

    • Veggie: Swap 50% of the potato for mashed cauliflower for a lighter bite.

Storage Hack: These are perfect for meal prep. Freeze them solid on a baking sheet first, then toss them into a freezer bag. This prevents them from sticking together into one giant potato brick!

Savory Puff Pastry Meat & Cheese Roll

Savory Puff Pastry Meat & Cheese Roll

This Savory Puff Pastry Meat & Cheese Roll is the ultimate comfort food—combining the buttery, flaky crunch of golden pastry with a rich, seasoned meat filling and a molten cheese core. Whether served as a centerpiece for a family brunch or sliced into appetizers for a party, this dish is guaranteed to disappear in minutes.


Ingredients

  • 1 sheet Puff Pastry (thawed)

  • 300g Minced Meat (Beef, Chicken, or Pork)

  • 100g Grated Cheese (Mozzarella or Cheddar)

  • 2 Hard-boiled Eggs (finely chopped)

  • 1 Medium Onion (finely chopped)

  • 1 bunch Fresh Parsley (chopped)

  • Seasoning: 1 tsp dried basil, salt, and black pepper to taste.

  • Binding: 1 egg (beaten, for egg wash)


Instructions

  1. Prepare the Savory Filling: In a large skillet, melt a knob of butter and sauté the onions until translucent. Add the minced meat, browning it thoroughly. Season with salt, pepper, and dried basil. Once cooked, remove from heat and stir in the chopped boiled eggs and fresh parsley. Let the mixture cool slightly to prevent the pastry from becoming soggy.

  2. Assemble the Roll: Unroll the puff pastry onto a piece of parchment paper. Spread the meat mixture evenly across the dough, leaving a 2cm border at the edges. Generously sprinkle the grated cheese over the meat.

  3. Roll and Seal: Starting from the long edge, carefully roll the pastry into a tight log. Pinch the ends to seal in the juices.

  4. The Golden Finish: Place the roll seam-side down on a baking tray. Brush the top thoroughly with the beaten egg wash. Use a sharp knife to score light diagonal vents across the top.

  5. Bake: Slide into a preheated oven at 200°C (400°F) for 20–25 minutes until the pastry is puffed and deep golden brown.

Allow it to rest for 5 minutes before slicing to ensure the cheese stays perfectly set inside each decadent bite.

Soft Fluffy Milk Bread Recipe 🍞

Soft Fluffy Milk Bread Recipe 🍞

Ingredients

  • 3 cups all-purpose flour (maida)
  • 2 tbsp sugar
  • 1 tsp salt
  • 1 tbsp instant yeast
  • 1 cup warm milk
  • 2 tbsp butter (softened)
  • 1 egg (optional but makes bread softer)
  • 1 tbsp oil
  • Extra flour for dusting

Step-by-Step Instructions

Step 1: Activate Yeast

In a bowl, add warm milk, sugar, and yeast. Mix gently and leave it for 5–10 minutes until it becomes slightly foamy.

Step 2: Prepare the Dough

In a large bowl add:

  • flour
  • salt

Mix them together. Then pour in the yeast mixture and add the egg (if using).

Step 3: Knead the Dough

Start mixing and knead the dough for 8–10 minutes until it becomes soft and elastic.

Add butter while kneading and continue kneading until the dough becomes smooth.

Step 4: First Rise

Grease a bowl with oil and place the dough inside.

Cover it with a cloth or plastic wrap and let it rest in a warm place for 1 hour or until it doubles in size.

Step 5: Shape the Bread

Punch the dough gently to remove air.

Divide it into 3–4 equal balls and place them inside a greased loaf pan.

Step 6: Second Rise

Cover the pan and let the dough rise again for 30–40 minutes until puffy.

Step 7: Bake

Preheat oven to 180°C (350°F).

Bake the bread for 25–30 minutes until the top becomes golden brown.

Step 8: Final Touch

Brush the hot bread with butter for extra softness.

Let it cool slightly before slicing.

✨ Result: Soft, fluffy homemade bread that you can press with your finger just like in the picture!

Fluffy Whipped Cream Frosting

🧁 Fluffy Whipped Cream Frosting

📝 Ingredients

  • 1 cup cold heavy whipping cream
  • 3–4 tablespoons powdered sugar
  • 1 teaspoon vanilla extract
  • 1 tablespoon cornstarch or cream stabilizer (optional, helps it hold shape)

👩‍🍳 Step-by-Step Instructions

1️⃣ Chill the bowl

Place your mixing bowl and beaters in the fridge for 10–15 minutes. Cold tools help the cream whip better.

2️⃣ Add the cream

Pour 1 cup cold heavy whipping cream into the chilled bowl.

3️⃣ Start whipping

Using a hand mixer or whisk, beat on medium speed for about 1 minute until the cream becomes slightly thick.

4️⃣ Add sugar and vanilla

Add powdered sugar and vanilla extract. If using cornstarch/stabilizer, add it now.

5️⃣ Whip until fluffy

Continue beating for 2–3 minutes until soft peaks form. The cream should look thick and hold its shape like the frosting in the picture.

6️⃣ Check the texture

Lift the whisk — if the cream forms a soft peak that holds shape, your frosting is ready. Do not overmix or it can turn grainy.

7️⃣ Use immediately

Spread or pipe it on cakes, cupcakes, pancakes, or desserts.

✨ Tip: Keep the frosting refrigerated if not using right away. It stays fresh for 1–2 days in the fridge.

No Knead Beer Bread

No-Knead Artisan Beer Bread

A crusty, rustic loaf that relies on time and fermentation rather than elbow grease.

  • Prep time: 10 mins

  • Rise time: 3 hrs 10 mins

  • Cook time: 35 mins

  • Yield: 1 Loaf (approx. 15 servings)

Ingredients

  • 1 ½ tsp active dry yeast

  • 4 ½ cups all-purpose flour (divided)

  • ½ cup warm water (approx. 100°F / 38°C)

  • 1 (12 oz) can or bottle of beer (room temperature works best)

  • 1 ½ tsp fine salt

  • Extra flour for dusting

  • 1 tbsp cornmeal (for the baking sheet)

Instructions

  1. Activate the Yeast: In a large bowl, stir together the yeast, ½ cup of the flour, and the warm water. Cover the bowl and let it sit in a warm spot for 30 minutes until slightly bubbly.

  2. Mix the Dough: Stir in the beer, salt, and the remaining 4 cups of flour. Mix until the flour is fully incorporated. The dough will be thick, sticky, and should pull away from the sides of the bowl.

  3. First Rise: Cover the bowl again and let the dough rise in a warm spot for 2 hours, or until it has doubled in size.

  4. Shape: Scrape the dough onto a well-floured surface using a spatula. Dust the top of the dough generously with flour and gently shape it into an oval or round loaf.

  5. Second Rise: Sprinkle a baking sheet with cornmeal. Transfer the loaf to the sheet, sprinkle a little more flour on top, and cover loosely with a clean kitchen towel. Let it rise for another 30–40 minutes.

  6. Prepare the Oven: Preheat your oven to 425°F (220°C). To get that “bakery crust,” place a small loaf pan filled with warm water on the bottom rack to create steam.

  7. Score and Bake: Use a sharp knife or razor to slash a long slit down the center of the loaf. Place the baking sheet on the rack above the water pan. Bake for 35 minutes or until the crust is deep golden brown.

  8. Cool: Transfer to a wire rack. Resist the urge to cut it immediately! Letting it cool completely ensures the middle finishes setting and doesn’t become gummy.


A Quick Tip for Success

The type of beer you use will change the flavor profile significantly:

  • Lagers/Pilsners: Result in a mild, classic bread flavor.

  • Stouts/Porters: Create a darker, maltier, and slightly sweeter loaf.

  • IPAs: Can sometimes leave a bitter aftertaste due to the hops, so stick to maltier brews if you’re unsure!

Quick Oatmeal Breakfast Bread with Pumpkin & Nuts

Quick Oatmeal Breakfast Bread with Pumpkin & Nuts

Soft • Nourishing • Naturally Flavorful

Preparation Time

  • Prep: 15 minutes

  • Bake: 40–45 minutes

  • Servings: 1 medium loaf (8–10 slices)


Ingredients

  • 1 cup oatmeal (rolled oats or quick oats)

  • 1 glass warm water (200–250 ml)

  • ½ pumpkin (about 400 g), peeled and grated or finely chopped

  • 1 tablespoon sweetener (optional, to taste)

  • 1 teaspoon cinnamon (optional)

  • A pinch of salt

  • 3 tablespoons vegetable oil (optional, for extra softness)

  • 1 tablespoon sesame seeds

  • 5–6 dried apricots, rinsed and soaked in hot water, then finely chopped

  • 1 tablespoon chia seeds

  • 1–2 tablespoons finely chopped nuts (walnuts, almonds, or pecans)

  • 2 tablespoons mixed nuts, seeds, and dried fruits (for topping or inside)

  • 1 teaspoon baking powder

  • Parchment paper for lining the pan


Step-by-Step Instructions

1. Prepare the Oats

Place the oatmeal in a mixing bowl.
Pour the warm water over the oats, stir well, and let them soak for 10 minutes until soft and slightly thick.


2. Prepare the Pumpkin

Grate or finely chop the pumpkin.
If it contains excess moisture, gently squeeze it with your hands to remove extra liquid.


3. Combine the Base

Add the pumpkin to the soaked oats.
Mix in:

  • Sweetener (if using)

  • Cinnamon (if using)

  • Salt

  • Vegetable oil (optional)

Stir until evenly combined.


4. Add Fruits, Nuts & Seeds

Fold in:

  • Chopped dried apricots

  • Chia seeds

  • Chopped nuts

  • Mixed nuts, seeds, and dried fruits

Mix gently so everything is evenly distributed.


5. Add the Leavening

Sprinkle in the baking powder and stir just until combined.
Do not overmix.


6. Prepare for Baking

Preheat oven to 180°C (350°F).
Line a loaf pan with parchment paper.

Pour the batter into the pan and smooth the top.
Sprinkle sesame seeds evenly over the surface.


7. Bake

Bake for 40–45 minutes, or until:

  • The top is golden

  • A toothpick inserted in the center comes out clean


8. Cool & Serve

Remove from oven and allow the bread to cool in the pan for 10–15 minutes.
Lift out using the parchment paper and cool completely before slicing.


Serving Suggestions

  • Enjoy warm with yogurt, honey, or nut  butter

  • Perfect for breakfast, snack time, or lunchbox slices

  • Stores well in the refrigerator for up to 4 days

🐔 Crock Pot Chicken and Dumplings (Easy & Creamy)

🐔 Crock Pot Chicken and Dumplings (Easy & Creamy)

This slow cooker chicken and dumplings recipe gives you tender chicken, soft dumplings, and a rich, creamy broth with almost no effort. Perfect for busy days when you want a homemade meal waiting for you.

⏱ Prep Time: 5 minutes

🍲 Cook Time: 4–5 hours

🍽 Servings: 4


🛒 Ingredients

  • 1 medium yellow onion, finely diced

  • 1 (10 oz) can cream of mushroom soup

  • 1 (10 oz) can cheddar cheese soup

  • 2 teaspoons dried thyme

  • ½ teaspoon garlic powder

  • ¼ teaspoon black pepper

  • 3 pounds boneless, skinless chicken thighs (or breasts), cut into 1-inch pieces

  • 3 cups chicken broth

  • 1 (16 oz) bag frozen mixed vegetables, thawed

  • 1 (10 oz) tube refrigerated flaky biscuits

Optional garnish: chopped parsley


👩‍🍳 Instructions

  1. Prepare the slow cooker
    Lightly grease a 6-quart slow cooker. Add the diced onion, then spread the chicken pieces evenly on top.

  2. Make the sauce
    In a bowl, mix together:

    • Cream of mushroom soup

    • Cheddar cheese soup

    • Thyme

    • Garlic powder

    • Black pepper

    Pour this mixture over the chicken. Add the chicken broth.

  3. Cook
    Cover and cook:

    • On HIGH for 4 hours, or

    • On LOW for 6–7 hours

  4. Add vegetables
    Stir in the thawed mixed vegetables.

  5. Prepare dumplings
    Roll each biscuit flat to about ¼-inch thickness.
    Cut each biscuit into 6 small pieces.

  6. Cook dumplings
    Place biscuit pieces gently on top of the mixture.
    Cover and cook on HIGH for 45–60 minutes, until dumplings are fully cooked and soft.

  7. Shred chicken
    Remove chicken with a slotted spoon and shred with two forks.
    Return chicken to the slow cooker and gently stir. Some dumplings may break apart—this thickens the broth.

  8. Serve
    Spoon into bowls and garnish with parsley if desired. Serve warm.


🌽 Optional Add-Ins

You can customize with:

  • Diced carrots

  • Celery

  • Corn

  • Peas

  • Potatoes


✅ Tips for Best Results

  • Use thawed vegetables to avoid cooling the crockpot.

  • Avoid lifting the lid while dumplings cook.

  • Chicken thighs give richer flavor, but breasts work too.

  • If broth is too thick, stir in a little warm chicken broth before serving.

Triple Crust Peach Cobbler

Triple-Crust Peach Cobbler

This version features a bottom crust, a middle layer that soaks up the juices, and a golden-brown top crust.

  • Prep time: 30 minutes

  • Bake time: 50–60 minutes

  • Servings: 8–10

Ingredients

For the Peaches:

  • 6–8 cups Fresh Peaches, peeled and sliced (or 3 cans of sliced peaches, drained)

  • 1 cup Granulated Sugar

  • 1/2 cup Brown Sugar, packed

  • 1 tsp Ground Cinnamon

  • 1/4 tsp Ground Nutmeg

  • 1 tbsp Lemon Juice

  • 2 tbsp Cornstarch

For the Triple Crust:

  • 3 Refrigerated Pie Crusts (or 3 batches of your favorite homemade double-crust dough)

  • 1/2 cup Unsalted Butter, melted

  • 2 tbsp Granulated Sugar (for sprinkling)

  • 1 Egg + 1 tbsp Water (for egg wash)


Instructions

  1. Prepare the Filling: In a large saucepan, combine the peachessugarscinnamonnutmeglemon juice, and cornstarch. Cook over medium heat for about 5–8 minutes until the peaches soften and the syrup thickens slightly. Remove from heat.

  2. The Bottom Layer (Crust #1): Preheat your oven to 375°F (190°C). Fit one pie crust into the bottom of a 9×13 inch baking dish. Prick the bottom with a fork and bake for 10 minutes until just slightly set.

  3. The Middle Layer (Crust #2): Pour half of the peach mixture over the bottom crust. Take your second pie crust and cut it into 1-inch strips. Lay these strips directly over the peaches in a lattice pattern or simply lay them flat. Brush these strips with some of the melted butter.

  4. The Top Layer (Crust #3): Pour the remaining peaches over the middle crust layer. Place the third pie crust over the top. You can do a full top crust (vented with a knife) or another lattice.

  5. The Finish: Brush the top crust with the egg wash and sprinkle with the 2 tbsp of sugar. This creates that “aesthetically pleasing” golden finish you mentioned.

  6. Bake: Place in the oven for 40–50 minutes. If the edges brown too quickly, cover them with foil. The cobbler is done when the crust is deep golden brown and the peach filling is bubbling through the gaps.

  7. Rest: Let it sit for at least 15–20 minutes before serving. This allows the three layers of crust to set and the juices to thicken.


Why This Works

  • Layers upon Layers: The middle crust acts as a “dumpling” layer, soaking up the peach syrup while remaining tender.

  • Texture: You get a crispy bottom, a gooey middle, and a flaky top.

  • Variety: Every bite offers a different ratio of buttery crust to sweet fruit.

Cheesy Chicken Broccoli Protein Bake

Cheesy Chicken Broccoli Protein Bake

A comforting, one-dish meal that is high in protein and perfectly seasoned.

  • Prep time: 10 minutes

  • Bake time: 20–25 minutes

  • Servings: 4

Nutritional Profile (Per Serving)

  • Calories: 260

  • Protein: 38g

  • Net Carbs: 6g

  • Fat: 8g


Ingredients

  • 2 cups cooked chicken breast, shredded

  • 2 cups broccoli florets, steamed until tender-crisp

  • 1 cup low-fat cottage cheese (blended until completely smooth)

  • ½ cup plain Greek yogurt

  • ½ cup shredded cheddar cheese

  • ¼ cup grated Parmesan cheese

  • 1 tsp garlic powder

  • 1 tsp onion powder

  • Salt and black pepper to taste


Detailed Directions

  1. Preparation: Preheat your oven to 375°F (190°C). Lightly grease an 8×8-inch or similar-sized baking dish with non-stick spray or a touch of olive oil.

  2. Create the Creamy Base: If you haven’t already, place the cottage cheese in a blender or food processor and pulse until it reaches a smooth, sour cream-like consistency.

  3. Mix: In a large mixing bowl, combine the shredded chicken, steamed broccoli, blended cottage cheese, and Greek yogurt.

  4. Season: Stir in the garlic powder, onion powder, salt, and pepper. Ensure the chicken and broccoli are thoroughly coated in the creamy sauce.

  5. Assemble: Transfer the mixture into your prepared baking dish, spreading it out into an even layer.

  6. Top with Cheese: Sprinkle the shredded cheddar and grated Parmesan evenly over the top.

  7. Bake: Place in the oven and bake for 20–25 minutes. The edges should be bubbling, and the cheese on top should be melted and starting to turn golden brown.

  8. Serve: Let the dish stand for 5 minutes before serving to allow the sauce to set slightly.


Success Tips

  • Chicken Shortcuts: You can use a rotisserie chicken to save time; just remove the skin to keep the fat content lower.

  • Broccoli Texture: To avoid a watery bake, ensure your steamed broccoli is well-drained and patted dry before adding it to the mixture.

  • Meal Prep: This dish reheats beautifully in the microwave or oven, making it an excellent option for healthy lunches throughout the week.

Soft & Fluffy Milk Pudding

Soft & Fluffy Milk Pudding

This looks like a light, airy baked milk pudding — soft, slightly bubbly texture, and melts in the mouth 🤍 Perfect simple dessert with basic ingredients!

🛒 Ingredients

  • 4 eggs (room temperature)
  • ½ cup sugar
  • 2 cups warm milk
  • 1 tsp vanilla essence
  • 1 tbsp melted butter (optional, for richness)
  • 1 tbsp flour or cornflour (optional – for slightly firmer texture)

👩‍🍳 Step-by-Step Detailed Recipe

🔹 Step 1: Prepare the Mixture

  1. In a bowl, crack 4 eggs.
  2. Add sugar and whisk until slightly light and creamy.
    (Do not overbeat, just mix well.)
  3. Add vanilla essence and melted butter.
  4. Slowly pour warm milk while mixing continuously.
  5. If using flour/cornflour, sift and mix until smooth.

💡 Tip: Strain the mixture for extra smooth texture.

🔹 Step 2: Prepare Baking Dish

  1. Lightly grease a glass or baking dish.
  2. Pour the mixture into the dish.

🔹 Step 3: Water Bath Baking (Important!)

  1. Place the filled dish inside a larger baking tray.
  2. Pour hot water into the larger tray (halfway up the sides).
    This prevents cracks and keeps pudding soft.

🔹 Step 4: Bake

  • Preheat oven to 170°C (340°F).
  • Bake for 35–45 minutes.
  • Center should be set but slightly jiggly.

🔹 Step 5: Cool & Chill

  1. Remove from oven.
  2. Let it cool at room temperature.
  3. Refrigerate for at least 2–3 hours before slicing.

🍽️ Serving Tip

  • Slice gently with a sharp knife.
  • Serve plain or drizzle with caramel or fruit sauce.

✨ Texture Tips

✔ Use room temperature eggs

✔ Do not overbake (it becomes rubbery)

✔ Always use water bath

✔ Chill well for clean slices

Hearty Ham & Navy Bean Soup

Hearty Ham & Navy Bean Soup

Prep time: 15 mins | Cook time: 1.5 – 2 hours | Servings: 6-8

Ingredients

Category Item Quantity
The Stars Dried Navy Beans (soaked overnight) 1 lb (16 oz)
Ham Bone (or 2 cups diced smoked ham) 1 bone
Aromatics Yellow Onion, diced 1 large
Carrots, diced 2 medium
Celery stalks, diced 2 stalks
Garlic, minced 3 cloves
Liquid/Spice Chicken Broth or Water 6 – 8 cups
Fresh Thyme (plus more for garnish) 3-4 sprigs
Bay Leaf 1 leaf
Black Pepper & Salt To taste

Instructions

  1. Sauté the Base: In a large Dutch oven or heavy-bottomed pot, heat a splash of oil over medium heat. Add the onion, carrots, and celery. Cook for 5–7 minutes until the onions are translucent. Stir in the garlic for the last minute.

  2. Combine: Add the soaked beans, the ham bone (or diced ham), thyme, and bay leaf. Pour in the broth until everything is covered by at least 2 inches of liquid.

  3. Simmer: Bring the soup to a gentle boil, then reduce heat to low. Cover and simmer for 1.5 to 2 hours. You’ll know it’s ready when the beans are tender and the meat is falling off the bone.

  4. The “Creamy” Secret: For that slightly thick texture seen in the photo, take a potato masher and lightly mash about 10% of the beans directly in the pot. This releases starches and thickens the broth beautifully.

  5. Finish: Remove the bone and the woody thyme stems. Shred any meat from the bone and return it to the pot. Season with plenty of cracked black pepper. (Wait to add salt until the end, as the ham is naturally very salty!)

Pro Tip: If you want that extra “zing” seen in high-end versions, add a teaspoon of apple cider vinegar or a squeeze of lemon just before serving to brighten the savory flavors.

Mango Banana Oat Breakfast Smoothie

🥭 Mango Banana Oat Breakfast Smoothie

Ingredients

Category Ingredient Quantity
Fiber Rolled Oats (Old Fashioned) ¼ cup
Fruit Fresh or Frozen Mango (cubed) 1 cup
Fruit Ripe Banana ½ large
Liquid Orange Juice or Coconut Water ½ cup
Creaminess Milk or Yogurt (Dairy or Plant-based) ½ cup
Optional Honey or Agave Syrup 1 tsp
Optional Fresh Turmeric or Ginger A tiny pinch (for extra glow)


Instructions

  1. Soften the Oats (Optional): If you prefer a completely smooth texture without any “chew,” place the oats in the blender first and pulse them into a fine powder before adding other ingredients.

  2. Layer Your Ingredients: Add your liquid base (orange juice/milk) first. Follow with the oats, then the banana and mango chunks. Placing the frozen items on top helps push everything down into the blades.

  3. The Blend: Start on a medium speed to break down the oats and fruit, then finish on high for 45 seconds. You want to ensure the oats are fully pulverized for that “silk” finish seen in the second image.

  4. Adjust Consistency: * Too thick? Add a splash more orange juice.

    • Too thin? Add a few ice cubes or more frozen mango.


Why this combination works

  • The Oats: They act as a natural thickener and provide slow-release energy, preventing a “sugar crash” later in the morning.

  • The Mango: High in Vitamin C and fiber, it provides that intense tropical color and natural sweetness.

  • The Banana: This is the “glue” of the smoothie; it provides the creamy, emulsified texture that binds the oats and juice together.

Pro Tip for Texture

If you have the time, let the blended smoothie sit for 2–3 minutes before drinking. This allows the oats to hydrate slightly, making the drink even creamier!

Layered Avocado Banana Smoothie Recipe

This layered avocado and banana smoothie is a nutrient-dense “Green Goddess” blend that combines healthy fats, antioxidants, and fiber. The specific visual presentation uses a thick yogurt base, decorative avocado slices, and distinct color layers achieved by adding matcha powder.

Ingredients

Layer Components
Bottom Base 1/2 cup Greek or vanilla yogurt, 1 tsp chia seeds.
Main Smoothie 1 ripe avocado (pitted and peeled), 1 large frozen banana, 1 cup plant-based milk (almond or coconut), and 1-2 tsp honey or maple syrup.
Matcha Layer 1 tsp high-quality matcha powder added to half of the main smoothie blend.
Toppings Fresh banana slices and a sprinkle of chia seeds.

Step-by-Step Instructions

  1. Prepare the Glass Decor:

    • Slice a few thin wedges of fresh avocado and press them firmly against the inside walls of the glass.

    • Spoon the yogurt into the bottom of the glass around the avocado slices. Sprinkle a few chia seeds into the yogurt layer so they are visible through the glass.

  2. Blend the Light Green Layer:

    • Add the avocado, frozen banana, milk, and sweetener into a high-speed blender.

    • Blend on high until the consistency is thick and creamy. If it is too thick to pour, add a splash more milk.

    • Pour about half of this mixture into the glasses over the yogurt base.

  3. Blend the Darker Matcha Layer:

    • Add the matcha powder to the remaining smoothie still in the blender.

    • Pulse or blend briefly until the color is a vibrant, darker green.

    • Carefully pour or spoon this matcha layer over the light green layer to maintain the distinct separation.

  4. Garnish and Serve:

    • Top with fresh banana slices and a final dusting of chia seeds or extra matcha powder. Serve immediately while cold.

Chef’s Tips for Success

  • Use Frozen Fruit: Frozen bananas are essential for achieving a thick, “smoothie bowl” consistency that allows for distinct layering.

  • Prevent Browning: Avocados brown quickly; if preparing in advance, adding a squeeze of lime juice can help maintain the bright green color.

  • Layering Technique: For the cleanest layers, use the back of a large spoon to gently guide the smoothie down the side of the glass.

Mango Coconut Chia Pudding

Mango Coconut Chia Pudding

Prep time: 10 mins | Chill time: 4+ hours | Servings: 2


Ingredients

Layer Ingredients

Chia Base 1/4 cup chia seeds, 1 cup coconut milk (canned or carton), 1 tbsp maple syrup or honey, 1/2 tsp vanilla extract

Mango Puree 1 ripe mango (peeled and pitted), 1 tsp lime juice

Toppings Diced mango, toasted coconut flakes, fresh mint or lime zest

Instructions

Prepare the Pudding: In a jar or bowl, whisk together the chia seeds, coconut milk, sweetener, and vanilla. Stir well to ensure there are no clumps.


The First Set: Let it sit for 5–10 minutes, then give it one more stir. This prevents the seeds from sinking to the bottom. Cover and refrigerate for at least 4 hours (overnight is best).


Make the Puree: Blend half of your mango chunks with a squeeze of lime juice until smooth. Keep the other half diced for the top.


Assemble: Once the pudding is thick, spoon it into glasses. Pour the mango puree over the pudding, then pile on the diced mango.


Garnish: Finish with toasted coconut flakes and a tiny bit of lime zest or mint for that professional look.


Pro Tips for Success

Milk Choice: Use canned coconut milk if you want a very rich, dessert-like texture, or coconut milk from a carton for a lighter, everyday breakfast version.


Texture: If the pudding is too thick after chilling, stir in an extra splash of milk.


Layering: To get those clean lines like in the photo, use a spoon to gently place the mango puree over the set pudding rather than pouring it quickly.

Homemade Pink Strawberry Ice Cream

Homemade Pink Strawberry Ice Cream


This creamy, pastel-pink ice cream is smooth, rich, and easy to make without a machine. The images show a whipped mixture poured into a container, then frozen into perfect scoops—so this recipe recreates that exact soft, velvety texture.

🍓 Ingredients

2 cups heavy whipping cream (cold)


1 cup sweetened condensed milk


1 cup strawberry puree or strawberry syrup


1 tsp vanilla extract


2–3 drops pink food coloring (optional but gives the vibrant color)


1 tbsp lemon juice (enhances strawberry flavor)

🍨 Step-by-Step Instructions

1. Prepare the Strawberry Base

Blend fresh or frozen strawberries into a smooth puree. Strain if you want a silky finish. Mix in lemon juice and set aside.


2. Whip the Cream

Using a chilled bowl, beat the heavy cream on high for 3–4 minutes until stiff peaks form. This step creates the fluffy, scoopable ice-cream texture.


3. Combine the Ingredients

In another bowl, whisk together the sweetened condensed milk, strawberry puree, vanilla extract, and food coloring until pink and creamy.


4. Fold Gently

Add the whipped cream gradually into the strawberry mixture. Gently fold using a spatula to keep the mixture airy and smooth.


5. Pour Into a Container

Transfer the mixture into a freezer-safe container (as shown in the image). Smooth the top with a spatula.


6. Freeze

Cover the container tightly. Freeze for 6–8 hours, or overnight for best results. Scoop and enjoy!

❓ Q&A Section

Q1: Can I use fresh strawberries instead of syrup?

Yes! Fresh puree makes the ice cream taste natural and juicy. Just strain the seeds if you prefer a smoother texture.


Q2: What if I don’t have heavy cream?

You can use whipping cream, but avoid milk—it won’t whip properly and the ice cream will become icy.


Q3: How can I make it even creamier?

Add 1–2 tablespoons of cream cheese while mixing the condensed milk. It gives a rich, premium texture.


Q4: Can I make this recipe sugar-free?

Yes. Use sugar-free condensed milk and a low-calorie strawberry syrup. The texture stays very close to the original.

Q5: How long does it last in the freezer?

Homemade ice cream stays fresh for up to 2 weeks when sealed airtight.

Discover the Magic of Ginger & Lemon for Weight Loss

Believe it or not, some people are shedding those extra pounds without the need for strict dieting. They are doing it by incorporating a simple, natural blend of ginger and lemon into their daily routine. This dynamic duo not only boosts metabolism but also reduces bloating, supporting natural fat burning. And the best part? It’s easy to make, tastes refreshing, and can easily become your new daily habit!


The Winning Combination of Ginger and Lemon

✅ Ginger works wonders by speeding up your metabolism, curbing your appetite, and enhancing digestion.


✅ Lemon, on the other hand, is packed with vitamin C, aids in flushing out toxins, and helps break down fat.


Together, these two powerhouses assist your body in burning more calories, staying energized, and trimming down, especially around the belly area!


Morning & Night Fat-Burning Drink (Lemon & Ginger Water)

Ingredients:


1–2 slices of fresh ginger (or ½ tsp grated)

Juice from ½ fresh lemon

1 cup hot (not boiling) water

Optional: 1 tsp raw honey or a pinch of cinnamon

Instructions:


Add ginger to a cup of hot water. Let it steep for 5–10 minutes.

Mix in the lemon juice.

Optional: For added flavor and benefits, include honey or cinnamon.

Enjoy it warm.

When to Enjoy It

✅ Morning (before breakfast):

Jumpstarts your metabolism and aids digestion.


✅ Evening (before bed):

Supports overnight fat burning, aids digestion, and helps in detoxification.


You can also drink it between meals to curb cravings and reduce bloating.


Witness the Transformation Over Time

When paired with:


Consistent water intake

Lighter meal choices

Some light movement or a casual walk

This simple drink can assist you in naturally shedding those unwanted pounds without the need for starvation or calorie counting.


Numerous individuals have reported losing up to 5–10 kg in just a month by staying dedicated!


Final Words

Bid farewell to strict diets and pills! This ginger and lemon drink serves as a natural, healthy, and sustainable way to aid weight loss while improving your overall well-being. Simply sip, stay active, and allow your body to work its wonders.


Give it a try for 30 days, and witness the fantastic transformation your body undergoes!


Enjoy the journey to a healthier, happier you!

Banana Pineapple Mango Yogurt Almond Milk Smoothie

Q: What is this smoothie made of?

This tropical smoothie is made with ripe banana, fresh pineapple, sweet mango, plain yogurt, and almond milk. The combination creates a naturally sweet, creamy, and refreshing drink packed with vitamins, minerals, and natural energy.

Q: What ingredients do I need (1–2 servings)?


1 ripe banana, sliced


½ cup fresh or frozen mango cubes


½ cup fresh or frozen pineapple chunks


½ cup plain yogurt (Greek or regular)


¾ to 1 cup unsweetened almond milk

Optional: 1–2 teaspoons honey or dates (if extra sweetness is needed)


Optional: a few ice cubes (for a thicker, chilled smoothie)


Q: How do I prepare this smoothie step by step?

First, peel and slice the banana. Cut the mango and pineapple into small cubes if using fresh fruit. Add the banana, mango, and pineapple to a blender. Next, add the yogurt and pour in the almond milk. If you prefer a colder or thicker texture, add ice cubes. Blend on high speed for 30–60 seconds until smooth and creamy. Taste and adjust sweetness if needed, then blend again briefly. Pour into a glass and serve immediately.

Q: What does this smoothie taste like?

This smoothie has a naturally sweet, tropical flavor. The banana adds creaminess, mango provides rich sweetness, pineapple gives a light tang, and yogurt balances everything with a mild, creamy texture. Almond milk keeps it light and dairy-free-friendly.

Q: Is this smoothie healthy?

Yes, it’s very nutritious. Bananas provide potassium and energy, mango and pineapple are rich in vitamin C and antioxidants, yogurt adds protein and probiotics, and almond milk is low in calories and lactose-free. It’s ideal for breakfast, a post-workout drink, or a healthy snack.


Q: Can I customize this recipe?

Absolutely. You can add chia seeds or flaxseeds for extra fiber, protein powder for muscle recovery, or spinach for added greens without changing the taste much. Coconut milk can replace almond milk for a richer flavor.


Q: How should it be served?

Serve chilled in a tall glass. You can garnish with fruit pieces or seeds if desired. Enjoy fresh for best taste and nutrition.

Citrus Sunrise Smoothie

This Citrus Sunrise Smoothie is a vibrant, nutrient-rich drink packed with vitamin C, antioxidants, and natural hydration. It’s perfect for breakfast, a mid-day refresher, or a light detox drink. The combination of sweet oranges, slightly bitter grapefruit, and a hint of lemon creates a beautifully balanced flavor that is both refreshing and energizing.

Ingredients (Serves 2)

2 medium oranges, peeled and chopped


1 large grapefruit, peeled and segmented


½ lemon, peeled and deseeded


½ cup cold water or fresh orange juice


½ cup ice cubes


1 teaspoon honey or maple syrup (optional)


A small pinch of turmeric (optional, for anti-inflammatory benefits)

Preparation Method

Start by thoroughly washing all citrus fruits before peeling. Remove as much of the white pith as possible to avoid bitterness. Chop the oranges and grapefruit into medium-sized pieces so they blend smoothly.


Place the orange chunks, grapefruit segments, and lemon pieces into a high-speed blender. Add cold water or fresh orange juice to help the blending process. If you prefer a thicker smoothie, reduce the liquid slightly; for a lighter, juice-like consistency, add more.


Add ice cubes to give the smoothie a chilled, refreshing texture. If you like a touch of sweetness, include honey or maple syrup. For extra health benefits, add a pinch of turmeric.

Blend on high speed for 45–60 seconds until the mixture becomes smooth, creamy, and vibrant orange in color. Check the consistency and taste. Adjust sweetness or liquid as needed, then blend again briefly.


Serving Suggestions

Pour the smoothie into tall glasses and serve immediately for maximum freshness and nutrition. Garnish with a slice of orange or grapefruit if desired. This smoothie tastes best when freshly prepared.


Health Benefits

Boosts immunity with high vitamin C content


Aids digestion and hydration


Naturally detoxifying and energizing


Low in calories and rich in antioxidants


Tips & Variations

Add a banana for extra creaminess


Include ginger for a spicy kick


Replace water with coconut water for electrolytes


This Citrus Sunrise Smoothie is simple, delicious, and perfect for a healthy lifestyle. 🌞🥤

The “Crunchy” Chocolate Bar Base

The “Crunchy” Chocolate Bar Base

  • The Crunch: 3 cups Rice Krispies (or puffed quinoa for a protein boost!).

  • The Binder: 1/2 cup creamy peanut butter (or almond butter) mixed with 1/3 cup honey or maple syrup.

  • The Topping: 1 cup dark chocolate chips melted with 1 tbsp coconut oil (this gives it 그 glossy, smooth finish and makes it easier to slice).


Quick Steps

  1. Melt & Mix: Warm the nut butter and sweetener together until smooth, then fold in your cereal until fully coated.

  2. Press: Firmly pack the mixture into a lined square pan.

  3. Top: Pour that melted chocolate layer over the top and smooth it out with a spatula.

  4. Chill: Pop them in the fridge for about 1 hour before slicing.

Cheesy Garlic Roasted Cabbage Steaks

🥬🧄 Cheesy Garlic Roasted Cabbage Steaks

Mediterranean Style | Oven-Baked | Budget-Friendly

🛒 Ingredients (Serves 4)

  • 1 large green cabbage

  • 3 tbsp extra-virgin olive oil

  • 3 cloves garlic, minced

  • ½ tsp smoked paprika

  • ½ tsp dried oregano

  • ½ tsp dried thyme

  • Salt & black pepper, to taste

Creamy Garlic Spread (as seen brushed on cabbage)

  • 3 tbsp Greek yogurt or mayonnaise

  • 1 tbsp Dijon mustard or tahini

  • 1 clove garlic, grated

  • 1 tbsp lemon juice

Cheesy Topping

  • 1 cup shredded mozzarella or Mediterranean cheese blend

  • ¼ cup grated Parmesan

  • Red chili flakes (optional)

  • Fresh parsley or dill, chopped


👩‍🍳 Instructions

  1. Preheat Oven
    Preheat oven to 220°C (425°F). Line a baking tray with parchment paper.

  2. Slice the Cabbage
    Remove outer leaves. Slice cabbage into 2–3 cm (¾–1 inch) thick rounds (steaks). Keep core intact so slices stay together.

  3. Make the Garlic Spread
    Mix yogurt (or mayo), mustard/tahini, garlic, and lemon juice until smooth.

  4. Season & Brush
    Place cabbage steaks on tray.
    Brush both sides with olive oil. Sprinkle with garlic, paprika, oregano, thyme, salt, and pepper.
    Lightly brush tops with the creamy garlic spread.

  5. First Roast
    Roast for 20–25 minutes, flipping once halfway, until tender and lightly golden.

  6. Add Cheese
    Remove from oven. Top each steak with mozzarella and Parmesan.
    Sprinkle chili flakes if using.

  7. Final Bake
    Return to oven for 8–10 minutes until cheese melts and turns golden.

  8. Finish
    Garnish with fresh herbs and an extra drizzle of olive oil.


🌿 Mediterranean Variations

  • Greek-style: Add feta & olives after baking

  • Low-carb: Keep as is (keto-friendly)

  • Vegan: Use dairy-free cheese & tahini sauce

  • Extra crispy: Broil for last 2–3 minutes


🥗 Serving Ideas

  • As a main with a tomato-cucumber salad

  • Side dish for grilled chicken or fish

  • Tucked into pita or wraps


🔥 Why You’ll Love It

  • Crispy outside, tender inside

  • Inexpensive & filling

  • Packed with fiber & flavor

  • Perfect meatless Mediterranean meal