Spinach and Feta Egg Muffins!

 Spinach and Feta Egg Muffins!

Ingredients

  • Eggs: 6 large eggs

  • Milk: 2 tablespoons (any kind)

  • Spinach: 1 cup fresh spinach, chopped

  • Feta Cheese: 1/2 cup crumbled feta cheese

  • Salt & Pepper: A pinch of each to taste

  • Cooking Spray or Olive Oil: For greasing the pan

Instructions

  1. Preheat and Prep: Preheat your oven to 350°F (180°C). Generously grease a 6-cup muffin tin with cooking spray or olive oil to prevent sticking.

  2. Whisk: In a medium bowl, whisk the eggs and milk together until smooth. Season with a pinch of salt and black pepper.

  3. Layer Fillings: Divide the chopped fresh spinach and crumbled feta cheese evenly among the 6 prepared muffin cups.

  4. Pour: Carefully pour the whisked egg mixture over the spinach and feta in each cup, filling them about 3/4 of the way full.

  5. Bake: Place the tin in the oven and bake for 18 to 20 minutes. The egg muffins are done when they are puffed up, golden brown on the edges, and the center is set (not jiggly).

  6. Cool and Serve: Remove from the oven and let them cool in the pan for 5 minutes. Use a butter knife to gently loosen the edges of each muffin and pop them out. Enjoy warm!

Tip: You can store these in an airtight container in the fridge for up to 4 days. Just microwave them for 20–30 seconds for a quick, warm breakfast on the go!

Easy Mozzarella Sticks

Easy Mozzarella Sticks

Ingredients

  • Mozzarella: 12 low-moisture mozzarella string cheese sticks

  • Flour: 1/2 cup all-purpose flour

  • Eggs: 2 large eggs, beaten

  • Breadcrumbs: 1 cup Panko or Italian seasoned breadcrumbs

  • Seasonings: 1 teaspoon garlic powder and 1 teaspoon dried oregano (or Italian seasoning)

  • Oil: Vegetable oil for frying

  • Sauce: Marinara or pizza sauce for dipping

Instructions

  1. Prep the Cheese: Cut the string cheese sticks in half horizontally if you prefer shorter bites.

  2. Set Up Coating Station: Place the flour in one shallow bowl. In a second bowl, whisk the eggs. In a third bowl, mix the breadcrumbs with the garlic powder and dried oregano.

  3. Coat the Cheese: Dredge a cheese stick in the flour, shaking off the excess. Dip it into the egg, then roll it in the breadcrumbs until fully coated.

  4. Double Coat: Dip the stick back into the egg and into the breadcrumbs one more time. This double-coating prevents the cheese from leaking out while cooking. Repeat for all sticks.

  5. Freeze: Place the coated cheese sticks on a tray and freeze them for at least 1 to 2 hours. Do not skip this step, or the cheese will melt too quickly.

  6. Cook: Heat about 2 inches of vegetable oil in a deep skillet over medium-high heat. Fry the frozen sticks in small batches for about 1 to 2 minutes until they are golden brown.

  7. Serve: Drain on paper towels and serve warm with a side of heated marinara sauce.

Blueberry Cashew Green Smoothie

Blueberry Cashew Green Smoothie

Ingredients

  • 1/2 cup raw cashews (soaked for 10 minutes in warm water for maximum creaminess)

  • 1 cup fresh or frozen blueberries

  • 1 cup fresh spinach leaves, packed

  • 1/2 ripe banana (sliced)

  • 1 cup milk of your choice (almond, oat, or dairy milk work wonderfully)

  • 1 tablespoon honey or maple syrup (optional, for extra sweetness)

  • 3-4 ice cubes (optional, if using fresh fruit)

Instructions

  1. Prep the Base: If you have a standard blender, rinse your soaked cashews and place them at the bottom. This helps them blend completely smooth.

  2. Layer the Greens and Fruit: Add the fresh spinach leaves, sliced banana, and blueberries into the blender cup.

  3. Pour the Liquid: Pour in your choice of milk and the optional sweetener. Starting with one cup of liquid keeps the smoothie thick, but you can add a splash more later if needed.

  4. Blend Until Smooth: Secure the lid and blend on high speed for about 60 to 90 seconds. You want to make sure the cashews and spinach are completely broken down into a silky, purple texture.

  5. Serve: Pour the smoothie into a tall glass and enjoy immediately while cold!

Tip: Using a frozen banana or frozen blueberries will give you a thicker, frostier milkshake-like consistency without needing to add extra ice.

Banana Walnut Bread.

Banana Walnut Bread.

Ingredients

  • 3 large ripe bananas, mashed (plus 1 extra for slicing on top)

  • ⅓ cup butter, melted

  • ¾ cup granulated sugar

  • 1 large egg, beaten

  • 1 tsp vanilla extract

  • 1 tsp baking soda

  • Pinch of salt

  • 1 ½ cups all-purpose flour

  • ½ cup walnuts, chopped (plus extra for topping)

Instructions

  1. Preheat & Prep: Preheat your oven to 350°F (175°C). Grease a standard 4×8-inch loaf pan with a little butter or line it with parchment paper.

  2. Mash & Mix Wet Ingredients: In a large mixing bowl, mash the ripe bananas with a fork until smooth. Stir the melted butter into the mashed bananas.

  3. Combine: Mix in the sugar, beaten egg, and vanilla extract until well combined.

  4. Add Dry Ingredients: Sprinkle the baking soda and salt over the mixture and stir. Gently fold in the flour until just combined—be careful not to overmix. Gently fold in the chopped walnuts.

  5. Pour & Decorate: Pour the batter into your prepared loaf pan. Top with thin slices of the extra banana and a handful of chopped walnuts for a beautiful finish.

  6. Bake: Bake for 50 to 60 minutes. Check readiness by inserting a toothpick into the center; it should come out clean.

  7. Cool & Serve: Let the bread cool in the pan for 10 minutes, then transfer it to a wire rack to cool completely before slicing. Enjoy it plain, or served with a drizzle of honey and a dollop of yogurt!

Cocoa Avocado Bliss smoothie.

Cocoa Avocado Bliss smoothie.

Ingredients

  • ½ ripe avocado (pitted and scooped)

  • 1 cup milk (dairy or your favorite plant-based alternative like almond or oat milk)

  • 1 teaspoon cocoa powder (unsweetened)

  • 1 teaspoon honey (or maple syrup for a vegan option)

  • Optional: A few ice cubes for a colder texture

Instructions

  1. Prep the Avocado: Cut a ripe avocado in half, remove the pit, and scoop out one half of the green flesh. Save the other half for later.

  2. Load the Blender: Place the avocado, milk, cocoa powder, and honey into a high-speed blender. If you prefer a chilled, thicker shake, toss in a few ice cubes at this stage.

  3. Blend Until Smooth: Secure the lid and blend on high speed for about 30 to 45 seconds. Ensure all the avocado is completely emulsified so the texture becomes velvety and smooth, without any green flecks.

  4. Adjust and Serve: Taste the smoothie. If you prefer it sweeter, add a tiny bit more honey and pulse briefly. Pour the creamy mixture into a large glass or mason jar.

  5. Garnish: Top with a tiny dusting of extra cocoa powder if desired, pop in a straw, and enjoy immediately!

Tip: This drink is best enjoyed fresh, as the healthy fats from the avocado give it an incredibly rich, milkshake-like texture right after blending.

Garlic & Herb Roasted Vegetables

Garlic & Herb Roasted Vegetables

Ingredients

  • 1 head Cauliflower (cut into bite-sized florets)

  • 1 head Broccoli (cut into bite-sized florets)

  • 1 Red Bell Pepper (chopped into large chunks)

  • 1 Yellow Bell Pepper (chopped into large chunks)

  • 2 medium Carrots (peeled and sliced into thick rounds)

  • 3 tablespoons Olive oil (or any cooking oil you prefer)

  • 2 teaspoons Garlic powder (or 3 cloves of minced fresh garlic)

  • 1 teaspoon Dried Italian seasoning (or dried oregano/thyme)

  • Salt and black pepper (to your taste)

  • Fresh parsley (finely chopped, for a beautiful garnish at the end)

Instructions

  1. Prep the Oven: Preheat your oven to 400°F (200°C).

  2. Mix the Vegetables: In a large mixing bowl, combine the cauliflower, broccoli, red bell pepper, yellow bell pepper, and carrots.

  3. Season: Drizzle the olive oil over the vegetables. Sprinkle the garlic powder, Italian seasoning, salt, and black pepper evenly over everything. Toss well so all the veggies are coated nicely in the oil and spices.

  4. Arrange: Spread the vegetables out in a single layer on a large baking sheet or baking dish (just like the one in your picture). Tip: Try not to crowd them too much so they get nice and crispy instead of steaming!

  5. Roast: Bake in the preheated oven for 20 to 25 minutes, stirring halfway through. You will know they are done when the edges are slightly charred and brown, and the carrots are tender when poked with a fork.

  6. Garnish and Serve: Remove from the oven, toss on the fresh chopped parsley for that bright pop of green, and serve warm.

Crispy Veggie Patties

These golden veggie patties are crispy outside, soft inside, and packed with fresh vegetables. Perfect for breakfast, snacks, or a light dinner!

🛒 Ingredients

  • 2 medium potatoes, grated
  • 1 carrot, grated
  • 1 zucchini or cucumber, grated & squeezed dry
  • 2 eggs
  • 3 green onions, chopped
  • ½ cup flour
  • ½ cup shredded cheese
  • Salt & black pepper
  • 2 tbsp oil for frying

👩‍🍳 Step-by-Step Instructions

1️⃣ Prepare the Vegetables

  • Grate potatoes, carrot, and zucchini.
  • Squeeze out extra water using a clean towel.

👉 This helps make the patties crispy instead of soggy.


2️⃣ Make the Mixture

  • Add vegetables to a large bowl.
  • Mix in:
    • Eggs
    • Green onions
    • Cheese
    • Flour
    • Salt & pepper
  • Stir well until everything is combined.

3️⃣ Shape the Patties

  • Take small portions of mixture.
  • Shape into oval or round patties with your hands.

👉 If mixture feels loose, add a little more flour.


4️⃣ Fry Until Golden

  • Heat oil in a pan over medium heat.
  • Place patties carefully into the pan.
  • Cook for 3–4 minutes per side until golden brown and crispy.

🔥 Flip gently so they stay together.


5️⃣ Serve

  • Place on paper towels to remove extra oil.
  • Serve warm with yogurt dip, ketchup, or garlic sauce. 😋

❓ Q/A

❓ Can I bake them instead of frying?

✅ Yes! Bake at 200°C (400°F) for about 20–25 minutes, flipping halfway.

❓ How do I keep them crispy?

✅ Remove excess water from vegetables before mixing.

❓ Can I add other veggies?

✅ Absolutely! Bell peppers, corn, or spinach work great.


💡 Helpful Tips

  • Use freshly grated cheese for better flavor.
  • Medium heat works best so patties cook evenly inside.
  • Add chili flakes for a spicy version. 🌶️

🍽️ Serving Ideas

  • Breakfast side
  • Lunch snack
  • Party appetizer
  • Healthy dinner with salad

💪 Nutritional Benefits

  • Carrots provide vitamin A.
  • Potatoes add energy and texture.
  • Green onions and zucchini add freshness and fiber.

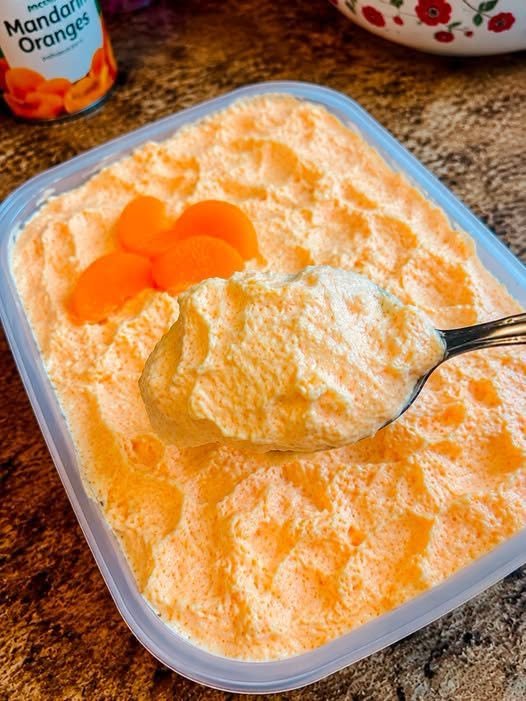
Orange fluff Recipe

Instructions

  1. Add ¾ cup boiling water to a medium-sized bowl. Pour in Jello powder and stir until fully dissolved.
  2. Make 1 cup of ice water by measuring out 1 cup of ice, and pouring water in until it fills the cup.
  3. Add ice water to the dissolved Jello and mix until ice melts and Jello thickens.
  4. Add Jello mixture and 1 cup yogurt to a blender and blend on high for 30 seconds
  5. Pour the Jello into serving glasses or a medium-sized bowl and chill for 2 hours.

NUTRITION

  • Serving Size: 1 cup
  • Calories: 35
  • Fat: 0
  • Carbohydrates: 2
  • Fiber: 0
  • Protein: 6

Shrimp & Spinach Pasta Rolls

Shrimp & Spinach Stuffed Pasta Rolls 🍤🌿

These creamy pasta rolls are filled with juicy shrimp and spinach, then covered in a rich roasted red pepper cream sauce. Perfect for a cozy dinner or special family meal!

🛒 Ingredients

  • 3 cannelloni pasta tubes
  • 120 g shrimp, peeled & deveined
  • 100 g fresh spinach
  • 120 ml roasted red pepper cream sauce
  • 2 garlic cloves, minced
  • 2 tbsp fresh parsley, chopped
  • 1 tsp red pepper flakes
  • 1 tbsp olive oil
  • Salt & black pepper

👩‍🍳 Step-by-Step Instructions

1️⃣ Cook the Shrimp

  • Heat olive oil in a skillet over medium heat.
  • Add garlic and cook for 30 seconds until fragrant.
  • Add shrimp and cook for 2–3 minutes per side until pink.
  • Remove shrimp and chop into small pieces.

2️⃣ Prepare the Spinach Filling

  • In the same skillet, add spinach.
  • Cook until wilted and soft.
  • Mix spinach with chopped shrimp.
  • Season lightly with salt and pepper.

3️⃣ Cook the Pasta

  • Boil cannelloni pasta in salted water until slightly tender.
  • Drain carefully and let cool slightly.

4️⃣ Stuff the Pasta

  • Spoon the shrimp-spinach mixture into each pasta tube.
  • Fill generously but gently so the pasta doesn’t tear.

5️⃣ Add the Sauce

  • Pour roasted red pepper cream sauce into a baking dish.
  • Arrange stuffed pasta rolls on top.
  • Spoon extra sauce over the pasta.
  • Sprinkle red pepper flakes evenly.

6️⃣ Bake

  • Preheat oven to 180°C (350°F).
  • Bake for 20 minutes until bubbly and hot.

7️⃣ Garnish & Serve

  • Top each roll with a whole cooked shrimp.
  • Sprinkle fresh parsley over the dish.
  • Serve warm and enjoy! 🍽️

❓ Q/A

❓ Can I use frozen shrimp?

✅ Yes! Just thaw and pat dry before cooking.

❓ Can I make this ahead?

✅ Yes, assemble the rolls and refrigerate before baking.

❓ What can I use instead of cannelloni?

✅ Lasagna sheets rolled up work great too.


🌟 Helpful Tips

  • Don’t overcook shrimp or they may become rubbery.
  • Use fresh spinach for the best flavor.
  • Add extra parsley for freshness and color.

💪 Nutritional Benefits

  • Shrimp provides lean protein.
  • Spinach adds iron and vitamins.
  • Roasted peppers give antioxidants and natural sweetness.

Cheesy Zucchini Bites

Cheesy Zucchini Bites

Ingredients:

  • 2 medium zucchinis, grated

  • 2 eggs

  • 1/2 cup breadcrumbs

  • 1/2 cup shredded cheese (parmesan or mozzarella)

  • Salt, pepper, and garlic powder to taste

Instructions:

  1. Prep Zucchini: Grate the zucchini, sprinkle with a pinch of salt, let sit for 10 minutes, and squeeze out all excess water using a cloth.

  2. Mix: In a bowl, combine the squeezed zucchini, eggs, breadcrumbs, cheese, and seasonings. Mix well.

  3. Shape & Bake: Roll the mixture into small balls. Place on a lined baking sheet and bake at 200°C (400°F) for 20 minutes until golden brown.

Strawberry Chocolate Chip Dessert Ball Recipe

Strawberry Chocolate Chip Dessert Ball Recipe
Ingredients
  • 2 packs cream cheese, softened

  • 1/2 cup unsalted butter, softened

  • 3/4 cup powdered sugar

  • 1 teaspoon vanilla extract

  • 1/2 cup mini chocolate chips

  • 1/2 cup finely chopped fresh strawberries

  • 1/3 cup crushed graham crackers

  • 2 tablespoons strawberry jam

For Serving

  • Pretzels

  • Graham crackers

  • Fresh strawberries

  • Cookies or vanilla wafers

Instructions

  1. In a large mixing bowl, beat the cream cheese and butter until smooth and fluffy.

  2. Add powdered sugar and vanilla extract. Mix until creamy.

  3. Stir in mini chocolate chips, chopped strawberries, crushed graham crackers, and strawberry jam.

  4. Place the mixture onto plastic wrap and shape it into a large ball.

  5. Refrigerate for 2–3 hours until firm.

  6. Before serving, sprinkle extra mini chocolate chips on top for decoration.

  7. Arrange pretzels, crackers, and fresh strawberries around the dessert ball on a serving tray.

Optional Tips

  • Chill the strawberries before mixing for extra freshness.

  • Add white chocolate chips for a sweeter flavor.

  • Serve cold for the best texture and taste.

This creamy strawberry chocolate chip dessert ball is perfect for parties, family gatherings, or a fun sweet snack.

Smoothie for a Goddess

Smoothie for a Goddess

Ingredients

  • 1 banana

  • 1 cup almond milk

  • 1/2 cup frozen mango

  • 1 handful of fresh spinach

  • 1 small piece of ginger (peeled)

Instructions

  1. Prep the ingredients: Peel the banana and a small piece of fresh ginger.

  2. Load the blender: Add the almond milk first to help everything blend smoothly. Next, add the banana, frozen mango cubes, spinach, and ginger.

  3. Blend until smooth: Secure the lid and blend on high speed for about 45 to 60 seconds until the mixture is completely smooth, vibrant green, and free of leafy bits.

  4. Serve: Pour into a large glass or mason jar, grab a straw, and enjoy fresh!

Creamy Chicken Alfredo

Creamy Chicken Alfredo

Ingredients

  • 8 oz (225g) Fettuccine or your choice of pasta

  • 2 Boneless, skinless chicken breasts (sliced into bite-sized pieces)

  • 2 tbsp Olive oil

  • 2 tbsp Butter

  • 3 cloves Garlic, minced

  • 1 cup Heavy cream

  • 1 cup Parmesan cheese, freshly grated

  • Salt and black pepper to taste

  • Fresh parsley, chopped (for garnish)

Instructions

  1. Cook the Pasta: Bring a large pot of salted water to a boil. Add the pasta and cook according to the package instructions until al dente. Drain, reserving 1/2 cup of pasta water, and set aside.

  2. Sear the Chicken: Heat the olive oil in a large skillet over medium-high heat. Season the chicken pieces with a pinch of salt and pepper. Add them to the skillet and cook for about 5–7 minutes until golden brown and cooked through. Remove the chicken from the skillet and set aside on a plate.

  3. Make the Sauce: Turn the heat down to medium. In the same skillet, melt the butter. Add the minced garlic and sauté for about 1 minute until fragrant, being careful not to let it burn. Pour in the heavy cream and bring to a gentle simmer.

  4. Thicken with Cheese: Turn the heat to low and gradually stir in the grated Parmesan cheese. Whisk constantly until the cheese melts completely and the sauce becomes smooth and slightly thick.

  5. Toss and Serve: Add the cooked pasta and seared chicken back into the skillet. Toss everything together until well coated in the sauce. If the sauce feels too thick, splash in a little of the reserved pasta water. Season with extra salt and pepper to taste, garnish with fresh parsley, and serve hot.

Blueberry Custard Pudding Cake

Blueberry Custard Pudding Cake

  • Prep time: 10 minutes

  • Bake time: 35–40 minutes

  • Servings: 2–4 (depending on the size of your ramekins/baking dish)

Ingredients

  • 1 cup (approx. 150g) Fresh blueberries (plus a few extra for topping)

  • 2 large Eggs

  • ¼ cup (50g) Granulated sugar

  • ½ cup (120ml) Whole milk

  • ¼ cup (60ml) Heavy cream (Note: You can use all milk if you want it lighter, but cream makes it extra rich!)

  • 3 tablespoons All-purpose flour

  • 1 teaspoon Vanilla extract

  • 1 tablespoon Melted butter (for greasing the baking dish)

  • Optional: Powdered sugar for dusting on top

Instructions

1. Prep the Oven and Dish

  • Preheat your oven to 180°C (350°F).

  • Brush the inside of a medium baking dish (or 2–3 smaller glass ramekins, like the one in the photo) with the melted butter.

2. Arrange the Berries

  • Wash and thoroughly dry your blueberries.

  • Place a generous handful of blueberries at the bottom of your greased baking dish(es).

3. Mix the Custard Batter

  • In a mixing bowl, whisk the eggs and sugar together until smooth and slightly pale.

  • Whisk in the all-purpose flour until no lumps remain.

  • Slowly pour in the milk, heavy cream, and vanilla extract. Whisk gently until you have a smooth, thin batter (it will look like pancake batter but much thinner).

4. Pour and Bake

  • Carefully pour the liquid batter over the blueberries in the dish. The berries will naturally float to the top—that is exactly what you want!

  • Place the dish in the preheated oven and bake for 35 to 40 minutes.

  • How to tell it’s done: The edges should be golden brown and puffed up, and the center should be mostly set with just a slight, tiny jiggle when shaken.

5. Serve

  • Remove from the oven and let it cool slightly for 5–10 minutes (it will deflate a little as it cools, which is normal).

  • Dust the top with a little powdered sugar, spoon a few extra fresh blueberries on top, and enjoy it warm with a spoon!

Tip: If you want that extra gooey, stringy texture shown on the spoon in the photo, enjoy it right out of the oven while it’s still warm. If you prefer a firmer, more sliceable custard, let it cool completely and chill it in the fridge for an hour before serving.

Matthew McConaughey’s Viral Tuna Salad

Matthew McConaughey’s Viral Tuna Salad

🛒 Ingredients

  • 2 cans tuna, drained
  • ½ cup mayonnaise
  • ½ cup frozen peas
  • ½ cup cheddar cheese cubes
  • 2 tbsp red onion, chopped
  • 1 tbsp pickle relish
  • 1 tsp mustard
  • Salt & black pepper
  • Crackers for serving

👩‍🍳 Detailed Step-by-Step Recipe

🐟 1. Prepare the Tuna

➡️ Open the tuna cans and drain all the liquid well.
➡️ Add the tuna to a large mixing bowl.

💡 Break the tuna apart gently with a fork so it becomes flaky.


🧀 2. Add the Mix-Ins

➡️ Add:

  • Frozen peas
  • Cheddar cheese cubes
  • Chopped red onion
  • Pickle relish

➡️ Stir lightly so everything spreads evenly.


🥣 3. Make It Creamy

➡️ Add mayonnaise and mustard to the bowl.
➡️ Sprinkle a little salt and black pepper.

➡️ Mix slowly until the salad becomes creamy and fully combined.

💡 Don’t overmix — keeping some texture makes it extra delicious.


❄️ 4. Chill the Salad

➡️ Cover the bowl and refrigerate for at least 20 minutes.

➡️ This helps the flavors blend together beautifully.


🍽️ 5. Serve

➡️ Scoop onto crackers, toast, sandwiches, or lettuce cups.
➡️ Serve cold and enjoy!


💡 Tips

✅ Add chopped celery for extra crunch.
✅ A squeeze of lemon makes it brighter and fresher.
✅ Best served chilled.


❓Q&A

Q: Can I make it ahead of time?

➡️ Yes! It tastes even better after a few hours in the fridge.

Q: Can I use canned chicken instead?

➡️ Absolutely — the recipe works great with chicken too.

Q: How long does it last?

➡️ Store in the fridge for up to 3 days in an airtight container.

Cheesy Zucchini Egg Muffins

Cheesy Zucchini Egg Muffins

🛒 Ingredients

  • 2 small zucchinis, grated
  • 4 eggs
  • 1 cup shredded mozzarella cheese
  • 2 green onions, chopped
  • Salt & black pepper
  • 1 tbsp olive oil or butter

👩‍🍳 Detailed Step-by-Step Recipe

🔪 1. Prepare the Zucchini

➡️ Wash the zucchinis well.
➡️ Grate them using a box grater.

➡️ Place the grated zucchini in a clean towel or paper towel.
➡️ Squeeze out as much water as possible.

💡 This step is important so the muffins stay firm and not watery.


🥚 2. Make the Egg Mixture

➡️ Crack the eggs into a large bowl.
➡️ Add salt and black pepper.
➡️ Whisk until smooth.

➡️ Add:

  • Grated zucchini
  • Mozzarella cheese
  • Chopped green onions

➡️ Mix everything together well.


🧁 3. Prepare the Muffin Tray

➡️ Preheat oven to 375°F (190°C).
➡️ Grease a muffin tray lightly with olive oil or butter.

➡️ Spoon the mixture evenly into each muffin cup.

💡 Fill each cup almost to the top.


🔥 4. Bake

➡️ Bake for 20–25 minutes until:
✅ Golden on top
✅ Firm in the center
✅ Cheese becomes bubbly and slightly crispy

➡️ Let them cool for 5 minutes before removing from the tray.


🍽️ 5. Serve

➡️ Serve warm for breakfast, snacks, or meal prep.


💡 Tips

✅ Add cooked chicken or turkey for extra protein.
✅ Use cheddar cheese for a stronger flavor.
✅ Store leftovers in the fridge and reheat easily.


❓Q&A

Q: Can I freeze these muffins?

➡️ Yes! Freeze in an airtight container for up to 2 months.

Q: Why squeeze the zucchini?

➡️ Removing water helps the muffins bake properly and stay fluffy.

Q: Can I make them without cheese?

➡️ Yes, but the texture will be less creamy.

Vibrant Berry Smoothie Bowl

Vibrant Berry Smoothie Bowl

Ingredients

Base: 1 cup frozen berries, 1 ripe banana, ½ cup milk (or yogurt).


Toppings: Fresh blueberries, sliced kiwi, diced mango, sliced strawberries, pomegranate seeds, granola, and shredded coconut.

Instructions

Blend: Add the frozen berries, banana, and milk to a blender. Blend on high until completely smooth and thick.

Pour: Spoon the thick smoothie base into a serving bowl and smooth out the top.

Arrange: Neatly line up your toppings (blueberries, kiwi, mango, strawberries, granola, coconut, and pomegranate) in rows across the top.

Enjoy immediately with a spoon!

Spicy Chicken and Cabbage Stir-Fry

Spicy Chicken and Cabbage Stir-Fry

– fast, savory, and works great over rice or noodles.

Serves 3-4*

Ingredients:

For the chicken:

  • – Chicken breast: 1 lb, sliced thin against the grain
  • Soy sauce: 1 tbsp
  • Cornstarch: 1 tsp
  • Oil: 1 tsp
  • Salt & pepper: To taste

For the stir-fry:

Cabbage: 3 cups, roughly chopped

Red bell pepper: 1, sliced

Green bell pepper: 1, sliced

Carrot: 1 medium, julienned

Onion: 1 small, sliced

Garlic: 3 cloves, minced

Ginger: 1 tsp, grated

Chili flakes or chili crisp: 1-2 tsp, adjust for heat

Oil 2 tbsp, for frying

For the sauce:

Soy sauce: 3 tbsp

Oyster sauce: 1 tbsp

Rice vinegar: 1 tbsp

Honey: 1 tsp

Water: 2 tbsp

Instructions:

1. Marinate chicken: Toss sliced chicken with soy sauce, cornstarch, 1 tsp oil, salt, and pepper. Let sit 10 min.

2. Mix sauce: Whisk soy sauce, oyster sauce, rice vinegar, honey, and water in a small bowl. Set aside.

3. Stir-fry chicken: Heat 1 tbsp oil in a wok or large pan over high heat. Cook chicken 2-3 min until just cooked through and lightly golden. Remove to a plate.

4. Cook veggies: Add remaining oil. Toss in onion, garlic, and ginger for 30 sec until fragrant. Add cabbage, peppers, and carrot. Stir-fry 3-4 min until veggies are tender-crisp.

5. Combine: Return chicken to the pan. Add sauce and chili flakes. Toss 1-2 min until everything is coated and sauce thickens slightly.

6. Serve: Eat immediately over rice or noodles.

Tip: High heat and a hot pan are key for that slight char without making the veggies soggy. Don’t overcrowd the pan – cook in batches if needed.


Buttermilk Cornbread Recipe

Buttermilk Cornbread Recipe


Ingredients

• 2 cups cornmeal (300g)

• 1 cup all-purpose flour (125g)

• ½ cup granulated sugar (100g)

• 1 tbsp baking powder

• ½ tsp baking soda

• ½ tsp salt

• 2 large eggs

• 2 cups buttermilk (480ml)

• ½ cup melted butter (113g)

• 2 tbsp vegetable oil

Instructions

Preheat oven to 190°C (375°F).

Grease an 8-inch or 9-inch baking pan.

In a large bowl, combine cornmeal, flour, sugar, baking powder, baking soda, and salt.

In another bowl, whisk together eggs, buttermilk, melted butter, and vegetable oil.

Pour the wet ingredients into the dry ingredients and mix until just combined.

Do not overmix.

Pour batter into the prepared baking pan and smooth the top.

Bake for 25–30 minutes or until golden brown and a toothpick inserted in the center comes out clean.

Allow to cool slightly before slicing.

Serve warm with butter, honey, or jam.

Tuna Niçoise Bowl

Tuna Niçoise Bowl

Ingredients

1 can tuna, drained

2 hard-boiled eggs, halved

1 cup roasted baby potatoes

½ cup steamed green beans

½ cup cherry tomatoes & Kalamata olives

Fresh parsley, lemon juice, olive oil, salt, and pepper

Instructions

Prep Veggies: Toss potatoes with olive oil, salt, and pepper; roast until golden. Steam green beans until tender-crisp.

Assemble: Arrange the warm roasted potatoes, green beans, tomatoes, and olives in a large serving bowl.

Finish: Flake the tuna into the center and add the egg halves. Top generously with fresh parsley, a squeeze of lemon juice, and a drizzle of olive oil.

Fresh Marinated Tomato Salad

Ingredients

  • 4 large ripe tomatoes
  • 2 cloves garlic, minced
  • 2 green onions, finely chopped
  • 2 tbsp fresh parsley, chopped
  • 2 tbsp fresh cilantro, chopped
  • 3 tbsp olive oil
  • 2 tbsp lemon juice
  • 1 tsp red chili flakes
  • 1 tsp dried oregano
  • Salt to taste
  • Black pepper to taste

👩‍🍳 Step-by-Step Instructions

➡️ Step 1: Prepare the Tomatoes

🍅 Wash the tomatoes well.
🔪 Slice them into medium thick rounds or wedges.
👉 Arrange them neatly on a serving plate.


➡️ Step 2: Make the Marinade

🥣 In a bowl, add:

  • Minced garlic
  • Green onions
  • Parsley
  • Cilantro
  • Olive oil
  • Lemon juice
  • Chili flakes
  • Oregano
  • Salt & black pepper

✨ Mix everything together until well combined.


➡️ Step 3: Marinate the Tomatoes

🥄 Spoon the fresh herb mixture all over the tomatoes.
👉 Make sure every slice gets coated with the flavorful dressing.


➡️ Step 4: Rest the Salad

⏰ Let the salad sit for about 15–20 minutes.
This helps the tomatoes absorb all the delicious flavors.


➡️ Step 5: Serve

🍽️ Serve fresh with:

  • Grilled chicken
  • Bread
  • Rice dishes
  • BBQ meals

😋 Best enjoyed chilled or at room temperature.


🌟 Tips

  • Use ripe tomatoes for the best juicy flavor.
  • Add cucumber for extra freshness.
  • A little feta cheese on top tastes amazing.

❓Q/A

❓Can I make it ahead of time?

✅ Yes! Prepare it 1–2 hours earlier and keep refrigerated.

❓How long does it stay fresh?

✅ Best eaten within 1 day for maximum freshness.

❓Can I use dried herbs?

✅ Fresh herbs are best, but dried parsley can also work.


💪 Nutritional Benefits

  • 🍅 Tomatoes are rich in vitamins and antioxidants.
  • 🫒 Olive oil provides healthy fats.
  • 🌿 Fresh herbs add freshness and nutrients.
  • 🍋 Lemon juice gives vitamin C and bright flavor.

Double Chocolate Muffins 🧁

Double Chocolate Muffins 🧁

These rich and fluffy chocolate muffins are loaded with melty chocolate chips and bakery-style flavor! Perfect for breakfast, dessert, or an anytime sweet treat ❤️

👇 FULL RECIPE 👇

Ingredients

  • 2 cups all-purpose flour
  • 1/2 cup cocoa powder
  • 1 cup sugar
  • 1 tablespoon baking powder
  • 2 eggs
  • 1 cup milk
  • 1/2 cup oil or melted butter
  • 1 teaspoon vanilla extract
  • 1/2 cup chocolate chips

Instructions

1. Prepare the oven

  • Preheat oven to 180°C / 350°F.
  • Line a muffin tray with cupcake liners.

2. Mix dry ingredients

  • In a large bowl, add:
    • flour
    • cocoa powder
    • sugar
    • baking powder
  • Mix well.

3. Make the batter

  • Add eggs, milk, oil, and vanilla extract.
  • Whisk until smooth and creamy.
  • Do not overmix.

4. Add chocolate chips

  • Fold chocolate chips gently into the batter.
  • Save a few chips for topping.

5. Fill muffin liners

  • Fill cupcake liners about 3/4 full.
  • Sprinkle extra chocolate chips on top.

6. Bake

  • Bake for 18–22 minutes until fluffy.
  • Insert a toothpick into the center — it should come out mostly clean.

7. Cool down

  • Let muffins cool for 10 minutes.
  • Transfer to a wire rack.

8. Serve

  • Enjoy warm with tea, coffee, or milk 😍

Tips

  • Do not overmix the batter or muffins can become dense.
  • Use room-temperature eggs and milk for softer muffins.
  • Add a little coffee powder for deeper chocolate flavor.
  • Store in an airtight container for up to 3 days.

Q/A

Q: Can I use dark chocolate chips?
A: Yes, dark chocolate gives a richer flavor.

Q: Can I make these without cocoa powder?
A: Cocoa powder is important for the chocolate flavor.

Q: Can I freeze muffins?
A: Yes, freeze after cooling completely and reheat before serving.

Soft and Buttery Homemade Dinner Rolls

Soft and Buttery Homemade Dinner Rolls

Ingredients

  • 3 cups all-purpose flour
  • 2 1/4 teaspoons instant yeast
  • 2 tablespoons sugar
  • 1 teaspoon salt
  • 1 cup warm milk
  • 1/4 cup melted butter
  • 1 egg
  • 2 tablespoons melted butter, for brushing

Step-by-Step Recipe

1. Activate the yeast

  • In a large bowl, add warm milk, sugar, and yeast.
  • Mix gently.
  • Let it sit for 5–10 minutes until slightly foamy.

2. Make the dough

  • Add melted butter and egg to the yeast mixture.
  • Mix well.
  • Add flour and salt.
  • Stir until a soft dough forms.

3. Knead the dough

  • Knead the dough for 8–10 minutes by hand.
  • The dough should become soft, smooth, and slightly stretchy.
  • If it feels too sticky, add 1 tablespoon flour at a time.
  • Do not add too much flour, or the rolls will become dry.

4. First rise

  • Place the dough in a lightly greased bowl.
  • Cover with a clean towel.
  • Let it rise for 1 hour, or until doubled in size.

5. Shape the rolls

  • Punch down the dough gently.
  • Divide into 12 equal pieces.
  • Roll each piece into a smooth ball.
  • Place them in a greased baking dish, leaving a little space between each roll.

6. Second rise

  • Cover the rolls again.
  • Let them rise for 30–40 minutes until puffy.

7. Bake

  • Preheat oven to 180°C / 350°F.
  • Bake for 18–22 minutes until golden on top.

8. Brush with butter

  • Remove from oven.
  • Brush warm rolls with melted butter.
  • Let them rest for 5 minutes before serving.

Tips for Super Soft Rolls

  • Use warm milk, not hot milk.
  • Do not add too much flour.
  • Let the dough rise properly.
  • Brush with butter right after baking for a soft, shiny top.
  • For extra softness, cover the rolls with a towel for 10 minutes after baking.

Serving Ideas

Serve with:

  • Butter
  • Honey
  • Jam
  • Soup
  • Pasta
  • Roast chicken
  • Holiday dinner

Q/A

Q: Can I make these rolls without eggs?
A: Yes, you can skip the egg and add 2 extra tablespoons of milk.

Q: Can I use active dry yeast?
A: Yes, use the same amount, but make sure it becomes foamy in warm milk first.

Q: Can I freeze dinner rolls?
A: Yes, bake them first, cool completely, then freeze. Reheat before serving.

Q: Why are my rolls not soft?
A: Usually because too much flour was added or the dough did not rise enough.

Creamy Butternut Squash Orzo with Spinach

Creamy Butternut Squash Orzo with Spinach

Ingredients

For roasted squash

  • 2 cups butternut squash, peeled and cubed
  • 1 tablespoon olive oil
  • 1/2 teaspoon salt
  • 1/2 teaspoon black pepper
  • 1/2 teaspoon chili flakes
  • 1/2 teaspoon dried oregano or thyme

For orzo

  • 1 cup orzo pasta
  • 1 tablespoon butter
  • 2 garlic cloves, minced
  • 2 cups vegetable or chicken broth
  • 1/2 cup heavy cream or cooking cream
  • 1/2 cup grated parmesan cheese
  • 1 cup fresh spinach
  • Salt and black pepper to taste

For garnish

  • Fresh thyme or parsley
  • Extra parmesan
  • Chili flakes

Step-by-Step Recipe

1. Roast the butternut squash

  • Preheat oven to 200°C / 400°F.
  • Add butternut squash cubes to a baking tray.
  • Drizzle with olive oil.
  • Add salt, black pepper, chili flakes, and oregano.
  • Mix well so every piece is coated.
  • Roast for 20–25 minutes until soft and lightly golden.

2. Cook the garlic base

  • Heat butter in a pan on medium heat.
  • Add minced garlic.
  • Cook for 30–40 seconds until fragrant.
  • Do not burn the garlic.

3. Add the orzo

  • Add orzo pasta to the pan.
  • Stir for 1 minute so it gets lightly coated with butter and garlic.
  • This gives the orzo a better flavor.

4. Cook the orzo

  • Pour in the broth.
  • Stir well.
  • Let it simmer on medium-low heat for 8–10 minutes.
  • Stir often so the orzo does not stick to the bottom.
  • Cook until the orzo is soft and creamy.

5. Make it creamy

  • Add heavy cream.
  • Add parmesan cheese.
  • Mix until the sauce becomes smooth and creamy.
  • Add a little more broth if the orzo becomes too thick.

6. Add spinach

  • Add fresh spinach.
  • Stir for 1–2 minutes until the spinach becomes soft.
  • Taste and adjust salt and black pepper.

7. Add roasted squash

  • Gently add the roasted butternut squash on top.
  • Mix lightly so the cubes stay whole.
  • Sprinkle thyme, chili flakes, and extra parmesan.

Serving Idea

Serve warm as:

  • A creamy vegetarian dinner
  • A side dish with grilled chicken
  • A cozy lunch bowl
  • A holiday-style pasta dish

Tips

  • Use fresh butternut squash for the best taste.
  • Do not overcook the orzo because it can become too soft.
  • Stir often while cooking to make it creamy.
  • Add broth slowly if you want a thinner texture.
  • Parmesan adds salt, so taste before adding extra salt.

Q/A

Q: Can I use rice instead of orzo?
A: Yes, but cooking time will be longer. Orzo gives the best creamy pasta texture.

Q: Can I make it without cream?
A: Yes, use milk or extra broth, but the dish will be less creamy.

Q: Can I add chicken?
A: Yes, cooked shredded chicken or grilled chicken works very well.

Q: Can I store leftovers?
A: Yes, keep in the fridge for up to 2 days. Add a splash of broth or milk when reheating.


Nutritional Benefits

  • Butternut squash gives fiber, vitamin A, and natural sweetness.
  • Spinach adds iron, vitamins, and minerals.
  • Orzo gives energy and makes the dish filling.
  • Parmesan adds protein and rich flavor.
  • Olive oil adds healthy fats.

Cheesy Pizza Pockets Full Recipe

Cheesy Pizza Pockets Full Recipe

Ingredients

For the dough

  • 2 cups all-purpose flour
  • 1 teaspoon instant yeast
  • 1 teaspoon sugar
  • 1/2 teaspoon salt
  • 2 tablespoons oil
  • 3/4 cup warm water

For the filling

  • 1 cup pizza sauce
  • 1 cup shredded mozzarella cheese
  • 1/2 cup cooked chicken, pepperoni, or veggies
  • 1/2 teaspoon oregano
  • 1/2 teaspoon chili flakes
  • 1/2 teaspoon garlic powder

For topping

  • 1/2 cup mozzarella cheese
  • 1 teaspoon dried oregano
  • 1 tablespoon melted butter or oil

Step-by-Step Recipe

1. Make the dough

  • In a bowl, add flour, yeast, sugar, and salt.
  • Add oil and warm water slowly.
  • Mix well and knead for 5–7 minutes until soft.
  • Cover the dough and let it rest for 45 minutes until it becomes slightly fluffy.

2. Prepare the filling

  • In a bowl, mix pizza sauce, mozzarella cheese, cooked chicken or veggies, oregano, chili flakes, and garlic powder.
  • Keep the filling thick, not watery, so the pockets do not open while baking.

3. Shape the pizza pockets

  • Divide the dough into equal small balls.
  • Roll each ball into a rectangle or square shape.
  • Add 1–2 tablespoons filling in the center.
  • Fold the dough over the filling.
  • Press the edges tightly with your fingers.
  • Use a fork to seal the edges properly.

4. Add topping

  • Place the pockets on a baking tray.
  • Brush the top with melted butter or oil.
  • Add mozzarella cheese on top.
  • Sprinkle oregano for extra flavor.

5. Bake

  • Preheat oven to 180°C / 350°F.
  • Bake for 18–22 minutes until golden and cheesy on top.
  • Let them rest for 5 minutes before serving.

Serving Idea

Serve warm with:

  • Pizza sauce
  • Garlic mayo
  • Ranch dip
  • Ketchup

Tips

  • Do not overfill the pockets, or they may open while baking.
  • Seal the edges well with a fork.
  • Use less sauce inside for a crispy texture.
  • You can also make them in an air fryer at 170°C for 10–12 minutes.

Q/A

Q: Can I make these without yeast?
A: Yes, use ready-made pizza dough or puff pastry.

Q: Can I freeze pizza pockets?
A: Yes, freeze before baking. Bake directly from frozen, adding 5–7 extra minutes.

Q: Can I use puff pastry instead of dough?
A: Yes, puff pastry makes them extra flaky and crispy.

Q: Which cheese is best?
A: Mozzarella is best because it melts beautifully.