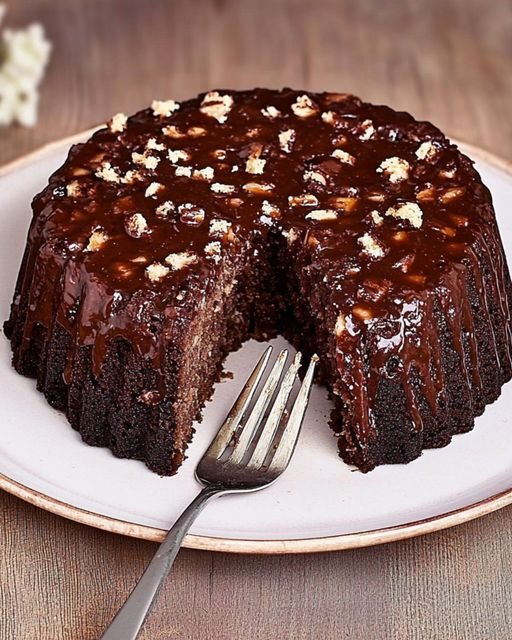
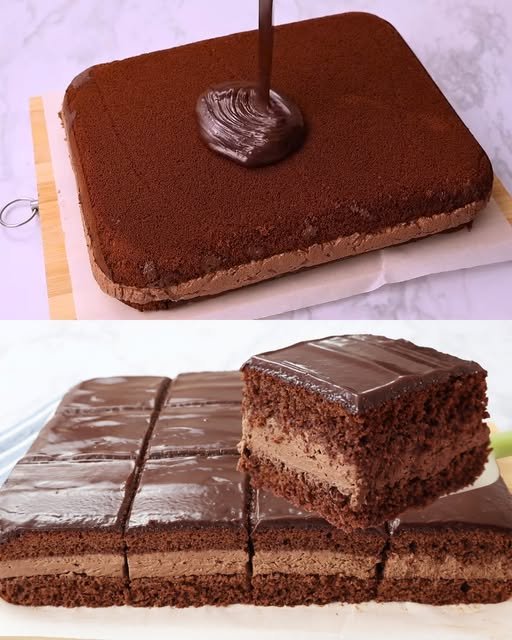
Soft Orange Sugar Cookie

Soft Orange Sugar Cookie

Prep Time: 15 minutes
Bake Time: 12–15 minutes
Yield: 20–24 cookies

These cookies are lightly crisp on the outside and soft on the inside, with a fresh orange flavor and gentle sweetness.


📝 Ingredients

  • 2 large eggs

  • 80 g sugar (plus extra for coating)

  • 120 ml sunflower oil (or any light vegetable oil)

  • 1 teaspoon vanilla extract

  • Zest of 1 orange, finely grated

  • 300 g all-purpose flour

  • 1 teaspoon baking powder

  • Pinch of salt


👩‍🍳 Instructions

Step 1: Prepare the Wet Mixture

In a large bowl:

  1. Add the eggs and sugar.

  2. Whisk until the mixture becomes pale and slightly thick.

  3. Add sunflower oil, vanilla extract, and orange zest.

  4. Mix well until evenly combined.


Step 2: Mix the Dry Ingredients

In another bowl:

  • Add flour, baking powder, and salt.

  • Whisk or sift together to distribute evenly.


Step 3: Make the Dough

  • Gradually add the dry mixture into the wet mixture.

  • Stir with a spatula or spoon until a soft dough forms.

Tip: If the dough feels too soft or sticky, place it in the refrigerator for 15 minutes to make shaping easier.


Step 4: Shape the Cookies

Preheat oven to 350°F (175°C).
Line a baking tray with parchment paper.

  1. Take about 1 tablespoon of dough and roll into a ball.

  2. Gently shape into a small oval.

  3. Press one side into granulated sugar.

  4. Place sugar-side up on the tray.

  5. Lightly press with a fork to make a pattern.

Leave space between cookies.


Step 5: Bake

Bake for 12–15 minutes until the edges turn light golden while the tops remain pale.

Do not overbake, or cookies will become dry.


Step 6: Cool

Let cookies rest on the tray for 5 minutes, then move to a wire rack to cool completely.

They will firm slightly as they cool.


🌟 Tips for Best Results

  • Zesting: Only grate the orange-colored peel. Avoid the white layer underneath.

  • Oil: Use a neutral-flavored oil for best taste.

  • Texture: For extra softness, do not brown the tops.

  • Storage: Keep in an airtight container for up to 7 days at room temperature.

Creamy Homemade Filled Donuts

Creamy Homemade Filled Donuts

Yield: 12–15 donuts
Prep Time: 20 minutes + rising time
Cook Time: 15 minutes

Soft fried donuts filled with smooth vanilla cream and coated in sugar.


📝 Ingredients

For the Dough

  • 500 g all-purpose or bread flour

  • 8 g dry yeast (or 12 g fresh yeast)

  • 200 g milk, lukewarm

  • 80 g sugar

  • 50 g butter, melted and cooled

  • 1 medium egg

  • 1 pinch salt

  • Oil for frying (vegetable or canola)

  • Granulated sugar (for coating)


For the Vanilla Cream Filling

  • 2 cups milk

  • ½ cup sugar

  • ¼ cup cornstarch

  • 4 egg yolks

  • 1 teaspoon vanilla extract


👩‍🍳 Instructions

Step 1: Activate the Yeast

In a large bowl, mix:

  • Lukewarm milk

  • Sugar

  • Yeast

Let sit for 5 minutes until slightly foamy.


Step 2: Make the Dough

Add to the yeast mixture:

  • Egg

  • Melted butter

Mix well.
Gradually add flour and salt.
Mix until a soft dough forms.

Transfer to a floured surface and knead for 8–10 minutes until smooth and elastic.


Step 3: First Rise

Place dough in a lightly greased bowl.
Cover with a clean cloth.
Let rise in a warm place for 1 to 1½ hours or until doubled in size.


Step 4: Shape the Donuts

Punch down the dough.
Roll out to ½ inch thickness.
Cut into circles using a cutter or glass.

Place on parchment paper.
Cover and let rise again for 30–45 minutes.


Step 5: Prepare the Cream Filling

In a bowl, whisk:

  • Egg yolks

  • Sugar

  • Cornstarch

Heat milk in a pan until warm (not boiling).
Slowly whisk hot milk into egg mixture.
Return to pan and cook on medium heat, stirring constantly until thick.

Remove from heat.
Add vanilla extract.
Transfer to a bowl and cover with plastic wrap touching the surface.
Cool completely.


Step 6: Fry the Donuts

Heat oil to 350°F (175°C).
Fry donuts in batches for about 2 minutes per side until golden.

Remove and drain on paper towels.


Step 7: Coat and Fill

Roll warm donuts in granulated sugar.

Make a small hole on the side of each donut using a knife or straw.
Fill a piping bag with cooled cream.
Pipe cream into each donut until filled.


⭐ Tips for Best Results

  • Milk temperature: Should be warm, not hot.

  • Oil temperature: Keep steady for even frying.

  • Do not overcrowd when frying.

  • Filling options: Jam, chocolate cream, or custard work well.

Banana Carrot Raisin Bread

Banana Carrot Raisin Bread

Prep Time: 15 minutes
Bake Time: 50–60 minutes
Yield: 1 standard loaf (9×5 inch pan)

This bread is soft, naturally sweet from bananas and carrots, and dotted with juicy raisins. It’s perfect for breakfast, tea time, or a light dessert.


📝 Ingredients

Wet Ingredients

  • 2 medium ripe bananas, mashed well

  • 1 cup grated carrots (about 2 medium carrots)

  • 2 large eggs, at room temperature

  • ½ cup (120 ml) vegetable oil

  • ½ cup (100 g) brown sugar, packed

  • 1 teaspoon vanilla extract

Dry Ingredients

  • 1½ cups (190 g) all-purpose flour

  • 1 teaspoon baking soda

  • 1 teaspoon baking powder

  • ½ teaspoon salt

  • 1 teaspoon ground cinnamon

Mix-ins

  • ½ cup (80 g) raisins


👩‍🍳 Instructions

Step 1: Prepare the Pan and Oven

Preheat your oven to 350°F (175°C).
Grease a 9×5 inch loaf pan with oil or butter, or line it with parchment paper so the bread can be removed easily after baking.


Step 2: Mix the Wet Ingredients

In a large mixing bowl:

  1. Mash the bananas until smooth.

  2. Add grated carrots.

  3. Add eggs, vegetable oil, brown sugar, and vanilla extract.

  4. Whisk everything together until well blended and smooth.


Step 3: Mix the Dry Ingredients

In a separate bowl:

  • Add flour, baking soda, baking powder, salt, and cinnamon.

  • Whisk or sift them together so the leavening agents and spices are evenly mixed.


Step 4: Combine Wet and Dry

  • Gradually add the dry ingredients into the wet mixture.

  • Stir gently using a spatula or spoon until just combined.

  • Do not overmix; overmixing can make the bread dense instead of soft.


Step 5: Add the Raisins

  • Fold in the raisins gently so they are evenly spread throughout the batter.


Step 6: Bake

  • Pour the batter into the prepared loaf pan.

  • Smooth the top with a spatula.

  • Bake for 50–60 minutes.

  • Check doneness by inserting a toothpick into the center:

    • It should come out clean or with a few moist crumbs.


Step 7: Cool

  • Let the bread cool in the pan for 10 minutes.

  • Remove it and place it on a wire rack to cool completely before slicing.


🌟 Tips for Best Results

  • Carrots: Use the fine side of a grater for a smoother texture.

  • Extra texture (optional): Add ½ cup chopped walnuts or pecans along with raisins.

  • Sweetness: You may reduce sugar slightly if your bananas are very ripe.

  • Storage:

    • Keep in an airtight container at room temperature for 3–4 days.

    • Refrigerate for up to 1 week.

    • Freeze slices for up to 2 months.

Creamy Amish Baked Custard

This Amish Baked Custard is a classic, simple dessert prized for its silky, melt-in-your-mouth texture and gentle sweetness. Unlike many modern custards that use heavy cream, this traditional version relies on sweetened condensed milk and a careful tempering method to create a light, airy consistency. Finished with a sprinkle of nutmeg, it’s comforting served warm from the oven or chilled for a cool treat.


Amish Baked Custard

Ingredients

Ingredient Amount
Sweetened condensed milk 1 can (14 oz)
Hot water 4 cups
Eggs 6
Vanilla extract 2 teaspoons
Salt ¼ teaspoon
Nutmeg For garnish

How to Make Amish Baked Custard

Step 1: Prep the Base
Preheat oven to 325°F. In a large bowl, combine the sweetened condensed milk and hot water, stirring until smooth.

Step 2: Beat the Eggs
In a separate bowl, beat the eggs until light and fluffy. This helps give the custard its signature lift.

Step 3: Temper the Eggs
Slowly add a small amount of the hot milk mixture to the eggs while whisking constantly to prevent scrambling. Once warmed, stir the eggs back into the main milk mixture. Add vanilla and salt.

Step 4: Set Up a Water Bath
Pour the mixture into individual ramekins or a 2-quart baking dish. Place the dishes in a larger, high-sided pan. Carefully add about ½ inch of hot water to the outer pan to ensure gentle, even cooking.

Step 5: Bake

  • Ramekins: Bake for 1 hour.
  • Large Dish: Bake for 1 hour 40 minutes.
    Custard is done when a knife inserted in the center comes out clean.

Step 6: Cool and Garnish
Let the custard cool for at least 1 hour to set. Sprinkle with nutmeg before serving. Serve warm, or refrigerate for a chilled version.

Easy Mini Cinnamon Sugar Muffins

🧁 Easy Mini Cinnamon Sugar Muffins (WW Friendly)

Soft, bite-sized, and lightened up with applesauce.

Yields: About 24 mini muffins
WW Points: ~3 points per mini muffin

📝 Ingredients

  • 1½ cups all-purpose flour

  • ½ cup sugar or sugar substitute

  • 1 tbsp baking powder

  • ½ tsp salt

  • 1 tsp cinnamon

  • ½ cup unsweetened applesauce

  • ½ cup milk (skim or almond)

  • 1 large egg

  • 1 tsp vanilla extract

Topping

  • 2 tbsp sugar or sugar substitute

  • 1 tsp cinnamon


🥣 Instructions

1️⃣ Prep:
Preheat oven to 350°F (175°C). Spray a mini muffin pan with nonstick spray.

2️⃣ Dry Mix:
In a bowl, combine flour, sugar, baking powder, salt, and cinnamon.

3️⃣ Wet Mix:
In another bowl, whisk together applesauce, milk, egg, and vanilla.

4️⃣ Combine:
Stir wet ingredients into dry ingredients just until combined. Do not overmix.

5️⃣ Fill:
Fill mini muffin cups about ⅔ full.

6️⃣ Top:
Mix topping ingredients and sprinkle evenly over batter.

7️⃣ Bake:
Bake for 12–15 minutes, until a toothpick inserted comes out clean.

8️⃣ Cool & Serve:
Let cool slightly and enjoy warm or room temperature.

No-Churn Chocolate Chunk Ice CreamRich, Easy, and Diet-Friendly Homemade Treat in Minutes

Servings: 6
Total Time: 15 minutes prep + 4 hours freezing
Difficulty: Easy
Calories per Serving: ~180 kcal (varies by diet)
Macros per Serving (approx):
  • WW: Protein: 5g | Carbs: 15g | Fat: 10g | Fiber: 2g | SmartPoints: 5
  • Keto: Protein: 5g | Carbs: 6g | Fat: 15g | Fiber: 2g
  • Slimming : Syns: 0–2 (depending on chocolate choice)
  • Mediterranean: Protein: 5g | Carbs: 12g | Fat: 12g | Fiber: 2g

Introduction

Creamy, chocolatey, and unbelievably simple—this No-Churn Chocolate Chunk Ice Cream is a dessert you can enjoy any day of the week without an ice cream machine. It’s a multi-diet-friendly treat for Weight Watchers, Keto, Slimming World, and Mediterranean lifestyles, allowing you to indulge without guilt.

The combination of rich chocolate chunks and smooth, velvety ice cream makes each bite irresistible. Best of all, this recipe requires just a few wholesome ingredients and minimal prep. Whether it’s a hot summer day or a quick dessert after dinner, this ice cream is your answer to guilt-free, homemade indulgence.


Why You’ll Love This Recipe

  • Sensory Appeal: Smooth, creamy base studded with chocolate chunks for the perfect bite.
  • Flavor Highlight: Deep chocolate flavor balanced with subtle vanilla notes.
  • Diet-Friendly Benefit: Low-carb for Keto, SmartPoints-conscious for WW, Syn-free for Slimming World, and clean, nutrient-rich ingredients for Mediterranean eaters.

Ingredients Needed

Base Ingredients:

  • 2 cups heavy whipping cream (or coconut cream for Keto/Mediterranean)
  • 1 can (14 oz / 400 g) sweetened condensed milk (use sugar-free for WW/Keto)
  • 1 tsp pure vanilla extract

Chocolate Chunks:

  • 1/2 cup dark chocolate chunks (sugar-free for WW/Keto, or high-quality dark for Mediterranean/Slimming World)

Optional Enhancements:

  • 1–2 tbsp cocoa powder for extra chocolate richness
  • Pinch of sea salt

How to Make Our No-Churn Chocolate Chunk Ice Cream

  1. Whip the cream in a large bowl until stiff peaks form.
  2. Gently fold in condensed milk and vanilla extract until smooth and uniform.
  3. Fold in chocolate chunks, keeping the mixture airy.
  4. Pour the mixture into a freezer-safe loaf pan or container. Smooth the top.
  5. Freeze for at least 4 hours or until firm.
  6. Serve chilled, optionally garnished with extra chocolate chunks or a drizzle of sugar-free chocolate sauce.

Storage & Serving Suggestions

  • Storing: Freeze in an airtight container for up to 2 weeks.
  • Serving: Let ice cream sit 5 minutes at room temperature before scooping for creamier texture.
  • Freezing: No special preparation needed.
  • Serving Pairings: Fresh berries, chopped nuts, or a drizzle of sugar-free chocolate or caramel sauce.

Tips & FAQs

Q1: Can I make this dairy-free?
Yes! Use coconut cream and dairy-free chocolate chunks.

Q2: How can I reduce WW SmartPoints?
Use sugar-free condensed milk and chocolate chunks to keep points low.

Q3: Can I add mix-ins?
Yes! Add nuts, low-carb cookies, or dried fruit while folding in the chocolate chunks.

Q4: Do I need an ice cream machine?
No! This is a true no-churn recipe, perfect for quick homemade ice cream.

Q5: How do I get a creamier texture?
Whip the cream thoroughly and fold in the milk gently to maintain airiness.

Pineapple Coconut Dream Cake

Pineapple Coconut Dream Cake

Yield: 10–12 slices
Prep Time: 25 minutes
Bake Time: 30–35 minutes
Assembly Time: 15 minutes
Total Time: About 1½ hours
Course: Dessert

This cake is soft, moist, and packed with tropical flavor from pineapple and coconut. It has fluffy layers, creamy coconut filling, and a smooth coconut frosting with toasted coconut on the outside.


🧾 Ingredients

For the Pineapple Cake:

  • 2½ cups all-purpose flour

  • 2 cups granulated sugar

  • 1 teaspoon baking soda

  • 1 teaspoon salt

  • 2 large eggs

  • 1 can (20 oz / 565 g) crushed pineapple with juice

  • ½ cup coconut milk (full-fat recommended)

  • ½ cup vegetable oil

  • 1 teaspoon vanilla extract


For the Coconut Cream Filling:

  • 1 cup heavy cream (cold)

  • 1 cup powdered sugar

  • 1 cup sweetened shredded coconut

  • 4 oz (115 g) cream cheese, softened


For the Coconut Frosting:

  • 1 cup unsalted butter, softened

  • 4 cups powdered sugar

  • 2 tablespoons coconut milk

  • 1 teaspoon vanilla extract

  • 1½ cups toasted coconut flakes (for coating)


👩‍🍳 Instructions


1️⃣ Bake the Cake Layers

  1. Preheat oven to 175°C (350°F).

  2. Grease and flour two 9-inch round pans.

  3. In a bowl, whisk together:

    • Flour

    • Sugar

    • Baking soda

    • Salt

  4. In another bowl, mix:

    • Eggs

    • Crushed pineapple (with juice)

    • Coconut milk

    • Oil

    • Vanilla

  5. Combine wet and dry ingredients. Mix until smooth.

  6. Divide batter evenly between pans.

  7. Bake for 30–35 minutes or until a toothpick comes out clean.

  8. Cool completely before assembling.


2️⃣ Make Coconut Cream Filling

  1. Beat heavy cream with powdered sugar until stiff peaks form.

  2. In a separate bowl, beat cream cheese until smooth.

  3. Stir shredded coconut into cream cheese.

  4. Gently fold whipped cream into coconut mixture.


3️⃣ Make Coconut Frosting

  1. Beat butter until creamy.

  2. Gradually add powdered sugar.

  3. Mix in coconut milk and vanilla.

  4. Stir in ½ cup toasted coconut (reserve rest for coating).


4️⃣ Assemble the Cake

  1. Place one cake layer on a plate.

  2. Spread coconut cream filling evenly on top.

  3. Place second cake layer on top.

  4. Frost entire cake with coconut frosting.

  5. Press remaining toasted coconut flakes onto sides and top.

Optional garnish:

  • Pineapple slices

  • Cherries

  • Extra coconut flakes


🍽 Serving

Serve chilled or at room temperature.


💡 Tips

✔ Use pineapple with juice (do not drain)
✔ Let cake cool fully before frosting
✔ Toast coconut lightly for best flavor
✔ Chill cake 30 minutes before slicing

Creamy Iced Dessert (No-Bake Frozen Treat)

Creamy Iced Dessert (No-Bake Frozen Treat)

Yield: 6–8 servings
Prep Time: 15 minutes
Chill/Freeze Time: 3–4 hours
Total Time: About 4 hours
Course: Dessert

This creamy frozen dessert is made with a rich milk base, folded with whipped cream, and finished with chocolate pieces. It’s smooth, refreshing, and perfect for special occasions.


🧾 Ingredients

  • ¾ cup (200 ml) whipped cream (prepared)

  • ½ cup powdered milk

  • 1 can (395 g / 14 oz) sweetened condensed milk

  • 1 carton (240 ml / 8 oz) heavy cream

  • 1 cup chocolate flakes or chocolate chips

  • 1 chocolate bar, chopped (for topping)


👩‍🍳 Instructions


1️⃣ Prepare the Cream Base

  • In a saucepan, add:

    • Sweetened condensed milk

    • Heavy cream

    • Powdered milk

  • Stir until fully combined.


2️⃣ Thicken the Mixture

  • Place saucepan over medium heat.

  • Stir constantly to prevent sticking.

  • Cook until mixture thickens slightly and coats the back of a spoon.

  • Do not boil.


3️⃣ Cool Completely

  • Remove from heat.

  • Transfer to a bowl and let cool to room temperature.


4️⃣ Whip the Cream

  • Prepare whipped cream according to package instructions.

  • Whip until soft peaks form.


5️⃣ Combine

  • Gently fold whipped cream into the cooled milk mixture.

  • Use slow folding motions to keep the mixture airy.


6️⃣ Add Chocolate

  • Stir in chocolate flakes gently.


7️⃣ Assemble

  • Pour mixture into a glass dish.

  • Sprinkle chopped chocolate bar on top.


8️⃣ Chill

  • Refrigerate or freeze for at least 3 hours until firm and cold.


🍽 Serving

Serve well chilled or semi-frozen.


💡 Tips & Variations

✔ Add vanilla extract for extra flavor
✔ Use white chocolate or dark chocolate
✔ Add crushed cookies or nuts
✔ Use molds for individual portions
✔ Add fruit pieces for a fresh twist


❄️ Storage

  • Freezer: Up to 1 month

  • Refrigerator (soft texture): Up to 3 days


🧮 Nutrition (Approximate per serving)

  • Calories: 320–380

  • Fat: 18–22 g

  • Carbohydrates: 35–40 g

  • Protein: 6–7 g

Basque Burnt Cheesecake

Basque Burnt Cheesecake

Yield: 6–8 servings
Pan Size: 6-inch (15 cm) round pan
Prep Time: 15 minutes
Bake Time: 30 minutes
Chill Time: 4 hours
Total Time: About 5 hours
Course: Dessert

Basque Burnt Cheesecake is famous for its dark, caramelized top and ultra-creamy center. It looks deeply browned on the outside but stays soft and custard-like inside. No crust is needed, and the recipe is very simple.


🧾 Ingredients

  • 340 g (12 oz) cream cheese, softened

  • 80 g (2.8 oz) white sugar

  • 3 large eggs, room temperature

  • 1 teaspoon vanilla extract

  • 1 g (about ¼ tsp) salt

  • 150 g (5.3 oz) whipping cream (heavy cream)

  • 10 g (0.4 oz) cornstarch or cake flour


👩‍🍳 Instructions


1️⃣ Prepare the Pan

  • Lightly grease a 6-inch round pan.

  • Line the bottom and sides with parchment paper, allowing paper to rise above the edges (this helps remove the cake easily).

  • Preheat oven to 210°C (415°F).


2️⃣ Soften the Cream Cheese

  • Place cream cheese in a bowl.

  • Mash with a spatula or mix on low speed until smooth and creamy.

  • Make sure there are no lumps.


3️⃣ Add Sugar

  • Add sugar to cream cheese.

  • Mix until fully combined and mixture looks lighter and smooth.


4️⃣ Add Eggs

  • Add eggs one at a time, mixing well after each addition.

  • The batter should look smooth and slightly fluffy after all eggs are added.


5️⃣ Add Flavor and Cream

  • Mix in vanilla extract and salt.

  • Add whipping cream and stir until fully blended.


6️⃣ Add Starch

  • Sift in cornstarch (or cake flour).

  • Mix gently until batter is completely smooth.


7️⃣ Pour and Remove Air

  • Pour batter into prepared pan.

  • Tap pan gently on the counter a few times to release air bubbles.


8️⃣ Bake

  • Place pan on the middle oven rack.

  • Bake at 210°C (415°F) for 30 minutes.

  • The top should be dark brown (almost burnt).

  • Center will still jiggle when shaken.


9️⃣ Cool and Chill

  • Let cheesecake cool at room temperature.

  • Refrigerate for at least 4 hours before slicing.

✔ Texture improves after chilling
✔ Flavor deepens after 1 day


🧠 Tips for Best Results

✔ All ingredients should be room temperature
✔ Do not overmix after adding eggs
✔ Do not bake longer than 30 minutes
✔ Dark top = correct result
✔ Use parchment paper, not foil


🔁 Variations

  • Stronger cheese flavor: Add 50 g more cream cheese

  • Softer texture: Add 20–30 ml more cream

  • Lemon version: Add 1 tsp lemon zest

  • Chocolate version: Add 80 g melted dark chocolate


❄️ Storage

  • Refrigerator: Up to 4 days

  • Freezer: Up to 1 month (wrap tightly)


🧮 Nutrition (Approximate per slice)

  • Calories: 280–320

  • Fat: 20–23 g

  • Carbohydrates: 18–22 g

  • Protein: 5–6 g

Almond Cream Cake (Yeast-Based Almond Cake)

Almond Cream Cake (Yeast-Based Almond Cake)

Yield: 12–16 slices
Prep Time: 30 minutes
Rising Time: 1 hour 20 minutes
Bake Time: 35–40 minutes
Total Time: About 3 hours
Course: Dessert

This soft, buttery yeast cake is topped with a sugar-butter crust, soaked with cream, and finished with almond flakes for a rich and tender texture. It’s similar to European bakery cream cakes and perfect for tea or special occasions.


🧾 Ingredients

For the Dough:

  • 200 ml (¾ cup + 1 tbsp) warm milk

  • 2 teaspoons active dry yeast

  • 2 tablespoons sugar

  • 2 large eggs (room temperature)

  • ½ teaspoon vanilla extract (or 2 g vanillin)

  • Pinch of salt

  • 120 g (½ cup) butter, melted and cooled

  • 470 g (about 4 cups) all-purpose flour

For the Topping:

  • 120 g (½ cup) sugar

  • 50 g (¼ cup) cold butter

  • Almond slices or almond flakes (as needed)

For the Cream Finish:

  • 125 ml (½ cup) heavy cream


👩‍🍳 Instructions


1️⃣ Activate the Yeast

  • Warm milk to about 43°C (110°F) — warm, not hot.

  • Add sugar and sprinkle yeast on top.

  • Stir gently and let sit 15–20 minutes until foamy.

✔ This step ensures a light, airy cake.


2️⃣ Prepare Wet Ingredients

In a large bowl, combine:

  • Activated yeast mixture

  • Eggs

  • Melted butter

  • Vanilla
    Whisk until smooth.


3️⃣ Make the Dough

  • Sift flour and add gradually to the wet mixture.

  • Add salt.

  • Knead for 10–15 minutes until soft and elastic.
    The dough should be smooth and slightly tacky, not sticky.


4️⃣ First Rise

  • Place dough in a greased bowl.

  • Cover and let rise in a warm place for 1 hour until doubled in size.


5️⃣ Prepare the Sugar-Butter Topping

  • Mix sugar with cold butter using fingers until crumbly.
    This creates a light crust during baking.


6️⃣ Shape and Second Rise

  • Grease a 9×13 inch (23×33 cm) pan.

  • Spread dough evenly into the pan.

  • Cover and let rise 20–30 minutes.

  • Preheat oven to 180°C (350°F).


7️⃣ Add Topping

  • Make small indentations with fingers across the dough.

  • Sprinkle sugar-butter mixture evenly on top.


8️⃣ Bake

  • Bake for 25–30 minutes until lightly golden.


9️⃣ Cream & Almond Finish

  • Remove cake from oven.

  • Pour heavy cream evenly over hot cake.

  • Sprinkle almond flakes on top.

  • Return to oven for 10 minutes.

✔ The cream soaks into the cake, making it moist and rich.


🔟 Cool and Serve

  • Cool completely in pan.

  • Cut into squares and serve at room temperature.


🧠 Helpful Tips

✔ Milk must be warm, not hot
✔ Use room-temperature eggs
✔ Bake on center rack
✔ Don’t skip second rise — it improves texture
✔ Let cake cool before slicing for best structure


🔁 Variations

  • Lemon version: Add 1 tsp lemon zest

  • Almond flavor: Add ½ tsp almond extract

  • Spiced: Add cinnamon or cardamom

  • Nut-free: Use coconut flakes instead of almonds

  • Dairy-free: Use plant milk, vegan butter, and coconut cream

  • Gluten-free: Use gluten-free baking flour blend


❄️ Storage

  • Room temperature (covered): 2–3 days

  • Refrigerator: Up to 5 days

  • Freezer: Up to 1 month (wrap tightly)


🧮 Nutrition (Approximate per slice)

  • Calories: 350–400

  • Fat: 18–22 g

  • Carbohydrates: 40–45 g

  • Protein: 6–7 g

Healthy Diet Cake with Oats and Apples – Ready in Just 5 Minutes Prep

Healthy Diet Cake with Oats and Apples – Ready in Just 5 Minutes Prep

Ingredients:

    • 1 cup oats
      • 2 apples, grated
      • 100 ml water
      • 1 banana, mashed
    • 2 eggs
    • 80g cranberries
    • 1 teaspoon baking powder
  • 1/4 teaspoon cinnamon
  • Butter for greasing the pan

Instructions:

    1. Preheat the Oven:
      • Preheat your oven to 180°C (360°F).
  1. Prepare the Batter:
      • In a large mixing bowl, combine the oats, grated apples, water, mashed banana, and eggs. Mix well until all ingredients are evenly incorporated.


      • Add the cranberries, baking powder, and cinnamon to the mixture. Stir until everything is well combined.
  2. Prepare the Pan:
        • Grease a baking dish with butter to prevent the cake from sticking.


    • Pour the batter into the prepared baking dish, spreading it out evenly.
  3. Bake the Cake:
        • Place the baking dish in the preheated oven and bake for 40 minutes, or until the cake is golden brown and a toothpick inserted into the center comes out clean.


  4. Cool and Serve:
        • Allow the cake to cool in the pan for a few minutes before transferring it to a wire rack to cool completely.
      • Slice and serve warm or at room temperature.


Cooking Tips:

      • For added texture, you can include chopped nuts or seeds in the batter.
    • Use ripe bananas for a sweeter cake without adding any sugar.
    • If you don’t have cranberries, you can substitute them with raisins, dried cherries, or chopped dates.

Nutritional Benefits:

      • Oats are rich in fiber, which aids in digestion and helps keep you feeling full longer.
      • Apples provide vitamins and antioxidants that are beneficial for overall health.
      • Bananas are a good source of potassium, which is essential for heart health.
  • Eggs add high-quality protein and essential nutrients to the cake.

Why You’ll Love This Recipe:

      • It’s a quick and easy recipe that fits perfectly into a busy lifestyle.
      • The natural sweetness from fruits means no added sugar is needed.
      • It’s a healthy, nutritious option that can be enjoyed any time of the day.
    • The cake is moist and flavorful, with a delightful mix of textures from the oats and cranberries.

Dietary Information:

    • This cake is free from added sugar and flour, making it suitable for those on a sugar-free or gluten-free diet (ensure oats are certified gluten-free if necessary).
  • It contains eggs, so it’s not suitable for a vegan diet, but you can substitute the eggs with a flaxseed or chia seed egg replacement.

Butterfinger Balls (No-Bake Candy Bites)

Butterfinger Balls (No-Bake Candy Bites)

Yield: 20 balls
Prep Time: 15 minutes
Chill Time: 30 minutes
Total Time: About 45 minutes
Course: Dessert
Cuisine: American

These no-bake Butterfinger Balls combine creamy peanut butter, crunchy graham cracker crumbs, and crushed Butterfinger candy, all coated in smooth chocolate. They’re easy to make, freezer-friendly, and perfect for parties or gifting.


🧾 Ingredients

For the filling:

  • 4 tablespoons (56 g) unsalted butter, softened

  • 1 cup (240 g) creamy peanut butter (use regular creamy peanut butter, not natural)

  • 1 teaspoon vanilla extract

  • 1 cup (120 g) powdered (confectioners’) sugar, sifted

  • ¾ cup (75 g) graham cracker crumbs (about 6 full crackers, crushed)

  • ½ cup (about 50 g) Butterfinger bars, crushed (2–3 regular bars)

For coating:

  • 8 ounces (225 g) chocolate chips, melting wafers, or chocolate bark

Optional toppings:

  • Extra crushed Butterfinger

  • Sprinkles

  • Pinch of coarse sea salt


👩‍🍳 Instructions

1️⃣ Mix the base

In a medium bowl, beat together:

  • Softened butter

  • Peanut butter

Mix until smooth and fully blended.


2️⃣ Add sugar and vanilla

  • Stir in vanilla extract.

  • Gradually add powdered sugar (in 2–3 parts), mixing well after each addition.
    You should get a soft, moldable dough that holds together.


3️⃣ Add crumbs and candy

  • Fold in graham cracker crumbs.

  • Gently mix in crushed Butterfinger pieces.
    (Reserve 1 tablespoon of candy for topping, if desired.)


4️⃣ Shape the balls

  • Scoop about 1 to 1½ tablespoons of mixture.

  • Roll into smooth balls using your palms.

  • Place on a parchment-lined tray.


5️⃣ Chill

Refrigerate or freeze for 30 minutes until firm.
(Cold balls are much easier to dip in chocolate.)


6️⃣ Melt the chocolate

Melt chocolate:

  • In the microwave: 20–30 second bursts, stirring each time
    OR

  • Over a double boiler until smooth


7️⃣ Dip the balls

  • Dip each chilled ball into melted chocolate using a fork.

  • Tap gently to remove excess chocolate.

  • Place back on parchment paper.

Optional: sprinkle crushed Butterfinger, sprinkles, or sea salt on top before chocolate sets.


8️⃣ Set the coating

Chill for 10–20 minutes until chocolate hardens.


🧠 Troubleshooting

Too sticky?
➜ Add 1–2 tablespoons powdered sugar or graham crumbs.

Too dry?
➜ Add 1 teaspoon peanut butter or softened butter.

Chocolate too thick?
➜ Stir in 1 teaspoon vegetable oil or coconut oil.

Candy lost crunch?
➜ Do not over-crush Butterfinger; leave some small chunks.


❄️ Storage

Refrigerator:
Store in airtight container for up to 7 days

Freezer:
Freeze up to 5–6 months
Thaw overnight in fridge before serving.


💡 Expert Tips

✔ Use cookie scoop for equal sizes
✔ Let balls sit 5 minutes before dipping to prevent cracking
✔ For extra crunch, press candy on top after dipping
✔ Add espresso powder to chocolate for mocha flavor
✔ For nut-free: use sunflower seed butter and nut-free candy


🧮 Nutrition (Approximate per ball)

  • Calories: ~140

  • Fat: 9–10 g

  • Carbohydrates: 12–14 g

  • Protein: 3–4 g


📌 Important Note

Use regular creamy peanut butter.
Natural peanut butter can make the mixture too oily and soft.

Honey & Coconut Cake Bars

Honey & Coconut Cake Bars

Soft honey sponge covered in smooth chocolate and coated with coconut

Ingredients

For the Cake

  • 1 large egg

  • 200 ml milk

  • 200 g sugar

  • 2 tablespoons honey

  • 1 tablespoon cooking oil

  • 300 g all-purpose flour

  • 1 teaspoon baking powder

For the Coating

  • 150 g dark or milk chocolate

  • ½ cup milk

  • 2 cups desiccated coconut


Instructions

Step 1: Make the Batter

In a large bowl, whisk the egg and sugar together until the mixture becomes light in color and slightly airy.

Add the milk, honey, and oil. Stir well until the honey is completely blended into the liquid.

Sift the flour and baking powder over the wet mixture.
Gently fold everything together until a smooth batter forms with no dry spots or lumps.


Step 2: Bake the Cake

Preheat the oven to 180°C (350°F).

Lightly grease a rectangular baking pan and line it with parchment paper.

Pour the batter evenly into the pan and level the top with a spoon or spatula.

Bake for 20–25 minutes, or until a toothpick inserted into the center comes out clean.

Let the cake cool fully in the pan before moving to the next step.


Step 3: Prepare the Coating

Place the chocolate and milk in a heat-safe bowl.
Warm gently (using a microwave or a bowl set over warm water) and stir until smooth and glossy.

Spread the coconut on a plate or shallow tray.


Step 4: Cut and Coat

Once the cake is completely cool, cut it into equal-sized rectangular bars.

Dip each cake bar into the chocolate mixture, turning gently so all sides are covered.

Immediately roll each coated bar in the coconut until evenly coated.


Step 5: Rest and Serve

Place the coated bars on a wire rack or parchment paper.
Let them rest for about 15 minutes until the chocolate layer firms up.

Serve with tea, coffee, or milk.


Helpful Tips

✔ For a lighter sponge, separate the egg and whip the egg white until fluffy, then fold it into the batter at the end
✔ For extra flavor, add a little vanilla or orange zest to the batter
✔ Store in an airtight container once set

Ultimate Low-Carb Cream Cheese Pancakes

Ultimate Low-Carb Cream Cheese Pancakes

Fluffy, buttery, and made with zero grains

These pancakes are soft, lightly sweet, and perfect for anyone following a low-carb or gluten-free lifestyle. They cook gently, stay tender inside, and taste amazing with both sweet and savory toppings.


🧾 Ingredients

  • 4 oz (115 g) cream cheese, softened to room temperature

  • 4 large eggs

  • ½ cup almond flour (super-fine gives the best texture)

  • 1 teaspoon baking powder

  • 1 teaspoon vanilla extract

  • 1 tablespoon erythritol or stevia (optional, for sweetness)

  • ½ teaspoon cinnamon (optional, for aroma and warmth)

  • Butter or light oil for the pan


🥣 Step-by-Step Instructions

1️⃣ Prepare the Batter

Add the cream cheese, eggs, almond flour, baking powder, vanilla, sweetener, and cinnamon into a blender or food processor.
Blend for about 30 seconds until the mixture becomes smooth and creamy with no visible lumps.


2️⃣ Rest the Batter

Let the batter rest for 2–3 minutes.
This helps the almond flour absorb moisture and makes the pancakes stronger and easier to handle while cooking.


3️⃣ Warm the Pan

Place a non-stick pan or griddle over medium-low heat.
Add a small amount of butter or oil and spread it evenly across the surface.

💡 Low-carb batters cook faster than regular pancake batter, so gentle heat gives the best results.


4️⃣ Pour the Pancakes

Scoop 2–3 tablespoons of batter per pancake onto the pan.
Keep pancakes small for easy turning and better shape.


5️⃣ Cook the First Side

Cook for about 2 minutes until:

  • The edges look firm

  • Small bubbles appear on the surface


6️⃣ Flip Carefully

Use a thin spatula to gently turn each pancake over.
Cook for 1 more minute until lightly golden and cooked through.


7️⃣ Serve Warm

Serve immediately with:

  • Sugar-free syrup

  • Fresh berries

  • A spoon of whipped cream

  • Or a little melted butter


⭐ Pro Tips

Room Temperature Cream Cheese
Cold cream cheese can cause small lumps.
If needed, warm it in the microwave for 15 seconds before blending.

Steam Trick for Fluffiness
Cover the pan with a lid for the first 60 seconds of cooking.
The trapped steam helps the pancakes rise and stay soft.

Extra Flavor Ideas

  • Add lemon zest for freshness

  • Add a pinch of nutmeg for bakery-style aroma

  • Add cocoa powder for chocolate pancakes


🥞 Texture & Taste

These pancakes are:
✔ Soft inside
✔ Light and fluffy
✔ Mildly sweet
✔ Great for low-carb or gluten-free diets

Homemade Nut and Date Energy Bars

Homemade Nut and Date Energy Bars

Yields: 8–10 bars | Prep time: 15 mins | Chilling time: 1 hour

Ingredients

The Nut & Seed Base:

  • 70 g (1/2 cup) Cashews

  • 70 g (1/2 cup) Walnuts

  • 70 g (1/2 cup) Almonds

  • 70 g (1/2 cup) Hazelnuts

  • 40 g (1/4 cup) Pine nuts

  • 70 g (1/3 cup) Pumpkin seeds

The Natural Binder:

  • 150 g (1 cup) Dates, pitted

  • Cold water (for soaking)


Instructions

1. Prepare the Dates

  • Soak: Place the pitted dates in a small bowl and cover them with cold water. Let them soak for about 15 minutes to soften.

  • Blend: Drain the water and place the softened dates into a food processor. Blend until they form a thick, smooth paste. If the mixture is too dry to move, add 1 tablespoon of the soaking water back in.

2. Toast and Chop the Nuts

  • Toast (Optional but recommended): For a deeper flavor, spread all the nuts and pumpkin seeds on a baking sheet and toast them in a preheated oven at 325°F (160°C) for 8–10 minutes. Watch closely so they don’t burn.

  • Chop: Roughly chop the larger nuts (walnuts, almonds, hazelnuts, cashews) into smaller pieces. You want a variety of sizes to ensure the bars hold together well while still having a great crunch.

3. Combine the Ingredients

  • In a large mixing bowl, combine the chopped nuts, pine nuts, and pumpkin seeds.

  • Add the date paste to the bowl.

  • Mix: Use a sturdy spatula or clean hands to thoroughly mix the ingredients. Ensure every nut and seed is well-coated in the sticky date paste, as this is what prevents the bars from crumbling.

4. Press and Chill

  • Line the Pan: Line a small rectangular baking dish or loaf pan with parchment paper, leaving some overhang on the sides for easy removal.

  • Press: Transfer the mixture into the pan. Use a spatula or the bottom of a heavy glass to press the mixture down as firmly and evenly as possible. The more you compress it, the better the bars will hold their shape.

  • Chill: Place the pan in the refrigerator for at least 1 hour (or 30 minutes in the freezer) to allow the date paste to set firmly.

5. Slice and Serve

  • Use the parchment paper “handles” to lift the block out of the pan.

  • Place it on a cutting board and use a sharp knife to slice it into bars or bite-sized squares.


Storage Tip

Store these bars in an airtight container in the refrigerator for up to two weeks, or in the freezer for up to two months. They are best served chilled.

Fresh and Fruity Jelly Cake

Fresh and Fruity Jelly Cake

A colorful, multi-layered jelly cake filled with fresh fruit, perfect for a light dessert or celebratory treat.

Prep Time: 30 minutes
Chill Time: 4–6 hours (or overnight)
Servings: 6–8


🧺 Ingredients

Jelly Base

  • 3 cups water

  • 1 cup sugar (adjust to taste depending on the sweetness of your fruit)

  • 4 tablespoons (approx. 40 g) unflavored gelatin powder (or use clear agar-agar for a vegan version)

  • 1 tablespoon lemon juice

Fruit Selection

  • 2 kiwis, peeled and sliced into rounds

  • 1 cup strawberries, hulled and sliced

  • 2 bananas, sliced

  • 1 orange or 1 mango, peeled and cut into segments

  • ½ cup pomegranate seeds


👩‍🍳 Instructions

1️⃣ Prepare the Fruit

  1. Wash all fruit thoroughly.

  2. Slice the kiwis, strawberries, bananas, and oranges/mangoes into uniform pieces.

  3. For an attractive presentation, place the visually appealing slices (like kiwi and strawberries) against the sides and bottom of your mold or silicone pan first.


2️⃣ Make the Jelly Mixture

  1. Bloom the Gelatin: In a small bowl, mix the gelatin with ½ cup cold water. Let it sit for 5 minutes until soft.

  2. Dissolve the Sugar: In a saucepan, combine the remaining 3 cups of water and sugar. Heat gently over medium heat until the sugar fully dissolves.

  3. Combine: Remove from heat and stir in the bloomed gelatin until the mixture is fully clear.

  4. Add the lemon juice for brightness.

  5. Cool: Let the mixture reach room temperature. Avoid pouring hot jelly directly over the fruit to prevent softening or cloudiness.


3️⃣ Assemble the Cake

  1. Arrange the prepared fruit in your mold, layering carefully to fill any gaps.

  2. Pour the cooled jelly mixture gently over the fruit until fully covered.

  3. Lightly tap the mold on the counter to release any trapped air bubbles.


4️⃣ Chill and Set

Place the mold in the refrigerator for at least 4–6 hours, or ideally overnight, until the jelly is firm and set.


5️⃣ Unmold and Serve

  1. Briefly dip the bottom of the mold into warm water for 5–10 seconds to loosen the edges.

  2. Place a serving plate over the mold and gently flip it to release the jelly cake.

  3. Slice into wedges with a sharp, warm knife for clean edges.


💡 Tips for Success

  • For a sparkling “jeweled” look, add the pomegranate seeds last so they settle into the smaller gaps between the fruit.

  • Use fruits that are firm and fresh for best results.

  • Serve chilled for a refreshing dessert.

Flourless Chocolate Banana Oat Loaf

Flourless Chocolate Banana Oat Loaf

Prep Time: 10 minutes
Bake Time: 35–45 minutes
Servings: 6–8 slices

A soft, rich loaf made with oats, bananas, and cocoa. It contains no flour and has a naturally sweet flavor from ripe bananas.


🧺 Ingredients

  • 120 g oat flakes (use certified gluten-free if needed)

  • 250 ml hot milk (dairy or plant-based)

  • 2 medium ripe bananas

  • 2 eggs

  • 4 tablespoons (45 g) cocoa or carob powder

  • 1 tablespoon baking powder

  • A small pinch of salt

  • 40 g chopped nuts (walnuts, pecans, or almonds)

  • Sugar-free dark chocolate, melted or finely chopped (for topping)


👩‍🍳 Instructions

1️⃣ Soften the Oats

Place the oat flakes in a mixing bowl.
Pour the hot milk over them and stir gently.
Let them rest for about 10 minutes, so the oats absorb the liquid and become tender.


2️⃣ Prepare the Banana Mixture

Peel the bananas and place them in a separate bowl.
Mash them with a fork until smooth and creamy.

Add the eggs and whisk gently until the mixture looks evenly blended.


3️⃣ Combine the Batter

Add the cocoa powder, baking powder, and salt to the banana mixture.
Stir until smooth and well mixed.

Add the softened oats and milk to the bowl.
Mix gently until everything is evenly combined.

Fold in half of the chopped nuts, keeping the rest for the top.


4️⃣ Bake the Loaf

Lightly coat a loaf pan with oil or line it with parchment paper.

Pour the batter into the pan and spread it evenly.

Sprinkle the remaining nuts over the surface.

Bake in a preheated oven at 350°F (180°C) for 35–45 minutes, until:

  • The top looks set

  • The center feels firm

  • A toothpick inserted comes out clean


5️⃣ Finish and Serve

Allow the loaf to cool slightly in the pan.

Drizzle melted dark chocolate over the top.

Let the chocolate firm up before slicing and serving.


🍽️ Serving Ideas

  • Enjoy warm or cooled

  • Serve with yogurt or fruit

  • Pair with tea or coffee

  • Lightly dust with cocoa powder if desired


💡 Helpful Tip

For a finer, more cake-like texture, you can blend the dry oats briefly to make oat flour before adding the hot milk.

Flourless Chocolate Oat & Banana Cake

Flourless Chocolate Oat & Banana Cake

A naturally sweet, rich chocolate cake made with oats and bananas instead of flour or refined sugar.

Prep Time: 10 minutes
Bake Time: 35–40 minutes
Servings: 6–8 slices

This cake has a soft, fudgy texture and a deep chocolate flavor, making it a satisfying dessert or snack made from simple, wholesome ingredients.


🧺 Ingredients

Base

  • 1½ cups (150 g) oat flakes (rolled or quick oats)

  • ⅔ cup (150 g) milk (dairy or plant-based)

  • 2 large ripe bananas, mashed until smooth

  • 2 eggs

Flavor & Rise

  • ¼ cup (30 g) cocoa powder

  • 1 teaspoon (5 g) baking powder

  • 1 g sweetener (optional: stevia or monk fruit)

Crunch & Topping

  • 1 oz (30 g) walnuts, chopped

  • 1 oz (30 g) dark chocolate, melted or finely chopped


👩‍🍳 Instructions

1️⃣ Soften the Oats

Place the oat flakes and milk into a medium bowl.
Stir gently and allow them to rest for 10 minutes so the oats absorb the liquid and become tender.


2️⃣ Prepare the Batter

In a large bowl, mash the bananas until smooth.

Add the eggs and whisk until evenly blended.

Sprinkle in the cocoa powder, baking powder, and sweetener (if using).
Stir gently until the mixture looks smooth and well combined.

Add the softened oats and milk to the banana mixture.
Stir until everything is evenly incorporated.

Fold in most of the chopped walnuts, saving a small amount for the top.


3️⃣ Bake the Cake

Lightly coat a small cake pan or silicone mold with oil, or line it with parchment paper.

Pour the batter into the pan and gently smooth the surface.

Place in a preheated oven at 350°F (180°C) and bake for 35–40 minutes, until:

  • The top looks set

  • The center feels firm

  • A toothpick inserted comes out clean


4️⃣ Finish the Cake

Allow the cake to cool slightly in the pan.

Melt the dark chocolate and drizzle it gently over the top.

Sprinkle the remaining walnuts over the chocolate while it is still soft.

Let the topping set before slicing.


🍽️ Serving Ideas

  • Enjoy warm or chilled

  • Serve with yogurt or fruit

  • Pair with tea or coffee

  • Lightly dust with cocoa powder if desired


💡 Helpful Tip

For a smoother, more cake-like texture, you may blend the oats, milk, eggs, and bananas together in a blender before mixing in the cocoa powder and walnuts by hand.

Dual-Flavor Ring Tea Cake

Dual-Flavor Ring Tea Cake

Prep Time: 5 minutes
Bake Time: 35–40 minutes
Pan: Round cake pan with heat-safe glass in center

A soft vanilla and chocolate cake baked together in a beautiful ring shape, perfect for tea time or light dessert.


🧺 Ingredients

For the Base Batter

  • 3 large eggs

  • 1 cup (200 g) granulated sugar

  • 1 cup (200 ml) milk

  • ½ cup (100 ml) vegetable oil (or any neutral oil)

  • 2¾ cups (350 g) all-purpose flour, sifted

  • 2 teaspoons (10 g) baking powder

  • 1 pinch (1 g) vanillin or 1 teaspoon vanilla extract

  • Butter, for greasing the pan

For the Chocolate Batter

  • 2 tablespoons cocoa powder

  • 2 tablespoons water


👩‍🍳 Instructions

1️⃣ Prepare the Base Batter

Mix Eggs and Sugar
In a large mixing bowl, combine the eggs and sugar. Whisk until the mixture becomes pale and slightly airy in texture.

Add Liquid Ingredients
Pour in the milk, vegetable oil, and vanillin or vanilla extract. Whisk until fully blended and smooth.

Add Dry Ingredients
Gradually add the sifted flour and baking powder.
Stir gently using a whisk or spatula until the batter becomes smooth and free of large lumps.
Mix only until combined to keep the cake soft and tender.


2️⃣ Create Two Flavors

Divide the Batter
Transfer half of the batter into a second bowl so you now have two equal portions.

Prepare Cocoa Mixture
In a small cup, mix the cocoa powder with the water until it forms a smooth paste.

Make Chocolate Batter
Add the cocoa paste to one bowl of batter. Stir gently until the color is even and rich.

Now you have:
✔ One vanilla batter
✔ One chocolate batter


3️⃣ Prepare the Pan & Create the Pattern

Grease the Pan
Lightly coat the inside of a round cake pan with butter.

Place the Center Glass
Butter the outside of a heat-safe glass or jar.
Place it gently in the middle of the pan to create the ring shape.

Pour the Batters
Slowly pour the vanilla batter on one side of the pan and the chocolate batter on the opposite side at the same time.
The batters will meet in the center while remaining mostly separate, creating a two-tone effect.


4️⃣ Bake the Cake

Preheat Oven
Set oven to 350°F (180°C).

Bake
Place the pan in the oven and bake for 35–40 minutes, until the cake is fully cooked and lightly golden.

Check for Doneness
Insert a toothpick into the thickest area of the cake.
If it comes out clean, the cake is ready.


5️⃣ Cool & Remove

Let the cake cool in the pan for about 10 minutes.

Gently twist and lift the glass from the center.
Run a knife carefully around the edge of the pan and turn the cake out onto a serving plate.

Allow to cool completely before decorating.


🍽️ Serving Ideas

  • Dust the vanilla side with powdered sugar

  • Drizzle the chocolate side with melted chocolate or ganache

  • Serve with tea, coffee, or warm milk


💡 Helpful Tips

✔ Add orange or lemon zest for fragrance
✔ Use yogurt instead of milk for extra softness
✔ Keep batters thick so the pattern stays defined
✔ Stores well for 2–3 days in an airtight container

New York Cheesecake with Blueberry Sauce

New York Cheesecake with Blueberry Sauce

If you’ve never tried a classic New York Cheesecake, this recipe is the perfect introduction. Rich, creamy, and slightly tangy, this cheesecake is easy to make at home and can be prepared as individual mini cheesecakes or one large cake. Enhanced with a luscious homemade blueberry sauce, it’s a dessert that delights the eyes and the taste buds. Brought to you by tinsuf, this recipe is simple yet indulgent, perfect for celebrations or any time you want a decadent treat.


  • Author: tinsuf
  • Cuisine: American
  • Category: Dessert, Cheesecake
  • Keywords: New York cheesecake, mini cheesecakes, blueberry sauce, creamy cheesecake
  • Prep Time: 20 minutes
  • Cook Time: 16–20 minutes
  • Total Time: Approx. 5 hours 40 minutes (including chilling)
  • Yield: 6–8 mini cheesecakes


Ingredients

Crust

  • 50 g digestive biscuits, crushed
  • 1/2 tablespoon sugar
  • 2–2.5 tablespoons butter, melted

Filling

  • 275 g cream cheese (about 15 Kiri cheese squares)
  • 65 g (1/3 cup) sugar
  • A very small pinch of salt
  • 1 egg, room temperature
  • 1/2 teaspoon vanilla extract
  • 1/4 teaspoon lemon zest
  • 1/4 cup sour cream or yogurt

Blueberry Sauce

  • 1/2 cup blueberries
  • 1 1/2 tablespoons sugar
  • 3/4 teaspoon cornflour
  • A very small pinch cinnamon powder (optional)
  • A very small pinch salt
  • 2 tablespoons water
  • A drop of vanilla extract (optional)
  • A small pinch of lemon zest (optional)
  • 1/4 teaspoon lemon juice, or to taste


Instructions

  1. Prepare the crust: Crush the digestive biscuits into a coarse powder. Mix with sugar, then add melted butter and combine thoroughly. Line a muffin tin with paper liners or grease silicone molds with butter. Place equal amounts of crust in each cup and press down evenly. Cover and refrigerate while preparing the filling.
  2. Make the cheesecake filling: Preheat oven to 150°C (300°F). In a mixing bowl, beat cream cheese until smooth and creamy. Add sugar and salt, mixing gently. Add the egg and mix until incorporated—avoid overmixing to prevent excess air. Stir in vanilla, lemon zest, and sour cream or yogurt. Mix until smooth.
  3. Assemble and bake: Spoon the filling over the chilled crusts. Bake for 16–20 minutes, or until centers are set but slightly wobbly. Remove from oven and let cool completely.
  4. Chill: Cover cheesecakes and refrigerate for 4–5 hours or longer. Properly chilled cheesecakes stay fresh for several days.
  5. Prepare blueberry sauce: In a small saucepan, combine sugar, cornflour, water, salt, and cinnamon (if using). Stir over low heat until sugar dissolves. Add blueberries and cook 3–5 minutes until sauce thickens, allowing some berries to break. Remove from heat and stir in vanilla, lemon zest, and lemon juice. Let cool and store in an airtight container in the refrigerator for up to a week.
  6. Serve: Remove cheesecakes from refrigerator and peel off liners or remove from molds. Spoon blueberry sauce on top. Optionally, serve with fresh berries or drizzle chocolate sauce for extra indulgence.


Troubleshooting & Consistency Tips

For a smooth, creamy texture, ensure cream cheese and egg are at room temperature. Avoid overmixing, which can create cracks or a grainy texture. If you prefer a thicker crust, increase the amount of digestive biscuits and butter. Individual cheesecakes bake faster than a large one, so monitor closely to avoid overbaking.

ADVERTISEMENT


Storage & Make-Ahead

Store refrigerated cheesecakes in an airtight container for up to 5 days. Blueberry sauce can be made ahead and stored for up to a week. For special occasions, you can prepare crust and filling in advance, then bake and chill closer to serving time.


Why This Recipe Works

This New York Cheesecake recipe balances sweetness with a subtle tang from sour cream or yogurt. Individual portions ensure even baking and a creamy texture, while the crust adds a satisfying crunch. The optional  blueberry sauce enhances flavor and adds a vibrant, fresh finish.


ADVERTISEMENT

Expert Tips

  • Use room-temperature ingredients for smooth batter.
  • Do not overmix eggs into cream cheese to prevent cracks.
  • Mini cheesecakes bake faster than one large  cake; adjust timing accordingly.
  • Add lemon zest or juice to the filling for a subtle, bright flavor contrast.
  • Serve chilled for the best creamy texture.


This classic New York Cheesecake with blueberry sauce is brought to you by tinsuf. Enjoy this creamy, decadent dessert and explore more of our professional, easy-to-follow recipes for all occasions.

3-Ingredient Yogurt Cake

3-Ingredient Yogurt Cake

Yield: 1 round cake (8 slices)
Prep Time: 10 minutes
Bake Time: 45–55 minutes

This cake is soft, creamy, and lightly sweet. It’s perfect for tea time or as a simple dessert when you want something comforting with very few ingredients.


🧾 Ingredients

  • 500 g (2 cups) plain yogurt
    (Greek yogurt or any thick yogurt works best)

  • 4 large eggs

  • ½ cup (100 g) sugar

✔ Optional for flavor (not counted as ingredients):

  • 1 teaspoon vanilla extract

  • Powdered sugar for dusting


👩‍🍳 Instructions

1. Prepare the Pan and Oven

Preheat the oven to 170°C (340°F).
Line a round cake pan with parchment paper, allowing some paper to rise up the sides. This helps remove the cake easily after baking.


2. Mix the Batter

In a large bowl, add the yogurt and sugar.
Whisk until smooth and creamy.

Add the eggs one at a time, whisking well after each addition until the mixture is fully blended and silky.


3. Pour and Level

Pour the batter into the prepared pan.
Gently tap the pan on the counter once or twice to release air bubbles.


4. Bake

Place the pan in the oven and bake for 45–55 minutes, until the top is lightly golden and the center is set.

The cake should look firm around the edges and slightly soft in the center.


5. Cool

Remove from the oven and let the cake cool completely in the pan.
As it cools, it will gently settle and become more compact.


6. Serve

Lift the cake out using the parchment paper.
Dust with powdered sugar if desired.
Slice and serve chilled or at room temperature.


🌟 Helpful Tips

  • Use thick yogurt for the best texture.

  • Do not overbake; this keeps the cake creamy inside.

  • Refrigerate for 2–3 hours for clean slices.

  • Store in the refrigerator up to 3 days.

No-Bake Coffee Mousse Cake

No-Bake Coffee Mousse Cake

Yield: 1 round cake (8–10 slices)
Prep Time: 20 minutes
Chill Time: 4–6 hours

This dessert has a soft, creamy texture with a light coffee flavor. It sets beautifully in the refrigerator and can be sliced like a cake without baking.


🧾 Ingredients

For the Coffee Mousse

  • 2 cups heavy cream (cold)

  • 2 tablespoons instant coffee or espresso powder

  • 3 tablespoons hot water

  • ½ cup powdered sugar

  • 1 teaspoon vanilla extract

  • 2 teaspoons unflavored gelatin

  • 3 tablespoons warm milk


For the Base (optional, but recommended)

  • 150 g crushed biscuits (tea biscuits or digestive)

  • 5 tablespoons melted butter


👩‍🍳 Instructions

1. Prepare the Coffee

In a small bowl, dissolve the coffee in hot water.
Set aside to cool to room temperature.


2. Prepare the Base

Mix crushed biscuits with melted butter until evenly combined.
Press mixture firmly into the bottom of a lined cake ring or springform pan.
Refrigerate while preparing the mousse.


3. Activate the Gelatin

In a small bowl, mix gelatin with warm milk.
Stir gently until completely dissolved.
Let cool slightly (not hot).


4. Whip the Cream

In a large bowl, whip cold cream until soft peaks form.
Add powdered sugar and vanilla extract.
Continue whipping until smooth and fluffy.


5. Combine

Slowly pour the cooled coffee into the whipped cream while gently folding.
Add the dissolved gelatin and fold carefully until fully mixed.


6. Assemble

Pour the mousse over the chilled base.
Smooth the top with a spatula.


7. Chill

Refrigerate for at least 4–6 hours, or until fully set.


8. Serve

Carefully remove from the mold.
Slice with a warm knife for clean cuts.


🌟 Helpful Tips

  • Use cold cream for best volume.

  • Let coffee cool before mixing to avoid thinning the cream.

  • You can flavor with cocoa powder or caramel if desired.

  • Store in refrigerator up to 3 days.

Classic Apple Pie with Lemon Cream Filling

Classic Apple Pie with Lemon Cream Filling

Yield: 1 round pie (8–10 slices)
Prep Time: 25 minutes
Bake Time: 40–45 minutes

This apple pie features a soft buttery crust, a smooth lemon cream layer, and tender apple slices on top. It is lightly sweet, gently citrusy, and perfect for tea time or dessert.


🧾 Ingredients

For the Dough

  • 2 large eggs

  • 5 tablespoons sugar (100 g)

  • 1 packet vanilla sugar (8 g) or 1 teaspoon vanilla extract

  • 5 tablespoons butter (100 g), softened

  • 3 cups all-purpose flour (360 g)

  • 2 teaspoons baking powder (8 g)


For the Lemon Cream Filling

  • 2 cups milk (500 ml)

  • 2 egg yolks

  • 4 tablespoons sugar

  • 3 tablespoons cornstarch

  • Zest of 1 lemon

  • 2 tablespoons lemon juice

  • 1 teaspoon vanilla extract


For the Apple Layer

  • 3–4 medium apples, peeled and sliced

  • 2 tablespoons sugar

  • 1 teaspoon cinnamon (optional)

  • 1 tablespoon lemon juice


For Topping

  • Powdered sugar, for dusting

  • Sliced almonds or walnuts (optional)


👩‍🍳 Instructions

1. Prepare the Dough

In a bowl, whisk eggs, sugar, and vanilla until smooth.
Add softened butter and mix until creamy.
Add flour and baking powder gradually and mix until a soft dough forms.

Divide the dough into two parts:
✔ One larger portion (for base)
✔ One smaller portion (for top)

Wrap and refrigerate for 20 minutes.


2. Make the Lemon Cream

In a saucepan, whisk milk, egg yolks, sugar, and cornstarch until smooth.
Cook over medium heat, stirring constantly, until thick and creamy.
Remove from heat and stir in lemon zest, lemon juice, and vanilla.
Set aside to cool slightly.


3. Prepare the Apples

In a bowl, mix apple slices with sugar, lemon juice, and cinnamon.
Set aside for 5 minutes to soften slightly.


4. Assemble the Pie

Preheat oven to 180°C (350°F).
Grease a round baking pan.

Roll out the larger dough portion and press into the pan, forming a base and sides.
Spread lemon cream evenly over the dough.
Arrange apple slices on top of the cream.

Roll out the remaining dough and place over apples in strips or decorative pattern.


5. Bake

Bake for 40–45 minutes, until golden and set.
Let cool completely before slicing so layers stay neat.


6. Finish and Serve

Dust with powdered sugar and sprinkle nuts if desired.
Serve plain or with tea, coffee, or vanilla sauce.


🌟 Helpful Tips

  • Use firm apples (Granny Smith, Fuji, or Golden).

  • Chill dough for easier handling.

  • For extra shine, brush top with a little milk before baking.

  • Store in refrigerator up to 3 days.

Orange–Carrot Cake with Coconut Cream

Orange–Carrot Cake with Coconut Cream

Yield: 1 loaf (8–10 slices)
Prep Time: 20 minutes
Bake Time: 45–55 minutes

This moist carrot cake is gently flavored with fresh orange zest, crunchy walnuts, coconut flakes, and sesame seeds. It is finished with a light, dairy-free coconut cream topping for a naturally rich and fragrant dessert.


🧾 Ingredients

For the Cake

  • 4 medium carrots, finely grated

  • 4 tablespoons unsweetened coconut flakes

  • 2 tablespoons sesame seeds

  • ½ cup walnuts, chopped (plus extra for topping)

  • 1½ cups all-purpose flour

  • 1 teaspoon baking soda

  • 1 teaspoon baking powder

  • 1 teaspoon ground cinnamon

  • ½ teaspoon salt

  • 3 large eggs, at room temperature

  • ¾ cup granulated sugar or brown sugar

  • ½ cup vegetable oil or melted coconut oil

  • Zest of 1 orange

  • 2 tablespoons fresh orange juice

For the Coconut Cream Topping

  • 1 can (14 oz / 400 ml) full-fat coconut milk, chilled overnight

  • 2 tablespoons maple syrup or powdered sugar

  • ½ teaspoon vanilla extract


👩‍🍳 Instructions

1. Prepare the Pan and Oven

Preheat the oven to 350°F (175°C).
Lightly grease a loaf pan and line it with parchment paper so the cake can be lifted out easily after baking.


2. Mix the Dry Ingredients

In a medium bowl, whisk together:

  • flour

  • baking soda

  • baking powder

  • cinnamon

  • salt

Stir in the coconut flakes, sesame seeds, and chopped walnuts until evenly combined.


3. Prepare the Wet Ingredients

In a large bowl, whisk the eggs and sugar until pale and slightly thick.
Slowly add the oil while whisking continuously.
Mix in the orange zest and orange juice.
Fold in the grated carrots until well distributed.


4. Combine the Batter

Add the dry ingredients to the wet mixture in two parts.
Gently fold with a spatula just until no dry flour is visible.
Do not mix too much—this helps keep the cake soft and tender.


5. Bake

Pour the batter into the prepared pan and smooth the top.
Bake for 45–55 minutes, or until a skewer or toothpick inserted in the center comes out clean.

Let the cake cool in the pan for 15 minutes, then lift it out and allow it to cool completely on a rack.


🥥 Coconut Cream Topping

6. Prepare the Coconut Cream

Open the chilled coconut milk can carefully.
Scoop out only the thick cream from the top into a bowl (reserve the liquid for drinks or smoothies).

Add the maple syrup (or powdered sugar) and vanilla extract.
Whisk or beat until smooth and creamy.


7. Decorate

Spread the coconut cream evenly over the cooled cake.
Sprinkle with extra chopped walnuts and a few sesame seeds if desired.


🌟 Helpful Tips

  • Orange Flavor: The zest gives the strongest orange taste, so use fresh orange peel for best results.

  • Cold Coconut Milk: Chilling is essential for thick, spreadable cream.

  • Storage: Keep the cake in the refrigerator for up to 3 days because of the coconut topping.

  • Serving: Best served slightly cool or at room temperature.

Easy and Fluffy Vanilla Muffins

Easy and Fluffy Vanilla Muffins

Prep Time: 10 minutes
Bake Time: 20–25 minutes
Yields: 12 standard muffins

Soft, airy, and golden muffins that are simple to make and perfect for breakfast, snacks, or dessert.


🧾 Ingredients

  • 2 eggs

  • 125 ml (½ cup) vegetable oil

  • 250 ml (1 cup) milk

  • 200 g (1 cup) sugar

  • 360 g (3 cups) all-purpose flour

  • 1 teaspoon baking powder

  • ½ teaspoon salt

  • 100 g (⅔ cup) raisins or chocolate chips (optional)

  • 1 teaspoon vanilla extract (optional, for extra flavor)


👩‍🍳 Step-by-Step Instructions

🔥 Step 1: Prepare Oven and Muffin Pan

  1. Preheat oven to 375°F (190°C).

  2. Line a 12-cup muffin tin with paper liners or grease each cup lightly with butter or oil.


🥄 Step 2: Whisk Wet Ingredients

  1. In a large mixing bowl, whisk eggs and sugar until pale and slightly frothy.

  2. Add vegetable oil, milk, and vanilla extract (if using).

  3. Whisk until fully combined.


🥣 Step 3: Combine with Dry Ingredients

  1. Sift flour, baking powder, and salt directly into the wet mixture.

  2. Use a spatula or wooden spoon to fold gently until just combined.

    • Stop mixing when flour streaks disappear to keep muffins light and fluffy.


🍫 Step 4: Add Mix-ins (Optional)

  1. Gently fold in raisins or chocolate chips if desired.


🧁 Step 5: Fill Muffin Cups

  1. Divide batter evenly among the 12 cups, filling about ¾ full.

  2. Place the tin in the center of the oven.


🔥 Step 6: Bake

  1. Bake for 20–25 minutes.

  2. Muffins are done when:

    • Tops are golden brown

    • They spring back when lightly pressed

    • Toothpick inserted comes out clean or with a few moist crumbs


❄ Step 7: Cool

  1. Let muffins cool in the tin for 5 minutes.

  2. Transfer to a wire rack to cool completely.


🌟 Pro-Tips for Success

  • Room Temperature Ingredients: Eggs and milk at room temperature give a smoother, well-incorporated batter.

  • Storage: Keep in an airtight container at room temperature for up to 3 days. Freeze for up to 2 months.

  • Optional Flavors: Add cinnamon, nutmeg, or lemon zest for a flavor twist.