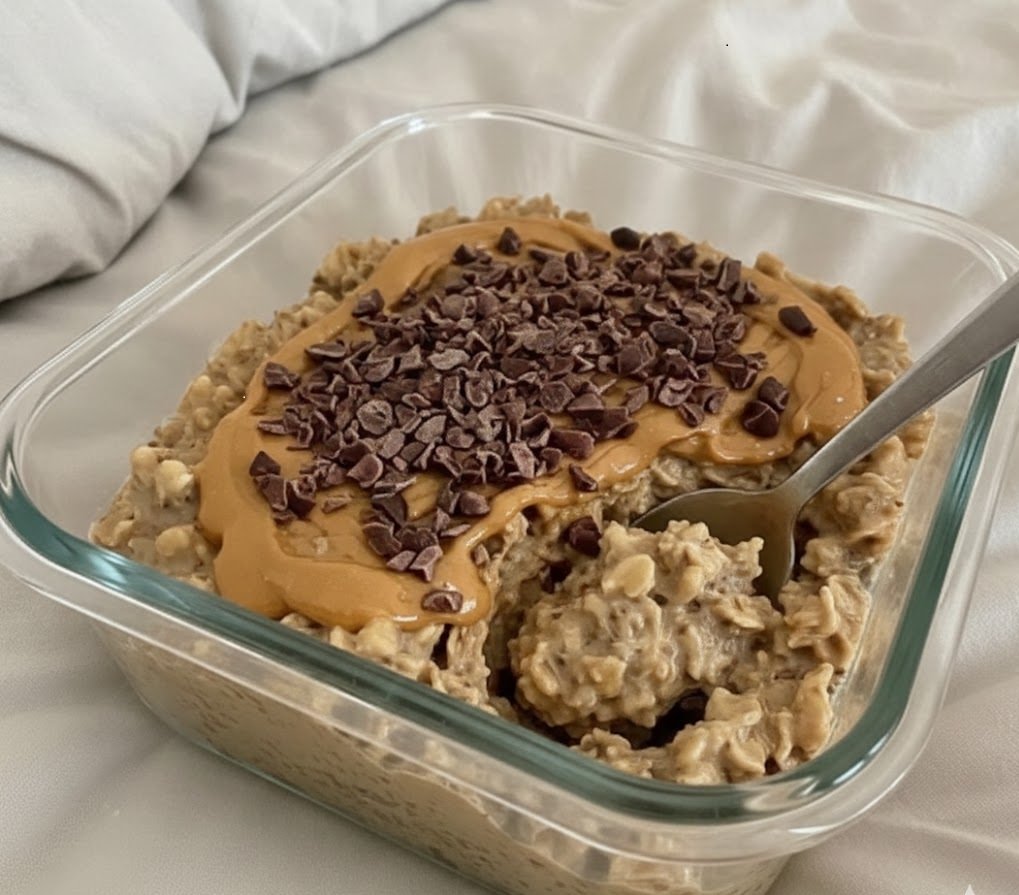
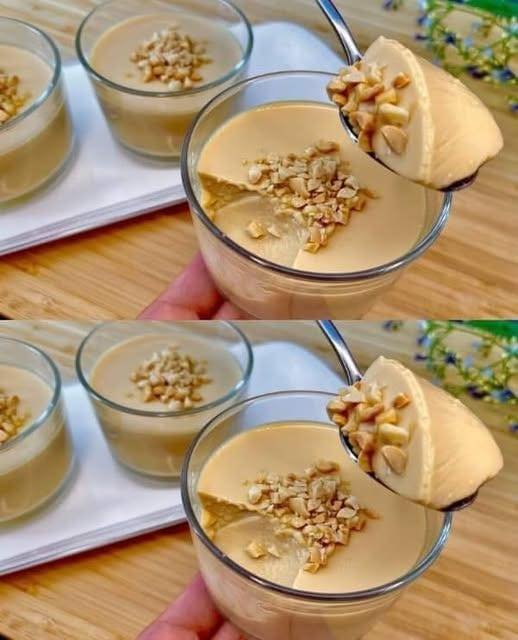
Classic Moist Vanilla Sheet Cake

Classic Moist Vanilla Sheet Cake

Ingredients

  • 2 1/2 cups All-purpose flour

  • 1 3/4 cups Granulated sugar

  • 1 1/4 cups Whole milk (room temperature)

  • 1/2 cup (1 stick) Unsalted butter (softened)

  • 1/2 cup Vegetable oil

  • 4 Large eggs (room temperature)

  • 1 tbsp Vanilla extract

  • 2 1/2 tsp Baking powder

  • 1/2 tsp Salt


Instructions

1. Prep and Preheat

  • Preheat your oven to 175ยฐC (350ยฐF).

  • Grease a 9×13 inch baking pan and line the bottom with parchment paper to ensure the cake releases easily, as seen in the provided image.

2. Mix Dry Ingredients

  • In a medium bowl, whisk together the flour, baking powder, and salt. Set this aside.

3. Cream Butter and Sugar

  • In a large mixing bowl (or stand mixer), beat the softened butter and granulated sugar together on medium-high speed until the mixture is light and fluffy (about 3 minutes).

  • Pour in the vegetable oil and mix until well combined.

4. Add Eggs and Vanilla

  • Add the eggs one at a time, beating well after each addition.

  • Stir in the vanilla extract.

5. Combine Everything

  • Reduce the mixer speed to low. Add the flour mixture in three parts, alternating with the milk, starting and ending with the flour.

  • Mix just until combined; do not overmix, or the cake may become dense.

6. Bake

  • Pour the batter into the prepared pan and smooth the top with a spatula.

  • Bake for 30โ€“35 minutes, or until the top is golden brown and a toothpick inserted into the center comes out clean.

7. Cool and Serve

  • Place the pan on a wire rack and let the cake cool completely before frosting.


Pro Tip for the Best Texture

Using room temperature milk and eggs is essential! It allows the ingredients to emulsify properly, creating a uniform, velvety crumb that doesn’t crumble when sliced.

Fluffy Stovetop Milk Bread (No Oven Needed)

Fluffy Stovetop Milk Bread (No Oven Needed)
These soft bread rolls are cooked in a pan instead of an oven, giving them a golden outside and a very fluffy inside. They are perfect for breakfast, tea time, or as a sweet treat when coated in sugar.


๐Ÿงพ Ingredients

  • 1 glass (200 ml) warm milk

  • 400 g (about 2 cups) all-purpose flour or bread flour

  • 50 g butter, softened

  • 2 tablespoons sugar

  • 1 teaspoon dry yeast

  • 1 teaspoon salt

  • Extra sugar for coating (optional)


๐Ÿ‘ฉโ€๐Ÿณ Instructions

1. Activate the Yeast

Pour the warm milk into a large bowl.

Add:

  • Sugar

  • Dry yeast

Stir gently and let it rest for 5 minutes until the mixture becomes slightly foamy.
(This shows the yeast is active.)


2. Make the Dough

Add flour and salt to the milk mixture.

Mix with a spoon or your hands until a rough dough forms.

Add the softened butter and knead the dough for 8โ€“10 minutes until:

  • Smooth

  • Soft

  • Elastic

  • Not sticky


3. First Rise

Lightly grease a bowl and place the dough inside.

Cover with a cloth or plastic wrap.

Leave in a warm place for 1 hour, or until the dough doubles in size.


4. Shape the Rolls

Gently press the dough to remove excess air.

Divide into equal portions and roll into small balls (about golf-ball size).

Place them on a tray, cover, and let them rest for 15 minutes.


5. Cook on the Stovetop

Lightly grease a wide non-stick pan with a small amount of oil or butter.

Place the dough balls in the pan with a little space between them.

Cover tightly with a lid.

Cook on very low heat for 10โ€“12 minutes.

Flip the rolls gently, cover again, and cook for another 5โ€“8 minutes until:

  • Both sides are golden

  • Bread sounds hollow when tapped


6. Finish and Serve

While still warm, roll the bread in sugar if you want a sweet coating.

Serve warm or at room temperature.


โญ Important Tip

Keep the heat very low and the lid on at all times.
This creates steam inside the pan and helps the bread cook through without burning.


๐Ÿฝ Serving Ideas

โœ” With tea or coffee
โœ” With jam or honey
โœ” As a sandwich roll
โœ” With butter or Nutella


๐Ÿ“ฆ Storage

  • Store in an airtight container for up to 2 days

  • Reheat lightly in a pan or microwave

  • Can be frozen for up to 1 month

Healthy Chocolate Banana Oatmeal Muffins

Healthy Chocolate Banana Oatmeal Muffins
These muffins are soft, naturally sweet from bananas, and flavored with cocoa for a chocolate taste. They are perfect for breakfast, snacks, or lunchboxes.


๐Ÿงพ Ingredients

For the Muffin Batter:

  • 1 cup (90 g) oats (quick oats or rolled oats)

  • 1 cup (240 ml) water

  • 2 eggs

  • 2 ripe bananas, mashed

  • 1 tablespoon cocoa powder

  • 1 teaspoon baking powder

  • 1 tablespoon stevia sweetener (or sweetener of choice)

  • 1 teaspoon vanilla extract

  • 1 tablespoon coconut flakes

  • A pinch of salt


For Topping:

  • Chopped almonds

  • Sugar-free chocolate syrup (optional)


๐Ÿ‘ฉโ€๐Ÿณ Instructions

1. Soak the Oats

Place the oats and water in a large bowl.

Stir and let them rest for 10 minutes so the oats soften and absorb the water.


2. Prepare the Banana Mixture

In another bowl, mash the bananas until smooth.

Add:

  • Eggs

  • Sweetener

  • Vanilla extract

  • Salt

Whisk until fully combined.


3. Combine the Mixtures

Pour the banana mixture into the soaked oats and mix well.

Sift in:

  • Cocoa powder

  • Baking powder

Add coconut flakes.

Stir gently until the batter is smooth and evenly mixed.


4. Prepare for Baking

Preheat oven to 180ยฐC (350ยฐF).

Lightly grease a muffin tin or use silicone or paper liners.

Fill each cup about ยพ full with batter.

Sprinkle chopped almonds on top.


5. Bake

Place in the oven and bake for 20โ€“25 minutes, or until:

  • The tops are set

  • A toothpick inserted in the center comes out clean


6. Cool and Serve

Let the muffins cool in the tin for 5โ€“10 minutes, then remove carefully.

Before serving, drizzle lightly with sugar-free chocolate syrup if desired.


๐ŸŒŸ Texture Tip

For a smoother, cake-like texture:
Blend the oats briefly in a blender to make oat flour before soaking them.


๐Ÿฝ Serving Ideas

โœ” With tea or coffee
โœ” As a breakfast muffin
โœ” As a school snack
โœ” With yogurt or fruit


๐Ÿ“ฆ Storage

  • Store in an airtight container in the refrigerator for up to 3 days

  • Freeze for up to 1 month

  • Reheat in microwave or oven before serving

Spicy Date and Nut Energy Bites

Spicy Date and Nut Energy Bites
These bite-sized snacks are naturally sweet and full of nutty crunch, gently flavored with warm spices. Perfect for a quick energy boost or a healthy dessert.


๐Ÿงพ Ingredients

  • 250 g soft dates, pitted (Medjool dates are ideal)

  • 30 g peanuts

  • 20 g almonds

  • 15 g pistachios

  • 15 g hazelnuts

  • A small pinch of cinnamon

  • A small pinch of cardamom

Optional for Coating:

  • Shredded coconut

  • Finely crushed nuts

  • Cocoa powder


๐Ÿ‘ฉโ€๐Ÿณ Instructions

1. Prepare the Dates

If the dates feel firm or dry, soak them in warm water for 5โ€“10 minutes, then drain well.

Place the pitted dates into a food processor and blend until they form a smooth, sticky paste.


2. Add Nuts and Spices

Add to the processor:

  • Peanuts

  • Almonds

  • Pistachios

  • Hazelnuts

  • Cinnamon

  • Cardamom

Pulse a few times until:

  • Nuts are chopped into small pieces

  • Mixture holds together

  • Texture remains slightly chunky (not powdered)


3. Shape the Bites

Take about 1 tablespoon of the mixture and roll it between your palms to form a small ball (about walnut-sized).

Tip: Lightly wet your hands with water if the mixture sticks.


4. Coat the Bites (Optional)

Roll each ball in:

  • Shredded coconut

  • Crushed nuts

  • Or cocoa powder

For decoration, gently press a small nut or a tiny piece of date on top of each ball.


5. Chill and Store

Place the energy bites on a plate or tray.

Refrigerate for 15โ€“20 minutes to help them firm up.

Store in an airtight container in the refrigerator for up to 2 weeks.


๐Ÿฝ Serving Ideas

โœ” As a snack
โœ” With tea or coffee
โœ” After exercise
โœ” As a lunchbox treat


โญ Flavor Tip

Cinnamon and cardamom provide gentle warmth that pairs beautifully with the natural sweetness of dates and the crunch of mixed nuts.


๐Ÿ“ฆ Storage

  • Keep refrigerated

  • Can be frozen for up to 2 months

  • Let thaw for a few minutes before eating

3-Ingredient Coconut Chocolate Jelly

๐Ÿฅฅ๐Ÿซ 3-Ingredient Coconut Chocolate Jelly
This smooth and light dessert uses agar-agar for setting instead of gelatin. It is simple to make and perfect for a quick plant-based treat.


๐Ÿงพ Ingredients

  • 1ยฝ cups (360 ml) coconut milk

  • 1 cup (240 ml) water

  • โ…“ cup (30 g) unsweetened cocoa powder

  • 1 tablespoon agar-agar powder

Optional Flavor Additions:

  • 1โ€“2 tablespoons honey, maple syrup, or any sweetener (optional)

  • ยฝ teaspoon vanilla extract

  • A pinch of salt (to enhance chocolate flavor)


๐Ÿ‘ฉโ€๐Ÿณ Instructions

1. Mix the Liquid Base

Pour the water and coconut milk into a medium saucepan.

Add the cocoa powder.

Whisk well while the mixture is still cold so the cocoa powder dissolves completely and no lumps remain.


2. Activate the Agar-Agar

Add the agar-agar powder to the saucepan and whisk again.

Place the pan over medium heat and bring the mixture to a gentle boil while stirring constantly.

Once boiling, reduce heat and simmer for 1โ€“2 minutes, stirring continuously.
(This step is important because agar-agar must boil in order to set properly.)


3. Pour and Set

Carefully pour the hot mixture into:

  • A glass dish

  • Silicone molds

  • Or small serving bowls

Let it cool slightly at room temperature for about 5 minutes, then place it in the refrigerator.

Chill for 1โ€“2 hours or until fully set and firm.


4. Serve

Once set, gently remove from the mold or serve directly from the bowl.

For decoration, lightly dust with cocoa powder before serving if desired.


๐ŸŒŸ Texture Tip

Agar-agar sets firmer than gelatin.
For a softer texture:

  • Reduce agar-agar by ยผ teaspoon
    OR

  • Increase coconut milk slightly for a creamier result.


๐Ÿฝ Serving Ideas

โœ” Serve chilled
โœ” Top with fresh berries
โœ” Add shaved dark chocolate
โœ” Serve with coconut flakes


๐Ÿ“ฆ Storage

  • Store covered in the refrigerator for up to 3 days

  • Best enjoyed cold

  • Do not freeze (texture may change)

Homemade Twisted Sugar Doughnuts

Homemade Twisted Sugar Doughnuts

Ingredients

  • 3 ยฝ cups All-purpose flour (approx. 500g)

  • 1 cup Milk (warm)

  • 2 tsp Dry yeast

  • 3 tbsp Sugar (plus extra for coating)

  • 2 tbsp Butter (melted)

  • 1 Egg (room temperature)

  • A pinch of salt

  • Oil for frying


Instructions

1. Prepare the Yeast Mixture

  • In a small bowl, combine the warm milk, sugar, and dry yeast.

  • Stir gently and let it sit for about 5โ€“10 minutes until it becomes frothy.

2. Mix the Dough

  • In a large mixing bowl, whisk the egg and melted butter together.

  • Add the yeast mixture to the egg and butter.

  • Gradually stir in the flour and salt. Mix until a dough forms.

3. Knead and Rise

  • Turn the dough onto a floured surface and knead for about 8 minutes until it is smooth and elastic.

  • Place the dough in a lightly oiled bowl, cover with a cloth, and let it rise in a warm place for 1 hour or until doubled in size.

4. Shape the Twists

  • Punch the dough down and divide it into small, equal-sized balls.

  • Roll each ball into a long rope (about 10 inches).

  • Fold the rope in half and twist the two strands together, pinching the ends to seal them.

  • Place the twists on a tray and let them rest for another 15 minutes.

5. Fry to Golden Perfection

  • Heat oil in a deep pan over medium heat.

  • Carefully drop the twists into the oil (do not overcrowd the pan).

  • Fry for about 2โ€“3 minutes per side until they are a deep golden brown.

6. The Sugar Coating

  • While the doughnuts are still hot, toss them immediately in a bowl of granulated sugar (or a sugar-cinnamon mix) until evenly coated.


Pro Tip for Texture

To ensure the center is fully cooked without burning the outside, keep your oil at a steady medium heat. If the oil is too hot, the outside will darken before the inside is fluffy.

2-Ingredient Chocolate “Magic” Mousse

2-Ingredient Chocolate “Magic” Mousse

This recipe creates a light, airy, and creamy dessert without the need for eggs, gelatin, or heavy flour.

Ingredients

  • 2 cups (500ml) Whole Milk (Full-fat works best for a creamy texture)

  • 1/2 cup (50g) Unsweetened Cocoa Powder

  • Optional: 2-3 tablespoons of your preferred sweetener (honey, maple syrup, or sugar) if you prefer it less dark.

  • Optional: A pinch of cornstarch (1 tbsp) if you want a thicker, “pudding-like” stability.

Instructions

  1. Combine: In a medium saucepan, whisk together the cocoa powder and the milk while cold. This helps prevent the cocoa from clumping.

  2. Heat: Place the pan over medium heat. Continue to whisk constantly. If you are using a sweetener or a bit of cornstarch for thickness, add them now.

  3. Thicken: Bring the mixture to a very gentle simmer (do not let it reach a rolling boil). Keep whisking for about 3โ€“5 minutes until the mixture coats the back of a spoon and starts to thicken slightly.

  4. Aerating (The Secret Step): For that “mousse” texture seen in your photo, take the mixture off the heat and use a hand mixer or a vigorous whisk to beat it for 1-2 minutes. This incorporates tiny air bubbles.

  5. Set: Pour the mixture into a glass bowl or individual ramekins. Let it cool to room temperature, then cover and refrigerate for at least 4 hours (overnight is best) to let it firm up into that sliceable texture.

  6. Serve: Just before serving, dust the top with a little extra cocoa powder through a fine-mesh strainer for that professional finish.


Quick Tips for Success

  • Texture: If the mixture feels too thin while heating, a tiny “slurry” of cornstarch mixed with a teaspoon of cold milk can be stirred in to help it set firmly.

  • Sifting: Always sift your cocoa powder first! It loves to clump, and nobody wants a pocket of dry powder in their dessert.

Banana Yogurt Parfait Cups

Banana Yogurt Parfait Cups

Prep Time: 10 minutes
Chill Time: 30 minutes (optional)
Servings: 4 cups
Difficulty: Easy

This layered dessert or breakfast cup is made with yogurt, crushed biscuits or oats, and fresh bananas.


Ingredients

  • 2 cups plain yogurt (or Greek yogurt)

  • 2 ripe bananas, sliced

  • 1 cup crushed biscuits, granola, or oats

  • 2 tablespoons peanut butter or nut butter (optional)

  • 1 teaspoon vanilla extract (optional)

  • Mini chocolate chips or grated chocolate (optional, for topping)


Equipment

  • Mixing bowl

  • Spoon

  • 4 clear cups or glasses

  • Knife and cutting board


Instructions

  1. Prepare yogurt mixture
    In a bowl, mix yogurt with vanilla extract and peanut butter (if using) until smooth.

  2. Prepare bananas
    Peel bananas and slice into thin rounds.

  3. Layer the cups
    In each cup:

    • Add a layer of crushed biscuits or granola

    • Add a layer of yogurt

    • Add banana slices

  4. Repeat layers
    Continue layering until the cup is full, finishing with yogurt and banana on top.

  5. Add topping (optional)
    Sprinkle with mini chocolate chips or grated chocolate.

  6. Chill (optional)
    Refrigerate for 30 minutes before serving for better texture.


Optional Variations

  • Use strawberries or apples instead of bananas

  • Add cinnamon for extra flavor

  • Use honey or dates for sweetness (optional)

  • Add chia seeds or nuts for crunch


Storage

  • Store covered in refrigerator

  • Best consumed within 24 hours

Chickpea Flour Pancakes with Apple Filling

Chickpea Flour Pancakes with Apple Filling

Prep Time: 10 minutes
Cook Time: 10โ€“12 minutes
Servings: 8โ€“10 small pancakes
Difficulty: Easy

These pancakes are made with chickpea flour and yogurt, giving them a soft texture and mild flavor. They are filled with lightly cooked apples and cooked in a pan until golden.


Ingredients

Pancake Batter

  • 2 large eggs

  • 2 tablespoons sugar

  • 1 cup (250 ml) plain yogurt

  • 1ยพ cups (250 g) chickpea flour

  • 1 teaspoon baking soda

  • Pinch of salt

Apple Filling

  • 2 medium apples, peeled and diced

  • 1 tablespoon butter

  • 1 tablespoon sugar (optional)

For Cooking

  • Butter or oil, for greasing the pan


Equipment

  • Mixing bowls

  • Whisk or spoon

  • Frying pan or skillet

  • Knife and cutting board

  • Spoon or piping bag

  • Spatula


Instructions

1. Prepare the Batter

  1. In a large bowl, add the eggs and sugar. Whisk until combined.

  2. Add the yogurt and salt. Mix until smooth.

  3. Stir in the baking soda.

  4. Gradually add the chickpea flour while mixing to form a smooth, thick batter.
    Set aside for 5 minutes.


2. Prepare the Apple Filling

  1. Peel and dice the apples into small cubes.

  2. Heat butter in a pan over medium heat.

  3. Add the apples and sugar (if using).

  4. Cook for 5โ€“7 minutes, stirring, until apples become soft and lightly golden.

  5. Remove from heat and let cool slightly.


3. Cook the Pancakes

  1. Lightly grease a skillet and heat over medium-low heat.

  2. Spoon or pipe small rounds of batter onto the pan.

  3. Place a small spoon of apple filling in the center of each pancake.

  4. Cover the filling with a little more batter.

  5. Cook for 2โ€“3 minutes per side, until golden brown and cooked through.


Serving Suggestions

  • Serve warm with honey or maple syrup

  • Sprinkle with powdered sugar

  • Add yogurt or fresh fruit on top


Storage

  • Store cooked pancakes in the refrigerator for up to 2 days

  • Reheat in a pan or microwave

  • Best served fresh

Cinnamon Sugar Donut Muffins

Cinnamon Sugar Donut Muffins

Servings: 12 muffins
Prep Time: 10 minutes
Bake Time: 15โ€“18 minutes
Total Time: 25 minutes
Difficulty: Easy

These baked muffins have a soft, cake-like texture and are finished with a cinnamon coating for a donut-style flavor.


Ingredients

For the Muffins

  • 2 cups almond flour

  • 2 tablespoons coconut flour

  • 1ยฝ teaspoons baking powder

  • ยฝ teaspoon baking soda

  • ยฝ teaspoon salt

  • ยผ cup granulated erythritol or other granulated sweetener

  • 2 large eggs

  • โ…“ cup plain Greek yogurt or sour cream

  • ยผ cup unsweetened almond milk (or regular milk)

  • 1 teaspoon vanilla extract

  • 1 tablespoon melted butter or olive oil

For the Cinnamon Coating

  • 2 tablespoons melted butter or olive oil

  • ยผ cup granulated erythritol or other granulated sweetener

  • 1ยฝ teaspoons ground cinnamon


Equipment

  • Mixing bowls

  • Whisk

  • Muffin tin (12-cup)

  • Paper liners or cooking spray

  • Pastry brush

  • Cooling rack


Instructions

  1. Preheat the oven
    Set oven to 350ยฐF (175ยฐC).
    Line a 12-cup muffin tin with paper liners or lightly grease it.

  2. Mix dry ingredients
    In a large bowl, whisk together:

    • Almond flour

    • Coconut flour

    • Baking powder

    • Baking soda

    • Salt

    • Sweetener

  3. Mix wet ingredients
    In a separate bowl, whisk:

    • Eggs

    • Greek yogurt

    • Almond milk

    • Vanilla extract

    • Melted butter or olive oil

  4. Combine batter
    Add the wet mixture to the dry mixture.
    Stir gently until just combined.
    Do not overmix; batter should be thick and smooth.

  5. Fill muffin cups
    Divide batter evenly among muffin cups, filling each about ยพ full.

  6. Bake
    Bake for 15โ€“18 minutes, or until:

    • Tops are lightly golden

    • A toothpick inserted in the center comes out clean

  7. Cool
    Let muffins cool in the pan for 5 minutes, then transfer to a rack.

  8. Prepare coating
    In a small bowl, mix:

    • Sweetener

    • Cinnamon

  9. Coat muffins
    Brush each muffin lightly with melted butter or oil.
    Roll in the cinnamon mixture until evenly coated.

  10. Serve
    Serve warm or at room temperature.


Storage

  • Store in an airtight container at room temperature for 2 days

  • Refrigerate up to 5 days

  • Freeze (uncoated) for up to 1 month

  • Reheat gently and coat before serving


Optional Variations

  • Add nutmeg (ยผ teaspoon) for extra spice

  • Add chopped nuts to the batter

  • Add a vanilla glaze instead of cinnamon coating

Creamy Blender Dessert (No-Bake, No-Cook)

Creamy Blender Dessert (No-Bake, No-Cook)

Prep Time: 10 minutes
Chill Time: 1โ€“2 hours
Servings: 6โ€“8 small cups
Difficulty: Very easy

This creamy dessert is made entirely in a blender and set in the refrigerator. It has a smooth texture with small chocolate crunch pieces inside.


Ingredients

  • 1 can sweetened condensed milk (395 g / 14 oz)

  • 200 ml (ยพ cup) heavy cream or table cream

  • 100 ml (โ…– cup) cold milk

  • 200 ml (ยพ cup) whipped cream (cold)

  • 1 packet passion fruit flavored powdered drink mix

  • 90 g (about ยพ cup) chocolate sprinkles


Equipment

  • Blender

  • Mixing spoon or spatula

  • Measuring cup

  • Serving cups or small bowls


Instructions

  1. Prepare the blender mixture
    Add the following to the blender:

    • Heavy cream

    • Sweetened condensed milk

    • Whipped cream

    • Milk

    • Passion fruit powdered drink mix

  2. Blend
    Blend on medium speed for about 4โ€“5 minutes, until the mixture becomes:

    • Smooth

    • Thick

    • Fully combined with no lumps

  3. Add chocolate sprinkles
    Pour the blended mixture into a bowl.
    Add the chocolate sprinkles and gently mix with a spoon or spatula.
    Do not stir hard, so the sprinkles keep their shape and texture.

  4. Portion the dessert
    Divide the mixture into individual cups (about 250 ml / 8 oz each).

  5. Chill
    Place the cups in the refrigerator for at least 1 hour (2 hours for a firmer texture).

  6. Serve
    Once chilled and set, the dessert is ready to serve.


Optional Garnishes

  • Extra whipped cream on top

  • Chocolate shavings

  • Crushed biscuits

  • Fresh fruit slices


Flavor Variations

You can replace the passion fruit drink mix with:

  • Strawberry

  • Pineapple

  • Lemon

  • Mango

Use the same amount (1 packet).


Storage

  • Keep refrigerated

  • Best consumed within 2โ€“3 days

  • Do not freeze (texture may change)

Pistachio Cheesecake Domes with Raspberry Surprise

Pistachio Cheesecake Domes with Raspberry Surprise

Ingredients

For the Pistachio Cheesecake

8 oz (225 g) cream cheese, softened

ยฝ cup heavy cream

โ…“ cup powdered sugar

โ…“ cup pistachio paste or finely ground pistachios

1 tsp vanilla extract

For the Raspberry Center

ยฝ cup fresh or frozen raspberries

1ยฝ tbsp sugar

1 tsp lemon juice

For the Base (Optional)

ยพ cup crushed graham crackers or digestive biscuits

3 tbsp melted butter

For Garnish (Optional)

Chopped pistachios

Fresh raspberries

Directions

Prepare the Raspberry Surprise

In a small saucepan, combine raspberries, sugar, and lemon juice. Cook over medium heat for 5โ€“7 minutes until the berries break down and slightly thicken. Let cool completely.

Make the Cheesecake Base (Optional)

Mix crushed graham crackers with melted butter. Press lightly into silicone dome molds or the base of serving cups. Chill for 10 minutes.

Prepare the Pistachio Cheesecake

In a bowl, beat cream cheese and powdered sugar until smooth. Add pistachio paste and vanilla, mixing well. In a separate bowl, whip heavy cream to soft peaks, then gently fold into the pistachio mixture until light and fluffy.

Assemble the Domes

Spoon pistachio cheesecake mixture halfway into dome molds. Add a small spoon of cooled raspberry filling in the center. Cover with more cheesecake mixture and smooth the tops.

Chill

Refrigerate for at least 4 hours, or until fully set.

Serve

Carefully unmold the domes. Garnish with chopped pistachios and fresh raspberries before serving.

Nutritional Information (Per Dome โ€“ Approximate, based on 6 domes)

Calories: 340 kcal

Protein: 6 g

Carbohydrates: 22 g

Fat: 26 g

Fiber: 2 g

Sugar: 18 g

No-Sugar-Added Oat & Fruit Energy Bars

No-Sugar-Added Oat & Fruit Energy Bars

  • Prep time:ย 5 minutes

  • Setting time:ย 30โ€“60 minutes (fridge)

  • Yields:ย 8โ€“10 bars


Ingredients

  • 1 cup (80g)ย Rolled oats

  • 3/4 cup (100g)ย Raisins

  • 3/4 cup (80g)ย Walnuts, roughly chopped

  • 100g (3.5 oz)ย Dried apricots, chopped

  • 1 mediumย Ripe banana, mashed

  • 100g (3.5 oz)ย Dark chocolate (sugar-free), chopped

  • 1 tspย Coconut oil (for the chocolate glaze)


Instructions

  1. Prepare the Base:ย In a large mixing bowl, combine the rolled oats, chopped walnuts, chopped apricots, and raisins. Mix well to distribute the fruit.

  2. Bind:ย Add the mashed banana to the dry ingredients. Stir thoroughly until everything is evenly coated and the mixture sticks together. If it feels too dry, add another tablespoon of mashed banana.

  3. Shape:ย Line a small rectangular container or baking dish with parchment paper. Transfer the mixture into the dish and press downย firmlyย with the back of a spoon or a spatula to create an even, compact layer.

  4. Melt Chocolate:ย Place the chopped dark chocolate and coconut oil in a microwave-safe bowl. Microwave in 20-second intervals, stirring in between, until completely smooth.

  5. Glaze:ย Pour the melted chocolate over the oat base and spread it evenly to the edges.

  6. Chill & Cut:ย Place the dish in the refrigerator for at least 30โ€“60 minutes until the chocolate has hardened and the bars are firm. Lift the parchment paper out of the dish and slice into bars using a sharp knife.

Easy Moist Date Cake

Easy Moist Date Cake

A rich, tender cake naturally sweetened by dates with a warm hint of spice.

  • Prep time: 20 minutes

  • Bake time: 35โ€“45 minutes

  • Servings: 8โ€“10

Ingredients

The Date Base:

  • 1 cup (150g) Pitted dates, chopped

  • 1 cup (250ml) Hot water (boiling)

  • 1 tsp Baking soda

The Batter:

  • ยฝ cup (115g) Unsalted butter, softened to room temperature

  • ยพ cup (150g) Granulated sugar (or brown sugar for a deeper caramel flavor)

  • 2 Large eggs

  • 1 tsp Vanilla extract

  • 1 ยฝ cups (190g) All-purpose flour

  • 1 tsp Baking powder

  • ยฝ tsp Ground cinnamon

  • ยผ tsp Ground nutmeg (optional)

  • Pinch of salt


Detailed Instructions

1. Prepare the Dates

In a heat-proof bowl, combine the chopped dates and the baking soda. Pour the boiling hot water over them. Stir gently and let the mixture sit for about 15 minutes. The baking soda will soften the date skins and break them down, creating a thick, jam-like consistency that ensures the cake is incredibly moist.

2. Prep the Oven and Pan

Preheat your oven to 350ยฐF (175ยฐC). Grease an 8-inch or 9-inch round cake pan (or a square pan) with butter and lightly dust with flour, or line the bottom with parchment paper for easy removal.

3. Cream the Butter and Sugar

In a large mixing bowl, beat the softened butter and sugar together using a hand mixer or stand mixer until the mixture is pale, light, and fluffy (about 3 minutes).

4. Add Wet Ingredients

Add the eggs one at a time, beating well after each addition. Stir in the vanilla extract. If the mixture looks slightly curdled at this stage, don’t worry; it will smooth out once the flour is added.

5. Sift Dry Ingredients

In a separate bowl, whisk together the flour, baking powder, cinnamon, nutmeg, and salt.

6. Combine

Gradually add the dry ingredients to the butter mixture, alternating with the date mixture (including the liquid). Stir with a spatula or use the mixer on low speed just until combined. Avoid overmixing, as this can make the cake tough rather than tender.

7. Bake

Pour the batter into your prepared pan and smooth the top. Bake for 35 to 45 minutes. To check for doneness, insert a wooden skewer or toothpick into the centerโ€”it should come out clean or with just a few moist crumbs attached.

8. Cool and Serve

Let the cake cool in the pan for about 10 minutes before transferring it to a wire rack. Serve warm or at room temperature.


Serving Suggestions

  • Classic: Serve with a dollop of whipped cream or a scoop of vanilla bean ice cream.

  • Toffee Style: Drizzle with a warm caramel sauce while the cake is still slightly warm.

  • Tea Time: This cake pairs beautifully with a strong cup of black tea or coffee.

No-Bake 3-Ingredient Milk Pudding

No-Bake 3-Ingredient Milk Pudding

Smooth โ€ข Creamy โ€ข Simple Custard-Style Dessert

This easy milk pudding is a soft, creamy dessert made with just milk, sugar, and eggs. It sets gently in the refrigerator and has a smooth, comforting texture similar to classic custard. With careful low-heat cooking and constant stirring, you get a silky pudding without baking or complicated steps.


Recipe Overview

  • Prep Time:ย 5 minutes

  • Cook Time:ย 10โ€“15 minutes

  • Chill Time:ย 2โ€“3 hours

  • Servings:ย 4 small bowls


Ingredients

Main Ingredients

  • 2 cups (500 ml) milk

  • โ…“ cup (70 g) sugar

  • 2 large eggs

Optional (Recommended)

  • 1 teaspoon vanilla extract
    (adds aroma and smooth flavor)

Optional Toppings

  • Chopped peanuts or walnuts

  • Caramel drizzle

  • Fresh fruit


Equipment Needed

  • Medium saucepan

  • Whisk or silicone spatula

  • Fine-mesh strainer

  • Serving bowls or ramekins


Step-by-Step Instructions

1. Mix the Eggs and Sugar

  • Place the saucepan on the counter (do not heat yet)

  • Add eggs and sugar

  • Whisk until the sugar is mostly dissolved and the mixture looks slightly pale and smooth


2. Add the Milk

  • Slowly pour the milk into the egg mixture

  • Whisk continuously to keep everything smooth

  • Add vanilla extract if using


3. Cook Gently

  • Place the saucepan overย low heat

  • Stir constantly using a whisk or spatula

  • Scrape the bottom and sides of the pan to prevent sticking

โš ๏ธย Important:ย Keep the heat low. High heat can cause the eggs to cook unevenly.


4. Thicken the Pudding

  • Continue stirring forย 10โ€“12 minutes

  • The mixture will gradually thicken

  • It is ready when it:

    • Coats the back of a spoon

    • Looks creamy but still pours easily

(It will firm up more as it cools.)


5. Strain for Smoothness

  • Remove from heat

  • Pour the mixture through a fine strainer into a bowl or jug

  • This step ensures a silky, lump-free texture


6. Chill and Set

  • Pour the pudding into serving bowls or ramekins

  • Let cool at room temperature for aboutย 20 minutes

  • Cover and refrigerate forย 2โ€“3 hours, until fully set


7. Serve

  • Serve chilled

  • Add nuts, caramel, or fruit just before serving if desired


Texture & Flavor

  • Texture:ย Smooth, soft, custard-like

  • Flavor:ย Lightly sweet, creamy, comforting


Helpful Tips

  • Stir continuously for best texture

  • Never let the mixture boil

  • Use room-temperature eggs for smoother blending

  • For extra richness, replace ยผ cup of milk with cream


Optional Variation (Firmer Texture)

If you prefer a firmer, pudding-style set:

  • Mixย 1 tablespoon cornstarchย into the cold milk before heating

  • Proceed with the recipe as written


Storage

  • Store covered in the refrigerator

  • Best enjoyed withinย 2 days

Easy & Healthy Oatmeal Apple Loaf

Easy & Healthy Oatmeal Apple Loaf

No Refined Sugar โ€ข No White Flour โ€ข Naturally Sweetened

This wholesome oatmeal apple loaf is soft, moist, and naturally sweet from fruits alone. Itโ€™s perfect for breakfast, tea time, or a healthy snack. Packed with oats, apples, bananas, dried fruits, and nuts, itโ€™s both nourishing and satisfying.


๐Ÿฅงย Ingredients

  • 1 cup fine rolled oats (or oat flour)

  • 3 medium apples, peeled and grated or finely chopped

  • ยฝ cup water

  • 1 ripe banana, mashed

  • 3.5 oz (100 g) dried blueberries

  • 3.5 oz (100 g) raisins

  • 2 large eggs

  • 1 teaspoon baking powder

  • 1 teaspoon cinnamon powder (optional, for warmth and flavor)

  • ยฝ cup mixed nuts, chopped (almonds, walnuts, or your choice)


๐Ÿฅฃย Instructions

  1. Prepare the Oats
    If using rolled oats, blend them into a fine flour using a blender or food processor. Set aside.

  2. Cook the Apples
    Add the grated apples and water to a saucepan. Cook on medium heat for 5โ€“7 minutes until soft and slightly thick. Remove from heat and let cool slightly.

  3. Mix Wet Ingredients
    In a large bowl, mash the banana. Add the eggs and whisk well. Stir in the cooked apples.

  4. Combine Dry Ingredients
    Add oat flour, baking powder, cinnamon, dried blueberries, raisins, and chopped nuts to the wet mixture. Mix until fully combined.

  5. Prepare for Baking
    Line or lightly grease a loaf pan. Pour in the batter and smooth the top. Sprinkle extra nuts on top if desired.

  6. Bake
    Bake in a preheated oven atย 180ยฐC (350ยฐF)ย forย 40โ€“45 minutes, or until a toothpick inserted in the center comes out clean.

  7. Cool & Serve
    Let the loaf cool in the pan for 10 minutes, then transfer to a wire rack. Slice and enjoy!


๐Ÿฝย Serving Suggestions

  • Serve warm with yogurt and fresh blueberries

  • Enjoy plain with tea or coffee

  • Store in the refrigerator for up to 5 days

Simple 10-Minute Prep Apple Sponge Cake

Simple 10-Minute Prep Apple Sponge Cake

This recipe is prized for its โ€œhigh riseโ€ and the way the sugar creates a slightly crunchy meringue-like top.

Ingredients

  • Apples:ย 3โ€“4 large (Tart varieties like Granny Smith or Honeycrisp work best)

  • Eggs:ย 3 large

  • Sugar:ย 200 g

  • Butter:ย 120 g (melted and slightly cooled)

  • All-Purpose Flour:ย 200 g

  • Baking Powder:ย 1 tsp

  • Vanilla Extract:ย 1 tsp

  • Cinnamon:ย 1 tsp (optional, for tossing with apples)

  • Pinch of salt


Instructions

  1. Prepare the Oven and Pan:ย Preheat your oven toย 180ยฐC (350ยฐF). Line a baking pan (approx. 9ร—9 inch or similar) with parchment paper, just like in your photo.

  2. Prepare the Apples:ย Core and slice the apples into bite-sized chunks or thin wedges. Spread them evenly across the bottom of the lined baking pan. If you like extra flavor, toss them with a little cinnamon beforehand.

  3. Mix the Batter:

    • In a large bowl, beat theย eggs and sugarย together with a mixer for about 3โ€“5 minutes until the mixture is pale, thick, and has doubled in volume. This is the secret to the โ€œhusband-approvedโ€ fluffiness!

    • Slowly pour in theย melted butterย andย vanilla, whisking gently.

    • Sift in theย flour, baking powder, and salt. Fold gently with a spatula until just combined so you donโ€™t deflate the eggs.

  4. Bake:ย Pour the batter over the apples (as shown in your image), ensuring it seeps down into the gaps. Bake forย 30โ€“40 minutes, or until a toothpick inserted into the center comes out clean and the top is golden brown.

  5. Serve:ย Let it cool for at least 10 minutes before slicing. It is excellent served warm with a scoop of vanilla ice cream.

No-Bake Peanut Butter Cheesecake Balls Recipe

No-Bake Peanut Butter Cheesecake Balls Recipe

๐Ÿฅœ Ingredients:

  • 8 oz cream cheese, softened
  • ยฝ cup creamy peanut butter
  • ยผ cup powdered sugar
  • 1 tsp vanilla extract
  • 1 cup crushed graham crackers (or crushed digestive biscuits)
  • 1 cup semi-sweet chocolate chips (for coating)
  • 1 tbsp coconut oil (optional, to thin chocolate)
  • Crushed peanuts or graham crumbs, for garnish

๐Ÿ‘ฉโ€๐Ÿณ Directions:

Mix the cheesecake base:

In a mixing bowl, combine cream cheese, peanut butter, powdered sugar, and vanilla extract. Beat until smooth and creamy.

Add texture:

Stir in crushed graham crackers until the mixture thickens and can be rolled into balls. Chill for 15โ€“20 minutes to firm up slightly.

Form balls:

Using your hands or a small cookie scoop, roll the mixture into bite-sized balls and place them on a parchment-lined tray. Freeze for 30 minutes to set.

Coat in chocolate:

Melt the chocolate chips with coconut oil (if using) until smooth. Dip each chilled ball into the chocolate, coating evenly. Return to the tray.

Add toppings & chill:

Sprinkle with crushed peanuts or graham crumbs before the chocolate sets. Refrigerate until firm, about 20 minutes.

Serve & store:

Enjoy chilled! Store leftovers in an airtight container in the refrigerator for up to 5 days or freeze for up to 1 month.

๐Ÿฝ๏ธ Nutritional Info (per ball, makes ~16):

Calories: 145

Protein: 3g

Carbohydrates: 10g

Fat: 10g

Fiber: 1g

Sugar: 7g

Sodium: 85mg

Crockpot Christmas Crack

Crockpot Christmas Crack (Chocolate Peanut Clusters)

A massive batch of sweet, salty, and crunchy holiday treats.

  • Prep time: 10 minutes

  • Cook time: 2 hours 30 minutes

  • Yield: 40โ€“50 clusters

Ingredients

  • 16 oz Salted Peanuts

  • 16 oz Unsalted Peanuts (using a mix balances the salt perfectly)

  • 12 oz bag Semi-Sweet Chocolate Chips

  • 10 oz bag Peanut Butter Chips

  • 10 oz bag White Chocolate Chips (or Vanilla Almond Bark/Wafers)

  • Holiday Sprinkles (Red, green, and white)


Instructions

  1. Layer the Peanuts: Pour both the salted and unsalted peanuts into the bottom of a 5-quart (or larger) slow cooker. Spread them out into an even layer.

  2. Add the Sweets: Layer the chips on top of the peanuts in this order:

    • Semi-sweet chocolate chips

    • Peanut butter chips

    • White chocolate chips (or wafers) on top.

    • Note: Do not stir yet! Keep the layers as they are.

  3. Low & Slow Cook: Cover with the lid and set the Crockpot to LOW. Cook for 2 hours.

  4. The First Stir: Remove the lid. Use a heavy spoon to stir everything together until the peanuts are completely coated in a smooth, uniform chocolate-peanut butter mixture.

  5. Final Melt: Replace the lid and cook on LOW for another 30 minutes. Give it one final, thorough stir.

  6. Scoop and Decorate: * Line your counter or baking sheets with parchment paper (or use mini cupcake liners for a cleaner look).

    • Drop the mixture by the tablespoon onto the paper.

    • Immediately add your Christmas sprinkles while the chocolate is still wet.

  7. Set and Cool: Allow the candy to sit at room temperature for at least 1โ€“2 hours until fully hardened. If your kitchen is warm, you can pop the trays in the fridge to speed this up.


Success Tips for the Perfect Batch

  • Avoid the “High” Setting: Chocolate is temperamental. Never use the “High” setting on your slow cooker, or the chocolate will seize and turn grainy.

  • The Condensation Trick: If your slow cooker lid tends to collect a lot of steam, place a clean tea towel or double layer of paper towels across the top of the Crockpot before putting the lid on. This prevents water droplets from falling into the chocolate (which can cause it to ruin).

  • Storage: Store these in an airtight container in a cool place. They also freeze beautifully if you want to make them weeks in advance!

Quick Jam-Swirl Sponge Cake

Quick Jam-Swirl Sponge Cake

Ingredients

  • The Batter:

    • 3 Large eggs

    • A pinch of salt

    • 150 g (4/5 cup) Sugar

    • 120 ml (1/2 cup + 2 tbsp) Milk

    • 120 ml (1/2 cup + 1 tbsp) Vegetable oil

    • 2 tsp Vanilla extract

    • 250 g (1 cup + 2/3 cup) All-purpose flour

    • 15 g (3 tsp) Baking powder

  • The Topping:

    • 150 g (approx. 1/2 cup) Jam of your choice (cherry, apricot, or strawberry work beautifully)

    • Powdered sugar for dusting


Instructions

1. Prepare Your Setup

  • Preheat your oven to 350ยฐF (180ยฐC).

  • Line a rectangular baking pan (approx. 8×11 inches) with parchment paper or grease it thoroughly with oil or butter.

2. Beat the Eggs and Sugar

  • In a large mixing bowl, combine the 3 eggs, salt, and sugar.

  • Using a hand mixer or whisk, beat the mixture for about 3โ€“5 minutes until it becomes pale, thick, and doubles in volume. This step ensures the cake is light and fluffy.

3. Add the Liquids

  • Pour in the milk, vegetable oil, and vanilla extract.

  • Mix on low speed just until combined.

4. Sift in Dry Ingredients

  • Sift the flour and baking powder into the wet mixture.

  • Gently fold or whisk the batter until smooth and no flour pockets remain. Do not overmix, as this can make the cake dense.

5. Add the Jam Swirl

  • Pour the batter into your prepared baking pan and smooth the top with a spatula.

  • Drop small spoonfuls of jam onto the surface of the batter, spacing them out evenly.

  • Use the tip of a knife or a toothpick to gently swirl the jam into the batter for a marbled effect.

6. Bake and Finish

  • Bake for 30โ€“35 minutes, or until a toothpick inserted into the center of the cake comes out clean.

  • Remove from the oven and allow it to cool in the pan for 10 minutes.

  • Once cooled, dust the top generously with powdered sugar before slicing into squares.


Pro Tip

If your jam is very thick, stir it in a small bowl with a teaspoon of warm water before adding it to the cake; this makes it much easier to create those beautiful swirls!

Chocolate Cream Dream Cake

Chocolate Cream Dream Cake

Ingredients

The Cake

  • 1 + 1/4 cups (150g) All-purpose flour

  • 1/3 cup (30g) Unsweetened cocoa powder

  • 2 tsp (8g) Baking powder

  • 1/4 tsp (1g) Salt

  • 1/2 cup (120g) Milk (room temp)

  • 1/4 cup (55g) Vegetable oil

  • 1 tsp (5g) Vanilla extract

  • 4 Large eggs (separated into yolks and whites)

  • 1 cup (200g) Granulated sugar

The Soaking Syrup

  • 1/3 cup (80g) Heavy cream

  • 2 tbsp (25g) Granulated sugar

  • 1 tbsp (6g) Unsweetened cocoa powder

  • 2/3 cup (160g) Milk

The Filling

  • 1 + 1/3 cups (200g) Milk chocolate (melted and cooled slightly)

  • 1 + 1/3 cups (300g) Cream cheese (room temp)

  • 1 cup (240g) Heavy cream (cold)

The Ganache

  • 1 cup (150g) Milk chocolate

  • 1/3 cup (80g) Heavy cream


Instructions

1. Prepare the Cake Base

  • Preheat your oven to 350ยฐF (180ยฐC). Grease and line a rectangular baking pan (approx. 9×13 inch) with parchment paper.

  • Whisk Dry Ingredients: Sift the flour, cocoa powder, baking powder, and salt together in a bowl.

  • Mix Liquids: In a separate bowl, whisk the egg yolks with the milk, oil, and vanilla extract until smooth.

  • Beat Egg Whites: In a clean bowl, beat the egg whites while gradually adding the sugar. Continue beating until stiff peaks form.

  • Combine: Gently fold the yolk mixture into the dry ingredients. Finally, gently fold in the whipped egg whites in three batches to keep the batter airy.

  • Bake: Pour into the pan and bake for 25โ€“30 minutes. Let it cool completely, then slice the cake horizontally into two even layers.

2. Make the Soaking Syrup

  • In a small saucepan, combine the heavy cream, sugar, cocoa powder, and milk.

  • Bring to a simmer over medium heat, stirring until the sugar and cocoa are dissolved.

  • Remove from heat and let it cool.

3. Prepare the Creamy Filling

  • Beat Cream Cheese: Whisk the room-temperature cream cheese until smooth and fluffy.

  • Add Chocolate: Pour in the melted milk chocolate and mix until combined.

  • Whip Cream: In a separate chilled bowl, whip the cold heavy cream until stiff peaks form.

  • Fold: Gently fold the whipped cream into the chocolate-cheese mixture until you have a uniform, light mousse.

4. Assemble the Cake

  • Place the bottom layer of the cake back into the baking pan or on a serving tray.

  • Soak: Brush or pour half of the cocoa syrup evenly over the cake layer.

  • Layer: Spread all of the creamy filling over the soaked base.

  • Top: Place the second cake layer on top and soak it with the remaining syrup. Refrigerate for at least 1 hour to set.

5. Add the Ganache

  • Heat the heavy cream in the microwave for 20 seconds (don’t let it boil).

  • Pour the warm cream over the chocolate chips/pieces. Let it sit for 1 minute, then stir until shiny and smooth.

  • Pour the ganache over the top of the chilled cake and spread evenly.


Pro Tip

For the best flavor and cleanest slices, let the cake rest in the refrigerator for at least 4 hours (or overnight) before serving. This allows the syrup to fully hydrate the sponge and the filling to firm up.

Nutty Cottage Cheese Dessert Log

Nutty Cottage Cheese Dessert Log

A creamy, nutty, and naturally sweet dessert packed with protein, healthy fats, and chewy fruits. Perfect for a wholesome treat or snack.

Prep Time: 20 minutes
Chill Time: 4โ€“6 hours (overnight recommended)
Yield: 8โ€“10 servings


Ingredients

For the Base:

  • 12.5 oz (350 g) cottage cheese, smooth or small-curd

  • 3.5 oz (100 g) sour cream (or Greek yogurt for extra protein)

  • 2.5 oz (70 g) honey (adjust to taste)

  • 1/4 tsp vanillin powder or 1 tsp pure vanilla extract

  • 0.7 oz (20 g) instant gelatin

  • 3โ€“4 tbsp water (to bloom the gelatin)

For the Mix-ins:

  • 1.8 oz (50 g) hazelnuts, toasted

  • 3.5 oz (100 g) walnuts, toasted

  • 1.5 oz (45 g) peeled pistachios

  • 3.5 oz (100 g) dried apricots, chopped

  • 3.5 oz (100 g) dates, pitted and chopped


Instructions

1. Prepare the Fruit and Nuts

  1. Chop the dried apricots and dates into small, bite-sized pieces.

  2. Toast the nuts if they are raw:

    • Place nuts in a dry skillet over medium heat.

    • Stir frequently for 3โ€“5 minutes until fragrant and lightly golden.

  3. Combine all nuts and dried fruits in a bowl and set aside.

2. Bloom the Gelatin

  1. Place the instant gelatin in a small heat-proof bowl with 3โ€“4 tablespoons of water.

  2. Let it sit for 5 minutes to absorb water and soften.

  3. Melt the gelatin gently:

    • Microwave for 10โ€“15 seconds or use a double boiler.

    • Stir until liquid and clear. Avoid boiling, which reduces gelatinโ€™s setting ability.

3. Make the Smooth Base

  1. In a large mixing bowl or blender, combine cottage cheese, sour cream, honey, and vanillin/vanilla extract.

  2. Blend until completely smooth and creamy. Use a whisk if doing by hand, ensuring no large curds remain.

  3. Gradually pour in the melted gelatin while blending or whisking continuously. Mix until fully incorporated.

4. Fold in Nuts and Fruits

  1. Add the toasted nuts and chopped dried fruits to the cheese mixture.

  2. Gently fold with a spatula until evenly distributed.

5. Mold the Dessert Log

Option 1: Using a Plastic Bottle

  1. Take a clean, empty plastic water or soda bottle and carefully cut off the top.

  2. Pour the mixture into the bottle.

  3. Tap firmly on the counter to remove air bubbles and settle the mixture.

Option 2: Using a Loaf Pan

  1. Line a standard loaf pan with plastic wrap, leaving enough overhang on the sides.

  2. Pour the mixture into the pan and tap gently to remove air pockets.

6. Chill Until Firm

  1. Cover with plastic wrap and refrigerate for at least 4โ€“6 hours (overnight is best) until fully set.

7. Serve

  1. For the bottle: Carefully cut the plastic down the side and peel it away.

  2. For the loaf pan: Lift the dessert out using the overhanging plastic wrap.

  3. Slice into thick rounds using a sharp knife. Serve chilled.


Tips for Best Results

  • Use smooth cottage cheese for a creamier texture; small-curd works too but may be slightly chunkier.

  • Adjust honey depending on desired sweetness. You can replace part of it with maple syrup or date syrup.

  • For extra flavor, lightly toast the dried fruits in a dry skillet for 1โ€“2 minutes.

  • Garnish slices with extra chopped nuts or a drizzle of honey before serving.

Chocolate Peanut Butter Trifle

๐Ÿจ Chocolate Peanut Butter Trifle
๐Ÿ“ Ingredients

For the Cake Layer:

1 chocolate cake (baked and cooled โ€“ box mix or homemade)

Crumbled into chunks

For the Peanut Butter Layer:

1 cup creamy peanut butter

1 cup powdered sugar

1 cup cream cheese, softened

1 cup cold milk

1 packet (3.4 oz / 100 g) instant vanilla pudding mix

For the Whipped Layer:

2 cups heavy whipping cream

3 tbsp powdered sugar

1 tsp vanilla extract

For Topping:

1 cup chocolate chips

ยฝ cup chopped peanut butter cups (or caramel chocolates)

ยฝ cup crushed cookies or brownie crumbs

๐Ÿง Instructions
Step 1: Make the Peanut Butter Cream

In a large bowl:

Beat peanut butter, cream cheese, and powdered sugar until smooth

Add milk and pudding mix

Beat again until thick and creamy
Set aside.

Step 2: Make the Whipped Cream

Beat heavy cream with powdered sugar and vanilla until stiff peaks form

Chill in refrigerator until ready to use

Step 3: Assemble the Trifle

In a glass bowl or trifle dish:

1๏ธโƒฃ First Layer:
Spread peanut butter cream at the bottom

2๏ธโƒฃ Second Layer:
Add crumbled chocolate cake

3๏ธโƒฃ Third Layer:
Spread whipped cream

๐Ÿ‘‰ Repeat layers until bowl is full
(Finish with whipped cream on top)

Step 4: Decorate

Top with:

Chocolate chips

Chopped peanut butter cups

Cookie crumbs

Step 5: Chill

Refrigerate at least 3โ€“4 hours (overnight is best)
This helps flavors blend beautifully.

๐Ÿฝ Serving Tips

Serve cold

Use a big spoon to scoop all layers

Keep refrigerated

Decadent Frozen Chocolate Peanut Bars

Decadent Frozen Chocolate Peanut Bars

Prep time: 20 mins | Freezing time: 2โ€“3 hours | Yield: 6โ€“8 bars

Ingredients

The Creamy Center

  • 300g cottage cheese: (or curd cheese/cream cheese for a smoother finish).

  • 40g coconut or cocoa butter: (regular butter works as a substitute).

  • 40g honey: Adjust to your preferred sweetness.

  • 1 tsp vanilla extract

  • 20g cocoa powder

The Crunchy Coating

  • 160g dark chocolate: High-quality chocolate melts most evenly.

  • 40g peanuts: Ground or finely chopped.


Instructions

1. Blend the Filling

In a food processor or high-speed blender, combine the cottage cheese, melted butter (coconut, cocoa, or regular), honey, vanilla extract, and cocoa powder. Blend until the mixture is completely smooth and no lumps from the cheese remain.

2. Shape the Bars

Pour the mixture into silicone bar molds. If you do not have molds, you can pour the mixture into a parchment-lined square pan and cut them into bars once partially frozen. Place in the freezer for at least 2 hours or until they are firm enough to handle.

3. Prepare the Coating

While the bars are freezing, melt the dark chocolate in a microwave-safe bowl in 30-second intervals or using a double boiler. Once smooth, stir in the ground peanuts. Pour the chocolate mixture into a tall glass; this makes dipping the bars much easier and ensures an even coat.

4. Dip and Set

Remove the frozen bars from their molds. Working quickly, dip each bar into the chocolate-peanut mixture until fully coated. Because the bars are frozen, the chocolate will set almost instantly.

5. Storage

Place the finished bars back in the freezer for another 15โ€“20 minutes to fully set. Store them in an airtight container in the freezer.


Pro Tips for Success

  • Texture Secret: If using cottage cheese with large curds, pulsing the cheese by itself first before adding the other ingredients ensures the smoothest possible texture.

  • Butter Choice: Using coconut or cocoa butter will give the filling a firmer, “snap” quality when bitten into compared to regular butter.

  • Peanut Prep: Toast your peanuts slightly before grinding them to significantly enhance the nutty aroma of the coating.


Nutritional Highlight (Per Bar)

  • High Protein: Thanks to the cottage cheese base.

  • Antioxidants: Provided by the dark chocolate and cocoa powder.

  • Healthy Fats: From the peanuts and coconut butter.

Quick Strawberry Jam-Filled Muffins

Quick Strawberry Jam-Filled Muffins

Prep Time: 15 minutes
Bake Time: 20โ€“25 minutes
Yield: 12 muffins

These muffins are soft and moist with a fruity jam center and a lightly crunchy almond topping. They are ideal for breakfast, snacks, or dessert.


๐Ÿ“ Ingredients

  • 2 large eggs

  • 100 g sugar

  • 8 g vanilla sugar (or 1 teaspoon vanilla extract)

  • Pinch of salt

  • 125 g vanilla yogurt

  • 50 ml milk

  • 100 ml vegetable or sunflower oil

  • 200 g all-purpose flour

  • 8 g baking powder

  • Strawberry jam (for filling and topping)

  • Chopped almonds (for topping)


๐Ÿ‘ฉโ€๐Ÿณ Instructions

Step 1: Prepare the Oven and Pan

Preheat oven to 350ยฐF (175ยฐC).
Line a muffin tin with paper liners or lightly grease each cup.


Step 2: Mix the Eggs and Sugar

In a large bowl:

  • Add eggs, sugar, vanilla sugar, and salt.

  • Whisk until the mixture becomes pale and slightly thick.


Step 3: Add the Liquid Ingredients

Stir in:

  • Vanilla yogurt

  • Milk

  • Oil

Whisk until the mixture is smooth and evenly blended.


Step 4: Add the Dry Ingredients

Sift together:

  • Flour

  • Baking powder

Add them to the wet mixture.
Fold gently with a spatula until just combined.
Do not mix too much, as this can affect the texture.


Step 5: Fill the Muffin Cups

  • Spoon batter into each cup until half full.

  • Add 1 teaspoon strawberry jam in the center of each.

  • Cover with more batter until cups are about ยพ full.


Step 6: Add Toppings

  • Sprinkle chopped almonds on top of each muffin.

  • Add a small dot of jam on the top for appearance.


Step 7: Bake

Bake for 20โ€“25 minutes, or until:

  • The tops are lightly golden

  • A toothpick inserted into the muffin (not the jam) comes out clean


Step 8: Cool

Let muffins cool in the pan for 5 minutes.
Transfer to a wire rack to cool completely or serve slightly warm.


๐ŸŒŸ Tips for Best Results

  • Yogurt: Vanilla or plain yogurt works well.

  • Jam options: Strawberry, raspberry, apricot, or mixed berry can be used.

  • Topping alternative: Use chopped walnuts or omit nuts if preferred.

  • Do not overfill: This prevents overflow during baking.


๐Ÿ“ฆ Storage

  • Store in an airtight container at room temperature for up to 3 days.

  • Refrigerate for up to 5 days.