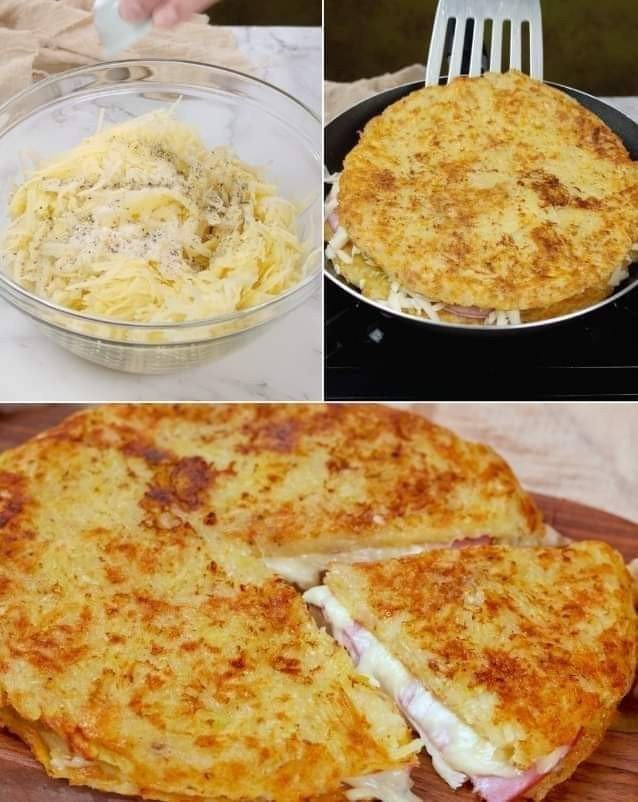
Mary Berry–Style Boiled Fruit Cake

Mary Berry–Style Boiled Fruit Cake

A classic, moist fruit loaf made with a simple boiling method

Why You’ll Love This Cake

This traditional boiled fruit cake is loved for its deep flavor, soft texture, and easy preparation. The gentle simmering step plumps the dried fruit and blends the flavors beautifully, resulting in a cake that improves with time.

  • Naturally moist from simmered fruit

  • Simple method — no mixer needed

  • Perfect for make-ahead baking

  • Great for tea time, gifting, or celebrations

  • Customizable with fruit, citrus, or nuts


Ingredients

For the Cake

  • 225 g (1 cup) unsalted butter

  • 225 g (1 cup) soft brown sugar

  • 225 g (1½ cups) mixed dried fruit
    (raisins, currants, sultanas, or chopped dates)

  • Zest and juice of 1 orange

  • 1 teaspoon ground cinnamon

  • 1 teaspoon mixed spice

  • 2 large eggs, lightly beaten

  • 225 g (1¾ cups) self-raising flour

Optional flavor boost (non-alcoholic):

  • 1 teaspoon orange extract or vanilla extract


Equipment Needed

  • Medium saucepan

  • Mixing spoon

  • 900 g (2 lb) loaf tin

  • Baking parchment


Step-by-Step Instructions

Step 1: Prepare the Oven and Tin

  • Preheat your oven to 160°C (325°F) or 140°C fan

  • Grease and line a 900 g loaf tin with parchment paper


Step 2: Boil the Fruit Mixture

  • Place the butter in a medium saucepan over low heat

  • Add the brown sugar, dried fruit, orange zest, orange juice, cinnamon, and mixed spice

  • Stir gently until the butter melts

  • Bring to a gentle simmer and cook for 5 minutes, stirring occasionally

  • Remove from heat and allow to cool for 10–15 minutes

This step softens the fruit and evenly distributes sweetness throughout the cake.


Step 3: Make the Batter

  • Once the mixture is warm (not hot), stir in the beaten eggs

  • Add the optional extract, if using

  • Sift in the self-raising flour

  • Fold gently until smooth and fully combined


Step 4: Bake

  • Spoon the batter into the prepared loaf tin

  • Smooth the top evenly

  • Bake for 1½ to 1¾ hours, or until a skewer inserted in the center comes out clean

  • If the top browns too quickly, loosely cover with foil during the final baking time


Step 5: Cool and Rest

  • Cool in the tin for 10 minutes

  • Transfer to a wire rack and cool completely

  • Wrap the cake in parchment and store in an airtight container

  • Resting the cake for 1–2 days improves flavor and texture


Tips for Best Results

  • Use fresh spices for the best aroma

  • Chop larger dried fruits for even distribution

  • Do not rush cooling — the structure sets as it cools

  • This cake slices best the next day


Variations

  • Nut version: Add ½ cup chopped walnuts or almonds

  • Fruit swap: Use dried apricots, cranberries, or figs

  • Citrus twist: Add lemon zest along with orange

  • Festive style: Add a small amount of candied peel


Storage

  • Room temperature (airtight): up to 7 days

  • Refrigerator: up to 2 weeks

  • Freezer: up to 3 months (wrap well)


Serving Suggestions

  • Enjoy with tea or coffee

  • Serve lightly warmed with butter

  • Pair with fresh fruit or mild cheese

  • Slice thinly for afternoon snacks

Sherry’s Blueberry Cream Cheese Crumb Cake

Sherry’s Blueberry Cream Cheese Crumb Cake

A soft vanilla cake layered with creamy filling, juicy berries, and a buttery crumb topping

Introduction

This Blueberry Cream Cheese Crumb Cake is a comforting, bakery-style dessert that’s perfect for sharing. A tender vanilla cake forms the base, topped with a smooth cream cheese layer, bursts of blueberries, and a golden cinnamon crumb topping. It’s ideal for brunch tables, afternoon coffee breaks, or as a make-ahead dessert for gatherings.


⏱️ Time & Yield

  • Preparation Time: 25 minutes

  • Baking Time: 35–50 minutes (depending on pan size)

  • Cooling Time: 1 hour

  • Total Time: About 2 hours

  • Servings: 12–15 slices


🧾 Ingredients

Cake Batter

(Fits a 9×13-inch pan or an 8-inch square dish)

  • ½ cup unsalted butter, softened

  • 1 cup granulated sugar

  • 2 large eggs

  • 1 teaspoon vanilla extract

  • 2 cups all-purpose flour

  • 2 teaspoons baking powder

  • ½ teaspoon salt

  • ½ cup milk

  • 1½ cups fresh or frozen blueberries


Cream Cheese Layer

  • 8 oz cream cheese, softened

  • ¼ cup granulated sugar

  • 1 egg

  • ½ teaspoon vanilla extract


Crumb Topping

  • ½ cup all-purpose flour

  • ¼ cup brown sugar

  • ¼ cup cold butter, cubed

  • ½ teaspoon ground cinnamon


👩‍🍳 Step-by-Step Instructions

1. Prepare the Pan and Oven

Preheat your oven to 350°F (175°C).
Grease and lightly flour a 9×13-inch baking pan or an 8-inch square dish. Set aside.


2. Make the Cake Batter

In a large mixing bowl, beat the softened butter and granulated sugar together until light and fluffy.

Add the eggs one at a time, mixing well after each addition. Stir in the vanilla extract.

In a separate bowl, whisk together the flour, baking powder, and salt.

Add the dry ingredients to the butter mixture in two additions, alternating with the milk. Mix gently just until combined.

Carefully fold in the blueberries, taking care not to crush them.

Spread the batter evenly into the prepared pan.


3. Prepare the Cream Cheese Layer

In a medium bowl, beat the cream cheese until smooth.

Add the sugar, egg, and vanilla extract. Mix until creamy and well blended.

Spoon the cream cheese mixture over the cake batter. Use a knife to gently swirl if desired, or leave it layered.


4. Make the Crumb Topping

In a small bowl, combine the flour, brown sugar, and cinnamon.

Add the cold butter cubes and work them into the mixture using your fingers or a pastry cutter until small clumps form.

Sprinkle the crumb topping evenly over the cream cheese layer.


5. Bake

Bake uncovered:

  • 45–50 minutes for a 9×13-inch pan

  • 35–40 minutes for an 8-inch square pan

The top should be lightly golden and set.

Remove from the oven and allow the cake to cool completely before slicing. This helps the layers set neatly.


🍽️ Serving Suggestions

  • Serve at room temperature or slightly chilled

  • Pair with tea or coffee

  • Dust lightly with powdered sugar before serving if desired


💡 Helpful Tips & Variations

  • Nutty crunch: Add chopped walnuts or pecans to the crumb topping

  • Citrus touch: Stir 1 teaspoon lemon zest into the batter for added brightness

  • Berry swap: Use raspberries or blackberries in place of blueberries

  • Gentle mixing: Stir just until combined for a soft, tender cake


🧊 Storage

  • Store covered in the refrigerator for up to 3 days

  • Individual slices may be wrapped and frozen for up to 3 months

  • Thaw overnight in the refrigerator before serving

Ginger & Turmeric Honey Tonic

Ginger & Turmeric Honey Tonic

A flavorful homemade concentrate perfect for stirring into warm water or tea

Introduction

This Ginger & Turmeric Honey Tonic is a vibrant, golden infusion made with fresh roots, citrus, and raw honey. The ingredients slowly blend together in the refrigerator, creating a fragrant syrup with a balanced mix of warmth, gentle spice, and natural sweetness. It’s easy to prepare, stores well, and can be enjoyed daily as a comforting addition to your routine.


Ingredients

  • Fresh Ginger Root: 3–4 inches, washed, peeled if desired, and thinly sliced

  • Fresh Turmeric Root: 2–3 inches, washed, peeled if desired, and thinly sliced

  • Lemons: 2–3 whole lemons, thinly sliced into rounds or freshly juiced

  • Black Peppercorns: ½ teaspoon, whole or lightly crushed

  • Raw Honey: About 1 cup, or enough to fully cover and submerge all ingredients

Tip: Black pepper adds depth of flavor and complements the turmeric beautifully.


Step-by-Step Instructions

1. Prepare the Fresh Roots

Rinse the ginger and turmeric thoroughly under cool water. If you prefer, peel them using the edge of a spoon. Slice both roots into thin, even coins to help release their natural flavors into the honey.

Note: Turmeric may stain hands and surfaces—using gloves or parchment paper can help.


2. Prepare the Lemons

Wash the lemons well. Slice them into thin rounds, removing any visible seeds.
Alternatively, you may juice the lemons if you prefer a smoother tonic without fruit slices.


3. Layer the Ingredients

In a clean, dry glass mason jar:

  • Add a layer of ginger slices

  • Follow with turmeric slices

  • Add lemon slices or a portion of lemon juice
    Repeat the layers until all ingredients are used.


4. Add Black Pepper

Sprinkle the black peppercorns evenly throughout the layers to distribute flavor.


5. Cover with Honey

Slowly pour the raw honey over the layered ingredients.
Use a spoon or butter knife to gently press the ingredients down, releasing air bubbles and ensuring everything is fully coated and submerged in honey.


6. Seal and Infuse

Close the jar tightly with a lid.
Place it in the refrigerator and allow it to rest for at least 24 hours. Over time, the honey will become thinner as it blends with the natural juices from the roots and lemon.


7. Storage

Store the jar in the refrigerator.
For best quality and flavor, use within 2–3 weeks. Always use a clean spoon when serving.


How to Enjoy

  • Warm Drink: Stir 1–2 tablespoons of the infused honey syrup into a mug of warm (not boiling) water.

  • Tea Booster: Add to herbal or green tea for extra warmth and aroma.

  • Flavor Add-In: Spoon a little over oatmeal, yogurt, or warm lemon water.

  • Optional: Add a few slices of the infused ginger or turmeric for a stronger taste.


Helpful Tips

  • Avoid boiling water to preserve the natural flavor of the honey

  • Adjust sweetness by adding more or less honey

  • Shake or gently stir the jar every few days to redistribute flavors

No-Sugar Healthy Oatmeal Cookies

No-Sugar Healthy Oatmeal Cookies

Naturally Sweet • Wholesome • Easy to Make

These no-sugar oatmeal cookies are gently sweetened with fruit and stevia, making them a great option for everyday snacking. They are soft, lightly chewy, and full of natural texture from oats, nuts, and dried fruit. No refined sugar, no butter, and no flour are needed.

Prep Time

10 minutes

Bake Time

15–20 minutes

Yield

8–10 cookies


Ingredients

  • 1 cup (90 g) rolled oats

  • 50 g oat flakes (for added texture)

  • 1 medium apple, peeled, cored, and finely diced

  • 1 ripe banana

  • 80 g nuts (almonds, walnuts, or pecans), roughly chopped

  • 50 g dried cranberries

  • 1 tablespoon stevia (adjust to taste)

  • 1 tablespoon sesame seeds

  • 1 teaspoon vanillin or vanilla powder (optional)


Instructions

1. Prepare the Oven

Preheat your oven to 350°F (180°C).
Line a baking sheet with parchment paper or lightly grease it.

2. Mash the Banana

Place the banana in a large mixing bowl and mash thoroughly with a fork until smooth and creamy. This will act as the main binder for the cookies.

3. Combine the Base

Add the diced apple, rolled oats, oat flakes, and vanillin (if using) to the mashed banana.
Stir well until everything is evenly coated and the mixture begins to hold together.

4. Add Texture and Flavor

Fold in the chopped nuts, dried cranberries, stevia, and sesame seeds.
Mix gently until fully combined. The mixture should be thick and slightly sticky. If it feels too dry, add 1–2 teaspoons of water.

5. Shape the Cookies

Scoop about 2 tablespoons of the mixture for each cookie.
Roll gently into a ball, then flatten slightly into a thick disc.
Place cookies on the prepared baking sheet, leaving a little space between each one.

6. Bake

Bake for 15–20 minutes, or until the edges turn lightly golden and the cookies feel set when touched.

7. Cool

Remove from the oven and let the cookies cool on the baking sheet for 5 minutes, then transfer to a plate or cooling rack.
They will firm up more as they cool.


Helpful Tips

  • For softer cookies, bake closer to 15 minutes.

  • For firmer, slightly crisp edges, bake closer to 20 minutes.

  • You can replace cranberries with raisins or chopped dates if preferred.

  • Store cookies in an airtight container at room temperature for up to 2 days, or refrigerate for up to 5 days.

Carrot Cake with Cream Cheese Frosting

Carrot Cake with Cream Cheese Frosting

Prep Time: 25 minutes
Bake Time: 25–35 minutes
Cooling & Assembly: 60 minutes
Yield: 1 two-layer 8-inch cake or one 9×13-inch cake

This carrot cake has a moist crumb, balanced spice flavor, and a smooth cream cheese frosting. It is suitable for gatherings, celebrations, or everyday desserts.


Ingredients

For the Carrot Cake

  • 2 cups (250 g) all-purpose flour

  • 1½ cups (300 g) granulated sugar or brown sugar

  • 1 teaspoon baking powder

  • 1 teaspoon baking soda

  • ½ teaspoon salt

  • 1 tablespoon ground cinnamon

  • ½ teaspoon ground nutmeg

  • ½ teaspoon ground ginger

  • ¼ teaspoon ground cloves (optional)

  • 3 large eggs, room temperature

  • ¾ cup (180 ml) vegetable oil

  • ½ cup (120 ml) buttermilk or milk

  • 1 teaspoon vanilla extract

  • 2½ cups (260 g) finely grated carrots

  • ½ cup chopped walnuts or pecans (optional)

  • ½ cup raisins, sultanas, or dried cranberries (optional)

  • Zest of 1 orange (optional)


For the Cream Cheese Frosting

  • 200 g cream cheese, softened

  • ½ cup (113 g) unsalted butter, softened

  • 2½ cups (300 g) powdered sugar

  • 1 teaspoon vanilla extract

  • ½ teaspoon orange zest (optional)


Detailed Instructions

1. Prepare the Oven and Pans

Preheat the oven to 350°F (175°C).

Grease and line:

  • Two 8-inch round cake pans, or

  • One 9×13-inch baking pan

Set aside.


2. Mix Dry Ingredients

In a large bowl, whisk together:

  • Flour

  • Sugar

  • Baking powder

  • Baking soda

  • Salt

  • Cinnamon

  • Nutmeg

  • Ginger

  • Cloves

Whisk until evenly combined and free of lumps.


3. Mix Wet Ingredients

In a separate bowl, whisk together:

  • Eggs

  • Vegetable oil

  • Buttermilk

  • Vanilla extract

Mix until smooth and fully combined.


4. Combine Batter

Pour the wet ingredients into the dry ingredients.

Using a spatula, gently fold until just combined.

Add:

  • Grated carrots

  • Nuts (if using)

  • Dried fruit (if using)

  • Orange zest

Fold gently. Do not overmix, as this can affect texture.


5. Bake

Divide the batter evenly between prepared pans.

Bake for 25–35 minutes, or until:

  • The center springs back lightly when touched

  • A toothpick inserted in the center comes out clean

Remove from the oven and allow cakes to cool in pans for 10 minutes. Transfer to a wire rack and cool completely before frosting.


Cream Cheese Frosting

6. Prepare the Frosting

In a large bowl, beat the softened cream cheese and butter until smooth and creamy.

Gradually add powdered sugar, mixing on low speed until incorporated.

Add vanilla extract and orange zest (if using).

Increase speed and beat until light and smooth.


7. Assemble the Cake

If using layered pans:

  • Place one cake layer on a serving plate

  • Spread frosting evenly on top

  • Place the second layer on top

Frost the top and sides evenly.

For a sheet cake:

  • Spread frosting evenly over the cooled cake


Optional Garnishes

  • Chopped nuts

  • Dried fruit

  • Thin carrot curls

  • Light dusting of powdered sugar


Storage

  • Store refrigerated in an airtight container for 3–4 days

  • Bring to room temperature before serving

  • Cake layers can be frozen (unfrosted) for up to 2 months

Homemade White Bread

Homemade White Bread

Soft, fluffy loaf with a tender golden crust

Prep Time: 20 minutes
Rise Time: 1½–2½ hours
Bake Time: 30–35 minutes
Total Time: About 3 hours
Yield: 1 standard loaf

This homemade white bread is light, soft, and versatile. It works well for sandwiches, toast, or serving warm with butter. The recipe uses simple pantry ingredients and straightforward techniques suitable for beginners.


Ingredients

For the Bread

  • 4 cups all-purpose flour

  • 2 teaspoons instant yeast

  • 2 teaspoons salt

  • 2 tablespoons sugar

  • 2 tablespoons unsalted butter, softened

  • 1½ cups warm water (about 105–110°F / 40–43°C)

Optional Topping

  • 1 tablespoon milk

  • 1 tablespoon unsalted butter, melted


Step-by-Step Instructions

1. Activate the Yeast

In a small bowl, combine the warm water, sugar, and yeast. Stir gently and let sit for 5–10 minutes, until the mixture becomes foamy. This indicates the yeast is active.


2. Prepare the Dough

In a large mixing bowl, add:

  • Flour

  • Salt

  • Softened butter

Pour in the yeast mixture. Mix until a shaggy dough forms.

Transfer the dough to a lightly floured surface and knead for 8–10 minutes, until smooth, elastic, and slightly tacky but not sticky.

(If using a stand mixer, knead with a dough hook on medium speed for 6–7 minutes.)


3. First Rise

Lightly grease a clean bowl and place the dough inside, turning once to coat. Cover with a clean kitchen towel or plastic wrap.

Let rise in a warm, draft-free place for 1–2 hours, or until doubled in size.


4. Shape the Loaf

Gently press the dough to release excess air. Shape it into a loaf by rolling it tightly and pinching the seam closed.

Place the shaped dough seam-side down into a greased 9 × 5-inch loaf pan.


5. Second Rise

Cover the pan and allow the dough to rise again for 30–45 minutes, until it rises slightly above the edge of the pan.


6. Preheat the Oven

Preheat oven to 375°F (190°C).

If using the topping, mix the milk and melted butter in a small bowl.


7. Bake

Brush the top of the loaf with the milk-butter mixture if desired.

Bake for 30–35 minutes, until:

  • The top is golden brown

  • The loaf sounds hollow when tapped

For accuracy, the internal temperature should reach 190–200°F (88–93°C).


8. Cool

Remove the bread from the pan and place it on a wire rack. Allow to cool completely before slicing to ensure the best texture.


Storage

  • Store at room temperature in an airtight container for 2–3 days

  • Refrigeration is not recommended

  • Freeze sliced bread for up to 2 months


Helpful Tips

  • Warm water should not be hot, as high heat can damage yeast.

  • For a softer crust, brush the loaf with butter after baking.

  • Measure flour accurately by spooning into the cup and leveling off.

Italian Lemon Yogurt Cake (Sugar-Free)

Italian Lemon Yogurt Cake (Sugar-Free)

Moist, fragrant, and naturally sweetened

Prep Time: 15 minutes
Bake Time: 45–50 minutes
Total Time: 1 hour
Yield: 1 loaf (8–10 slices)

This Italian-style lemon yogurt cake is light, moist, and full of bright citrus flavor. It’s sweetened with stevia instead of refined sugar, making it a better option for those reducing sugar intake while still enjoying a classic homemade cake.


Ingredients

Dry Ingredients

  • 1½ cups all-purpose flour

  • 2 teaspoons baking powder

  • ½ teaspoon kosher salt

Wet Ingredients

  • 1 cup plain coconut yogurt (or whole milk yogurt)

  • Stevia powder, to taste
    (use the amount equivalent to ¾–1 cup sugar, depending on brand strength)

  • 3 large eggs

  • 2 teaspoons finely grated lemon zest (from about 2 lemons)

  • ⅓ cup freshly squeezed lemon juice

  • ½ teaspoon pure vanilla extract

  • ½ cup olive oil

Lemon Soaking Syrup (Sugar-Free)

  • ¼ cup lemon juice

  • Stevia powder, equivalent to ¼ cup sugar

Sugar-Free Lemon Glaze (Optional)

  • Juice of 1 lemon

  • Powdered stevia sweetener, to taste
    (or sugar-free confectioner’s sweetener blend)


Step-by-Step Instructions

1. Prepare the Pan

Preheat oven to 350°F (180°C).
Grease an 8½ × 4¼ × 2½-inch loaf pan and line the bottom with parchment paper, or lightly coat with baking spray.


2. Mix Dry Ingredients

In a large bowl, sift together:

  • Flour

  • Baking powder

  • Salt

Set aside.


3. Mix Wet Ingredients

In a separate bowl, whisk together:

  • Yogurt

  • Stevia powder

  • Eggs

  • Lemon zest

  • Lemon juice

  • Vanilla extract

Whisk until smooth and well combined.


4. Combine Batter

Gradually whisk the dry ingredients into the wet mixture until just combined.
Do not overmix.


5. Add Oil

Gently fold in the olive oil using a spatula until fully incorporated.
The batter should be smooth and slightly thick.


6. Bake

Pour the batter into the prepared loaf pan and smooth the top.

Bake for 45–50 minutes, or until a toothpick inserted into the center comes out clean.


7. Prepare the Lemon Syrup

While the cake bakes, combine:

  • ¼ cup lemon juice

  • Stevia powder

Heat gently in a small saucepan just until dissolved. Do not boil. Set aside.


8. Soak the Cake

Allow the cake to cool in the pan for 10 minutes.
While still warm, slowly pour the lemon syrup over the cake so it absorbs evenly.

Let the cake cool completely.


9. Prepare the Sugar-Free Glaze (Optional)

Mix powdered stevia with lemon juice until a pourable glaze forms.
Drizzle over the cooled cake.

Allow glaze to set for about 1 hour before slicing.


Tips for Best Results

  • Use fine powdered stevia for smooth texture.

  • Olive oil gives authentic Italian flavor; use light olive oil if preferred.

  • For extra moisture, wrap the cooled cake and rest overnight before serving.

  • Skip the glaze for a lighter, breakfast-style cake.


Storage

  • Store covered at room temperature for 2 days

  • Refrigerate for up to 5 days

  • Freeze slices for up to 2 months

Egg Muffins – Quick & Nutritious Breakfast

Egg Muffins – Quick & Nutritious Breakfast

High in protein, low in carbs, and fully customizable

Prep Time: 10 minutes
Cook Time: 18–22 minutes
Total Time: 30 minutes
Yield: 6 muffins

Egg muffins are a versatile breakfast or snack option. You can add your favorite vegetables, meats, or cheeses, making them ideal for low-carb, keto, or meal-prep-friendly diets.


Ingredients

  • 6 large eggs

  • ¼ cup (60 ml) milk (or unsweetened almond/oat milk for dairy-free)

  • ½ cup shredded cheese (cheddar, feta, or your choice; optional for dairy-free)

  • ½ cup chopped vegetables (bell peppers, spinach, green onions, mushrooms, zucchini, etc.)

  • ¼ cup cooked bacon or ham (optional)

  • Salt and pepper to taste

  • ½ teaspoon garlic powder (optional)

  • ½ teaspoon paprika (optional)


Step-by-Step Instructions

1. Preheat the Oven

Preheat your oven to 375°F (190°C).
Lightly grease a 6-cup muffin tin with cooking spray, oil, or butter. Silicone muffin cups can also be used.


2. Prepare Ingredients

  • Chop your vegetables into small pieces.

  • Dice cooked bacon or ham if using.

  • Pre-sauté watery vegetables (like mushrooms or spinach) for 2–3 minutes to prevent soggy muffins.


3. Whisk the Eggs

In a large bowl, whisk together the eggs, milk, salt, pepper, garlic powder, and paprika until smooth and slightly frothy.
This ensures fluffy muffins with evenly distributed seasoning.


4. Assemble the Muffins

  • Divide the chopped vegetables and cooked meat evenly among the muffin cups.

  • Pour the egg mixture over the fillings, filling each cup about ¾ full.

  • Top each with shredded cheese, if using.


5. Bake

Place the muffin tin in the preheated oven.
Bake for 18–22 minutes, or until the egg muffins are set and lightly golden on top.
A toothpick inserted in the center should come out clean.


6. Cool and Serve

  • Allow the muffins to cool for a few minutes before removing them from the tin.

  • Serve warm, or store for meal prep.


Tips for Perfect Egg Muffins

  • Grease Well: Prevents sticking; silicone cups work best.

  • Whisk Thoroughly: Ensures light, fluffy muffins.

  • Do Not Overfill: Fill ¾ full to prevent overflow.

  • Cool Slightly Before Removing: Prevents breaking.

  • Storage & Reheating: Refrigerate in an airtight container for up to 5 days; microwave for 30–45 seconds to reheat.

  • Freezing: Let muffins cool completely, then freeze in airtight containers or freezer bags for up to 3 months. Reheat 1–2 minutes in the microwave.

Garlic, Lemon, and Honey Drink for Respiratory Comfort

Garlic, Lemon, and Honey Drink for Respiratory Comfort

A natural remedy to soothe the throat, reduce coughing, and support lung health

Prep Time: 5 minutes
Cook/Steep Time: 5 minutes
Yield: 1–2 servings

This simple drink combines garlic, lemon, and honey to create a soothing beverage that may help reduce coughing, clear mucus, and support respiratory wellness. It is a gentle, natural option that can be prepared easily at home.


Ingredients

  • 2 cloves garlic, peeled and crushed
    Garlic has natural antibacterial and antiviral properties that may support respiratory health.

  • 1 lemon, juiced
    Rich in vitamin C and antioxidants to support the immune system.

  • 1 tablespoon honey (preferably raw or organic)
    Soothes the throat and adds mild antimicrobial properties.

  • 2 cups water


Step-by-Step Instructions

1. Prepare the Ingredients

  • Peel and crush the garlic cloves to release their natural oils.

  • Juice the lemon carefully, removing any seeds.


2. Boil the Water

  • In a small pot, bring 2 cups of water to a gentle boil.


3. Steep Garlic and Lemon

  • Add the crushed garlic and lemon juice to the boiling water.

  • Reduce the heat to low and let it simmer for 5 minutes to extract the beneficial compounds from the garlic and lemon.


4. Strain and Sweeten

  • Pour the liquid through a strainer into a cup to remove the garlic pieces (optional: you may leave them in for a stronger flavor).

  • Stir in 1 tablespoon of honey while the liquid is still warm until fully dissolved.


5. Serve

  • Drink the beverage warm.

  • Recommended intake: 1–2 cups per day, for up to three days.


Notes and Tips

  • Gentle on the Stomach: If you have a sensitive stomach, reduce the garlic to 1 clove or drink the mixture with food.

  • Stronger Flavor: Leaving the garlic in the drink will intensify the flavor and medicinal potency.

  • Adjust Sweetness: You can add extra honey if desired, but keep in mind it increases sugar content.

  • Storage: Best consumed fresh. Any leftovers can be stored in the refrigerator for up to 24 hours and warmed before drinking.


Benefits

  • Respiratory Support: Helps soothe the throat, reduce coughing, and may loosen mucus.

  • Immune Boosting: Garlic and lemon provide antioxidants and compounds that support the immune system.

  • Natural Relief: Offers a simple, chemical-free way to ease mild bronchial discomfort.


Safety and Considerations

  • Not a Cure: This drink helps relieve symptoms but does not cure bronchitis. Consult a healthcare professional if symptoms are severe or persistent.

  • Allergies: Ensure you are not allergic to garlic, honey, or citrus before consuming.

  • Children: Honey should not be given to children under 1 year old.

Homemade 3-Ingredient Strawberry Ice Cream

Homemade 3-Ingredient Strawberry Ice Cream

No gelatin, no ice cream machine—just creamy, fruity goodness

Prep Time: 10 minutes
Freeze Time: 4–6 hours
Yield: About 4–6 servings

This recipe is simple, naturally creamy, and customizable. You can swap strawberries for other fruits, chocolate chips, or even cookie pieces.


Ingredients

  • 500 ml (2 cups) whipping cream
    Use full-fat cream for best results; it creates a rich, creamy texture.

  • 150 g (2/3 cup) sweetened condensed milk
    Provides sweetness and helps the ice cream hold its shape without gelatin.

  • 100 g (3/4 cup) fresh strawberries, diced
    Adds natural fruit flavor. You can substitute raspberries, blueberries, or mango if desired.


Step-by-Step Instructions

1. Whip the Cream

Pour the cold whipping cream into a large mixing bowl.
Using an electric mixer, whip on medium-high speed until stiff peaks form.

  • Stiff peaks mean the cream holds its shape when the beaters are lifted.

  • Do not overwhip, or the cream may turn into butter.


2. Fold in the Condensed Milk

Gently add the sweetened condensed milk to the whipped cream.
Use a spatula to fold it in carefully, preserving the air in the whipped cream.
The mixture should become smooth and slightly glossy.


3. Add the Fruit

Fold in the diced strawberries (or your chosen fruit) until evenly distributed.
Be gentle to keep the whipped cream light and airy.


4. Transfer and Freeze

Pour the mixture into a freezer-safe container.
Smooth the top with a spatula and cover the container with a lid or plastic wrap.

Freeze for at least 4 hours, or until firm.
For best flavor, you can refrigerate the mixture for 1–2 hours before freezing to let the flavors meld, but this step is optional.


5. Serve

Scoop the ice cream into bowls and enjoy immediately.
Optional toppings: fresh berries, chocolate shavings, or a drizzle of fruit syrup.


Tips & Variations

  • Fruit Variations: Mango, banana, or mixed berries all work well.

  • Chocolate Strawberry: Fold in 50 g of finely chopped chocolate with the fruit.

  • Nutty Option: Add 2–3 tablespoons chopped nuts for texture.

  • Storage: Keep covered in the freezer for up to 7 days. For softer scooping, let ice cream sit at room temperature for 5 minutes before serving.

Lemon Crinkle Cookies

Lemon Crinkle Cookies

Soft, bright cookies with a delicate citrus flavor and a classic cracked sugar finish

Prep Time: 15 minutes
Chill Time: 30–60 minutes
Bake Time: 10–12 minutes
Yield: About 20–24 cookies

These Lemon Crinkle Cookies are tender on the inside with lightly crisp edges. Fresh lemon zest and juice give them a refreshing citrus taste, while the powdered sugar coating creates the signature crinkled appearance as they bake.


Ingredients

Cookie Dough

  • 1½ cups (180 g) all-purpose flour
    Provides structure for the cookies.

  • 1 teaspoon baking soda
    Helps the cookies spread slightly and crack on top.

  • ½ teaspoon baking powder
    Adds lightness to the texture.

  • ¼ teaspoon salt
    Balances the sweetness and enhances flavor.

  • 1 cup (227 g) unsalted butter, softened
    Creates a rich, tender cookie.

  • 1 cup (200 g) granulated sugar
    Sweetens and helps create a soft crumb.

  • 1 large egg
    Binds the dough and adds moisture.

  • 1 tablespoon fresh lemon zest
    Provides bright lemon aroma.

  • 2 tablespoons fresh lemon juice
    Adds natural citrus flavor.


For Coating

  • ½ cup powdered sugar
    Creates the classic crinkle finish.

  • Optional: 2–3 tablespoons granulated sugar
    Helps form a slight crust before rolling in powdered sugar.


Step-by-Step Instructions

1. Prepare the Dough

In a large bowl, beat the softened butter and granulated sugar together until pale, light, and fluffy. This usually takes 2–3 minutes with an electric mixer.

Add the egg and mix until fully incorporated.
Stir in the lemon zest and lemon juice until evenly combined.


2. Mix the Dry Ingredients

In a separate bowl, whisk together the flour, baking soda, baking powder, and salt.

Gradually add the dry ingredients to the wet mixture. Mix just until a soft, smooth dough forms. Avoid overmixing.


3. Chill the Dough

Cover the bowl and refrigerate the dough for 30–60 minutes.
This step firms the dough, improves texture, and helps prevent excessive spreading.


4. Shape and Coat

Preheat the oven to 175°C (350°F).
Line baking sheets with parchment paper.

Scoop the dough into tablespoon-sized portions and roll into balls.

For best results:

  1. Roll each dough ball lightly in granulated sugar (optional).

  2. Roll generously in powdered sugar, completely coating the surface.

Place the coated dough balls on the baking sheet, spacing them about 2 inches apart.


5. Bake

Bake for 10–12 minutes, until:

  • The edges are set

  • The tops are cracked and puffed

  • The centers remain soft

Do not overbake; the cookies will continue to set as they cool.


6. Cool

Let the cookies rest on the baking sheet for 5 minutes, then transfer them to a wire rack to cool completely.


Tips for Perfect Crinkle Cookies

  • Extra Cracks: Roll the dough in powdered sugar twice for a thicker white coating.

  • Strong Lemon Flavor: Add a drop of lemon extract if desired.

  • Soft Centers: Remove cookies when the centers still look slightly underbaked.

  • Storage: Store in an airtight container at room temperature for up to 4 days.

Italian Peach Crumble Cake

Italian Peach Crumble Cake

A soft, airy sponge topped with sweet peaches and a buttery crumb

Prep Time: 15 minutes
Bake Time: 35–40 minutes
Yield: One 9-inch (23 cm) round cake

This Italian-style Peach Crumble Cake is loved for its light, tender crumb and simple preparation. The delicate vanilla sponge gently supports juicy peaches, while the golden crumble topping adds texture and richness. It’s perfect for afternoon tea, dessert, or a casual gathering.


Ingredients

For the Cake Batter

  • 2 large eggs
    Provide structure and richness.

  • 100 g granulated sugar
    Sweetens the cake and helps create a light texture.

  • 8 g vanilla sugar (or 1 teaspoon vanilla extract)
    Adds gentle aroma and flavor.

  • 100 ml sunflower oil
    Keeps the cake moist and soft.

  • 100 ml milk
    Adds tenderness to the crumb.

  • 200 g all-purpose flour
    Forms the base of the sponge.

  • 12 g baking powder
    Helps the cake rise evenly.

  • 150 g peaches in syrup, drained and sliced
    Adds sweetness and juiciness. Fresh ripe peaches may also be used.


For the Crumble Topping

  • 50 g butter, softened
    Creates a rich, crumbly texture.

  • 50 g granulated sugar
    Sweetens and helps the topping turn golden.

  • 3 tablespoons all-purpose flour
    Binds the crumble together.


Step-by-Step Instructions

1. Prepare the Cake Batter

In a large mixing bowl, add the eggs, granulated sugar, and vanilla sugar.
Whisk until the mixture becomes pale, slightly thick, and airy.

Slowly pour in the sunflower oil and milk. Whisk again until fully combined.

Sift the flour and baking powder directly into the bowl.
Using a spatula or whisk, gently fold until the batter is smooth and free of lumps. Avoid overmixing.

Pour the batter into a greased and parchment-lined 9-inch round cake pan, spreading it evenly.


2. Arrange the Peaches

Place the sliced peaches gently on top of the batter in a circular or fan-shaped pattern.
Lightly press them into the surface so they sit neatly without sinking too deeply.


3. Make the Crumble Topping

In a small bowl, combine the softened butter, sugar, and flour.

Using your fingertips or a fork, rub the mixture together until it resembles small crumbs.

Sprinkle the crumble evenly over the peaches, covering the surface generously.


4. Bake the Cake

Preheat your oven to 180°C (350°F).

Bake the cake for 35–40 minutes, or until:

  • The top is golden and lightly crisp

  • A toothpick inserted into the center comes out clean

If the top browns too quickly, loosely cover with foil during the last few minutes.


Cooling & Serving

Allow the cake to cool in the pan for 10–15 minutes, then transfer to a wire rack.

Before serving, you may lightly dust the top with powdered sugar for a classic bakery-style finish.


Helpful Tips & Variations

  • Fresh Peaches: Use ripe, peeled peaches when in season.

  • Extra Flavor: Add a pinch of cinnamon or lemon zest to the crumble.

  • Storage: Keep covered at room temperature for 1 day or refrigerate for up to 3 days.

  • Serving Ideas: Enjoy plain, with whipped cream, or alongside vanilla yogurt.


Healthy Apple & Oat Breakfast Bake

Healthy Apple & Oat Breakfast Bake

A naturally sweet, nourishing breakfast perfect for meal prep

Prep Time: 15 minutes
Bake Time: 35–40 minutes
Yield: 6–8 servings

This Healthy Apple & Oat Breakfast Bake is a comforting, nutrient-rich dish made with whole ingredients and no refined sugar. Sweetness comes naturally from apples, banana, raisins, and cranberries, while oats and nuts provide lasting energy and fiber. It’s ideal for busy mornings, light breakfasts, or a satisfying snack.


Ingredients & Their Purpose

  • 1 cup (100 g) rolled oats
    Forms the base of the bake and provides fiber for sustained energy.

  • 3 medium apples, grated
    Adds moisture, natural sweetness, and a soft texture. Keep the peel on for added fiber.

  • 1 ripe banana, mashed
    Acts as a natural binder and sweetener.

  • 1/2 cup (120 ml) water
    Helps soften the oats and create a tender texture.

  • 2 large eggs
    Adds protein and helps the bake set properly.

  • 3.5 oz (100 g) dried cranberries
    Adds gentle tartness and natural sweetness.

  • 3.5 oz (100 g) raisins
    Enhances sweetness and moisture.

  • 1/2 cup (50 g) chopped nuts
    Walnuts, almonds, or pecans add crunch, healthy fats, and flavor.

  • 1 teaspoon baking powder
    Gives the bake a light lift.

  • 1 teaspoon ground cinnamon (optional)
    Adds warmth and aroma.


Step-by-Step Instructions

1. Prepare the Dried Fruit

Place the raisins and dried cranberries in a bowl. Cover them with hot water and let soak for 5 minutes.
Drain thoroughly and set aside. This step softens the fruit and prevents dryness in the bake.


2. Soak the Oats

In a large mixing bowl, combine the rolled oats and water.
Let sit for 5–10 minutes so the oats absorb the liquid and soften slightly.


3. Prepare the Fruit Base

  • Mash the banana until smooth.

  • Grate the apples using a coarse grater.

Add both the mashed banana and grated apples to the soaked oats. Stir well to combine.


4. Add the Eggs

In a separate bowl, lightly whisk the eggs.
Pour them into the oat mixture and stir until evenly incorporated.


5. Build Flavor & Texture

  • Sprinkle in the baking powder and cinnamon.

  • Fold in the soaked cranberries, raisins, and chopped nuts.

Mix gently to distribute everything evenly without overworking the batter.


6. Bake

  • Preheat oven to 180°C (350°F).

  • Lightly grease or line a 9×9-inch baking dish.

  • Pour the mixture into the dish and smooth the top.

Bake for 35–40 minutes, until:

  • The top is lightly golden

  • The center feels firm when gently pressed


Cooling & Serving

Let the bake cool in the pan for 10–15 minutes before slicing.
This allows it to set and makes cleaner slices.

Serve:

  • Warm on its own

  • With plain yogurt or a drizzle of nut butter

  • With fresh fruit on the side


Helpful Tips & Variations

  • Softer Texture: Blend oats briefly before soaking for a smoother result.

  • Dairy-Free: This recipe is naturally dairy-free.

  • Egg-Free Option: Replace eggs with 2 tablespoons ground flaxseed mixed with 5 tablespoons water (let rest 5 minutes).

  • Storage: Store slices in an airtight container in the refrigerator for up to 4 days.

  • Reheating: Warm in the microwave for about 30 seconds.

Spinach Artichoke Crescent Roll Bake

🥬 Spinach Artichoke Crescent Roll Bake

Yields: 8–10 rolls
Prep Time: 20 minutes
Bake Time: 18–22 minutes

A warm, cheesy appetizer that combines creamy spinach and artichokes inside golden, buttery crescent rolls. Perfect for parties, snacks, or cozy meals.


📝 Ingredients

For the Filling:

  • 1 cup frozen chopped spinach, thawed and well-drained

  • 1 cup canned artichoke hearts, chopped and well-drained

  • 4 oz (115 g) cream cheese, softened

  • ¼ cup sour cream

  • ¼ cup mayonnaise

  • ½ cup shredded mozzarella cheese

  • ¼ cup grated Parmesan cheese

  • 1 clove garlic, minced

  • Salt & pepper, to taste

For the Rolls:

  • 1 can (8 oz / 225 g) refrigerated crescent roll dough (sheet or regular)

  • 1 egg, beaten (optional, for brushing tops)

  • Extra mozzarella or Parmesan for topping (optional)

  • Fresh parsley, chopped (for garnish, optional)


👩‍🍳 Step-by-Step Instructions

Step 1 — Preheat & Prepare the Dish

  1. Preheat oven to 375°F (190°C).

  2. Lightly grease a baking dish or oven-safe skillet with butter or cooking spray.


Step 2 — Make the Filling

  1. In a medium bowl, combine cream cheese, sour cream, and mayonnaise. Mix until smooth.

  2. Stir in mozzarella, Parmesan, and garlic.

  3. Add the spinach and artichokes, mixing until evenly combined.

  4. Season with salt and pepper to taste.

Optional: Add a pinch of red pepper flakes or Italian seasoning for extra flavor.


Step 3 — Prepare the Dough

  1. Unroll the crescent dough onto a clean surface. If using perforated crescent rolls, pinch the seams to form a solid rectangle.

  2. Spread the spinach artichoke filling evenly over the dough, leaving about ½ inch from the edges.

  3. Starting from one long edge, roll the dough into a log (like a jelly roll).

  4. Using a sharp knife or unflavored dental floss, slice the log into 1-inch rolls (about 8–10 pieces).


Step 4 — Assemble & Bake

  1. Place the rolls cut side up in the prepared baking dish.

  2. Optional: Brush tops with beaten egg for a golden finish.

  3. Optional: Sprinkle extra mozzarella or Parmesan on top.

  4. Bake for 18–22 minutes or until golden brown and puffed.


Step 5 — Garnish & Serve

  1. Remove from oven and let cool for 5 minutes.

  2. Garnish with fresh parsley if desired.

  3. Serve warm as an appetizer, snack, or side dish.


💡 Tips for Success

  • Drain Well: Squeeze out excess liquid from spinach and artichokes to avoid soggy rolls.

  • Cheese Variations: Try Monterey Jack, cheddar, or Gruyère for different flavors.

  • Make Ahead: Assemble rolls and refrigerate for up to 8 hours before baking. Add 2–3 minutes to baking time.

  • Freezing: Bake, cool, and freeze in an airtight container for up to 1 month. Reheat at 350°F until warmed through.


🍴 Serving Ideas

  • Pair with tomato soup for a cozy meal.

  • Serve alongside a fresh garden salad for lunch.

  • Offer with marinara or garlic dip for extra indulgence.


⏱ Summary Table

Step Time Key Notes
Preheat Oven 5 min Grease baking dish
Make Filling 10 min Drain spinach well
Prepare Dough 5 min Roll tightly for neat slices
Bake 18–22 min Golden brown top
Serve Best served warm

🍯 Honey Infusion with Ginger, Garlic & Onion

🍯 Honey Infusion with Ginger, Garlic & Onion

Yields: 1 small jar
Preparation Time: 10 minutes
Infusion Time: 12–24 hours

This honey-based infusion combines aromatic ingredients with natural sweetness to create a richly flavored syrup. It can be used in warm drinks, drizzled over foods, or enjoyed in small amounts as part of a balanced diet.


📋 Ingredients

  • 1 cup raw honey

  • 1 large red onion, finely diced

  • 3–4 garlic cloves, peeled and thinly sliced or lightly crushed

  • 1 tablespoon fresh ginger, finely grated or thinly sliced

  • 2 tablespoons fresh lemon juice


👩‍🍳 Step-by-Step Instructions

Step 1: Prepare the Ingredients

  1. Peel and finely dice the red onion.

  2. Peel the garlic cloves and slice them thinly or lightly crush them to release flavor.

  3. Peel the ginger and grate it finely or cut it into very thin strips.


Step 2: Layer the Jar

  1. Use a clean, dry glass jar.

  2. Add the onion, garlic, and ginger to the jar in layers.

  3. Pour the lemon juice evenly over the ingredients.


Step 3: Add the Honey

  1. Slowly pour the honey into the jar.

  2. Make sure all ingredients are fully submerged.

  3. Leave about 2–3 cm (1 inch) of space at the top, as the mixture may release liquid over time.


Step 4: Infuse

  1. Seal the jar tightly.

  2. Place it in the refrigerator or a cool, dark area.

  3. Allow the mixture to infuse for 12–24 hours.

  4. During this time, the honey will thin slightly and absorb the flavors.


Step 5: Use and Store

  1. Stir gently before each use.

  2. Use small amounts as desired:

    • Stir into warm (not hot) water or tea

    • Drizzle over roasted vegetables

    • Add to salad dressings or marinades

  3. Keep refrigerated and use within 2 weeks.


💡 Helpful Notes

  • The flavor is strong at first but becomes more balanced as it infuses

  • Honey helps soften the sharp taste of onion and garlic

  • Always use clean utensils when scooping to maintain freshness


🔄 Optional Flavor Additions

  • A cinnamon stick for warmth

  • A small pinch of ground spice for depth

  • Orange or lemon peel for citrus aroma


🧊 Storage Tips

  • Store in a sealed glass jar

  • Keep refrigerated after opening

  • Discard if you notice unusual odor or appearance

Butter Biscuits & Soft Melting Cookies

Butter Biscuits & Soft Melting Cookies

Yields: Approximately 40–50 biscuits
Preparation Time: 20 minutes
Baking Time: 10–12 minutes

These butter-based biscuits are light, tender, and gently crisp at the edges. The same dough can be shaped in different ways to create both simple butter biscuits and soft, swirl-style cookies. They are perfect for sharing, gifting, or enjoying with tea.


📋 Ingredients

  • 500 g butter, softened at room temperature

  • 1 cup fine or granulated sugar

  • 3 large eggs

  • 3 tablespoons neutral oil

  • 1 teaspoon vanilla flavoring

  • 5 cups all-purpose flour, sifted

  • 4 teaspoons baking powder

  • ¼ teaspoon bicarbonate of soda

Optional Decorations

  • Glacé cherries, finely chopped

  • Fruit jam (such as apricot or strawberry)

  • Melted chocolate for drizzling


👩‍🍳 Step-by-Step Instructions

Step 1: Prepare the Butter Mixture

  1. Place the softened butter and sugar in a large mixing bowl.

  2. Beat together until light in color and creamy in texture.

  3. Add the oil and vanilla flavoring.

  4. Beat in the eggs one at a time, mixing well after each addition.


Step 2: Add Dry Ingredients

  1. In a separate bowl, sift together the flour, baking powder, and bicarbonate of soda.

  2. Gradually add the dry mixture to the butter mixture.

  3. Mix gently until a soft, smooth dough forms.

  4. Stop mixing once combined to keep the biscuits tender.


Step 3: Shape the Biscuits

  1. Preheat the oven to 180°C (350°F).

  2. Lightly grease or line baking trays with parchment paper.

For Swirl-Style Cookies

  • Transfer the dough to a piping bag fitted with a large star nozzle.

  • Pipe small swirls onto the tray.

  • Add a small amount of jam or a piece of cherry in the center if desired.

For Simple Butter Biscuits

  • Roll small portions of dough into balls and flatten gently with a fork,
    or

  • Roll the dough out and cut into shapes using a cutter.


Step 4: Bake

  1. Place trays in the preheated oven.

  2. Bake for 10–12 minutes, until the edges are lightly colored.

  3. The biscuits should remain pale for a soft texture.


Step 5: Cool and Finish

  1. Remove biscuits from the oven.

  2. Allow them to cool completely on a wire rack.

  3. Once cooled, drizzle with melted chocolate if desired.


🧊 Storage Tips

  • Store in an airtight container at room temperature for up to 2 weeks

  • Flavors develop further after resting for a day


💡 Helpful Notes

  • Butter should be soft, not melted, before mixing

  • Avoid overmixing to maintain a light texture

  • Use similar-sized portions for even baking

Homemade Whole Wheat Digestive Biscuits

🍪 Homemade Whole Wheat Digestive Biscuits

Yields: Approximately 15–20 biscuits
Preparation Time: 20 minutes
Chilling Time: 30 minutes
Baking Time: 15–18 minutes

These homemade digestive-style biscuits are crisp, lightly sweet, and made with simple pantry ingredients. They are ideal for enjoying with tea, coffee, or as a light snack.


📋 Ingredients

Dry Ingredients

  • 1½ cups (240 g) whole wheat flour

  • ½ cup (75 g) powdered sugar

  • 1 teaspoon baking powder

  • ¼ teaspoon salt (use only if butter is unsalted)

Fat

  • ½ cup (130 g) cold butter, cut into small cubes

Liquid

  • 5 tablespoons cold milk


👩‍🍳 Step-by-Step Instructions

Step 1: Combine Dry Ingredients

  1. In a large mixing bowl, sift together the whole wheat flour, powdered sugar, and baking powder.

  2. Add salt if using unsalted butter.

  3. Whisk until evenly mixed.


Step 2: Add the Butter

  1. Add the cold butter cubes to the flour mixture.

  2. Using your fingertips or a pastry cutter, rub the butter into the flour.

  3. Continue until the mixture resembles fine crumbs.
    Keeping the butter cold helps create a crisp texture.


Step 3: Form the Dough

  1. Add the cold milk one tablespoon at a time.

  2. Mix gently until the dough just comes together.

  3. Avoid kneading; the dough should be firm, not soft.

  4. If the mixture feels too dry, add 1 teaspoon of milk.


Step 4: Chill the Dough

  1. Shape the dough into a flat disc.

  2. Wrap it and refrigerate for 30 minutes.
    Chilling helps with rolling and improves texture.


Step 5: Roll and Shape

  1. Preheat the oven to 180°C (350°F).

  2. Place the chilled dough between two sheets of parchment paper.

  3. Roll to about 5 mm thickness.

  4. Cut into rounds using a cookie cutter.

  5. If desired, lightly press or mark the surface with a fork or toothpick.


Step 6: Bake

  1. Arrange the biscuits on a parchment-lined baking tray.

  2. Leave a little space between each biscuit.

  3. Bake for 15–18 minutes, or until the edges turn lightly golden.


Step 7: Cool Completely

  1. Remove the tray from the oven.

  2. Transfer biscuits to a wire rack.

  3. Allow them to cool fully; they will become crisp as they rest.


🍽️ Serving Suggestions

  • Enjoy with tea, coffee, or warm milk

  • Serve with fruit spreads or nut butter

  • Use as a base for layered desserts


🧊 Storage Tips

  • Store in an airtight container at room temperature for up to 1 week

  • Keep away from moisture to maintain crispness


💡 Helpful Notes

  • For less sweetness, reduce powdered sugar slightly

  • Butter can be replaced with chilled plant-based fat if needed

  • Thinner biscuits will bake faster and become crisper

Wholesome Carrot Cake (No Refined Flour, No Added Sugar)

🥕 Wholesome Carrot Cake (No Refined Flour, No Added Sugar)

Serves: 6 slices
Preparation Time: 15 minutes
Baking Time: 45–50 minutes

This carrot cake is soft, naturally sweet, and easy to prepare using simple ingredients. It relies on oats, fruits, and nuts for structure and flavor, making it suitable for breakfast, snacks, or a light dessert. No special equipment is needed—just a bowl, a spoon, and an oven.


📋 Ingredients

  • 2 cups (200 g) oat flakes

  • 1 teaspoon baking powder

  • 1 cup (240 ml) milk of choice

  • 1 medium carrot, finely grated

  • 1 medium apple, finely grated

  • 4 tablespoons raisins, rinsed and drained

  • ¼ cup (50 g) walnuts, chopped

  • 3 large eggs

  • 2 tablespoons olive oil

  • 4 tablespoons stevia or preferred sweetener

  • ½ teaspoon vanilla flavoring (optional)


👩‍🍳 Step-by-Step Instructions

Step 1: Prepare the Oats

Place the oat flakes in a mixing bowl. For a softer texture, you may blend them briefly to create a coarse flour.


Step 2: Add Dry Ingredients

Add the baking powder to the oats and mix well to distribute evenly.


Step 3: Prepare Fruits and Vegetables

Grate the carrot and apple using a fine grater. Add them directly to the oat mixture.


Step 4: Add Liquid Ingredients

Crack the eggs into the bowl. Pour in the milk and olive oil. Add the sweetener and vanilla flavoring if using.


Step 5: Mix the Batter

Stir everything together until well combined. The batter will be thick.
Let it rest for 5 minutes so the oats can absorb moisture.


Step 6: Add Raisins and Nuts

Gently fold in the raisins and chopped walnuts until evenly distributed.


Step 7: Prepare the Baking Tin

Line an 18 cm (7-inch) round cake tin with parchment paper or lightly grease it.


Step 8: Bake

  1. Preheat the oven to 180°C (360°F).

  2. Pour the batter into the prepared tin and smooth the top.

  3. Bake for 45–50 minutes, until the top is set and lightly golden.

  4. Insert a toothpick into the center; it should come out clean.


Step 9: Cool and Serve

Remove the cake from the oven and allow it to cool completely before slicing.


🍽️ Serving Ideas

  • Serve warm or chilled

  • Pair with plain yogurt or fresh fruit

  • Slice into smaller portions for snacks or packed meals


🧊 Storage Tips

  • Store in an airtight container in the refrigerator for up to 5 days

  • Individual slices can be frozen for up to 2 months

  • Warm briefly before serving if desired


💡 Helpful Notes

  • Walnuts can be replaced with seeds for a nut-free version

  • Raisins may be replaced with chopped dates

  • Apples with natural sweetness work best

The Best Air Fryer Grilled Cheese Sandwich

The Best Air Fryer Grilled Cheese Sandwich

Serves: 1–2 people
Preparation Time: 5 minutes
Cooking Time: 8–10 minutes

This Air Fryer Grilled Cheese Sandwich delivers a perfectly crisp outside with a warm, creamy cheese center—all made quickly and easily. Using an air fryer allows even browning with minimal effort, making this a reliable go-to meal any time of day.


📋 Ingredients

  • 2 slices bread (white, sourdough, whole wheat, or preferred type)

  • 2–3 slices cheese (cheddar, mozzarella, American, or a combination)

  • 1–2 tablespoons butter, softened
    or mayonnaise for a crisp finish

Optional Add-Ins

  • Thinly sliced tomatoes

  • Cooked bacon or ham

  • Avocado slices

  • Jalapeños or red pepper flakes (optional)


👩‍🍳 Step-by-Step Instructions

Step 1: Preheat the Air Fryer

  1. Preheat the air fryer to 375°F (190°C).

  2. Allow it to warm for 2–3 minutes to ensure even cooking.


Step 2: Prepare the Bread

  1. Spread a thin, even layer of butter or mayonnaise on one side of each slice of bread.

  2. This coated side will become the outer, crispy surface.


Step 3: Assemble the Sandwich

  1. Place one slice of bread on a plate, coated side down.

  2. Layer the cheese evenly over the bread.

  3. Add any optional ingredients if desired.

  4. Top with the second slice of bread, coated side facing up.


Step 4: Cook

  1. Place the sandwich carefully into the air fryer basket.

  2. Cook for 4–5 minutes, then gently flip the sandwich.

  3. Continue cooking for another 4–5 minutes, or until:

    • The bread is golden and crisp

    • The cheese is fully melted


Step 5: Serve

  1. Remove the sandwich from the air fryer.

  2. Let it rest for 1 minute.

  3. Slice in half and serve warm.


🌟 Why This Recipe Works

  • Even Crisping: Hot air circulates evenly for consistent browning.

  • Smooth Melting: The closed air fryer environment helps melt the cheese evenly.

  • Simple Technique: Butter or mayonnaise creates a beautifully crisp texture.


🔄 Variations to Try

  • Cheese Upgrade: Use gouda, brie, or a cheese blend

  • Vegetable Option: Add spinach, roasted peppers, or caramelized onions

  • Spicy Style: Try pepper jack cheese or mild chili flakes

  • Gluten-Free: Use gluten-free bread

  • Sweet Version: Use chocolate spread with banana slices for a dessert-style sandwich


💡 Helpful Tips

  • Do not overfill the sandwich to keep it easy to flip

  • Flip gently using a spatula or tongs

  • Best enjoyed fresh, but leftovers can be reheated in the air fryer for 1–2 minutes


🍽️ Serving Ideas

  • Pair with tomato soup for a comforting meal

  • Serve with a fresh salad or sliced fruit

  • Cut into smaller portions for sharing

Crispy Potato & Egg Nest Muffins

🥔🍳 Crispy Potato & Egg Nest Muffins

Yields: 12 muffins
Prep Time: 15 minutes
Bake Time: 25–30 minutes

These Crispy Potato & Egg Nest Muffins are a comforting and satisfying dish made with simple ingredients. Grated potatoes form a crisp outer layer, while the inside stays soft and flavorful. They are perfect for breakfast, brunch, or light meals and are easy to prepare ahead of time.


📋 Ingredients

  • 3 large potatoes, peeled and grated

  • 4–5 large eggs, well beaten

  • 1 cup shredded cheese (cheddar or mozzarella works well)

  • 12 cherry tomatoes (one per muffin)

  • 2 green onions, finely chopped

  • Salt, to taste

  • Black pepper, to taste

  • A small pinch of garlic powder or paprika (optional)

  • Vegetable oil or butter, for greasing the muffin tin


👩‍🍳 Step-by-Step Instructions

Step 1: Prepare the Potatoes

  1. Preheat your oven to 400°F (200°C).

  2. Place the grated potatoes into a bowl of cold water.

  3. Rinse well to remove excess starch.

  4. Drain and squeeze the potatoes firmly using a clean kitchen towel until they are as dry as possible.
    Dry potatoes help create a crisp texture during baking.


Step 2: Make the Potato Nests

  1. Transfer the dried potatoes to a mixing bowl.

  2. Add salt, black pepper, and half of the shredded cheese.

  3. Mix gently until evenly combined.

  4. Grease a 12-cup muffin tin thoroughly.

  5. Divide the potato mixture evenly among the cups.

  6. Press the mixture firmly into the bottom and up the sides of each cup to form a nest shape.


Step 3: Prepare the Egg Mixture

  1. In a separate bowl or jug, whisk the eggs until smooth.

  2. Add chopped green onions and any remaining seasoning.

  3. Stir gently to combine.


Step 4: Assemble and Bake

  1. Carefully pour the egg mixture into the center of each potato nest.

  2. Place one cherry tomato in the center of each muffin.

  3. Sprinkle the remaining shredded cheese evenly on top.

  4. Bake for 25–30 minutes, or until:

    • The potato edges are golden and crisp

    • The egg filling is fully set


Step 5: Cool and Serve

  1. Remove the muffin tin from the oven.

  2. Allow the muffins to rest for 5 minutes.

  3. Use a small knife to gently loosen the edges.

  4. Lift the muffins out carefully.

Serve warm for the best texture and flavor.


🌟 Why You’ll Love This Recipe

  • Crispy Outside, Soft Inside: The potato base becomes golden and crunchy while the egg stays tender.

  • Easy to Customize: Add extra vegetables like spinach, bell peppers, or mushrooms for variety.

  • Great for Planning Ahead: These muffins can be prepared in advance and reheated while keeping their texture.

No-Bake 3-Ingredient Milk Pudding

🍮 No-Bake 3-Ingredient Milk Pudding

Smooth • Creamy • Simple Custard-Style Dessert

This easy milk pudding is a soft, creamy dessert made with just milk, sugar, and eggs. It sets gently in the refrigerator and has a smooth, comforting texture similar to classic custard. With careful low-heat cooking and constant stirring, you get a silky pudding without baking or complicated steps.


Recipe Overview

  • Prep Time: 5 minutes

  • Cook Time: 10–15 minutes

  • Chill Time: 2–3 hours

  • Servings: 4 small bowls


Ingredients

Main Ingredients

  • 2 cups (500 ml) milk

  • ⅓ cup (70 g) sugar

  • 2 large eggs

Optional (Recommended)

  • 1 teaspoon vanilla extract
    (adds aroma and smooth flavor)

Optional Toppings

  • Chopped peanuts or walnuts

  • Caramel drizzle

  • Fresh fruit


Equipment Needed

  • Medium saucepan

  • Whisk or silicone spatula

  • Fine-mesh strainer

  • Serving bowls or ramekins


Step-by-Step Instructions

1. Mix the Eggs and Sugar

  • Place the saucepan on the counter (do not heat yet)

  • Add eggs and sugar

  • Whisk until the sugar is mostly dissolved and the mixture looks slightly pale and smooth


2. Add the Milk

  • Slowly pour the milk into the egg mixture

  • Whisk continuously to keep everything smooth

  • Add vanilla extract if using


3. Cook Gently

  • Place the saucepan over low heat

  • Stir constantly using a whisk or spatula

  • Scrape the bottom and sides of the pan to prevent sticking

⚠️ Important: Keep the heat low. High heat can cause the eggs to cook unevenly.


4. Thicken the Pudding

  • Continue stirring for 10–12 minutes

  • The mixture will gradually thicken

  • It is ready when it:

    • Coats the back of a spoon

    • Looks creamy but still pours easily

(It will firm up more as it cools.)


5. Strain for Smoothness

  • Remove from heat

  • Pour the mixture through a fine strainer into a bowl or jug

  • This step ensures a silky, lump-free texture


6. Chill and Set

  • Pour the pudding into serving bowls or ramekins

  • Let cool at room temperature for about 20 minutes

  • Cover and refrigerate for 2–3 hours, until fully set


7. Serve

  • Serve chilled

  • Add nuts, caramel, or fruit just before serving if desired


Texture & Flavor

  • Texture: Smooth, soft, custard-like

  • Flavor: Lightly sweet, creamy, comforting


Helpful Tips

  • Stir continuously for best texture

  • Never let the mixture boil

  • Use room-temperature eggs for smoother blending

  • For extra richness, replace ¼ cup of milk with cream


Optional Variation (Firmer Texture)

If you prefer a firmer, pudding-style set:

  • Mix 1 tablespoon cornstarch into the cold milk before heating

  • Proceed with the recipe as written


Storage

  • Store covered in the refrigerator

  • Best enjoyed within 2 days

🥕 Moist Carrot Cake with Cream Cheese Frosting

🥕 Moist Carrot Cake with Cream Cheese Frosting

Soft • Spiced • Rich • Perfectly Balanced

This classic carrot cake is incredibly moist and tender, made with freshly grated carrots, warm spices, and a smooth cream cheese frosting. It bakes evenly, slices beautifully, and tastes even better the next day as the flavors deepen.


Recipe Overview

  • Prep Time: 20 minutes

  • Bake Time: 35–40 minutes

  • Cooling Time: 1 hour

  • Total Time: About 2 hours

  • Yield: 1 square cake (9–12 servings)


Why This Recipe Works

  • Oil keeps the cake moist for days

  • Fresh carrots add natural sweetness and texture

  • Balanced spices enhance flavor without overpowering

  • Cream cheese frosting adds gentle tang and richness

  • Simple mixing method prevents a dense crumb


Ingredients

For the Cake

  • 2 cups (250 g) all-purpose flour

  • 2 teaspoons baking powder

  • ½ teaspoon baking soda

  • ½ teaspoon salt

  • 1 teaspoon ground cinnamon

  • ½ teaspoon ground nutmeg

  • 1 cup (200 g) granulated sugar

  • 4 large eggs, room temperature

  • 1 cup (240 ml) vegetable oil

  • 2 cups (240 g) finely grated carrots

  • ½ cup (120 g) chopped walnuts or pecans (optional)


For the Cream Cheese Frosting

  • 8 oz (225 g) cream cheese, softened

  • ½ cup (115 g) unsalted butter, softened

  • 2 cups (250 g) powdered sugar, sifted

  • 1 teaspoon vanilla extract


Optional Garnish

  • Chopped nuts

  • Light dusting of cinnamon


Equipment Needed

  • 8×8-inch or 9×9-inch square baking pan

  • Mixing bowls

  • Whisk

  • Hand mixer or spatula

  • Parchment paper

  • Cooling rack


Step-by-Step Instructions

1. Prepare the Oven and Pan

  • Preheat oven to 350°F (180°C)

  • Line a square baking pan with parchment paper or grease well

  • Set aside


2. Mix the Dry Ingredients

  • In a medium bowl, whisk together:

    • Flour

    • Baking powder

    • Baking soda

    • Salt

    • Cinnamon

    • Nutmeg

This ensures even spice distribution.


3. Mix the Wet Ingredients

  • In a large bowl, whisk sugar and vegetable oil until smooth

  • Add eggs one at a time, mixing well after each addition

  • The mixture should look glossy and well blended


4. Combine and Fold

  • Gradually add the dry ingredients to the wet mixture

  • Fold gently until just combined

⚠️ Do not overmix to keep the cake tender.

  • Fold in grated carrots

  • Stir in chopped nuts if using


5. Bake

  • Pour batter into the prepared pan

  • Spread evenly

  • Bake for 35–40 minutes, or until a toothpick inserted in the center comes out clean


6. Cool Completely

  • Let the cake cool in the pan for 15 minutes

  • Transfer to a wire rack

  • Cool completely before frosting


Cream Cheese Frosting Instructions

7. Prepare the Frosting

  • In a bowl, beat softened cream cheese and butter until smooth

  • Gradually add powdered sugar, mixing slowly

  • Add vanilla extract

  • Beat until creamy, fluffy, and spreadable


8. Frost and Serve

  • Spread frosting evenly over the cooled cake

  • Garnish with chopped nuts if desired

  • Slice into squares and serve


Texture & Flavor Notes

  • Cake: soft, moist, and lightly spiced

  • Frosting: creamy, smooth, and gently tangy

  • Flavor improves after resting overnight


Storage Tips

  • Room temperature: Up to 1 day (covered)

  • Refrigerator: Up to 5 days

  • Freezer: Unfrosted cake freezes well up to 2 months


Optional Variations

  • Add ½ cup crushed pineapple, well drained

  • Mix in raisins or shredded coconut

  • Use brown sugar for deeper flavor

  • Make as cupcakes (bake 18–22 minutes)

Moist Banana Nut Bread

Moist Banana Nut Bread

Soft • Rich • Nutty • Stays Fresh for Days

This classic Banana Nut Bread is perfectly moist with a tender crumb and a rich banana flavor. Made with very ripe bananas and toasted walnuts, it’s ideal for breakfast, tea time, or sharing as a homemade gift. The loaf slices cleanly and tastes even better the next day.


Recipe Overview

  • Prep Time: 10 minutes

  • Bake Time: 55–60 minutes

  • Total Time: About 1 hour 10 minutes

  • Yield: 1 loaf (about 10 slices)


Why This Recipe Works

  • Very ripe bananas add natural sweetness and moisture

  • Butter provides rich flavor and soft texture

  • Toasted walnuts enhance aroma and crunch

  • Gentle mixing keeps the loaf tender

  • Balanced ingredients prevent dryness or heaviness


Ingredients

Wet Ingredients

  • 3 very ripe bananas (medium to large)

  • ½ cup (8 tablespoons) unsalted butter, room temperature

  • ¾ cup granulated sugar
    (Honey may be used as a substitute for deeper flavor)

  • 2 large eggs, lightly beaten

  • ½ teaspoon vanilla extract


Dry Ingredients

  • 1½ cups all-purpose flour

  • 1 teaspoon baking soda

  • ½ teaspoon salt


Mix-Ins

  • 1 cup walnuts, toasted and coarsely chopped

  • ½ cup raisins
    (or chocolate chips, if preferred)


Equipment Needed

  • 9×5-inch loaf pan

  • Mixing bowls

  • Whisk

  • Rubber spatula

  • Wire cooling rack


Step-by-Step Instructions

1. Prepare the Oven and Pan

  • Preheat oven to 350°F (175°C)

  • Grease a 9×5-inch loaf pan with butter

  • Lightly dust with flour or line with parchment paper


2. Toast the Walnuts

  • Place walnuts in a dry skillet over medium heat

  • Stir continuously for 3–5 minutes, until fragrant

  • Remove from heat, let cool, then chop coarsely

Tip: Toasting brings out the natural oils and flavor of the nuts.


3. Cream Butter and Sugar

  • In a large bowl, beat the softened butter and sugar together

  • Mix until smooth, creamy, and pale

This step helps create a soft, even crumb.


4. Prepare the Banana Mixture

  • Mash bananas with a fork until they resemble chunky applesauce

  • Add mashed bananas to the butter mixture

  • Stir in the beaten eggs and vanilla extract

  • Mix until fully combined


5. Combine Dry Ingredients

  • In a separate bowl, whisk together:

    • Flour

    • Baking soda

    • Salt


6. Make the Batter

  • Add dry ingredients to the wet mixture

  • Gently fold until just combined

⚠️ Do not overmix — stop as soon as no dry flour remains.

  • Fold in the toasted walnuts and raisins evenly


7. Bake

  • Pour batter into the prepared loaf pan

  • Smooth the top gently

  • Bake for 55–60 minutes


8. Test for Doneness

  • Insert a toothpick into the center

  • It should come out clean or with a few moist crumbs

If needed, bake an additional 5 minutes and check again.


9. Cool Properly

  • Let the bread cool in the pan for 10 minutes

  • Transfer carefully to a wire rack

  • Cool completely before slicing


Texture & Flavor Notes

  • Inside: moist, soft, and banana-rich

  • Top: lightly golden with nutty crunch

  • Flavor deepens after resting overnight


Storage Tips

  • Room temperature: Wrap tightly, keeps fresh for 2–3 days

  • Refrigerator: Up to 5 days

  • Freezer: Slice and freeze up to 3 months


Optional Variations

  • Add ½ teaspoon cinnamon for warmth

  • Replace half the flour with whole wheat flour

  • Use pecans instead of walnuts

  • Add banana slices on top before baking for decoration

🧀 Savory Herb & Garlic Pull-Apart Bread

🧀 Savory Herb & Garlic Pull-Apart Bread

Soft • Aromatic • Golden • Perfect for Sharing

This Savory Herb & Garlic Bread is fluffy on the inside with a lightly crisp, golden top. Fresh garlic and herbs infuse every bite, while olive oil keeps the crumb tender and flavorful. Designed as a pull-apart loaf, it’s ideal for serving warm at the table.


Why This Recipe Works

  • Proper yeast activation ensures a light, airy texture

  • Olive oil adds softness and rich flavor

  • Fresh garlic and herbs create deep aroma

  • Two rises give excellent structure and fluffiness

  • Pull-apart shaping makes it easy to serve


Ingredients

For the Dough

  • 3 cups all-purpose flour, plus extra for dusting

  • 1 teaspoon salt

  • 2 teaspoons sugar

  • 2¼ teaspoons instant dry yeast (1 standard packet)

  • 1 cup warm water (about 105–110°F / 40–43°C)

  • 3 tablespoons olive oil

Flavor Add-Ins

  • 3 cloves garlic, finely minced

  • 1½ tablespoons fresh rosemary, finely chopped
    (or 1 teaspoon dried rosemary)

For the Top (Optional but Recommended)

  • 1–2 tablespoons olive oil or melted butter

  • Optional: pinch of salt or grated cheese


Step-by-Step Instructions

1. Activate the Yeast

  • In a small bowl, combine:

    • Warm water

    • Sugar

    • Yeast

  • Stir gently and let sit for 5–10 minutes

  • The mixture should become slightly foamy

Tip: If it doesn’t foam, the yeast may be inactive—start again for best results.


2. Mix the Dough

  • In a large bowl, whisk together:

    • Flour

    • Salt

    • Minced garlic

    • Chopped rosemary

  • Make a well in the center

  • Pour in:

    • Yeast mixture

    • Olive oil

  • Mix with a spoon or your hands until a shaggy dough forms


3. Knead the Dough

  • Transfer dough to a lightly floured surface

  • Knead for 5–8 minutes until:

    • Smooth

    • Elastic

    • Slightly tacky but not sticky

Adjustment Tip:
If the dough sticks, add flour 1 tablespoon at a time.


4. First Rise

  • Lightly oil a clean bowl

  • Place dough inside and turn once to coat

  • Cover with a damp cloth or plastic wrap

  • Let rise in a warm place for about 1 hour, or until doubled in size


5. Shape the Pull-Apart Pieces

  • Gently punch down the dough to release air

  • Divide into 8–10 equal portions

  • Roll each portion into a smooth ball

  • Arrange balls snugly in a greased loaf pan


6. Second Rise

  • Cover the pan loosely

  • Let rise again for 30 minutes

This step ensures a light, fluffy final texture.


7. Bake

  • Preheat oven to 375°F (190°C)

  • Brush the top with olive oil or melted butter

  • Bake for 25–30 minutes, until:

    • Top is golden brown

    • Bread sounds hollow when tapped


8. Cool and Serve

  • Let bread cool in the pan for 10 minutes

  • Remove gently and serve warm

  • Pull apart and enjoy the soft, herbed layers


Texture & Flavor Notes

  • Interior: soft, fluffy, and aromatic

  • Exterior: lightly crisp and golden

  • Flavor: savory garlic with fresh herb warmth


Storage Tips

  • Room temperature: Wrap and store up to 2 days

  • Refrigerator: Up to 4 days (reheat before serving)

  • Freezer: Freeze baked bread up to 2 months


Optional Variations

  • Add grated cheese between dough balls

  • Mix in parsley or thyme

  • Sprinkle sesame or herb seasoning on top

  • Brush with garlic-infused butter after baking

Creamy Broccoli Cauliflower Salad

Creamy Broccoli Cauliflower Salad

Crunchy • Creamy • Savory-Sweet • Perfect for Gatherings

This classic Creamy Broccoli Cauliflower Salad is a well-loved favorite for potlucks, picnics, and family meals. Crisp fresh vegetables are paired with smoky, crunchy bacon, sharp cheese, and a tangy-sweet dressing that coats every bite beautifully. It improves with time, making it ideal for preparing ahead.


Why This Recipe Works

  • Raw broccoli and cauliflower stay crisp and refreshing

  • Creamy dressing balances tang and sweetness

  • Bacon adds depth and crunch

  • Chilling time allows flavors to blend perfectly

  • Easy to customize for different diets


Ingredients

The Salad Base

  • 3 cups fresh broccoli florets, chopped into bite-sized pieces

  • 3 cups fresh cauliflower florets, chopped small

  • 6 slices bacon, cooked until crisp and crumbled

  • ¾ cup sharp cheddar cheese, freshly grated

  • ⅓ cup red onion, finely diced

  • ½ cup roasted sunflower seeds
    (or chopped almonds for a nutty variation)

  • Optional: ½ cup dried cranberries or raisins for gentle sweetness


The Creamy Dressing

  • ¾ cup mayonnaise, good quality

  • ¼ cup sour cream or plain Greek yogurt

  • 2 tablespoons apple cider vinegar

  • 2 tablespoons granulated sugar
    (or honey or maple syrup)

  • ½ teaspoon salt

  • ¼ teaspoon black pepper


Step-by-Step Instructions

1. Prepare the Vegetables

  • Wash broccoli and cauliflower thoroughly

  • Pat completely dry using a clean kitchen towel

Important Tip: Dry vegetables allow the dressing to cling properly instead of sliding off.

  • Chop into small, evenly sized pieces for the best texture and flavor in every bite


2. Cook the Bacon

  • Cook bacon in a skillet or oven until deeply crisp

  • Transfer to paper towels to cool

  • Crumble into small pieces

Make-Ahead Tip: Store bacon separately and add just before serving to keep it crunchy.


3. Make the Dressing

  • In a medium bowl, whisk together:

    • Mayonnaise

    • Sour cream (or yogurt)

    • Apple cider vinegar

    • Sugar

    • Salt

    • Black pepper

  • Whisk until smooth and creamy

  • Taste and adjust:

    • Add more vinegar for tang

    • Add a touch more sweetener if desired


4. Assemble the Salad

  • In a large mixing bowl, combine:

    • Broccoli

    • Cauliflower

    • Red onion

    • Cheddar cheese

    • Sunflower seeds

  • Pour dressing over the salad

  • Fold gently until all vegetables are evenly coated


5. Chill for Best Flavor

  • Cover and refrigerate for at least 30 minutes

  • For best results, chill 3–4 hours to allow flavors to blend

  • Stir in the crumbled bacon just before serving
    (or sprinkle on top for presentation)


Texture & Flavor Notes

  • Crisp vegetables with creamy coating

  • Savory, slightly sweet, and tangy balance

  • Bacon adds crunch and smoky depth


Customization & Variations

Lighter Version

  • Replace half the mayonnaise with Greek yogurt

  • Use honey or reduce sweetener

Low-Carb Version

  • Omit sugar and dried fruit

  • Add extra bacon or chopped hard-boiled eggs

Plant-Based Version

  • Use dairy-free mayonnaise

  • Replace bacon with toasted seeds or smoked seasoning


Storage & Make-Ahead Tips

  • Make Ahead:

    • Chop vegetables and prepare dressing up to 24 hours in advance

    • Store separately and combine 1–2 hours before serving

  • Leftovers:

    • Store in an airtight container in the refrigerator

    • Keeps well for up to 3 days

    • Stir before serving as some moisture may release

  • Freezing:

    • Not recommended due to texture changes