Bay Leaf & Clove Herbal Tea
A warm, aromatic, caffeine-free beverage
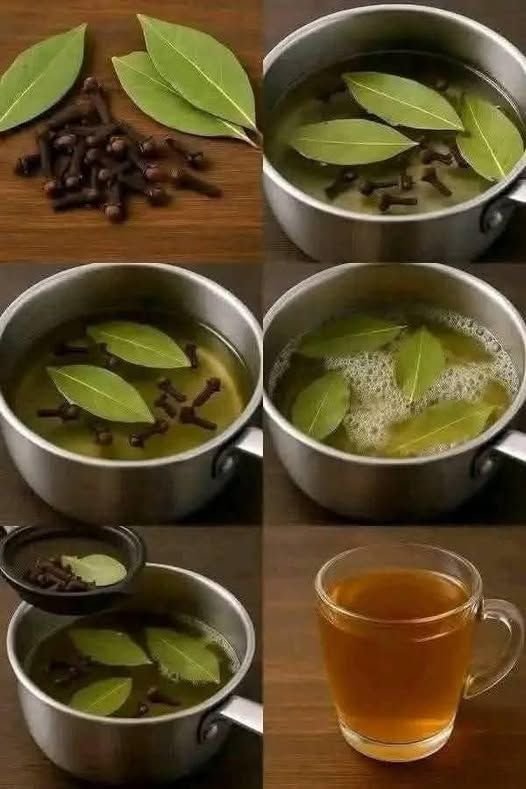
Bay Leaf and Clove Herbal Tea is a simple, comforting drink made by gently simmering dried bay leaves and whole cloves in water. The result is a lightly golden infusion with a warm, earthy aroma and subtle spice. This tea is appreciated for its soothing character, pleasant fragrance, and ease of preparation.
Bay leaves bring a mild herbal depth with hints of eucalyptus and mint, while cloves add a gentle warmth and soft spice. Together, they create a balanced cup that can be enjoyed plain or customized with natural flavor additions like lemon, honey, ginger, or cinnamon.
This herbal tea contains no caffeine and can be enjoyed at any time of day. It is especially comforting during cool weather or quiet moments when a warm, aromatic drink is desired.
 Ingredients
Base Ingredients
-
3 dried bay leaves (whole)
-
5–6 whole cloves
-
2 cups water
Optional Flavor Add-Ins (choose as desired)
-
1 teaspoon honey (for gentle sweetness)
-
1 slice fresh ginger
-
1 small cinnamon stick
-
1 teaspoon lemon juice or a lemon wedge
-
1 mint leaf
 Instructions
Step 1: Prepare Ingredients
Ensure the bay leaves and cloves are clean and free of dust.
If using ginger or cinnamon, prepare them by slicing or breaking them into small pieces.
Step 2: Heat the Water
Pour 2 cups of water into a small saucepan.
Place over medium heat and bring to a gentle boil.
Step 3: Add Spices
Once the water begins to boil, add the bay leaves and cloves.
Add any optional ingredients at this stage if using.
Step 4: Simmer
Reduce the heat to low and allow the mixture to simmer gently for 7–10 minutes.
The liquid will gradually take on a light golden color and release a pleasant aroma.
Step 5: Strain
Remove the saucepan from heat and let it rest for 1–2 minutes.
Strain the tea into a cup using a fine mesh strainer, removing all solids.
Step 6: Serve
Serve warm. Stir in honey or lemon juice if desired.
Garnish with a mint leaf or lemon slice for presentation.
 Servings
Makes 1 large mug or 2 small cups.
The recipe can be doubled or tripled as needed.
 Helpful Notes
-
Bay Leaves: Dried whole bay leaves are best. Avoid crushed or powdered leaves, which are difficult to strain.
-
Cloves: Use whole, aromatic cloves for best flavor.
-
Simmering: Gentle simmering preserves aroma and prevents bitterness.
-
Flavor Strength: Adjust steeping time to taste—shorter for mild, longer for stronger flavor.
-
Sweeteners: Honey complements the spice naturally without overpowering.
-
Serving: Best enjoyed warm, but may also be served chilled.
-
Storage: Prepared tea can be refrigerated for up to 24 hours and reheated gently.
 Serving Ideas
-
Enjoy on its own as a calming beverage
-
Pair with light snacks or fruit
-
Serve in a clear glass mug to highlight the golden color
-
Add cinnamon and ginger for a richer, spiced version
Bay Leaf and Clove Herbal Tea is a simple drink made with care and intention. Its warm aroma, gentle flavor, and minimal ingredients make it a pleasant addition to any daily routine. Whether enjoyed alone or shared, this tea celebrates simplicity, tradition, and mindful preparation.


 Ingredients
 Time Breakdown
 Step-by-Step Instructions
 Serving Suggestions
 Helpful Tips
 Dietary Notes
 Storage