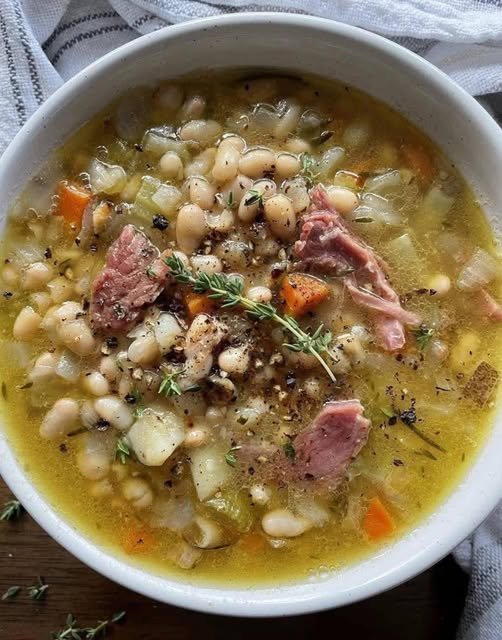
Homemade Enchirito (Taco Bell–Style)

Homemade Enchirito (Taco Bell–Style)
This dish combines the best of a burrito and enchilada: a soft tortilla filled with seasoned beef and beans, topped with flavorful sauce and melted cheese. It’s comforting, hearty, and perfect for family meals.


🧾 Ingredients (Serves 4)

🔸 Beef Filling:

  • 1⅓ lb (600 g) ground beef

  • 1½ tbsp masa harina (corn flour)

  • 4½ tsp chili powder

  • ½ tsp onion powder

  • ½ tsp garlic powder

  • ½ tsp seasoning salt

  • ½ tsp paprika

  • ¼ tsp ground cumin

  • ½ tsp garlic salt

  • ¼ tsp sugar

  • 1 tsp dried minced onion

  • ½ tsp beef bouillon powder

  • ¾ to 1 cup water


🔸 Sauce:

  • 8 oz (1 cup) tomato sauce

  • ⅓ cup water

  • ¼ tsp chili powder

  • 1½ tsp cumin

  • 1½ tsp dried minced onion

  • 1 tbsp white vinegar

  • ½ tsp garlic powder

  • ½ tsp garlic salt

  • ¼ tsp paprika

  • ¼ tsp sugar

  • ¼ tsp cayenne pepper (optional)


🔸 For Assembly:

  • 4 flour tortillas (8-inch)

  • 1 cup refried beans (heated)

  • 1 cup shredded cheddar cheese

  • ¼ cup chopped white onion

  • Sliced black olives (optional)


🍳 Equipment

  • Skillet

  • Small saucepan

  • Baking dish

  • Mixing bowls

  • Spoon or spatula


👩‍🍳 Instructions

1. Make the Seasoning Mix

In a small bowl, combine:

  • Masa harina

  • Chili powder

  • Onion powder

  • Garlic powder

  • Seasoning salt

  • Paprika

  • Cumin

  • Garlic salt

  • Sugar

  • Dried onion

  • Bouillon powder

Mix well and set aside.


2. Cook the Beef

Heat a skillet over medium heat.

Add ground beef and cook until fully browned, breaking it apart with a spoon.

Drain excess fat.


3. Season the Beef

Return beef to the skillet.

Add the seasoning mixture and ¾ to 1 cup water.

Simmer on low heat for 20 minutes, stirring occasionally, until thick and flavorful but still moist.


4. Make the Sauce

In a small saucepan, combine all sauce ingredients.

Bring to a gentle simmer over low heat.

Cook for 15–20 minutes, stirring occasionally.

Remove from heat.


5. Prepare for Baking

Preheat oven to 175°C (350°F).

Lightly grease a baking dish.


6. Assemble the Enchiritos

Warm tortillas until soft.

On each tortilla:

  • Spread ¼ cup refried beans

  • Add ¼ of the beef mixture

Roll tightly and place seam-side down in the dish.


7. Top and Bake

Pour sauce evenly over tortillas.

Sprinkle with:

  • Shredded cheese

  • Chopped onion

  • Olives (optional)

Bake uncovered for 15 minutes, until cheese is melted and bubbly.


🍽 Serving Suggestions

Serve with:

  • Mexican rice

  • Fresh salad

  • Corn on the cob

  • Sour cream or guacamole


📦 Storage

  • Refrigerate leftovers up to 3 days

  • Reheat in oven or microwave

  • Add extra sauce when reheating to keep tortillas soft


⭐ Tips

✔ Use soft tortillas for easy rolling
✔ Add jalapeños for extra heat
✔ Can use chicken or turkey instead of beef
✔ Double recipe for meal prep


🌮 Final Note

This homemade enchirito gives you all the flavor of a restaurant favorite with simple ingredients and fresh preparation. Soft tortillas, savory beef, rich sauce, and melted cheese make it a satisfying meal any day of the week.

California Spaghetti Salad

🥗 California Spaghetti Salad
A refreshing pasta salad made with tender spaghetti and crisp vegetables, tossed in a flavorful dressing. Perfect for picnics, parties, or light meals.

🧾 Ingredients

For the Salad Base:

  • 1 lb (450 g) spaghetti

  • 1½ cups cherry tomatoes, halved

  • 1 cucumber, diced

  • 2 zucchini, diced

  • 1 green bell pepper, diced

  • 1 small red onion, finely chopped (optional)

  • 1 can (about 2.25 oz / 65 g) sliced black olives, drained


For the Dressing:

  • 2 cups Italian dressing (from a 16 oz bottle)

  • ½ cup grated Parmesan cheese

  • 1 tablespoon sesame seeds

  • 1 teaspoon paprika

  • ½ teaspoon celery seed


👩‍🍳 Instructions

1. Cook the Pasta

Bring a large pot of salted water to a boil.

Add spaghetti and cook according to package instructions until al dente (tender but firm).

Drain the pasta and rinse with cold water to stop the cooking and cool it completely.

Break the spaghetti into shorter pieces for easier serving.


2. Prepare the Vegetables

Wash all vegetables well.

Dice:

  • Cucumber

  • Zucchini

  • Green bell pepper

Halve the cherry tomatoes.

Finely chop the red onion (if using).


3. Combine the Salad

In a very large bowl, add:

  • Cooled spaghetti

  • Cherry tomatoes

  • Cucumber

  • Zucchini

  • Green bell pepper

  • Red onion

  • Black olives

Gently toss to mix evenly.


4. Make the Dressing

In a small bowl or jar, combine:

  • Italian dressing

  • Parmesan cheese

  • Sesame seeds

  • Paprika

  • Celery seed

Whisk or shake well until fully blended.


5. Dress the Salad

Pour the dressing over the pasta and vegetables.

Toss thoroughly until everything is evenly coated.


6. Chill

Cover the bowl and refrigerate for at least 3 hours (overnight is best).
This allows the pasta and vegetables to absorb the flavors.

Before serving, toss again.
If it looks dry, add a little extra Italian dressing.


🍽 Serving

Serve chilled as:

  • A side dish

  • A light lunch

  • A picnic or party salad

Optional garnishes:

  • Extra Parmesan cheese

  • Fresh parsley or basil


⭐ Helpful Tips

✔ Add cooked chicken, tuna, or chickpeas for protein
✔ Add sweet corn for extra color
✔ Keep tomatoes and cucumber separate and mix in 1 hour before serving for extra crunch

Fresh Vegetable Juice Blend

Fresh Vegetable Juice Blend

A refreshing vegetable juice made from simple, fresh ingredients. This drink is intended for general nourishment and hydration as part of a balanced diet.


Yield

Approximately 2 servings

Preparation Time

10 minutes


Ingredients

  • 5 medium carrots

  • 8 celery ribs

  • 1 medium cucumber

  • 1 beetroot

  • ¼ lemon (peeled)

  • 1-inch piece fresh ginger


Instructions

1. Wash and Prepare the Vegetables

Rinse the carrots, celery, and cucumber thoroughly under running water to remove dirt.

Scrub the beetroot well. You may leave the skin on if it is clean, or peel it for a milder taste.

Peel the ginger using the edge of a spoon.

Remove the outer yellow peel from the lemon and keep the inner white portion.


2. Cut for Juicing

Cut the carrots, celery, and cucumber into pieces that fit easily into your juicer.

Cut the beetroot into smaller chunks to help it process smoothly.


3. Juice the Ingredients

Turn on the juicer and feed the ingredients through gradually.

Alternate between firm vegetables (carrots, beetroot) and softer items (cucumber, lemon, ginger) to ensure smooth processing.


4. Mix and Serve

Stir the juice well to combine all flavors evenly.

Pour into glasses and serve immediately. Ice may be added if desired.


Storage

Fresh juice is best consumed right away. If needed, store in a sealed glass container in the refrigerator for up to 24 hours. Shake well before drinking.

Creamy Broccoli Cauliflower Salad

Creamy Broccoli Cauliflower Salad

Crunchy • Creamy • Savory-Sweet • Perfect for Gatherings

This classic Creamy Broccoli Cauliflower Salad is a well-loved favorite for potlucks, picnics, and family meals. Crisp fresh vegetables are paired with smoky, crunchy bacon, sharp cheese, and a tangy-sweet dressing that coats every bite beautifully. It improves with time, making it ideal for preparing ahead.


Why This Recipe Works

  • Raw broccoli and cauliflower stay crisp and refreshing

  • Creamy dressing balances tang and sweetness

  • Bacon adds depth and crunch

  • Chilling time allows flavors to blend perfectly

  • Easy to customize for different diets


Ingredients

The Salad Base

  • 3 cups fresh broccoli florets, chopped into bite-sized pieces

  • 3 cups fresh cauliflower florets, chopped small

  • 6 slices bacon, cooked until crisp and crumbled

  • ¾ cup sharp cheddar cheese, freshly grated

  • ⅓ cup red onion, finely diced

  • ½ cup roasted sunflower seeds
    (or chopped almonds for a nutty variation)

  • Optional: ½ cup dried cranberries or raisins for gentle sweetness


The Creamy Dressing

  • ¾ cup mayonnaise, good quality

  • ¼ cup sour cream or plain Greek yogurt

  • 2 tablespoons apple cider vinegar

  • 2 tablespoons granulated sugar
    (or honey or maple syrup)

  • ½ teaspoon salt

  • ¼ teaspoon black pepper


Step-by-Step Instructions

1. Prepare the Vegetables

  • Wash broccoli and cauliflower thoroughly

  • Pat completely dry using a clean kitchen towel

Important Tip: Dry vegetables allow the dressing to cling properly instead of sliding off.

  • Chop into small, evenly sized pieces for the best texture and flavor in every bite


2. Cook the Bacon

  • Cook bacon in a skillet or oven until deeply crisp

  • Transfer to paper towels to cool

  • Crumble into small pieces

Make-Ahead Tip: Store bacon separately and add just before serving to keep it crunchy.


3. Make the Dressing

  • In a medium bowl, whisk together:

    • Mayonnaise

    • Sour cream (or yogurt)

    • Apple cider vinegar

    • Sugar

    • Salt

    • Black pepper

  • Whisk until smooth and creamy

  • Taste and adjust:

    • Add more vinegar for tang

    • Add a touch more sweetener if desired


4. Assemble the Salad

  • In a large mixing bowl, combine:

    • Broccoli

    • Cauliflower

    • Red onion

    • Cheddar cheese

    • Sunflower seeds

  • Pour dressing over the salad

  • Fold gently until all vegetables are evenly coated


5. Chill for Best Flavor

  • Cover and refrigerate for at least 30 minutes

  • For best results, chill 3–4 hours to allow flavors to blend

  • Stir in the crumbled bacon just before serving
    (or sprinkle on top for presentation)


Texture & Flavor Notes

  • Crisp vegetables with creamy coating

  • Savory, slightly sweet, and tangy balance

  • Bacon adds crunch and smoky depth


Customization & Variations

Lighter Version

  • Replace half the mayonnaise with Greek yogurt

  • Use honey or reduce sweetener

Low-Carb Version

  • Omit sugar and dried fruit

  • Add extra bacon or chopped hard-boiled eggs

Plant-Based Version

  • Use dairy-free mayonnaise

  • Replace bacon with toasted seeds or smoked seasoning


Storage & Make-Ahead Tips

  • Make Ahead:

    • Chop vegetables and prepare dressing up to 24 hours in advance

    • Store separately and combine 1–2 hours before serving

  • Leftovers:

    • Store in an airtight container in the refrigerator

    • Keeps well for up to 3 days

    • Stir before serving as some moisture may release

  • Freezing:

    • Not recommended due to texture changes

Air Fryer Poached Eggs

Air Fryer Poached Eggs

These “poached” eggs are technically steamed in the air fryer, resulting in a tender white and a perfectly runny yolk. It is a hands-off, mess-free alternative to the stovetop.

  • Prep time: 2 minutes

  • Cook time: 5–7 minutes

  • Total time: Under 10 minutes

Equipment

  • Air Fryer

  • Heat-proof ramekins or small ceramic bowls

Ingredients

  • Eggs: Large, fresh eggs (as many as your basket can fit)

  • Water: 3 tbsp hot water per ramekin

  • Oil Spray: Optional (non-stick spray or olive oil)

  • Seasoning: Salt and black pepper to taste

Instructions

  1. Preheat: Set your air fryer to 340°F (170°C) and let it preheat for about 3 minutes.

  2. Prep Ramekins: Lightly spray the inside of each ramekin with oil to prevent sticking. Add 3 tablespoons of hot water into each ramekin.

  3. Add Eggs: Carefully crack one egg into each ramekin, being careful not to break the yolk.

  4. Air Fry: Place the ramekins into the air fryer basket. Cook at 340°F (170°C) according to your preferred doneness:

    • 5 Minutes: Very runny yolk and soft whites.

    • 6 Minutes: Classic poached (jammy yolk, set whites).

    • 7 Minutes: Firm yolk and fully set whites.

  5. Serve: Using oven mitts, carefully remove the hot ramekins. Use a slotted spoon to lift the egg out of the water. Drain on a paper towel for a second if desired, then serve immediately

Creamy Crack Chicken Soup

Ingredients
4 slices bacon, diced
1 tablespoon butter
1 small yellow onion, diced
3 cloves garlic, minced
4 to 6 cups low sodium chicken broth
1/2 teaspoon garlic powder
1/2 teaspoon onion powder
1/2 teaspoon dried dill weed
1/2 teaspoon dried chives
salt and fresh ground pepper, to taste
1 bay leaf
4 cups cooked shredded chicken
1 package (8 ounces) softened cream cheese
1 cup shredded cheddar cheese
3 to 4 cups baby spinach
1/4 cup heavy cream
sliced green scallions, for garnish
Instructions
Cook diced bacon to a crisp in a Dutch Oven or soup pot.
Remove bacon from pot with a slotted spoon, leaving bacon grease in the pot.
Add butter to the pot and melt over medium-high heat.
Stir in onions and cook for 3 minutes.
Stir in garlic and cook for 20 seconds.
Add chicken broth and scrape up all the browned bits from the bottom of the pot.
Season with garlic powder, onion powder, dill weed, chives, salt, and pepper.
Add bay leaf and bring to a boil; lower heat to medium low and cook for 5 minutes.
Stir in shredded chicken; cook for 5 minutes.
Add cream cheese and whisk in until completely melted and combined.
Stir in shredded cheese; whisk until melted and thoroughly combined.
Add baby spinach; cook for 2 minutes.
Stir in heavy cream and cook for 1 minute.
Taste for seasonings (salt and pepper) and adjust accordingly. Remove bay leaf.
Remove soup from heat; top with scallions and previously prepared bacon.

Keto Cheddar Quick Bread

Keto Cheddar Quick Bread

Savory, fluffy, and sturdy—perfect for toasting or sandwiches.

  • Prep time: 15 mins

  • Cook time: 40–50 mins

  • Yield: 1 Loaf (approx. 10–12 slices)

Ingredients

Dry Team:

  • 2 cups Almond flour (super-fine)

  • 1 tsp Baking powder

  • ½ tsp Baking soda

  • ½ tsp Salt

  • ½ tsp Garlic powder

  • 1 tbsp Ground psyllium husk powder (this is the secret to a “bread-like” chew)

Wet Team:

  • 3 Large eggs

  • ¼ cup Heavy cream

  • ¼ cup Sour cream (or plain Greek yogurt)

  • ¼ cup Unsalted butter, melted and cooled

The Star:

  • 1 ½ cups Shredded sharp cheddar cheese (plus extra for the crust)

  • Optional: 1 tbsp fresh chives or jalapeño slices for a kick.


Instructions

  1. Prep: Preheat your oven to 375°F (190°C). Line an 8×4 inch loaf pan with parchment paper, leaving an overhang on the sides to easily lift the bread out later.

  2. Mix Dry: In a large bowl, whisk together the almond flour, baking powder, baking soda, salt, garlic powder, and psyllium husk. Ensure there are no large clumps.

  3. Mix Wet: In a separate medium bowl, beat the eggs well. Whisk in the heavy cream, sour cream, and melted butter until the mixture is smooth.

  4. Combine: Pour the wet ingredients into the dry ingredients. Stir with a spatula until a thick, uniform batter forms.

  5. Add Cheese: Fold in 1 ¼ cups of the shredded cheddar (and chives/jalapeños if using) until evenly distributed.

  6. Transfer: Spread the batter into the prepared loaf pan. The batter will be thick, so use your spatula to smooth the top. Sprinkle the remaining ¼ cup of cheese over the top.

  7. Bake: Bake for 40 to 50 minutes.

    • Test: Insert a toothpick into the center; it should come out clean, and the top should be golden brown and firm to the touch.

  8. The Cooling Rule: This is the hardest part! Let the bread cool in the pan for 10 minutes, then lift it out using the parchment paper and move it to a wire rack. Let it cool completely before slicing. Keto breads use eggs and cheese for structure; if you cut it while hot, it may seem moist or “eggy.”


Nutrition Note (Per Slice)

Since this is a Keto recipe, it’s naturally low-carb.

  • Net Carbs: Approximately 3–4g per slice.

  • Protein: High (thanks to the almond flour, eggs, and cheese).

Keto Cheddar Quick Bread

Keto Cheddar Quick Bread

Savory, fluffy, and sturdy—perfect for toasting or sandwiches.

  • Prep time: 15 mins

  • Cook time: 40–50 mins

  • Yield: 1 Loaf (approx. 10–12 slices)

Ingredients

Dry Team:

  • 2 cups Almond flour (super-fine)

  • 1 tsp Baking powder

  • ½ tsp Baking soda

  • ½ tsp Salt

  • ½ tsp Garlic powder

  • 1 tbsp Ground psyllium husk powder (this is the secret to a “bread-like” chew)

Wet Team:

  • 3 Large eggs

  • ¼ cup Heavy cream

  • ¼ cup Sour cream (or plain Greek yogurt)

  • ¼ cup Unsalted butter, melted and cooled

The Star:

  • 1 ½ cups Shredded sharp cheddar cheese (plus extra for the crust)

  • Optional: 1 tbsp fresh chives or jalapeño slices for a kick.


Instructions

  1. Prep: Preheat your oven to 375°F (190°C). Line an 8×4 inch loaf pan with parchment paper, leaving an overhang on the sides to easily lift the bread out later.

  2. Mix Dry: In a large bowl, whisk together the almond flour, baking powder, baking soda, salt, garlic powder, and psyllium husk. Ensure there are no large clumps.

  3. Mix Wet: In a separate medium bowl, beat the eggs well. Whisk in the heavy cream, sour cream, and melted butter until the mixture is smooth.

  4. Combine: Pour the wet ingredients into the dry ingredients. Stir with a spatula until a thick, uniform batter forms.

  5. Add Cheese: Fold in 1 ¼ cups of the shredded cheddar (and chives/jalapeños if using) until evenly distributed.

  6. Transfer: Spread the batter into the prepared loaf pan. The batter will be thick, so use your spatula to smooth the top. Sprinkle the remaining ¼ cup of cheese over the top.

  7. Bake: Bake for 40 to 50 minutes.

    • Test: Insert a toothpick into the center; it should come out clean, and the top should be golden brown and firm to the touch.

  8. The Cooling Rule: This is the hardest part! Let the bread cool in the pan for 10 minutes, then lift it out using the parchment paper and move it to a wire rack. Let it cool completely before slicing. Keto breads use eggs and cheese for structure; if you cut them while hot, they may seem moist or “eggy.”


Nutrition Note (Per Slice)

Since this is a keto recipe, it’s naturally low-carb.

  • Net Carbs: Approximately 3–4 g per slice.

  • Protein: High (thanks to the almond flour, eggs, and cheese).

No-Bake Banana & Nut Energy Bars

No-Bake Banana & Nut Energy Bars

A naturally sweet, wholesome, and energizing snack packed with fruit, oats, and nuts. Perfect for breakfast, post-workout, or a healthy treat.

Prep Time: 15 minutes
Chill Time: 1–2 hours
Yield: 8–10 bars


Ingredients

For the Base:

  • 80 g (1 cup) oat flakes

  • 1 medium ripe banana, mashed

For the Mix-ins:

  • 100 g (1/2 cup) raisins

  • 100 g (1/2 cup) dried apricots, chopped

  • 80 g (1/2 cup) walnuts, chopped

For the Topping:

  • 100 g (3.5 oz) dark chocolate


Instructions

1. Prepare the Fruit and Nuts

  1. Check the raisins and chopped apricots. If they are very dry, soak them in warm water for 5 minutes, then drain and pat dry with a paper towel.

  2. Chop the walnuts into small pieces so the bars hold together more easily.

2. Make the Energy Bar Base

  1. In a large mixing bowl, mash the ripe banana into a smooth paste, ensuring there are no large lumps.

  2. Add the oat flakes, raisins, chopped apricots, and walnuts to the banana.

  3. Mix thoroughly with a spatula or spoon until all ingredients are evenly coated with the banana. The mixture should be sticky and hold its shape when pressed.

3. Shape the Bars

  1. Line a small square or rectangular dish (about 8×8 inches or similar) with parchment paper.

  2. Transfer the mixture into the prepared dish.

  3. Use a spatula, the back of a spoon, or your hands (slightly dampened to prevent sticking) to press the mixture firmly and evenly into a flat layer.

4. Add the Chocolate Topping

  1. Break the dark chocolate into small pieces.

  2. Melt the chocolate using a double boiler or microwave in 20-second intervals, stirring between each interval until smooth.

  3. Pour the melted chocolate over the oat mixture. Use a spatula to spread it evenly to the edges, creating a smooth chocolate layer.

5. Chill and Slice

  1. Place the dish in the refrigerator for at least 1–2 hours, or until the chocolate has fully hardened and the base is firm.

  2. Once set, lift the block out using the parchment paper.

  3. Slice into rectangular bars with a sharp knife.


Tips for Best Results

  • Use a very ripe banana for natural sweetness and a smooth texture.

  • Lightly toast the walnuts for extra flavor if desired.

  • Store the bars in an airtight container in the refrigerator to keep them firm for up to 1 week.

  • You can also add a pinch of cinnamon or a teaspoon of nut butter for extra flavor and richness.

Loaded Cheesy Pocket Tacos

Loaded Cheesy Pocket Tacos

Prep time: 15 mins | Cook time: 25 mins | Total time: 40 mins

Ingredients

The Filling

  • 1 lb ground beef

  • 1 small onion: Finely chopped.

  • 1 tsp garlic powder

  • 1 tsp paprika

  • 1 tsp cumin

  • 1 tsp chili powder

  • Salt and black pepper: To taste.

  • 1/2 cup pizza sauce or taco sauce

The Cheese Blend

  • 1 cup shredded mozzarella or cheddar

  • 1/2 cup shredded Monterey Jack

The Dough & Finish

  • 1 package refrigerated crescent or pizza dough

  • 1 egg: Beaten (for egg wash).

  • Optional toppings: Sour cream, salsa, chopped parsley, or cilantro.


Instructions

1. Sauté and Season the Beef

In a skillet over medium heat, cook the ground beef and chopped onion until the beef is browned and the onions are soft. Drain the excess fat—this is crucial to ensure the dough doesn’t get soggy. Stir in the garlic powder, paprika, cumin, chili powder, salt, and pepper. Cook for 2 more minutes to let the spices “bloom,” then remove from heat to cool slightly.

2. Prepare the Oven and Dough

Preheat your oven to 375°F (190°C). Line a baking sheet with parchment paper. Unroll your dough and cut it into equal squares or rectangles. If using crescent dough, you can pinch the perforated diagonal seams together to create solid rectangles.

3. Assemble the Pockets

Place a spoonful of the beef mixture in the center of each dough piece. Drizzle a little sauce over the meat, then top with a generous pinch of the blended cheeses.

AI Tip: Leave a small border around the edges so you can get a clean seal!

4. Seal and Glaze

Fold the dough over the filling. Use your fingers or the tines of a fork to pinch the edges firmly. Place them seam-side down on your baking sheet. Brush the tops with the beaten egg wash; this is what gives them that professional, bakery-style golden sheen.

5. Bake to Perfection

Bake for 20–25 minutes. You’re looking for the dough to be puffed up and a deep golden brown. Let them rest for 5 minutes after they come out of the oven—the cheese inside will be very hot!


Serving Suggestions

  • The “Dip” Flight: Serve these with three small bowls: one with cool sour cream, one with spicy salsa, and one with guacamole.

  • Add a Crunch: If you want some texture, sprinkle a little cornmeal on the bottom of the baking sheet before placing the pockets down.

Keto Chicken Stir-Fry with Low-Carb Noodles

Introduction: This Keto Chicken Stir-Fry with Low-Carb Noodles is a delicious, low-carb twist on the classic stir-fry. Packed with tender chicken, crisp vegetables, and keto-friendly noodles, it’s a satisfying and flavorful meal that’s ready in under 30 minutes. With a savory garlic and ginger sauce, this dish is perfect for busy weeknights when you want something healthy, filling, and packed with flavor.


Ingredients:

  • 1 lb boneless, skinless chicken breast or thigh, sliced into thin strips
  • 2 tablespoons avocado oil or olive oil, divided
  • 1 medium bell pepper, thinly sliced
  • 1 medium zucchini, spiralized or sliced into thin strips
  • 1 cup broccoli florets
  • 1 cup mushrooms, sliced
  • 1 cup shredded cabbage (optional for extra crunch)
  • 2 cloves garlic, minced
  • 1 tablespoon fresh ginger, minced
  • 1 pack low-carb noodles (such as shirataki noodles or zucchini noodles, rinsed and drained)
  • 2 tablespoons soy sauce or tamari (for gluten-free)
  • 1 tablespoon rice vinegar
  • 1 teaspoon sesame oil
  • Salt and black pepper, to taste
  • Sesame seeds and sliced green onions, for garnish

Instructions:

Step 1: Prepare the Chicken

  1. Heat Oil in a Large Skillet:
    • In a large skillet or wok, heat 1 tablespoon of avocado oil over medium-high heat.
  2. Cook the Chicken:
    • Add the sliced chicken, season with a little salt and pepper, and stir-fry for 5-7 minutes, or until fully cooked and golden brown. Remove from the skillet and set aside.

Step 2: Stir-Fry the Vegetables

  1. Add Remaining Oil to the Skillet:
    • Add the remaining 1 tablespoon of oil to the skillet.
  2. Sauté Garlic and Ginger:
    • Add the minced garlic and ginger, stirring for 1-2 minutes until fragrant.
  3. Add Vegetables:
    • Add the bell pepper, broccoli, mushrooms, zucchini, and cabbage (if using). Stir-fry for 4-5 minutes, or until the vegetables are tender but still crisp.

Step 3: Add the Noodles and Sauce

  1. Prepare Low-Carb Noodles:
    • If using shirataki noodles, rinse them thoroughly and pat them dry. If using spiralized zucchini, lightly pat dry with a paper towel to remove excess moisture.
  2. Combine Noodles with Veggies:
    • Add the low-carb noodles to the skillet with the vegetables, stirring to combine.
  3. Add Sauce Ingredients:
    • Pour in the soy sauce (or tamari), rice vinegar, and sesame oil. Stir well, coating everything in the sauce.
  4. Return Chicken to Skillet:
    • Add the cooked chicken back to the skillet and toss to combine with the noodles and veggies. Stir-fry for an additional 2-3 minutes to heat everything through.

Step 4: Serve and Garnish

  1. Transfer to Serving Plates:
    • Divide the stir-fry into bowls or plates.
  2. Garnish and Enjoy:
    • Garnish with sesame seeds and sliced green onions. Serve hot, and enjoy your keto-friendly stir-fry!

Tips and Variations:

  1. Switch Up the Protein: Substitute chicken with shrimp, beef, or tofu for different flavors.
  2. Add Spice: Add a pinch of red pepper flakes or a drizzle of sriracha if you like a little heat.
  3. Storage: Store leftovers in an airtight container in the refrigerator for up to 3 days. Reheat in a skillet over low heat.

Nutritional Information (Per Serving, Approx. 4 Servings):

  • Calories: 250
  • Carbohydrates: 6 g
  • Fiber: 2 g
  • Net Carbs: 4 g
  • Protein: 25g
  • Fat: 15g

WW SmartPoints (Per Serving):

Each serving has approximately 6 SmartPoints on the Weight Watchers program, depending on specific ingredients used.


This Keto Chicken Stir-Fry with Low-Carb Noodles is a quick, satisfying, and flavorful meal that’s low in carbs but high in nutrients and protein. With tender chicken, fresh vegetables, and keto-friendly noodles, it’s a complete meal that’s perfect for any night of the week. Enjoy!

Cracker Barrel Style Meatloaf

Cracker Barrel-Style Meatloaf

A cheesy, savory meatloaf made with Ritz crackers for the perfect crumb.

Ingredients

  • 2 pounds ground beef

  • 1/2 cup crushed Ritz crackers

  • 2 large eggs

  • 1/4 cup finely diced onions

  • 1/4 cup finely diced green bell peppers

  • 1/2 cup shredded cheddar cheese

  • 1/2 cup milk

Optional Glaze (Classic Style):

  • 1/2 cup ketchup

  • 2 tbsp brown sugar

  • 1 tsp mustard


Instructions

  1. Preheat: Set your oven to 350°F (175°C).

  2. Combine: In a large bowl, lightly whisk the eggs and milk together.

  3. Mix: Add the ground beef, crushed Ritz crackers, diced onions, green bell peppers, and shredded cheddar cheese. Use your hands to mix until just combined—be careful not to overwork the meat, or it will become dense.

  4. Shape: Press the mixture into a 9×13 inch baking pan (like the one in your photo) or shape it into a rectangular loaf on a parchment-lined baking sheet.

  5. Glaze: If using a glaze, whisk the ketchup, brown sugar, and mustard together and spread it evenly over the top.

  6. Bake: Bake for 45–55 minutes, or until the internal temperature reaches 160°F.

  7. Rest: Let the meatloaf rest for at least 10 minutes before slicing to ensure it holds its shape.


Tips for the Best Result

  • The Cracker Prep: Don’t pulverize the Ritz crackers into fine dust; leave some small buttery chunks for better texture.

  • Drain the Fat: If you use a higher fat percentage beef (like 80/20), you may want to carefully drain the excess grease from the pan halfway through baking.

OLD SCHOOL BUTTER PECAN POUND CAKE

This buttery pecan cake is rich, tender, moist, and filled with chopped pecans. It is topped with a delicious cream cheese frosting that pairs perfectly with the easy cake. It’s a pecan lover’s dream.
Pecan desserts are a Southern tradition. From adding them to layered desserts to making them the stars of the show in cakes and pies, pecans are a classic addition to many different desserts. Over the years, pecans have been put into all kinds of recipes.
Of course, Hummingbird Cake is a classic dessert with pecans in it, as we like to call it “Pink Stuff” here. It’s a kind of pudding and whipped cream. Also, you better believe I’ve made my fair share of pecan pie. There is one pecan dessert that I love to make more than anything else: this delicious pecan cake.
Pecan Butter Pound Cake is a super easy cake recipe even for beginners. Just a few simple ingredients, a little mixing, a little baking, and frosting—that’s it. There are no fancy layers or build methods. It’s just good old-fashioned cake, and it’s delicious.

Ingredients:

3 cups of cake flour
°2 cups of sugar
°1 cup packed brown sugar
°3 sticks of butter (room temperature)
°5 eggs (room temperature)
°1 c whole milk (at room temperature)
°1/2 teaspoon baking powder
° 1/4 teaspoon salt
° 1 tablespoon of vanilla extract
°1 tablespoon pound extract
°2 cups of roasted American nuts
thick snow
°2 cups of powdered sugar
°4 ounces of butter
°4 ounces of cream cheese
°4 teaspoons half-and-half

*Directions:

Cream the butter and sugar together until smooth (about 3-7 minutes).
Slowly add eggs 1 at a time
Add flavors
Add flour and milk (alternately)
Start with flour and end with flour
stir in chopped pecans
Pour into a greased tube bowl
Bake at 325 degrees for 1 hour and 10 minutes. Check out after 45 minutes. Mine was ready in 1 hour.
Place a toothpick in the center of the cake, and if the toothpick comes out of the batter, leave the cake in it while baking.
Leave to cool in the pan on a wire rack for 20 minutes. Then put it on a cake plate. Make sure to cover it so the cake doesn’t dry out. A snugly fitting cake pan will be perfect.

Enjoy!

The “Perfect Transition” Ribeye & Butter-Basted Eggs

The “Perfect Transition” Ribeye & Butter-Basted Eggs

A nutrient-dense, zero-carb meal to keep energy high during the transition phase.

Ingredients

  • 1 lb Ribeye Steak: (Or any well-marbled cut like New York Strip). Look for “fat caps,” as fat is your primary fuel source on this diet.

  • 2-3 Large Eggs: (The “avian orbs” return, but this time as the star!).

  • 2 Tbsp Unsalted Butter: (Or Beef Tallow/Suet if avoiding dairy).

  • Coarse Sea Salt: To taste (essential for electrolytes during the first few weeks).


Instructions

  1. Temper the Meat: Take your steak out of the fridge 30 minutes before cooking. Pat it bone-dry with paper towels. A dry steak equals a better crust.

  2. Salt Heavily: Season all sides of the steak generously with sea salt. Don’t be shy; on a carnivore diet, salt is vital for preventing the “keto flu” or fatigue mentioned in your guide.

  3. The Sear: Heat a cast-iron skillet over high heat until it’s lightly smoking. Place the steak in the dry pan (the fat on the steak will render out). Sear for about 3–4 minutes per side for medium-rare.

  4. The Butter Baste: Reduce the heat to medium. Toss in the butter. Once it foams, use a spoon to pour the melted butter over the steak repeatedly for 1 minute.

  5. Rest: Remove the steak and let it rest on a wooden board for at least 5–8 minutes. This keeps the juices inside.

  6. Fry the Eggs: In the same pan with the leftover beef fat and browned butter, crack your eggs. Fry them sunny-side up or over-easy until the whites are set but the yolks remain liquid.

  7. Serve: Place the eggs directly on top of the sliced steak. The runny yolks act as a natural, creamy sauce.


Tips for the “Transition” Phase

  • Don’t Fear the Fat: If you find yourself hit by the “fatigue” mentioned in your guide, you likely aren’t eating enough fat. Increase the butter or choose fattier cuts of meat.

  • Hydration: Drink plenty of water, but ensure you are adding a pinch of salt to it if you feel a headache coming on.

  • Simplicity is Key: Don’t worry about “side dishes.” In this lifestyle, the meat is the meal.

Rich Roasted Allium and Tuber Chowder

It sounds like you’re absolutely craving that specific “crispy, salty, and comforting” magic! However, it looks like there was a bit of a mix-up in the recipe provided. You described the most delicious pan-fried crispy tuber patties (classic potato latkes or Kartoffelpuffer), but the recipe listed at the bottom was actually for a roasted garlic and potato chowder.

While chowder is great, it won’t give you that “lacy texture” and “savory crunch” you’re after. As you requested, I have put together the full, authentic recipe for those crispy patties based on your description!


Pan-Fried Crispy Tuber Patties (Classic Potato Latkes)

Yields: About 10–12 patties Prep time: 15 mins | Cook time: 15 mins

Ingredients

  • 1 ½ lbs (approx. 3 medium) Russet Potatoes: Freshly shredded (raw).

  • 1 small yellow onion: Finely chopped or grated.

  • 2 Large Eggs: The “avian orbs” that bind it all together.

  • 3 Tbsp All-Purpose Flour: (The refined grain powder).

  • ½ tsp Baking Powder: The chemical leavening agent for a lighter texture.

  • 1 tsp salt & ½ tsp black pepper: For essential seasoning.

  • Neutral Oil: Vegetable, canola, or grapeseed oil for frying.


Instructions

  1. Prep the Tubers: Grate your peeled potatoes and onion. Pro Tip: Place the shredded mixture into a clean kitchen towel and squeeze out as much liquid as humanly possible. The drier the potatoes, the crispier the patty!

  2. Mix the Binder: In a large bowl, whisk the eggs. Stir in the flour, baking powder, salt, and pepper until smooth.

  3. Combine & Knead: Add the dried potato and onion shreds to the bowl. Use your hands to “knead” and toss the mixture until every strand is coated in the egg and flour binder.

  4. Heat the Oil: Fill a heavy skillet with about ¼ inch of oil. Heat over medium-high until a small shred of potato sizzles immediately when dropped in.

  5. Fry in Batches: Scoop about ¼ cup of the mixture for each patty. Place in the hot oil and press down slightly with a spatula to form a disc. Do not crowd the pan!

  6. Golden Perfection: Fry for 3–4 minutes per side until the edges are dark golden brown and lacy.

  7. Drain & Rest: Move the patties to a plate lined with paper towels to absorb excess fat. Sprinkle with a tiny bit more salt while hot.


Serving Suggestions

To get that authentic experience you mentioned, try serving these with:

  • The Sweet Route: Cold applesauce (the classic pairing!).

  • The Savory Route: A dollop of sour cream and a sprinkle of fresh chives.

  • The Fancy Route: Smoked salmon and a sprig of dill.

A Quick Note: In the chowder recipe you shared, it mentioned “Tuber Chips” made of garlic slices. While those are a tasty garnish for soup, they are definitely different from these shredded patties! Stick to the raw shredded method for that “lacy” texture you love.

Mexicorn Rotel Dip

Mexicorn Rotel Dip

A warm, creamy, and slightly spicy cheese dip perfect for parties and game days.

Why You’ll Love It

  • Quick and simple to make with mostly shelf-stable ingredients

  • Creamy cheese meets sweet corn and tangy, slightly spicy tomatoes

  • Crowd-pleasing flavor ideal for potlucks, casual gatherings, or snacks


Ingredients

  • 1 (16-ounce) package pasteurized process cheese product (e.g., Velveeta), cubed

  • 1 (10-ounce) can diced tomatoes with green chilies (e.g., Rotel), undrained

  • 1 (11-ounce) can Mexicorn (whole kernel corn with red and green peppers), drained

  • Optional toppings: sliced jalapeños, chopped fresh cilantro

  • For serving: tortilla chips

Notes:

  • Use the “Hot” variety of diced tomatoes for a spicier dip.

  • If Mexicorn is unavailable, substitute 1 can of whole kernel corn plus 2 tbsp of finely diced red or green bell pepper.


Step-by-Step Instructions

  1. Prepare Ingredients:

    • Cube the processed cheese for even melting.

    • Drain the Mexicorn.

  2. Combine Ingredients:

    • In a medium saucepan over low to medium heat, combine the cubed cheese, undrained tomatoes with green chilies, and drained Mexicorn.

  3. Melt and Stir:

    • Heat gently, stirring frequently to prevent scorching.

    • Continue until the cheese is fully melted and the mixture is smooth (about 10–15 minutes).

  4. Adjust Consistency:

    • For a thinner dip, stir in 1 tbsp of milk or water at a time.

    • Slow cooker option: Combine all ingredients in a slow cooker on low, stirring occasionally until melted and hot.

  5. Serve:

    • Transfer to a serving bowl and serve immediately with tortilla chips.

    • Optional: Top with fresh cilantro or sliced jalapeños for extra flavor.


FAQ

Can I make this dip in advance?

  • Yes. Prepare, cool, and store in the refrigerator for up to 2 days. Reheat gently on the stovetop or in a slow cooker, adding a little milk or water to restore creaminess.

What if I don’t have Mexicorn?

  • Use canned corn plus diced bell peppers (see ingredient notes).

Can I use natural cheese instead of processed cheese?

  • Yes, but combine shredded cheddar or Monterey Jack with 1 tbsp cornstarch to prevent separation. Texture may be slightly grainier, and frequent stirring is needed.


Storage Tips

  • Cool leftovers completely and store in an airtight container in the fridge for 3–4 days.

  • Reheat gently on the stovetop with a splash of milk or water.

  • Can be frozen for up to 2 months; corn and tomatoes may soften slightly after thawing.

Soft & Fluffy No-Knead Bread — Simple, Affordable, and Perfect for Any Meal”

Introduction

There’s nothing more comforting than a soft, fluffy slice of homemade bread, especially when it’s easy, no-knead, and budget-friendly. This recipe delivers all the classic bread flavor and texture without the fuss of kneading or shaping.

Perfect for slimming, Weight Watchers, Mediterranean, and high-protein meal plans, and adaptable for keto/low-carb versions, this bread is versatile, wholesome, and perfect for daily meals. From sandwiches and toast to sides for soups and salads, it’s your go-to homemade bread recipe.

With minimal ingredients and maximum fluff, this bread proves that homemade baking doesn’t need to be complicated or expensive.


Look at the recipe.

  • Texture & Visual: Soft, airy interior with a lightly golden crust.
  • Flavor Highlight: Mild, buttery flavor that complements both sweet and savory dishes.
  • Diet Benefit: Can be made low-carb, high-protein, or whole grain-friendly depending on flour choice.

Ingredients Needed

Basic Bread

  • 3 cups all-purpose flour (or almond flour + psyllium husk for the keto/low-carb version)
  • 1 tsp salt
  • 1 tsp sugar or low-calorie sweetener (optional)
  • 1 tsp instant yeast
  • 1 ½ cups warm water
  • 1 tbsp olive oil (optional)

How to Make Our Easy No-Knead Bread

  1. Combine dry ingredients:
    In a large bowl, mix flour, yeast, salt, and sugar (if using).
  2. Add water:
    Pour in warm water and olive oil. Stir with a wooden spoon until a sticky dough forms. No kneading needed.
  3. Let it rise:
    Cover the bowl with plastic wrap or a kitchen towel. Let dough rise at room temperature for 2–3 hours until doubled in size.
  4. Shape & prepare for baking:
    Gently transfer dough to a floured surface. Fold edges over to shape a rough loaf. Place in a greased or parchment-lined loaf pan.
  5. Bake:
    Preheat oven to 450°F (230°C). Bake covered with foil or a lid for 20 minutes, then remove the cover and bake 15–20 minutes more until golden brown and hollow-sounding when tapped.
  6. Cool & serve:
    Let bread cool on a wire rack for at least 15 minutes before slicing.

Storage & Serving Suggestions

  • Store: Keep in an airtight container at room temperature for up to 3 days.
  • Freeze: Slice and freeze for up to 1 month. Toast directly from frozen.
  • Serving Ideas:
    • Perfect for sandwiches, avocado toast, or with soups and salads.
    • Use as a base for keto-friendly bread by substituting with almond flour and psyllium husk.
    • Brush with garlic butter or olive oil for Mediterranean-style toast.

Tips & FAQs

1. Can I make this keto-friendly?
Yes—use almond flour with 1–2 tbsp psyllium husk and reduce water slightly. Bake at the same temperature but for 30–35 minutes.

2. Can this be slimming-friendly?
Yes—use wholemeal flour and skip butter; enjoy as part of your Healthy Extra B allowance.

3. How many Weight Watchers points per slice?
Approximately 3–4 points, depending on the flour and oil used.

4. Can I make it whole grain or high-protein?
Yes — substitute 1 cup of flour with whole wheat flour and/or 2 tbsp of whey protein powder for a protein boost.

5. Can I bake this in a Dutch oven?
Absolutely—a covered Dutch oven creates a perfect crust. Bake covered for 20 minutes, then uncover for 15 minutes.

Creamy Lime & Chocolate Dessert (No-Bake Layered Dessert)

Creamy Lime & Chocolate Dessert (No-Bake Layered Dessert)

Yield: 6–8 servings
Prep Time: 15 minutes
Chill Time: 3 hours
Total Time: About 3 hours 15 minutes
Course: Dessert

This dessert is made with a smooth lime-flavored cream layer and a rich chocolate ganache. It’s easy to prepare, requires no baking, and has a perfect balance of creamy and chocolatey flavors.


🧾 Ingredients

For the Lime Cream Layer:

  • 1 can (395 g / 14 oz) sweetened condensed milk

  • ⅓ cup (100 ml) milk

  • 1 cup (200 ml) heavy cream

  • Juice of 2 fresh limes
    (or 1 packet lime-flavored powdered drink mix)

For the Chocolate Ganache:

  • 80 g (3 oz) semi-sweet chocolate, chopped

  • ½ cup (100 ml) heavy cream


👩‍🍳 Instructions


1️⃣ Prepare the Lime Cream

  • Add to a blender:

    • Heavy cream

    • Condensed milk

    • Milk

    • Lime juice

  • Blend for 3–4 minutes until thick and smooth.

  • The acid from the lime will naturally thicken the mixture.


2️⃣ Prepare the Chocolate Ganache

  • Place chopped chocolate and heavy cream in a saucepan.

  • Heat on low, stirring constantly until chocolate melts fully.

  • Continue stirring until mixture becomes smooth and glossy.

  • Remove from heat and let cool slightly (still pourable).


3️⃣ Assemble the Dessert

  • Use a glass dish (about 800 ml / 27 fl oz capacity).

  • Spread one layer of lime cream on the bottom.

  • Add a layer of chocolate ganache on top.

  • Repeat layers until dish is filled.

  • Finish with chocolate ganache on top.


4️⃣ Chill

  • Cover and refrigerate for at least 3 hours, or until firm and set.


🍽 Serving

Serve cold.
Optional garnish:

  • Lime zest

  • Chopped nuts

  • Whipped cream

  • Chocolate shavings


💡 Tips & Variations

✔ For tangier flavor: use fresh lime juice
✔ For sweeter flavor: use bottled juice or milk chocolate
✔ For firmer texture: chill overnight
✔ For extra richness: use dark chocolate
✔ Can be served in individual cups


❄️ Storage

  • Refrigerator: Up to 3 days

  • Do not freeze (texture may change)


🧮 Nutrition (Approximate per serving)

  • Calories: 300–350

  • Fat: 18–22 g

  • Carbohydrates: 30–35 g

  • Protein: 4–5 g

Grandmother’s Golden Potato & Egg Bake

🥔 Grandmother’s Golden Potato & Egg Bake

Serves: 4
Prep Time: 10 minutes
Cook Time: 25 minutes

This comforting potato and egg dish is inspired by classic potato frittatas and Spanish-style tortillas. It transforms simple ingredients into a warm, filling meal with a golden top and tender inside.


🧺 Ingredients

For the Potatoes

  • 3–4 medium potatoes (Yukon Gold or Russet), peeled and sliced into rounds about ¼ inch thick

  • 3 tablespoons vegetable oil or olive oil

  • ½ teaspoon salt

  • ¼ teaspoon black pepper

For the Egg Mixture

  • 4–5 large eggs

  • ½ cup milk or heavy cream

  • 1 bunch green onions (scallions), finely chopped

  • ½ red bell pepper, finely diced

  • ½ cup shredded cheese (mozzarella, cheddar, or Monterey Jack)

  • 1 teaspoon baking powder (optional, for a lighter texture)

  • A small pinch of salt and pepper

For the Topping

  • ½ cup extra shredded cheese

  • Fresh parsley, finely chopped (for garnish)


👩‍🍳 Instructions

1️⃣ Prepare the Potatoes

Warm the Oil
Place a large oven-safe non-stick skillet over medium heat. Add the oil and allow it to warm gently.

Cook the Potatoes
Arrange the potato slices in the pan in a single layer (work in batches if needed).
Sprinkle with salt and pepper.

Cook the potatoes for about 5–7 minutes per side, until they become lightly golden and tender when tested with a fork.

Arrange Evenly
Once all potatoes are cooked, spread them in an even, slightly overlapping layer across the bottom of the skillet.


2️⃣ Prepare the Egg Mixture

In a medium bowl, combine the eggs and milk. Whisk until smooth and evenly blended.

Add the chopped green onions, diced red bell pepper, and the first ½ cup of shredded cheese.

Sprinkle in a small pinch of salt and pepper, and stir gently to combine.


3️⃣ Combine and Cook

Add the Egg Mixture
Slowly pour the egg mixture over the potatoes in the skillet.
Use a spatula to help the eggs settle gently between the potato layers.

Begin on the Stovetop
Cook over low to medium heat for 3–5 minutes, until the edges begin to look set while the center remains soft.

Add Topping and Finish
Sprinkle the remaining cheese evenly over the top.

Place the skillet into a preheated oven at 375°F (190°C) and bake for 10–12 minutes, until:

  • The center is fully set

  • The top is lightly golden

  • The cheese is melted and bubbly


4️⃣ Serve

Remove the skillet from the oven and sprinkle with fresh parsley.

Let the bake rest for 2 minutes so it slices neatly.

Cut into wedges and serve warm.


🍽️ Serving Ideas

  • Enjoy with a fresh green salad

  • Serve with crusty bread

  • Pair with yogurt or sour cream

  • Perfect for breakfast, lunch, or dinner


💡 Helpful Tip (No Oven Option)

If you prefer not to use the oven, cover the skillet with a tight-fitting lid and continue cooking over very low heat for 10–15 minutes, until the eggs are fully set and the cheese on top is melted.

Frozen Chocolate Mousse Bars


🍦 Frozen Chocolate Mousse Bars

A light, airy no-bake treat with a crisp chocolate shell. Perfect for make-ahead entertaining.

  • Prep time: 20 minutes

  • Freeze time: 4–6 hours (or overnight)

  • Yield: 8–10 bars

Ingredients

For the Mousse Filling:

  • 1½ cups (360 ml) heavy whipping cream, cold

  • ½ cup (60 g) powdered sugar, sifted

  • ½ cup (50 g) unsweetened cocoa powder, sifted

  • 1 tsp vanilla extract

  • Optional: A pinch of espresso powder (to intensify the chocolate)

For the Chocolate Coating:

  • 12 oz (340 g) milk or semisweet chocolate, finely chopped

  • 1 tbsp coconut oil (optional, for a smoother, glossier finish)

Optional Garnishes:

  • Sea salt flakes, chopped toasted nuts, freeze-dried raspberries, or sprinkles.


Instructions

  1. Prepare Equipment: If using silicone bar molds, place them on a baking sheet for stability. If you don’t have molds, line a small loaf pan with parchment paper (you will slice these into bars once frozen).

  2. Whip the Mousse: In a chilled large bowl, beat the cold heavy cream until it starts to thicken. Add the sifted powdered sugar, cocoa powder, vanilla, and espresso powder (if using). Continue whipping until soft peaks form. The mixture should be thick enough to hold its shape but still airy.

  3. Fill Molds: Spoon or pipe the mousse into the molds. Smooth the tops with a spatula and tap the tray on the counter to pop any air bubbles.

  4. Initial Freeze: Freeze for at least 4–6 hours, or ideally overnight, until the bars are completely rock-solid.

  5. Prepare Coating: Melt the chopped chocolate and coconut oil in the microwave in 20-second bursts, stirring in between until smooth. Let the chocolate cool slightly so it isn’t piping hot when you dip.

  6. Dip and Decorate: Remove bars from the molds. Working quickly, dip each bar into the chocolate. Let the excess drip off, then place on a parchment-lined tray. Add toppings immediately before the chocolate sets.

  7. Final Set: Return the bars to the freezer for 15–30 minutes to let the shell fully harden.

  8. Serve: Remove from the freezer 2–3 minutes before eating for the perfect texture.


Tips for Success

  • The “Cold” Factor: Keep your cream, bowl, and beaters as cold as possible. This ensures the mousse stays stable and airy.

  • Batch Dipping: If you are making a large batch, keep half the bars in the freezer while you dip the first half. If the mousse starts to soften, the chocolate won’t “snap” correctly.

  • Storage: These keep beautifully for up to 4 weeks in an airtight container. Use parchment paper between layers to prevent them from sticking together.

Variations

  • Mint Chocolate: Swap vanilla for ½ tsp peppermint extract.

  • Mocha: Increase espresso powder to 1 tsp.

  • Nutty: Press crushed hazelnuts into the shell before it hardens.

☁️ Blueberry Cottage Cheese Cloud Bread

☁️ Blueberry Cottage Cheese Cloud Bread

A light, airy, and protein-packed treat.

  • Prep time: 15 minutes

  • Cook time: 25–30 minutes

  • Yields: 6–8 rounds

Organic Ingredients

  • 3 large eggs, separated (ensure no yolk gets in the whites)

  • ½ cup cottage cheese, blended until completely smooth

  • ¼ tsp cream of tartar (essential for stabilizing the egg whites)

  • ½ tsp salt

  • 1 tbsp cornstarch or arrowroot powder (optional, but highly recommended for a “bread-like” texture)

  • 1 tsp honey (or preferred sweetener)

  • ¼ cup fresh or frozen blueberries


Instructions

  1. Prep: Preheat your oven to 300°F (150°C). Line a large baking sheet with parchment paper or a high-quality silicone mat.

  2. Whip the Whites: In a clean, grease-free glass or metal bowl, beat the egg whites and cream of tartar. Start slow, then move to medium-high until stiff peaks form (the peaks should stand straight up when you lift the beaters).

  3. Mix the Base: In a separate medium bowl, whisk the egg yolks, smooth cottage cheese, salt, cornstarch, and honey until the color is uniform and the texture is creamy.

  4. The Fold: Gently add the yolk mixture to the egg whites. Using a spatula, use a “cut and fold” motion—cut through the middle and fold over the side. Do not stir, or you will pop the air bubbles and the bread will be flat.

  5. Shape: Scoop the airy batter into 6–8 rounds on the baking sheet. They should be about 3 inches wide and 1 inch thick.

  6. Top: Press 3–5 blueberries into the top of each mound.

  7. Bake: Bake for 25–30 minutes. They are done when they are golden brown on top and feel firm (not jiggly) to the touch.

  8. Cool: Let them rest on the pan for 5 minutes, then move to a wire rack. They will “settle” slightly as they cool—this is normal!


Pro-Tips for Success

  • Temperature Matters: Eggs separate more easily when cold, but whites whip to a higher volume when they are at room temperature. Separate them early and let the whites sit for 20 minutes before whipping.

  • Avoid Humidity: Cloud bread is sensitive to moisture. If it’s a very rainy/humid day, they may turn out a bit more “rubbery” than “cloud-like.”

  • The “Smooth” Secret: If you don’t have a blender, you can push the cottage cheese through a fine-mesh sieve with a spoon to get that creamy consistency.

Storage & Enjoyment

  • Refrigerator: Store in an airtight container for up to 3 days. Use parchment paper between layers to prevent sticking.

  • Serving Idea: These are excellent toasted lightly and topped with a little extra Greek yogurt or a smear of almond butter.

5 MINUTE CHOCOLATE MILK DESSERT

Low-Carb | Keto | Gluten-Free | WW-Friendly

Craving a rich, chocolatey treat that fits your keto lifestyle and stays low in SmartPoints? This Keto 5-Minute Chocolate Milk Dessert is quick, comforting, and deeply satisfying—perfect for late-night cravings, busy days, or when you want something sweet without excess sugar or carbs.

Unlike traditional chocolate milk desserts that rely on sugar and starches, this keto-friendly version uses simple pantry ingredients, healthy fats, and zero added sugar—making it ideal for keto, low-carb, and Weight Watchers plans.


🧾 Ingredients (1 Serving)

  • 1 cup unsweetened almond milk (240 ml)

  • 2 tbsp heavy cream (optional, for richness)

  • 2 tbsp unsweetened cocoa powder

  • 2 tsp powdered erythritol or monk fruit sweetener (to taste)

  • 1/4 tsp pure vanilla extract

  • 1/4 tsp xanthan gum (optional, for thickening)

  • Pinch of sea salt

Optional Toppings:

  • Sugar-free dark chocolate chips

  • Sugar-free whipped cream


🍫 Instructions

  1. Heat the Base:
    In a small saucepan, combine almond milk and heavy cream (if using). Heat over medium heat until warm but not boiling.

  2. Add Cocoa:
    Whisk in cocoa powder until completely smooth.

  3. Sweeten:
    Add sweetener and stir until dissolved.

  4. Flavor Boost:
    Stir in vanilla extract and sea salt.

  5. Thicken (Optional):
    Sprinkle in xanthan gum while whisking continuously. The mixture will thicken slightly as it cools.

  6. Rest:
    Remove from heat and let cool for 2–3 minutes.

  7. Serve:
    Pour into a mug or dessert glass. Add toppings if desired.

  8. Enjoy:
    Serve warm or refrigerate for a chilled pudding-style dessert.


🥄 Texture & Taste

Creamy, smooth, and deeply chocolatey. The cocoa and salt balance beautifully, while optional cream adds richness. Xanthan gum gives it a silky, pudding-like consistency.


🍽️ Nutritional Information (Approx.)

  • Calories: 140–170 kcal

  • Fat: 13–15 g

  • Carbs: 4–5 g

  • Fiber: 2 g

  • Net Carbs: 2–3 g

  • Protein: 2 g

  • Sugar: 0 g

Values vary by brand and toppings.


🧠 WW SmartPoints (Approx.)

  • Blue Plan: 3–4

  • Green Plan: 3–4

  • Purple Plan: 3–4

Lower Points Tip:

  • Skip heavy cream

  • Use 1 tbsp cocoa powder

  • Avoid chocolate toppings


💡 Pro Tips & Variations

  • Dairy-Free: Use full-fat coconut milk

  • Protein Boost: Add 1/2 scoop keto protein powder

  • Mocha Version: Add a pinch of espresso powder

  • Spiced Chocolate: Add cinnamon

  • Mint Version: Add peppermint extract

  • Thicker Texture: Chill 10–15 minutes after cooking


❄️ Storage

  • Store in an airtight container in the fridge for up to 3 days

  • Reheat gently or thin with almond milk if needed


🔁 Ingredient Swaps

  • Sweetener: Stevia, monk fruit, allulose

  • Milk: Coconut milk or macadamia milk

  • Cream: Skip for lower fat version


🔍 FAQ

Can I skip xanthan gum?
Yes. It will be drinkable like chocolate milk instead of pudding.

Can kids eat this?
Yes, using mild sweeteners like monk fruit.

Can it be served cold?
Yes. Chill for 1 hour for a cold dessert.


✨ Final Thoughts

This Keto 5-Minute Chocolate Milk Dessert is fast, affordable, and incredibly satisfying. It fits keto macros, stays low in carbs, and can be adapted for many lifestyles. Whether warm or chilled, it delivers rich chocolate flavor without added sugar.

Add this to your weekly rotation—you’ll be surprised how indulgent something this simple can taste.

Apple Fritter Bites

These Apple Fritter Bites are really a life-changing autumn treat that I had to share with you today.

These are true apple-flavored, doughnut-like fritters that are light as air and covered with the most delectable apple cider glaze.

You may feel somewhat better about coming back for seconds—or thirds—because they are baked rather than fried!

I first sampled these little morsels of perfection when Baker Mama’s clever friend Courtney sent me a copy of her new cookbook, Brilliant Bites.

I had to make them as soon as I saw the recipe title.

Could you possibly come up with an autumn snack that is better? Crisp cider glaze over warm, doughy apple fritters that pop? Indeed, do!

These, let me just say, are every bit as good as apple fritters could possibly be.

Soft pieces of fresh apple abound in these very moist treats.

The glaze is sweet and sour, and it gives you that distinctive crackly crust that is just too good.

Finally, the nicest thing? You may feel comfortable about nibbling on a couple since they are baked rather than fried. If you’re anything like me, the whole batch!

Components Cooking spray nonstick
One and a half cups total flour
Two tsp baking powder
A teaspoon each of ground cinnamon and kosher salt
Melt one-fourth cup unsalted butter
3/4 cup sugar, granulated
Just one big egg
A half teaspoon of vanilla essence
1/2 cup applesauce, unsweet
About two medium-sized neatly chopped Honeycrisp or Gala apples
Apple cider and two cups powdered sugar for the glaze
1/3 cup plus two tablespoons apple juice or cider


Arrange an oven rack to 400°F and mist a baking sheet with nonstick cooking spray.

Stir together the flour, baking powder, salt, and cinnamon in a medium-sized basin.

Beat the sugar and melted butter together well in a big basin. Whisk in the applesauce, vanilla, and egg until smooth.

Stirring just until mixed, add the dry ingredients to the wet ones. Fold in the diced apples rather gently.

To the prepared baking sheet, scoop out 1 tablespoon quantities of batter and place them a few inches apart.

After ten minutes of baking, take it out of the oven and set the broiler to high.

To make the glaze, beat the powdered sugar and apple juice or cider until it is pourable.

Let some of the glaze run down the edges of the heated fritter bits as you brush over them. Broil, turning the pan often, for two to four minutes, or until the glaze begins to boil and caramelize.

Take them out of the oven and liberally coat the fritters’ tops with the remaining glaze.

Give the glaze fifteen minutes to set before serving.

Enjoy!

Mexican-Style Potato Puff Casserole

Mexican-Style Potato Puff Casserole

A crunchy, cheesy, taco-inspired twist on the classic tater tot casserole. Perfectly sized to feed a hungry family of eight.

  • Prep time: 10 minutes

  • Cook time: 50 minutes

  • Total time: 1 hour

  • Yields: 8 servings

Ingredients

The Filling

  • 2 lbs Ground beef (lean works best to minimize grease)

  • 1 packet Taco seasoning (your favorite brand)

  • 1 can (15 oz) Whole kernel corn, fully drained

  • 1 can (10.5 oz) Condensed nacho cheese soup

The Topping

  • 32 oz bag Frozen tater tots (cylindrical potato puffs)

  • 1 ½ cups Sharp cheddar cheese, shredded


Instructions

  1. Preheat and Prep: Preheat your oven to 350°F (175°C). Lightly grease a 9×13 inch baking dish with non-stick cooking spray.

  2. Brown the Beef: In a large skillet over medium-high heat, brown the ground beef until it is completely cooked through and no pink remains. Drain the excess grease thoroughly to prevent a soggy casserole.

  3. Season: Turn the heat down to low. Sprinkle the taco seasoning over the beef and stir for 2–3 minutes to let the spices bloom and coat the meat.

  4. Create the Sauce: Add the drained corn and the can of nacho cheese soup to the skillet. Stir constantly for about 2 minutes until the mixture is creamy and well combined.

  5. Layer the Base: Pour the warm meat and cheese mixture into the prepared 9×13 dish. Use a spatula to spread it into an even layer.

  6. The “Crust”: Arrange the frozen tater tots in a single, even layer over the top of the meat. Pro tip: For maximum crunch, don’t overlap them too much!

  7. The First Bake: Place the dish in the oven and bake for 45 minutes. The filling should be bubbly, and the tots should be starting to turn golden.

  8. Add the Cheese: Carefully remove the pan and sprinkle the shredded cheddar cheese evenly over the tots.

  9. The Final Melt: Return to the oven for 5 more minutes, or until the cheese is completely melted and gooey.

  10. Serve: Let it sit for 5 minutes before serving to let the sauce set.


Serving Suggestions

To really lean into the “Taco Night” vibe, set out bowls of these fresh toppings so the kids can customize their plates:

  • Cold sour cream or Greek yogurt

  • Diced tomatoes or pico de gallo

  • Sliced jalapeños (for the brave ones!)

  • Shredded lettuce for a bit of crunch

Cod and Potatoes in Rosemary Cream Sauce

Tender, flaky cod and golden baby potatoes come together in a luxurious rosemary cream sauce that feels restaurant-worthy but is easy enough for a weeknight. Infused with garlic, herbs, and a touch of Dijon, this one-pan-style dish is rich, comforting, and perfect for cooler evenings or an elevated family dinner.


Ingredients

For the Cod & Potatoes

  • 2 cod fillets (about 6 oz each)

  • 4–5 baby potatoes, halved

  • 2 tbsp olive oil

  • 1 tsp dried thyme

  • ½ tsp paprika

  • Salt & black pepper, to taste

For the Rosemary Cream Sauce

  • 2 tbsp butter

  • 2 cloves garlic, minced

  • ½ cup chicken or vegetable broth

  • 1 cup heavy cream

  • 1–2 tsp fresh rosemary, finely chopped

  • 1 tsp Dijon mustard (optional but recommended)


Instructions

  1. Prep the Potatoes
    Preheat oven to 400°F (200°C). Toss halved potatoes with olive oil, thyme, paprika, salt, and pepper. Arrange cut-side down on a baking dish or oven-safe skillet.

  2. Roast
    Roast potatoes for 20–25 minutes, until lightly golden and fork-tender.

  3. Season the Cod
    Pat cod fillets dry and season both sides with salt and pepper.

  4. Make the Sauce
    In a skillet over medium heat, melt butter. Add garlic and sauté for 30 seconds until fragrant.
    Stir in broth, cream, rosemary, and Dijon. Simmer 3–4 minutes until slightly thickened.

  5. Combine & Bake
    Nestle cod fillets among the potatoes. Pour rosemary cream sauce over everything.

  6. Finish Cooking
    Return to the oven and bake for 12–15 minutes, until the cod flakes easily and the sauce is bubbling.

  7. Serve
    Spoon sauce generously over the fish and potatoes. Garnish with extra rosemary if desired.


Notes

  • Cod is done when it reaches 145°F (63°C) internally.

  • Fresh rosemary gives the best flavor, but dried works in a pinch (use ½ tsp).

  • Sauce will thicken more as it rests.


Tips for Best Results

  • Dry the cod well before seasoning for better texture.

  • Don’t overbake—cod cooks fast.

  • For extra richness, finish with a squeeze of lemon or a sprinkle of Parmesan.


Servings

  • 2 hearty servings

  • Easily doubled for 4 people


Estimated Nutritional Information (Per Serving)

  • Calories: ~520

  • Protein: ~38g

  • Fat: ~36g

  • Carbohydrates: ~18g

  • Fiber: ~3g

  • Sodium: ~480mg

(Estimates vary by ingredient brands.)


Benefits

  • ✔️ High-protein, nutrient-rich cod

  • ✔️ One-pan-style comfort meal

  • ✔️ Elegant yet easy

  • ✔️ Naturally gluten-free


Recipe Q & A

Q: Can I use another fish?
A: Yes! Halibut, haddock, or sea bass work beautifully.