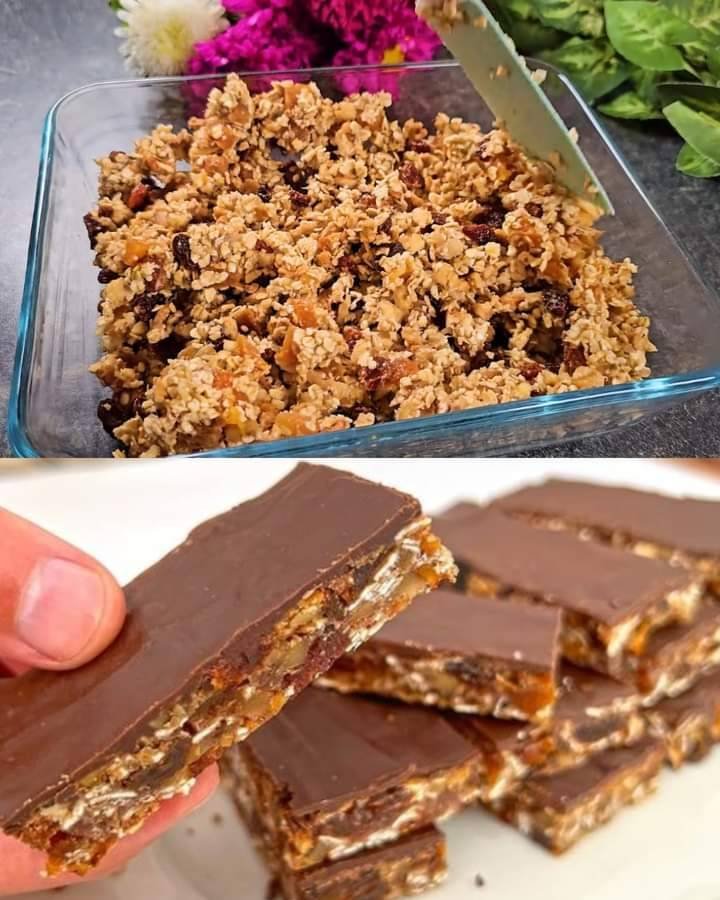
Spinach Artichoke Crescent Roll Bake

🥬 Spinach Artichoke Crescent Roll Bake

Yields: 8–10 rolls
Prep Time: 20 minutes
Bake Time: 18–22 minutes

A warm, cheesy appetizer that combines creamy spinach and artichokes inside golden, buttery crescent rolls. Perfect for parties, snacks, or cozy meals.


📝 Ingredients

For the Filling:

  • 1 cup frozen chopped spinach, thawed and well-drained

  • 1 cup canned artichoke hearts, chopped and well-drained

  • 4 oz (115 g) cream cheese, softened

  • ¼ cup sour cream

  • ¼ cup mayonnaise

  • ½ cup shredded mozzarella cheese

  • ¼ cup grated Parmesan cheese

  • 1 clove garlic, minced

  • Salt & pepper, to taste

For the Rolls:

  • 1 can (8 oz / 225 g) refrigerated crescent roll dough (sheet or regular)

  • 1 egg, beaten (optional, for brushing tops)

  • Extra mozzarella or Parmesan for topping (optional)

  • Fresh parsley, chopped (for garnish, optional)


👩‍🍳 Step-by-Step Instructions

Step 1 — Preheat & Prepare the Dish

  1. Preheat oven to 375°F (190°C).

  2. Lightly grease a baking dish or oven-safe skillet with butter or cooking spray.


Step 2 — Make the Filling

  1. In a medium bowl, combine cream cheese, sour cream, and mayonnaise. Mix until smooth.

  2. Stir in mozzarella, Parmesan, and garlic.

  3. Add the spinach and artichokes, mixing until evenly combined.

  4. Season with salt and pepper to taste.

Optional: Add a pinch of red pepper flakes or Italian seasoning for extra flavor.


Step 3 — Prepare the Dough

  1. Unroll the crescent dough onto a clean surface. If using perforated crescent rolls, pinch the seams to form a solid rectangle.

  2. Spread the spinach artichoke filling evenly over the dough, leaving about ½ inch from the edges.

  3. Starting from one long edge, roll the dough into a log (like a jelly roll).

  4. Using a sharp knife or unflavored dental floss, slice the log into 1-inch rolls (about 8–10 pieces).


Step 4 — Assemble & Bake

  1. Place the rolls cut side up in the prepared baking dish.

  2. Optional: Brush tops with beaten egg for a golden finish.

  3. Optional: Sprinkle extra mozzarella or Parmesan on top.

  4. Bake for 18–22 minutes or until golden brown and puffed.


Step 5 — Garnish & Serve

  1. Remove from oven and let cool for 5 minutes.

  2. Garnish with fresh parsley if desired.

  3. Serve warm as an appetizer, snack, or side dish.


💡 Tips for Success

  • Drain Well: Squeeze out excess liquid from spinach and artichokes to avoid soggy rolls.

  • Cheese Variations: Try Monterey Jack, cheddar, or Gruyère for different flavors.

  • Make Ahead: Assemble rolls and refrigerate for up to 8 hours before baking. Add 2–3 minutes to baking time.

  • Freezing: Bake, cool, and freeze in an airtight container for up to 1 month. Reheat at 350°F until warmed through.


🍴 Serving Ideas

  • Pair with tomato soup for a cozy meal.

  • Serve alongside a fresh garden salad for lunch.

  • Offer with marinara or garlic dip for extra indulgence.


⏱ Summary Table

Step Time Key Notes
Preheat Oven 5 min Grease baking dish
Make Filling 10 min Drain spinach well
Prepare Dough 5 min Roll tightly for neat slices
Bake 18–22 min Golden brown top
Serve Best served warm

Butter Biscuits & Soft Melting Cookies

Butter Biscuits & Soft Melting Cookies

Yields: Approximately 40–50 biscuits
Preparation Time: 20 minutes
Baking Time: 10–12 minutes

These butter-based biscuits are light, tender, and gently crisp at the edges. The same dough can be shaped in different ways to create both simple butter biscuits and soft, swirl-style cookies. They are perfect for sharing, gifting, or enjoying with tea.


📋 Ingredients

  • 500 g butter, softened at room temperature

  • 1 cup fine or granulated sugar

  • 3 large eggs

  • 3 tablespoons neutral oil

  • 1 teaspoon vanilla flavoring

  • 5 cups all-purpose flour, sifted

  • 4 teaspoons baking powder

  • ¼ teaspoon bicarbonate of soda

Optional Decorations

  • Glacé cherries, finely chopped

  • Fruit jam (such as apricot or strawberry)

  • Melted chocolate for drizzling


👩‍🍳 Step-by-Step Instructions

Step 1: Prepare the Butter Mixture

  1. Place the softened butter and sugar in a large mixing bowl.

  2. Beat together until light in color and creamy in texture.

  3. Add the oil and vanilla flavoring.

  4. Beat in the eggs one at a time, mixing well after each addition.


Step 2: Add Dry Ingredients

  1. In a separate bowl, sift together the flour, baking powder, and bicarbonate of soda.

  2. Gradually add the dry mixture to the butter mixture.

  3. Mix gently until a soft, smooth dough forms.

  4. Stop mixing once combined to keep the biscuits tender.


Step 3: Shape the Biscuits

  1. Preheat the oven to 180°C (350°F).

  2. Lightly grease or line baking trays with parchment paper.

For Swirl-Style Cookies

  • Transfer the dough to a piping bag fitted with a large star nozzle.

  • Pipe small swirls onto the tray.

  • Add a small amount of jam or a piece of cherry in the center if desired.

For Simple Butter Biscuits

  • Roll small portions of dough into balls and flatten gently with a fork,
    or

  • Roll the dough out and cut into shapes using a cutter.


Step 4: Bake

  1. Place trays in the preheated oven.

  2. Bake for 10–12 minutes, until the edges are lightly colored.

  3. The biscuits should remain pale for a soft texture.


Step 5: Cool and Finish

  1. Remove biscuits from the oven.

  2. Allow them to cool completely on a wire rack.

  3. Once cooled, drizzle with melted chocolate if desired.


🧊 Storage Tips

  • Store in an airtight container at room temperature for up to 2 weeks

  • Flavors develop further after resting for a day


💡 Helpful Notes

  • Butter should be soft, not melted, before mixing

  • Avoid overmixing to maintain a light texture

  • Use similar-sized portions for even baking

Chef’s Key to Exceptional Egg Salad: Techniques for Achieving Creamy Perfection

Egg salad may seem simple, but any seasoned chef will tell you: the difference between an ordinary bowl and an unforgettable one comes down to technique. This humble dish relies on a balance of texture, seasoning, and method. When done right, egg salad becomes silky, rich, and luxurious—the kind you want to eat straight from the bowl.

Here’s how chefs elevate this classic comfort food into something exceptional.

1. Start With Perfectly Cooked Eggs

The foundation of a creamy egg salad is a tender, velvety egg—never rubbery whites, never chalky yolks.

Chef’s Technique:

  • Place eggs in a pot.
  • Cover with cold water by at least one inch.
  • Bring to a boil slowly over medium heat.
  • Once the water reaches a full boil, turn off the heat, cover, and let the eggs sit for 10–11 minutes.
  • Immediately transfer to an ice bath for 5 minutes.

This prevents that gray ring around the yolk and ensures they peel beautifully.

2. Grate, Don’t Chop

Most home cooks roughly chop their eggs. Chefs often use a different method:

Use the small side of a grater or press eggs through a mesh cooling rack.

This technique creates:

  • An ultra-fine texture
  • Even distribution of yolk richness
  • That signature restaurant-level creaminess

This is the trick that transforms good egg salad into silky egg salad.

3. Build a Balanced, Creamy Base

The classic mistake is adding too much mayonnaise in an attempt to make the salad creamy. True creaminess comes from combining:

  • Mayonnaise for richness
  • Mustard for acidity
  • A touch of sour cream or Greek yogurt for extra silkiness
  • A tiny splash of pickle brine or lemon juice for brightness

This creates a layered flavor profile and prevents the salad from tasting flat.

4. Season Like a Chef

Eggs crave seasoning. Without it, even the best technique falls flat.

Chefs add:

  • A generous pinch of Kosher salt
  • Fresh black pepper
  • Smoked paprika or regular paprika for depth
  • Fresh dill or chives for fresh, aromatic notes

Optional but chef-approved:

  • A small spoon of finely minced shallot
  • Celery for crisp texture
  • A little Dijon for tang

5. Let It Rest

Texture and flavor improve dramatically after 20–30 minutes in the refrigerator.

Resting time allows:

  • Flavors to meld
  • Excess moisture to absorb
  • The salad thickens naturally

This is why restaurant egg salad always tastes “more put together.”

Restaurant-Quality Creamy Egg Salad Recipe

Ingredients (Serves 4)

For the eggs:

  • 8 large eggs

Creamy base:

  • 1/3 cup mayonnaise
  • 1 tbsp Dijon mustard
  • 1 tbsp sour cream or Greek yogurt
  • 1–2 tsp pickle brine or lemon juice

Mix-ins & seasoning:

  • 1/4 cup finely diced celery
  • 1 tbsp minced shallot (optional)
  • 1 tbsp chopped fresh dill or chives
  • 1/2 tsp salt
  • 1/4 tsp black pepper
  • Pinch of smoked or regular paprika

Instructions

1. Cook the Eggs

  1. Place eggs in a pot and cover with cold water.
  2. Heat over medium until the water comes to a full boil.
  3. Turn off heat, cover, and let sit for 10–11 minutes.
  4. Transfer eggs to an ice bath for 5 minutes.
  5. Peel once cool.

2. Prepare the Eggs

  • Grate the eggs using the small side of a box grater, OR press them through a metal rack for fluffy, even pieces.

3. Make the Creamy Dressing

In a large bowl, whisk together:

  • Mayonnaise
  • Dijon
  • Sour cream/Greek yogurt
  • Pickle brine or lemon juice
  • Salt, pepper, and paprika

4. Combine

  • Fold in the grated eggs, celery, and shallot.
  • Finish with fresh herbs.
  • Mix gently to keep the mixture airy.

5. Chill and Serve

  • Refrigerate for 20–30 minutes to enhance creaminess.
  • Serve on toasted bread, crackers, croissants, or in lettuce cups.

Final Thoughts

The secret to extraordinary egg salad isn’t a long list of ingredients—it’s professional technique. Perfectly cooked eggs, grated texture, balanced acidity, and a short resting time transform a simple, everyday recipe into something luxurious and memorable.

Master these steps, and you’ll never go back to ordinary egg salad again.

Slow-Cooker Pot Roast Recipe

Ingredients:

For the Roast:

  • 3 lbs chuck roast (well-marbled)
  • Salt and pepper (to taste)
  • 2 tbsp olive oil

Aromatics & Veggies:

  • 1 large onion, sliced
  • 4 cloves garlic, minced
  • 4 large carrots, cut into 2-inch pieces
  • 1 lb baby potatoes, halved

Braising Liquid:

  • 2 cups  beef  broth
  • 1 cup red wine (optional, but recommended)
  • 2 tbsp tomato paste
  • 1 tbsp Worcestershire sauce
  • 1 tsp dried thyme
  • 1 tsp dried rosemary
  • bay leaves

 Gravy Thickener (Optional):

Keto Recipes Cookbook
  • 2 tbsp cornstarch + 2 tbsp water

Instructions: 

Discover more
garlic
Beef
Slow Cooker
Garlic
gravy
slow cooker
beef
Gravy
Slow-Cooker
cream

Sear the Roast:

  • Season the chuck roast with salt/pepper.
  • Heat olive oil in a skillet over medium-high. Sear for 3-4 mins per side until crusted.

Layer in the Slow Cooker:

  • Place onioncarrots, and potatoes in slow cooker.
  • Set the seared roast atop the veggies.

Add Braising Liquid:

  • Sprinkle garlic over the roast.
  • Whisk beef brothwinetomato pasteWorcestershirethymerosemary, and bay leaves. Pour around roast.

Cook:

  • Cover. Low: 8-10 hrs / High: 4-5 hrs until fork-tender (203°F internal).

Optional Gravy:

  • Remove roast/veggies; cover.
  • Strain liquid into saucepan. Simmer.
  • Mix cornstarch and water; whisk into liquid. Boil for 2-3 mins until thickened.

Serve:

  • Slice the roast against the grain. Serve with veggies and gravy.

Classic Golden Crispy Egg Rolls

Classic Golden Crispy Egg Rolls

Prep time: 30 mins | Cook time: 10 mins | Yields: 12-15 egg rolls


Ingredients

The Filling:

  • 1 lb Ground pork (or beef)

  • 1 tsp Ground ginger

  • 2 cloves Garlic, minced

  • 3 cups Coleslaw mix (shredded cabbage and carrots)

  • 2 tbsp Soy sauce

  • 1 tbsp Oyster sauce

  • 1 tsp Sesame oil

  • 2 Green onions, thinly sliced

Assembly:

  • 1 package Egg roll wrappers

  • 1 Egg, beaten (for sealing)

  • Neutral oil (Vegetable, Canola, or Peanut) for frying


Instructions

  1. Brown the Meat: In a large skillet or wok over medium-high heat, cook the ground meat until fully browned. Drain any excess fat.

  2. Season & Sauté: Add the ginger, garlic, and coleslaw mix to the skillet. Sauté for 3–4 minutes until the cabbage is wilted but still has a slight crunch.

  3. Finish Filling: Stir in the soy sauce, oyster sauce, and sesame oil. Remove from heat and toss in the green onions. Pro Tip: Let the filling cool completely before wrapping to prevent the wrappers from getting soggy.

  4. The Wrap: Lay an egg roll wrapper in a diamond shape. Place about 2–3 tablespoons of filling in the center.

    • Fold the bottom corner up over the filling.

    • Fold the two side corners into the center.

    • Brush the top corner with the beaten egg and roll tightly.

  5. Fry until Golden: Heat 2 inches of oil in a heavy pot to 350°F (175°C). Fry 3–4 egg rolls at a time for about 3–5 minutes, turning occasionally, until they reach that deep golden brown seen in your photo.

  6. Drain: Place on a wire rack or paper towels to remove excess oil.

🍗 Crack Chicken Pinwheels

🍗 Crack Chicken Pinwheels

Creamy, cheesy, and savory pinwheels loaded with bacon and ranch flavor.

  • Prep Time: 15 minutes

  • Cook Time: 25 minutes

  • Total Time: 40 minutes

  • Servings: 6

Ingredients

  • 2 cups cooked chicken, finely chopped or shredded (rotisserie works great)

  • 8 oz (225g) cream cheese, fully softened

  • 1 cup shredded cheddar cheese (sharp cheddar recommended)

  • ½ cup cooked bacon, finely chopped and crispy

  • 1 packet (1 oz / 28g) dry ranch seasoning mix

  • 2 large refrigerated crescent roll dough sheets (or crescent rolls with seams pressed together)

  • Optional: Chopped green onions for a pop of freshness

Instructions

1. Prep the Oven and Pan

Preheat your oven to 375°F (190°C). Line a large baking sheet with parchment paper or lightly grease it to ensure the cheese doesn’t stick.

2. Make the Filling

In a medium mixing bowl, beat the softened cream cheese until smooth and creamy. Add the ranch seasoning, shredded cheddar, chicken, and chopped bacon. Stir well until the chicken is evenly coated and the mixture is uniform.

3. Assemble the Rolls

Unroll the crescent dough sheets onto a flat, clean surface. If using standard crescent rolls, use your fingers to pinch the perforated seams together to create one solid rectangle. Spread the chicken mixture evenly over the dough, leaving about a half-inch border at the edges.

4. Roll and Slice

Starting from the long side, roll the dough tightly into a log. Using a sharp knife, slice the log into rounds roughly ½ to ¾ inch thick. Tip: Wipe your knife with a damp cloth between slices for cleaner edges.

5. Bake

Place the pinwheels cut-side up on the prepared baking sheet, leaving a little space between each one. Bake for 18–22 minutes, or until the dough is golden brown and the cheese is bubbly.

6. Rest and Serve

Allow the pinwheels to rest on the pan for 5 minutes. This helps the filling set so it doesn’t spill out when you pick them up. Serve warm.


Pro-Tips for Success

  • Tighter Rolls: If the dough is getting too soft to handle, pop the rolled log into the fridge for 10–15 minutes before slicing. This helps them keep their round shape.

  • Keto Option: To make these low-carb, swap the crescent dough for a “Fathead” dough (mozzarella and almond flour base) or spread the filling onto low-carb tortillas.

  • Storage: Leftovers can be stored in an airtight container in the fridge for up to 4 days. Reheat in the oven or air fryer at 325°F to maintain the flaky texture of the dough.

Crispy Baked Cabbage Steaks

Crispy Baked Cabbage Steaks are thick slices of fresh cabbage brushed with olive oil, seasoned simply, and oven-roasted until the edges are golden and caramelized while the centers stay tender. This easy, budget-friendly dish works beautifully as a healthy side, a vegetarian main, or a base for flavorful toppings.


⏱️ Prep & Cook Time

  • Prep Time: 10 minutes

  • Cook Time: 30–35 minutes

  • Total Time: 40–45 minutes


🍽️ Servings

Serves: 4 people
(1 cabbage yields 4 thick steaks)


🧾 Ingredients

  • 1 large green cabbage

  • 3–4 tablespoons olive oil

  • ½ teaspoon salt (or to taste)

  • ½ teaspoon black pepper

  • ½ teaspoon garlic powder (optional)

  • ½ teaspoon smoked paprika (optional)

  • Optional toppings:

    • Parmesan cheese

    • Lemon zest or juice

    • Red pepper flakes

    • Fresh herbs (parsley, thyme)


👩‍🍳 Instructions

  1. Preheat Oven
    Preheat oven to 425°F (220°C). Line a baking sheet with foil or parchment paper.

  2. Slice the Cabbage
    Remove loose outer leaves. Slice cabbage into ¾–1 inch thick steaks, keeping the core intact to hold them together.

  3. Season
    Arrange cabbage steaks on the baking sheet. Brush both sides generously with olive oil. Sprinkle with salt, pepper, and optional seasonings.

  4. Bake
    Roast for 30–35 minutes, flipping once halfway through, until edges are browned and crispy.

  5. Finish & Serve
    Add optional toppings and serve hot.


⭐ Recipe Notes

  • Thicker slices stay intact and develop better texture.

  • Don’t overcrowd the pan—space helps crisping.

  • Olive oil is key for caramelization.


🔥 Pro Tips for Extra Crispiness

  • Use high heat (425°F+)

  • Flip gently using a wide spatula

  • Add a final 2–3 minutes under the broiler

  • Sprinkle cheese during the last 5 minutes


🧮 Nutritional Information (Per Serving – Approximate)

  • Calories: 120

  • Carbohydrates: 10g

  • Protein: 2g

  • Fat: 9g

  • Fiber: 4g

  • Sodium: 230mg


💚 Health Benefits

  • Rich in fiber for digestion

  • High in vitamin C & K

  • Low-calorie and heart-healthy

  • Contains antioxidants that support immunity

  • Naturally gluten-free & vegan


❓ Q & A

Q: Can I use red cabbage?
Yes! Red cabbage works well but may need 5 extra minutes to soften.

Q: Can I make this in an air fryer?
Yes. Cook at 375°F for 12–15 minutes, flipping halfway.

Q: How do I store leftovers?
Store in an airtight container for up to 3 days in the fridge.

Q: Can I add protein?
Absolutely—top with chickpeas, tofu, or a fried egg.

Q: Why isn’t my cabbage crispy?
Likely overcrowding, low heat, or not enough oil.

🥣 Classic Homemade Chicken Noodle Soup

🥣 Classic Homemade Chicken Noodle Soup

Serves: 6–8
Prep Time: 20 minutes
Cook Time: 45–60 minutes


🧾 Ingredients

For the Soup Base

  • 2 tablespoons olive oil or butter

  • 1 medium onion, diced

  • 3 cloves garlic, minced

  • 3 medium carrots, sliced

  • 2 celery stalks, sliced

  • 1 teaspoon salt (adjust to taste)

  • ½ teaspoon black pepper

  • 1 teaspoon dried thyme

  • ½ teaspoon dried oregano

  • 1 bay leaf

Chicken & Broth

  • 1½–2 pounds chicken (bone-in thighs, drumsticks, or breasts)

  • 8–10 cups chicken broth (homemade or good-quality store-bought)

  • 2 cups water (if needed, for extra broth)

Noodles & Finish

  • 2–3 cups egg noodles (wide or homestyle)

  • 1 tablespoon fresh parsley, chopped

  • 1 teaspoon lemon juice (optional, brightens flavor)


🥄 Instructions

1️⃣ Sauté the Vegetables

Heat olive oil or butter in a large soup pot over medium heat.
Add onion and cook for 3–4 minutes until soft and fragrant.
Stir in garlic, carrots, and celery. Cook another 3–5 minutes, stirring often.

2️⃣ Build the Flavor

Season with salt, black pepper, thyme, and oregano, and add the bay leaf.
Pour in chicken broth and water. Bring to a gentle boil.

3️⃣ Cook the Chicken

Add chicken pieces directly into the pot.
Reduce heat to a simmer, cover, and cook for 25–30 minutes, until chicken is fully cooked and tender.

4️⃣ Shred the Chicken

Remove the chicken from the pot and place it on a plate.
Shred into bite-sized pieces using two forks.
Discard skin and bones. Return shredded chicken to the soup.

5️⃣ Add the Noodles

Stir in egg noodles and cook uncovered for 8–10 minutes, until noodles are tender but not mushy.

6️⃣ Final Touch

Remove bay leaf.
Stir in fresh parsley and lemon juice if using.
Taste and adjust seasoning with extra salt or pepper if needed.


🌟 Tips for the Best Soup

  • For extra-rich flavor: Use bone-in chicken and simmer a little longer

  • For leftovers: Keep noodles separate if storing more than 1 day

  • For freezer-friendly soup: Freeze without noodles; add fresh when reheating

  • Like it thicker? Add a handful of broken noodles or reduce broth slightly


🥖 Serving Ideas

  • Crusty bread or buttered toast

  • Crackers or garlic bread

  • Pickles on the side 😉 (because you said it!)

Baklava Bundt Cake

This Baklava Bundt Cake is a fusion dessert that captures the classic flavors of traditional baklava—honey, walnuts, cinnamon, and butter—in a moist, easy-to-slice cake form. Baked in a Bundt pan, it presents the rich, nutty, and syrup-soaked essence of the beloved pastry as a simple, shareable cake.

Why You’ll Love This Recipe

The recipe simplifies the labor-intensive process of layering phyllo dough while delivering the same signature taste and texture. It is designed for reliability, using common baking ingredients and pans. The cake is thoroughly soaked in a spiced honey syrup, ensuring every bite is moist and flavorful.

Ingredients

For the Cake:

  • 3 cups all-purpose flour
  • 1 teaspoon baking powder
  • 1/2 teaspoon baking soda
  • 1/2 teaspoon salt
  • 1 cup unsalted butter, softened
  • 1 3/4 cups granulated sugar
  • 4 large eggs, room temperature
  • 1 teaspoon vanilla extract
  • 1 cup plain Greek yogurt or sour cream, room temperature
  • 1 1/2 cups finely chopped walnuts
  • 1/2 cup granulated sugar (for nut mixture)
  • 2 teaspoons ground cinnamon

For the Honey Syrup:

  • 1 cup granulated sugar
  • 1 cup water
  • 1 cup honey
  • 1 cinnamon stick
  • 3 whole cloves
  • 1 strip of lemon peel

Step-by-Step Instructions

  1. Prepare: Preheat oven to 350°F (175°C). Generously grease and flour a 10-12 cup Bundt pan.
  2. Make Nut Mixture: In a bowl, combine the chopped walnuts, 1/2 cup sugar, and ground cinnamon. Set aside.
  3. Make Cake Batter: In a medium bowl, whisk together flour, baking powder, baking soda, and salt. In a large bowl, cream the softened butter and 1 3/4 cups sugar until light and fluffy. Beat in eggs one at a time, then mix in vanilla extract. Alternately add the flour mixture and the Greek yogurt to the butter mixture, beginning and ending with the flour, mixing just until combined.
  4. Layer in Pan: Spoon about one-third of the cake batter into the prepared Bundt pan and smooth the top. Sprinkle half of the walnut-cinnamon mixture evenly over the batter. Add another third of the batter, then the remaining walnut mixture. Top with the final third of the batter, smoothing gently.
  5. Bake: Bake for 50-60 minutes, or until a long skewer inserted into the center comes out clean.
  6. Make Syrup: While the cake bakes, combine the sugar, water, honey, cinnamon stick, cloves, and lemon peel in a saucepan. Bring to a boil, stirring until sugar dissolves. Reduce heat and simmer for 10-15 minutes without stirring. Remove from heat, discard the spices and peel, and let cool slightly.
  7. Soak Cake: As soon as the cake comes out of the oven, use the skewer to poke holes all over the top (which will be the bottom of the cake). Slowly and evenly pour about two-thirds of the warm syrup over the hotcake. Let the cake cool completely in the pan for at least 2 hours.
  8. Unmold and Finish: Once completely cool, invert the cake onto a serving plate. Rewarm the remaining syrup if needed and brush or drizzle it over the exterior of the cake.

FAQ

Can I use a different type of nut?  Yes. Pistachios or a blend of walnuts and pistachios are common, authentic substitutions.

Discover more
Bread
Butter
sugar
cake
honey
Honey
Sugar
flour
butter
Cake

Can I make the syrup ahead of time?  Yes. The syrup can be made up to a week in advance and stored covered in the refrigerator. Warm before using.

Why did my cake stick to the pan?  Ensure the pan is thoroughly greased and floured, including all crevices. Let the cake cool completely in the pan to allow its structure to set before inverting.

Is the cake overly sweet?  The syrup is integral, but the cake itself is not overly sweet, and the nuts provide balance. The full syrup recipe is traditional for a soaked texture.

You Must Know

It is critical to pour the honey syrup over the cake immediately after it comes out of the oven while both are still warm. This allows the cake to fully absorb the syrup, creating the signature moist, sticky texture. Cooling the cake completely in the pan is also non-negotiable for a clean release.

Storage Tips

Store the cake at room temperature, tightly covered with plastic wrap or under a cake dome, for up to 3 days. For longer storage, wrap individual slices or the whole cake securely and freeze for up to 2 months. Thaw at room temperature. Do not refrigerate, as it can dry out the cake and cause the syrup to harden.

German Potato Pancakes

There are so many potato pancake recipes out there, and they are all claiming to be the original German Potato Pancakes. These are really fun to make and eat. They are crispy, slightly crunchy, and overly tasty. These cakes are truly loved worldwide. Of course, each locale has their own recipe. For instance, Swedish pancakes are also quite popular and eerily similar to the German potato pancakes.

Ingredients

  • 2 ½ pounds Russet potatoes, or any starchy potato, peeled and grated very finely
  • 1 yellow onion, grated very fine
  • 2 large eggs
  • 1 tsp salt
  • ¼ cup all-purpose flour
  • Oil for frying

How To Make German Potato Pancakes

FIRST STEP:

After grating the potatoes, using a towel, thoroughly wring out all the liquid from the potatoes

Place the drained potatoes into a large bowl with the grated onion, salt, eggs, and flour.

Mix it thoroughly with your hands; you want it to be somewhat tacky. Add a little more flour if it is too sticky

SECOND STEP:

Heat 3 tbsp oil in a skillet

Place ⅓ to ½ a cup of mixture into the hot skillet

THIRD STEP:

Fry for three to five minutes on each side, until they are golden.

Briefly drain on paper towels

FOURTH STEP:

Serve immediately, while hot, with applesauce and a sprinkle of powdered sugar, sour cream, or even yogurt.

These could also be served with meat and a gravy, using these as a side dish.

Enjoy!

Ultimate Crock Pot Chicken and Dumplings

This Best Ever Crock Pot Chicken and Dumplings is the definition of a true “set it and forget it” comfort meal. Chicken thighs stay juicy and tender during the slow cook, and refrigerated biscuits make an easy shortcut for soft, fluffy dumplings—no homemade dough required.

Best Ever Crock-Pot Chicken and Dumplings

Ingredients

INGREDIENT AMOUNT
Boneless, skinless chicken thighs 6
Buttermilk refrigerated biscuits 1 can
Frozen mixed vegetables, thawed 2 cups
Chicken broth 2 cups
Cream of chicken soup 1 can
Cream of celery soup 1 can
Onion, diced 1
Fresh parsley, chopped (divided) 2 tablespoons
Poultry seasoning 1 teaspoon
Black pepper To taste

How to Make Best Ever Crock-Pot Chicken and Dumplings

Step 1: Build the Base
Scatter the diced onion evenly across the bottom of the crock pot. Arrange the chicken thighs in a single layer on top of the onions.

Step 2: Mix the Sauce
In a medium bowl, whisk together the cream of chicken soup, cream of celery soup, poultry seasoning, fresh parsley, and black pepper until smooth. Pour the mixture evenly over the chicken.

Discover more
Buttermilk
stuffed
Bread
Beef
Dressing
buttermilk
bread
gravy
Sunscreen
Meatloaf recipes cookbook

Step 3: Slow Cook
Pour the chicken broth over the contents of the crock pot. Cover and cook on high for 5 hours.
Important: Keep the lid closed for the first 4 hours to retain steam and ensure the chicken cooks properly.

Step 4: Shred the Chicken & Add Vegetables
With 1 hour remaining, remove the lid and add the thawed mixed vegetables. Shred the chicken directly in the crock pot using two forks, stirring to combine.

Step 5: Add the Dumplings
Lightly flatten each biscuit and cut into 4 long strips. Place the biscuit strips evenly over the top of the chicken mixture.

Discover more
gravy
Dressing
Buttermilk
buttermilk
bread
Beef
Bread
stuffed
Sunscreen
Vegetable

Step 6: Finish and Serve
Cover and continue cooking for the final hour. Once the dumplings are cooked through and fluffy, gently stir to distribute them throughout the dish. Serve hot, topped with additional fresh parsley if desired.

🥕 Moist Carrot Cake with Cream Cheese Frosting

🥕 Moist Carrot Cake with Cream Cheese Frosting

Soft • Spiced • Rich • Perfectly Balanced

This classic carrot cake is incredibly moist and tender, made with freshly grated carrots, warm spices, and a smooth cream cheese frosting. It bakes evenly, slices beautifully, and tastes even better the next day as the flavors deepen.


Recipe Overview

  • Prep Time: 20 minutes

  • Bake Time: 35–40 minutes

  • Cooling Time: 1 hour

  • Total Time: About 2 hours

  • Yield: 1 square cake (9–12 servings)


Why This Recipe Works

  • Oil keeps the cake moist for days

  • Fresh carrots add natural sweetness and texture

  • Balanced spices enhance flavor without overpowering

  • Cream cheese frosting adds gentle tang and richness

  • Simple mixing method prevents a dense crumb


Ingredients

For the Cake

  • 2 cups (250 g) all-purpose flour

  • 2 teaspoons baking powder

  • ½ teaspoon baking soda

  • ½ teaspoon salt

  • 1 teaspoon ground cinnamon

  • ½ teaspoon ground nutmeg

  • 1 cup (200 g) granulated sugar

  • 4 large eggs, room temperature

  • 1 cup (240 ml) vegetable oil

  • 2 cups (240 g) finely grated carrots

  • ½ cup (120 g) chopped walnuts or pecans (optional)


For the Cream Cheese Frosting

  • 8 oz (225 g) cream cheese, softened

  • ½ cup (115 g) unsalted butter, softened

  • 2 cups (250 g) powdered sugar, sifted

  • 1 teaspoon vanilla extract


Optional Garnish

  • Chopped nuts

  • Light dusting of cinnamon


Equipment Needed

  • 8×8-inch or 9×9-inch square baking pan

  • Mixing bowls

  • Whisk

  • Hand mixer or spatula

  • Parchment paper

  • Cooling rack


Step-by-Step Instructions

1. Prepare the Oven and Pan

  • Preheat oven to 350°F (180°C)

  • Line a square baking pan with parchment paper or grease well

  • Set aside


2. Mix the Dry Ingredients

  • In a medium bowl, whisk together:

    • Flour

    • Baking powder

    • Baking soda

    • Salt

    • Cinnamon

    • Nutmeg

This ensures even spice distribution.


3. Mix the Wet Ingredients

  • In a large bowl, whisk sugar and vegetable oil until smooth

  • Add eggs one at a time, mixing well after each addition

  • The mixture should look glossy and well blended


4. Combine and Fold

  • Gradually add the dry ingredients to the wet mixture

  • Fold gently until just combined

⚠️ Do not overmix to keep the cake tender.

  • Fold in grated carrots

  • Stir in chopped nuts if using


5. Bake

  • Pour batter into the prepared pan

  • Spread evenly

  • Bake for 35–40 minutes, or until a toothpick inserted in the center comes out clean


6. Cool Completely

  • Let the cake cool in the pan for 15 minutes

  • Transfer to a wire rack

  • Cool completely before frosting


Cream Cheese Frosting Instructions

7. Prepare the Frosting

  • In a bowl, beat softened cream cheese and butter until smooth

  • Gradually add powdered sugar, mixing slowly

  • Add vanilla extract

  • Beat until creamy, fluffy, and spreadable


8. Frost and Serve

  • Spread frosting evenly over the cooled cake

  • Garnish with chopped nuts if desired

  • Slice into squares and serve


Texture & Flavor Notes

  • Cake: soft, moist, and lightly spiced

  • Frosting: creamy, smooth, and gently tangy

  • Flavor improves after resting overnight


Storage Tips

  • Room temperature: Up to 1 day (covered)

  • Refrigerator: Up to 5 days

  • Freezer: Unfrosted cake freezes well up to 2 months


Optional Variations

  • Add ½ cup crushed pineapple, well drained

  • Mix in raisins or shredded coconut

  • Use brown sugar for deeper flavor

  • Make as cupcakes (bake 18–22 minutes)

Moist Banana Nut Bread

Moist Banana Nut Bread

Soft • Rich • Nutty • Stays Fresh for Days

This classic Banana Nut Bread is perfectly moist with a tender crumb and a rich banana flavor. Made with very ripe bananas and toasted walnuts, it’s ideal for breakfast, tea time, or sharing as a homemade gift. The loaf slices cleanly and tastes even better the next day.


Recipe Overview

  • Prep Time: 10 minutes

  • Bake Time: 55–60 minutes

  • Total Time: About 1 hour 10 minutes

  • Yield: 1 loaf (about 10 slices)


Why This Recipe Works

  • Very ripe bananas add natural sweetness and moisture

  • Butter provides rich flavor and soft texture

  • Toasted walnuts enhance aroma and crunch

  • Gentle mixing keeps the loaf tender

  • Balanced ingredients prevent dryness or heaviness


Ingredients

Wet Ingredients

  • 3 very ripe bananas (medium to large)

  • ½ cup (8 tablespoons) unsalted butter, room temperature

  • ¾ cup granulated sugar
    (Honey may be used as a substitute for deeper flavor)

  • 2 large eggs, lightly beaten

  • ½ teaspoon vanilla extract


Dry Ingredients

  • 1½ cups all-purpose flour

  • 1 teaspoon baking soda

  • ½ teaspoon salt


Mix-Ins

  • 1 cup walnuts, toasted and coarsely chopped

  • ½ cup raisins
    (or chocolate chips, if preferred)


Equipment Needed

  • 9×5-inch loaf pan

  • Mixing bowls

  • Whisk

  • Rubber spatula

  • Wire cooling rack


Step-by-Step Instructions

1. Prepare the Oven and Pan

  • Preheat oven to 350°F (175°C)

  • Grease a 9×5-inch loaf pan with butter

  • Lightly dust with flour or line with parchment paper


2. Toast the Walnuts

  • Place walnuts in a dry skillet over medium heat

  • Stir continuously for 3–5 minutes, until fragrant

  • Remove from heat, let cool, then chop coarsely

Tip: Toasting brings out the natural oils and flavor of the nuts.


3. Cream Butter and Sugar

  • In a large bowl, beat the softened butter and sugar together

  • Mix until smooth, creamy, and pale

This step helps create a soft, even crumb.


4. Prepare the Banana Mixture

  • Mash bananas with a fork until they resemble chunky applesauce

  • Add mashed bananas to the butter mixture

  • Stir in the beaten eggs and vanilla extract

  • Mix until fully combined


5. Combine Dry Ingredients

  • In a separate bowl, whisk together:

    • Flour

    • Baking soda

    • Salt


6. Make the Batter

  • Add dry ingredients to the wet mixture

  • Gently fold until just combined

⚠️ Do not overmix — stop as soon as no dry flour remains.

  • Fold in the toasted walnuts and raisins evenly


7. Bake

  • Pour batter into the prepared loaf pan

  • Smooth the top gently

  • Bake for 55–60 minutes


8. Test for Doneness

  • Insert a toothpick into the center

  • It should come out clean or with a few moist crumbs

If needed, bake an additional 5 minutes and check again.


9. Cool Properly

  • Let the bread cool in the pan for 10 minutes

  • Transfer carefully to a wire rack

  • Cool completely before slicing


Texture & Flavor Notes

  • Inside: moist, soft, and banana-rich

  • Top: lightly golden with nutty crunch

  • Flavor deepens after resting overnight


Storage Tips

  • Room temperature: Wrap tightly, keeps fresh for 2–3 days

  • Refrigerator: Up to 5 days

  • Freezer: Slice and freeze up to 3 months


Optional Variations

  • Add ½ teaspoon cinnamon for warmth

  • Replace half the flour with whole wheat flour

  • Use pecans instead of walnuts

  • Add banana slices on top before baking for decoration

🧀 Savory Herb & Garlic Pull-Apart Bread

🧀 Savory Herb & Garlic Pull-Apart Bread

Soft • Aromatic • Golden • Perfect for Sharing

This Savory Herb & Garlic Bread is fluffy on the inside with a lightly crisp, golden top. Fresh garlic and herbs infuse every bite, while olive oil keeps the crumb tender and flavorful. Designed as a pull-apart loaf, it’s ideal for serving warm at the table.


Why This Recipe Works

  • Proper yeast activation ensures a light, airy texture

  • Olive oil adds softness and rich flavor

  • Fresh garlic and herbs create deep aroma

  • Two rises give excellent structure and fluffiness

  • Pull-apart shaping makes it easy to serve


Ingredients

For the Dough

  • 3 cups all-purpose flour, plus extra for dusting

  • 1 teaspoon salt

  • 2 teaspoons sugar

  • 2¼ teaspoons instant dry yeast (1 standard packet)

  • 1 cup warm water (about 105–110°F / 40–43°C)

  • 3 tablespoons olive oil

Flavor Add-Ins

  • 3 cloves garlic, finely minced

  • 1½ tablespoons fresh rosemary, finely chopped
    (or 1 teaspoon dried rosemary)

For the Top (Optional but Recommended)

  • 1–2 tablespoons olive oil or melted butter

  • Optional: pinch of salt or grated cheese


Step-by-Step Instructions

1. Activate the Yeast

  • In a small bowl, combine:

    • Warm water

    • Sugar

    • Yeast

  • Stir gently and let sit for 5–10 minutes

  • The mixture should become slightly foamy

Tip: If it doesn’t foam, the yeast may be inactive—start again for best results.


2. Mix the Dough

  • In a large bowl, whisk together:

    • Flour

    • Salt

    • Minced garlic

    • Chopped rosemary

  • Make a well in the center

  • Pour in:

    • Yeast mixture

    • Olive oil

  • Mix with a spoon or your hands until a shaggy dough forms


3. Knead the Dough

  • Transfer dough to a lightly floured surface

  • Knead for 5–8 minutes until:

    • Smooth

    • Elastic

    • Slightly tacky but not sticky

Adjustment Tip:
If the dough sticks, add flour 1 tablespoon at a time.


4. First Rise

  • Lightly oil a clean bowl

  • Place dough inside and turn once to coat

  • Cover with a damp cloth or plastic wrap

  • Let rise in a warm place for about 1 hour, or until doubled in size


5. Shape the Pull-Apart Pieces

  • Gently punch down the dough to release air

  • Divide into 8–10 equal portions

  • Roll each portion into a smooth ball

  • Arrange balls snugly in a greased loaf pan


6. Second Rise

  • Cover the pan loosely

  • Let rise again for 30 minutes

This step ensures a light, fluffy final texture.


7. Bake

  • Preheat oven to 375°F (190°C)

  • Brush the top with olive oil or melted butter

  • Bake for 25–30 minutes, until:

    • Top is golden brown

    • Bread sounds hollow when tapped


8. Cool and Serve

  • Let bread cool in the pan for 10 minutes

  • Remove gently and serve warm

  • Pull apart and enjoy the soft, herbed layers


Texture & Flavor Notes

  • Interior: soft, fluffy, and aromatic

  • Exterior: lightly crisp and golden

  • Flavor: savory garlic with fresh herb warmth


Storage Tips

  • Room temperature: Wrap and store up to 2 days

  • Refrigerator: Up to 4 days (reheat before serving)

  • Freezer: Freeze baked bread up to 2 months


Optional Variations

  • Add grated cheese between dough balls

  • Mix in parsley or thyme

  • Sprinkle sesame or herb seasoning on top

  • Brush with garlic-infused butter after baking

Crispy Turkish-Style Fried Eggplant

Crispy Turkish-Style Fried Eggplant

Yields: 4 Servings | Prep time: 15 mins | Cook time: 10–12 mins

Ingredients

The Base:

  • 2 Large eggplants

  • Salt (to taste, used for sweating and seasoning)

  • Water (for soaking)

The Coating:

  • 3 Eggs

  • 1/2 cup All-purpose flour

  • 1/2 cup Breadcrumbs (optional, for extra crunch)

  • 1/2 tsp Red pepper flakes (Pul Biber) or Paprika

  • 1/2 tsp Garlic powder

  • Vegetable oil (for frying)


Detailed Instructions

1. Prepare the Eggplants

  • Wash the 2 large eggplants.

  • You can peel them in a “zebra” pattern (strips of skin removed) or leave the skin on for texture.

  • Slice the eggplants into rounds or long strips about 1/2 inch thick.

2. Remove Bitterness (Sweating)

  • Place the eggplant slices in a large bowl and sprinkle generously with salt.

  • Let them sit for 10–15 minutes. This process draws out any bitter juices.

  • Rinse the slices under cold water and pat them completely dry with paper towels. Drying is key to ensuring the coating sticks and they don’t steam in the pan.

3. Set Up the Breading Station

  • In one shallow bowl, place the flour mixed with a pinch of salt, pepper flakes, and garlic powder.

  • In a second bowl, beat the 3 eggs thoroughly.

  • Optional: Place breadcrumbs in a third bowl if you prefer a thicker, crunchier crust.

4. Coat the Slices

  • Dredge each eggplant slice first in the flour, shaking off the excess.

  • Dip the floured slice into the beaten eggs, ensuring it is fully submerged.

  • If using breadcrumbs, press the egg-washed slice into the crumbs last.

5. Fry to Golden Perfection

  • Heat about 1 inch of vegetable oil in a large skillet over medium-high heat.

  • Once the oil is shimmering, add the eggplant slices in a single layer (do not overcrowd the pan).

  • Fry for 3–5 minutes per side until they are deep golden brown and the centers are tender when pierced with a fork.

6. Drain and Serve

  • Transfer the fried eggplants to a plate lined with paper towels to drain excess oil.

  • Serve immediately while hot and crispy.


Serving Suggestion

In Turkey, these are often served with a side of garlic yogurt sauce (plain yogurt mixed with minced garlic and a pinch of salt) and a drizzle of tomato sauce.

Classic Homemade Fluffy Doughnuts

Classic Homemade Fluffy Doughnuts

Soft, light doughnuts with a tender interior and a lightly crisp exterior. These are made with simple pantry ingredients and are best enjoyed fresh.


Yield

12–15 doughnuts

Time

  • Preparation: 20 minutes

  • Rising: 1½ hours

  • Cooking: 15 minutes


Ingredients

Dough

  • 3 cups all-purpose flour

  • 1 cup whole milk, warm (not hot)

  • 7 g active dry yeast

  • 5 tablespoons granulated sugar

  • 2 tablespoons unsalted butter, softened

  • 1 large egg, room temperature

  • ½ teaspoon salt

Frying and Coating

  • Vegetable oil, for frying

  • Granulated sugar or powdered sugar, for coating


Instructions

1. Prepare the Yeast

Pour the warm milk into a small bowl. Add 1 tablespoon of the sugar and stir to dissolve. Sprinkle the yeast over the milk and stir gently. Let it rest for 5–10 minutes until the mixture looks foamy. This shows the yeast is ready.


2. Mix the Dough

In a large bowl, combine the flour, remaining sugar, and salt. Make a well in the center. Add the egg, softened butter, and the yeast mixture. Stir with a spoon until a soft, rough dough forms.


3. Knead the Dough

Transfer the dough to a lightly floured surface.

  • Knead by hand for 8–10 minutes until smooth and elastic

  • Or knead with a mixer and dough hook for about 5 minutes

The dough should feel soft and slightly tacky but not sticky.


4. First Rise

Place the dough in a lightly greased bowl. Cover and let it rest in a warm place for about 1 hour, or until doubled in size.


5. Shape the Doughnuts

Gently press the dough to release air. Roll it out to about ½-inch thickness on a floured surface.

Cut doughnut shapes using a cutter or a large glass with a smaller cutter for the center. Place each doughnut on a small piece of parchment paper. Cover and let rest for 30 minutes.


6. Fry the Doughnuts

Heat about 2 inches of oil in a heavy pot to 350°F (175°C).

Carefully lower the doughnuts into the oil. Remove the parchment paper once it releases.

Fry for 1–2 minutes per side until evenly golden.

Transfer to paper towels to drain excess oil.


7. Coat and Serve

While still warm, roll the doughnuts in granulated sugar or dust with powdered sugar.

Serve fresh.


Helpful Notes

  • Keep oil temperature steady for even cooking

  • Do not overcrowd the pot

  • Best enjoyed the same day

Keto Egg Roll Wrap

Keto Egg Roll Wrap
❤️Ingredients

🍓 1 tablespoon sesame oil
12 ounces of ground pork
3 tablespoons fresh ginger grated
🍒3 teaspoon fresh garlic minced
1 ½ cup green cabbage, shredded
¼ cup carrot shredded
¼ cup gluten-free soy sauce
8 large eggs
½ teaspoon salt
1 teaspoon avocado oil
Instructions

Measure out and prepare all of the ingredients.
In a frying pan over medium heat, add the sesame oil along with the ground pork, grated ginger, and minced garlic.
Stir together and break up the meat until the pork starts to brown.
Add the shredded cabbage, shredded carrots, and gluten-free soy sauce. Stir together and let cook for 3-5 minutes.
In a large bowl, crack the eggs. Season with salt.
Whisk them together until they are combined well.
In a frying pan over medium heat, add the avocado oil. Pour the egg mixture in until it fills up the pan. Let this sit and cook for about 1-2 minutes.
Carefully flip over the egg wrap and let this side cook for 1-2 minutes. Move to a plate.
Spoon the pork and vegetable mixture onto the egg wrap.
Carefully roll the egg wrap like a burrito. Roll it over the pork, then tuck both of the sides in and continue to roll.
Serve and enjoy!

Hamburger Potato Casserole

This hearty Hamburger Potato Casserole is the ultimate comfort food—perfect for family dinners or potlucks. Creamy mushroom soup, seasoned ground beef, and layers of cheesy potatoes come together to create a rich, flavorful dish everyone will love.


Ingredients

Ingredient Amount
Ground beef 1 ½ lb
Russet potatoes 4 large, peeled and thinly sliced
Onion 1 medium, chopped
Shredded cheddar cheese 2 cups
Cream of mushroom soup (condensed) 1 can (10.75 oz)
Milk ¾ cup
Garlic powder 1 tsp
Paprika 1 tsp
Salt & pepper To taste
Olive oil 2 tbsp
Fresh parsley Chopped, for garnish

Instructions

1. Preheat the oven
Set your oven to 375°F (190°C).

2. Prep the ingredients
Peel and thinly slice the potatoes, chop the onion, and shred the cheddar cheese.

3. Cook the ground beef
In a large skillet, heat olive oil over medium heat. Add the ground beef and chopped onion. Cook until the beef is browned and the onion is softened. Drain any excess fat.

4. Make the casserole layers
In a small bowl, whisk together cream of mushroom soup, milk, garlic powder, paprika, salt, and pepper. In a greased 9×13-inch baking dish, layer half of the sliced potatoes, then half of the cooked beef mixture, and half of the shredded cheese. Repeat the layers with the remaining ingredients.

5. Add the soup mixture
Pour the soup mixture evenly over the layered casserole.

6. Bake
Cover the dish with aluminum foil and bake for 60–70 minutes, or until the potatoes are tender.

7. Garnish and serve
Remove the foil, sprinkle with chopped parsley, and let the casserole rest a few minutes before serving.

Mediterranean Creamy Lemon Mousse

Mediterranean Creamy Lemon Mousse

Table of Contents

Creamy Lemon Mousse is one of those desserts that feels light, refreshing, and indulgent all at once. It’s smooth, airy, and perfectly balanced between sweet and tangy, making it an ideal finish to almost any meal. What makes this version especially appealing is its simplicity. With just a handful of ingredients, you can create a dessert that looks elegant enough for guests but is easy enough for everyday cravings. The cold whipping cream provides a fluffy base, condensed milk adds richness and sweetness, and fresh lemon juice brings everything to life with bright citrus flavor. Served chilled and topped with lemon zest, this mousse is proof that simple desserts can still feel special.

Prep Time: 15 minutes

Chilling Time: 2 hours

Total Time: 2 hours 15 minutes

Servings: 4 to 6

Ingredients

1½ cups heavy whipping cream, very cold

¾ cup sweetened condensed milk

¼ cup fresh lemon juice (about 2 lemons)

Zest of 1 lemon, for garnish

Extra lemon zest for serving

Optional: additional lemon juice for extra tang

Optional: whipped cream for topping

Optional: mint leaves for garnish

Optional: crushed biscuits for serving

Optional: pinch of extra zest mixed into the mousse

Instructions

Place the cold heavy whipping cream into a large mixing bowl.

Using a hand mixer or stand mixer, whip the cream on medium speed until soft peaks form.

Reduce the mixer speed to low and slowly pour in the condensed milk.

Continue mixing gently until the condensed milk is fully incorporated.

See also  Mediterranean Dill Pickle Hot Sauce.

Add the fresh lemon juice gradually while mixing on low speed.

Increase the speed slightly and mix until the mousse thickens and holds its shape.

Taste the mousse and adjust with a little more lemon juice if needed.

Spoon the mousse into serving glasses or bowls.

Cover and refrigerate for at least 2 hours to fully set.

Garnish with lemon zest just before serving.

Tips

Make sure the whipping cream is very cold for maximum volume.

Chill the mixing bowl for a few minutes before whipping for better results.

Add the condensed milk slowly to avoid deflating the cream.

Use freshly squeezed lemon juice for the best flavor.

Add lemon juice gradually so you can control the tartness.

Stop mixing as soon as the mousse thickens to avoid overwhipping.

If the mousse feels loose, chill it longer rather than remixing.

Zest the lemon before juicing it for easier handling.

Keep the mousse refrigerated until just before serving.

Garnish at the last moment for the freshest look.

Variations

Make it extra tangy by increasing the lemon juice slightly.

Fold a little lemon zest directly into the mousse for a stronger citrus aroma.

Serve layered with crushed biscuits for added texture.

Pipe the mousse into glasses for a more polished presentation.

Top with a swirl of whipped cream for added richness.

Serve in small portions for a lighter dessert option.

Chill overnight for an even firmer texture.

Use lime juice instead of lemon for a different citrus twist.

Add a thin biscuit base at the bottom of each glass.

Garnish with mint leaves for a fresh finish.

See also  Chicken & Chorizo One-Pan Recipe

Q & A

Why did my mousse not thicken?
The cream may not have been cold enough or was underwhipped.

Can I make this dessert ahead of time?
Yes, it can be made up to 24 hours in advance.

Can I freeze lemon mousse?
Freezing is not recommended, as it can affect the texture.

Is this mousse very sweet?
It’s balanced, but you can add more lemon juice to reduce sweetness.

Can I use bottled lemon juice?
Fresh lemon juice is best, but bottled can work in a pinch.

How long does it keep in the fridge?
Up to 2 days when covered properly.

Can I overwhip the cream?
Yes, overwhipping can make the mousse grainy.

Does the lemon juice help thicken it?
Yes, lemon juice reacts with condensed milk to help set the mousse.

Can I serve it immediately?
It’s best chilled so it fully sets and develops flavor.

Is this dessert suitable for kids?
Yes, it’s gentle and refreshing, perfect for all ages.

Nutrition

(Per Serving, Approximate)

Calories: 320

Protein: 5 g

Fat: 22 g

Carbohydrates: 26 g

Sugar: 24 g

Fiber: 0 g

Sodium: 90 mg

Conclusion

Creamy Lemon Mousse is a dessert that delivers maximum satisfaction with minimal effort. Its light texture, bright lemon flavor, and smooth finish make it a reliable favorite for both casual meals and special occasions. Because it uses just a few basic ingredients, it’s easy to prepare anytime a dessert craving strikes. Whether served plain or dressed up with garnishes, this mousse feels fresh, comforting, and timeless. Once you try it, you’ll likely find yourself returning to this recipe again and again.

Crispy Cocoa Peanut Clusters

Crispy Cocoa Peanut Clusters

No flour • No chocolate bars • No butter


Ingredients

  • 1 small egg

  • 100 g (½ cup) granulated sugar

  • 30 g (about 4 tablespoons) unsweetened cocoa powder

  • 150 g (about 1 cup) roasted peanuts (unsalted or lightly salted)

  • 40 g (about 1½ cups) crispy rice cereal

  • Optional: a pinch of salt


Instructions

Prep:
Preheat the oven to 300°F (150°C). Line a baking sheet with parchment paper or a silicone baking mat.

Whisk the Base:
In a mixing bowl, whisk the egg and sugar until pale and slightly frothy.

Add Cocoa:
Sift in the cocoa powder (and salt, if using). Whisk until smooth, dark, and glossy.

Fold in Crunch:
Add the roasted peanuts and crispy rice cereal. Gently fold until everything is evenly coated with the cocoa mixture.

Form the Clusters:
Spoon small mounds of the mixture onto the prepared baking sheet, keeping them compact so they hold together while baking.

Bake:
Bake for 15–18 minutes, until the coating sets and looks matte rather than shiny.

Cool Completely:
Allow the clusters to cool fully on the baking sheet. They will firm up and become crunchy as they cool.


Storage Tip

Store in an airtight container at room temperature. These clusters remain crunchy for up to one week.

Refreshing Fruit and Milk Jelly Delight

Refreshing Fruit and Milk Jelly Delight

This Refreshing Fruit and Milk Jelly Delight is a beautiful, light, and luscious chilled dessert that layers vibrant fresh fruits with a delicate, creamy milk jelly. It’s a no-bake treat that’s perfect for summer gatherings, special occasions, or when you want to serve something elegant yet easy to prepare. Made with gelatin, milk, condensed milk, and a colorful medley of fruits like kiwi, banana, strawberries, and oranges, this dessert is both stunning to look at and refreshing to eat.

The final presentation is enhanced with a fruity glaze made from lemon juice, strawberry syrup, and fresh mint, giving the dish a glossy finish and an extra layer of flavor. Whether you’re entertaining guests or simply treating your family, this dessert is sure to impress with its delicate texture and sweet, fruity taste.


Preparation and Chilling Time

Prep Time: 25 minutes
Chilling Time: 3 hours
Total Time: 3 hours 25 minutes


Ingredients

For the Milk Jelly Base:

  • 60 g gelatin

  • 100 ml water (for blooming gelatin)

  • 400 ml milk

  • 200 ml sweetened condensed milk

  • 2 oranges (peeled and segmented)

  • 3 strawberries (sliced)

  • 2 kiwis (peeled and sliced)

  • 1 banana (sliced)

For the Glaze Topping:

  • 3 strawberries (blended or crushed)

  • Juice of ½ lemon

  • Water (to loosen the glaze)

  • Sugar (to taste)

  • Fresh mint leaves

  • Strawberry syrup (optional)


Step-by-Step Directions

  1. Bloom the Gelatin
    In a small bowl, mix the gelatin with cold water. Stir well and let it sit for 10–15 minutes until fully bloomed.

  2. Prepare the Milk Mixture
    In a saucepan, combine milk and condensed milk. Heat gently over medium heat, stirring constantly until warm but not boiling. Add the bloomed gelatin and stir until fully dissolved. Set aside to cool slightly.

  3. Prepare the Fruits
    Peel and segment the oranges, removing seeds and membranes. Slice the strawberries, kiwis, and banana into bite-sized pieces.

  4. Layer the Dessert
    In a mold or glass dish, layer the fruits evenly. Pour the slightly cooled milk gelatin mixture over the fruits, ensuring they are fully covered. Tap gently to release air bubbles.

  5. Chill the Jelly
    Refrigerate for at least 3 hours, or until fully set.

  6. Prepare the Glaze
    Blend or gently heat strawberries, lemon juice, water, sugar, and mint leaves until combined. Chill before use.

  7. Serve
    Unmold carefully onto a serving plate. Spoon the strawberry glaze over the top or serve on the side. Serve well chilled.

Salty Garlic Roasted Chicken & Potatoes

It sounds like you have a wonderful, time-tested base for this meal! The combination of roasted garlic and maple syrup creates a fantastic sweet-and-savory glaze.

Based on your request for a “salty” version and your note to always provide the full recipe, I have adjusted the seasoning profile. I’ve increased the salt slightly and suggested using salted butter to lean into that savory-sweet contrast.


Salty Garlic Roasted Chicken & Potatoes

A savory-forward version of the classic maple-glazed roast.

  • Prep time: 15 minutes

  • Cook time: 60 minutes

  • Servings: 6

Ingredients

  • 1/4 cup salted butter (using salted butter enhances the “salty” profile)

  • 6 chicken leg quarters, split into drumsticks and thighs (12 pieces total)

  • 8 large Yukon Gold potatoes, cut into 1.5-inch chunks (increased for your preference)

  • 24 cloves garlic, unpeeled

  • 1 ½ teaspoons sea salt (plus more to taste for the finishing)

  • 1 teaspoon cracked black pepper

  • 1/4 cup maple syrup

Directions

  1. Preheat & Prep Pan: Preheat your oven to 400°F (200°C). Place the butter in a large roasting pan and put it in the oven for a few minutes until melted. Swirl the pan to ensure the bottom is fully coated.

  2. Season the Base: Place the chicken pieces, potato chunks, and unpeeled garlic cloves into the pan. Sprinkle generously with the sea salt and black pepper. Toss everything thoroughly in the melted butter until well-coated. Arrange the chicken skin-side up.

  3. First Roast: Bake for 40 minutes. During this time, baste the chicken and potatoes with the pan drippings at least three times to keep the meat moist and help the potatoes crisp.

  4. The Glaze: Remove the pan from the oven. Brush the maple syrup evenly over the chicken pieces. Use a spoon to drizzle the remaining salty pan drippings over the potatoes.

  5. Final Crisp: Return the pan to the oven and bake for another 20 minutes, or until the chicken reaches an internal temperature of 165°F (74°C) and the potatoes are golden-brown and tender.

  6. The “Secret” Finish: To serve, have your guests squeeze the softened garlic out of the skins and spread it directly onto the chicken. Pour the remaining salty juices from the pan over everything. Sprinkle with a final pinch of flaky salt if desired.


Tips for Success

  • Potato Sizing: To ensure the potatoes are soft on the inside and crispy on the outside, keep the chunks uniform in size.

  • The Garlic: Don’t skip the unpeeled garlic! The skin protects the garlic from burning, allowing it to “steam” into a spreadable paste inside the shell.

  • Extra Salt: If you really want that “salty” punch to hit first, use a coarse kosher salt or Maldon sea salt at the very end.

Classic Creamed Chipped Beef

Classic Creamed Chipped Beef (S.O.S.)

Prep time: 5 mins | Cook time: 10 mins | Servings: 2-4

Ingredients

  • 4-5 oz. Dried Beef: Usually found in a glass jar (like Hormel) or plastic pouch.

  • 2 tbsp Butter: Unsalted is best, as the beef is already quite salty.

  • 2 tbsp All-Purpose Flour: To create your roux.

  • 2 cups Whole Milk: For a rich, creamy sauce.

  • 1/4 tsp Black Pepper: Freshly ground is best.

  • 1 pinch Nutmeg (Optional): A secret diner trick to add depth.

  • 4 slices Toast: Thick-cut white bread or “Texas Toast” holds up best under the gravy.


Instructions

  1. Prepare the Beef: Take the dried beef out of the jar and slice it into small, bite-sized strips or squares.

    Pro Tip: Dried beef is very salty. If you want to reduce the saltiness, rinse the beef under cold water and pat it dry before chopping.

  2. Make the Roux: In a medium skillet over medium heat, melt the butter. Once bubbling, add the chopped beef. Sauté for 2–3 minutes until the edges of the beef begin to curl slightly.

  3. Build the Sauce: Sprinkle the flour over the beef and butter. Stir constantly for about 1 minute to cook out the “raw” flour taste.

  4. Add the Milk: Slowly pour in the milk while whisking or stirring constantly. Continue to cook over medium heat until the mixture thickens and comes to a gentle simmer (usually 3–5 minutes).

  5. Season: Stir in the black pepper and a pinch of nutmeg if using. Taste it before adding any salt—you likely won’t need any!

  6. Serve: Toast your bread until it’s nice and golden-brown. Place the toast on a plate (you can leave them whole or cut them into triangles) and ladle a generous amount of the creamed beef over the top.


Variations to Try

  • The “Luxury” Version: Add a splash of Worcestershire sauce or a handful of frozen peas for color and sweetness.

  • The Sausage Swap: If you don’t have dried beef, you can use cooked crumbled breakfast sausage to make a standard “Biscuits and Gravy” style sauce.

  • Heat: Add a dash of cayenne pepper or hot sauce if you like a little kick.

Roasted Savory Cabbage Steaks

Roasted Savory Cabbage Steaks

Prep time: 10 mins | Cook time: 25-30 mins | Servings: 4-6 steaks

Ingredients

The Base:

  • 1 medium head of Cabbage (Green or Savoy works best)

  • 50 ml Olive oil

  • 1 tsp Salt

  • Ground black pepper & Red pepper flakes (to taste)

The Savory Brush-on Sauce:

  • 1 tbsp Balsamic vinegar or Dijon mustard (to get that creamy brown color seen in your photo)

  • 2 cloves Garlic, minced

  • 1 tsp Paprika (optional, for color and smoke)

The Topping:

  • 1 cup Shredded Mozzarella or Gruyère cheese

  • 1/4 cup Finely diced red bell pepper or chili (for that pop of color)


Instructions

  1. Prep the Oven and Pan: Preheat your oven to 200°C (400°F). Line a large baking sheet with parchment paper to prevent sticking.

  2. Slice the Cabbage: Remove any wilted outer leaves. Slice the cabbage into rounds (disks) about 1.5 to 2 cm thick. Keep the core intact in each slice so the “steak” doesn’t fall apart.

  3. Prepare the Seasoning Oil: In a small bowl, whisk together the olive oil, salt, black pepper, red pepper, garlic, and your choice of mustard or balsamic vinegar.

  4. Season the Steaks: Place cabbage slices on the baking sheet. Using a pastry brush (as seen in your image), generously coat both sides of each cabbage slice with the oil mixture.

  5. First Roast: Bake for 20-25 minutes. The edges should be starting to brown and get crispy, and the center should be tender when pierced with a fork.

  6. Add Toppings: Remove the tray from the oven. Sprinkle the shredded cheese and diced red peppers evenly over the top of each steak.

  7. Melt and Crisp: Return to the oven for another 5-7 minutes, or until the cheese is melted, bubbly, and slightly golden.

  8. Serve: Serve immediately while hot. These are great as a side dish or even a light main course!

Keto Cubed Steak Recipe

This  Keto Cubed Steak with onion gravy is a keto and satisfying soup. This dish is made with very simple ingredients that we can easily get access to in any supermarket, or might be present in the home. We can have this steak and gravy dish on this diet.  This dish is prepared very fast in only 35 minutes, so it is best to make it on a quick weeknight or busy days. Keto Cubed Steak with Onion Gravy is very amusing & tasty, and everybody enjoys eating this dish. We can easily store this dish so we can make it for meal prep purposes. We can also use the coconut cream if you are allergic to dairy. You can also use sunflower seed flour to prepare this dish nut-free.

STATS:

  • Total time: 35 mints.
  • Serving size: 1 steak with gravy
  • Caloric content: 390 kcal
  • Culinary: American
  • Time of preparation: Ten mints.
  • Course: Main Course
  • Cook time: 25 mints.
  • Diet: Keto, Low-Carb
  • Servings: 4

EQUIPMENT:

  • Large skillet
  • Tongs
  • Whisk
  • Measuring cups & spoons

INGREDIENTS:

  • 4 cubed steaks
  • Salt and pepper
  • 1 tsp. garlic powder
  • ½ cup almond flour
  • 1 tsp. onion powder
  • 3 tbsp. olive oil
  • One onion
  • Two pieces of garlic
  • One cup beef stock
  • Two tablespoon heavy cream
  • 1 tsp. Worcestershire sauce
  • Fresh parsley

INGREDIENT NOTES:

CUBE STEAK:

  • We use the cube steak to prepare this dish, and it is also called minute steak as it gets tenderized very quickly.

ALMOND FLOUR:

  • We can use the almond flour for dredging as a low-carb substitute to prepare the light crust.

ONION:

  • Onions are added to give a slight sweetness and depth in the taste.

GARLIC:

  • It is used in the dish to deliver the aroma & essence.

BEEF BROTH:

  • It is added to provide the rich and savory base to prepare the gravy, and we have to use low-sodium.

HEAVY CREAM:

  • We use heavy cream to prepare the creamy gravy, and it also helps to thicken the gravy.

WORCESTERSHIRE SUCE:

  • We have to use the keto Worcestershire sauce as it adds the umami flavor to the dish.

OLIVE OIL:

  • We use the oil in this dish to provide the healthy fats.

Parsley:

  • We use parsley to garnish the dish.

INSTRUCTIONS:

  1. We can apply the oil on the steak and sprinkle garlic seasoning, black pepper, salt, and onion seasoning, and then lightly coat the steak with almond flour.
  2. Then we can warm up oil on a moderate setting.
  3. Put the steak on the flame & sear for 3-4 minutes from every surface to brown the steak, & put it on a plate.
  4. Then we can put the leftover oil along with onions in the pan and sauté the onions for six minutes.
  5. We would include garlic & stir-fry it for thirty seconds.
  6. Then we can put the steak in the pan and cook for ten to twelve minutes till the steak gets tender and the gravy gets thick.
  7. We can garnish the dish with parsley and serve it warm.

SERVING SUGGESTIONS:

  • Serve this dish with cauliflower mash.
  • We can pair this dish with sautéed green beans or asparagus.
  • You can also add this dish to the zoodles.
  • We can also include some salad or ranch dressing in this dish.
  • Serve this dish over mashed turnips or radishes
  • We can have this dish with roasted broccoli or Brussels sprouts

TIPS:

  • We don’t have to overcook the steak, or it will become chewy.
  • You have to slice the onions evenly so that they caramelize evenly.
  • We can also add some mushrooms for the extra depth.
  • You can add some wine and deglaze the pan to add some relish.
  • We would use xanthan gum to thicken the gravy.

STORAGE INFORMATION:

FRIDGE:

  • You would transfer this dish in close dish and stock it for 4 days.

FREEZER:

  • You would stock this dish in the freezer for 2 months.

FAQs:

Can I prepare this soup dairy-free?

  • We can use coconut cream to prepare the dairy-free steak and onion gravy.

Is the dish free from gluten?

  • This dish is completely free from gluten as it has almond flour instead of classic flour.

Can I utilize any other steak to prepare this dish?

  • We can easily use a sirloin steak to prepare this steak.

Will I use slow cooker to prepare this dish?

  • We can make this steak in the slow cooker on low heat for four hours, but we have to sear the steak first.

NUTRITIONAL INFORMATION:

Calories: 390 kcal
Net carbs: 5g
Total Carbs: 6g
Fiber: 1g
Protein: 38g
Fat: 25g
Sodium: 420mg
Potassium: 610mg
Calcium: 45mg
Iron: 3.1mg
Vitamin A: 110IU
Serving Size: 1 cubed steak with gravy