Pan-Cooked Cheese and Potato Bread

Pan-Cooked Cheese and Potato Bread

Soft flatbread filled with creamy potato and melted cheese, cooked gently in a frying pan

This cheese and potato bread is made with a simple milk-based dough and cooked slowly in a frying pan until soft inside and lightly golden outside. The filling is smooth, comforting, and stretchy, making this bread perfect for breakfast, snacks, or a light meal.


Ingredients

For the Soft Bread Dough

  • Strong (bread) flour – 90 g
    Gives the bread structure while keeping it tender.

  • Milk – 55 g (about 4 tablespoons)
    Adds moisture and softness.

  • Unsalted butter – 10 g, melted
    Adds richness and flavor.

  • Salt – a small pinch
    Balances the taste.


For the Filling

  • Boiled potato – 1 medium, mashed until smooth
    Creates a soft, creamy center.

  • Shredded cheese – 80–100 g
    Mozzarella, mild cheddar, or a melting cheese works best.

  • Salt – a small pinch (optional)

  • Black pepper – optional, to taste


Equipment Needed

  • Mixing bowl

  • Spoon or spatula

  • Rolling pin or bottle

  • Non-stick frying pan with lid


Step-by-Step Instructions


1. Prepare the Dough

  1. In a bowl, add the flour and salt.

  2. Pour in the milk and melted butter.

  3. Mix with a spoon until a soft dough forms.

  4. Transfer to a clean surface and knead gently for 2–3 minutes until smooth.

The dough should feel soft, pliable, and not sticky.


2. Rest the Dough

  • Cover the dough and let it rest for 10 minutes.

  • This relaxes the dough and makes it easier to roll.


3. Prepare the Filling

  1. Mash the boiled potato until completely smooth.

  2. Add the shredded cheese and mix gently.

  3. Season lightly with salt and pepper if desired.

The filling should be thick and creamy, not runny.


4. Shape the Bread

  1. Roll the dough into a thin circle (about 18–20 cm wide).

  2. Spread the potato and cheese mixture evenly over the surface.

  3. Fold the dough inward from the edges to enclose the filling, forming a flat round shape.

  4. Gently flatten with your hands.


5. Cook in the Frying Pan

  1. Heat a non-stick frying pan over low to medium heat.

  2. Place the filled bread into the pan.

  3. Cover with a lid and cook for 4–5 minutes until the bottom is lightly golden.

  4. Flip carefully, cover again, and cook the other side for another 4–5 minutes.

Cooking slowly allows the cheese to melt fully and the bread to cook evenly.


6. Serve

  • Remove from the pan and let rest for 1–2 minutes.

  • Cut into wedges and serve warm.


Serving Ideas

  • Enjoy plain as a comforting snack

  • Serve with yogurt, sour cream, or a fresh salad

  • Pair with soup or tea for a simple meal


Storage Tips

  • Best enjoyed fresh and warm

  • Can be refrigerated for 1 day

  • Reheat gently in a frying pan for best texture

Crispy Potato and Tuna Tortilla Pockets

Crispy Potato and Tuna Tortilla Pockets

Warm, comforting tortilla pockets with a creamy filling and golden exterior

These tortilla pockets are filled with a smooth potato and tuna mixture, folded with melted cheese, and cooked until lightly golden on the outside. They are easy to prepare, satisfying, and perfect for lunch, snacks, or a simple dinner. The filling is soft and flavorful, while the tortillas provide a pleasant contrast in texture.


Ingredients

For the Filling

  • 1 large potato, boiled and mashed until smooth
    Forms the soft, comforting base of the filling.

  • Cream cheese – 1 tablespoon
    Adds creaminess and helps the filling blend smoothly.

  • Canned tuna – 1 can, well drained
    Provides protein and mild flavor.

  • Hard-boiled egg – 1, finely chopped
    Adds richness and texture.

  • Canned corn – 2 to 3 tablespoons, drained
    Brings gentle sweetness and color.

  • Fresh parsley – 2 tablespoons, chopped
    Adds freshness and aroma.

  • Chopped olives and gherkins (pickles) – a small handful
    Give balance and mild tang.

  • Salt and black pepper – optional, to taste


For Assembly and Cooking

  • Small tortillas – 4 to 6 (flour or corn)
    Soft tortillas work best for folding.

  • Shredded cheese – 1 cup (mozzarella or cheddar)
    Melts smoothly and adds richness.

  • Melted butter or olive oil – 2 tablespoons
    Helps the tortillas turn golden when cooked.

  • Optional seasoning:
    A small pinch of paprika or garlic powder for added flavor.


Equipment Needed

  • Mixing bowl

  • Spoon or spatula

  • Skillet, oven, or air fryer

  • Pastry brush (or spoon)


Step-by-Step Instructions


1. Prepare the Filling

  • While the potato is still warm, place it in a medium bowl.

  • Add the cream cheese and mix until completely smooth and well combined.

  • Add the tuna, chopped egg, corn, parsley, olives, and gherkins.

  • Stir gently until everything is evenly mixed.

  • Season lightly with salt and black pepper if desired.

The filling should be creamy, soft, and easy to spread.


2. Assemble the Tortilla Pockets

  • Place a tortilla flat on a clean surface.

  • Spoon 2–3 tablespoons of the filling onto one half of the tortilla.

  • Sprinkle a generous layer of shredded cheese over the filling.


3. Fold the Tortillas

  • Fold the tortilla over to form a half-moon shape.

  • Press gently along the edges to help it stay closed during cooking.

  • Repeat with the remaining tortillas.


4. Prepare the Exterior

  • In a small bowl, mix the melted butter or olive oil with the optional paprika or garlic powder.

  • Lightly brush both sides of each folded tortilla.

  • This helps the outside cook evenly and develop a light golden color.


5. Cook the Tortilla Pockets

Stovetop Method

  • Heat a dry skillet over medium heat.

  • Place the tortillas in the pan and cook for 2–3 minutes per side, until the cheese has melted and the outside is lightly golden.

Oven or Air Fryer Method

  • Preheat oven or air fryer to 400°F (200°C).

  • Arrange tortillas in a single layer.

  • Air fry for 5–7 minutes or bake for 10 minutes, turning once halfway through.


6. Serve

  • Remove from heat and let rest for a minute before serving.

  • Serve warm with sour cream, yogurt, salsa, or a fresh green salad on the side.


Storage and Reheating Tips

  • Best enjoyed fresh and warm

  • Refrigerate leftovers in a covered container for up to 2 days

  • Reheat in a skillet or air fryer to restore texture

🍗 Chicken, Spinach, and Mushroom Oven Bake

🍗 Chicken, Spinach, and Mushroom Oven Bake

  • Servings: 6

  • Prep Time: 15 minutes

  • Cook Time: 50–55 minutes

  • Total Time: ~70 minutes


📝 Ingredients

  • 6 thinly sliced chicken breasts

  • 1 large package sliced mushrooms (cremini or button)

  • 1 small bag fresh baby spinach

  • 1 container (8 oz) green onion cream cheese, softened

  • ¼ cup olive oil

  • ½ cup chicken broth or stock

  • 8 oz shredded mozzarella cheese

  • Seasonings: Herb and garlic seasoning (e.g., Weber), black pepper, and salt to taste


👩‍🍳 Detailed Instructions

  1. Prep the Oven and Pan: Preheat your oven to 375°F (190°C) and grease a 9×13-inch baking dish.

  2. Layer the Base: Lay the chicken breasts in a single layer at the bottom of the dish. Top the chicken with a generous layer of fresh spinach followed by the sliced mushrooms.

  3. Season: Sprinkle the herb and garlic seasoning, salt, and pepper evenly over the vegetables.

  4. Make the Sauce: In a separate bowl, whisk together the softened green onion cream cheese, olive oil, and chicken broth until the mixture is smooth and creamy.

  5. Assemble: Pour the cream cheese sauce evenly over the layered chicken and vegetables.

  6. Bake (Phase 1): Cover the pan loosely with aluminum foil (do not seal tightly) and bake for 20 minutes.

  7. Bake (Phase 2): Remove the foil and continue baking uncovered for 20–25 minutes.

  8. Add Cheese: Sprinkle the shredded mozzarella over the top and bake uncovered for a final 10 minutes, or until the cheese is melted and begins to brown.

  9. Serve: Let the dish cool for 10 minutes before serving to allow the sauce to thicken slightly.


💡 Tips for Success

  • Mushroom Moisture: If you find the dish too watery, sauté the mushrooms in a pan first to release their liquid before adding them to the oven dish.

  • Chicken Texture: Ensure chicken breasts are an even thickness—you can pound them lightly if needed to ensure they cook at the same rate.

  • Storage: This dish is excellent for meal prep and will keep in the refrigerator for up to 4 days.


📊 Nutrition Facts (Approx. Per Serving)

  • Calories: 350 kcal

  • Net Carbs: 4–6g

  • Protein: ~30g

🍓 Keto No-Bake Strawberry Cheesecake Jars

This recipe is a brilliant “hack” for keto enthusiasts—using blended cottage cheese is a fantastic way to boost the protein content while maintaining that signature cheesecake creaminess.

Following your preference for full recipes, here is the complete, organized guide for your Cheesecake Jars.


🍓 Keto No-Bake Strawberry Cheesecake Jars

A high-protein, low-carb delight that layers a buttery almond crumble with a silky, citrus-kissed cheesecake filling and fresh macerated strawberries.

  • Servings: 4 jars

  • Prep Time: 15 minutes

  • Chill Time: 1 hour

  • Diet: Keto, Low-Carb, High-Protein, Sugar-Free


📝 Ingredients

For the Low-Carb “Crust” Layer

  • ½ cup almond flour

  • 1 tbsp butter, melted

  • 1 tbsp granular erythritol or allulose

  • ¼ tsp cinnamon (optional)

  • Pinch of salt

For the Cheesecake Filling

  • 1 cup cottage cheese (full fat or low fat)

  • 4 oz cream cheese, softened to room temperature

  • ½ cup Greek yogurt (0% or 2%)

  • 3–4 tbsp powdered erythritol or allulose (adjust to your sweetness preference)

  • 1 tsp vanilla extract

  • 1 tbsp lemon juice

For the Strawberry Layer

  • 1 cup fresh strawberries, diced

  • 1 tbsp powdered sweetener

  • 1 tsp lemon juice


👩‍🍳 Detailed Instructions

  1. Prepare the Crust: In a small bowl, combine the almond flour, melted butter, sweetener, cinnamon, and salt. Stir until it forms a soft, sandy crumble. Set aside.

  2. Blend the Base: Place the cottage cheese in a blender or food processor. Blend on high until it is completely silky with no visible curds.

  3. Finish the Filling: Add the softened cream cheese, Greek yogurt, sweetener, vanilla, and lemon juice to the blender. Process until the mixture is smooth, thick, and creamy.

  4. Prep the Berries: In a separate bowl, toss the diced strawberries with lemon juice and sweetener. Use a fork to gently mash a few of the berries—this creates a natural “syrup” while keeping most of the fruit chunky.

  5. Assemble: * Drop 1–2 tablespoons of the almond crust into the bottom of 4 small glass jars.

    • Spoon or pipe in a thick layer of the cheesecake cream.

    • Top with a generous spoonful of the strawberry mixture.

    • (Optional) Repeat the layers if using tall jars.

  6. Chill: Cover the jars and refrigerate for at least 1 hour. This allows the cheesecake layer to firm up and the flavors to meld.


❄️ Storage & Tips

  • Fridge: These jars are perfect for meal prep! They stay fresh for up to 4–5 days.

  • High Protein Tip: Don’t skip the cottage cheese; blending it is the secret to getting a high-protein count without a “diet” taste.

  • Texture: If the filling is too thick to blend easily, add 1 tablespoon of unsweetened almond milk to help the blades move.


📊 Quick Macros (Estimated per jar)

  • Net Carbs: ~5g

  • Protein: ~12g

  • Sugar: 0g added

Creamed Spinach-Stuffed Salmon with Garlic Shrimp

This recipe sounds incredible—it’s essentially a high-end steakhouse meal made right in your kitchen. The combination of the rich cream cheese filling and the buttery garlic shrimp creates a perfect texture contrast with the seared salmon.

As requested, here is the full, organized recipe for your records.


🐟 Creamed Spinach-Stuffed Salmon with Garlic Shrimp

Prep time: 15 mins | Cook time: 20 mins | Servings: 2

Nutrition: ~520 Calories | ~45g Protein per serving

Ingredients

For the Salmon & Filling

  • 2 large Salmon fillets (skin-on or off)

  • 1 cup Chopped spinach (fresh or frozen, squeezed very dry)

  • 2 oz Cream cheese, softened

  • ¼ cup Shredded mozzarella or parmesan cheese

  • 1 tbsp Heavy cream

  • 1 Garlic clove, minced

  • 1 tbsp Olive oil

  • 1 tbsp Lemon juice

  • Seasonings: Salt, black pepper, and paprika (to taste)

For the Garlic Shrimp

  • ½ lb Large shrimp, peeled and deveined

  • 1 tbsp Butter

  • 1 Garlic clove, minced

  • 1 tbsp Fresh parsley, chopped

  • Optional: Red pepper flakes for heat

Recommended Sides

  • Steamed Rice: 1 cup dry, cooked according to package instructions.

  • Roasted Asparagus: 1 bunch, tossed in olive oil, salt, and pepper.


Instructions

1. Prepare the Creamed Spinach Filling

In a small saucepan over medium-low heat, combine the spinach, cream cheese, heavy cream, minced garlic, and shredded cheese. Stir continuously until the cheese is melted and the mixture is smooth and creamy. Set aside to cool slightly.

2. Prep and Stuff the Salmon

  • The Pocket: Using a sharp paring knife, cut a slit horizontally into the thickest part of the salmon fillet to create a pocket (be careful not to cut all the way through).

  • The Stuffing: Spoon the spinach mixture generously into the pocket of each fillet.

  • Season: Rub the outside of the salmon with olive oil, lemon juice, salt, pepper, and paprika.

3. Sear the Salmon

Heat a skillet over medium-high heat. Place the salmon fillets in the pan. Sear for 4–5 minutes per side until the crust is golden brown and the salmon is cooked to your preferred doneness. Remove from the pan and let rest.

4. Sizzle the Garlic Shrimp

In the same skillet (or a fresh one), melt the butter. Add the minced garlic and shrimp. Sauté for 2–3 minutes per side until the shrimp are pink and opaque. Toss in the parsley and optional red pepper flakes.

5. Prepare the Sides

  • Asparagus: While the salmon cooks, roast the asparagus at 400°F (200°C) for 10–12 minutes.

  • Rice: Prepare your steamed rice using your preferred quick-cook method.

6. Assemble and Serve

Place a bed of rice on each plate, add the roasted asparagus, and top with the stuffed salmon fillet. Pile the garlic shrimp directly on top of the salmon and drizzle any remaining garlic butter from the pan over the entire dish.


💡 Pro-Tips for Success

  • Keep it Dry: If using frozen spinach, squeeze it in a kitchen towel until no liquid remains. This prevents the filling from becoming watery inside the fish.

  • Toothpick Hack: If your salmon fillets are thin and the stuffing is falling out, use a toothpick to “stitch” the opening closed while searing.

  • The “Pan Flip”: Flip the salmon carefully using a wide spatula to ensure the stuffing stays intact.

LOW CALORIE WENDY’S FROSTY

This recipe is a fantastic way to hit that “Frosty” craving without the heavy sugar load of the original. Since you like having the full recipe on hand, I’ve cleaned up the formatting and added a few “Pro-Tips” to help you get that iconic, thick consistency.


🍦 Low-Calorie Wendy’s Frosty

Prep time: 5 minutes | Yields: 1 Serving

Calories: 153 kcal

Ingredients

  • 1 cup Unsweetened Almond Milk

  • 2 tbsp Sugar-Free Fat-Free Chocolate Pudding Mix (or Vanilla/Butterscotch/Pistachio)1


  • 1 tsp Unsweetened Cocoa Powder

  • 1 tsp Vanilla Extract

  • 2 packets Stevia (or sweetener of choice)

  • 10-12 Ice Cubes

  • Optional: 2 tbsp Cool Whip Lite (for extra creaminess)

Instructions

  1. Combine: Add the almond milk, pudding mix, cocoa powder, vanilla, stevia, and Cool Whip (if using) into your blender or Nutribullet.

  2. Add Ice: Add the ice cubes last.

  3. Blend: Blitz on high for approximately one minute. You want the ice to be completely pulverized into a smooth, “soft-serve” texture.

  4. Check Consistency: if it’s too thin, add 2-3 more ice cubes and blend again. If it’s too thick to pour, add a splash more almond milk.

  5. Serve: Pour into a chilled glass and enjoy immediately with a spoon or a straw!


💡 Pro-Tips for the Best Texture

  • The “Frosty” Secret: For a more authentic “malty” taste, you can add a tiny pinch of salt. It helps bring out the chocolate flavor against the sweetener.

  • Freeze the Milk: If you want it even thicker without diluting the flavor with ice, try freezing your almond milk into ice cubes beforehand.

  • Pulse First: If you aren’t using a high-powered blender like a Nutribullet, pulse the ice a few times first to break it down before running the blender continuously.


Nutritional Profile (Per 1 Cup Serving)

Nutrient Amount
Calories 153
Total Fat 3.1 g
Carbohydrates 28.3 g
Sugar 25.7 g*
Protein 1.9 g
Sodium 187 mg

> Note: The sugar content listed in the original text (25.7g) seems high for “Sugar-Free” ingredients. If using truly Sugar-Free pudding mix and Stevia, the actual sugar count is likely much lower (closer to 1-2g from the almond milk and cocoa).

Homemade Flaky Green Onion & Spinach Flatbread

Homemade Flaky Green Onion & Spinach Flatbread

This recipe creates a beautiful, multi-layered bread similar to a scallion pancake or paratha.

Ingredients

  • Dough:

    • 550g (4 1/5 cups) Flour

    • 300ml (1 1/2 cups) Warm water

    • 1 Egg

    • 1 tsp (7g) Salt

  • Filling:

    • 40g Green onions, chopped

    • 50g Fresh spinach, chopped

    • 1/2 tsp Salt

    • 1/2 tsp Red pepper flakes

    • Oil or melted butter (for brushing between layers)

Instructions

  1. Make the Dough: In a large bowl, whisk the egg into the warm water and salt. Gradually add the flour and knead until a smooth, soft dough forms. Cover and let it rest for 20 minutes to relax the gluten.

  2. Prepare Filling: Mix the chopped onions, spinach, salt, and red pepper in a small bowl.

  3. Shape & Layer: Divide the dough into equal portions. Roll one piece out into a very thin rectangle. Brush the surface lightly with oil or butter and sprinkle a generous amount of the green filling over it.

  4. Create Flakiness: Roll the dough up tightly into a long rope, then coil that rope into a spiral (like a snail shell). Flatten the spiral gently with your hand or a rolling pin. This creates the “swirled” layers seen in the photo.

  5. Cook: Heat a lightly oiled skillet over medium heat. Fry each flatbread for 3–4 minutes per side until golden brown and crispy on the outside.


Lemon, Ginger & Turmeric Immune Tonic

A refreshing and simple infusion to support your daily hydration.

Ingredients

  • 3 slices Fresh lemon

  • 2–3 slices Raw ginger

  • 1 pinch Ground turmeric or fresh root

  • 1 dash Black pepper (optional, helps with turmeric absorption)

  • Warm water

Instructions

  1. Place the lemon, ginger, and turmeric into a mug.

  2. Pour warm water over the ingredients.

  3. Let steep for 5 minutes and sip slowly.


Simple Clove Water

Ingredients

  • 3–5 Whole cloves

  • 1 cup Water

Instructions

  1. Cold Method: Place cloves in water and let sit overnight in the fridge.

  2. Hot Method: Steep cloves in hot water for 10 minutes, then remove the cloves before drinking.

Grandma’s Secret Soft Poppy Seed Bread

Grandma’s Secret Soft Poppy Seed Bread

Adding a small amount of vinegar to yeast dough acts as a natural dough conditioner, making the bread incredibly soft, helping it rise higher, and extending its freshness.

Ingredients:

  • Flour: 3 ½ cups (approx. 500g) All-purpose or Bread flour

  • Milk: 1 cup (250ml) warm milk

  • Yeast: 2 ¼ tsp (1 packet) active dry yeast

  • Sugar: 2 tbsp

  • Salt: 1 tsp

  • Vinegar: 1 tbsp white distilled vinegar (The “Secret Ingredient”)

  • Butter: 4 tbsp (60g) unsalted, softened

  • Egg: 1 large egg (at room temperature)

  • Poppy Seeds: 2 tbsp

Instructions:

  1. Activate Yeast: In a large bowl, combine warm milk, sugar, and yeast. Let it sit for 5–10 minutes until foamy.

  2. Mix: Add the egg, softened butter, and the vinegar. Stir in the poppy seeds.

  3. Knead: Gradually add the flour and salt. Knead by hand or with a mixer for 8–10 minutes until the dough is smooth and elastic.

  4. First Rise: Place dough in a greased bowl, cover with a damp cloth, and let rise in a warm spot for 1 hour (or until doubled).

  5. Shape: Punch down the dough. Divide into 4 equal balls and place them in a greased baking pan (as seen in your image).

  6. Second Rise: Cover and let rise for another 30–45 minutes.

  7. Bake: Preheat oven to 350°F (175°C). Brush the top with a little milk or egg wash. Bake for 25–30 minutes until the top is golden brown.

  8. Cool: Let the bread cool in the pan for 10 minutes before transferring to a wire rack.


Lemon, Ginger & Turmeric Water

This warming drink is designed for hydration and comfort.

Ingredients:

  • Lemon: 3 fresh slices

  • Ginger: 2–3 slices of raw root

  • Turmeric: A pinch of ground turmeric or a small piece of fresh root

  • Black Pepper: A dash (helps with turmeric absorption)

  • Water: 1 cup of warm water

Instructions:

  1. Place the lemon, ginger, and turmeric into a mug.

  2. Add a dash of black pepper if desired.

  3. Pour warm water over the ingredients and let it infuse for 5 minutes.

  4. Sip slowly.


Simple Clove Infusion

A traditional, aromatic drink made with whole cloves.

Ingredients:

  • Whole Cloves: 3–5 pieces

  • Water: 1 cup

Instructions:

  1. Hot Method: Add cloves to boiling water, remove from heat, and steep for 10 minutes.

  2. Overnight Method: Place cloves in room temperature water and let soak overnight for a milder flavor.

  3. Strain the cloves out before drinking.

4-Ingredient Homemade Crusty Bread

4-Ingredient Homemade Crusty Bread

Simple • Beginner-Friendly • Oven-Baked

Servings: 1 round loaf
Prep Time: 10 minutes
Rest Time: 1–2 hours
Bake Time: 40–45 minutes

This is a classic rustic bread with a crisp golden crust and soft, airy inside—made using just four basic ingredients.


Ingredients

  • 1½ cups warm water (370 ml)
    (Warm, not hot — about body temperature)

  • 2 teaspoons active dry yeast

  • 4 cups all-purpose flour (about 500 g)

  • 1 teaspoon salt


Step-by-Step Instructions

1. Activate the Yeast

  1. Pour the warm water into a large mixing bowl.

  2. Sprinkle the yeast over the water.

  3. Stir gently and let it sit for 5–10 minutes until slightly foamy.

This shows the yeast is ready.


2. Add Flour and Salt

  1. Add the flour and salt to the yeast mixture.

  2. Mix with a spoon or spatula until a soft, sticky dough forms.

No kneading is required.


3. First Rest (Rising Time)

  1. Cover the bowl with a clean kitchen towel or plastic wrap.

  2. Let the dough rest in a warm place for 1–2 hours, until doubled in size and bubbly.


4. Prepare for Baking

  1. Preheat your oven to 450°F (230°C).

  2. Place a heavy oven-safe pot with a lid (Dutch oven or deep casserole) inside the oven to heat for 30 minutes.


5. Shape the Dough

  1. Lightly flour your hands and work surface.

  2. Gently turn out the dough and shape it into a round loaf.

  3. Do not press out the air—handle gently.


6. Bake the Bread

  1. Carefully remove the hot pot from the oven.

  2. Place the dough inside the pot (you may line with parchment paper).

  3. Cover with the lid and bake for 30 minutes.

  4. Remove the lid and bake for an additional 10–15 minutes, until golden brown.


7. Cool Before Slicing

  1. Remove the bread from the pot.

  2. Let it cool on a wire rack for at least 20 minutes before cutting.


Helpful Tips

  • Crispy crust: Baking covered first traps steam, giving the bread its crisp exterior.

  • Soft inside: Do not cut while hot; cooling helps set the crumb.

  • Flavor options: You may add herbs, garlic powder, or seeds if desired.


Storage

  • Store at room temperature, wrapped in a clean cloth, for up to 2 days.

  • For longer storage, slice and freeze.

Lemon Poppy Seed Bread

Lemon Poppy Seed Bread

Servings: 8–10 slices | Prep Time: 15 minutes | Cook Time: 50–60 minutes


Ingredients

For the Bread

  • 2 cups all-purpose flour

  • 2 tablespoons poppy seeds

  • 1 teaspoon baking soda

  • ½ teaspoon baking powder

  • ½ teaspoon salt

  • 1 cup granulated sugar

  • ½ cup (1 stick) unsalted butter, softened

  • 2 large eggs

  • ⅓ cup fresh lemon juice (about 2 large lemons)

  • 1 tablespoon lemon zest

  • ¾ cup Greek yogurt or sour cream (for moisture)

  • 1 teaspoon vanilla extract

For the Lemon Glaze

  • 1 cup powdered sugar

  • 2 tablespoons fresh lemon juice


Instructions

1. Prepare the Oven and Pan

  1. Preheat your oven to 350°F (175°C).

  2. Grease a standard 9×5 inch loaf pan thoroughly, or line it with parchment paper for easy removal.


2. Combine the Dry Ingredients

  1. In a medium bowl, whisk together:

    • 2 cups flour

    • 2 tablespoons poppy seeds

    • 1 teaspoon baking soda

    • ½ teaspoon baking powder

    • ½ teaspoon salt

  2. Set aside.


3. Cream Butter and Sugar

  1. In a large mixing bowl, beat the softened butter and granulated sugar together until light, creamy, and fluffy (about 2–3 minutes).


4. Add Wet Ingredients

  1. Add the eggs one at a time, beating well after each.

  2. Stir in:

    • ⅓ cup fresh lemon juice

    • 1 tablespoon lemon zest

    • 1 teaspoon vanilla extract

    • ¾ cup Greek yogurt or sour cream

  3. Mix until smooth and fully combined.

Tip: For extra lemon flavor, rub the lemon zest into the sugar before creaming it with butter—this releases the natural oils.


5. Combine Wet and Dry Ingredients

  1. Gradually fold the dry ingredient mixture into the wet ingredients using a spatula.

  2. Mix just until combined—avoid over-mixing to keep the bread light and tender.

  3. The batter should be thick with a slightly textured consistency.


6. Bake the Bread

  1. Pour the batter into the prepared loaf pan and smooth the top with a spatula.

  2. Bake in the preheated oven for 50–60 minutes, or until:

    • The top is golden brown

    • A toothpick inserted in the center comes out clean


7. Cool and Glaze

  1. Allow the bread to cool in the pan for 10 minutes, then transfer it to a wire rack to cool completely.

  2. Prepare the glaze: whisk together 1 cup powdered sugar and 2 tablespoons lemon juice until smooth.

  3. Drizzle the glaze generously over the cooled loaf.


Baker’s Tips

  • Even Baking: If your oven tends to brown unevenly, tent the bread with foil halfway through baking.

  • Storage: Keep the bread in an airtight container at room temperature for up to 3 days, or refrigerate for up to a week to maintain moisture.

  • Serving Suggestion: Enjoy as a breakfast treat, snack, or dessert. Pairs wonderfully with tea or coffee.

Crispy Air Fryer Roast Potatoes

Crispy Air Fryer Roast Potatoes

Servings: 4 | Prep Time: 10 minutes | Cook Time: 25 minutes


Ingredients

  • 1.5 lbs (≈700g) potatoes – Use a starchy variety like Russet or Yukon Gold for fluffy interiors.

  • 2–3 tbsp vegetable oil or olive oil – Helps achieve a golden, crispy exterior.

  • 1 tsp salt – Enhances flavor and helps draw out moisture for crispiness.

  • ½ tsp garlic powder – Adds a gentle, savory flavor.

  • ½ tsp dried rosemary or thyme – Aromatic herbs that complement roasted potatoes.

  • ¼ tsp black pepper – Adds a mild, warming spice.


Instructions

1. Prepare the Potatoes

  1. Peel the potatoes.

  2. Cut them into uniform 1–2 inch chunks. Uniform size ensures even cooking.

2. Parboil the Potatoes (Optional but Recommended)

  1. Place the potato chunks in a pot of salted water.

  2. Bring the water to a gentle boil.

  3. Cook for 5–8 minutes, until the edges start to soften but the centers are still firm.

  4. Drain the water thoroughly. Let the potatoes sit for 1–2 minutes to allow excess moisture to evaporate.

Tip: This step ensures the inside stays fluffy while the outside crisps beautifully.

3. Roughen the Edges

  1. Return the drained potatoes to the pot.

  2. Cover with the lid and gently shake the pot for 10–15 seconds.

  3. This creates small rough edges on the potatoes, which will become extra-crispy when cooked.

4. Season the Potatoes

  1. Transfer the potatoes to a large mixing bowl.

  2. Add the oil, salt, garlic powder, herbs, and black pepper.

  3. Toss gently but thoroughly to coat every piece evenly.

5. Preheat the Air Fryer

  1. Set the air fryer to 400°F (200°C).

  2. Allow it to preheat for 3–5 minutes.

6. Air Fry the Potatoes

  1. Place the seasoned potatoes in the air fryer basket in a single layer. Avoid overcrowding for maximum crispiness.

  2. Air fry for 20–25 minutes.

  3. Shake the basket every 10 minutes to ensure even browning.

7. Check for Doneness

  • The potatoes should be deep golden brown.

  • Tap a piece lightly; it should sound “hollow” when done.

8. Serve

  • Serve immediately while hot for the best texture.

  • These potatoes pair well with roasted meats, salads, or as a snack with a dipping sauce.


Pro Tips for Perfect Crispiness

  1. Ensure dryness: After parboiling, remove as much surface moisture as possible before tossing with oil.

  2. Cook in batches: Avoid overcrowding the air fryer basket. Air circulation is key to crisp edges.

  3. Adjust seasoning: Feel free to add paprika or onion powder for extra flavor.

Cloves: Nutritional Value and Gentle Ways to Use Them

Cloves: Nutritional Value and Gentle Ways to Use Them

Cloves are dried flower buds from the Syzygium aromaticum tree. They are widely used in cooking and traditional food preparations because of their strong aroma and naturally occurring plant compounds, including eugenol.

Nutritional Highlights

  • Naturally occurring antioxidants: Cloves contain plant compounds that help protect foods and the body from everyday environmental stress.

  • Manganese content: A small amount of ground cloves contributes to daily manganese needs, a mineral that supports normal bone structure and overall metabolism.

  • Digestive tradition: Cloves have long been included in meals and drinks to support comfortable digestion and reduce heaviness after eating.


Gentle Daily Use (Up to 2 Cloves)

Cloves have a strong flavor and should be used in small amounts. These methods allow you to enjoy them comfortably.

1. Clove-Infused Warm Drink

This is one of the mildest and most pleasant ways to use cloves.

Ingredients

  • 2 whole cloves

  • 1 cup hot water

  • Optional: a slice of lemon or a teaspoon of honey

Method

  • Place the cloves in hot water

  • Let steep for 5–10 minutes

  • Remove the cloves before drinking


2. Small Amounts in Breakfast Foods

Ground cloves can be blended easily into everyday meals.

How to use

  • Add a very small pinch (about the amount from 2 cloves) to oatmeal, yogurt, or smoothies

  • Pairs well with cinnamon, ginger, apples, or bananas


3. Flavoring Savory Dishes

Whole cloves can gently enhance cooked foods.

How to use

  • Add 1–2 whole cloves to rice water, soups, or stews while cooking

  • Remove the cloves before serving to keep the flavor balanced


Important Usage Notes

  • Use whole cloves or ground spice only: Concentrated clove extracts are much stronger than culinary cloves and are not intended for everyday food use.

  • Moderation matters: Small amounts are sufficient due to their strong natural oils.

  • Mouth comfort: Chewing raw cloves may feel intense for some people, so using them infused or cooked is usually more comfortable.


A Helpful Reminder

Spices like cloves are best enjoyed as part of a varied, balanced diet. They are commonly used to enhance flavor and support everyday wellness routines, but they are not substitutes for professional care when dealing with serious health concerns.

Mediterranean Swirled Garlic & Herb Cheese Bread

Mediterranean Swirled Garlic & Herb Cheese Bread

This soft pull-apart cheese bread is layered with fragrant garlic, herbs, and melted cheese. Each slice reveals beautiful swirls and delivers a comforting Mediterranean-inspired flavor. It is perfect for sharing with meals, soups, or enjoyed warm on its own.


Ingredients

For the Dough

  • 3 cups all-purpose flour

  • 1 packet (2¼ teaspoons) instant yeast

  • 1 tablespoon sugar

  • 1 teaspoon salt

  • 1 cup warm water (about 110°F / warm to the touch)

  • 2 tablespoons olive oil

For the Filling

  • 4 tablespoons unsalted butter, softened

  • 3 cloves garlic, finely minced

  • 1½ cups shredded cheese (mozzarella and cheddar combination works well)

  • 2 tablespoons fresh parsley, finely chopped

  • 1 teaspoon dried oregano or Italian seasoning

  • ¼ teaspoon red pepper flakes (optional)


Instructions

1. Prepare the Dough
In a large bowl, combine the flour, yeast, sugar, and salt. Add the warm water and olive oil. Mix until a soft dough forms.

2. Knead and Rest
Transfer the dough to a lightly floured surface and work it gently for about 5–7 minutes until smooth and elastic. Place it into a lightly greased bowl, cover, and allow it to rest in a warm area for 1 hour, or until it increases in size.

3. Make the Garlic Herb Butter
In a small bowl, mix together the softened butter, garlic, parsley, and dried herbs until evenly blended.

4. Shape the Dough
Roll the rested dough into a large rectangle, about 12 x 18 inches. Spread the garlic herb butter evenly over the surface, then sprinkle the shredded cheese across the top.

5. Create the Layers
Cut the dough into squares about 3–4 inches wide. Stack several squares together, keeping the layers aligned.

6. Arrange in the Pan
Lightly grease a loaf pan. Place the stacked dough pieces upright inside the pan, arranging them side by side so the layers are visible from the top. Cover and allow to rest for 20–30 minutes.

7. Bake
Preheat the oven to 350°F (175°C). Bake for 30–35 minutes, until the top is golden and the cheese is fully melted.

Tip: If the top colors too quickly, loosely cover with foil during the final minutes.

8. Serve
Let the bread rest in the pan for 10 minutes, then remove and serve warm.


Flavor Ideas

  • Add finely chopped sun-dried tomatoes for extra richness

  • Mix in sliced olives for a Mediterranean touch

  • Sprinkle a little extra parsley on top before serving

30-Minute Homemade Margherita Pizza (Detailed & Gentle Recipe) ✨🍕

30-Minute Homemade Margherita Pizza (Detailed & Gentle Recipe) ✨🍕

This classic Margherita pizza is all about simple ingredients and fresh flavor. With a soft crust, rich tomato sauce, creamy mozzarella, and fragrant basil, it comes together quickly and delivers bakery-style results at home. Perfect for busy days when you still want something special.


⏱️ Time & Yield

  • Total Time: 30 minutes

  • Servings: 2–3

  • Style: Simple, fresh, and comforting


🧾 Ingredients

For the Pizza Base

  • 1 prepared pizza dough (store-bought or homemade, room temperature)

  • 1 tablespoon olive oil (for brushing)

For the Sauce

  • ½ cup crushed tomatoes or pizza sauce

  • 1 tablespoon olive oil

  • 1 small garlic clove, finely minced

  • ¼ teaspoon salt

  • ¼ teaspoon dried oregano (optional)

Toppings

  • 200 g (about 7 oz) fresh mozzarella cheese, sliced or torn

  • 1 small tomato, thinly sliced (optional but lovely 🍅)

  • Fresh basil leaves, torn 🌿

  • Freshly ground black pepper (optional)


👩‍🍳 Step-by-Step Instructions

1️⃣ Preheat the Oven

Preheat your oven to 475°F (245°C).
If using a pizza stone or steel, place it in the oven while it heats for best results.


2️⃣ Prepare the Sauce

In a small bowl, mix together:

  • Crushed tomatoes

  • Olive oil

  • Garlic

  • Salt

  • Oregano (if using)

Stir until smooth and set aside.


3️⃣ Shape the Dough

Lightly flour your work surface.
Stretch or roll the dough into a round or oval shape, about 10–12 inches wide.
Transfer it to a parchment-lined baking tray or pizza peel.

Brush the edges lightly with olive oil for a golden finish.


4️⃣ Add Sauce and Toppings

Spread a thin, even layer of sauce over the dough, leaving a small border around the edges.
Arrange the mozzarella evenly on top, then add tomato slices if using.


5️⃣ Bake

Bake for 10–14 minutes, or until:

  • The crust is golden

  • The cheese is melted and lightly bubbling


6️⃣ Finish and Serve

Remove from the oven and immediately scatter fresh basil over the top 🌿.
Add a light sprinkle of black pepper if you like.

Let rest for 1–2 minutes, then slice and enjoy warm 🍕


🍽️ Serving Ideas

  • Serve with a simple green salad 🥗

  • Pair with roasted vegetables

  • Enjoy as-is for a classic, comforting meal


💡 Helpful Tips

  • Less sauce keeps the crust crisp

  • Fresh mozzarella gives the best texture

  • Tear basil by hand to keep its aroma bright

My daughter enjoys making these to give as presents. I’ve tried it, and it’s excellent.

Slow Cooker Golden Honey-Glazed Chicken

This recipe yields tender chicken with a rich, amber glaze. The slow cooking process allows the honey and garlic to infuse deeply into the meat.

  • Prep time: 10 minutes

  • Cook time: 3–7 hours (depending on heat setting)

  • Servings: 4

Ingredients

  • Chicken: 4 boneless, skinless chicken breasts (or thighs for extra juiciness)

  • Honey: 1 cup

  • Soy Sauce: 1/2 cup (or Tamari for gluten-free)

  • Ketchup: 1/4 cup

  • Oil: 2 tablespoons vegetable oil

  • Aromatics: 2 cloves garlic, minced

  • Spice: 1/4 teaspoon red pepper flakes (adjust to taste)

  • Seasoning: Salt and pepper to taste

Instructions

  1. Prep the Chicken: Place the chicken breasts in the bottom of your slow cooker.

  2. Whisk the Glaze: In a medium bowl, whisk together the honey, soy sauce, ketchup, vegetable oil, minced garlic, red pepper flakes, salt, and pepper until smooth.

  3. Combine: Pour the honey mixture evenly over the chicken.

  4. Slow Cook: Cover and cook on low for 6–7 hours or on high for 3–4 hours, until the chicken is tender and reaches an internal temperature of 165°F (74°C).

  5. Thicken the Sauce: Once cooked, remove the chicken and set aside. Pour the liquid from the slow cooker into a saucepan.

  6. Simmer: Bring the sauce to a simmer over medium heat for 5–10 minutes until it reduces and thickens into a glossy glaze.

  7. Serve: Drizzle the thickened glaze generously over the chicken.

Serving Suggestions

  • Grains: Serve over fluffy white rice or creamy mashed potatoes to catch the extra sauce.

  • Vegetables: Pairs perfectly with steamed broccoli, green beans, or a crisp green salad.

  • Additions: A crusty baguette is excellent for mopping up the remaining glaze.


Tips for Success

  • Tangy Twist: Add 1 tablespoon of apple cider vinegar to the sauce before cooking to cut through the sweetness.

  • Kid-Friendly: Omit the red pepper flakes and serve with sweet corn or glazed carrots.

  • Meal Prep: This chicken shreds beautifully, making it great for leftovers in wraps or salads the next day.

Homemade Garlic Buns

Homemade Garlic Buns

Soft, fluffy buns brushed with aromatic garlic butter

These homemade garlic buns are tender on the inside with a lightly golden top and a rich garlic aroma. They are perfect as a side for soups, pasta, or enjoyed on their own while warm.


Ingredients

Dough

  • All-purpose flour — 400 g (about 3¼ cups)

  • Sugar — 50 g (¼ cup)

  • Salt — 1 teaspoon

  • Instant dry yeast — 7 g (1 packet)

  • Lukewarm milk — 250 ml (1 cup)

  • Egg — 1 large, room temperature

  • Butter — 55 g (¼ cup), softened

  • Minced garlic — 1 tablespoon


Garlic Butter Topping

  • Minced garlic — 1 tablespoon

  • Dried parsley — 2 teaspoons

  • Salted butter — 55 g (¼ cup), melted


Step-by-Step Method

1. Prepare the Dough

  • In a large bowl, combine the flour, sugar, salt, and instant yeast.

  • Add the lukewarm milk and egg.

  • Mix until a rough dough forms.


2. Knead the Dough

  • Knead using a stand mixer or by hand for 5 minutes, until smooth.

  • Cover the dough with a clean towel and let it rest for 20 minutes.


3. Add Butter and Garlic

  • Add the softened butter and minced garlic to the dough.

  • Continue kneading for 5–7 minutes until the dough becomes elastic and slightly glossy.


4. First Rise

  • Lightly grease a bowl with oil.

  • Place the dough inside, cover, and let rise in a warm place for 1 hour, or until doubled in size.


5. Shape the Buns

  • Gently press the dough to release excess air.

  • Shape into a square and divide into 25 equal pieces.

  • Roll each piece into a smooth ball.

  • Cover and let rest for 15 minutes.


6. Second Rise

  • Lightly flatten each dough ball and tuck the edges underneath to create a smooth top.

  • Place in a greased baking pan.

  • Cover and let rise again for 30 minutes, until puffy.


7. Prepare Garlic Butter

  • In a small bowl, combine:

    • Melted butter

    • Minced garlic

    • Dried parsley

  • Mix well.


8. Bake

  • Preheat the oven to 180°C (350°F).

  • Brush the tops of the buns generously with garlic butter.

  • Bake for 15–17 minutes, until lightly golden.


9. Finish and Serve

  • Remove from the oven.

  • While still warm, brush with more garlic butter for extra flavor.

  • Serve warm.


Serving Suggestions

  • Pair with soups or pasta dishes

  • Serve as a dinner roll or party bread

  • Enjoy plain or with cheese spread


Storage Tips

  • Store at room temperature for 1 day

  • Refrigerate for up to 3 days

  • Reheat gently before serving

Honey Fruit Cake Loaf

Honey Fruit Cake Loaf

A soft, fragrant loaf filled with sweet dried fruits and natural honey

This Honey Fruit Cake Loaf is gently sweet, beautifully moist, and perfect for tea time or breakfast. Honey and brown sugar give it depth, while orange zest adds a fresh aroma. The loaf keeps well and tastes even better the next day.


Ingredients

Dry Ingredients

  • All-purpose flour — 2 cups (250 g)

  • Baking powder — 1 teaspoon

  • Baking soda — ½ teaspoon

  • Mixed spice or ground nutmeg — 1 teaspoon

  • Salt — a small pinch


Wet Ingredients

  • Melted butter or vegetable oil — ½ cup
    (113 g butter or 120 ml oil)

  • Honey — ½ cup

  • Brown sugar — ½ cup (100 g)

  • Eggs — 3 large, room temperature

  • Vanilla extract — 1 teaspoon

  • Orange zest — 1 teaspoon (optional)

  • Fresh orange juice — ¼ cup (60 ml)


Fruits

  • Mixed dried fruits — 1½ cups (200–220 g)
    (raisins, sultanas, cherries, pawpaw, pineapple, cranberries — choose any mix)

  • All-purpose flour — 2 tablespoons (for coating fruits)


Step-by-Step Instructions

1. Prepare the Pan and Oven

  • Preheat the oven to 170°C (340°F).

  • Line a standard loaf pan with parchment paper or lightly grease it.


2. Prepare the Fruits

  • Place the dried fruits in a bowl.

  • Toss with 2 tablespoons of flour to help them stay evenly distributed in the cake.

  • Set aside.


3. Mix the Wet Ingredients

  • In a large mixing bowl, combine:

    • Melted butter or oil

    • Honey

    • Brown sugar

  • Mix until smooth.

  • Add the eggs one at a time, mixing well after each addition.

  • Stir in vanilla, orange zest (if using), and orange juice.


4. Mix the Dry Ingredients

  • In a separate bowl, sift together:

    • Flour

    • Baking powder

    • Baking soda

    • Mixed spice or nutmeg

    • Salt


5. Combine the Batter

  • Add the dry ingredients to the wet mixture.

  • Gently fold using a spatula until just combined.

  • Do not overmix; the batter should be smooth but thick.


6. Add the Fruits

  • Fold the floured fruits into the batter gently until evenly distributed.


7. Bake the Cake

  • Pour the batter into the prepared loaf pan.

  • Smooth the top evenly.

  • Bake for 45–55 minutes, or until a skewer inserted into the center comes out clean.


8. Finish and Cool

  • Remove the loaf from the oven.

  • While still warm, brush the top with 1 tablespoon of warm honey for extra moisture and shine.

  • Let the cake cool in the pan for 10–15 minutes, then transfer to a wire rack to cool completely.


Serving & Storage

  • Slice and serve plain or with butter

  • Keeps well at room temperature for 3 days

  • Refrigerate for up to 1 week in an airtight container


Helpful Tips

  • Room-temperature eggs help create a smooth batter

  • You can replace orange juice with apple juice if desired

  • For extra texture, add chopped nuts (optional)

Knead Garlic Herb Bread

No-Knead Garlic Herb Dutch Oven Bread

A rustic, artisan-style loaf with a crackling crust and a soft, pillowy interior infused with fresh garlic.

  • Prep time: 10 minutes

  • Rise time: 8–12 hours (overnight)

  • Cook time: 45–50 minutes

  • Total time: ~13 hours

Ingredients

  • 500 g (approx. 4 cups) All-purpose flour

  • 1 packet (7 g) Dry active yeast

  • 2 tsp Salt

  • 3 cloves Fresh garlic, finely chopped

  • 1 tsp Dried rosemary or thyme (optional, for extra aroma)

  • 350 ml Warm water (approx. 105°F–110°F; not hot to the touch)

  • 2 tbsp Olive oil

Instructions

1. Mix the Dough

In a large mixing bowl, whisk together the flour, yeast, salt, chopped garlic, and optional herbs. Pour in the warm water and olive oil. Using a wooden spoon or spatula, mix until a shaggy, sticky dough forms and no dry flour remains. Do not be tempted to add more flour; the stickiness is what creates the airy crumb!

2. The Long Rise

Cover the bowl tightly with plastic wrap or a damp kitchen towel. Leave it on your counter at room temperature for 8 to 12 hours. The dough is ready when it has doubled in size and the surface is dotted with tiny bubbles.

3. Shape and Second Proof

Lightly flour a work surface and your hands. Gently turn the dough out. Do not knead. Simply fold the edges toward the center a few times to create a rough ball shape. Place the dough onto a sheet of parchment paper, cover loosely, and let it rest for 30–45 minutes.

4. Preheat the “Bakery.”

While the dough rests, place a Dutch oven (or a heavy-lidded pot) into the oven. Preheat the oven to 220°C (425°F) with the pot inside. Heating the pot is essential for creating the steam needed for a golden, crispy crust.

5. Bake

Carefully remove the hot pot from the oven. Using the parchment paper as a sling, lift the dough and drop it (paper and all) into the pot.

  • Step A: Cover with the lid and bake for 30 minutes.

  • Step B: Remove the lid and bake for another 15–20 minutes until the crust is a deep, burnished gold.

6. The Cool Down

Lift the bread out of the pot and transfer it to a wire rack. Wait at least 20 minutes before slicing. If you cut it too soon, the steam escapes and the bread can become gummy!


Flavor Variations to Try

  • The Cheesy Garlic: Fold in ½ cup of grated sharp cheddar or Gruyère during the initial mixing phase.

  • The Mediterranean: Swap the garlic for ¼ cup of chopped sun-dried tomatoes and a tablespoon of dried oregano.

  • The Spicy Kick: Add 1 teaspoon of red pepper flakes to the dry ingredients for a subtle heat that pairs perfectly with the garlic.

Storage Tip

Store leftovers in a paper bag at room temperature for up to 2 days for the best crust. If you need to store it longer, slice it and freeze it in a zip-top bag; it toasts up beautifully straight from the freezer!

Crispy Golden Baked Cauliflower Steaks

Crispy Golden Baked Cauliflower Steaks

A flavorful oven-baked vegetable dish with crisp edges and a tender center

These baked cauliflower steaks transform a simple vegetable into a satisfying and hearty dish. A well-seasoned coating and high-heat roasting bring out deep flavor and a beautifully golden surface, while the inside stays soft and tender. This recipe works equally well as a main dish or a side.


Recipe Overview

  • Prep Time: 10 minutes

  • Bake Time: 30–40 minutes

  • Total Time: 40–50 minutes

  • Servings: 4


Ingredients

Main Ingredient

  • 1 large head cauliflower, outer leaves removed, core intact

Seasoning & Oil

  • 3 tablespoons olive oil

  • 2 tablespoons finely grated Parmesan cheese (optional)

    • For a plant-based option, use nutritional yeast

  • 1 teaspoon smoked paprika

  • 1 teaspoon garlic powder

  • 1 teaspoon salt, or to taste

  • ½ teaspoon black pepper

Garnish

  • 1 tablespoon fresh parsley, finely chopped


Step-by-Step Instructions

1. Prepare the Oven and Cauliflower

  • Preheat the oven to 400°F (200°C).

  • Line a large baking sheet with parchment paper for easy cleanup.

  • Remove the outer leaves from the cauliflower while keeping the core intact.

  • Using a sharp knife, slice the cauliflower from top to bottom into 1-inch-thick slices.

  • You should get 3–4 full steaks; reserve any loose florets for roasting alongside.


2. Make the Seasoning Mixture

  • In a small bowl, combine:

    • Olive oil

    • Parmesan cheese (if using)

    • Smoked paprika

    • Garlic powder

    • Salt

    • Black pepper

  • Stir until well blended and smooth.


3. Season the Cauliflower

  • Arrange the cauliflower steaks and florets in a single layer on the prepared baking sheet.

  • Brush both sides generously with the seasoning mixture.

  • Make sure the coating reaches all surfaces—this helps develop a golden finish during baking.


4. Bake the First Side

  • Place the baking sheet in the oven.

  • Bake for 15–20 minutes, until the underside begins to turn golden.


5. Flip and Finish Baking

  • Carefully turn each cauliflower piece using a spatula.

  • Return to the oven and bake for another 15–20 minutes, until:

    • The cauliflower is tender when pierced with a fork

    • The edges are deeply golden and lightly crisp


6. Serve

  • Transfer the baked cauliflower to a serving platter.

  • Sprinkle with freshly chopped parsley.

  • Serve immediately while warm.


Helpful Tips & Variations

  • Extra flavor: Add onion powder, dried herbs, or a squeeze of lemon before serving.

  • Crispier finish: Use convection or broil for the last 2 minutes, watching closely.

  • Meal idea: Serve over grains, with a yogurt-based sauce, or alongside roasted vegetables.

  • Leftovers: Reheat in the oven or air fryer to restore crispness.

Sherry’s Blueberry Cream Cheese Crumb Cake

Sherry’s Blueberry Cream Cheese Crumb Cake

A soft vanilla cake layered with creamy filling, juicy berries, and a buttery crumb topping

Introduction

This Blueberry Cream Cheese Crumb Cake is a comforting, bakery-style dessert that’s perfect for sharing. A tender vanilla cake forms the base, topped with a smooth cream cheese layer, bursts of blueberries, and a golden cinnamon crumb topping. It’s ideal for brunch tables, afternoon coffee breaks, or as a make-ahead dessert for gatherings.


⏱️ Time & Yield

  • Preparation Time: 25 minutes

  • Baking Time: 35–50 minutes (depending on pan size)

  • Cooling Time: 1 hour

  • Total Time: About 2 hours

  • Servings: 12–15 slices


🧾 Ingredients

Cake Batter

(Fits a 9×13-inch pan or an 8-inch square dish)

  • ½ cup unsalted butter, softened

  • 1 cup granulated sugar

  • 2 large eggs

  • 1 teaspoon vanilla extract

  • 2 cups all-purpose flour

  • 2 teaspoons baking powder

  • ½ teaspoon salt

  • ½ cup milk

  • 1½ cups fresh or frozen blueberries


Cream Cheese Layer

  • 8 oz cream cheese, softened

  • ¼ cup granulated sugar

  • 1 egg

  • ½ teaspoon vanilla extract


Crumb Topping

  • ½ cup all-purpose flour

  • ¼ cup brown sugar

  • ¼ cup cold butter, cubed

  • ½ teaspoon ground cinnamon


👩‍🍳 Step-by-Step Instructions

1. Prepare the Pan and Oven

Preheat your oven to 350°F (175°C).
Grease and lightly flour a 9×13-inch baking pan or an 8-inch square dish. Set aside.


2. Make the Cake Batter

In a large mixing bowl, beat the softened butter and granulated sugar together until light and fluffy.

Add the eggs one at a time, mixing well after each addition. Stir in the vanilla extract.

In a separate bowl, whisk together the flour, baking powder, and salt.

Add the dry ingredients to the butter mixture in two additions, alternating with the milk. Mix gently just until combined.

Carefully fold in the blueberries, taking care not to crush them.

Spread the batter evenly into the prepared pan.


3. Prepare the Cream Cheese Layer

In a medium bowl, beat the cream cheese until smooth.

Add the sugar, egg, and vanilla extract. Mix until creamy and well blended.

Spoon the cream cheese mixture over the cake batter. Use a knife to gently swirl if desired, or leave it layered.


4. Make the Crumb Topping

In a small bowl, combine the flour, brown sugar, and cinnamon.

Add the cold butter cubes and work them into the mixture using your fingers or a pastry cutter until small clumps form.

Sprinkle the crumb topping evenly over the cream cheese layer.


5. Bake

Bake uncovered:

  • 45–50 minutes for a 9×13-inch pan

  • 35–40 minutes for an 8-inch square pan

The top should be lightly golden and set.

Remove from the oven and allow the cake to cool completely before slicing. This helps the layers set neatly.


🍽️ Serving Suggestions

  • Serve at room temperature or slightly chilled

  • Pair with tea or coffee

  • Dust lightly with powdered sugar before serving if desired


💡 Helpful Tips & Variations

  • Nutty crunch: Add chopped walnuts or pecans to the crumb topping

  • Citrus touch: Stir 1 teaspoon lemon zest into the batter for added brightness

  • Berry swap: Use raspberries or blackberries in place of blueberries

  • Gentle mixing: Stir just until combined for a soft, tender cake


🧊 Storage

  • Store covered in the refrigerator for up to 3 days

  • Individual slices may be wrapped and frozen for up to 3 months

  • Thaw overnight in the refrigerator before serving

Italian Lemon Yogurt Cake (Sugar-Free)

Italian Lemon Yogurt Cake (Sugar-Free)

Moist, fragrant, and naturally sweetened

Prep Time: 15 minutes
Bake Time: 45–50 minutes
Total Time: 1 hour
Yield: 1 loaf (8–10 slices)

This Italian-style lemon yogurt cake is light, moist, and full of bright citrus flavor. It’s sweetened with stevia instead of refined sugar, making it a better option for those reducing sugar intake while still enjoying a classic homemade cake.


Ingredients

Dry Ingredients

  • 1½ cups all-purpose flour

  • 2 teaspoons baking powder

  • ½ teaspoon kosher salt

Wet Ingredients

  • 1 cup plain coconut yogurt (or whole milk yogurt)

  • Stevia powder, to taste
    (use the amount equivalent to ¾–1 cup sugar, depending on brand strength)

  • 3 large eggs

  • 2 teaspoons finely grated lemon zest (from about 2 lemons)

  • ⅓ cup freshly squeezed lemon juice

  • ½ teaspoon pure vanilla extract

  • ½ cup olive oil

Lemon Soaking Syrup (Sugar-Free)

  • ¼ cup lemon juice

  • Stevia powder, equivalent to ¼ cup sugar

Sugar-Free Lemon Glaze (Optional)

  • Juice of 1 lemon

  • Powdered stevia sweetener, to taste
    (or sugar-free confectioner’s sweetener blend)


Step-by-Step Instructions

1. Prepare the Pan

Preheat oven to 350°F (180°C).
Grease an 8½ × 4¼ × 2½-inch loaf pan and line the bottom with parchment paper, or lightly coat with baking spray.


2. Mix Dry Ingredients

In a large bowl, sift together:

  • Flour

  • Baking powder

  • Salt

Set aside.


3. Mix Wet Ingredients

In a separate bowl, whisk together:

  • Yogurt

  • Stevia powder

  • Eggs

  • Lemon zest

  • Lemon juice

  • Vanilla extract

Whisk until smooth and well combined.


4. Combine Batter

Gradually whisk the dry ingredients into the wet mixture until just combined.
Do not overmix.


5. Add Oil

Gently fold in the olive oil using a spatula until fully incorporated.
The batter should be smooth and slightly thick.


6. Bake

Pour the batter into the prepared loaf pan and smooth the top.

Bake for 45–50 minutes, or until a toothpick inserted into the center comes out clean.


7. Prepare the Lemon Syrup

While the cake bakes, combine:

  • ¼ cup lemon juice

  • Stevia powder

Heat gently in a small saucepan just until dissolved. Do not boil. Set aside.


8. Soak the Cake

Allow the cake to cool in the pan for 10 minutes.
While still warm, slowly pour the lemon syrup over the cake so it absorbs evenly.

Let the cake cool completely.


9. Prepare the Sugar-Free Glaze (Optional)

Mix powdered stevia with lemon juice until a pourable glaze forms.
Drizzle over the cooled cake.

Allow glaze to set for about 1 hour before slicing.


Tips for Best Results

  • Use fine powdered stevia for smooth texture.

  • Olive oil gives authentic Italian flavor; use light olive oil if preferred.

  • For extra moisture, wrap the cooled cake and rest overnight before serving.

  • Skip the glaze for a lighter, breakfast-style cake.


Storage

  • Store covered at room temperature for 2 days

  • Refrigerate for up to 5 days

  • Freeze slices for up to 2 months

Homemade Garden Vegetable Spread

Homemade Garden Vegetable Spread

This creamy, tangy spread is packed with crunchy carrots, celery, and zesty green onions. It’s the perfect companion for toasted bagels, crackers, or even as a dip for fresh bell pepper strips.

  • Prep time: 15 minutes

  • Inactive time: 1–2 hours (chilling)

  • Yields: Serves 8

  • Dietary Info: Vegetarian, Contains Milk

Ingredients

  • 2 (8 oz) packages cream cheese, softened to room temperature

  • ¼ cup carrots, chopped

  • ½ cup celery, chopped

  • 2 green onions, chopped

  • ½ tsp salt

  • ½ tsp garlic powder

  • ¼ tsp onion powder

Preparation

  1. Prep the Veggies: Place the chopped carrots, celery, and green onions into a food processor. Pulse several times until the vegetables are broken down into very small bits.

    Tip: Be careful not to over-process; you want distinct texture, not a watery paste.

  2. Mix: In a medium-sized mixing bowl, combine the softened cream cheese, the pulsed vegetable mixture, salt, garlic powder, and onion powder. Stir vigorously until the vegetables and seasonings are evenly distributed throughout the cream cheese.

  3. Chill: Spoon the spread into an airtight container or a glass jar. Place it in the refrigerator for at least 1 to 2 hours. This allows the cream cheese to firm back up and the flavors from the onion and garlic to meld.

  4. Serve: Spread generously on toasted bagels or crusty bread.

Storage

Keep the spread refrigerated in an airtight container. It will stay fresh and delicious for 7–10 days.

Southern Corn & Cheese Pudding

Southern Corn & Cheese Pudding

  • Prep time: 10 minutes

  • Bake time: 40–50 minutes

  • Servings: 6–8 sides

Ingredients

  • 2 cups Corn kernels (canned/drained or thawed frozen)

  • 1 ½ cups Shredded cheese (Cheddar, Colby Jack, or Pepper Jack for a kick)

  • 2 cups Half-and-half (for richness) or whole milk

  • 4 large Eggs

  • ½ tsp Salt (optional)

  • ¼ tsp Black pepper (optional)

Instructions

1. Prep the Dish

Preheat your oven to 350°F (175°C). Lightly grease a 9-inch baking dish or a 2-quart casserole dish with butter or nonstick cooking spray.

2. Create the Custard Base

In a medium mixing bowl, whisk the 4 eggs until they are slightly frothy and well-combined. Pour in the 2 cups of half-and-half (or milk) and whisk again until the mixture is smooth. If you are using salt and pepper, stir them in now.

3. Mix in Textures

Gently fold in the 2 cups of corn and 1 cup of the shredded cheese. Set the remaining ½ cup of cheese aside for the topping. Stir well to ensure the corn is distributed throughout the liquid so it doesn’t all settle at the bottom.

4. Bake to Golden Perfection

Pour the mixture into your prepared baking dish. Sprinkle the reserved ½ cup of cheese evenly over the top. Place on the middle oven rack and bake for 40–50 minutes.

5. Test for Doneness

The pudding is done when the edges are firm and a deep golden brown. The center should still have a slight jiggle (wobble) when shaken gently, and a knife inserted near the center should come out mostly clean.

6. The “Carry-Over” Rest

Crucial Step: Let the pudding rest on the counter for 10–15 minutes before serving. This allows the internal heat to finish setting the custard, ensuring it isn’t runny when scooped.


Tips for the Perfect Pudding

  • Texture Control: If you prefer a creamier, thicker texture, you can pulse 1 cup of the corn in a blender before adding it to the mix; this releases the natural starches in the corn.

  • The “Wobble”: Don’t overbake! If the center is completely stiff in the oven, it may become “weepy” (release water) once it cools. A little jiggle is your friend.

  • Add-ins: For more flavor, consider adding a pinch of nutmeg or some chopped green chives to the custard.

Lemon Crinkle Cookies

Lemon Crinkle Cookies

Soft, bright cookies with a delicate citrus flavor and a classic cracked sugar finish

Prep Time: 15 minutes
Chill Time: 30–60 minutes
Bake Time: 10–12 minutes
Yield: About 20–24 cookies

These Lemon Crinkle Cookies are tender on the inside with lightly crisp edges. Fresh lemon zest and juice give them a refreshing citrus taste, while the powdered sugar coating creates the signature crinkled appearance as they bake.


Ingredients

Cookie Dough

  • 1½ cups (180 g) all-purpose flour
    Provides structure for the cookies.

  • 1 teaspoon baking soda
    Helps the cookies spread slightly and crack on top.

  • ½ teaspoon baking powder
    Adds lightness to the texture.

  • ¼ teaspoon salt
    Balances the sweetness and enhances flavor.

  • 1 cup (227 g) unsalted butter, softened
    Creates a rich, tender cookie.

  • 1 cup (200 g) granulated sugar
    Sweetens and helps create a soft crumb.

  • 1 large egg
    Binds the dough and adds moisture.

  • 1 tablespoon fresh lemon zest
    Provides bright lemon aroma.

  • 2 tablespoons fresh lemon juice
    Adds natural citrus flavor.


For Coating

  • ½ cup powdered sugar
    Creates the classic crinkle finish.

  • Optional: 2–3 tablespoons granulated sugar
    Helps form a slight crust before rolling in powdered sugar.


Step-by-Step Instructions

1. Prepare the Dough

In a large bowl, beat the softened butter and granulated sugar together until pale, light, and fluffy. This usually takes 2–3 minutes with an electric mixer.

Add the egg and mix until fully incorporated.
Stir in the lemon zest and lemon juice until evenly combined.


2. Mix the Dry Ingredients

In a separate bowl, whisk together the flour, baking soda, baking powder, and salt.

Gradually add the dry ingredients to the wet mixture. Mix just until a soft, smooth dough forms. Avoid overmixing.


3. Chill the Dough

Cover the bowl and refrigerate the dough for 30–60 minutes.
This step firms the dough, improves texture, and helps prevent excessive spreading.


4. Shape and Coat

Preheat the oven to 175°C (350°F).
Line baking sheets with parchment paper.

Scoop the dough into tablespoon-sized portions and roll into balls.

For best results:

  1. Roll each dough ball lightly in granulated sugar (optional).

  2. Roll generously in powdered sugar, completely coating the surface.

Place the coated dough balls on the baking sheet, spacing them about 2 inches apart.


5. Bake

Bake for 10–12 minutes, until:

  • The edges are set

  • The tops are cracked and puffed

  • The centers remain soft

Do not overbake; the cookies will continue to set as they cool.


6. Cool

Let the cookies rest on the baking sheet for 5 minutes, then transfer them to a wire rack to cool completely.


Tips for Perfect Crinkle Cookies

  • Extra Cracks: Roll the dough in powdered sugar twice for a thicker white coating.

  • Strong Lemon Flavor: Add a drop of lemon extract if desired.

  • Soft Centers: Remove cookies when the centers still look slightly underbaked.

  • Storage: Store in an airtight container at room temperature for up to 4 days.

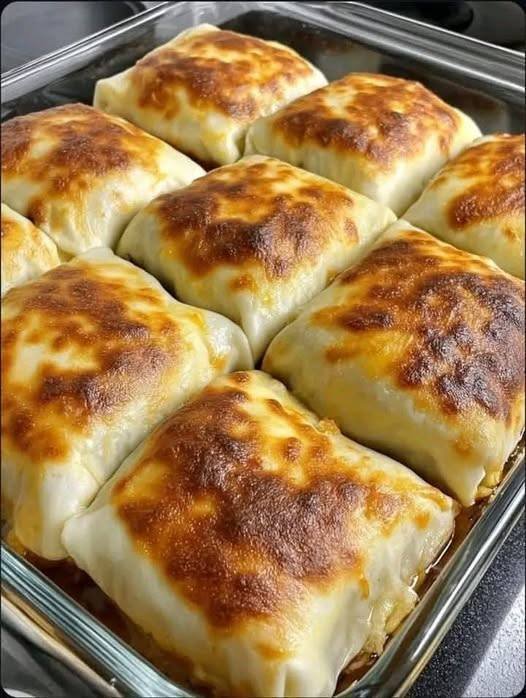
🌽🧀 Cheesy Herb Pull-Apart Bread

This golden, soft, cheesy pull-apart bread is packed with herbs, sweet corn, and melted cheese, just like the one in the image. It’s fluffy on the inside, beautifully browned on the outside, and perfect for sharing. Ideal for tea time, dinner rolls, or as a party centerpiece.


📝 Ingredients

For the Dough

  • 3½ cups all-purpose flour

  • 2¼ teaspoons instant yeast (1 packet)

  • 2 tablespoons sugar

  • 1 teaspoon salt

  • ¾ cup warm milk (not hot)

  • ¼ cup warm water

  • 3 tablespoons melted butter or oil

  • 1 large egg

For the Filling

  • 1½ cups mozzarella cheese, shredded

  • ½ cup cheddar cheese, shredded

  • ½ cup sweet corn (boiled or canned, drained well)

  • 2 tablespoons softened butter

  • 1 teaspoon garlic powder

  • 1 teaspoon dried oregano

  • 1 teaspoon dried parsley

  • ½ teaspoon black pepper

  • ½ teaspoon chili flakes (optional)

  • Salt to taste

For Topping

  • 1 tablespoon melted butter

  • ½ teaspoon dried parsley or mixed herbs


👩‍🍳 Step-by-Step Instructions

1. Prepare the Dough

  1. In a large bowl, mix warm milk, warm water, sugar, and yeast.

  2. Let it rest for 5–10 minutes until foamy.

  3. Add egg, melted butter, salt, and flour gradually.

  4. Knead for 8–10 minutes until soft, smooth, and elastic.

  5. Place in a greased bowl, cover, and let rise 1 hour or until doubled.


2. Make the Filling

In a bowl, mix:

  • Both cheeses

  • Sweet corn

  • Butter

  • Garlic powder

  • Oregano

  • Parsley

  • Black pepper

  • Chili flakes

  • Salt

Set aside.


3. Shape the Bread

  1. Punch down the risen dough.

  2. Roll into a large rectangle (about 12×16 inches).

  3. Spread the cheese-corn filling evenly.

  4. Cut into long strips.

  5. Stack strips on top of each other, then cut into squares.

  6. Arrange upright in a greased loaf pan, creating a pull-apart pattern.


4. Second Rise

  • Cover and let rest 20–30 minutes until slightly puffy.


5. Bake

  1. Preheat oven to 180°C / 350°F

  2. Brush top with melted butter and sprinkle herbs.

  3. Bake for 30–35 minutes until golden brown and fully baked.

  4. If browning too fast, loosely cover with foil.


🧈 Final Touch

Brush with more melted butter while hot for extra softness and shine.


🍞 Serving Suggestions

  • Serve warm with soup or salad

  • Perfect with tea or coffee

  • Great as a party bread or lunchbox treat


Tips

  • You can add olives, jalapeños, or cooked chicken

  • Use garlic butter instead of plain butter for extra flavor

  • Best enjoyed fresh but reheats well