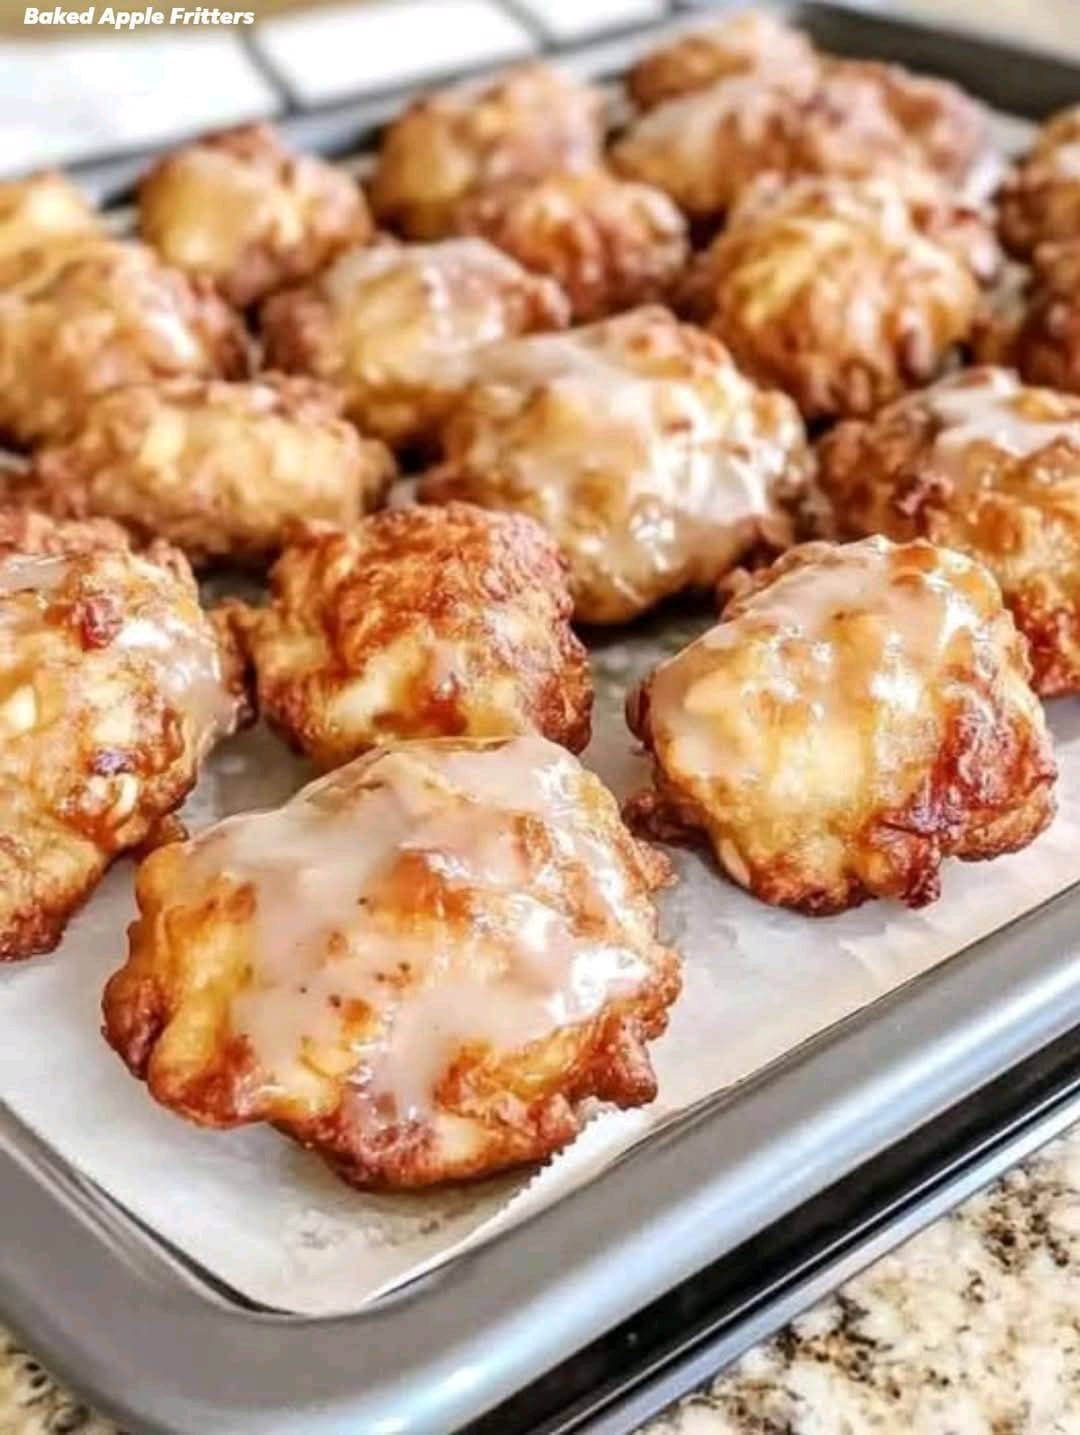
Apple Fritter Bites

Apple Fritter Bites

These Apple Fritter Bites are really a life-changing autumn treat that I had to share with you today.

This is true apple flavor packed, doughnut-like fritters that are light as air and covered with the most delectable apple cider glaze.

You may feel somewhat better about coming back for seconds—or thirds—because they are baked rather than fried!

I first sampled these little morsels of perfection when Baker Mama’s clever friend Courtney sent me a copy of her new cookbook Brilliant Bites.

I had to make them as soon as I saw the recipe title.

Could you possibly come up with an autumn snack that is better? Crisp cider glaze over warm, doughy apple fritters that pop? Indeed, do!

These, let me just say, are every bit as good as apple fritters could possibly be.

Soft pieces of fresh apple abound in these very moist treats.

The glaze is sweet and sour, and it gives you that distinctive crackly crust that is just too good.

Finally, the nicest thing? You may feel comfortable about nibbling on a couple since they are baked rather than fried.If you’re anything like me, the whole batch!

Components Cooking spray nonstick
One and a half cups total flour
Two tsp baking powder
A teaspoon each of ground cinnamon and kosher salt
Melt one-fourth cup unsalted butter
3/4 cup sugar, granulated
Just one big egg
A half teaspoon of vanilla essence
1/2 cup applesauce, unsweet
About two medium-sized neatly chopped Honeycrisp or Gala apples
Appel Cider two cups powdered sugar for the glaze
1/3 cup plus two tablespoons apple juice or cider

See also  Air Fryer Roasted Garlic Recipe

Guidelines :


Arrange an oven rack to 400°F and mist a baking sheet with nonstick cooking spray.

Stir together the flour, baking powder, salt, and cinnamon in a medium-sized basin.

Beat the sugar and melted butter together well in a big basin. Whisk in the applesauce, vanilla, and egg until smooth.

Stirring just until mixed, add the dry ingredients to the wet ones. Fold in the diced apples rather gently.

To the prepared baking sheet, scoop out 1 tablespoon quantities of batter and place them a few inches apart.

After ten minutes of baking, take out of oven and set broiler to high.

To make the glaze, beat the powdered sugar and apple juice or cider until it is pourable.

Let some of the glaze run down the edges of the heated fritter bits as you brush over them. Broil, turning the pan often, for two to four minutes, or until the glaze begins to boil and caramelize.

Take out of the oven and liberally coat the fritters’ tops with the remaining glaze.

Give the glaze fifteen minutes to set before serving.

Enjoy !

Sugar-Free Creamy Chia Seed Pudding

Sugar-Free Creamy Chia Seed Pudding

Prep time: 5 minutes | Set time: 2 hours (or overnight)

Ingredients

  • 3 tbsp Chia seeds

  • 1 cup Unsweetened almond milk (or coconut milk for extra creaminess)

  • 1/4 tsp Vanilla extract

  • Sweetener (pick one): 1 tsp Monk fruit sweetener, a few drops of Stevia, or half a mashed banana for natural sweetness.

  • Toppings (as seen in the image): Fresh orange zest or slices, and a few berries.


Instructions

  1. Mix the Base: In a medium bowl or wide-mouth jar, combine the chia seeds, your choice of milk, vanilla extract, and your preferred sugar-free sweetener.

  2. Stir Thoroughly: Whisk or stir vigorously for about 1-2 minutes. This is the most important step! If you don’t stir well initially, the seeds will clump together at the bottom.

  3. The First Rest: Let the mixture sit for 5 minutes, then give it one more good stir to break up any remaining clumps.

  4. Chilling: Cover the bowl or transfer the mixture into small glass jars (like those in the photo). Place them in the refrigerator for at least 2 hours. For the best “pudding” texture, let them sit overnight.

  5. Serve: Before eating, give it a quick stir. If it’s too thick, add a splash more milk. Top with fresh orange segments or berries as shown in the image.


Pro Tips for Success

  • Texture: If you don’t like the “beady” texture of chia seeds, you can blend the entire mixture in a high-speed blender before chilling to create a smooth, mousse-like consistency.

  • Storage: These jars will stay fresh in the fridge for up to 5 days, making them an excellent option for Sunday meal prep.

  • The “Slim” Factor: Focus on using unsweetened nut milks to keep the calorie count low while maintaining the high fiber content that helps with digestion.

Purple Onion Metabolic Support Salad

Purple Onion Metabolic Support Salad

A nutrient-rich side dish that may help support blood sugar and heart health when eaten regularly as part of a healthy lifestyle.

Description

This simple raw purple onion recipe preserves beneficial plant compounds like quercetinanthocyanins, and sulfur compounds. These antioxidants may help improve insulin sensitivity, reduce inflammation, and support cardiovascular health — not as a treatment, but as nutritional support.

Ingredients

  • 1 medium purple (red) onion, finely chopped

  • 1 tbsp lemon juice or apple cider vinegar

  • 1 tbsp extra-virgin olive oil

  • 1 small garlic clove, minced

  • Salt to taste

  • Optional: parsley, cucumber, tomato, or avocado

Instructions

  1. Soak chopped onion in cold water for 5–10 minutes (reduces harshness).

  2. Drain well.

  3. Mix with garlic, lemon juice (or vinegar), olive oil, and salt.

  4. Add optional vegetables if desired.

  5. Serve fresh.


Servings

2 servings

Nutritional Info (approx. per serving)

  • Calories: ~60

  • Carbohydrates: ~7 g

  • Fiber: ~1.5 g

  • Fat: ~4 g

  • Sugar: ~3 g

  • Glycemic load: Low

Potential Benefits (Evidence-Based, Not Miracles)

✔ May help support blood sugar regulation over time
✔ Rich in antioxidants (especially quercetin)
✔ May support heart health by reducing inflammation
✔ Low-glycemic and diabetes-friendly when portioned properly

These effects are gradual and supportive, not immediate or curative.

Tips

  • Eat raw or lightly cooked to preserve antioxidants.

  • Pair with protein or healthy fats to reduce glucose spikes.

  • Best consumed regularly, not as a one-time “fix.”

Q & A

Q: Can this replace diabetes medication?
❌ No. Never replace prescribed treatment without a doctor’s guidance.

Q: Will my blood sugar drop instantly after eating this?
❌ No. Blood sugar changes happen over hours to days, not minutes.

Q: Is purple onion better than white?
✅ Yes — purple onions contain more antioxidants.

Q: How often can I eat this?
✅ 3–5 times per week is reasonable for most people.

2-Ingredient Orange Fluff

🍊 2-Ingredient Orange Fluff

This recipe is prized for being quick, airy, and a clever way to incorporate more protein into a dessert.

Ingredients

  • Greek Yogurt: 2 cups of plain, non-fat or low-fat Greek yogurt.

  • Orange Gelatin Mix: 1 small package (about 0.3 oz or 9g) of sugar-free orange gelatin powder.

Instructions

  1. Combine: In a medium mixing bowl, add the Greek yogurt.

  2. Mix: Sprinkle the dry orange gelatin powder directly over the yogurt.

  3. Whip: Using a whisk or an electric hand mixer, beat the mixture for 2–3 minutes. This incorporates air, making it “fluffy” rather than just a thick yogurt.

  4. Chill: For the best texture, let it sit in the refrigerator for at least 30 minutes. This allows the gelatin to set slightly and the flavors to meld.

  5. Serve: Enjoy it on its own, or use it as a dip for fresh fruit slices.


✨ Pro-Tips for the “Genius” Result

  • Consistency: If you want it even lighter, you can fold in $1/2$ cup of fat-free whipped topping after mixing.

  • The “Dough” Connection: Since you mentioned being a “professional 2-ingredient dough maker,” you can actually use the same Greek yogurt mixed with self-rising flour to make quick bagels or pizza crusts to pair with your meals!


⚠️ A Quick Refresh on Your Previous Recipes

To keep your wellness routine balanced, here is a quick recap of the safety tips for the other recipes you’ve shared:

  • Clove Tea: Continue to avoid this blend if you are pregnant or taking blood-thinning medication.

  • Papaya Seeds: Keep your intake to a maximum of 1 teaspoon per day to avoid digestive sensitivity.

  • Moderation: Always consult a healthcare professional before making these remedies a permanent part of your daily routine if you have underlying medical conditions.

Cheesy Potato Bread (3 Ingredients – No Flour)

Cheesy Potato Bread (3 Ingredients – No Flour)

Ingredients

  1. 2 medium potatoes (about 400–500 g)

  2. 1 cup shredded cheese (mozzarella or mozzarella + cheddar mix)

  3. 1 large egg
    (Optional: pinch of salt or pepper for flavor)


Instructions

1. Prepare the potatoes

  • Peel the potatoes and cut them into chunks.

  • Boil in salted water for 12–15 minutes until very soft.

  • Drain completely.

  • Mash until smooth with no lumps.

2. Make the dough

  • Add 1 egg to the mashed potatoes and mix well.

  • Add shredded cheese and mix until you get a thick, sticky dough.

3. Shape

  • Lightly grease your hands or a pan.

  • Spread the mixture into a round flat bread shape (about 1–1.5 cm thick).

4. Cook

Pan method:

  • Heat a non-stick pan on low-medium heat.

  • Add a little oil or butter.

  • Place the dough in the pan and cook 5–7 minutes per side until golden and crispy.

Oven method (optional):

  • Bake at 180°C (350°F) for 20–25 minutes, flipping once.

5. Slice & serve

  • Cut into squares like in the photo.

  • Serve hot while the cheese is stretchy.

Muffin Tin Lasagna Cups

Muffin Tin Lasagna Cups

These are quick to assemble and easy to customize. Using wonton wrappers instead of traditional pasta makes them light and gives them a satisfying “crunch.”

Ingredients

  • Wonton Wrappers: 24 wrappers (found in the produce or refrigerated section of most stores).

  • Marinara Sauce: 1.5 cups of your favorite low-sodium tomato sauce.

  • Cheese Blend: 1 cup reduced-fat Mexican cheese blend (as you preferred!) or shredded mozzarella.

  • Ricotta Mixture: 1 cup part-skim ricotta cheese mixed with $1/4$ cup grated Parmesan and a pinch of dried oregano.

  • Protein (Optional): $1/2$ lb of cooked lean ground turkey or crumbled plant-based meat.

Instructions

  1. Prep the Tin: Preheat your oven to 375°F (190°C). Lightly spray a 12-cup muffin tin with non-stick cooking spray.

  2. The First Layer: Press one wonton wrapper into the bottom of each muffin cup. Make sure it flat against the bottom and sides.

  3. The Base Filling: Add a small dollop of the ricotta mixture, a spoonful of sauce, and a sprinkle of your Mexican cheese blend.

  4. The Second Layer: Place a second wonton wrapper on top of the first layer (rotate it slightly so the corners point in a different direction for better coverage).

  5. Top It Off: Repeat the filling layers—ricotta, sauce, and finally, a generous pinch of the reduced-fat Mexican cheese on top.

  6. Bake: Place in the oven for 12–15 minutes. Watch for the edges of the wontons to turn golden brown and the cheese to bubble.

  7. Rest & Serve: Let them cool in the pan for 5 minutes. This helps the cheese set so they pop out easily with a spoon or butter knife.


💡 Why This Recipe Works

  • Effortless Portion Control: Since they are pre-sized in a muffin tin, it’s easy to track exactly how much you’re eating.

  • Meal Prep Friendly: These store perfectly in an airtight container for 3–4 days. Reheat them in a toaster oven to keep the “wonton” edges crispy.

  • Balanced Swap: Using reduced-fat cheese and wonton wrappers significantly lowers the calorie density compared to a traditional deep-dish lasagna.

Crispy Pan-Fried Halloumi

Crispy Pan-Fried Halloumi

This 3-ingredient snack is quick to make and incredibly satisfying.

Ingredients

  • Halloumi Cheese: 1 block (about 250g), sliced into 1/2-inch thick rectangles.

  • Honey: For drizzling over the finished product.

  • Fresh Herbs: A sprinkle of fresh oregano or thyme for garnish.

  • Optional: A light coating of flour if you want an extra-crispy exterior.

Instructions

  1. Prep the Cheese: Pat the Halloumi slices dry with a paper towel. Halloumi is stored in brine, and removing excess moisture is the secret to getting that perfect golden sear.

  2. Heat the Pan: Place a non-stick frying pan over medium-high heat. You don’t usually need oil because the cheese releases its own fats, but you can add a tiny drop of olive oil if preferred.

  3. Sear: Place the slices in the pan. Fry for 2–3 minutes on each side until they are deeply golden brown and have a crispy texture.

  4. Finish: Remove from the pan and plate immediately. While hot, drizzle generously with honey and sprinkle with your fresh herbs.

  5. Serve: Eat right away while the cheese is still warm and flexible!


✨ Why This Recipe Works

  • High Melting Point: Unlike other cheeses, Halloumi doesn’t melt away in the pan; it softens while maintaining its shape.

  • Sweet & Salty: The natural saltiness of the cheese paired with the honey creates a sophisticated flavor profile.

💡 Variations

  • Citrus Twist: Squeeze a bit of fresh lemon juice over the top to cut through the richness.

  • Spicy Kick: Add a pinch of chili flakes to the honey before drizzling.

Soothing Clove and Ginger Tea

Soothing Clove and Ginger Tea

This recipe combines warming spices to create a fragrant drink that is easy to prepare at home.

Ingredients

  • Fresh Ginger: $1/2$ inch piece, sliced or crushed.

  • Cinnamon: 1 whole cinnamon stick.

  • Cloves: $1/4$ teaspoon of whole cloves.

  • Water: 3 cups of water.

  • Optional: 1 teaspoon of raw honey (add only when the tea has cooled slightly to preserve its natural properties).

Instructions

  1. Boil: Place the water, sliced ginger, cinnamon stick, and cloves in a small pot.

  2. Simmer: Bring the mixture to a boil and let it simmer for 7 to 8 minutes. This allows the spices to fully infuse the water.

  3. Strain: Pour the tea through a fine-mesh strainer into your favorite mug to remove the solids.

  4. Cool and Sweeten: Let the tea sit for a minute or two. If you prefer it sweet, stir in the honey once the tea is warm rather than boiling hot.

  5. Enjoy: Sip slowly while warm.


🌟 Benefits of the Ingredients

  • Clove: Traditionally used for its antimicrobial properties to help maintain mouth hygiene.

  • Ginger & Cinnamon: Known for their warming effects and support for the immune system.

  • Respiratory Support: The steam and warmth of the tea can help clear mucus and soothe the throat.

⚠️ Important Safety Notes

  • Pregnancy: It is recommended to avoid this tea if you are pregnant.

  • Medication: Those on blood-thinning medications should avoid this blend due to the natural properties of cloves and ginger.

  • Moderation: While these ingredients are natural, they are potent. Stick to the suggested measurements for the best experience.

Easy Creamy Layered Parfait

Easy Creamy Layered Parfait

This recipe is quick, tasty, and perfect for sharing at home.

Ingredients

  • The Base: 1 pack of plain biscuits (like Maria cookies, Graham crackers, or Digestive biscuits).

  • The Cream: * 2 cups whole milk.

    • 1/2 cup sugar.

    • 2 egg yolks.

    • 2 tablespoons cornstarch.

    • 1 teaspoon vanilla extract.

    • 1/2 cup heavy cream (optional, for extra richness).

Instructions

  1. Prepare the Biscuits: Crush the biscuits into small chunks or a coarse sandy texture. Set aside.

  2. Make the Custard: * In a saucepan, whisk together the milk, sugar, egg yolks, and cornstarch until smooth.

    • Place over medium heat, stirring constantly to avoid lumps.

    • Once the mixture thickens into a pudding-like consistency, remove from heat and stir in the vanilla extract.

  3. Layering: * Place a spoonful of crushed biscuits at the bottom of each glass.

    • Add a layer of the warm vanilla cream.

    • Repeat the layers until the glass is nearly full.

  4. Finish: Top with a final sprinkle of biscuit crumbs or a dusting of powdered sugar as seen in your photo.

  5. Chill: Let the glasses sit in the refrigerator for at least 2 hours to set and allow the biscuits to soften slightly.


⚠️ Safety Reminder Regarding Papaya Seeds

If you choose to incorporate the papaya seeds we discussed earlier into your diet, remember these safety guidelines from your reference:

  • Dosage: Do not exceed 1 teaspoon of seeds per day.

  • Avoid if: You are pregnant, have stomach ulcers, sensitive digestion, or a papaya allergy.

  • Consultation: Always speak with a healthcare professional before using natural remedies if you have medical conditions or take medication.

💡 Pro-Tips for Preparation & Storage

💡 Pro-Tips for Preparation & Storage

1. The “Clean & Dry” Method

Fresh seeds are encased in a slippery gelatinous sac (the sarcotesta). If you want to grind them into a powder for the recipes you mentioned:

  • The Wash: Place seeds in a fine-mesh strainer and rub them against the mesh under running water to break the sacs.

  • The Dry: Pat them dry and spread them on a baking sheet. You can air-dry them for 2–3 days or pop them in an oven at a very low temp (around 50°C or 120°F) for a few hours until they are hard and shriveled.

2. The Pepper Swap

Because papaya seeds have a flavor profile almost identical to black pepper, many people use a pepper grinder to use them as a seasoning.

  • Try this: Mix dried papaya seeds with black peppercorns in a 1:1 ratio. You get the digestive benefits with every meal without needing a dedicated “remedy” time.

3. Bitterness Management

Papaya seeds are intense. If the “Detox Smoothie” is too bitter for your palate, try adding a pinch of cinnamon or a slice of fresh ginger. Both pair perfectly with the seeds’ profile and add their own anti-inflammatory boost.


⚠️ A Note on Freshness

If you are using fresh seeds (like in the smoothie), they only stay good in the fridge for about 5–7 days. If they start to smell “fermented” or lose their firm texture, it’s time to compost them and crack open a new papaya.

The Ultimate Soft White Bread

The Ultimate Soft White Bread

Ingredients

  • 1 cup warm water (Ideally $105^\circ\text{F}$ to $115^\circ\text{F}$)

  • 1 package (2 ¼ tsp) active dry yeast

  • 1 tbsp sugar (This feeds the yeast and helps with browning)

  • 3 ½ cups all-purpose flour (Adjust slightly if the dough is too sticky)

  • 1 tsp salt

  • ¼ cup olive oil (This provides the “soft” crumb)


Instructions

1. Bloom the Yeast

In a large bowl, combine the warm water, sugar, and yeast. Let it sit for about 5–10 minutes until it becomes frothy and bubbly. if it doesn’t bubble, your yeast might be expired or the water was too hot.

2. Mix the Dough

Add the olive oil and salt to the yeast mixture. Gradually stir in the flour, one cup at a time. Once a shaggy dough forms, move it to a lightly floured surface.

3. The Knead (Crucial for Fluffiness)

Knead the dough for 8–10 minutes by hand (or 5–7 minutes in a stand mixer). You are looking for the “windowpane test”—stretch a small piece of dough; if it stretches thin enough to see light through it without tearing, the gluten is ready.

4. First Rise

Place the dough in a lightly greased bowl and cover it with a damp cloth. Let it rise in a warm, draft-free spot for 1 to 1.5 hours, or until it has doubled in size (just like your first photo!).

5. Shape and Second Rise

Gently punch the dough down to release air. Shape it into a log and place it into a greased 9×5 inch loaf pan. Cover and let it rise again for about 30–45 minutes.

6. Bake

Preheat your oven to $350^\circ\text{F}$ ($175^\circ\text{C}$). Bake for 30–35 minutes until the top is golden brown and the loaf sounds hollow when tapped on the bottom.


Tips for Success

  • Don’t Rush the Rise: The “fluff” comes from the air bubbles trapped by the gluten. Let it rise fully!

  • Butter the Crust: For an extra soft top, brush the crust with melted butter immediately after taking it out of the oven.

  • Cooling: Resist the urge to cut it immediately! Let it cool for at least 20 minutes so the internal structure sets.

Fluffy Banana Cottage Cheese Pancakes

Fluffy Banana Cottage Cheese Pancakes

Ingredients

  • 1 ripe banana, thoroughly mashed

  • ½ cup cottage cheese (small curd works best)

  • 2 large eggs

  • ½ cup all-purpose flour (or oat flour for a heartier texture)

  • ¼ tsp baking powder (essential for the “fluff”)

  • Pinch of salt

  • Optional: ½ tsp vanilla extract or a dash of cinnamon

  • Butter or oil for the skillet


Instructions

  1. Mix the Base: In a medium bowl, combine the mashed banana, cottage cheese, and eggs. Whisk them together until well combined.

    Pro-Tip: If you prefer a smoother texture without the cottage cheese “curds,” you can pulse these wet ingredients in a blender for 10 seconds.

  2. Add Dry Ingredients: Gently stir in the flour, baking powder, salt, and any optional spices. Mix until just combined—don’t overmix, or the pancakes will lose their fluffiness.

  3. Preheat the Pan: Heat a non-stick skillet or griddle over medium-low heat. Add a small amount of butter or oil to coat the surface.

  4. Cook: Scoop about ¼ cup of batter per pancake onto the skillet. Cook for 3–4 minutes. Because of the moisture in the banana and cheese, these cook a bit slower than traditional pancakes.

  5. Flip: Once you see small bubbles forming on the surface and the edges look set, carefully flip them. Cook for another 2 minutes until golden brown on both sides.

  6. Serve: Top with fresh banana slices, a dollop of Greek yogurt (or whipped cream as shown in your photo), and a drizzle of maple syrup.


Why This Works

The cottage cheese melts slightly during cooking, creating a creamy, melt-in-your-mouth interior, while the eggs and baking powder provide the lift needed to keep them from being too dense.

Aloe Vera & Cinnamon Juice

🌿 Recipe 1: Aloe Vera & Cinnamon Juice

Ingredients:

  • 1 large aloe vera leaf

  • 1 cinnamon stick or ½ teaspoon ground cinnamon

  • 1 glass (250 ml) water

  • 1 teaspoon honey (optional)

Instructions:

  1. Wash the aloe leaf thoroughly.

  2. Cut off the spiny edges and remove the thick green skin.

  3. Scoop out only the clear gel (avoid the yellow sap).

  4. Add aloe gel, water, and cinnamon to a blender.

  5. Blend until smooth.

  6. Strain if desired and sweeten with honey.

How to Use:

Drink 1 glass in the morning on an empty stomach, 2–3 times per week.

Safe Benefits:

  • Supports digestion

  • Provides antioxidants

  • Helps hydrate the body

  • May help reduce mild inflammation


☕ Recipe 2: Digestive Aloe & Cinnamon Infusion

Ingredients:

  • 2 tablespoons aloe vera gel

  • 1 cinnamon stick

  • 1 cup water

Instructions:

  1. Boil cinnamon stick in water for 5 minutes.

  2. Remove from heat.

  3. Add aloe vera gel.

  4. Cover and let steep for 10 minutes.

  5. Strain before drinking.

How to Use:

Drink after lunch or dinner for up to 7 days.

Benefits:

  • Helps ease bloating

  • Supports bowel movement

  • Soothes the digestive tract


🧴 Recipe 3: Aloe & Cinnamon Face Mask

Ingredients:

  • 2 tablespoons aloe vera gel

  • ½ teaspoon ground cinnamon

  • 1 teaspoon honey

Instructions:

  1. Mix all ingredients into a smooth paste.

  2. Wash face and pat dry.

  3. Apply a thin layer, avoiding eyes and lips.

  4. Leave on for 10–15 minutes.

  5. Rinse with lukewarm water and apply moisturizer.

Frequency:

Use once or twice weekly.

Benefits:

  • Helps refresh skin

  • Supports healing of minor blemishes

  • Improves skin appearance

  • Adds natural glow

⚠️ Do a patch test first (cinnamon can irritate skin).


🥕 Recipe 4: Carrot, Aloe & Cinnamon Juice

Ingredients:

  • 1 glass fresh carrot juice

  • 2 tablespoons aloe vera gel

  • ½ teaspoon ground cinnamon

Instructions:

  1. Blend all ingredients well.

  2. Drink immediately.

How to Use:

Drink 2–3 times per week in the morning.

Benefits:

  • Provides vitamin A

  • Supports eye health

  • Improves circulation

  • Boosts energy


💆 Recipe 5: Aloe & Cinnamon Hair Tonic

Ingredients:

  • ½ cup aloe vera gel

  • 1 cup cinnamon water (boil 1 stick in water)

  • 1 teaspoon olive oil

Instructions:

  1. Mix all ingredients well.

  2. Massage into scalp for 5 minutes.

  3. Leave for 30 minutes.

  4. Wash with mild shampoo.

Frequency:

Use once weekly.

Benefits:

  • Strengthens hair

  • Moisturizes scalp

  • Helps reduce dandruff

  • Improves shine


🌿 Main Natural Properties

Aloe Vera:

  • Contains vitamins A, C, E, B-complex

  • Rich in minerals (calcium, magnesium, zinc)

  • Hydrates and soothes tissues

  • Supports skin and digestion

Cinnamon:

  • Rich in antioxidants

  • Helps regulate blood sugar

  • Supports circulation

  • Has mild anti-inflammatory effects


⚠️ Safety Precautions

  • Do not consume aloe vera daily for long periods.

  • Avoid large doses of cinnamon.

  • Not recommended during pregnancy without doctor advice.

  • If you have diabetes, stomach problems, or take medication → consult your doctor.

  • Always remove yellow aloe sap (aloin).


🌞 Conclusion

Aloe vera and cinnamon can be helpful natural ingredients when used in moderation. These recipes support digestion, skin care, and overall wellness. They do not replace medical treatment, but they can be part of a healthy lifestyle when used safely.

WEEKLY SMOOTHIE RECIPES

Monday: Creamy Avocado Energy

  • Ingredients:

    • 1/2 ripe avocado

    • 1 medium banana (frozen is best for texture)

    • 1/4 cup raw almonds

    • 1 cup milk of choice (dairy, oat, or almond)

    • Optional: 1 tsp honey or maple syrup for sweetness.

  • Instructions: Place almonds in the blender first and pulse until finely crushed. Add the remaining ingredients and blend until completely smooth.

Tuesday: Tropical Glow

  • Ingredients:

    • 1 cup fresh pineapple chunks

    • 1 medium red apple, cored and sliced

    • 2 medium carrots, peeled and chopped

    • 1/2 cup water or orange juice (to help blending)

  • Instructions: If you don’t have a high-speed blender, grate the carrots first to avoid chunks. Blend all ingredients until vibrant and liquid.

Wednesday: The Refresher

  • Ingredients:

    • 2 stalks celery, chopped

    • 1/2 large cucumber, sliced

    • Juice of 1/2 lemon

    • 1/2 cup cold water

    • Optional: A few mint leaves for extra zest.

  • Instructions: Blend the celery and cucumber with water first. Once smooth, stir in the lemon juice. Sieve through a fine mesh if you prefer a “juice” consistency over a “smoothie” texture.

Thursday: Vitality Red

  • Ingredients:

    • 1 small beetroot (peeled and raw for maximum nutrients, or steamed for a smoother taste)

    • 1 stalk celery, chopped

    • 1 large green apple, cored

    • 1/2 cup water

  • Instructions: Chop the beetroot into very small cubes to help your blender. Blend until deep red and consistent.

Friday: Berry Blast

  • Ingredients:

    • 1/2 cup fresh strawberries

    • 1/2 cup blueberries

    • 1 banana

    • 1 cup milk of choice

  • Instructions: Add the berries and banana to the blender, pour the milk over them, and blend on high. This one is perfect with a scoop of protein powder if you’re hitting the gym!

Saturday: The Green Machine

  • Ingredients:

    • 1 green apple, cored

    • 1/2 cucumber, sliced

    • 1 large handful of fresh baby spinach

    • 1/2 cup water or coconut water

  • Instructions: Layer the spinach at the bottom near the blades, then add the cucumber and apple. Blend until there are no leafy “bits” left.


Pro-Tips for Success:

  • The Liquid Base: Start with 1/2 cup of liquid. If it’s too thick, add more a tablespoon at a time.

  • Temperature: For the best experience, use at least one frozen fruit element (like the banana or berries) to keep the drink cold and thick without diluting it with ice.

  • Prep: You can “meal prep” these by putting the dry/solid ingredients into freezer bags so you just have to dump them in and add liquid in the morning!

Crispy 3-Ingredient Savory Rolls

Crispy 3-Ingredient Savory Rolls

Gluten-free, flourless, and high in flavor.

Ingredients

  • 2 Large Zucchini (or 2 large Potatoes for a heartier version)

  • 1 ½ cups Shredded Mozzarella or Cheddar Cheese

  • 2 Large Eggs

  • Optional Seasoning: A pinch of salt, black pepper, and garlic powder for extra depth.


Instructions

  1. Prepare the Base: Grate the zucchini (or potatoes) using a box grater. Place the shreds into a clean kitchen towel and squeeze as hard as you can to remove all the excess moisture. This is the secret to getting them crispy rather than soggy!

  2. Mix the “Dough”: In a medium bowl, combine the squeezed vegetable shreds, one cup of the shredded cheese, and the two eggs. Add your seasonings here. Mix thoroughly until the egg and cheese are evenly distributed.

  3. The First Bake: Preheat your oven to 200°C (400°F). Line a baking sheet with parchment paper. Spread the mixture flat onto the sheet in a thin, even rectangle. Bake for 15–20 minutes until the edges are golden and the base feels firm.

  4. Add the Center: Remove from the oven. Sprinkle the remaining half cup of cheese evenly over the top of the baked sheet.

  5. Roll It Up: While still warm, carefully roll the sheet tightly from one end to the other (like a Swiss roll). Once rolled, you can slice the long roll into individual smaller rolls as seen in your photo.

  6. Final Crisp: Place the individual rolls back on the baking sheet and bake for another 5–10 minutes. This ensures the cheese inside is melted and the exterior gets that beautiful golden-brown crunch.

  7. Serve: Let them cool for a minute so the cheese sets, then enjoy!


Why This Recipe is a Winner

  • No Flour: By using eggs and cheese as the binder, you avoid heavy starches.

  • Vegetable-Forward: It’s an easy way to sneak a full serving of greens into your dinner.

  • Customizable: You can sprinkle poppy seeds or sesame seeds on top before the final bake for added texture and visual appeal.

Crispy Chicken Ham & Cheese Bites (Party Appetizer)

Crispy Chicken Ham & Cheese Bites (Party Appetizer)

Golden, crispy chicken layered with ham and melted cheese, finished with seasoning on top. Perfect for parties or family meals.


Ingredients

  • 2 large boneless, skinless chicken breasts

  • Salt and black pepper, to taste

  • ½ cup all-purpose flour

  • 2 large eggs

  • 1 cup breadcrumbs or crushed crackers

  • 1 teaspoon garlic powder

  • 1 teaspoon paprika

  • 8 slices ham

  • 8 slices Swiss, mozzarella, or provolone cheese

  • 2 tablespoons butter, melted

  • 1 tablespoon poppy seeds or mixed dried herbs (optional)


Instructions

1. Prepare the Chicken

Slice each chicken breast horizontally into thinner pieces (cutlets).
Season both sides with salt and black pepper.

2. Set Up Breading Station

Place in three bowls:

  • Bowl 1: flour

  • Bowl 2: beaten eggs

  • Bowl 3: breadcrumbs mixed with garlic powder and paprika

Dip each chicken piece:

  1. In flour

  2. In egg

  3. In breadcrumbs

Press gently so coating sticks well.

3. Fry or Bake the Chicken

Heat oil in a skillet over medium heat and cook chicken until golden on both sides (about 3–4 minutes per side).
OR bake at 200°C (400°F) for 18–20 minutes until fully cooked.

4. Assemble the Stacks

Preheat oven to 180°C (350°F).
Place cooked chicken pieces in a baking dish.

On each piece:

  • Add ½ slice ham

  • Add ½ slice cheese

  • Top with another chicken piece (to form a sandwich stack)

5. Add Topping

Brush tops with melted butter.
Sprinkle with poppy seeds or dried herbs.

6. Bake to Melt

Bake for 10–12 minutes until cheese melts and tops are lightly crisp.


Serving Suggestions

  • Serve hot

  • Cut into smaller pieces for appetizers

  • Serve with honey mustard, garlic sauce, or marinara


Storage

  • Refrigerate leftovers up to 3 days

  • Reheat in oven or air fryer for best texture


Variations

  • Use turkey instead of ham

  • Add a thin layer of mustard inside

  • Use cheddar or gouda cheese

  • Add a pinch of chili flakes for heat

No-Bake Creamy Cocoa Dessert (5-Minute Prep)

No-Bake Creamy Cocoa Dessert (5-Minute Prep)

A smooth, creamy chilled dessert with a cocoa-dusted top. No oven needed.


Ingredients

  • 2 cups (500 ml) heavy whipping cream

  • ½ cup (100 g) sugar or sweetener of choice

  • 1 teaspoon vanilla extract

  • 1 cup (250 g) cream cheese or mascarpone, softened

  • 2 tablespoons cornstarch (or instant vanilla pudding powder)

  • ½ cup (120 ml) milk

  • Unsweetened cocoa powder, for topping


Step-by-Step Instructions

1. Make the Cream Base

In a mixing bowl, beat:

  • Heavy cream

  • Sugar

  • Vanilla

Whip until thick and fluffy (soft peaks form).

2. Add the Cheese

Add the softened cream cheese (or mascarpone) to the whipped cream.
Beat again until completely smooth and creamy with no lumps.

3. Thicken the Mixture

In a small bowl, whisk:

  • Milk

  • Cornstarch

Pour this into the cream mixture and mix well until fully combined.

4. Chill

Pour the mixture into a serving dish or glass container.
Smooth the top with a spatula.

Refrigerate for 2–3 hours until firm.

5. Finish

Before serving, dust the top generously with unsweetened cocoa powder.


How to Serve

  • Serve cold

  • Scoop or slice with a spoon

  • Optional: add grated chocolate or coffee powder on top


Storage

  • Keep covered in the refrigerator for up to 3 days

  • Do not leave at room temperature for long


Optional Variations

  • Add instant coffee to the cream for coffee flavor

  • Layer with crushed biscuits for a tiramisu-style dessert

  • Add lemon zest for citrus flavor

  • Use chocolate pudding instead of vanilla


Tips

✔ Use cold cream for better whipping
✔ Sift cocoa powder for a smooth top
✔ Chill fully for clean slices
✔ Beat cream cheese well to avoid lumps

The 2-Ingredient Silk Pudding

The 2-Ingredient Silk Pudding

Creamy, sweet, and perfectly smooth.

Ingredients

  • 1 can (approx. 400g) Sweetened Condensed Milk

  • 1 ½ cups (approx. 350g) Plain Greek Yogurt (or Natural Unsweetened Yogurt)

  • Optional: Chocolate sprinkles or a dusting of cocoa powder for the top.


Instructions

  1. Combine: In a medium mixing bowl, pour in the entire can of sweetened condensed milk. Add the Greek yogurt.

  2. Blend until Smooth: Use a whisk or a hand mixer to blend the two ingredients together. Mix for about 1–2 minutes until the texture is completely uniform and has a beautiful glossy sheen.

  3. The “Cook” (Microwave or Oven): * Microwave Method: Pour the mixture into a microwave-safe glass dish. Heat on high for 2 minutes, stir gently, and heat for another 2 minutes. The mixture should thicken significantly.

    • Oven Method: Pour into a baking dish and bake at 160°C (320°F) in a water bath (place the dish inside a larger pan filled with hot water) for about 30 minutes until set.

  4. Add Toppings: While the mixture is still warm but not hot, smooth the top with a spatula and add your chocolate sprinkles or garnish.

  5. Chill to Set: This is the most important part! Let the dish cool to room temperature, then cover and refrigerate for at least 3–4 hours (overnight is even better). This allows the proteins to bond and creates that firm, spoonable texture.

  6. Serve: Scoop directly from the dish or slice if you used the oven method for a firmer set.


Why This Works

The acidity in the yogurt reacts with the proteins in the condensed milk, and the application of gentle heat helps it “set” into a custard without the need for eggs or gelatin. It’s a wonderful kitchen hack for a last-minute dessert!

Chocolate Peanut Butter Balls (No-Bake)

Chocolate Peanut Butter Balls (No-Bake)

These bite-size treats have a creamy peanut butter center and a smooth dark chocolate coating. They are easy to prepare and perfect for chilling and serving as a snack or dessert.


Ingredients

For the filling:

  • 1 cup natural peanut butter

  • ½ cup powdered sweetener or powdered sugar

  • ¼ cup protein powder (optional, plain or vanilla)

  • 1 teaspoon vanilla extract

  • Pinch of salt (if peanut butter is unsalted)

For coating:

  • 1½ cups dark chocolate chips or chopped dark chocolate

  • 1 tablespoon coconut oil or butter (for smooth melting)


Instructions

1. Make the Peanut Butter Mixture

In a mixing bowl, combine:

  • Peanut butter

  • Sweetener

  • Protein powder (if using)

  • Vanilla

  • Salt

Stir until thick, smooth, and fully combined. The mixture should be firm enough to roll.
If too soft, refrigerate for 10–15 minutes.

2. Shape the Balls

Scoop about 1 tablespoon of mixture and roll into a ball using your palms.
Place on a tray lined with baking paper.

Repeat with all the mixture.

3. Chill

Place the tray in the freezer for 15–20 minutes so the balls become firm for dipping.

4. Melt the Chocolate

In a microwave-safe bowl, melt the chocolate with coconut oil in 20–30 second bursts, stirring between each, until smooth.

5. Coat the Balls

Dip each chilled peanut butter ball into melted chocolate using a fork or toothpick.
Let excess chocolate drip off, then place back on the lined tray.

6. Set

Refrigerate for 20–30 minutes until the chocolate is fully set.


Storage

  • Store in an airtight container in the refrigerator for up to 5 days

  • Can be frozen for up to 1 month


Optional Variations

  • Add crushed nuts to the peanut butter mixture

  • Use milk or white chocolate instead of dark

  • Add a pinch of cinnamon or espresso powder

  • Drizzle with melted white chocolate on top

Creamy No-Bake Cheese Log (5-Minute Prep Dessert)

Creamy No-Bake Cheese Log (5-Minute Prep Dessert)

This simple no-bake dessert is smooth, lightly sweet, and easy to shape into a sliceable log. It’s perfect for quick entertaining or a make-ahead chilled treat.


Ingredients

  • 2 cups (500 g) ricotta or quark cheese, well drained

  • ½ cup (120 g) cream cheese, softened

  • ¼ cup sweetener of choice (honey, agave syrup, or powdered monk fruit)

  • 1 teaspoon vanilla extract

For coating (optional):

  • Unsweetened cocoa powder

  • Ground cinnamon

  • Finely chopped nuts (almonds, walnuts, pistachios)


Step-by-Step Instructions

1. Prepare the Cheese

If using ricotta, place it in a sieve or cheesecloth and let it drain for 10–15 minutes. This prevents excess moisture and helps the log hold its shape.

2. Blend Until Smooth

In a medium mixing bowl, add:

  • Ricotta (or quark)

  • Cream cheese

Beat using a hand mixer or whisk until completely smooth and creamy. Scrape the sides of the bowl so no lumps remain.

3. Sweeten and Flavor

Add:

  • Sweetener

  • Vanilla extract

Mix again for about 30 seconds until fully combined and evenly flavored.

4. Shape the Log

Lay a large sheet of plastic wrap on your counter.
Spoon the mixture onto the center and shape it into a thick line (log shape).

5. Roll and Seal

Lift the plastic wrap and roll the mixture tightly into a cylinder.
Twist the ends like a candy wrapper to compress and smooth the log.

6. Chill to Set

Place in:

  • Freezer: 20–30 minutes
    OR

  • Refrigerator: 2 hours

This firms it up so it slices neatly.

7. Coat the Outside

Unwrap the chilled log.
Roll it gently in:

  • Cocoa powder

  • Cinnamon
    or

  • Chopped nuts

until fully coated.

8. Slice and Serve

Cut into thick slices using a sharp knife.
Serve cold.


Optional Mix-Ins (Add Before Rolling)

  • Mini chocolate chips

  • Finely chopped dates or raisins

  • Lemon or orange zest

  • Shredded coconut


Storage

  • Store wrapped in the refrigerator for up to 3 days

  • Can be frozen for up to 2 weeks

  • Slice while cold for best shape

The High-Protein Cloud Cake

The High-Protein Cloud Cake

No flour, no refined sugar, and packed with protein.

Ingredients

  • 4 Large Eggs (separated into whites and yolks)

  • 1 ½ cups (approx. 350g) Plain Greek Yogurt (thick, strained yogurt works best)

  • 3 tbsp Cornstarch or Arrowroot Powder (to help stabilize the structure)

  • ¼ cup Natural Sweetener (Honey, Maple Syrup, or Stevia/Monkfruit to taste)

  • 1 tsp Vanilla Extract

  • A pinch of Salt

  • Optional: 1 tsp Lemon juice (helps the egg whites peak)


Instructions

  1. Prep the Oven: Preheat your oven to 150°C (300°F). Line a 6 or 7-inch round cake pan with parchment paper. Pro tip: Make sure the parchment paper sticks up higher than the pan edges, as this cake will rise quite a bit!

  2. Mix the Base: In a medium bowl, whisk together the egg yolks, Greek yogurt, sweetener, vanilla, and cornstarch until the mixture is completely smooth and creamy.

  3. Whip the Whites: In a separate, very clean glass or metal bowl, add the egg whites and a pinch of salt (and lemon juice if using). Use a hand mixer or stand mixer to beat them on high until stiff peaks form. You should be able to turn the bowl upside down without the whites moving.

  4. The Fold (Crucial Step): Gently fold about 1/3 of the egg whites into the yogurt mixture to lighten it up. Then, add the rest of the whites. Use a spatula to gently fold in a “U” motion—do not stir or whisk, as you want to keep all that air inside.

  5. Bake: Pour the batter into your prepared pan. Bake for 45–50 minutes. The top should be golden brown, and the cake should have a slight jiggle.

  6. The Cool Down: Turn off the oven and leave the door slightly ajar for 10 minutes before taking it out. This prevents the cake from collapsing too quickly.

  7. Chill: For the best texture, let it cool to room temperature, then refrigerate for at least 2 hours. This sets the “custard” texture inside.


Nutrition Note

Because this recipe uses Greek yogurt and eggs as the primary ingredients, it is exceptionally high in protein compared to traditional sponges. It’s a great way to satisfy a sweet craving while staying fueled.

3-Ingredient Lemon Soufflé Cakes

3-Ingredient Lemon Soufflé Cakes

These cakes use the natural lift of whipped eggs to create a tall, “magic” rise that looks incredible right out of the oven.

Ingredients

  • 3 Large Eggs, separated (whites in one bowl, yolks in another)

  • 1/2 cup Condensed Milk (or a sugar-free alternative for sweetness and creamy texture)

  • 1/4 cup Fresh Lemon Juice (about 1 large lemon)

  • Optional: Powdered sugar for dusting the tops


Instructions

  1. Prep Your Tools: Preheat your oven to 325°F (165°C). Lightly grease 4–6 ramekins or a muffin tin.

    • Tip: For an extra-clean rise, you can lightly dust the greased ramekins with a little granulated sugar substitute.

  2. Mix the Base: In a medium bowl, whisk together the egg yolks, condensed milk, and lemon juice until the mixture is smooth and pale yellow.

  3. Whip the Whites: In a separate, very clean glass or metal bowl, beat the egg whites on high speed until they form stiff peaks. The whites should stand straight up and not slide when you tilt the bowl.

  4. Fold with Care: Using a spatula, gently fold about a third of the whipped whites into the yolk mixture to lighten it. Then, very carefully fold in the remaining whites until just combined. Do not over-mix, as those air bubbles are what make the cakes rise.

  5. Bake: Divide the batter evenly among your prepared ramekins or muffin cups. Bake for 15–20 minutes until the tops are puffed up and lightly golden brown.

  6. Finishing Touch: Remove from the oven and let them sit for 2 minutes. Dust the tops with a light coating of powdered sugar before serving.


Why this works:

  • The Rise: By whipping the whites separately, you are trapping air that expands in the heat of the oven, creating that “treasure-like” height.

  • The Flavor: The lemon juice provides a sharp, refreshing contrast to the sweetness of the milk, making it feel light rather than heavy.

Crispy Baked Parmesan Zucchini Sticks


Crispy Baked Parmesan Zucchini Sticks

These sticks are roasted until the Parmesan creates a golden, savory crust around the tender zucchini.

Ingredients

  • 2–3 medium zucchinis, cut into sticks

  • 2–3 tbsp olive oil

  • ½ cup grated Parmesan cheese

  • ½ tsp garlic powder

  • ½ tsp onion powder

  • ½ tsp dried oregano or Italian seasoning

  • Optional: A pinch of salt and black pepper to taste.


Instructions

  1. Preparation: Preheat your oven to 400°F (200°C). Line a large baking sheet with parchment paper or a silicone baking mat for easy cleanup and to prevent sticking.

  2. Prepare the Zucchini: Wash the zucchinis and pat them completely dry. Slice off the ends, then cut them into halves or thirds crosswise. Slice each section into even “sticks” or fries.

    • Tip: Keeping the sticks roughly the same size ensures they all cook at the same rate.

  3. The Coating: In a small bowl, mix the Parmesan cheese, garlic powder, onion powder, and Italian seasoning.

  4. Toss and Season: Place the zucchini sticks in a large bowl. Drizzle with the olive oil and toss until every stick is lightly coated. Sprinkle the Parmesan mixture over the zucchini and toss again, or dip each oiled stick individually into the cheese mixture for a thicker crust.

  5. Bake: Arrange the zucchini sticks in a single layer on the prepared baking sheet. Ensure they aren’t touching so the air can circulate, making them crispier.

    • Bake for 15–20 minutes.

    • For extra crunch, turn the oven to broil for the last 2 minutes until the cheese is bubbly and deep golden brown.

  6. Serve: Remove from the oven and let them sit for 2 minutes to allow the cheese crust to firm up. Serve warm with your favorite dipping sauce.


Perfect Pairings

  • Marinara Sauce: The acidity of tomato sauce perfectly balances the salty Parmesan.

  • Lemon Yogurt Dip: Mix Greek yogurt with lemon zest and a little dill for a refreshing contrast.

Honeycrisp Apple Broccoli Salad

Honeycrisp Apple Broccoli Salad

This salad is a refreshing addition to any meal, featuring a creamy, tangy dressing that ties the crisp fruits and vegetables together.

Ingredients

For the Salad:

  • 4 cups broccoli florets, chopped into bite-sized pieces

  • 1 large Honeycrisp apple, diced

  • 1/2 cup dried cranberries

  • 1/2 cup chopped pecans or walnuts

  • 1/4 cup red onion, finely diced

For the Creamy Dressing:

  • 1/2 cup mayonnaise (or Greek yogurt for a tangier profile)

  • 2 tbsp apple cider vinegar

  • 1 tbsp honey or maple syrup

  • A pinch of salt and black pepper


Instructions

  1. Prepare the Broccoli: Wash the broccoli thoroughly and pat it dry. Chop the florets into very small pieces; smaller florets capture the dressing better and provide a more uniform crunch.

  2. Dice the Apple: Dice your Honeycrisp apple into half-inch cubes.

    • Tip: If you are not serving the salad immediately, toss the apple chunks in a little lemon juice to prevent them from browning.

  3. Combine the Base: In a large mixing bowl, combine the broccoli, apple, dried cranberries, chopped nuts, and red onion.

  4. Whisk the Dressing: In a small separate bowl, whisk together the mayonnaise, apple cider vinegar, honey, salt, and pepper until smooth and emulsified.

  5. Toss and Coat: Pour the dressing over the salad ingredients. Toss gently with large spoons until every piece of broccoli and apple is evenly coated.

  6. Chill and Set: For the best flavor, cover the bowl and refrigerate for at least 30 minutes before serving. This allows the dressing to soften the broccoli slightly and the flavors to meld together.


Why This Recipe Works

  • The Crunch: Honeycrisp apples are prized for their firm, juicy texture which stays crisp even after being tossed in dressing.

  • The Balance: The sharpness of the red onion and the tang of the vinegar perfectly offset the sweetness of the cranberries and honey.

Grandma’s Holiday Cheesy Asparagus Bake

Grandma’s Holiday Cheesy Asparagus Bake

This dish transforms simple asparagus into a rich, savory side with a golden, bubbly cheese crust.

Ingredients

  • 1–2 bunches of fresh asparagus (ends trimmed)

  • 1 ½ cups shredded mozzarella cheese

  • ½ cup freshly grated Parmesan cheese

  • 3 cloves garlic, minced

  • 2 tbsp unsalted butter, melted

  • ¼ tsp salt and ¼ tsp black pepper

  • 1/2 tsp dried thyme or fresh sprigs for garnish

  • Optional: A pinch of red pepper flakes for a little warmth.


Instructions

  1. Prep the Asparagus: Preheat your oven to 400°F (200°C). Wash the asparagus and snap off the woody bottom ends. Pat them dry thoroughly so the sauce sticks and they roast rather than steam.

  2. Seasoning: Place the asparagus in a single layer in a glass baking dish. In a small bowl, whisk together the melted butter, minced garlic, salt, pepper, and thyme. Pour the garlic butter over the asparagus and toss them directly in the pan until every spear is well-coated.

  3. The Cheese Layer: Arrange the spears so they are neatly lined up. Sprinkle the shredded mozzarella evenly over the middle of the spears, followed by a generous dusting of Parmesan cheese.

  4. Bake: Place the dish in the oven and bake for 15–20 minutes. The asparagus should be tender-crisp, and the cheese should be fully melted and starting to turn golden brown.

  5. Final Touch: For an extra-crispy top, you can turn on the broiler for the last 1–2 minutes of cooking. Watch it closely so the cheese doesn’t burn! Garnish with fresh thyme sprigs before serving hot.


Why This Recipe is Special

  • The Garlic Butter: Roasting the garlic in butter alongside the asparagus infuses the vegetables with a deep, mellow flavor.

  • The Texture: The contrast between the tender asparagus and the chewy, caramelized cheese “crust” is what makes this so addictive.