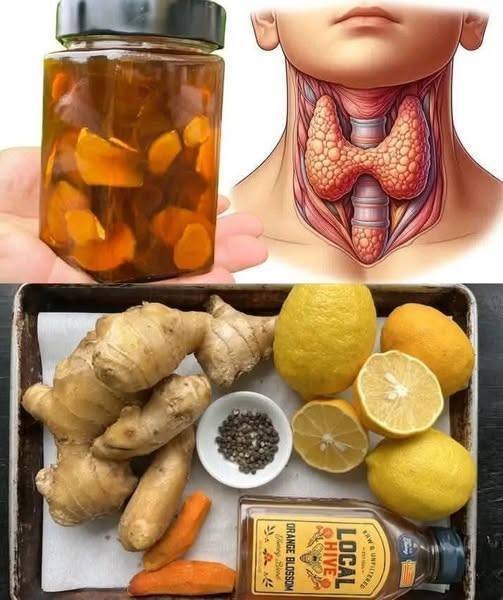
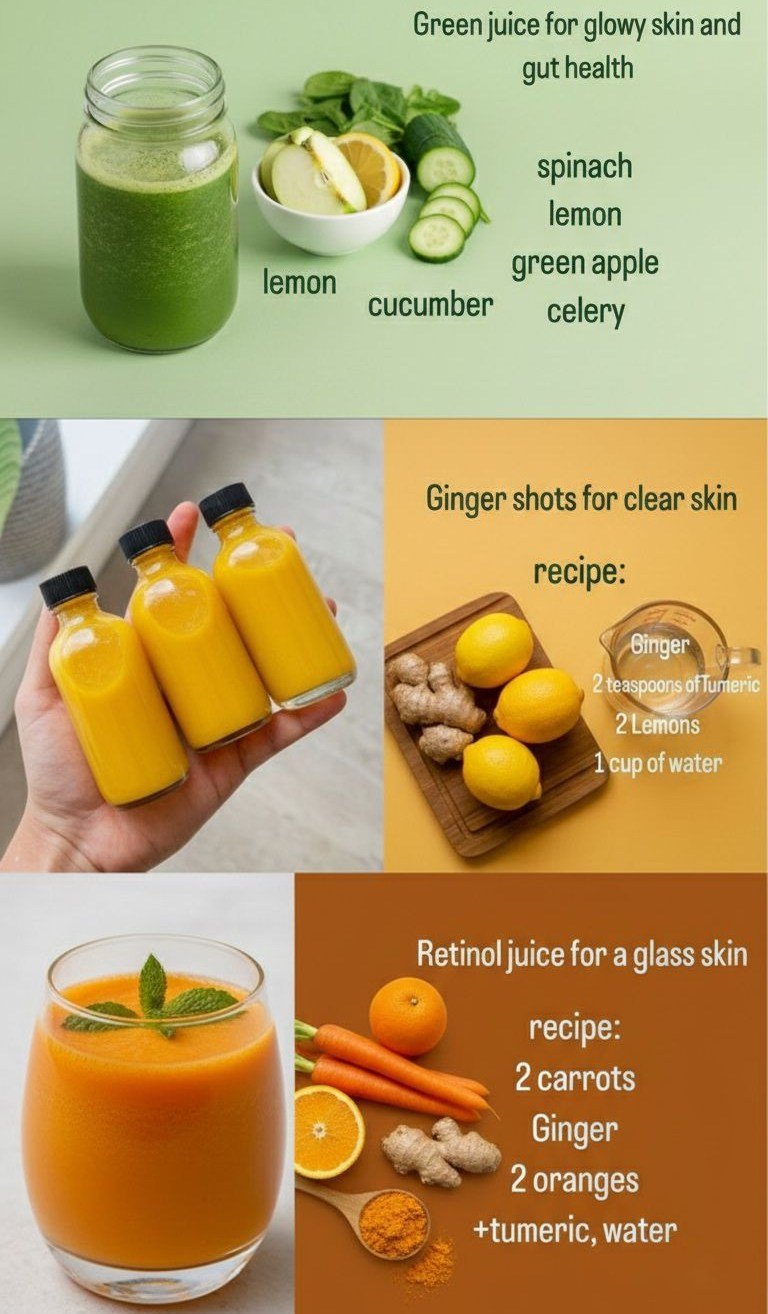
Easy & Healthy Oatmeal Apple Loaf

Easy & Healthy Oatmeal Apple Loaf

No Refined Sugar • No White Flour • Naturally Sweetened

This wholesome oatmeal apple loaf is soft, moist, and naturally sweet from fruits alone. It’s perfect for breakfast, tea time, or a healthy snack. Packed with oats, apples, bananas, dried fruits, and nuts, it’s both nourishing and satisfying.


🥧 Ingredients

  • 1 cup fine rolled oats (or oat flour)

  • 3 medium apples, peeled and grated or finely chopped

  • ½ cup water

  • 1 ripe banana, mashed

  • 3.5 oz (100 g) dried blueberries

  • 3.5 oz (100 g) raisins

  • 2 large eggs

  • 1 teaspoon baking powder

  • 1 teaspoon cinnamon powder (optional, for warmth and flavor)

  • ½ cup mixed nuts, chopped (almonds, walnuts, or your choice)


🥣 Instructions

  1. Prepare the Oats
    If using rolled oats, blend them into a fine flour using a blender or food processor. Set aside.

  2. Cook the Apples
    Add the grated apples and water to a saucepan. Cook on medium heat for 5–7 minutes until soft and slightly thick. Remove from heat and let cool slightly.

  3. Mix Wet Ingredients
    In a large bowl, mash the banana. Add the eggs and whisk well. Stir in the cooked apples.

  4. Combine Dry Ingredients
    Add oat flour, baking powder, cinnamon, dried blueberries, raisins, and chopped nuts to the wet mixture. Mix until fully combined.

  5. Prepare for Baking
    Line or lightly grease a loaf pan. Pour in the batter and smooth the top. Sprinkle extra nuts on top if desired.

  6. Bake
    Bake in a preheated oven at 180°C (350°F) for 40–45 minutes, or until a toothpick inserted in the center comes out clean.

  7. Cool & Serve
    Let the loaf cool in the pan for 10 minutes, then transfer to a wire rack. Slice and enjoy!


🍽 Serving Suggestions

  • Serve warm with yogurt and fresh blueberries

  • Enjoy plain with tea or coffee

  • Store in the refrigerator for up to 5 days

Air Fryer Poached Eggs

Air Fryer Poached Eggs

These “poached” eggs are technically steamed in the air fryer, resulting in a tender white and a perfectly runny yolk. It is a hands-off, mess-free alternative to the stovetop.

  • Prep time: 2 minutes

  • Cook time: 5–7 minutes

  • Total time: Under 10 minutes

Equipment

  • Air Fryer

  • Heat-proof ramekins or small ceramic bowls

Ingredients

  • Eggs: Large, fresh eggs (as many as your basket can fit)

  • Water: 3 tbsp hot water per ramekin

  • Oil Spray: Optional (non-stick spray or olive oil)

  • Seasoning: Salt and black pepper to taste

Instructions

  1. Preheat: Set your air fryer to 340°F (170°C) and let it preheat for about 3 minutes.

  2. Prep Ramekins: Lightly spray the inside of each ramekin with oil to prevent sticking. Add 3 tablespoons of hot water into each ramekin.

  3. Add Eggs: Carefully crack one egg into each ramekin, being careful not to break the yolk.

  4. Air Fry: Place the ramekins into the air fryer basket. Cook at 340°F (170°C) according to your preferred doneness:

    • 5 Minutes: Very runny yolk and soft whites.

    • 6 Minutes: Classic poached (jammy yolk, set whites).

    • 7 Minutes: Firm yolk and fully set whites.

  5. Serve: Using oven mitts, carefully remove the hot ramekins. Use a slotted spoon to lift the egg out of the water. Drain on a paper towel for a second if desired, then serve immediately

Simple 10-Minute Prep Apple Sponge Cake

Simple 10-Minute Prep Apple Sponge Cake

This recipe is prized for its “high rise” and the way the sugar creates a slightly crunchy meringue-like top.

Ingredients

  • Apples: 3–4 large (Tart varieties like Granny Smith or Honeycrisp work best)

  • Eggs: 3 large

  • Sugar: 200 g

  • Butter: 120 g (melted and slightly cooled)

  • All-Purpose Flour: 200 g

  • Baking Powder: 1 tsp

  • Vanilla Extract: 1 tsp

  • Cinnamon: 1 tsp (optional, for tossing with apples)

  • Pinch of salt


Instructions

  1. Prepare the Oven and Pan: Preheat your oven to 180°C (350°F). Line a baking pan (approx. 9×9 inch or similar) with parchment paper, just like in your photo.

  2. Prepare the Apples: Core and slice the apples into bite-sized chunks or thin wedges. Spread them evenly across the bottom of the lined baking pan. If you like extra flavor, toss them with a little cinnamon beforehand.

  3. Mix the Batter:

    • In a large bowl, beat the eggs and sugar together with a mixer for about 3–5 minutes until the mixture is pale, thick, and has doubled in volume. This is the secret to the “husband-approved” fluffiness!

    • Slowly pour in the melted butter and vanilla, whisking gently.

    • Sift in the flour, baking powder, and salt. Fold gently with a spatula until just combined so you don’t deflate the eggs.

  4. Bake: Pour the batter over the apples (as shown in your image), ensuring it seeps down into the gaps. Bake for 30–40 minutes, or until a toothpick inserted into the center comes out clean and the top is golden brown.

  5. Serve: Let it cool for at least 10 minutes before slicing. It is excellent served warm with a scoop of vanilla ice cream.

The Ginger Bug

The Ginger Bug

This acts like a sourdough starter, capturing wild yeast from the ginger skin.

Ingredients

  • 2 cups filtered or spring water (chlorine-free)

  • 1 inch fresh organic ginger, grated or finely chopped (keep skin on for more natural yeast)

  • 2 tbsp granulated sugar

Instructions

  1. Day 1: Mix the water, sugar, and ginger in a glass jar. Stir until sugar is dissolved. Cover with cheesecloth and a rubber band to let it breathe while keeping out dust.

  2. Days 2–5 (Feeding): Every 24 hours, add 1 tbsp of fresh ginger and 1 tbsp of sugar. Stir well.

  3. Check for Readiness: Around day 3 to 7, you should see small bubbles forming at the top and hear a light fizz when you stir it. It should smell yeasty and slightly sweet.


Part 2: Brewing the Ginger Beer

Once your bug is active, you can make the final beverage.

Ingredients

  • 1/2 cup strained ginger bug liquid

  • 2 liters (approx. 8 cups) filtered water

  • 150 g (3/4 cup) brown or cane sugar

  • 100 g (4-inch piece) fresh ginger, grated

  • Juice of 2–3 lemons

Instructions

  1. Make the Ginger Tea: Bring 500 ml of water, the 100 g of grated ginger, and the sugar to a boil in a pot. Simmer for 10–20 minutes to extract the spice.

  2. Cool Completely: Remove from heat and stir in the remaining 1.5 liters of cold water. Crucial: You must let this mixture reach room temperature before adding the bug, or the heat will kill your wild yeast.

  3. Combine: Strain the ginger solids out of your tea. Add the lemon juice and the 1/2 cup of strained liquid from your ginger bug.

  4. Bottle: Pour the mixture into clean flip-top (Grolsch-style) bottles, leaving at least 2 inches of headspace at the top.

  5. Secondary Fermentation: Leave bottles at room temperature in a dark place for 2 to 5 days.

    • Tip: Gently squeeze plastic bottles or briefly “burp” a glass bottle daily to check carbonation levels and prevent too much pressure from building up.

  6. Chill: Once it is as fizzy as you like, move it to the refrigerator. This slows down the fermentation and makes it ready to serve.

Healing Garden Vegetable Soup

Healing Garden Vegetable Soup

A nourishing, cozy vegetable soup packed with vitamins, minerals, and anti-inflammatory goodness. Light yet satisfying, this soup is perfect for daily meals, family dinners, and anyone looking to feel better from the inside out.

 Description

This Healing Garden Vegetable Soup is loaded with fresh vegetables simmered gently in a flavorful broth. It’s naturally low in calories, rich in fiber, and bursting with antioxidants. The flavors are clean, comforting, and deeply satisfying—making it a soup your body and your family will crave again and again.

 Ingredients

  • 1 tbsp olive oil

  • 1 medium onion, finely chopped

  • 2 cloves garlic, minced

  • 2 carrots, diced

  • 2 celery stalks, chopped

  • 1 medium potato, thinly sliced

  • 1½ cups broccoli florets

  • 1 zucchini, sliced

  • 1 cup green beans, chopped

  • 6 cups vegetable broth (low sodium)

  • 1 tsp dried thyme

  • ½ tsp turmeric (optional, for healing boost)

  • Salt and black pepper to taste

  • Fresh parsley or dill, chopped (for garnish)

  • Juice of ½ lemon (optional, for brightness)

 Instructions

  1. Heat olive oil in a large pot over medium heat.

  2. Add onion and sauté for 3–4 minutes until soft and translucent.

  3. Stir in garlic and cook for 30 seconds until fragrant.

  4. Add carrots, celery, and potato. Cook for 5 minutes, stirring occasionally.

  5. Pour in vegetable broth and bring to a gentle boil.

  6. Reduce heat and simmer for 10 minutes.

  7. Add broccoli, zucchini, and green beans.

  8. Season with thyme, turmeric, salt, and pepper.

  9. Simmer for another 8–10 minutes until vegetables are tender but vibrant.

  10. Finish with lemon juice if using.

  11. Serve hot, garnished with fresh herbs.

Notes

  • Keep vegetables slightly firm to preserve nutrients.

  • Chop vegetables evenly for consistent cooking.

  • This soup tastes even better the next day!

 Tips for Best Results

  • Use fresh, seasonal vegetables whenever possible

  • Don’t overcook—bright color means more nutrients

  • Add leafy greens (spinach or kale) at the end for extra benefits

  • A pinch of chili flakes adds gentle warmth

 Servings

  • Serves: 4–6 people

  • Prep Time: 15 minutes

  • Cook Time: 25 minutes

Nutritional Information (per serving, approx.)

  • Calories: 120

  • Protein: 4 g

  • Carbohydrates: 20g

  • Fiber: 6 g

  • Fat: 3 g

  • Sodium: varies by broth

Health Benefits

  • Supports digestion and gut health

  • Rich in antioxidants and vitamins A, C, and K

  • Anti-inflammatory and immune-boosting

  • Helps with hydration and detox support

  • Light, comforting, and easy on the stomach

 Q & A

Q: Can I eat this soup every day?
Absolutely! It’s balanced, light, and nutrient-dense.

Q: Can I freeze it?
Yes—store in airtight containers for up to 3 months.

Q: Can I add protein?
Of course! Add lentils, chickpeas, beans, or shredded chicken.

Q: Is this soup good for weight management?
Yes—low calorie, high fiber, and very filling.

Quick Jam-Swirl Sponge Cake

Quick Jam-Swirl Sponge Cake

Ingredients

  • The Batter:

    • 3 Large eggs

    • A pinch of salt

    • 150 g (4/5 cup) Sugar

    • 120 ml (1/2 cup + 2 tbsp) Milk

    • 120 ml (1/2 cup + 1 tbsp) Vegetable oil

    • 2 tsp Vanilla extract

    • 250 g (1 cup + 2/3 cup) All-purpose flour

    • 15 g (3 tsp) Baking powder

  • The Topping:

    • 150 g (approx. 1/2 cup) Jam of your choice (cherry, apricot, or strawberry work beautifully)

    • Powdered sugar for dusting


Instructions

1. Prepare Your Setup

  • Preheat your oven to 350°F (180°C).

  • Line a rectangular baking pan (approx. 8×11 inches) with parchment paper or grease it thoroughly with oil or butter.

2. Beat the Eggs and Sugar

  • In a large mixing bowl, combine the 3 eggs, salt, and sugar.

  • Using a hand mixer or whisk, beat the mixture for about 3–5 minutes until it becomes pale, thick, and doubles in volume. This step ensures the cake is light and fluffy.

3. Add the Liquids

  • Pour in the milk, vegetable oil, and vanilla extract.

  • Mix on low speed just until combined.

4. Sift in Dry Ingredients

  • Sift the flour and baking powder into the wet mixture.

  • Gently fold or whisk the batter until smooth and no flour pockets remain. Do not overmix, as this can make the cake dense.

5. Add the Jam Swirl

  • Pour the batter into your prepared baking pan and smooth the top with a spatula.

  • Drop small spoonfuls of jam onto the surface of the batter, spacing them out evenly.

  • Use the tip of a knife or a toothpick to gently swirl the jam into the batter for a marbled effect.

6. Bake and Finish

  • Bake for 30–35 minutes, or until a toothpick inserted into the center of the cake comes out clean.

  • Remove from the oven and allow it to cool in the pan for 10 minutes.

  • Once cooled, dust the top generously with powdered sugar before slicing into squares.


Pro Tip

If your jam is very thick, stir it in a small bowl with a teaspoon of warm water before adding it to the cake; this makes it much easier to create those beautiful swirls!

Chocolate Cream Dream Cake

Chocolate Cream Dream Cake

Ingredients

The Cake

  • 1 + 1/4 cups (150g) All-purpose flour

  • 1/3 cup (30g) Unsweetened cocoa powder

  • 2 tsp (8g) Baking powder

  • 1/4 tsp (1g) Salt

  • 1/2 cup (120g) Milk (room temp)

  • 1/4 cup (55g) Vegetable oil

  • 1 tsp (5g) Vanilla extract

  • 4 Large eggs (separated into yolks and whites)

  • 1 cup (200g) Granulated sugar

The Soaking Syrup

  • 1/3 cup (80g) Heavy cream

  • 2 tbsp (25g) Granulated sugar

  • 1 tbsp (6g) Unsweetened cocoa powder

  • 2/3 cup (160g) Milk

The Filling

  • 1 + 1/3 cups (200g) Milk chocolate (melted and cooled slightly)

  • 1 + 1/3 cups (300g) Cream cheese (room temp)

  • 1 cup (240g) Heavy cream (cold)

The Ganache

  • 1 cup (150g) Milk chocolate

  • 1/3 cup (80g) Heavy cream


Instructions

1. Prepare the Cake Base

  • Preheat your oven to 350°F (180°C). Grease and line a rectangular baking pan (approx. 9×13 inch) with parchment paper.

  • Whisk Dry Ingredients: Sift the flour, cocoa powder, baking powder, and salt together in a bowl.

  • Mix Liquids: In a separate bowl, whisk the egg yolks with the milk, oil, and vanilla extract until smooth.

  • Beat Egg Whites: In a clean bowl, beat the egg whites while gradually adding the sugar. Continue beating until stiff peaks form.

  • Combine: Gently fold the yolk mixture into the dry ingredients. Finally, gently fold in the whipped egg whites in three batches to keep the batter airy.

  • Bake: Pour into the pan and bake for 25–30 minutes. Let it cool completely, then slice the cake horizontally into two even layers.

2. Make the Soaking Syrup

  • In a small saucepan, combine the heavy cream, sugar, cocoa powder, and milk.

  • Bring to a simmer over medium heat, stirring until the sugar and cocoa are dissolved.

  • Remove from heat and let it cool.

3. Prepare the Creamy Filling

  • Beat Cream Cheese: Whisk the room-temperature cream cheese until smooth and fluffy.

  • Add Chocolate: Pour in the melted milk chocolate and mix until combined.

  • Whip Cream: In a separate chilled bowl, whip the cold heavy cream until stiff peaks form.

  • Fold: Gently fold the whipped cream into the chocolate-cheese mixture until you have a uniform, light mousse.

4. Assemble the Cake

  • Place the bottom layer of the cake back into the baking pan or on a serving tray.

  • Soak: Brush or pour half of the cocoa syrup evenly over the cake layer.

  • Layer: Spread all of the creamy filling over the soaked base.

  • Top: Place the second cake layer on top and soak it with the remaining syrup. Refrigerate for at least 1 hour to set.

5. Add the Ganache

  • Heat the heavy cream in the microwave for 20 seconds (don’t let it boil).

  • Pour the warm cream over the chocolate chips/pieces. Let it sit for 1 minute, then stir until shiny and smooth.

  • Pour the ganache over the top of the chilled cake and spread evenly.


Pro Tip

For the best flavor and cleanest slices, let the cake rest in the refrigerator for at least 4 hours (or overnight) before serving. This allows the syrup to fully hydrate the sponge and the filling to firm up.

Crispy Potato Pancakes

Crispy Potato Pancakes

Ingredients

  • 1 medium potato (about 150g), peeled and grated

  • 1 large egg

  • 2 tbsp all-purpose flour (16g)

  • 2 tbsp water (30ml)

  • 1 tbsp vegetable oil (15ml), for frying

  • Optional: A pinch of salt and black pepper to taste


Instructions

1. Prepare the Potato

  • Peel the potato and grate it using the large holes of a box grater.

  • Important: To ensure the pancakes are truly crispy, place the grated potato in a clean kitchen towel or cheesecloth and squeeze out as much excess liquid as possible.

2. Mix the Batter

  • In a medium mixing bowl, whisk the egg, water, and all-purpose flour together until you have a smooth, thin batter without any flour lumps.

  • Stir the grated potato into the batter until every strand is evenly coated. Add your salt and pepper at this stage if desired.

3. Fry the Pancake

  • Heat the vegetable oil in a non-stick skillet over medium-high heat.

  • Once the oil is shimmering, pour the potato mixture into the pan. Use a spatula to spread it out into a thin, even circle (about 1/2 inch thick).

4. Cook Until Golden

  • Fry for about 3–5 minutes on the first side. You want the edges to look golden brown and crispy.

  • Carefully flip the pancake over.

  • Cook the second side for another 3–4 minutes until the potato is tender in the middle and the outside is deeply golden and crunchy.

5. Drain and Serve

  • Slide the pancake onto a plate lined with a paper towel to remove any excess oil.

  • Serve immediately while hot and crispy.


Quick Tip

For extra flavor, you can stir in a tablespoon of finely chopped green onions or a sprinkle of garlic powder into the batter before frying!

Oatmeal and Apple Breakfast Cakes

Oatmeal and Apple Breakfast Cakes

Prep Time: 15 minutes
Bake Time: 35–40 minutes
Yield: 8–10 small cakes (or 6–8 larger ones)


Ingredients

  • 1 cup (90 g) oatmeal (rolled oats work best)

  • 150 ml (⅔ cup) warm milk (dairy or plant-based)

  • 2 medium apples, peeled and diced

  • 20 g (1½ tablespoons) butter, melted

  • ½ teaspoon vanillin powder or 1 teaspoon pure vanilla extract

  • 2 large eggs


Instructions

1. Soak the Oats

  1. Place the oatmeal in a large mixing bowl.

  2. Pour the warm milk over the oats and stir briefly to combine.

  3. Let the mixture sit for about 10 minutes. This softens the oats and creates a naturally moist structure for the cakes without needing flour.

2. Prepare the Apple Mixture

  1. Peel and dice the apples into small, uniform cubes.

  2. In a separate bowl, whisk the eggs with the melted butter and vanillin/vanilla extract until well combined.

3. Combine All Ingredients

  1. Add the egg and butter mixture to the soaked oats and stir until evenly combined.

  2. Gently fold in the diced apples until they are evenly distributed throughout the batter.

4. Fill the Molds

  1. Preheat your oven to 350°F (180°C).

  2. Grease a silicone muffin tin, a loaf pan, or a rectangular bar mold.

  3. Distribute the batter evenly into the molds, filling them almost to the top. These cakes do not rise significantly, so a nearly full mold ensures a good shape.

5. Bake and Cool

  1. Bake for 35–40 minutes, or until the tops are golden brown and a toothpick inserted in the center comes out clean.

  2. Let the cakes cool in the mold for at least 10 minutes before removing. This allows them to firm up and prevents them from breaking apart.


Serving Suggestions

  • Serve warm for a cozy breakfast.

  • Store cooled cakes in an airtight container in the refrigerator for up to 4 days.

  • Optional toppings: a drizzle of honey, a sprinkle of cinnamon, or a smear of nut butter.


Tips for Best Results

  • Use a sweet, crisp apple variety like Fuji or Honeycrisp for natural sweetness and texture.

  • For added flavor, stir in ½ teaspoon cinnamon or nutmeg with the oats.

  • If you want a slightly firmer texture, add 1–2 tablespoons of finely ground oats or almond flour.

Nutty Cottage Cheese Dessert Log

Nutty Cottage Cheese Dessert Log

A creamy, nutty, and naturally sweet dessert packed with protein, healthy fats, and chewy fruits. Perfect for a wholesome treat or snack.

Prep Time: 20 minutes
Chill Time: 4–6 hours (overnight recommended)
Yield: 8–10 servings


Ingredients

For the Base:

  • 12.5 oz (350 g) cottage cheese, smooth or small-curd

  • 3.5 oz (100 g) sour cream (or Greek yogurt for extra protein)

  • 2.5 oz (70 g) honey (adjust to taste)

  • 1/4 tsp vanillin powder or 1 tsp pure vanilla extract

  • 0.7 oz (20 g) instant gelatin

  • 3–4 tbsp water (to bloom the gelatin)

For the Mix-ins:

  • 1.8 oz (50 g) hazelnuts, toasted

  • 3.5 oz (100 g) walnuts, toasted

  • 1.5 oz (45 g) peeled pistachios

  • 3.5 oz (100 g) dried apricots, chopped

  • 3.5 oz (100 g) dates, pitted and chopped


Instructions

1. Prepare the Fruit and Nuts

  1. Chop the dried apricots and dates into small, bite-sized pieces.

  2. Toast the nuts if they are raw:

    • Place nuts in a dry skillet over medium heat.

    • Stir frequently for 3–5 minutes until fragrant and lightly golden.

  3. Combine all nuts and dried fruits in a bowl and set aside.

2. Bloom the Gelatin

  1. Place the instant gelatin in a small heat-proof bowl with 3–4 tablespoons of water.

  2. Let it sit for 5 minutes to absorb water and soften.

  3. Melt the gelatin gently:

    • Microwave for 10–15 seconds or use a double boiler.

    • Stir until liquid and clear. Avoid boiling, which reduces gelatin’s setting ability.

3. Make the Smooth Base

  1. In a large mixing bowl or blender, combine cottage cheese, sour cream, honey, and vanillin/vanilla extract.

  2. Blend until completely smooth and creamy. Use a whisk if doing by hand, ensuring no large curds remain.

  3. Gradually pour in the melted gelatin while blending or whisking continuously. Mix until fully incorporated.

4. Fold in Nuts and Fruits

  1. Add the toasted nuts and chopped dried fruits to the cheese mixture.

  2. Gently fold with a spatula until evenly distributed.

5. Mold the Dessert Log

Option 1: Using a Plastic Bottle

  1. Take a clean, empty plastic water or soda bottle and carefully cut off the top.

  2. Pour the mixture into the bottle.

  3. Tap firmly on the counter to remove air bubbles and settle the mixture.

Option 2: Using a Loaf Pan

  1. Line a standard loaf pan with plastic wrap, leaving enough overhang on the sides.

  2. Pour the mixture into the pan and tap gently to remove air pockets.

6. Chill Until Firm

  1. Cover with plastic wrap and refrigerate for at least 4–6 hours (overnight is best) until fully set.

7. Serve

  1. For the bottle: Carefully cut the plastic down the side and peel it away.

  2. For the loaf pan: Lift the dessert out using the overhanging plastic wrap.

  3. Slice into thick rounds using a sharp knife. Serve chilled.


Tips for Best Results

  • Use smooth cottage cheese for a creamier texture; small-curd works too but may be slightly chunkier.

  • Adjust honey depending on desired sweetness. You can replace part of it with maple syrup or date syrup.

  • For extra flavor, lightly toast the dried fruits in a dry skillet for 1–2 minutes.

  • Garnish slices with extra chopped nuts or a drizzle of honey before serving.

Decadent Frozen Chocolate Peanut Bars

Decadent Frozen Chocolate Peanut Bars

Prep time: 20 mins | Freezing time: 2–3 hours | Yield: 6–8 bars

Ingredients

The Creamy Center

  • 300g cottage cheese: (or curd cheese/cream cheese for a smoother finish).

  • 40g coconut or cocoa butter: (regular butter works as a substitute).

  • 40g honey: Adjust to your preferred sweetness.

  • 1 tsp vanilla extract

  • 20g cocoa powder

The Crunchy Coating

  • 160g dark chocolate: High-quality chocolate melts most evenly.

  • 40g peanuts: Ground or finely chopped.


Instructions

1. Blend the Filling

In a food processor or high-speed blender, combine the cottage cheese, melted butter (coconut, cocoa, or regular), honey, vanilla extract, and cocoa powder. Blend until the mixture is completely smooth and no lumps from the cheese remain.

2. Shape the Bars

Pour the mixture into silicone bar molds. If you do not have molds, you can pour the mixture into a parchment-lined square pan and cut them into bars once partially frozen. Place in the freezer for at least 2 hours or until they are firm enough to handle.

3. Prepare the Coating

While the bars are freezing, melt the dark chocolate in a microwave-safe bowl in 30-second intervals or using a double boiler. Once smooth, stir in the ground peanuts. Pour the chocolate mixture into a tall glass; this makes dipping the bars much easier and ensures an even coat.

4. Dip and Set

Remove the frozen bars from their molds. Working quickly, dip each bar into the chocolate-peanut mixture until fully coated. Because the bars are frozen, the chocolate will set almost instantly.

5. Storage

Place the finished bars back in the freezer for another 15–20 minutes to fully set. Store them in an airtight container in the freezer.


Pro Tips for Success

  • Texture Secret: If using cottage cheese with large curds, pulsing the cheese by itself first before adding the other ingredients ensures the smoothest possible texture.

  • Butter Choice: Using coconut or cocoa butter will give the filling a firmer, “snap” quality when bitten into compared to regular butter.

  • Peanut Prep: Toast your peanuts slightly before grinding them to significantly enhance the nutty aroma of the coating.


Nutritional Highlight (Per Bar)

  • High Protein: Thanks to the cottage cheese base.

  • Antioxidants: Provided by the dark chocolate and cocoa powder.

  • Healthy Fats: From the peanuts and coconut butter.

Quick Strawberry Jam-Filled Muffins

Quick Strawberry Jam-Filled Muffins

Prep Time: 15 minutes
Bake Time: 20–25 minutes
Yield: 12 muffins

These muffins are soft and moist with a fruity jam center and a lightly crunchy almond topping. They are ideal for breakfast, snacks, or dessert.


📝 Ingredients

  • 2 large eggs

  • 100 g sugar

  • 8 g vanilla sugar (or 1 teaspoon vanilla extract)

  • Pinch of salt

  • 125 g vanilla yogurt

  • 50 ml milk

  • 100 ml vegetable or sunflower oil

  • 200 g all-purpose flour

  • 8 g baking powder

  • Strawberry jam (for filling and topping)

  • Chopped almonds (for topping)


👩‍🍳 Instructions

Step 1: Prepare the Oven and Pan

Preheat oven to 350°F (175°C).
Line a muffin tin with paper liners or lightly grease each cup.


Step 2: Mix the Eggs and Sugar

In a large bowl:

  • Add eggs, sugar, vanilla sugar, and salt.

  • Whisk until the mixture becomes pale and slightly thick.


Step 3: Add the Liquid Ingredients

Stir in:

  • Vanilla yogurt

  • Milk

  • Oil

Whisk until the mixture is smooth and evenly blended.


Step 4: Add the Dry Ingredients

Sift together:

  • Flour

  • Baking powder

Add them to the wet mixture.
Fold gently with a spatula until just combined.
Do not mix too much, as this can affect the texture.


Step 5: Fill the Muffin Cups

  • Spoon batter into each cup until half full.

  • Add 1 teaspoon strawberry jam in the center of each.

  • Cover with more batter until cups are about ¾ full.


Step 6: Add Toppings

  • Sprinkle chopped almonds on top of each muffin.

  • Add a small dot of jam on the top for appearance.


Step 7: Bake

Bake for 20–25 minutes, or until:

  • The tops are lightly golden

  • A toothpick inserted into the muffin (not the jam) comes out clean


Step 8: Cool

Let muffins cool in the pan for 5 minutes.
Transfer to a wire rack to cool completely or serve slightly warm.


🌟 Tips for Best Results

  • Yogurt: Vanilla or plain yogurt works well.

  • Jam options: Strawberry, raspberry, apricot, or mixed berry can be used.

  • Topping alternative: Use chopped walnuts or omit nuts if preferred.

  • Do not overfill: This prevents overflow during baking.


📦 Storage

  • Store in an airtight container at room temperature for up to 3 days.

  • Refrigerate for up to 5 days.

Quick Stovetop Flatbread (No Oven)

Quick Stovetop Flatbread (No Oven)

Prep Time: 5 minutes
Cook Time: 10 minutes
Total Time: 15 minutes
Yield: 8–10 flatbreads

Soft, flexible flatbreads cooked on a pan. Perfect for wraps, dipping, or serving with meals.


📝 Ingredients

For the Dough

  • 4 cups (480 g) all-purpose flour

  • 1 cup (220 g) plain yogurt

  • ¾ cup (200 ml) lukewarm water

  • 10 g baking powder

  • 1 teaspoon salt

  • 1 tablespoon vegetable oil

For Finishing

  • 3½ tablespoons olive oil (for brushing after cooking)


👩‍🍳 Instructions

Step 1: Mix the Dough

In a large bowl:

  1. Add yogurt, water, vegetable oil, and salt.

  2. Stir in the baking powder.

  3. Gradually add flour while mixing.

  4. When the dough becomes thick, knead gently with your hands until smooth and no longer sticky.


Step 2: Divide and Shape

  • Divide the dough into 8–10 equal pieces.

  • Lightly flour your work surface.

  • Roll each piece into a circle about ¼ inch thick.


Step 3: Cook on the Stovetop

  • Heat a non-stick pan over medium heat (no oil needed).

  • Place one flatbread in the pan.

  • Cook for 1–2 minutes until bubbles appear.

  • Flip and cook the other side for 1–2 minutes until light brown spots form.

  • Repeat with remaining pieces.


Step 4: Brush with Olive Oil

  • As each flatbread comes off the pan, brush lightly with olive oil.

  • Stack them on a plate and cover with a clean cloth to keep warm and soft.


🌟 Tips for Best Results

  • Yogurt: Use plain yogurt for the best texture.

  • Pan heat: Medium heat prevents burning while cooking evenly.

  • Thickness: Thinner dough cooks faster and stays flexible.

  • Flavor ideas: You may add garlic powder or herbs to the dough if desired.


📦 Storage

  • Store leftovers in a sealed bag at room temperature for 1 day, or refrigerate for up to 3 days.

  • Reheat briefly in a dry pan or microwave before serving.

Simple Fluffy Breakfast Rolls

Simple Fluffy Breakfast Rolls

Prep Time: 15 minutes + rising time
Bake Time: 20–25 minutes
Yield: 9–12 rolls

Soft, lightly golden rolls with a tender inside. Perfect for breakfast or serving with meals.


📝 Ingredients

  • 1 cup (200 ml) warm water

  • 1 cup (200 ml) warm milk

  • 1 tablespoon sugar

  • 10 g dry yeast (about 2 teaspoons)

  • 1 teaspoon salt

  • 30 g butter (about 2 tablespoons), softened

  • 600 g all-purpose flour (about 4¾ cups)

  • 40 g butter (about 3 tablespoons), chilled and cut into thin strips (for topping)


👩‍🍳 Instructions

Step 1: Prepare the Yeast

In a large bowl, combine:

  • Warm water

  • Warm milk

  • Sugar

Stir in the yeast and let sit for 5–10 minutes until a light foam appears on the surface.


Step 2: Make the Dough

Add to the yeast mixture:

  • Softened butter

  • Salt

  • About half of the flour

Mix until a rough dough forms.
Gradually add the remaining flour while kneading.

Knead for 8–10 minutes until the dough becomes:

  • Smooth

  • Elastic

  • No longer sticky


Step 3: First Rise

Place the dough in a lightly greased bowl.
Cover with a clean cloth or plastic wrap.
Let rise in a warm place for about 1 hour, or until doubled in size.


Step 4: Shape the Rolls

Gently press down the dough to remove excess air.
Divide into 9–12 equal portions.
Roll each portion into a smooth ball.

Place on a parchment-lined baking tray.
Cover and let rise again for 20–30 minutes.


Step 5: Prepare for Baking

Preheat oven to 375°F (190°C).

Using a sharp knife or scissors, cut a deep line across the top of each roll.
Place a thin strip of chilled butter into each cut.
Lightly dust the tops with flour if desired.


Step 6: Bake

Bake for 20–25 minutes until:

  • The tops are golden

  • The rolls sound hollow when tapped underneath

The butter melts into the center while baking, adding moisture and flavor.


🌟 Tips for Best Results

  • Liquid temperature: Use lukewarm water and milk (about 100–110°F / 38–43°C).

  • Rising: Do not rush the rising time; this helps the rolls stay soft.

  • Serving: Best served warm with butter, honey, or jam.

  • Storage:

    • Store in a sealed container at room temperature for up to 3 days.

    • Reheat briefly before serving to refresh softness.

Simple Oat & Seed Bread (No Yeast, No Flour)

Simple Oat & Seed Bread (No Yeast, No Flour)

Prep Time: 10 minutes
Bake Time: 40–50 minutes
Total Time: About 1 hour
Yield: 1 small loaf

This bread is dense, hearty, and made with oats and seeds instead of flour. It is best sliced and toasted before serving.


📝 Ingredients

Base

  • 280 g rolled oats (regular oats, not instant)

  • 2 large eggs

  • 200–250 ml plain yogurt

  • 10 g baking powder

Texture & Flavor

  • 50 g pumpkin seeds

  • 50 g sunflower seeds

  • Salt, to taste

  • Black pepper, to taste

For Baking

  • Olive oil (for greasing the pan)

  • Extra rolled oats (for topping)


👩‍🍳 Instructions

Step 1: Prepare the Pan and Oven

Preheat the oven to 350°F (180°C).
Lightly grease a loaf pan or small baking dish with olive oil.
You may line the base with parchment paper for easier removal.


Step 2: Mix the Wet Ingredients

In a large bowl:

  • Whisk the eggs until smooth.

  • Add the yogurt and mix until creamy and fully combined.


Step 3: Add Oats, Seeds, and Seasoning

Add to the bowl:

  • Rolled oats

  • Pumpkin seeds

  • Sunflower seeds

  • Baking powder

  • Salt and black pepper

Mix with a spoon or spatula until all oats are evenly coated.

Tip: Let the mixture rest for 5 minutes so the oats absorb moisture and the texture improves.


Step 4: Transfer and Top

Pour the thick batter into the prepared pan.
Smooth the top with a spatula.
Sprinkle extra rolled oats over the surface for texture.


Step 5: Bake

Bake for 40–50 minutes, until:

  • The top is golden brown

  • The loaf feels firm when pressed

  • A knife inserted in the center comes out mostly clean


Step 6: Cool

Let the bread cool in the pan for 15 minutes.
Remove and place on a wire rack to cool completely before slicing.

Cooling helps the loaf hold its shape and slice neatly.


🌟 Tips for Best Results

  • Oats: Use rolled oats, not quick or steel-cut oats.

  • Texture: This bread is naturally dense and works best toasted.

  • Flavor options: Add herbs (oregano or rosemary) or a little garlic powder if desired.

  • Serving ideas: Toast and top with avocado, cheese, or serve alongside soups and salads.


📦 Storage

  • Store in an airtight container in the refrigerator for up to 5 days.

  • Slice and freeze for up to 3 months.

  • Best enjoyed toasted after storing.

Soft Orange Sugar Cookie

Soft Orange Sugar Cookie

Prep Time: 15 minutes
Bake Time: 12–15 minutes
Yield: 20–24 cookies

These cookies are lightly crisp on the outside and soft on the inside, with a fresh orange flavor and gentle sweetness.


📝 Ingredients

  • 2 large eggs

  • 80 g sugar (plus extra for coating)

  • 120 ml sunflower oil (or any light vegetable oil)

  • 1 teaspoon vanilla extract

  • Zest of 1 orange, finely grated

  • 300 g all-purpose flour

  • 1 teaspoon baking powder

  • Pinch of salt


👩‍🍳 Instructions

Step 1: Prepare the Wet Mixture

In a large bowl:

  1. Add the eggs and sugar.

  2. Whisk until the mixture becomes pale and slightly thick.

  3. Add sunflower oil, vanilla extract, and orange zest.

  4. Mix well until evenly combined.


Step 2: Mix the Dry Ingredients

In another bowl:

  • Add flour, baking powder, and salt.

  • Whisk or sift together to distribute evenly.


Step 3: Make the Dough

  • Gradually add the dry mixture into the wet mixture.

  • Stir with a spatula or spoon until a soft dough forms.

Tip: If the dough feels too soft or sticky, place it in the refrigerator for 15 minutes to make shaping easier.


Step 4: Shape the Cookies

Preheat oven to 350°F (175°C).
Line a baking tray with parchment paper.

  1. Take about 1 tablespoon of dough and roll into a ball.

  2. Gently shape into a small oval.

  3. Press one side into granulated sugar.

  4. Place sugar-side up on the tray.

  5. Lightly press with a fork to make a pattern.

Leave space between cookies.


Step 5: Bake

Bake for 12–15 minutes until the edges turn light golden while the tops remain pale.

Do not overbake, or cookies will become dry.


Step 6: Cool

Let cookies rest on the tray for 5 minutes, then move to a wire rack to cool completely.

They will firm slightly as they cool.


🌟 Tips for Best Results

  • Zesting: Only grate the orange-colored peel. Avoid the white layer underneath.

  • Oil: Use a neutral-flavored oil for best taste.

  • Texture: For extra softness, do not brown the tops.

  • Storage: Keep in an airtight container for up to 7 days at room temperature.

Creamy Homemade Filled Donuts

Creamy Homemade Filled Donuts

Yield: 12–15 donuts
Prep Time: 20 minutes + rising time
Cook Time: 15 minutes

Soft fried donuts filled with smooth vanilla cream and coated in sugar.


📝 Ingredients

For the Dough

  • 500 g all-purpose or bread flour

  • 8 g dry yeast (or 12 g fresh yeast)

  • 200 g milk, lukewarm

  • 80 g sugar

  • 50 g butter, melted and cooled

  • 1 medium egg

  • 1 pinch salt

  • Oil for frying (vegetable or canola)

  • Granulated sugar (for coating)


For the Vanilla Cream Filling

  • 2 cups milk

  • ½ cup sugar

  • ¼ cup cornstarch

  • 4 egg yolks

  • 1 teaspoon vanilla extract


👩‍🍳 Instructions

Step 1: Activate the Yeast

In a large bowl, mix:

  • Lukewarm milk

  • Sugar

  • Yeast

Let sit for 5 minutes until slightly foamy.


Step 2: Make the Dough

Add to the yeast mixture:

  • Egg

  • Melted butter

Mix well.
Gradually add flour and salt.
Mix until a soft dough forms.

Transfer to a floured surface and knead for 8–10 minutes until smooth and elastic.


Step 3: First Rise

Place dough in a lightly greased bowl.
Cover with a clean cloth.
Let rise in a warm place for 1 to 1½ hours or until doubled in size.


Step 4: Shape the Donuts

Punch down the dough.
Roll out to ½ inch thickness.
Cut into circles using a cutter or glass.

Place on parchment paper.
Cover and let rise again for 30–45 minutes.


Step 5: Prepare the Cream Filling

In a bowl, whisk:

  • Egg yolks

  • Sugar

  • Cornstarch

Heat milk in a pan until warm (not boiling).
Slowly whisk hot milk into egg mixture.
Return to pan and cook on medium heat, stirring constantly until thick.

Remove from heat.
Add vanilla extract.
Transfer to a bowl and cover with plastic wrap touching the surface.
Cool completely.


Step 6: Fry the Donuts

Heat oil to 350°F (175°C).
Fry donuts in batches for about 2 minutes per side until golden.

Remove and drain on paper towels.


Step 7: Coat and Fill

Roll warm donuts in granulated sugar.

Make a small hole on the side of each donut using a knife or straw.
Fill a piping bag with cooled cream.
Pipe cream into each donut until filled.


⭐ Tips for Best Results

  • Milk temperature: Should be warm, not hot.

  • Oil temperature: Keep steady for even frying.

  • Do not overcrowd when frying.

  • Filling options: Jam, chocolate cream, or custard work well.

Banana Carrot Raisin Bread

Banana Carrot Raisin Bread

Prep Time: 15 minutes
Bake Time: 50–60 minutes
Yield: 1 standard loaf (9×5 inch pan)

This bread is soft, naturally sweet from bananas and carrots, and dotted with juicy raisins. It’s perfect for breakfast, tea time, or a light dessert.


📝 Ingredients

Wet Ingredients

  • 2 medium ripe bananas, mashed well

  • 1 cup grated carrots (about 2 medium carrots)

  • 2 large eggs, at room temperature

  • ½ cup (120 ml) vegetable oil

  • ½ cup (100 g) brown sugar, packed

  • 1 teaspoon vanilla extract

Dry Ingredients

  • 1½ cups (190 g) all-purpose flour

  • 1 teaspoon baking soda

  • 1 teaspoon baking powder

  • ½ teaspoon salt

  • 1 teaspoon ground cinnamon

Mix-ins

  • ½ cup (80 g) raisins


👩‍🍳 Instructions

Step 1: Prepare the Pan and Oven

Preheat your oven to 350°F (175°C).
Grease a 9×5 inch loaf pan with oil or butter, or line it with parchment paper so the bread can be removed easily after baking.


Step 2: Mix the Wet Ingredients

In a large mixing bowl:

  1. Mash the bananas until smooth.

  2. Add grated carrots.

  3. Add eggs, vegetable oil, brown sugar, and vanilla extract.

  4. Whisk everything together until well blended and smooth.


Step 3: Mix the Dry Ingredients

In a separate bowl:

  • Add flour, baking soda, baking powder, salt, and cinnamon.

  • Whisk or sift them together so the leavening agents and spices are evenly mixed.


Step 4: Combine Wet and Dry

  • Gradually add the dry ingredients into the wet mixture.

  • Stir gently using a spatula or spoon until just combined.

  • Do not overmix; overmixing can make the bread dense instead of soft.


Step 5: Add the Raisins

  • Fold in the raisins gently so they are evenly spread throughout the batter.


Step 6: Bake

  • Pour the batter into the prepared loaf pan.

  • Smooth the top with a spatula.

  • Bake for 50–60 minutes.

  • Check doneness by inserting a toothpick into the center:

    • It should come out clean or with a few moist crumbs.


Step 7: Cool

  • Let the bread cool in the pan for 10 minutes.

  • Remove it and place it on a wire rack to cool completely before slicing.


🌟 Tips for Best Results

  • Carrots: Use the fine side of a grater for a smoother texture.

  • Extra texture (optional): Add ½ cup chopped walnuts or pecans along with raisins.

  • Sweetness: You may reduce sugar slightly if your bananas are very ripe.

  • Storage:

    • Keep in an airtight container at room temperature for 3–4 days.

    • Refrigerate for up to 1 week.

    • Freeze slices for up to 2 months.

Simple Wonton Soup Recipe

It looks like there might be a slight error in your question. Did you mean “wonton soup”? If so, I’d be happy to provide you with a simple and delicious recipe for wonton soup. Wonton soup is a popular Chinese dish consisting of wontons (dumplings) served in a flavorful broth.

Simple Wonton Soup Recipe:

Table of Contents

Ingredients:

For Wontons:

  • 1/2 pound ground pork
  • 1/2 cup finely chopped shrimp
  • 2 green onions, finely chopped
  • 1 tablespoon soy sauce
  • 1 tablespoon oyster sauce
  • 1 teaspoon sesame oil
  • 1 teaspoon grated ginger
  • Wonton wrappers

For Soup:

  • 4 cups chicken broth
  • 2 cups water
  • 2 cups bok choy, chopped
  • 1 cup sliced mushrooms
  • 1-2 teaspoons soy sauce (adjust to taste)
  • 1 teaspoon sesame oil
  • Salt and pepper to taste

Instructions:

  1. Prepare the Wonton Filling: In a bowl, mix together ground pork, chopped shrimp, green onions, soy sauce, oyster sauce, sesame oil, and grated ginger.
  2. Assemble the wontons: Place a small amount of the filling in the center of each wonton wrapper. Moisten the edges with water, fold in half to form a triangle, and press the edges to seal.
  3. Prepare the Broth: In a pot, bring chicken broth and water to a simmer. Add soy sauce, sesame oil, salt, and pepper to taste.
  4. Cook the Wontons: Gently drop the wontons into the simmering broth and cook until they float to the surface, which should take about 3-5 minutes.
  5. Add Vegetables: Add bok choy and sliced mushrooms to the broth and cook for an additional 3-5 minutes or until the vegetables are tender.
  6. Serve: Ladle the soup into bowls, making sure to include a mix of wontons, vegetables, and broth.
  7. Garnish (Optional): Garnish with additional chopped green onions and a drizzle of sesame oil if desired.

Liver and Blood Cleanser Juice

Liver and Blood Cleanser Juice

This vibrant juice is packed with antioxidants and nutrients known for supporting natural detoxification and boosting energy levels.

Ingredients

  • 2 Red Apples (cored)

  • 3 Medium Carrots (washed and trimmed)

  • 2 Small Beetroots (peeled)

  • 2 Whole Lemons (peeled)

  • 1/2 Large Cucumber

  • 1-inch Piece of Fresh Ginger

  • Optional: A handful of the beet greens (if fresh)


Instructions

  1. Prep your produce: Wash all fruits and vegetables thoroughly. Peel the lemons and beetroots to avoid a bitter taste.

  2. Chop: Cut the ingredients into sizes that fit your juicer or blender.

  3. Extract the juice: * If using a juicer: Run all ingredients through and stir the final juice to combine flavors.

    • If using a blender: Add a small splash of water or coconut water, blend until smooth, and then strain through a nut milk bag or fine-mesh sieve to remove the pulp.

  4. Serve: Pour over ice if desired and drink immediately for the maximum nutrient benefit.

Pro Tip: If this is your first time drinking beet juice, you might want to start with one beetroot and work your way up, as it is very potent!

🥤 Classic Blueberry Banana Oatmeal Smoothie

🥤 Classic Blueberry Banana Oatmeal Smoothie

A light, antioxidant-rich breakfast that tastes like blueberry pie.

Ingredients

  • Oats: $1/4$ cup rolled oats (old-fashioned)

  • Fruit: 1 ripe banana (frozen is best for creaminess)

  • Berries: $1/2$ cup fresh or frozen blueberries

  • Liquid: 1 cup unsweetened almond milk (or soy/skim milk)

  • Spice: $1/2$ teaspoon ground cinnamon

  • Sweetener (Optional): 1 teaspoon honey or 1 pitted date (only if your fruit isn’t ripe enough)


💪 Protein-Packed Weight Loss Version

Higher protein content to help preserve muscle and curb hunger longer.

Ingredients

  • Oats: $1/4$ cup rolled oats

  • Fruit: $1/2$ frozen banana

  • Berries: $1/2$ cup frozen blueberries

  • Liquid: $1/2$ cup unsweetened almond milk + $1/4$ cup water

  • Protein: $1/2$ cup plain Greek yogurt OR 1 scoop vanilla protein powder

  • Healthy Fat: 1 tablespoon chia seeds or ground flaxseed


📋 Instructions (For Both Recipes)

  1. Prep the Oats: For the smoothest texture, place the dry oats in the blender first and pulse until they become a fine flour. This prevents a “gritty” drink.

  2. Layer Ingredients: Add the liquid first, followed by the yogurt (if using), then the fruit and spices.

  3. Blend: Start on a low speed and gradually increase to high. Blend for 45–60 seconds until completely smooth.

  4. Adjust Consistency: If it’s too thick, add a splash more milk. If you prefer it colder/thicker, add a handful of ice cubes and blend again.

  5. Serve: Pour into a tall glass and top with a few extra blueberries or a sprinkle of dry oats for crunch.


💡 Pro-Tips for Weight Loss

  • Use Frozen Bananas: Peel and slice your overripe bananas before freezing. They act like “healthy ice cream” and give the smoothie a thick, milkshake-like texture.

  • Watch the Toppings: Granola and nut butters are delicious but high in calories. Stick to fresh berries or a dash of cinnamon if you are strictly tracking.

  • Don’t skip the Fiber: Using whole rolled oats instead of “instant” packets ensures you get the full benefit of the beta-glucan fiber, which is what actually helps with hunger control.

Golden Herbal Tea –

🌼 The “Stay Glowing” Golden Herbal Tea

A warm, anti-inflammatory tonic for daily wellness. Yields: 1 Cup | Prep time: 2 mins | Simmer time: 5 mins

Ingredients

  • 1 cup Water: Fresh, filtered water is best.

  • ½ tsp Turmeric Powder: The “golden” star of the show.

  • 1 small piece Fresh Ginger: About ½ inch, peeled and sliced or smashed.

  • 1 tiny pinch of black pepper: essential for activating the turmeric.

  • 1 tsp honey: Or to your preferred sweetness level.

  • 1 squeeze Fresh Lemon Juice: For brightness and Vitamin C.


Instructions

  1. Boil: Pour one cup of water into a small saucepan and bring it to a rolling boil over medium-high heat.

  2. Infuse: Add the turmeric powder, the fresh ginger pieces, and that tiny pinch of black pepper.

  3. Simmer: Turn the heat down to low and let the tea simmer gently for about 5 minutes. This slow “steep” allows the heat to extract the oils and nutrients from the ginger and turmeric.

  4. Strain: Place a fine-mesh strainer over your favorite mug and pour the tea through, discarding the ginger pieces.

  5. Brighten & Sweeten: Stir in your teaspoon of honey and a fresh squeeze of lemon juice.

  6. Enjoy: Sip while warm to feel that comforting, healthy glow!


Why You’ll Love It

  • Anti-Inflammatory: Both ginger and turmeric are famous for helping with joints and digestion.

  • Immune Support: The lemon and honey provide a soothing boost for the throat and immune system.

  • Caffeine-Free: Since there’s no actual tea leaf, this is a perfect “wind-down” drink for the evening that won’t keep you awake.

A “Bestie” Pro-Tip

If you want an even creamier version (like a Golden Milk Latte), you can swap the water for almond or coconut milk! Just be sure to whisk it constantly while simmering so the milk doesn’t scorch.

Sourdough Sandwich Bread

This soft sourdough sandwich bread recipe is made with all-purpose flour, olive oil, honey, salt, and sourdough starter in a stand mixer. It has a light, fluffy texture with a tight crumb, perfect for sandwiches and toast.

Are you searching for an easy sourdough sandwich bread recipe? Look no further because this is the only one you’ll ever need.

You don’t need to be a professional baker to make delicious sourdough bread for your family. Trust me, the kids will be begging for more.

INGREDIENTS

INGREDIENTS TO MAKE ¼ CUP (50 G) OF ACTIVE SOURDOUGH STARTER

  • 2 teaspoons (10 g) sourdough starter
  • 3 tablespoons (25 g) all-purpose flour
  • 5 teaspoons (25 g) water

DOUGH INGREDIENTS

  • ¼ cup (50 g) sourdough starter (active)
  • 1 cup + 2 ½ tablespoons (275 g) water
  • 4 tablespoons (60 g) olive oil
  • 1 tablespoon honey (maple syrup or sugar)
  • 4 cups + 2 tablespoons (500 g) all-purpose flour
  • 2 teaspoons (10 g) sea salt

INSTRUCTIONS

DAY 1

  • 7 AM – Feed your sourdough starter: 12 hours before you mix the dough, feed your sourdough starter. Add the ingredients to a clean jar, stir, cover loosely, and let rise at room temperature, 68-72°F (20-22°C), until doubled. 2 teaspoons (10 g) sourdough starter 3 tablespoons (25 g) all-purpose flour 5 teaspoons (25 g) water
  • 7 PM—Mix the dough: Add the dough ingredients to the bowl of a stand mixer. Use a dough whisk or a stiff spatula to get the dough started. Switch to your hands and mix the dough until it resembles a shaggy mess and there are no dry bits in the bowl. Cover the bowl and let the dough rest for 1 hour for the flour to fully absorb the water. ¼ cup (50 g) sourdough starter1 cup + 2 ½ tablespoons (275 g) water 4 tablespoons (60 g) olive oil1 tablespoon honey 4 cups + 2 tablespoons (500 g) all-purpose flour 2 teaspoons (10 g) sea salt
  • 8 PM – Knead and First Rise: Mix the dough on LOW speed (3) for 8-10 minutes, using the dough hook attachment. Remove the dough hook, cover the bowl, and allow the dough to rise at room temperature, 68-72°F (20-22°C), for 10-12 hours or until it has doubled in size.

DAY 2

  • 6 AM – Shape and second rise: Turn the dough out onto a lightly floured work surface and gently press it into a rectangle with the short end closest to you. Fold the left and right sides of the dough into the middle. Starting from the end farthest from you, roll the dough towards yourself into a log shape. Use your hands to gently cup the dough and pull it towards yourself to create tension on the outside. Pinch the ends to seal any edges. Transfer the dough, seam-side down, into a lightly greased bread pan. For easier removal, you can also line the pan with parchment paper. Allow the dough to rest at room temperature, uncovered until the dough has risen 1 inch above the rim of the pan, about 2-3 hours depending on the temperature of your kitchen.
  • 9 AM – Bake: Preheat the oven to 450°F (232°C). Transfer the pan to the oven and turn the oven down to 375°F (190°C). Bake for 45-50 minutes. Allow the bread to cool in the pan for 10-15 minutes before transferring the loaf to a cooling rack.

NOTES

Consider your kitchen’s temperature and humidity, especially in warm climates, as these factors can affect the final product.

Cooler kitchens (below 68°F / 20°C): The first and second rises will take longer than outlined in the sample timeline. If the dough takes too long to rise, you can adjust the recipe by using 100 g of active starter and 255 g of water. The extra starter will help the dough ferment faster.

Warmer kitchens (above 72°F / 22°C): The first and second rises will be shorter than outlined in the sample timeline. If the dough rises too quickly overnight, mix the dough in the morning and monitor it closely to avoid over-proofing.

If you wake up to a dough that’s over-proofed and too sticky to work with, don’t discard it. Use it to make sourdough focaccia bread.

Storage tips: Keep the bread in a bread bag, beeswax wrap, or kitchen towel at room temperature. It will stay fresh for a few days. To freeze, wrap individual loaves or slices in plastic wrap and place them in a freezer-safe container. Ensure they are fully cooled before wrapping to avoid condensation.

Orange Creamsicle Chia Seed Pudding

Orange Creamsicle Chia Seed Pudding

Yields: 2 servings Prep time: 10 mins | Set time: 4+ hours (or overnight)

Ingredients

  • 1 ¼ cups unsweetened coconut milk: for ultimate creaminess.

  • ¼ cup Chia Seeds: Black or white seeds work equally well.

  • 1 large Naval Orange: You will need both the zest (approx. ¼ tsp) and the juice/segments.

  • 1 tsp Honey or Maple Syrup: Optional, adjust based on the sweetness of your orange.

  • ⅛ tsp Vanilla Extract: For that classic “creamsicle” flavor profile.


Instructions

  1. Prepare the Base: In a medium bowl or large mason jar, whisk together the coconut milk, vanilla extract, and your chosen sweetener until well combined.

  2. Incorporate the Citrus: Grate approximately ¼ teaspoon of orange zest into the mixture. If you prefer a smoother texture, you can puree the orange segments with the milk in a blender first.

  3. Add the Seeds: Stir in the chia seeds.

  4. The Two-Stir Method: This is crucial to prevent clumping. Let the mixture sit for 5–10 minutes, then give it a second vigorous stir or shake to ensure the seeds are evenly distributed as they begin to gel.

  5. Refrigerate: Cover the container tightly and refrigerate for at least 4 hours, though overnight is best for a thick, pudding-like consistency.

  6. Serve: Before eating, give the pudding one final stir. Top with fresh orange segments, extra zest, or a few crushed nuts for crunch.


Why It Works for Beginners

  • High Fiber & Protein: Chia seeds are “powerhouse” ingredients packed with omega-3 fatty acids and fiber, which help keep you full and support heart health.

  • Meal Prep Friendly: You can store this in an airtight container in the fridge for up to 5 days, making it an easy grab-and-go option for busy mornings.

  • Customizable: If the pudding is too thick for your liking after setting, simply stir in a splash of extra milk to reach your desired consistency.

Jalapeño Cheddar Cornbread Muffins

Jalapeño Cheddar Cornbread Muffins

Servings: 10–12 muffins
Prep Time: 15 minutes
Cook Time: 18–20 minutes
Total Time: 35 minutes

A buttery, cheesy, slightly spicy muffin perfect for chili nights, BBQs, or a savory snack.


🧾 Ingredients

  • 1 cup (120 g) all-purpose flour

  • ⅓ cup (40 g) finely ground cornmeal

  • 2 tsp baking powder

  • ½ tsp baking soda

  • 3 tbsp (35 g) sugar

  • ½ tsp salt

  • ¼ cup (60 g) butter, melted and cooled

  • 1 large egg

  • ¾ cup (180 ml) cream or milk (or dairy alternative)

  • 1 cup (100 g) cheddar cheese, shredded

  • ¾ cup (120 g) corn kernels, fresh or canned (drained)

  • 2 green onions, chopped

  • 2 jalapeños – 1 chopped (seeds optional for heat), 1 sliced for garnish


👩‍🍳 Instructions


1️⃣ Preheat the Oven

  • Preheat oven to 350°F (175°C).

  • Spray a 10–12 cup muffin tin with nonstick cooking spray or line with paper liners.


2️⃣ Mix the Dry Ingredients

  • In a large bowl, whisk together:

    • All-purpose flour

    • Cornmeal

    • Baking powder

    • Baking soda

    • Sugar

    • Salt


3️⃣ Combine the Wet Ingredients

  • In a separate bowl, whisk together:

    • Melted butter

    • Egg

    • Cream (or milk alternative)

  • Pour the wet mixture into the dry ingredients.

  • Stir until just combined—do not overmix.


4️⃣ Fold in the Flavor

  • Gently fold in:

    • Corn kernels

    • Chopped green onions

    • Chopped jalapeño

    • Shredded cheddar cheese


5️⃣ Fill the Muffin Cups

  • Scoop the batter evenly into the prepared muffin cups.

  • Top each muffin with a slice of fresh jalapeño for a bakery-style finish.


6️⃣ Bake

  • Bake for 18–20 minutes, or until a toothpick inserted into the center comes out clean.

  • Let cool slightly before serving.


7️⃣ Serve & Enjoy

  • Serve warm as a side with chili, BBQ, or enjoy on their own.

  • Optional: Spread with butter or a drizzle of honey for a sweet-savory touch.


💡 Tips for Success

  • Use sharp cheddar for stronger flavor.

  • Drain canned corn well to prevent soggy muffins.

  • Keep some lumps in the batter—overmixing can make muffins dense.

  • For extra heat, leave the seeds in the jalapeños.


🔁 Variations

  • Smoky Twist: Add cooked bacon pieces.

  • Sweet & Spicy: Stir in 1 tbsp honey.

  • Gluten-Free: Swap flour for a 1:1 gluten-free blend.