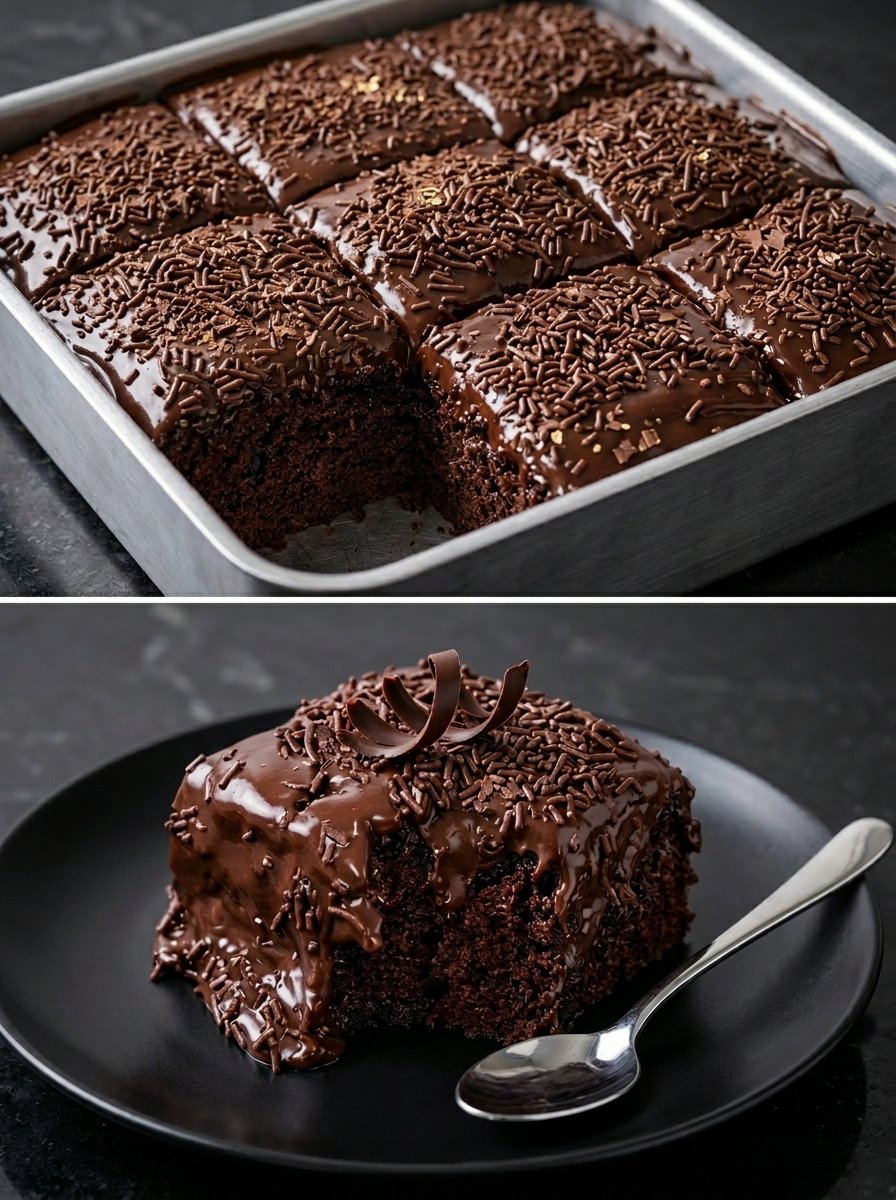
Strawberry Flavour Yogurt

Strawberry Flavour Yogurt

🛒 Ingredients

➡️ 2 cups thick plain yogurt (hung yogurt works best) 🥣
➡️ 1 cup fresh strawberries (chopped) 🍓
➡️ 3–4 tbsp sugar or honey 🍯
➡️ ½ tsp vanilla essence (optional) 🌼
➡️ 2 tbsp strawberry sauce or jam 🍓
➡️ 2 tbsp whipped cream (optional, for topping) 🍦


👩‍🍳 Step-by-Step Recipe

🔹 Step 1: Prepare Yogurt

➡️ Take thick yogurt in a bowl
➡️ Whisk until smooth and creamy 🥣✨

🔹 Step 2: Make Strawberry Puree

➡️ Blend strawberries into a smooth puree 🍓
➡️ Keep a few small chunks for texture

🔹 Step 3: Sweeten It

➡️ Add sugar or honey into yogurt 🍯
➡️ Mix well until fully combined

🔹 Step 4: Combine Flavors

➡️ Add strawberry puree into yogurt
➡️ Gently mix to create swirls (don’t overmix for that красив look 😉)

🔹 Step 5: Add Final Touch

➡️ Add vanilla essence (optional) 🌼
➡️ Spoon into serving glass or bowl

🔹 Step 6: Decorate

➡️ Top with whipped cream 🍦
➡️ Drizzle strawberry sauce 🍓
➡️ Add small strawberry pieces on top


💡 Pro Tips

✨ Use hung yogurt for extra thick texture
✨ Don’t overmix if you want pretty strawberry swirls
✨ Chill for 30 minutes before serving for best taste ❄️


❓ Q & A

Q1: What is hung yogurt?
➡️ It’s yogurt strained to remove water, making it thick and creamy 🥣

Q2: Can I skip cream?
➡️ Yes! It will still be delicious and lighter 😊

Q3: How long can I store it?
➡️ Keep in fridge for up to 2 days 🧊

Q4: Can I use jam instead of fresh strawberries?
➡️ Yes! It gives a stronger sweet strawberry flavor 🍓

Q5: How to make it like soft-serve style?
➡️ Chill well and whip before serving for a fluffy texture 🍦

Mixed Berry Brioche Bread Pudding

Mixed Berry Brioche Bread Pudding

🛒 Ingredients

  • 6-8 cups Brioche bread, cut into 1-inch cubes (stale bread works best!) 🍞

  • 2 cups Mixed berries (Raspberries, Blueberries, Blackberries) 🫐

  • 4 large Eggs 🥚

  • 2 cups Whole milk (or heavy cream for extra richness)

  • 1/2 cup Granulated sugar

  • 1 tsp Vanilla extract

  • 1/4 tsp Salt

  • Optional: White chocolate chips or a drizzle of condensed milk (as seen in the image) 🥛


🥣 Step-by-Step Instructions

  1. Prep the Dish ➡️ Grease a 9×13 inch baking dish with butter.

  2. Arrange the Bread ➡️ Spread the brioche cubes evenly into the prepared dish. 🍞➡️🥘

  3. Add the Berries ➡️ Scatter 1.5 cups of the mixed berries over and between the bread cubes. Save the remaining 0.5 cup for the very top. 🍓

  4. Whisk the Custard ➡️ In a large mixing bowl, whisk together the eggs, milk, sugar, vanilla extract, and salt until completely smooth. 🥣

  5. The Soak ➡️ Pour the custard mixture slowly over the bread, ensuring every piece of brioche is coated. ➡️ Use a spatula to gently press the bread down so it absorbs the liquid. 🥛

  6. Rest Time ➡️ Let the dish sit for at least 20–30 minutes (or refrigerate overnight). This prevents the pudding from being dry in the center. 🕒

  7. Preheat & Top ➡️ Preheat your oven to 350°F (175°C). Scatter the remaining berries and optional white chocolate on top.

  8. Bake ➡️ Bake for 40–50 minutes. The pudding is done when the custard is set (no longer wobbly) and the top is golden brown and slightly crisp. 🥧🔥

  9. Cool Slightly ➡️ Let it cool for 10 minutes before serving. This allows the custard to firm up.

  10. Final Touch ➡️ Drizzle with a little extra cream, condensed milk, or maple syrup if desired. 🍯


❓ Common Questions (Q&A)

Q: Can I use frozen berries? A: Yes! Do not thaw them first, as the juice will bleed and turn the bread purple. Just toss them in straight from the freezer. ❄️🍓

Q: What if I don’t have Brioche? A: Challah, Croissants, or even thick-cut Texas Toast are great substitutes. Avoid standard sandwich bread as it can become too mushy. 🍞

Q: Can I make this dairy-free? A: Certainly! Use full-fat coconut milk or oat milk for the best texture. 🥥🥛

Q: Is it okay to make this the night before? A: Yes, it’s actually better! Assembling it at night and baking it in the morning results in a much richer, more custardy texture. 🌙➡️☀️


✨ Pro-Tips for Success

  • Stale is Better: If your bread is fresh, toast the cubes in a 300°F oven for 10 minutes to dry them out. Dry bread acts like a sponge for the custard! 🧽

  • Golden Top: If the top is browning too fast but the center is still wet, cover the dish loosely with foil for the last 15 minutes of baking. 🛡️

Triple Chocolate Moist Sheet Cake

Triple Chocolate Moist Sheet Cake 🍫✨

This recipe produces an incredibly soft, tender cake topped with a rich, pourable chocolate ganache and classic sprinkles. It is the perfect dessert for celebrations or a cozy weekend treat.


🛒 Ingredients

  • For the Cake:

    • 2 cups all-purpose flour 🌾

    • 2 cups granulated sugar 🍯

    • ¾ cup unsweetened cocoa powder 🍫

    • 2 tsp baking soda and 1 tsp baking powder

    • 1 tsp salt 🧂

    • 1 cup buttermilk (at room temperature) 🥛

    • ½ cup vegetable oil 🌻

    • 2 large eggs 🥚

    • 2 tsp vanilla extract

    • 1 cup hot coffee or boiling water (this “blooms” the cocoa for deeper flavor) ☕

  • For the Topping:

    • 1 cup semi-sweet chocolate chips 🍫

    • ½ cup heavy cream 🥛

    • Chocolate sprinkles 🎊


🔪 Step-by-Step Instructions

  1. Prep Work ➡️ Preheat your oven to 350°F (175°C). Grease and flour a 9×13 inch baking pan.

  2. Mix Dry Ingredients ➡️ In a large bowl, whisk together the flour, sugar, cocoa, baking soda, baking powder, and salt. 🥣

  3. Add Wet Ingredients ➡️ Add the eggs, buttermilk, oil, and vanilla extract. ➡️ Beat on medium speed for about 2 minutes until well combined.

  4. The Secret Step ➡️ Lower the speed and carefully pour in the hot coffee or boiling water. ➡️ The batter will be very thin—this is normal and ensures a moist crumb!

  5. Bake ➡️ Pour the batter into the prepared pan. Bake for 30–35 minutes, or until a toothpick inserted in the center comes out clean. ➡️ Let the cake cool completely in the pan.

  6. Prepare the Ganache ➡️ Heat the heavy cream until it just begins to simmer. Pour it over the chocolate chips in a small bowl. ➡️ Let it sit for 5 minutes, then stir until shiny and smooth.

  7. Glaze and Garnish ➡️ Pour the warm ganache over the cooled cake, spreading it to the edges. ➡️ Immediately top with a generous layer of chocolate sprinkles while the glaze is still wet.

  8. Set and Slice ➡️ Let the glaze set for at least 30 minutes before slicing into squares. 🍽️


❓ Q/A Section

Q: Can I taste the coffee in the cake? A: Not at all! ➡️ The coffee simply intensifies the chocolate flavor. If you prefer to avoid it, boiling water works perfectly fine.

Q: Why is my batter so watery? A: Don’t worry! ➡️ This high-moisture batter is exactly what makes the cake so soft and prevents it from becoming dry.

Q: Can I make this in a different pan? A: Yes! ➡️ This recipe works for two 9-inch round pans (bake for 30-35 mins) or about 24 cupcakes (bake for 18-22 mins).

Q: How should I store the leftovers? A: Cover the pan tightly with foil or plastic wrap. ➡️ It stays moist at room temperature for up to 3 days or in the fridge for up to 5 days.

Cottage Cheese Chocolate Ice Cream

Cottage Cheese Chocolate Ice Cream 🍦🍫


🛒 Ingredients

  • The Base: 2 cups full-fat cottage cheese (small curd) 🧀

  • The Flavor: ¼ cup unsweetened cocoa powder 🍫

  • The Sweetener: 3–4 tbsp honey or maple syrup (adjust to taste) 🍯

  • The Boost: 1 tsp vanilla extract

  • Optional Mix-ins: Sugar-free chocolate chips or crushed walnuts 🥜


🔪 Step-by-Step Instructions

  1. Blend the Base ➡️ Add the cottage cheese, cocoa powder, sweetener, and vanilla to a high-speed blender or food processor.

  2. Make it Smooth ➡️ Blend on high for 1–2 minutes until the mixture is completely smooth and no cheese curds remain. ➡️ The consistency should look like a thick chocolate pudding.

  3. Fold in Extras ➡️ If you are using chocolate chips or nuts, stir them in by hand now. 🥣

  4. Transfer ➡️ Pour the mixture into a shallow, freezer-safe container or a loaf pan. Smooth the top with a spatula. ➡️

  5. Freeze ➡️ Place in the freezer for 3–5 hours. ❄️

  6. The “Soft Serve” Check ➡️ If you prefer a soft-serve texture, check it at the 2-hour mark. For scoopable ice cream, let it freeze until firm.

  7. Temper ➡️ If the ice cream has been in the freezer overnight, let it sit on the counter for 10–15 minutes before scooping. ➡️ This makes it much easier to get those perfect round scoops!

  8. Serve ➡️ Scoop into chilled bowls and enjoy! 🍨


❓ Q/A Section

Q: Does it actually taste like cottage cheese? A: Not at all! ➡️ Once blended, the “cheesy” texture disappears, leaving behind a rich, tangy creaminess that tastes very similar to a chocolate cheesecake.

Q: Can I use low-fat cottage cheese? A: You can, but for the best results, use full-fat. ➡️ Higher fat content results in a creamier mouthfeel and prevents the ice cream from becoming too icy in the freezer.

Q: How do I keep it from getting too hard? A: High-protein ice creams can freeze quite solid. ➡️ To help with this, you can add 1 tablespoon of vegetable glycerin or a splash of almond milk to the blender, which helps maintain a softer scoop. 🍦

Q: Can I make other flavors? A: Definitely! ➡️ Omit the cocoa powder and add frozen strawberries for a fruity version, or stir in peanut butter for a chocolate-peanut butter swirl. 🍓🥜

No-Bake Lemon Dazzling Blueberry Cream Cake

No-Bake Lemon Dazzling Blueberry Cream Cake

 Description

This No-Bake Lemon Blueberry Cream Cake is a light, refreshing dessert layered with a buttery biscuit base, silky lemon cream filling, and juicy blueberries. With no oven required, it’s the perfect make-ahead treat for warm days—zesty, creamy, and beautifully balanced between sweet and tangy flavours.

 Servings

Serves: 8–10 slices

 Ingredients

For the crust:

  • 2 cups crushed graham crackers or digestive biscuits
  • 1/2 cup melted butter
  • 2 tbsp sugar

For the lemon cream filling:

  • 1 1/2 cups heavy whipping cream
  • 8 oz cream cheese (softened)
  • 1/2 cup powdered sugar
  • 1/4 cup fresh lemon juice
  • 1 tbsp lemon zest
  • 1 tsp vanilla extract

For the blueberry layer:

  • 1 1/2 cups fresh or frozen blueberries
  • 2 tbsp sugar
  • 1 tbsp lemon juice
  • 1 tsp cornstarch (optional, for thickening)

 Instructions

  1. Prepare crust:
    Mix crushed biscuits, melted butter, and sugar. Press firmly into a springform pan. Chill for 20–30 minutes.
  2. Make blueberry layer:
    In a saucepan, cook blueberries with sugar and lemon juice for 5–7 minutes until slightly thick. Cool completely.
  3. Prepare filling:
    Beat cream cheese and powdered sugar until smooth. Add lemon juice, zest, and vanilla.
    In another bowl, whip cream until soft peaks form, then gently fold into the mixture.
  4. Assemble cake:
    Spread half the cream over crust → add blueberry layer → top with remaining cream.
  5. Chill:
    Refrigerate for 4–6 hours (or overnight) until set.
  6. Serve:
    Garnish with fresh blueberries and lemon zest before serving.

 Notes

  • Use fresh lemon juice for best flavor
  • Let blueberry layer cool completely before layering
  • Chill longer for cleaner slices

 Tips

  • Add gelatin (optional) for extra firmness
  • Use a clear glass dish for visible layers
  • Freeze for 30 minutes before serving for a firmer texture

 Nutritional Info (Approx per slice)

  • Calories: 320
  • Fat: 22g
  • Carbs: 28g
  • Sugar: 18g
  • Protein: 4g

 Benefits

  • Blueberries are rich in antioxidants 🫐
  • Lemon supports digestion & adds vitamin C 🍋
  • No-bake = retains more freshness

 Q&A

Q: Can I use frozen blueberries?
A: Yes, just cook them slightly longer.

Q: How long does it last?
A: 3–4 days in the fridge.

Q: Can I make it ahead?
A: Yes! Best made a day before.

Q: Can I make it lighter?
A: Use low-fat cream cheese and whipped topping.

Decadent Chocolate Mousse Terrine

Decadent Chocolate Mousse Terrine

🛒 Ingredients

  • For the Shell: 300g Milk or Dark Chocolate (melted)

  • For the Mousse: * 200g Dark chocolate (60% cocoa or higher)

    • 300ml Heavy whipping cream (chilled)

    • 2 Large egg yolks

    • 30g Granulated sugar

  • For the Layers: 1 pack of thin rectangular wafers or butter biscuits

  • For the Base: 100g Crushed chocolate cookies mixed with 2 tbsp melted butter


👩‍🍳 Step-by-Step Instructions

  1. Create the Chocolate Shell 🏗️ Pour melted chocolate into your silicone mold. Tilt it until all sides are coated. ➡️ Invert the mold over a tray to let excess chocolate drip out, then refrigerate for 20 minutes until set. Repeat for a second coat if needed.

  2. Prep the Mousse Base 🔥 Melt 200g of dark chocolate. In a small heat-proof bowl, whisk egg yolks and sugar over a pot of simmering water (double boiler) until pale and thick. ➡️ Fold the melted chocolate into the egg mixture.

  3. Whip and Fold ☁️ Whisk the chilled heavy cream until stiff peaks form. ➡️ Gently fold the cream into the chocolate mixture in three batches to keep it light and airy.

  4. Assemble the Layers 🪜 Pipe or spoon a layer of mousse into the chocolate shell. ➡️ Press a layer of wafers or biscuits on top. Repeat with more mousse and another layer of biscuits.

  5. Add the Base 🍪 Press the crushed cookie and butter mixture firmly over the final layer of mousse. This becomes the “bottom” of the cake.

  6. The Set & Reveal ❄️ Refrigerate for at least 8 hours or overnight. ➡️ Carefully peel back the silicone mold to reveal the ridged design.


❓ Common Questions (Q&A)

Q: How do I stop the chocolate shell from cracking? A: Make sure the shell isn’t too thin. Two coats of chocolate usually provide the stability needed to peel the mold away safely. 🛠️

Q: Can I make this without raw egg yolks? A: Absolutely! ➡️ You can skip the eggs and sugar and simply fold melted chocolate into whipped cream (this is known as a Chantilly-style mousse).

Q: What if I don’t have a silicone mold? A: You can use a metal loaf tin lined with plastic wrap. You won’t get the ridges, but the taste will be exactly the same! 🍞

Q: Why is my mousse grainy? A: This happens if the melted chocolate is too hot when added to the cold cream. 🌡️ Let the chocolate cool to room temperature (but still liquid) before folding.


✨ Quick Tips

  • The Perfect Slice: Just like in the photo, use a warm, dry knife. ➡️ Run the blade under hot water and wipe it clean between every single cut. 🔪

  • Flavor Boost: Add a splash of espresso or a drop of orange extract to the mousse for a gourmet touch. ☕🍊

Creamy Biscoff Icebox Cake

Creamy Biscoff Icebox Cake

🛒 Ingredients

  • 250g Biscoff or Speculoos biscuits (about 1.5 packs)

  • 500ml Heavy whipping cream (chilled)

  • 250g Mascarpone or Cream Cheese (softened)

  • 150g Biscoff spread (plus extra for the topping)

  • 1 tsp Vanilla extract

  • 50g Powdered sugar (optional, for extra sweetness)

  • 100g Milk chocolate or 3 tbsp Biscoff spread (melted for the top)


👩‍🍳 Step-by-Step Instructions

  1. Prep the Cream Base 🥣 In a large bowl, whisk the chilled heavy cream until soft peaks form. In a separate bowl, beat the mascarpone/cream cheese, Biscoff spread, and vanilla extract until smooth. ➡️ Fold the whipped cream gently into the Biscoff mixture until combined.

  2. The First Layer 🍪 Line a loaf tin with parchment paper (this makes it easy to lift out later). Place a single layer of biscuits at the bottom of the tin. You may need to break a few to fit the corners.

  3. Cream Layering 🍦 Spread a thick, even layer of the cream mixture over the biscuits. ➡️ Smooth it out with a spoon or spatula.

  4. Repeat the Process 🔄 Continue layering biscuits followed by cream until you reach the top of the tin or run out of ingredients. The final layer should be the cream mixture.

  5. The Smooth Topping 🍫 Melt your chocolate or Biscoff spread in the microwave for 20-30 seconds. Pour it over the final layer and tilt the tin to let it coat the surface evenly, just like in the photo.

  6. The Deep Freeze/Chill ❄️ Cover with plastic wrap and refrigerate for at least 6 hours, though overnight is best. This allows the biscuits to soften into a cake-like texture.


❓ Common Questions (Q&A)

Q: Can I use different biscuits? A: Yes! 🍪 Graham crackers, ginger snaps, or even chocolate wafers work beautifully.

Q: My cream isn’t thickening, what happened? A: Ensure your heavy cream is ice cold before whipping. If the room is too warm, the fat won’t stabilize into peaks. 🌡️

Q: How do I get those clean slices? A: Dip a sharp knife into hot water, wipe it dry, and slice while the cake is very cold. 🔪

Q: How long does it stay fresh? A: It will keep in the fridge for up to 3 days. After that, the biscuits may become a bit too soft. 🕒


✨ Quick Tips

  • Crunch Factor: Sprinkle some crushed biscuit crumbs on top before the chocolate sets for added texture. 💎

  • Salted Twist: A tiny pinch of sea salt on the chocolate topping balances the sweetness of the Biscoff perfectly. 🧂

Homemade Chocolate Protein Fluff

Homemade Chocolate Protein Fluff

Prep time: 5 mins | Freeze time: 12–24 hours | Servings: 1-2

🛒 Ingredients

  • 1.5 cups Milk of choice (Dairy, Almond, or Oat) 🥛

  • 1 scoop Chocolate Protein Powder 🍫

  • 1 tbsp Cocoa Powder (for extra richness) 🫘

  • 1 tsp Vanilla Extract ✨

  • Pinch of Sea Salt 🧂

  • Optional: 1 tsp Maple syrup or honey if you prefer it sweeter 🍯


👩‍🍳 Step-by-Step Instructions

  1. Mix the Base ➡️ In a container or blender, combine your milk, protein powder, cocoa powder, vanilla, and salt.

  2. Combine Well ➡️ Whisk or blend until the mixture is completely smooth with no clumps. 🌪️

  3. The First Freeze ➡️ Pour the mixture into a freezer-safe pint container. Place it in the freezer for at least 12 to 24 hours until it is solid. ❄️

  4. The Spin ➡️ Once frozen, place your container into your creamery machine (like a Ninja Creami) and select the “Lite Ice Cream” or “Protein Pint” setting. 🔄

  5. Check the Texture ➡️ If it looks a bit crumbly after the first spin, don’t worry!

  6. The Re-Spin ➡️ Add a splash (1 tablespoon) of extra milk to the center and hit the “Re-spin” button. 🥛 ➡️ 🔄

  7. Final Result ➡️ You should now have a thick, “soft-serve” consistency that holds its shape on a spoon, just like in the video! 🍦✨


❓ Common Questions & Answers

Q: Can I make this without a machine? A: ➡️ It is difficult to get this exact “fluffy” texture without a high-speed creamery machine, but you can blend the frozen cubes in a powerful food processor for a similar “nice cream” result.

Q: Why is my mixture crumbly? A: ➡️ This usually happens if the base is very cold or low in fat. Simply adding a tiny bit of liquid and re-spinning always fixes it! 🧪

Q: Can I add “mix-ins” like chocolate chips? A: ➡️ Yes! After the final spin, make a hole in the middle, add your chips or crushed cookies, and use the “Mix-in” setting on your machine. 🍪

No-Bake Raspberry Chocolate Cream Dessert

No-Bake Raspberry Chocolate Cream Dessert

This layered delight is best served chilled, allowing the biscuits to soften into a cake-like texture.

🛒 Ingredients

  • 2 packs Digestive biscuits or Graham crackers 🍪

  • 2 cups Fresh or frozen raspberries (sweetened slightly) 🍓

  • 2 cups Heavy whipping cream (cold) 🥛

  • 1 cup Cream cheese (softened) 🧀

  • 1/2 cup Powdered sugar 🤍

  • 1 tsp Vanilla extract

  • 1/2 cup Chocolate shavings or grated chocolate 🍫

  • 1/4 cup Milk (for dipping the biscuits)


👩‍🍳 Step-by-Step Instructions

  1. Prepare Raspberry Layer: Mash the raspberries with a spoon. If they are very tart, stir in a tablespoon of sugar. Set aside. 🍓 ➡️

  2. Make the Cream: In a large bowl, whip the heavy cream, powdered sugar, and vanilla until stiff peaks form. In a separate bowl, beat the cream cheese until smooth, then gently fold it into the whipped cream. 🥣 ➡️

  3. First Layer: Quickly dip biscuits into the milk (just a second!) and line the bottom of a glass dish. ➡️

  4. Fruit Layer: Spread half of the mashed raspberries evenly over the biscuit base. ➡️

  5. Cream Layer: Spread half of the cream mixture over the raspberries. ☁️ ➡️

  6. Repeat: Add another layer of milk-dipped biscuits, the remaining raspberries, and the rest of the cream. ➡️

  7. Topping: Generously cover the top with chocolate shavings or grated chocolate for that beautiful finish. 🍫 ➡️

  8. Chill: Cover and refrigerate for at least 4–6 hours (overnight is best!). This allows the layers to set so you can cut perfect squares. ⏱️ ➡️


❓ Common Questions (Q&A)

Q: Can I use other fruits?A: Absolutely! Strawberries, blueberries, or even a layer of lemon curd would work beautifully with this cream base. 🥭 ➡️ 🫐

Q: How do I get clean slices?A: Make sure the dessert is very cold. Wipe your knife with a warm, damp cloth between every single cut to keep the layers looking sharp. 🔪 ✨

Q: My cream is too runny. What happened?A: Ensure your heavy cream is ice-cold before whipping and that you beat the cream cheese separately first to remove lumps before combining them. 🥛

Q: Can I make this more “chocolatey”?A: You can fold 2 tablespoons of cocoa powder into the cream mixture or use chocolate-flavored biscuits for the base layers! 🍫


Enjoy every creamy bite!

Fluffy Lemon Blueberry Buttermilk Pancakes

Fluffy Lemon Blueberry Buttermilk Pancakes

The secret to this height is a thick batter and not over-mixing the flour!

🛒 Ingredients

  • 2 cups All-purpose flour 🌾

  • 2 tbsp Sugar 🤍

  • 2 tsp Baking powder

  • 1/2 tsp Baking soda

  • 1/2 tsp Salt 🧂

  • 2 cups Buttermilk (room temperature) 🥛

  • 2 Large eggs 🥚

  • 4 tbsp Unsalted butter (melted and cooled) 🧈

  • 1 tsp Vanilla extract

  • 1 tbsp Lemon zest (optional, for that bright flavor) 🍋

  • 1 ½ cups Fresh blueberries 🫐

  • Oil or butter for the griddle


👩‍🍳 Step-by-Step Instructions

  1. Whisk Dry Ingredients: In a large bowl, whisk together the flour, sugar, baking powder, baking soda, and salt. 🥣 ➡️

  2. Mix Wet Ingredients: In a separate medium bowl, whisk the buttermilk, eggs, melted butter, vanilla, and lemon zest until smooth. ➡️

  3. Combine: Pour the wet ingredients into the dry ingredients. Stir gently with a spatula just until combined. Stop while you still see a few lumps! Over-mixing makes pancakes tough. ➡️

  4. Rest the Batter: Let the batter sit for 5–10 minutes. You will see bubbles forming; this makes them extra fluffy. ⏱️ ➡️

  5. Heat the Pan: Heat a non-stick skillet or griddle over medium heat. Lightly grease with a little butter or oil. 🍳 ➡️

  6. Cook: Pour about 1/3 cup of batter onto the griddle. Gently press a handful of blueberries into the top of each pancake while the bottom cooks. 🫐 ➡️

  7. Flip: Wait until bubbles form on the surface and the edges look set and dry (about 2–3 minutes). Flip carefully and cook the other side until golden brown (about 1–2 minutes). ➡️

  8. Serve: Stack them high and serve with maple syrup, honey, or a squeeze of fresh lemon! 🍯 ➡️


❓ Common Questions (Q&A)

Q: Can I use frozen blueberries? A: Yes! Do not thaw them first, or they will turn your batter purple. Add them directly to the pancake on the griddle just like fresh ones. ❄️

Q: I don’t have buttermilk. What can I use? A: Mix 2 cups of regular milk with 2 tablespoons of lemon juice or white vinegar. Let it sit for 5 minutes until it curdles slightly before using! 🥛🍋

Q: Why are my pancakes flat? A: This usually happens if your baking powder is old or if you over-mixed the batter. Stir just until the flour disappears to keep that airy structure. 📈

Q: How do I keep them warm while cooking the rest? A: Place a wire rack on a baking sheet in the oven at its lowest setting (around 90°C or 200°F). Transfer the finished pancakes there to stay crisp and warm! 🌡️


Enjoy your delicious breakfast! ✨🥞

Creamy Mixed Berry Cloud Salad

Creamy Mixed Berry Cloud Salad

Prep time: 10 mins | Chilling time: 1 hour | Servings: 6-8

Ingredients

  • 1 lb (450g) Strawberries, hulled and sliced

  • 6 oz (170g) Blueberries

  • 6 oz (170g) Raspberries

  • 6 oz (170g) Blackberries

The Creamy Base:

  • 1 cup Heavy whipping cream, chilled

  • 8 oz (225g) Cream cheese, softened to room temperature

  • 1/2 cup Powdered sugar (adjust to your sweetness preference)

  • 1 tsp Vanilla extract

  • Optional: 1 cup Mini marshmallows for extra fluffiness


Instructions

  1. Prep the Fruit: Gently wash all the berries. Pat them completely dry with paper towels. Moisture is the enemy here; if the berries are wet, the cream will become runny. Slice the larger strawberries into bite-sized pieces.

  2. Whip the Cream: In a chilled bowl, beat the heavy whipping cream until stiff peaks form. Set this aside.

  3. Cream the Base: In a large mixing bowl, beat the softened cream cheese, powdered sugar, and vanilla extract until the mixture is smooth and completely free of lumps.

  4. Fold Together: Gently fold the whipped cream into the cream cheese mixture using a spatula. If you are using marshmallows, fold them in now.

  5. Combine: Carefully fold the dried berries into the creamy mixture. Use a light hand so you don’t crush the raspberries or turn the whole bowl purple/pink.

  6. Chill & Serve: Refrigerate for at least 1 hour before serving. This allows the flavors to meld and the mixture to set properly.


Pro-Tips & Variations

  • The “Lighter” Version: Swap the cream cheese and heavy cream for 2 cups of Greek yogurt and a bit of honey for a high-protein breakfast version.

  • Keep it Fresh: Only fold the berries in shortly before you plan to serve it to keep the fruit crisp and the cream white.

  • Add Crunch: Sprinkle some toasted pecans, sliced almonds, or granola on top just before serving for a nice texture contrast.


3 Catchy Captions for Social Media

  • Option 1: Berry bliss in every bite! 🍓✨ This Creamy Berry Cloud is the ultimate refreshing treat for a warm afternoon.

  • Option 2: Forget the cake—I’ll take a bowl of this! 🫐 Low-effort, high-flavor, and packed with all the best summer berries.

3-Ingredient Chocolate Protein Fluff

3-Ingredient Chocolate Protein Fluff

Prep time: 5 mins | Serves: 1 large bowl

Ingredients

  • 1 cup (250g) Fat-free plain Greek yogurt or blended cottage cheese

  • 1 scoop (30g) Chocolate whey or casein protein powder

  • 1–2 tbsp Unsweetened cocoa powder (for extra richness)

  • Optional: A splash of almond milk if it’s too thick; stevia or honey if you prefer it sweeter.

Instructions

  1. Combine: In a medium mixing bowl, add the Greek yogurt (or blended cottage cheese for a “cheesecake” vibe), protein powder, and cocoa powder.

  2. Whip: Use a hand mixer or a vigorous whisk to beat the mixture for 2–3 minutes. If using casein protein, it will naturally become very thick and “fluffy.”

  3. The Secret Step: For maximum “fluff,” add a tiny pinch (1/4 tsp) of xanthan gum while mixing. This creates that airy, voluminous texture seen in the photo.

  4. Chill: Place in the freezer for 10–15 minutes before eating to get that perfect chilled, soft-serve consistency.

Strawberry Cheesecake Fluff

Strawberry Cheesecake Fluff

This version is perfect if you are looking for a high-protein, low-carb treat. It has a thick, cheesecake-like consistency.

Yields: 1 Serving | WW Points: 1

Ingredients

  • 1 cup Fat-free plain Greek yogurt

  • 1 tbsp Sugar-free cheesecake instant pudding mix

  • 1/2 cup Fresh strawberries, chopped

  • Optional: Extra sliced strawberries for topping.

Instructions

  1. Mix: In a medium bowl, combine the Greek yogurt and the dry pudding mix. Stir vigorously until the powder is fully incorporated and the mixture is smooth and thick.

  2. Fold: Gently fold in the chopped strawberries.

  3. Chill: For the best texture, let it sit in the refrigerator for at least 15–30 minutes to allow the pudding mix to fully set.

  4. Serve: Top with additional fresh strawberry slices as seen in the photo.


2. Quick Strawberry Milk Delight

This is a simple, 3-ingredient blender dessert that creates a light and airy mousse-like texture.

Yields: 2–3 Servings | Chill Time: 60 mins

Ingredients

  • 300 ml Water

  • 200 g Powdered milk

  • 25 g Strawberry powder drink mix (like Tang or Nesquik)

Instructions

  1. Blend: Combine the water, powdered milk, and strawberry drink mix in a blender.

  2. Process: Blend on high for 2–3 minutes until the mixture becomes very frothy and begins to thicken.

  3. Set: Pour the mixture into a glass bowl and refrigerate for at least 60 minutes until it reaches a “fluff” consistency.

  4. Garnish: Just before serving, top with fresh halved strawberries.


Pro-Tip for Social Media

Since you’re managing a recipe page, these “fluff” recipes perform great on Facebook because they are visually appealing and require very few ingredients. Try using a clear glass bowl like the one in your photo to show off the strawberry chunks!

No-Bake S’mores Icebox Bars Recipe

No-Bake S’mores Icebox Bars Recipe

🛒 Ingredients

  • Graham Crackers: 2 Sleeves (approx. 18–20 full sheets)

  • Chocolate Layer: 2 cups semi-sweet chocolate chips + 1/2 cup heavy cream (or a pre-made chocolate fudge frosting)

  • Marshmallow Layer: 1 jar (7 oz) marshmallow fluff OR 3 cups mini marshmallows melted with 2 tbsp butter

  • Optional: A pinch of sea salt to balance the sweetness.


👩‍🍳 Step-by-Step Instructions

  1. Prepare the Pan ➡️ Line an 8×8 or 9×9 inch square baking pan with parchment paper. Leave a little overhang on the sides so you can lift the bars out easily later.

  2. The Base Layer ➡️ Lay down a single layer of graham crackers at the bottom of the pan. You may need to break some pieces to fit them snugly and cover the entire surface.

  3. The Marshmallow Core ➡️ Spread the marshmallow fluff evenly over the graham cracker base.

    • Tip: If using fluff, grease your spatula with a little butter or oil to prevent sticking! 🍯

  4. The Chocolate Top ➡️ If making a ganache: Melt the chocolate chips and heavy cream in the microwave in 30-second intervals, stirring until smooth. Pour this rich chocolate layer directly over the marshmallow.

  5. The Final Crunch ➡️ Place another layer of graham crackers on top of the chocolate, aligning them so they are easy to cut later. Press down very gently to set them. 🍪

  6. Chill & Set ➡️ Place the pan in the refrigerator for at least 2–3 hours (or the freezer for 1 hour). This allows the layers to firm up so they don’t slide apart when you bite into them.

  7. Slice & Serve ➡️ Use the parchment paper to lift the block out. Follow the lines of the graham crackers with a sharp knife to cut them into perfect squares. Enjoy! 🎉


❓ Common Questions (Q&A)

Q: Can I make these vegan? A: Absolutely! 🌿 Use dairy-free chocolate chips, coconut cream instead of heavy cream, and vegan-friendly marshmallows (which use carrageenan instead of gelatin).

Q: My marshmallow layer is too sticky to spread. What do I do? A: Wet your fingers or the back of a spoon with a tiny bit of water or butter. This creates a barrier that stops the marshmallow from “grabbing” your tools. 🥄

Q: How long do these last? A: They stay fresh in an airtight container in the fridge for up to 5 days. You can also freeze them for a cold, chewy treat! 🧊

Q: Can I add a “toasted” flavor? A: If you have a kitchen torch, you can lightly toast the marshmallow layer before adding the top graham cracker. Just be careful not to melt the whole bar! 🔥


💡 Pro-Tip

For a twist, try using Chocolate Graham Crackers or adding a thin layer of Peanut Butter between the bottom cracker and the marshmallow! 🥜✨

Ultimate Cookies & Cream Layered Trifle

Ultimate Cookies & Cream Layered Trifle 🥛

This “no-bake” masterpiece features layers of velvety cream filling and chocolate sandwich cookies that soften just enough to create a cake-like texture.

🛒 Ingredients

  • The Cookies: 2 packs (approx. 30-36 cookies) Chocolate sandwich cookies 🍪

  • The Cream Base: 2 packages (225g each) Cream cheese, softened 🥣

  • Sweetener: 120g Powdered sugar 🧂

  • The Fluff: 1 tub (approx. 225g) Whipped topping (chilled) or 2 cups heavy cream whipped to stiff peaks ☁️

  • Liquid: 120ml Milk (for dipping) 🥛

  • Extract: 1 tsp Vanilla extract ✨


👩‍🍳 Step-by-Step Instructions

  1. Prep the Cream ➡️ In a large bowl, beat the softened cream cheese and powdered sugar together until smooth. Stir in the vanilla extract. 🥣

  2. Fold in the Fluff ➡️ Gently fold in the whipped topping (or whipped cream) using a spatula until the mixture is light, airy, and well combined. ☁️

  3. The Base Layer ➡️ Briefly dip a few cookies into the milk (just a quick dunk!) and line the bottom of your glass bowl or trifle dish. Crush a few extra dry cookies to fill in any gaps. 🍪➡️

  4. Add the Cream ➡️ Spread about one-third of your cream mixture over the cookie base. Use the back of a spoon to smooth it to the edges so the layers look sharp from the outside. 🥄

  5. Repeat the Layers ➡️ Continue layering: Dipped cookies ➡️ Cream mixture ➡️ Dipped cookies ➡️ Cream mixture. You should aim for 3 solid layers of each. 🌀

  6. The Top Decoration ➡️ For the final look, sprinkle finely crushed cookie crumbs in the center and arrange whole cookies in a circle around the edge, exactly like the photo! 🎨

  7. The Chill Factor ➡️ This is crucial! Refrigerate for at least 4 to 6 hours. This gives the cookies time to absorb moisture from the cream and soften into a “melt-in-your-mouth” texture. ❄️🕒


❓ Common Questions (Q&A)

Q: Do I have to dip the cookies in milk? A: Dipping helps the cookies soften faster. If you plan to leave the trifle in the fridge overnight, you can skip the milk dip as the cream will naturally soften the cookies over 12–24 hours. 🥛

Q: Can I make this lower in sugar? A: Yes! You can use sugar-free chocolate cookies and a sugar-free whipped topping. For the cream cheese mixture, replace powdered sugar with a powdered monk fruit or stevia blend. 🍏

Q: Can I add fruit to this? A: Absolutely. Fresh strawberries or raspberries tucked between the layers add a lovely tartness that balances the rich cream and chocolate. 🍓

Q: How do I get clean layers on the glass? A: Use a piping bag or a large plastic bag with the corner snipped off to “pipe” the cream around the edges of the glass. This prevents smearing!

Glazed Blueberry Lemon Loaf 🫐

Glazed Blueberry Lemon Loaf 🫐

A moist, buttery cake packed with fresh blueberries and finished with a zesty lemon glaze.

🛒 Ingredients

  • Dry Ingredients: 250g All-purpose flour, 1 ½ tsp Baking powder, ½ tsp Salt 🧂

  • Wet Ingredients: 175g Unsalted butter (softened), 200g Granulated sugar, 3 Large eggs, 120ml Greek yogurt or Sour cream, 1 tsp Vanilla extract 🥚

  • Flavor & Fruit: Zest of 1 lemon, 200g Fresh blueberries (plus extra for topping) 🫐

  • The Glaze: 120g Powdered sugar & 2 tbsp Lemon juice 🍋


👩‍🍳 Step-by-Step Instructions

  1. Prep the Oven & Pan ➡️ Preheat your oven to 175°C. Grease a standard loaf pan with butter and line it with parchment paper for easy removal. 🍞

  2. Cream the Butter & Sugar ➡️ In a large bowl, beat the softened butter and sugar together until light and fluffy. Add the eggs one at a time, followed by the vanilla and lemon zest. 🥣

  3. Mix in the Moisture ➡️ Stir in the Greek yogurt or sour cream. This is the secret to making the loaf incredibly moist! 🥛

  4. Combine Dry & Wet ➡️ Gently fold in the flour, baking powder, and salt. Pro Tip: Toss your blueberries in a teaspoon of flour before folding them into the batter—this stops them from sinking to the bottom! 🫐➡️

  5. Bake ➡️ Pour the batter into the pan and smooth the top. Bake for 55–65 minutes. Test it by inserting a toothpick; if it comes out clean, it’s ready. 🕒

  6. Cool Down ➡️ Let the loaf cool in the pan for 10 minutes, then move it to a wire rack to cool completely. ❄️

  7. Glaze & Decorate ➡️ Whisk the powdered sugar and lemon juice until smooth. Pour it over the cooled loaf, letting it drip down the sides. Top with extra fresh blueberries while the glaze is still wet. ✨


❓ Common Questions (Q&A)

Q: Can I use frozen blueberries? A: Yes! However, do not thaw them first, as the juice will streak through the batter and turn the whole cake purple. Toss them in flour while frozen and fold them in quickly. ❄️🫐

Q: My cake is browning too fast on top but isn’t done inside. What should I do? A: Simply tent a piece of aluminum foil loosely over the top of the loaf pan for the last 15–20 minutes of baking. This protects the top while the middle finishes cooking. 🛡️

Q: Can I make this a “Weight Watchers” friendly version? A: To lighten it up, you can swap the sugar for a granulated stevia blend and use non-fat Greek yogurt. You can also skip the butter and use applesauce, though the texture will be slightly denser. 🍎

Q: How do I get that perfectly smooth glaze seen in the photo? A: Make sure your loaf is completely cold before glazing. If the cake is even slightly warm, the glaze will melt and run off instead of staying thick and white. 🧊

Enjoy every slice of this summery delight! 🍰✨

Decadent Classic Chocolate Mousse

Decadent Classic Chocolate Mousse 🥣

This recipe yields a rich, velvety dessert with those beautiful air bubbles seen in your image.

🛒 Ingredients

  • 200g High-quality dark chocolate (60-70% cocoa), chopped

  • 30g Unsalted butter, cubed

  • 3 Large Eggs (separated into yolks and whites)

  • 50g Caster sugar

  • 250ml Heavy whipping cream (chilled)

  • 1 tsp Vanilla extract

  • Garnish: Cocoa powder and chocolate shavings


👩‍🍳 Step-by-Step Instructions

  1. Melt the Base ➡️ Place the chopped chocolate and butter in a heat-proof bowl. Melt them together using a double boiler (simmering water under the bowl) or in short 20-second bursts in the microwave. Stir until silky smooth. Set aside to cool slightly. ✨

  2. Whisk the Yolks ➡️ In a separate bowl, whisk the egg yolks and vanilla extract into the melted chocolate mixture one by one until well combined. 🥣

  3. Whip the Cream ➡️ In another bowl, whip the chilled heavy cream until it reaches soft peaks. Gently fold the whipped cream into the chocolate mixture using a spatula. ☁️

  4. Beat the Egg Whites ➡️ In a clean, oil-free bowl, whisk the egg whites while gradually adding the sugar. Continue whisking until stiff peaks form (the foam should stand straight up when you lift the whisk). 🍦

  5. The Gentle Fold ➡️ This is the secret! Add a big spoonful of the egg whites to the chocolate to lighten it up. Then, very gently fold in the rest of the whites. Do not stir vigorously, or you will pop the air bubbles! 🤫

  6. Chill & Set ➡️ Spoon the mousse into ramekins or glasses. Refrigerate for at least 4 hours (overnight is even better) to let the texture set. ❄️

  7. Final Flourish ➡️ Just before serving, dust with a heavy layer of cocoa powder and top with chocolate curls, just like in your picture! 🎨


❓ Common Questions (Q&A)

Q: Why did my mousse turn out grainy? A: This usually happens if the chocolate was too hot when you added the eggs, or if a drop of water got into the melting chocolate (causing it to “seize”). Make sure your bowl and spatula are completely dry! 💧

Q: Can I use milk chocolate instead? A: You can, but since milk chocolate has more sugar and fat, the mousse will be much softer and sweeter. If you do, reduce the added sugar in the egg whites by half. 🍫

Q: Is it safe to use raw eggs? A: Traditional mousse uses raw whites for that airy lift. If you are concerned, you can use pasteurized eggs found in most grocery stores to enjoy your dessert with total peace of mind. ✅

Q: How long does it stay fresh? A: It’s best enjoyed within 2 days. Keep it tightly covered in the fridge so it doesn’t pick up any “fridge smells.” 👃

Enjoy your homemade masterpiece!

Golden Blueberry Crumble Bars

Golden Blueberry Crumble Bars

Ingredients

For the Crust & Crumble:

  • 1 1/2 cups all-purpose flour

  • 1/2 cup granulated sugar

  • 1/2 tsp baking powder

  • 1/4 tsp salt

  • 1/2 cup cold unsalted butter (cut into small cubes)

  • 1 large egg

For the Filling:

  • 2 cups fresh blueberries

  • 1/4 cup granulated sugar

  • 2 tsp cornstarch (to thicken the juices)

  • 1 tbsp lemon juice


Step-by-Step Instructions

Step 1: Prep Your Space 🧺

  • Preheat your oven to 190°C (375°F).

  • Grease an 8×8 inch square baking dish or line it with parchment paper so the bars are easy to lift out later.

Step 2: Create the Dough 🥣

  • In a medium bowl, whisk together the flour, 1/2 cup sugar, baking powder, and salt.

  • Use a fork or a pastry cutter to blend in the cold butter until the mixture looks like coarse crumbs.

  • ➡️ Add the egg and mix until the dough starts to clump together.

Step 3: Press the Base

  • Take about two-thirds of your crumble mixture and press it firmly into the bottom of your prepared baking dish to create an even crust.

Step 4: Prepare the Berries 🍋

  • In another bowl, gently toss the blueberries with 1/4 cup sugar, cornstarch, and lemon juice.

  • Spread the berry mixture evenly over the bottom crust.

Step 5: Add the Topping

  • Take the remaining crumble mixture and sprinkle it over the top of the berries.

  • ➡️ Note: It’s okay if some blueberries are still peeking through; that makes it look rustic and beautiful!

Step 6: Bake and Cool ⏲️

  • Bake for 35–40 minutes, or until the top is lightly golden brown and the berry juices are bubbling.

  • Crucial Step: Let the bars cool completely in the pan before cutting them. This helps the filling set so they don’t fall apart!


❓ Common Questions (Q&A)

Q: Can I use frozen blueberries? A: Yes! ➡️ Do not thaw them first. Just toss them with the sugar and cornstarch while frozen and bake as usual. You may need an extra 5 minutes in the oven.

Q: My crumble is too dry, what should I do? A: If it won’t clump at all, add 1 tablespoon of cold water or melted butter and mix again. It should feel like damp sand.

Q: How should I store these? A: Keep them in an airtight container. They stay fresh at room temperature for 2 days, or in the fridge for up to 5 days. 🧊


Quick Tips for Success

  • Zest it up: Add 1 tsp of lemon zest to the berry mixture for a brighter, citrusy flavor. 🍋

  • Serving Suggestion: These are amazing served warm with a scoop of vanilla bean ice cream! 🍦

  • Even Cuts: Use a sharp knife and wipe it clean between cuts for perfectly neat squares.

Enjoy your baking!

🍦 Creamy “Tang” Popsicles

🍦 Creamy “Tang” Popsicles

🍦 Creamy “Tang” Popsicles

Effortless, refreshing, and budget-friendly.

Ingredients Checklist

Ingredient Amount Note
Whole Milk 1 Liter (33.8 fl oz) Must be very cold
Tang Powder 1 Packet Any flavor (Passion fruit is a fan favorite!)
Heavy Cream 200ml (6.7 fl oz) Adds that “velvet” mouthfeel
Stabilizer 1 Tablespoon Also known as “Neutral Base”
Sugar 5 Tablespoons Optional, adjust to your sweet tooth

Step-by-Step Preparation

  1. The Mix: In a large bowl, combine the cold milk, juice powder, heavy cream, sugar, and stabilizer.

  2. The Emulsion: Whisk vigorously by hand or use a hand mixer. If you want it extra airy, pulse in a blender for 2 minutes.

  3. The Packaging: Use a funnel to pour the liquid into popsicle bags. Be sure to leave about an inch of space at the top so you can tie a secure knot.

  4. The Freeze: Lay them flat in the freezer for at least 6 hours. For the best texture, overnight is ideal.


Pro-Tips for Success

  • Prevent Ice Crystals: That stabilizer (neutral base) is the secret ingredient. It stops the milk from turning into a block of ice and keeps it “bitable” and creamy.

  • The “Luxury” Version: If you want these to taste like premium gelato, swap 200ml of the milk for powdered milk (like Nido). It boosts the protein and fat content for a richer finish.

  • Flavor Pairing: Try “Strawberry Tang” and add a teaspoon of strawberry jam into the bag before pouring the liquid for a marbled effect.

Peanut Butter Cup Dessert Lasagna 🍰


Peanut Butter Cup Dessert Lasagna 🍰

  • Prep time: 30 minutes ⏱️

  • Chilling time: 4 hours (minimum) ❄️

  • Servings: 12–15 👥

  • Difficulty: Easy (No-Bake!) ✨


Ingredients List 🛒

  • Chocolate Sandwich Cookies: 1 package (approx. 36 cookies) — For the crunchy base. 🍪

  • Melted Butter: 6 tablespoons — To bind the crust. 🧈

  • Cream Cheese: 8 oz package — Softened to room temperature. 🧀

  • Peanut Butter: 1 cup — Creamy works best for a smooth texture. 🥜

  • Powdered Sugar: 1 cup — To sweeten the peanut butter layer. 🍬

  • Milk: 2 tablespoons — To thin the peanut butter mixture slightly. 🥛

  • Whipped Topping: 1 container (12 oz) — Thawed (divided into two parts). ☁️

  • Instant Chocolate Pudding: 2 boxes (3.9 oz each). 🍫

  • Cold Milk: 3 cups — For the chocolate pudding layer. 🥛

  • Mini Peanut Butter Cups: 1.5 cups — Chopped or halved for the topping. 🍬

  • Chocolate Syrup: For drizzling. 🍯


Step-by-Step Instructions 👩‍🍳

  1. The Cookie Base 🍪

    • Crush the chocolate sandwich cookies into fine crumbs using a food processor or a rolling pin in a zip-top bag. ➡️ Mix the crumbs with melted butter until they look like wet sand. ➡️ Press the mixture firmly into the bottom of a 9×13 inch glass baking dish. ➡️ Place in the freezer for 10 minutes to set.

  2. The Creamy Peanut Butter Layer 🥜

    • In a large bowl, beat the softened cream cheese, peanut butter, powdered sugar, and 2 tablespoons of milk until completely smooth. ➡️ Gently fold in half of the whipped topping (about 1.5 cups). ➡️ Spread this mixture evenly over the chilled cookie crust.

  3. The Rich Chocolate Layer 🍫

    • In a separate bowl, whisk together both boxes of instant chocolate pudding and the 3 cups of cold milk for about 2 minutes until it starts to thicken. ➡️ Spread the pudding carefully over the peanut butter layer. ➡️ Let it sit for 5 minutes to firm up completely.

  4. The Fluffy Topping ☁️

    • Spread the remaining whipped topping over the chocolate pudding layer, smoothing it out to the edges of the dish.

  5. The Garnish 🍬

    • Sprinkle the chopped mini peanut butter cups generously over the top. ➡️ Drizzle with chocolate syrup in a zigzag pattern for that professional look.

  6. The Chill Phase ❄️

    • Cover the dish and refrigerate for at least 4 hours, or ideally overnight. ➡️ This is crucial so the layers can set and be sliced cleanly.


Q/A Section

Q: Can I use homemade whipped cream instead of store-bought whipped topping? A: ➡️ Yes! Use about 3-4 cups of heavy cream whipped with a little sugar until stiff peaks form. Note that the dessert may be slightly softer than the original version.

Q: Can I make this a lower-carb version? A: ➡️ You can swap the cookies for a nut-based crust, use sugar-free pudding mixes, and use a sugar-free whipped topping and sweetener. It still tastes delicious!

Q: What is the best way to slice this cleanly? A: ➡️ Use a sharp knife and wipe it clean with a damp paper towel between every single cut. This keeps the layers looking distinct and beautiful.

Q: How long will it stay fresh? A: ➡️ You can keep this in the refrigerator for up to 3–4 days. Keep it covered so it doesn’t absorb other fridge scents.


Pro-Tips 💡

  • Room Temperature Cheese: ➡️ Make sure your cream cheese is truly soft before mixing, or you will end up with small lumps in your peanut butter layer.

  • Cold Milk for Pudding: ➡️ Always use very cold milk for instant pudding to ensure it sets quickly and firmly.

  • Freeze for Quick Slicing: ➡️ If you are in a rush, pop the dessert in the freezer for 30 minutes before serving to get those perfect, clean squares.

Creamy Berry Whipped Delight

Creamy Berry Whipped Delight 🍓🍨

This light and airy dessert is a celebration of fresh berries. It has a soft, mousse-like texture that is incredibly refreshing. Whether served in a large family-style bowl or individual glasses, it is a beautiful treat for any occasion.


🛒 Ingredients

  • Fresh Strawberries: 2 cups (hulled and chopped) 🍓

  • Mixed Berries: 1 cup raspberries and blueberries (optional) 🫐

  • Heavy Whipping Cream: 2 cups (chilled) 🥛

  • Greek Yogurt: 1 cup (Vanilla or Plain) 🍦

  • Sweetener: 3–4 tbsp honey, maple syrup, or powdered sugar (adjust to taste) 🍯

  • Vanilla Extract: 1 tsp 🥥

  • Fresh Mint: For garnish 🌿


👩‍🍳 Instructions

  1. Prep the Berries ➡️ Wash all berries and pat them dry. Take 1 cup of the strawberries and mash them with a fork or pulse them in a blender to create a chunky puree. Slice the remaining berries for folding in. 🍓🥣

  2. Whip the Cream ➡️ In a large chilled bowl, pour in the heavy whipping cream and vanilla extract. Use an electric mixer to beat until stiff peaks form. ➡️🥛☁️

  3. Fold in the Base ➡️ In a separate bowl, whisk together the Greek yogurt and your choice of sweetener until smooth. Gently fold the yogurt mixture into the whipped cream using a spatula. 🥣⚖️

  4. Add the Fruit ➡️ Slowly fold in the strawberry puree and the sliced fresh berries. Be careful not to over-mix so the cream stays fluffy and you get beautiful pink swirls. 🍓🌀

  5. Chill ➡️ Transfer the mixture into serving glasses or a large glass bowl. Place in the refrigerator for at least 1 hour to set and allow the flavors to combine. ❄️⏳

  6. Garnish and Serve ➡️ Just before serving, top with extra fresh berries and a sprig of fresh mint. 🍨✨


❓ Q&A Section

Q: Can I make this a low-fat version? A: ➡️ You can use a light whipped topping instead of heavy cream and fat-free Greek yogurt. However, the texture will be slightly less stable and more airy than the original recipe. 🍦📉

Q: Why did my whipped cream turn runny? A: ➡️ This usually happens if the cream wasn’t cold enough or if it was over-mixed after the yogurt and berries were added. Always keep your cream in the fridge until the very second you use it! ❄️🥛

Q: Can I use frozen berries? A: ➡️ Yes, but make sure to thaw them completely and drain all excess liquid before mashing or folding them in. If they are too wet, they will thin out the cream. 🍓💧

Q: How long does this dessert stay fresh? A: ➡️ This is best enjoyed within 24 hours of making it. After that, the berries may release juices that can make the whipped cream soften. ⏳🛍️


💡 Tips for Success

  • Chilled Tools: For the fastest and fluffiest whipped cream, place your metal bowl and beaters in the freezer for 10 minutes before you start! 🧊⚒️

  • Texture: If you want an even thicker texture, you can fold in ½ cup of softened cream cheese to the yogurt mixture before combining with the whipped cream. 🧀✨

Frozen Blueberry Yogurt Clusters

Frozen Blueberry Yogurt Clusters 🫐✨

These refreshing, bite-sized treats are perfect for a light snack or a simple dessert. They are easy to prepare and satisfy a sweet craving using fresh fruit and creamy yogurt. 🥣


Ingredients 🛒

  • Fresh Blueberries: 2 cups (washed and dried thoroughly) 🫐

  • Greek Yogurt: 1 cup (Plain or Vanilla) 🍦

  • Vanilla Extract: 1 tsp 🥥

  • Sweetener (Optional): 1-2 tbsp honey, maple syrup, or a sugar-free alternative 🍯


Instructions 📋

  1. Prep the Base ➡️ In a medium mixing bowl, combine the Greek yogurt, vanilla extract, and your choice of sweetener. Stir until the mixture is smooth and creamy.

  2. Fold in Berries ➡️ Gently fold the fresh blueberries into the yogurt mixture until every berry is well-coated. 🥣

  3. Scoop and Cluster ➡️ Line a baking sheet or a large plate with parchment paper. Use a tablespoon or a small cookie scoop to drop “clusters” of the blueberry mixture onto the paper. 🥄

  4. Freeze ➡️ Place the tray in the freezer for at least 2 to 3 hours, or until the clusters are firm and completely frozen. ❄️

  5. Serve & Store ➡️ Once frozen, peel them off the parchment paper. Enjoy them immediately! Store any leftovers in a sealed container or freezer bag in the freezer. 🛍️


Common Questions & Answers

Q: Can I use frozen blueberries instead of fresh? A: ➡️ It is best to use fresh blueberries. Frozen berries can release extra moisture as they mix, which might make the yogurt runny or cause the clusters to become too icy. 🫐

Q: How long do these stay fresh in the freezer? A: ➡️ When stored in an airtight container, they stay delicious for up to 2 weeks. For the best texture, let them sit at room temperature for 1-2 minutes before eating. ⏳

Q: Can I add toppings? A: ➡️ Yes! You can sprinkle a little granola on top before freezing for a crunch, or drizzle them with a bit of melted dark chocolate once they are frozen for an extra treat. 🍫

Q: Why did my clusters stick to the plate? A: ➡️ Always use parchment paper or a silicone mat. This ensures they pop right off without breaking once they are frozen. 📜

Blueberry Ice Cream (Healthy & Easy)

Blueberry Ice Cream (Healthy & Easy)

📝 Ingredients

  • 1 cup blueberries (fresh or frozen)
  • ½ cup Greek yogurt
  • 2 tablespoons honey
  • ⅓ cup milk
  • 1 tablespoon chia seeds

👩‍🍳 Step-by-Step Instructions

Step 1: Prepare Ingredients

Wash the blueberries (if fresh) and measure all ingredients properly.

Step 2: Blend Everything

Add to a blender:

  • Blueberries
  • Greek yogurt
  • Honey
  • Milk
  • Chia seeds

Blend until the mixture becomes smooth and creamy.

Step 3: Adjust Texture (for crispiness tip 🔥)

  • If you want a slightly crispy/icy texture, don’t over-blend
  • You can also add a few whole blueberries after blending

Step 4: Transfer to Container

Pour the mixture into an airtight box or container.

Step 5: Freeze

Place it in the freezer for at least 4 hours.

Step 6: Serve & Enjoy

  • Take it out
  • Let it sit for 2–3 minutes
  • Scoop and enjoy your creamy + slightly icy blueberry ice cream 😍

💡 Extra Tips (Important)

  • For more crispiness: stir once after 2 hours to create icy crystals
  • For extra flavor: add vanilla extract or lemon zest
  • For thicker texture: use less milk

❓ Quick Q&A

Q: Can I skip chia seeds?

Yes, but they help make it slightly thick and textured.

Q: Can I use frozen blueberries?

Yes, they actually make it more creamy and cold.

Q: Why is my ice cream too hard?

  1. Because of no preservatives — just let it sit for a few minutes before eating.

Fluffy Orange Cream Frosting

Fluffy Orange Cream Frosting

Ingredients

  • 1 cup heavy whipping cream (chilled)

  • 4 oz cream cheese (softened)

  • 2 tbsp powdered monk fruit sweetener

  • 1 tsp orange zest (finely grated)

  • 1 tbsp fresh orange juice

  • 1 drop natural orange food coloring (optional, for the tint seen in the image)

Instructions

  1. Cream the Base: In a medium bowl, beat the softened cream cheese with the sweetener, orange zest, and juice until completely smooth and lump-free.

  2. Whip the Cream: In a separate chilled bowl, whip the heavy cream until stiff peaks form.

  3. Fold Together: Gently fold the whipped cream into the cream cheese mixture using a spatula. Do not overmix, or you will lose the airy texture shown in the second image.

  4. Chill: Keep the frosting in the refrigerator until the cake is entirely cool, then dollop generously on top.


Questions & Answers

Q: Can I use orange extract instead of fresh juice for the frosting? A: Yes, you can substitute 1/2 tsp of orange extract if you want a more intense flavor without adding extra liquid to the cream.

Q: Why did my coconut cake turn out crumbly? A: This usually happens if the cake is sliced while still warm. Since there is no flour or gluten, the eggs and coconut fibers need to cool completely to “bond” together.

Q: How do I get the frosting to look as fluffy as it does in the bowl? A: The secret is using cold heavy cream and a cold bowl. Whip the cream just until it stands up on its own—if you go too far, it will turn into butter; if you don’t go far enough, it will be runny.

Q: Is this dessert keto-friendly? A: Yes! Because it uses coconut, eggs, and sugar-free sweeteners, it is very low in net carbohydrates and fits well within a ketogenic or low-carb lifestyle.

3-Ingredient Flourless Protein Cookies 🍪

3-Ingredient Flourless Protein Cookies 🍪

Soft, chewy, and naturally rich—designed for sustained energy and blood sugar stability.

Ingredients

  • 1 cup Natural creamy peanut butter (Ensure the only ingredients are peanuts and salt) 🥜

  • 1 large Organic egg (Room temperature works best for binding) 🥚

  • 1/4 cup Sugar-free dark chocolate chips (Sweetened with Stevia or Monk Fruit) 🍫

  • Optional: A tiny pinch of sea salt on top to enhance the chocolate.


Detailed Step-by-Step Instructions 📋

  1. Preparation ➡️ Preheat your oven to 350°F (175°C). Line a large baking sheet with parchment paper or a silicone baking mat to prevent sticking.

  2. The Batter ➡️ In a medium mixing bowl, combine the peanut butter and the egg. Use a sturdy spatula to mix until the dough becomes thick and pulls away from the sides of the bowl.

  3. The Inclusion ➡️ Fold in the sugar-free chocolate chips gently until they are evenly distributed throughout the dough.

  4. Portioning ➡️ Scoop out approximately 1 tablespoon of dough per cookie. Roll into 12 small balls and place them about 2 inches apart on the prepared baking sheet.

  5. The Press ➡️ Use a fork to gently press down on each ball in a “criss-cross” pattern. Since these cookies have no flour, they will not spread much on their own; this step ensures they bake evenly. 🍴

  6. The Bake ➡️ Bake for 8–10 minutes. The edges should look slightly golden, but the centers will still look very soft. Do not overbake.

  7. The Critical Cooling ➡️ Remove from the oven and let the cookies sit on the hot pan for at least 10 minutes. They are fragile when warm but firm up beautifully as they cool. ❄️


Common Questions & Answers 💡

Q: Can I use almond butter instead of peanut butter? A: Yes! Any natural nut or seed butter (like sunflower butter) works, provided it is the “drippy” kind with no added oils or sugars. 🍯

Q: My dough is too oily. What happened? A: Natural peanut butter often separates. Make sure to stir your jar thoroughly before measuring to ensure the oil is fully incorporated into the nut solids. ➡️ Stir well!

Q: How should I store these? A: Keep them in an airtight container in the refrigerator for up to 7 days, or freeze them for up to 3 months for a quick grab-and-go snack.

Q: Can I add anything else to the dough? A: A teaspoon of vanilla extract or a dash of cinnamon adds wonderful depth without adding any sugar or significant calories. 🌿


Nutritional Highlights

  • Low Glycemic Impact: Since there is no flour or refined sugar, these provide a very slow energy release.

  • High Protein: Each cookie provides a solid hit of plant-based protein to keep you satisfied.

  • Heart Healthy: Rich in monounsaturated fats from the peanuts.